
Chapter 9: Let’s Do Some Magic: Integrating Your First Lottie Animation
Our app is now ready to display Lottie animations on its screens. In this chapter, we will learn how to integrate a Lottie file, whether downloaded from https://lottiefiles.com/ or generated by us in Adobe After Effects (AE). The requirements to perform this integration successfully are as follows:
- Have a JSON file with the Lottie animation exported from AE using the Bodymovin plugin or downloaded from LottieFiles.
- Have the React Native project ready after having followed the steps described in Chapter 8, Installing lottie-react-native.
The final result will be our app displaying the provided Lottie animation on the initial screen. The topics we will cover in this chapter are as follows:
- Understanding the Lottie file
- Using a Lottie file in a React Native app
- Using lottie-react-native in your TypeScript app
- Finding documentation for lottie-react-native
- Using remote Lottie files
Understanding the Lottie file elements
As we saw in previous chapters, Lottie files are JSON representations of our AE animations that have been transformed and exported using the Bodymovin plugin. As a JSON object, we can open it in a text editor and see that Lottie files are just a collection of keys and values storing the assets that need to be rendered and to which transformations should be applied on each frame of the animation.
Let's take a look at a sample Lottie file:
{"v":"4.8.0",
"meta":{"g":"LottieFiles AE "
},
"fr":30,
"w":500,
"h":250,
"nm":"Comp 1",
"assets":[],
"layers":[
{"nm":"Ellipses 3",
"ks":{...
},
"shapes":[
{"ty":"gr",
"nm":"Ellipse 1",
"mn":"ADBE Vector Group",
"hd":false
...
}
],
...
}
],
"markers":[]
}
Lottie files are usually much larger than this one, but we have summarized it for educational purposes. Let's now go through the most important values in this sample file:
- "v": Specifies which version of the file this one is. It has no direct effect on the animation as it serves as mere information for developers and designers.
- "meta": General information about the file such as name and license, for example.
- "fr": Also known as frame rate, this represents the number of frames per second that the animation should be rendered in.
- "w": The width of the animation.
- "h": The height of the animation.
- "assets": A list of external assets that will be shown within the animation.
- "layers": Details for each of the AE layers used in our animation.
- "layers/ks": Information about how to display a specific layer on a specific frame.
- "layers/shapes": Shapes used on each layer, including their metadata and rendering options.
In general, it's best to modify our Lottie animations on AE, but changing values in the exported Lottie JSON file is possible and may affect the animation itself.
Using a Lottie file in a React Native app
Once we have our animation exported into a Lottie file, we can integrate it into any React Native app and start the animation on any iOS or Android device. In this section, we will show how this is done on the main screen of a sample blank React Native app, but the process can be extrapolated into any screen or component within any React Native app.
The first thing we have to do is store our Lottie file in a folder inside our app. We need to make sure we can import files from this folder in our React components and screens. For example, we could store our Lottie files in the assets folder, where all images used in our app are stored:
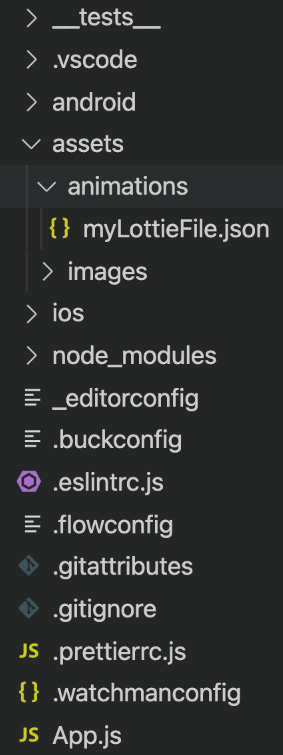
Figure 9.1 – Storing animation in the app folder structure
In this case, we stored a JSON file named myLottieFile.json inside the assets/animations folder so it's accessible through a simple import statement: require('./assets/animations/myLottieFile.json').
Let's now see an example of how App.js would look using the integrated Lottie file in the proposed folder structure:
import React from 'react';
import LottieView from 'lottie-react-native';
import {SafeAreaView, View, StyleSheet} from 'react-native';const App = () => {return (
<SafeAreaView>
<View style={styles.container}><LottieView
source={require('./assets/animations/myLottieFile.json')}
autoPlay
loop
/>
</View>
</SafeAreaView>
);
};
const styles = StyleSheet.create({ container: {width: '100%',
height: '100%',
justifyContent: 'center',
alignItems: 'center',
},
});
export default App;
In this file, we are displaying our Lottie animation on the main screen so users can see it just after opening the app. There are a number of things we should consider about this file:
- SafeAreaView is used to prevent the animation from going under the notch on notched-screen devices (for example, the iPhone 13).
- Having LottieView inside a sized container is important to prevent the animation from resizing or being cropped. That's why we use a 100% width and height-sized view containing the LottieView component.
- LottieView is a React component that will render the Lottie animation. It requires a source prop to import the JSON file containing the animation. It also accepts a number of properties to control and configure the animation. We will take a deeper look into these properties in this chapter.
The props passed to the LottieView components are also worth noting:
- source: This needs to receive the imported JSON file for the animation. The path for importing the animation, as it works with the require statement in JavaScript, can be absolute or relative to the parent component/screen.
- autoPlay: When specified (or set to true), this makes the app start playing right after the component is mounted. This is normally used when the parent component makes sense only when the animation is running.
- loop: When specified (or set to true), this will repeat the animation until the component gets unmounted.
The former component example is the simplest representation of a Lottie animation being rendered inside a React Native app but it's a good example of how important it is to place the LottieView component in a sized container.
If your app uses classes instead of functional components, you should know that lottie-react-native can still be imported and used in a very similar fashion.
Let's see an example of a Lottie file being integrated in to a class-based React native app:
import React from 'react';
import LottieView from 'lottie-react-native';
import {SafeAreaView, View, StyleSheet} from 'react-native';export default class App extends React.Component { render() { return (<SafeAreaView>
<View style={styles.container}> <LottieView source={require('./animation.json')} autoPlay loop />;
</View>
</SafeAreaView>
) }}
const styles = StyleSheet.create({ container: {width: '100%',
height: '100%',
justifyContent: 'center',
alignItems: 'center',
},
});
Similar to the previous example, the main difference in class-based apps is the need to return the rendering component inside the render method. One of the basic props (colorFilters) allows users to control and change the colors of the layers.
Let's take a look at how this prop can be used to do so:
import React from 'react';
import LottieView from 'lottie-react-native';
import {SafeAreaView, View, StyleSheet} from 'react-native';const App = () => {return (
<SafeAreaView>
<View style={styles.container}><LottieView
source={require('./assets/animations/myLottieFile.json')}
autoPlay
loop
colorFilters={[ {keypath: 'button', color: '#F00000',
},{keypath: 'Sending Loader',color: '#F00000',
},
]}
/>
</View>
</SafeAreaView>
);
};
const styles = StyleSheet.create({ container: {width: '100%',
height: '100%',
justifyContent: 'center',
alignItems: 'center',
},
});
export default App;
In this case, the colorFilters prop in the LottieView component is modifying the colors of two layers (which should have been defined with the same name in AE) to render them as black, no matter which color they were defined as during the animation creation process.
TypeScript has become the de facto language for modern React Native apps. In the previous example, we used plain JavaScript, but the LottieView component is TypeScript-ready.
In the next section, we will show what caveats a user may find when using lottie-react-native in their TypeScript applications.
Using lottie-react-native in your TypeScript app
The lottie-react-native library includes types, so LottieView components can be easily integrated with TypeScript applications. These types are defined in the file found in the lottie-react-native/src/js/index.d.ts (type definition file) path inside the library's code. They are also accessible in the library's repository through https://github.com/lottie-react-native/lottie-react-native/blob/master/src/js/index.d.ts.
Besides the definition of the props and methods applicable to LottieView, this file includes types for the following objects:
- AnimationObject: Types for the Lottie JSON file when it gets translated to a JavaScript object
- ColorFilter: Types for the filters that can be applied to change colors in the animation
- TextFilterIOS: Types for the filters that can be applied to change fonts on iOS devices
- TextFilterAndroid: Types for the filters that can be applied to change fonts on Android devices
The main caveat when using lottie-react-native concerns the way we import the Lottie component (LottieView) in our app. Depending on how TypeScript is configured in our project, we would need to import it in a different way:
- If your tsconfig.json file defines "esModuleInterop": false, you will need to use require to import LottieView in the following way: const LottieView = require("lottie-react-native");.
- If your tsconfig.json file defines "esModuleInterop": true and "allowSyntheticDefaultImports": true (true is the default value), you will need to import LottieView in the standard ES6 way: import LottieView from "lottie-react-native";.
Let's see how both ways could be implemented in the sample code we developed previously:
import React from 'react';
import {SafeAreaView, View, StyleSheet} from 'react-native';import LottieView from 'lottie-react-native'; // if you have "esModuleInterop": true
// import LottieView = require('lottie-react-native'); // otherwise you have "esModuleInterop": falseconst App = () => {return (
<SafeAreaView>
<View style={styles.container}><LottieView
source={require('./assets/animations/myLottieFile.json')}
autoPlay
loop
/>
</View>
</SafeAreaView>
);
};
In the next section, we will see where to find the best resources to work around other caveats when using the lottie-react-native library.
Finding documentation for lottie-react-native
Getting stuck when using a third-party library might be a frustrating experience but in the case of lottie-react-native, there is a large knowledge base accessible on the public repository of the library: https://github.com/lottie-react-native/.
This knowledge base includes the following elements:
- README (https://github.com/lottie-react-native/lottie-react-native/blob/master/README.md): This is the main source of truth for the library. It includes a Getting Started guide and code samples to integrate and use lottie-react-native (at a basic level). This file serves as a good introduction to the library and should be the first resource to check when looking for help related to library usage.
- API (https://github.com/lottie-react-native/lottie-react-native/blob/master/docs/api.md): This is a good explanation of all properties and methods that can be used in the LottieView component to control the animations in our apps.
- TypeScript caveats (https://github.com/lottie-react-native/lottie-react-native/blob/master/docs/typescript.md): As we saw in the Using lottie-react-native in your TypeScript app section, TypeScript can be difficult to integrate. This document explains what problems we might run into and how to work around them.
- Glossary (https://github.com/lottie-react-native/lottie-react-native/blob/master/docs/GLOSSARY.md): A list of specific terms and their definitions related to lottie-react-native.
- CHANGELOG (https://github.com/lottie-react-native/lottie-react-native/blob/master/CHANGELOG.md): A list of the versions released for the library. This document is very useful when having issues with a specific feature or platform so we can revert/update to versions where those issues don't exist.
- Contributing guide (https://github.com/lottie-react-native/lottie-react-native/blob/master/CONTRIBUTING.md): This document explains how to request help or contribute code updates to the open source repository.
- Pull requests (https://github.com/lottie-react-native/lottie-react-native/pulls): This is the list of contributions that are proposed to the library. Users can use this list to find out about upcoming fixes or discussions about bugs and features.
- Issues (https://github.com/lottie-react-native/lottie-react-native/issues): Here, library users share their problems, bugs, or questions about the library. This is a good resource to search through when getting problems with library usage or integration.
- Lottie for iOS repository (https://github.com/airbnb/lottie-ios): A source of information for the iOS-specific library for Lottie. This can be used to search for iOS-specific issues or features.
- Lottie for Android repository (https://github.com/airbnb/lottie-android): A source of information for the Android-specific library for Lottie. This can be used to search for Android-specific issues or features.
Now we have all the resources to get started, let's import and use our first Lottie file in our app.
Using remote Lottie files
For optimal performance, animations should be included locally within the app's folder structure but, in some cases, it could be useful to use a remote JSON file as a Lottie animation to be rendered in our React Native apps. For these cases, lottie-react-native allows us to transparently specify a remote URL as the source of the animation through the source prop passed to LottieView.
Let's see how our initial example would look if we used a remote animation instead of a local one:
import React from 'react';
import LottieView from 'lottie-react-native';
import {SafeAreaView, View, StyleSheet} from 'react-native';const App = () => {return (
<SafeAreaView>
<View style={styles.container}><LottieView
source={'https://raw.githubusercontent. com/lottie-react-native/lottie-react-native/ b96fd04c5d92d2acd55e6eb6cb8c3dd119d1a786/example/js/ animations/LottieLogo1.json'}autoPlay
loop
/>
</View>
</SafeAreaView>
);
};
const styles = StyleSheet.create({ container: {width: '100%',
height: '100%',
justifyContent: 'center',
alignItems: 'center',
},
});
export default App;
As this example shows, only the source property needs to change its value. In this case, we replaced the require statement with a simple URL that points to a JSON Lottie animation that is hosted on a public server. For external sources, users need to make sure that the app will always have access to the external file, as failing to reach the remote URL would show an empty space instead of showing the animation itself.
Assets (such as images) can also be used inside Lottie files and rendered with lottie-react-native. Let's take a look at how this behavior can be achieved through code.
Using Lottie files with assets
Lottie animations may contain external images displayed in them to make richer and more complex animations. When using AE and the Bodymovin plugin to create animations, the exported JSON may have various assets to rely on, such as the following:
...,
"assets": [
{"id": "image_name",
"w": 200,
"h": 100,
"u": "images/",
"p": "img_name.png"
}
],
...
In these cases, our app needs to include the files inside its binary, so you will need to add the files to the project and re-build it from scratch running yarn ios or yarn android so the app is compiled together with the newly added assets being used in the animation. Adding the assets to the project differs depending on which platform we are targeting:
- iOS: Open Xcode, right-click on the resources folder you can find in the right-hand column, and click on Add file to "LottieReactNative"… to select the images required.
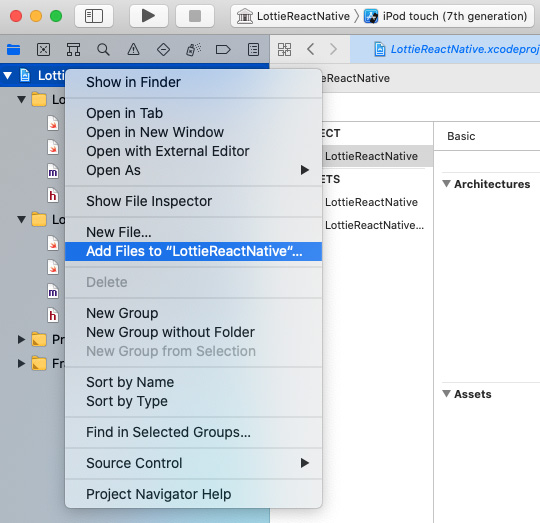
Figure 9.2 – Adding animation assets in Xcode
- Android: Your images should be copied to [PROJECT FOLDER]/android/app/src/main/assets. It is a good practice to establish a lottie subdirectory and then a folder for each animation. You'll need to refer to that folder in the imageAssetsFolder prop for the animation, using its relative path.
Let's take a look at an example of this:
<View style={styles.container}>
<LottieView
source={require('./assets/animations/myLottieFile. json')}
autoPlay
loop
imageAssetsFolder='lottie/animation_name'
/>
</View>
It is possible to rename the assets once you have them in your project, but you will need to modify the JSON file containing the Lottie animation too in order to identify the asset file by its new name:
...,
"assets": [
{"id": "image_name",
"w": 200,
"h": 100,
"u": "images/",
"p": "new_image_name.png"
}
],
...
With this, we will have our shiny assets loaded into our animations, making them fully capable of rendering external images.
Summary
In this chapter, we have learned about the way Lottie animations can be loaded into React Native, using basic integrations such as TypeScript types, and adding external assets into our animations. This gives us the ability to display complex animations inside our React Native apps, but what happens if we need to be in control of the playback (for example, tell the animation to start/stop based on events happening in the app)?
Let's move on to the next chapter to discover how controlling Lottie animations in lottie-react-native is done.