Now that you know how to get around your customized desktop, it's time to start using PC-BSD! In this chapter, we introduce you to some of the software that is available for your day-to-day computing needs. We also show you how to perform various computing tasks such as encrypting or compressing files, importing your data from another system, accessing data on removable drives, configuring a printer, and sharing your desktop.
If you've used only Windows operating systems, it can take some time to get used to the idea of having literally thousands of applications at your fingertips, all at no cost to you. For any given task, a choice of applications is usually available to suit the needs of any type of user. Some applications are barebones with command-line programs that get the job done, whereas others are feature-rich with a snazzy looking interface. Several other choices range between barebones and feature-rich.
You might find that the applications you are used to using and paying for are missing on PC-BSD. This doesn't mean that you can't use those applications on PC-BSD because you might still be able to use them. There is also a good possibility that an equivalent program is already installed or available for PC-BSD. In fact, there are probably several equivalent programs available, some of which might even contain features not provided by your original program. This is part of the open source experience—discovering the world of software choices and possibilities available to you.
PC-BSD installs many useful applications for you. Many start with the letter K, meaning that they come with the KDE desktop. These applications can be launched from Kickoff or KRunner.
Note
If you use KDE on another operating system, it might include the applications mentioned here, depending upon which KDE components are installed with that operating system.
Many of these applications are intuitive to use. If one sounds interesting, start it and poke about its menus. Don't forget that each application should have its own handbook that is accessible if you click F1 in the application or go to its Help menu. The application's handbook is a good reference for learning more about how to use the features provided by the program.
Note
Table 2 in the Appendix provides a summary of some of the built-in applications and where you can find them in Kickoff
PC-BSD uses the PBI (Push Button Installer) system to make it easy to find, install, run, and uninstall commonly used applications. We demonstrate in detail how to use the PBI system in Chapter 8.
Table 3 in the Appendix lists some of the most popular software available using the PBI system. If you want to install additional software, spend some time perusing the websites listed in this table. You'll probably find what you're looking for, and the websites contain all of the screenshots, feature lists, and documentation you need to get started with using the application.
Tip
If you have existing Windows applications you have already purchased, spend some time checking out Bourdeaux, Crossover Games, Wine, and Virtual Box, which are listed in Table 3 of the Appendix. If you can't find your favorite Linux application, refer to the "When You Can't Find Your Favorite Application" section in Chapter 8.
If you are used to using the Windows operating system, you might want to know which specific applications provide similar functionality to the applications you have been using. If you don't have time to look for software, Table 4 in the Appendix contains a list of software available for the PC-BSD and the equivalent application for Windows.
These equivalents will get you to work on your PC-BSD system in no time. However, we still recommend that when you have more time, you look for other equivalents. A lot of great software exists, and you might not know what you're missing!
The last consideration when researching which software is best for you is how to get your existing data into the new application. Many applications have made it easy for Windows users to migrate their existing data. Table 5-1 lists some common data sources and websites that contain instructions about how to import that data into the listed application. Note that the data sources listed in this table are in formats that need to be imported into the new application, meaning that you can't just copy the files over to your PC-BSD system.
Table 5-1. Import Instructions for Common Data Sources
New Application | Instructions | |
|---|---|---|
Accounting data | KMyMoney |
|
Bookmarks | Firefox |
|
Konqueror |
| |
MS Outlook email/contacts | Thunderbird |
|
Evolution |
|
For data that doesn't need to be imported, several utilities make it easy to drag and drop existing files and directories from your old system to your PC-BSD system. If the existing data is on a network share, you can use Split View in Konqueror. In Figure 5-1, the user dru opens Konqueror, and then clicks Window

The user can now click on the Network Folders link in the left frame, and then click the Samba Shares icon to browse for the files to copy over the network. The user simply drags the file to copy from one pane to the other.
Tip
This chapter assumes that the network share is already configured for you. Chapter 7 demonstrates how to create network shares on your PC-BSD system and discusses the basics of Samba shares.
If the existing data is on a system running SSH, use sftp:// in one of Konqueror's panes to connect to the other system. You can then drag and drop between panes. Figure 5-2 demonstrates a connection to a computer with the IP address 192.168.1.105 and the username dlavigne6. Before the connection is completed, a pop-up message prompts for the password of the user.

Tip
SSH is a secure method for transferring files. It is often seen on open-source systems and is what system administrators use most often to transfer files.
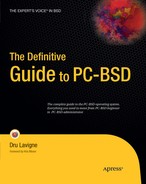
If you have backed up your existing data to an external USB drive, simply plug it into your PC-BSD system. It automatically displays in Dolphin's places. In the example shown in Figure 5-3, the user has opened Dolphin and clicked View
When finished using the USB drive, don't forget to right-click the USB media and select Unmount Volume (ufs) from the menu before physically unplugging the device. This is the safe way to eject the device and to let your PC-BSD system know that you are finished using the USB drive.
The rest of this chapter demonstrates how to perform some common tasks on PC-BSD. We start with some of the features users expect to see in their web browsers.
Your PC-BSD system comes with Java and the latest version of Flash (as of February 2010, version 10) pre-installed and preconfigured for you. Multimedia websites such as Youtube, video.google.com, veoh.com, and moviefone.com should work in Konqueror and the Firefox PBI.
Note
If you happen to come across a website that doesn't work, see Chapter 11 for instructions on how to get help from the PC-BSD forums.
Your PC-BSD system comes with many pre-installed fonts (these are discussed in Chapter 6). If you wish, you can also use Software Manager to install the PBI for MS TrueType Fonts, which adds the following fonts to your system:
Andale Mono
Arial Black
Arial (Bold, Italic, Bold Italic)
Comic Sans MS (Bold
Courier New (Bold, Italic, Bold Italic)
Georgia (Bold, Italic, Bold Italic)
Impact
Times New Roman (Bold, Italic, Bold Italic)
Trebuchet (Bold, Italic, Bold Italic)
Verdana (Bold, Italic, Bold Italic)
Webdings
Chapter 4 introduced you to the Dolphin File Manager. This section shows you how to encrypt/decrypt and compress/uncompress your files, and how to access the contents of the clipboard.
When you encrypt and decrypt files, you use something known as a public/private key pair. As the name suggests, the public key is made available to others, the private key must be kept secret and available only to yourself, and the two keys are related as a pair. Wikipedia provides a good introduction to encryption concepts at http://en.wikipedia.org/wiki/Public-key_cryptography.
Before you can encrypt or decrypt files, you have to generate a public/private key pair. The next section shows you how to do this using KDE's Gpg Assistant. If you already have a key pair, you can skip ahead to the "Encrypting/Decrypting" section.
KGpg Assistant can be used to generate your key pair. You can access this application using Kickoff
The Assistant starts with some informational messages as it goes through the process of creating a key pair for you. You can accept the default locations for the GnuPG binary and configuration file and leave the boxes checked to generate the new key and start KGpg automatically at KDE startup.
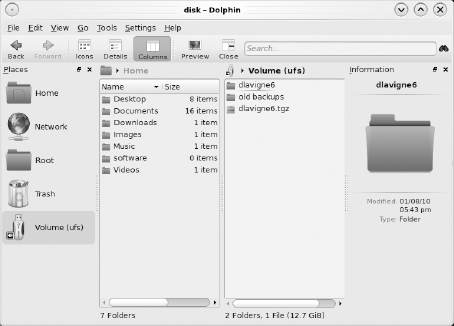
The assistant then opens a tip message and the Key Generation - KGpg menu seen in Figure 5-4.
You can complete this configuration screen as follows.
- Name:
Input your first and last name so others know to whom the key belongs.
- Email:
Input the email address you would like to associate with the key.
- Comment (optional):
This field is optional and can help remind you why you use the key.
- Expiration:
By default, your key never expires. You can select days, weeks, months, or years from the drop-down menu, and then type in the desired value.
- Key size:
The larger the key size, the harder it is to bypass the encryption provided by the key. You should select the largest key size available.
- Algorithm:
Unless you have a reason to change this to RSA, you can use the default.
- Expert Mode:
Power users can use this button to generate keys at the command line.
Tip
The KGpg Handbook contains information about each of the menus contained in the KGpg program. You can access it by pressing F1 in the program or by selecting Help
After you enter the values and click OK, a screen displays where you should type in your passphrase. It is important that you choose a passphrase that you can easily remember, but that is difficult for others to guess. The passphrase is needed to decrypt your files; if you lose it, you can't access the contents of your encrypted data. If someone else guesses it, he can access your encrypted data. After you input your passphrase two times, you will see a screen similar to the one shown in Figure 5-5.

The fingerprint is unique to the key and can be used to determine that you are using the correct key. If you send your public key to others, they can use the fingerprint to verify that the key is correct. You should either save or print the revocation certificate. If you forget your passphrase or if your private key is compromised or lost, the revocation certificate is used to notify others that they should no longer use that public key. A revoked public key can still be used to verify signatures made by you in the past, but it cannot be used to encrypt future messages to you. It does not affect your ability to decrypt existing messages, assuming you remember your passphrase.
After you click OK, the new key pair displays in the Key Management screen. You're now ready to encrypt and decrypt your files.
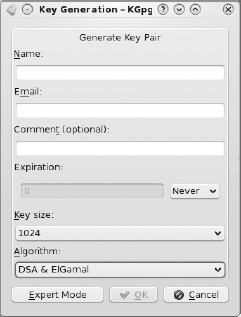
Now that you have a key pair, let's go back to Dolphin. Right-click the file you would like to encrypt and select Actions. As seen in Figure 5-6, there are two Encrypt File actions; the first uses the KGpg utility, and the second uses the Kleopatra application. We demonstrate both utilities.
To encrypt with KGpg, select the first Encrypt File option. KGpg presents the menu seen in Figure 5-7. Click the Options button to see the possible encryption options.
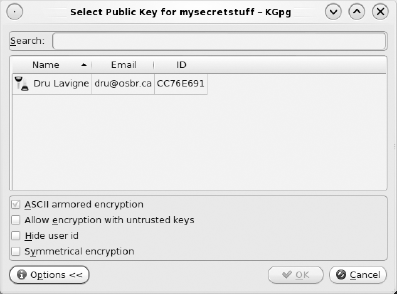
Before highlighting your key and clicking OK, review the options.
- ASCII armored encryption:
This does not encrypt the file; instead, it adds an encrypted "envelope" that protects the file from getting mangled by email programs. If you choose this option, the file will end with an .asc extension.
- Allow encryption with untrusted keys:
This option is not needed for encrypting your own files in Dolphin. If you are using KGpg to encrypt an email message, you need to use the recipient's public key to encrypt the message so he can use his private key to decrypt it. This means that you have to first import the recipient's public key into KGpg; at that time, you will have the option to indicate whether or not you trust the key.
- Hide user id:
This option is useful only when using KGpg to encrypt email. It removes the recipient information; if the wrong recipient receives the email, he won't know the name of the key to use to decrypt the message.
- Symmetrical encryption:
This is the option that actually encrypts the message. It prompts you to enter your passphrase twice.
Because your intent is to encrypt the file, select the Symmetrical encryption option. It is up to you to keep the ASCII armored encryption option selected or deselect it. If you're planning on emailing the file, it is good to keep this option. If you uncheck this option, the encrypted file will end with a .gpg extension instead of an .asc extension. The resulting file will be placed in the same directory and have the same name as the original file with the new extension added.
If you select the second Encrypt File action, the file is encrypted with Kleopatra instead. When Kleopatra first starts, it displays a self-test screen; if you don't want to see this screen, uncheck the Run these tests at startup box. Click the Continue button to see the screen in Figure 5-8.

Kleopatra offers the following options.
- Sign and encrypt:
This option encrypts the file and proves that it came from you (was signed by you). This is useful when emailing a file.
- Encrypt only:
This option is similar to the Symmetrical encryption option in KGpg.
- Sign only:
This option does not encrypt the file, but proves it came from you; again, this is useful when emailing a file.
- ASCII armor:
This option is similar to the ASCII armored encryption option in KGpg.
- Remove unencrypted original:
Because this option removes the original file, don't forget your passphrase because you will need it to access the contents of the decrypted file.
After you select your option(s), click Next. The next menu prompts you to highlight the file you plan to encrypt. After you do this, you click Next.
The Recipients menu might seem strange if you are not sending the file to anyone (for example, you are only encrypting a file on your hard disk). Think of it this way: you want to be able to access the contents of the encrypted file, so you are its recipient. Click the Add Recipient button and highlight the recipient's key (that is, your key) in the Certificate Selection menu. Click OK, and then click Next. You can click OK after Kleopatra indicates that your encryption was successful. You should now have a file with the same name as the original and a .gpg or .asc extension. If you highlight the encrypted file, Dolphin indicates that it is PGP/MIME-encrypted and won't allow you to preview it in the Information panel.
If you right-click the encrypted file and click the Actions menu, you can choose one of the following options.
- Decrypt/Verify File:
This action prompts you for a folder to save the decrypted file. After choosing the location, click the Decrypt/Verify button. You are prompted to enter your passphrase because you can't decrypt without it.
- View file decrypted:
This option is for text files only. Choose this option if you want to view the file without saving a decrypted copy. It again prompts you for your passphrase. After you enter it, the file opens in an application capable of viewing its contents. If you make changes to the file, you have the option of saving your changes and re-encrypting the file.
Tip
Kleopatra puts a red and white icon in your system tray. Double-click this icon to see the main Kleopatra window shown in Figure 5-9.

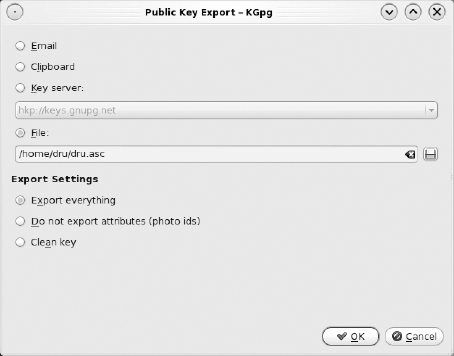
If you sign files or send encrypted emails, you need to export your public key so it is available to the recipients of the signed files and emails. You can export your public key using KGpg. Highlight your key in the Key Management screen and click the Export Key icon. The menu seen in Figure 5-10 displays.
Tip
If you "lose" KGpg, click the arrow to expand your system tray. It is the icon that looks like a yellow lock.
If you select the Email option and click OK, your default email program (KMail, unless you change the default) opens, and the public key is pasted into the body of the email. Simply type in the recipient's address and a subject before sending the email.
If you want your public key to be available to many recipients, select a Key server from the drop-down menu and let everyone know which server you use. If recipients go to the URL of the server and search for the name associated with the key, they can download your key. Remind recipients to contact you to verify the fingerprint so you both know that they have the correct key.
You can also save your public key to a file and give that file to recipients as they need a copy of your public key.
You have probably downloaded or created .zip files. These are examples of compressed files—files that have been reduced in size (compressed) either to conserve disk space or to reduce download time. Compression utilities are built in to your PC-BSD system, making it easy to work with compressed files.
Ark is KDE's archiving application. Think of an archive as a container holding one or more compressed files. When you compress[32] a file, directory, or a number of files, you create an archive.
You can launch Ark from Kickoff
Tip
The Ark Handbook provides more usage information for this application. It can be accessed by pressing F1 in Ark or by selecting Help
Figure 5-11 shows the menu you see when you click the New icon in Ark.

This menu prompts you to indicate where you want to store the archive, the name of the archive you are creating, and the type of compression to use for the files to be stored in the archive. If you share or send the compressed files to a user on a Windows system, you can create zip archives. If you and the person you share the archive with are familiar with the other file formats, you can select another compression method. In the example shown in Figure 5-12, a zip file called test has been created. You add files to compress and store inside the archive with the Add File or Add Folder icons.
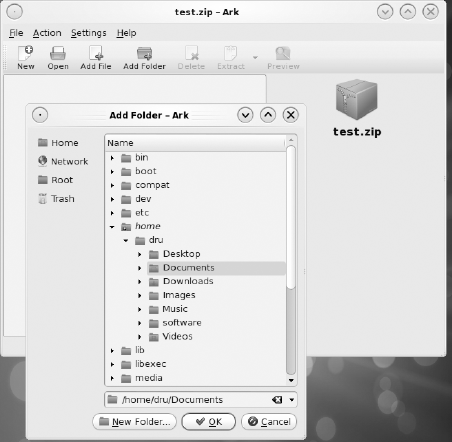
As you add a file or directory, Ark automatically compresses it in the archive. Ark displays the contents of the archive in a tree view (any directories between the selected folder and the root of the filesystem are unnamed—you can click through these to expand to the view you want to use). If you highlight a file and click Preview, you can view the uncompressed version of the file or list the compressed directory's contents. Use the Extract button to browse to the location where you would like to save an uncompressed version of the highlighted file or directory.
If you download or someone sends you a compressed archive, use the Open button to browse to its path. You can then preview and extract the contents of the archive. Table 5-2 summarizes the compression formats that Ark supports.
Table 5-2. Compression Formats Supported by Ark.
Extension | More information available from | |
|---|---|---|
Java | .jar |
|
Zip | .zip |
|
Gzip | .gz |
|
RAR | .rar |
|
XZ | .7zXZ |
|
LZMA and 7-zip | .7z |
|
Debian | .deb |
|
Tar | .tar |
|
Tar (bzip compressed) | .tar.bz |
|
Tar (gzip compressed) | .tar.gz |
|
If you right-click a file or directory in Dolphin, the following options for Compress are available.
- As ZIP Archive:
This option creates a compressed .zip file with the same name as the highlighted selection in the same directory.
- As RAR Archive:
This option creates a compressed .rar file with the same name as the highlighted selection in the same directory.
- As ZIP/TAR Archive:
This option creates a compressed tar.gz with the same name as the highlighted selection in the same directory.
- Compress To:
This option opens an Ark menu where you can browse to the location to save the archive and select which compression method to use in the Filter drop-down menu.
If you right-click an existing archive in Dolphin, the following options are available.
- Open with Ark:
Allows you to preview the contents of and extract the archive.
- Extract Archive To:
This option takes you directly to the Extract screen in Ark where you can select the directory to which you want to uncompress the contents of the archive.
- Extract Archive Here:
This option extracts the archive contained in the underlying directory structure. For example, an archive named mystuff.doc.zip would be extracted to a folder called Home. That folder would contain dru

By default, KDE's clipboard tool Klipper is placed in your system tray and looks like a small black box on a larger box. If you ever remove it from the tray, you can start it from Kickoff
Klipper keeps a history of your copy and cut operations. If you click or right-click Klipper, you can see your last seven clipboard items and the following actions:
- Enable Clipboard Actions:
This option enables actions that allow you to associate an expression with an action. How to configure an action is discussed later in this section.
- Clear Clipboard History:
Occasionally, Klipper becomes confused if you have performed several recent copy operations; clearing the history should get you pasting again.
- Configure Klipper:
Figure 5-13 shows the Configuration options which are discussed next.
- Help:
This option launches the Klipper Handbook.
- Quit:
Klipper remains in your system tray until you select this option. If you do, it asks you if you want Klipper to start the next time you log in.

The General configuration screen enables you to configure many settings, including how many copy operations are saved to the clipboard. If you need to copy and paste images, uncheck the Ignore images box.
The Actions menu enables you to associate actions with regular expressions. Figure 5-14 shows the expression and action that will allow you to click a URL in the Clipboard History to open it in Konqueror. Note that this action does not work unless the Enable Clipboard Actions box is checked in Klipper.

Tip
Regular expressions are definitely in the realm of power users. If you've created an Action that is useful to you, share it on the PC-BSD forums so less advanced users can benefit from your expertise. Chapter 11 introduces you to the PC-BSD community.
The Shortcuts tab enables you to view and create shortcuts to the options in the Klipper menu.
PC-BSD makes it easy to access the data on removable media as it can automatically notice the new data source and make it available to you. This section discusses dealing with CDROMs and DVDs, and USB devices such as thumb drives, USB hard drives, and digital cameras.
If you insert a data CDROM or DVD disk containing data and wait a second or so, Device Notifier pops up and displays the label of the disc. You can click the Device Notifier icon (a blue square with white arrows) to remove the notification message. The label representing the disk then displays in the Places panel of Dolphin, allowing you to access its data. When you are done, right-click the label in Places, and then click Eject. This automatically opens the CD tray so you can remove the media.
To access the data in Konqueror, type /media into the location bar and double-click the icon representing the label name (it should be a blue folder).
If you insert a music CD and hover over its label in Device Notifier, you will see a screen similar to the one shown in Figure 5-15:
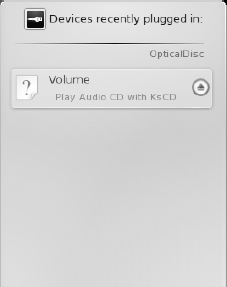
If you click the Play Audio square, Device Notifier launches the KsCD music player. If you click the round icon with an arrow (the Eject button), Device Notifier ejects the CD tray. The entry for the CD stays in Device Notifier until the CD is ejected; you can click the Device Notifier icon whenever you would like to access its menu.
If you insert a video DVD and hover over its entry in Device Notifier, it indicates that multiple actions are available for the device. Click the entry and select the option to Open with Video Player (Dragon Player).
Tip
The Appendix contains descriptions of other software that can be used to play music or video.
Unfortunately, not all DVDs play "out of the box." This is not a problem with PC-BSD but with the Digital Millennium Copyright Act (DMCA) that "criminalizes production and dissemination of technology, devices, or services intended to circumvent measures (commonly known as digital rights management or DRM) that control access to copyrighted works."[33] This means that the PC-BSD and FreeBSD Projects are not allowed to distribute the software that is able to play DVD content that has been encrypted by the manufacturer. You will know that your DVD is encrypted if nothing happens when you press Play in a computer video player.
Software capable of bypassing the encryption on DVDs does exist and is known as libdvdcss. Due to distribution restrictions, if you decide you want to install this software, you need to compile it yourself and assume any legal responsibility for doing so. Chapters 8–10 tell you everything you need to know about installing and compiling software. If you think that being denied computer access to DVDs that you purchased is unfair, consider speaking to your local political representative or join a digital advocacy group such as the EFF (http://www.eff.org).
To access data on a digital camera or on a USB thumb or hard drive, insert the USB device and wait a second or two until Device Notifier pops up with the label. You can then access the data in both Dolphin and Konqueror. When you're finished, right-click the label name in Dolphin to safely Eject the media before removing it.
PC-BSD provides a Printer Configuration module that makes it easy to set up printing on your PC-BSD system. It does assume that you know how to physically connect your computer to a printing device or to a network and that you have already done so. Depending upon how you choose to connect to the printing device, you might have to perform some tasks before you configure your PC-BSD system to print.
Consider how your computer connects to the printer device.
If your computer is physically cabled to the printer using a USB or printer cable, make sure the cable is plugged in and that the printer is turned on.
If another computer in your network is physically cabled to the printer, check that it has been configured to share its printer.
If you use a network printing device that is not physically cabled to any computer, you must first configure the network printing device using the manual that came with the device.
After you have verified your connection setup, you can use the PC-BSD Printer Configuration module to configure printing for any of these connection scenarios.
After you have ensured that you are connected to the printer device either through a cable or a network connection, launch the Kickoff

Before adding your printer, click Server Settings to see if the defaults are appropriate for your situation. This screen is seen in Figure 5-17.

The settings are
- Show printers shared by other systems:
Check this box if the printer device is not physically cabled to your computer.
- Share published printers connected to this system:
Check this box if you plan to share the printer that is physically cabled to your computer with other computers on your network.
Tip
If there are other computers on your network, don't forget to check the Shared published printers box so other users on the network can print from the computer cabled to your PC-BSD system.
- Allow remote administration:
By default, you can administer the printer (for example, view the print queue or stop and start the printer) only from this computer. This box should be selected only by advanced users who know how to secure remote administration connections.
- Allow users to cancel any job (not just their own):
By default, users can cancel only their own print jobs. Check this box with caution, unless the users in your network play nicely together. Note that the administrative user always has permission to cancel anyone's print job.
- Save debugging information for troubleshooting:
Check this box if you have problems configuring your printer.
After you check the boxes you want to use, click Apply to save your changes.
If the printer is attached to another PC-BSD or Linux system that has already shared its printer using CUPS (Common Unix Printing System, http://www.cups.org), the connection is automatically created for you after you check the Show printers shared by other systems checkbox and click Apply. Figure 5-18 shows an example; in this example, the printer is physically cabled to a Linux system with an IP address of 192.168.1.107.

Figure 5-18. The Printer Configuration - System Settings module has automatically found a remote printer that has been shared using CUPS.
Tip
If the remote CUPS printer is not automatically found for you, double-check that a firewall is not blocking port 631.
After the remote printer is found, you can highlight the remote printer and skip ahead to Figure 5-24.
If the printer is physically cabled to your computer or is shared by a Windows system, click the New Printer
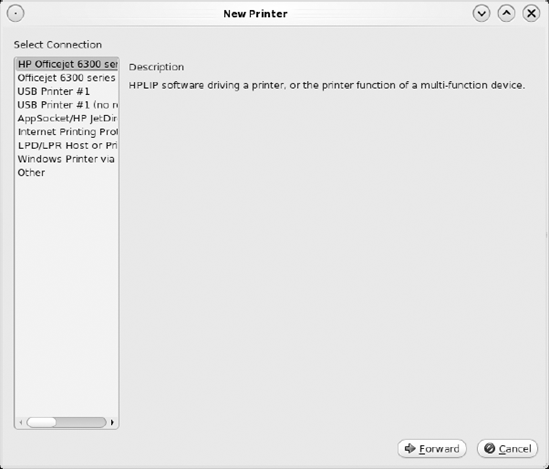
In this example, the PC-BSD computer is physically cabled to an HP 6310 printer, and the printer configuration module has found the printer.
Tip
If your computer is physically attached but the model is not showing in this screen, check that the cable is plugged in and the printer is turned on. If that's not the problem, search at http://www.linuxprinting.org/printer_list.cgi to determine whether an open-source printer driver exists.
If the printer is physically cabled to a Windows computer on your network, click the Windows Printer entry in the left frame, as shown in Figure 5-20.

Input the name of the Windows workgroup, the name of the computer the printer is cabled to, and the name of the printer share. If the share requires a username and password, input those as well.
After you have highlighted the printer cabled to your system or configured the Windows share, click Forward, where you will the screen in Figure 5-21.

The printer's manufacturer should be highlighted for you; if it is not, highlight the manufacturer for the printer and click Forward to the model screen, as shown in Figure 5-22.

The recommended print driver should already be selected for you. Otherwise, highlight the model of the printer; the number might not be exact, but it should be close. Click Forward to continue to the screen seen in Figure 5-23.
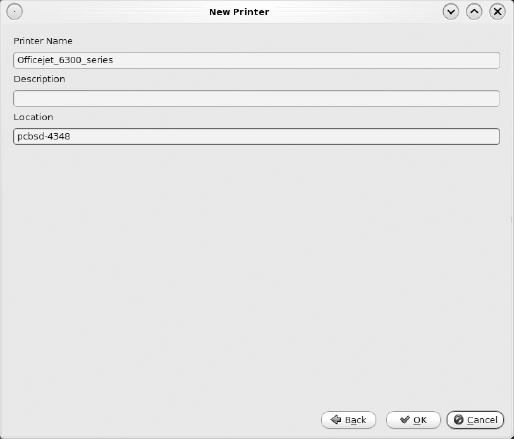
You can change the printer name and description to values that make sense to you, but do not change the Location. When you are finished, click OK, and the printer is created for you. You should see a screen similar to the one shown in Figure 5-24.

Make sure there is some paper in the printer, and then click the Print Test Page button to confirm that your setup works properly.
If you checked the box to share your printer, your printer connection will be published to the other computers in your network. You need to double check that each computer is capable of printing a test page.
If the other computer runs PC-BSD, Mac OS X, or Linux, open its web browser and type in the URL "localhost:631/printers", as seen in Figure 5-25.

That URL connects to the CUPS server that runs on the computer to display which printers are published (shared) on the network.
Note
This assumes that the CUPS has been installed and is running on the Linux system; if it is not, refer to the documentation for your Linux system. CUPS starts automatically on PC-BSD systems.
In this example, the printer running on computer 192.168.1.110 has been found. Click the Print Test Page button to verify that printing works over the network.
If the computer runs Windows, you need to use the Add Printer Wizard on the Windows system. The easiest configuration uses IPP (for example, using the IPP Device URI seen in Figure 5-25). How to configure an IPP printer varies by the version of Windows. We recommend that you Google "IPP Windows" to find a how-to for your version of Windows.
Desktop Sharing enables you to share your current desktop with a virtual networking computer (VNC)[34] user on another machine. Typically, you do this when another user shows you how to perform a task or helps you troubleshoot a problem with your system.
Click Kickoff

In this example, the Personal Invitation button has been clicked; it generates an invitation containing an IP address and port number, a unique password for the connection, and an expiration time of an hour for the password. Be sure that you give this information only to the person you trust to help you with your computer.
After you have created an invitation, it displays in the invitation menu with its creation and expire times. If you want to stop an invitation before it expires, highlight it and click Delete.
Note
Before your invitee can connect, you need to open the port number (in this case, TCP and UDP port 5900) listed in the invitation. See the "Firewall" section of Chapter 7 for instructions on how to open a firewall port.
After your invitee connects to your IP address and port number, a message similar to the one shown in Figure 5-27 displays on your desktop.

After confirming (by telephone, for example) the identity of the person trying to connect, decide whether or not you want the user to control your keyboard and mouse, and then click the Accept Connection button. After you do this, the other person is prompted to input the invitation password. After the password is accepted, the user can see your desktop and you can watch as she moves your mouse and interacts with your desktop. After she is finished assisting you, she can close the VNC session.
Tip
After a session is closed, the user cannot connect again unless you send another invitation. Don't forget to remove the firewall rule for the VNC port and restart your firewall when you are finished!
This chapter introduced you to some of the software available on and for your PC-BSD system. It also showed you how to deal with encrypted and compressed files, the Clipboard, and accessing data on removable media.
In Chapter 6, you will learn how to configure the system to best suit your needs by starting with the system settings that are accessible to your user account.
[32] Interested in learning more about file compression? Check out Tom Harris's "How Stuff Works" article at http://www.howstuffworks.com/file-compression.htm.
[33] http://en.wikipedia.org/wiki/DMCA
[34] The Wikipedia entry for VNC provides a good introduction, including links to VNC client software for other operating systems. Visit http://en.wikipedia.org/wiki/Virtual_Network_Computing.