Chapter 6 concentrated on system configuration settings available to any user. This chapter focuses on the system settings usually performed by the administrative user. Many of these configuration modules will prompt you for the superuser password.
We'll start by finishing up System Settings' General tab by discussing the modules in the Network & Connectivity section, as well as the remaining modules in the Computer Administration section. We'll then move on to the sections in the Advanced tab of System Settings.
The modules in this section allow you to configure the built-in firewall, various network settings, connections to Windows shares, and your network interfaces.
This module is specific to PC-BSD and is used to configure the pf[35] firewall. It requires administrative access. Figure 7-1 shows the Firewall configuration module.
Warning
A firewall affects the security of your operating system. If you are not familiar with TCP/IP ports or firewall rules, you should leave your firewall settings as-is. If you want to practice creating firewall rules in order to learn more about firewalls, use a test system that does not contain any of your data.

The General configuration screen allows the firewall to be enabled or disabled at system startup. You can tell that the firewall is currently running on this system because the Start button is greyed out. If the firewall was not running, the Stop and Restart buttons would be greyed out. If you ever mess up your firewall configuration, click the Restore default configuration button to return to the original working configuration. If you make a change to your firewall settings, don't forget to click Restart (or Start) for your changes to take effect.
Figure 7-2 shows the screen for the Exceptions tab.

The Exceptions tab provides a graphical interface for viewing, adding, modifying, and deleting firewall rules. Each rule (or exception) contains the following information:
- Service:
The name of the application affected by the firewall rule.
- Port:
The TCP/IP port associated with that service. The file /etc/services contains a list of common applications and their default port.
- Policy:
Whether that application is allowed to pass through or is blocked by the firewall.
- Interface:
The BSD name of the network interface.
Users already familiar with pf can view the underlying configuration file, /etc/pf.conf using Konsole. Figure 7-3 shows that configuration file from the same system. It should be noted that /etc/pf.conf shows all the underlying firewall rules. The default rules support network address translation (NAT[36]), allow you to access the Internet and run the ping and traceroute utilities, and accept NetBIOS packets on the interface attached to the internal network.
Tip
The default Exceptions show that the NetBIOS ports are open, allowing your computer to share files over a Windows or Samba network. Samba is discussed later in this chapter.

Power users can change their firewall rules using either the graphical Firewall module or by editing /etc/pf.conf directly.
Figure 7-4 shows the menu that appears if you click Add entry in the Exceptions tab. In this example, a firewall rule is being added to allow for incoming Doom connections over TCP port 666 on the em0 network interface.

When creating a rule, use the drop-down Service menu to select an application by name. You can choose to either allow or block connections over the port. Protocol choices are TCP or UDP, and the drop-down Interface menu will allow you to select from the interfaces installed on the system. Once you press Ok, the rule will be added and will show in /etc/pf.conf.
Note
While the new firewall rules will appear, they won't be used until you restart the firewall.
Figure 7-5 shows the Network Settings configuration module.

Warning
The menus in this module are for advanced users. Don't change them unless you have good reason to and you have researched your changes.
The menus within this module allow you to configure the following:
- Proxy:
If you need to go through a proxy to access the Internet, your service provider or network administrator will tell you which proxy settings you need to use. If you're curious, the Proxies document from
http://docs.kde.org/stable/en/kdebase-runtime/kcontrol/proxy/index.htmlgives an overview of each proxy setting.- Connection Preferences:
This menu allows you to change network timeout values and enable useful FTP options. It is rare that you would change the default values and you should leave them as-is unless you really know what you are doing.
- Service Discovery:
Service discovery is also known as zeroconf[37] and is designed to let a computer configure itself for networking with no user intervention. KDE uses Avahi to provide service discovery. It will search the local domain to see which resources are available. This screen allows you to add additional service discovery domains.
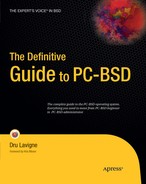
Figure 7-6 shows the Sharing configuration module which is used to set the default username and password for Windows shares. This allows you to browse Windows network shares using Konqueror without being prompted for the share username and password.
The System Network Configuration module is provided by PC-BSD and understands BSD network interface settings. You will need administrative access to change any of the settings in this module.
Tip
Your PC-BSD network settings should "just work." For example, if you plug in an Ethernet cable or insert an external wireless card, its network settings should be automatically configured for you. Should you have a problem with a network interface, you can use this module to configure the interface manually.
Figure 7-7 shows a screenshot of this module. This system contains a RealTek Ethernet card (rl0), a firewire (fwip0) interface, a wireless card (wlan0), and the loopback interface (lo0). The IP address for the highlighted wireless interface is 10.13.0.13.

Figure 7-7. System Network Configuration module showing an Ethernet, firewire, wireless, and loopback interface
Tip
BSD Ethernet device names differ from Linux. On BSD systems, the interface name is associated with its driver; on Linux systems, Ethernet drivers always start with eth. To read the details of a driver, look at the man page for the interface name (without the number). In this example, I could type man:/rl into Konqueror to learn more about the RealTek driver.
The Devices tab allows the administrator to view and configure the network interfaces. If you highlight an Ethernet, firewire, or loopback interface and click Configure, you have the option of obtaining the IP address automatically using DHCP or manually typing in the IP address and subnet mask.
If you highlight a wireless interface and click Configure, in addition to the options mentioned for the other interfaces, you have the ability to add, edit, and remove wireless network profiles. The Wireless configuration menu is shown in Figure 7-8.
Tip
A quick way to access an interface's configuration is to highlight it and check the Display system tray icon. Once in the system tray, you can double-click the icon to open the System Network Configuration module. Hover over the icon to get a summary of the interface's current settings.

If you click the +Add button, you have the option to scan for available wireless networks. You can also choose the appropriate security setting of disabled, WEP, WPA personal, or WPA enterprise[38]. Click the Configure button in the Network Security section to type in the key required by the wireless network.
Back to the main menu, the Network Configuration (Advanced) tab will show the DNS server and hostname received from a DHCP server. If you are manually configuring the interface, click the Change Configuration button so that you can enter the DNS servers, hostname, and default gateway settings. If you use PPPoE to connect to the Internet, you can configure the username and password you use to connect, as well as select the network interface from a drop down menu. PPPOE also provides check boxes to configure an always-on connection and Internet connection sharing.
Chapter 6 covered most of the modules in this section. We finish this section by describing the remaining modules.
This module allows the superuser to easily add and remove users, configure who has administrative access, and change the administrative password or the password of the selected user. Figure 7-9 provides a screenshot of this module.

In this example, the only regular user account on this system is "dru" and this user has superuser access because the Can administrate system check box is checked. The Change Password button can be used to reset the user's password. Because this utility is run as the superuser, you don't have to know the user's old password in order to change it.
The Change Admin Password can be used to reset the superuser password.
The Advanced View button allows you to view and modify all the user accounts and groups on the system. Figure 7-10 provides a screenshot with the dru user account selected.

This advanced view allows you to change the user's Full Name, Home Directory, default shell, and primary group.
Warning
Even the superuser shouldn't change the settings for the system user accounts unless there is a good reason to do so. System user accounts are all the accounts needed by the operating system and are created for you. In this example, it is every account except for the dru account.
The Groups tab allows you to easily create (add) new groups and add or remove members from groups. Again, be cautious about changing the settings for system groups—it is recommended that you modify only the settings for the groups that you have created.
This module is used to configure printing on your PC-BSD system. It supports printers that are physically cabled to the system, connecting to print shares over the network, and printing to a network printer. Using this module to set up printing is discussed in detail in Chapter 5.
This module requires the superuser password and is unique to PC-BSD. It allows the administrator to control the startup settings of PC-BSD services and to stop or start these services. Figure 7-11 provides a screenshot of this module.

Tip
Later in this chapter, we will discuss Service Manager, which is provided by KDE and shows KDE services.
Each entry in this menu shows the following:
- Service Name:
The name of the service.
- Running:
Whether the service is currently running or stopped.
- AutoStart:
Indicates whether the service is set to start automatically when the system boots up. Use the Enable Startup or Disable Startup buttons to change the current setting.
- Description:
A brief description of what the service does.
Tip
Don't change the startup setting for a service unless you understand what the service does.
If you highlight a service, the appropriate buttons will activate. For example, if a service is currently running, the Stop and Restart buttons will activate. If a service is currently set to start at boot time, the Disable Startup button will activate.
This module is unique to PC-BSD and requires superuser privileges to access. Figure 7-12 shows a screenshot of this module.

How to use this module to install software and to keep your installed applications and operating system up-to-date is described in detail in Chapter 8.
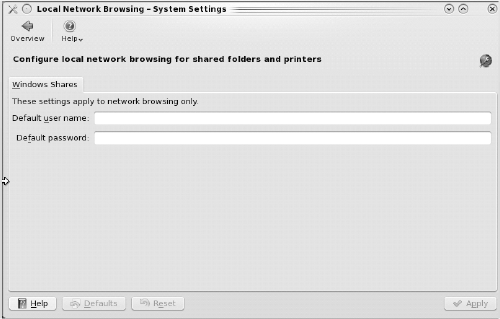
The System Manager module is unique to PC-BSD and requires the administrative password. Figure 7-13 provides a screenshot of this module.

The General tab can be used to view the version of PC-BSD, the version of FreeBSD it is based upon, the system's CPU type and frequency, and the amount of installed memory. The Generate button allows you to create a diagnostic report and will prompt you for the name and location of the file to generate. This allows you to easily send a file of diagnostic information to a mailing list or another user who is helping you to troubleshoot your system.
The Kernel tab, seen in Figure 7-14, allows you to enable ATAPI DMA mode. This mode is off by default as it can cause hardware on some systems to hang. If you feel that the transfer mode on your disk drives is less than optimal, you can try checking this box to see whether it makes a difference. If it results in system freezes, go back and uncheck the box. You can also reduce the boot delay in this tab. Boot delay is how long the system waits for you to select an option from the boot menu you see when the system starts up; it is set to 10 seconds by default. It's probably not a good idea to set a value lower than 3 seconds to give you time to select another boot option;[39] for example, if you ever need to go into single-user mode to repair your system. Finally, the Kernel tab allows a power user who has compiled and installed another kernel[40] to select which kernel to boot.
The Tasks tab is shown in Figure 7-15.

This tab is divided into two sections. The Ports Console section allows you to fetch the ports tree into Ports Console. (Ports Console and the Ports Tree are discussed in detail in Chapters 9 and 10.) The System Tasks section allows advanced users to fetch system source and the system ports tree; it is discussed in Chapter 14.
The Misc tab allows you to configure the language used in the system boot screen. The custom button allows you to select a custom image to display at boot time. This image will appear as the kernel starts to load and will hide the boot messages (you can press any key to leave the image and view the boot messages). The image must be in .pcx format; you can use the GIMP or KolourPaint applications to create pcx files.
Note
.pcx images are not graphic intensive. If you receive an error about the size or color depth of the image when you try to add it using the Custom button, that image will not load at boot time.
As the name suggests, the modules in the Advanced tab of the System Settings module tend to require more configuration knowledge and most require administrative access in order to make configuration changes. The Advanced User Settings section contains over a dozen modules dealing with various system services and hardware.
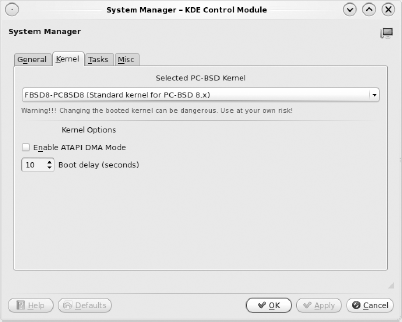
In KDE, Akonadi is the storage architecture behind the Kontact[41] Personal Information Management (PIM) application. A PIM application can be used to manage information such as your calendar, events, address book, and bookmarks. Figure 7-16 shows the menu for this configuration module. In this example, the Add button was selected.
Akonadi can store personal information from a variety of sources, and this menu is used to add and configure these resources. Unfortunately, the documentation on Akonadi is still a work in progress,[42] so you might have to resort to trial and error and asking questions within the KDE community. Chapter 11 describes in more detail how to get help when you are having trouble figuring something out.
The Akonadi Server Configuration tab will show the database settings. Akonadi uses the MySQL database application to store your personal information and preconfigures the database for you. You should leave these settings as-is. However, you might find the Test, Stop, and Restart buttons useful if you are having problems with the MySQL database.
Tip
If you don't use Kontact, you can reduce startup time by disabling the Akonadi service by unchecking Contacts in KRunner
Figure 7-17 shows the Audio CDs configuration module that is used to set the default settings used by applications that play audio CDs. You can override most of these settings in the configuration menus provided by a specific CD player application. It should be noted that your audio settings should "just work" as-is; this module is for audiophiles who want to tweak their settings.
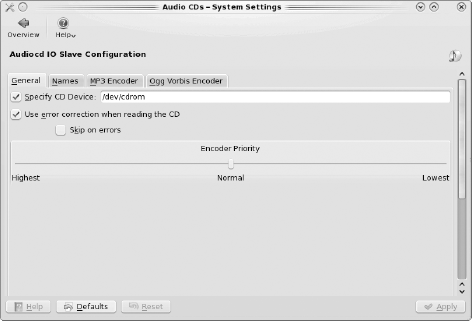
The tabs in this module allow you to configure the following:
- General:
Specifies the device name of the CD player, whether or not to use error correction and to skip on errors, and the encoder priority used when ripping CD tracks.
- Names:
The track and album information that is displayed by the CD player is set in this tab. The default is to show the track artist, track number, and song title for each track and the album artist followed by the album title for each album. This information is gathered using CDDB, which is discussed later on in this chapter.
- MP3 Encoder:
Various settings for encoding MP3 files can be set here. A good introduction to understanding the terminology used in these settings is at
http://arstechnica.com/old/content/2007/10/the-audiofile-understanding-mp3-compression.ars.- Ogg Vorbis Encoder:
Wikipedia has a good introduction to some of the terms used in this tab:
http://en.wikipedia.org/wiki/Ogg_vorbis.
KDE allows you to specify which scripts are executed when KDE starts up. PC-BSD comes preconfigured with scripts in the Autostart module that set up your system's network interfaces, check that sound is working correctly, and check that the system is up-to-date. Figure 7-18 shows the Autostart configuration module. The computer in this example has an Ethernet (em0) network interface which is configured to be enabled at KDE startup. The drop-down menu for startstrigi.sh is selected to demonstrate that Script Files can be run at KDE startup, KDE shutdown, or before KDE starts up.

If you want your favorite programs, such as Firefox or Akregator, to start with KDE, click Add Program and select the program from the menu. Power users can also run their own custom scripts by clicking Add Script to browse to the script. The script will be added to the Script File section with its own drop down menu to select when the script will be run.
The Compact Disc Database (CDDB[43]) is an Internet database of track information for music CDs. Figure 7-19 shows the CDDB Retrieval configuration module. CDDB is enabled by default, meaning that track information should be available in all your CD playing utilities.
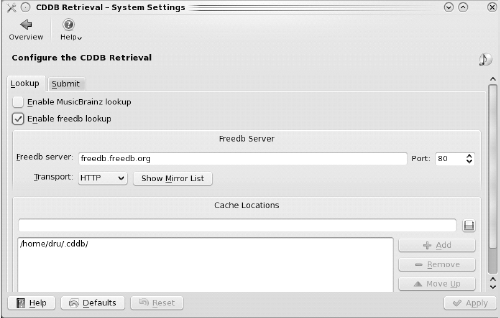
Two popular databases of CDDB information are MusicBrainz (http://musicbrainz.org) and freedb (http://www.freedb.org). freedb supports both the HTTP and CDDB protocols; HTTP is a good default because it is allowed through most firewalls. If track information is not available for your favorite CD, and freedb is enabled, you can use the Submit tab to configure the e-mail address used to submit the track information to the database using a CDDB-aware application such as xmms. Instructions on how to submit can be found at the freedb FAQ (http://www.freedb.org/en/faq.3.html#21).
The Desktop Search configuration module allows you to enable the Networked Environment for Personalized, Ontology-based Management of Unified Knowledge (Nepomuk) semantic desktop and the Strigi desktop search feature. Nepomuk allows you to tag, rate, and comment your files through Dolphin and to browse tagged files in Gwenview. Strigi[44] is a fast desktop search utility.
The Basic Settings tab, seen in Figure 7-20, allows you to see whether the services are running and to enable them if they are not.
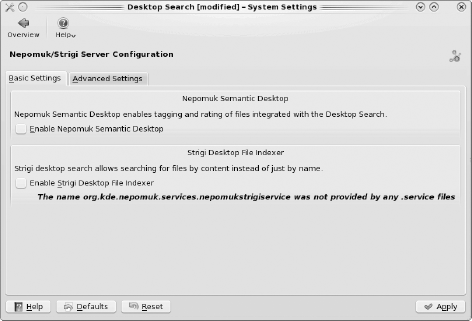
The Advanced Settings tab can be used to check off the directories you want Strigi to index for your searches. Your home directory will already be selected for you.
Nepomuk is the backend that allows Comments and Tags to appear in the right frame of Dolphin. In Figure 7-21, the Downloads folder has been selected. The Add Comment link is no longer seen on the right because it has been replaced by a text box containing the comment. A tag of "stuff" was previously added, and the user has clicked Change Tags to open the Create New Tag menu. Note that tags also allow you to change the icon and to add a detailed description.
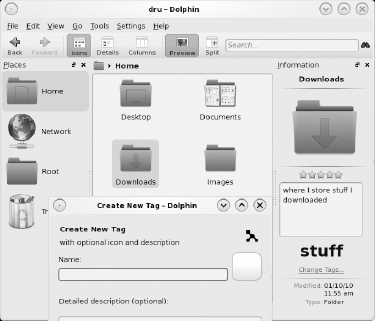
Strigi allows this user to type the word stuff in Dolphin's Search bar and receive search results for both the comment and the tag.
Figure 7-22 shows the Desktop Theme Details configuration module.

This configuration module allows you to fine-tune your theme settings by theme item. For example, the Color Scheme could be Air, while the Panel Background scheme could be Heron, and the Kickoff scheme could be Aya. You can get a preview of each scheme by clicking the drop-down menu above the Get New Theme button. The Get New Theme button provides easy access to the Plasma Themes section of kde-look.org.
Check the More box if you want to remove a theme or save it to a file. If you don't like your changes and want to return back to the defaults, click the Reset button.
KDE4 uses the Solid[45] hardware architecture to control access to hardware devices. Figure 7-23 shows the Device Actions module. This module is intended to be used by developers to set conditions to ensure that hardware is properly accessed by applications. Unless you are developing an application that requires access to hardware, you should leave the settings in this module as-is.

If you highlight an action and click Edit, a menu will open where a developer can view the conditions that must be met in order for the selected action to be applied to the device.
Warning
Unless you are a developer familiar with the Solid architecture, you should leave the settings as-is. Documentation on Solid is still pretty sparse. The curious can learn more about this architecture at http://solid.kde.org.
The File Associations module allows you to configure which applications are used to open files according to their file extension. Figure 7-24 shows this module with the image section expanded and the .bmp file type selected. In this example, Gwenview is the preferred application, followed by KolourPaint and Okular.

Use the Add button if your favorite application, capable of opening the highlighted extension, is not listed. If you highlight an application, you can move it up or down in the Application Preference Order. You can also remove applications that you don't want to associate with the specified file type.
The Embedding tab can be used to set the default left-click action. You can select one of the following:
Show file in embedded viewer
Show file in separate viewer
Use settings for group (where group is the parent group for the file extension)
Ask whether to save to disk instead
This configuration module allows you to set which locations, or resources, can be used as data sources for Contacts, Calendar, Notes, and Alarms. Figure 7-25 shows the possible resources for Calendar. This menu was accessed by selecting Calendar from the drop-down menu and clicking the Add button.

In this example, possible data sources for the Default Address Book containing your personal Contacts include KDE's Akonadi, OpenGroupware, Novell GroupWise, KMail, and OpenXchange. If you select a resource, it will attempt a connection to that type of server and will provide a resource settings configuration menu so you can select the correct location containing your contacts. You can have multiple resources, but only one can be selected as the Standard.
Spend some time browsing the possible resources for each item—you might be surprised how many types of resources are supported!
Note
This module assumes that you already understand the possible configurations for the resources you select. For example, if you select the Novell Groupwise Server module, it will prompt you for the resource settings needed to successfully connect to an existing account on a Groupwise server.
KDE Wallet is a tool to store your passwords, web form data, and cookies in an encrypted format. The first time you enter private information into a KDE utility, it should ask you if you want to store it in your KDE wallet. The wallet itself is protected by a password so other users don't have access to its contents.
The KDE Wallet configuration module, seen in Figure 7-26, allows you to configure your wallet preferences.

The Close Wallet section in the Wallet Preferences tab allows you to configure when the wallet closes. Note that once a wallet is closed, you need to input the wallet's password to reopen it.
The Automatic Wallet Selection allows you to select which of your wallets to use by default. You can store local passwords in a separate wallet from your Internet passwords. If you have never been prompted to make a KDE wallet, you can launch the wallet creation wizard by clicking New. You will be asked to choose a name for the wallet and then if you want to perform a basic setup (recommended) or advanced setup. Figure 7-27 shows the wizard screen after selecting the basic setup.

Once you enter a password and click Finish, the KDE Wallet Service will re-prompt you for the password and provide a strength meter for the password. After clicking Create, your new wallet will show in the Automatic Wallet Selection drop-down menu.
The Wallet Manager allows you to view the information stored in your wallets. If you double-click a wallet within Wallet Manager, it will prompt you for the wallet password before displaying its contents.
The Access Control tab within Wallet Manager allows you to view which applications have access to the wallet (the list will be empty until an application uses it). If you no longer want to have an application use the wallet, you can delete its access here.
The Service Manager configuration module, seen in Figure 7-28, allows you to view which KDE services are currently running and which are configured to start with KDE.
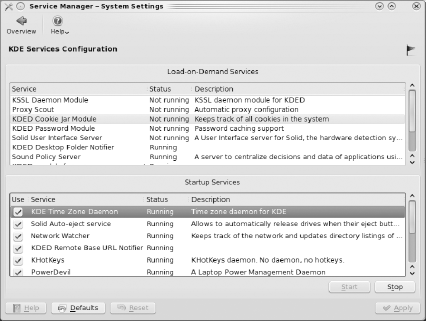
If you uncheck a box in Startup Services, that service will no longer be started with KDE. It will, however, continue to run in your current KDE session until you highlight it and click Stop. If there are services that you know you don't use, you can reduce KDE's startup time by not starting those services. If you are unsure, you should leave the services as-is. If you mess up your configurations, press Defaults to return to the system defaults.
Warning
Don't change the status of a service unless you understand what the service does.
The Load-on-Demand services are automatically loaded whenever another application requires that service. This means that you can't use this interface to stop or start the services in this section.
Tip
Power users can remove an unwanted Load-on-Demand service by editing the X-KDE-Kded-load-on-demand=true line to =false in the appropriate *.desktop file. These files are located in /usr/local/kde4/share/ kde4/services/kded/. Make sure you understand the ramifications before editing a service's *.desktop file.
The Session Manager module, seen in Figure 7-29, allows you to configure which icons appear in the Kickoff

If you don't like receiving the extra 30 seconds confirmation dialog when you click one of the options in the Leave menu, uncheck the Confirm logout box. If you uncheck the Offer shutdown options box, the Restart and Shutdown options will be removed from the Leave menu. This can be useful if you share your computer with others and don't want them to have access to those options. You can still safely restart or shut down the system manually by typing restart or halt at the command line or by changing the Default Leave Option to Turn off computer or Restart computer.
If you have applications running when you leave a session, the On Login section determines whether they are restored when you start your next session. If you select Restore manually saved session, a Save Session option will be added to the Leave menu, allowing you to decide on a session-by-session basis. Once you have saved your session, you can then log out, restart, or shut down the system.
This section of the System Settings' Advanced tab provides modules that deal with managing logins to scheduling when to run specified tasks.
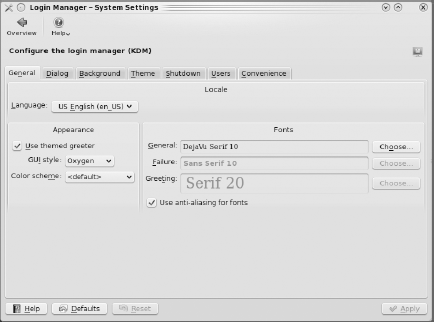
KDM,[46] the KDE Display Manager, is the software that is used to provide the PC-BSD login screen. The Login Manager configuration module, seen in Figure 7-30, allows you to configure various aspects of KDM.
The options available in each tab are as follows:
- General:
Here you can set the language, theme, color scheme, and fonts used by KDM.
- Dialog:
If the Use themed greeter box is checked in the General tab, you will receive a message indicating that there is no dialog window. If you uncheck that box, this tab allows you to create your own greeting and show a logo, a clock, or nothing but the greeting.
- Background:
Allows you to set the background wallpaper or a slideshow of pictures that appear behind the login screen.
- Theme:
This mode will be disabled unless the Use themed greeter box is checked in the General tab. Here you can select and preview preinstalled themes. Click Get New Themes to browse for more themes from
kde-look.org.- Shutdown:
This tab allows you to configure who is allowed to perform local (this computer) and remote (other computers on the network) shutdowns. The choices are Everybody, Only Root, and Nobody. By default, Everybody can perform a local shutdown and Only Root can perform a remote shutdown. The actual commands should be left as is, but you can view which commands are used to perform those operations. If you have installed the Grub boot manager, change the Boot Manager from None to Grub. Grub is most often seen on systems which dual boot with Linux.
- Users:
If you want to choose from a list of users when you log in, check any usernames that you do not want to appear from the Excluded Users list and make sure that the Show list check box is checked. For security reasons, you should leave the System UIDs setting as-is; this will prevent the root user and system accounts from being used at login time. In the User Images section, you can select a user in the drop-down list; then click the icon to select which picture appears next to that username. If you prefer the more secure but inconvenient setting of manually typing in the username without seeing a list of users and their icons, uncheck the Show list check box.
- Convenience:
This section comes with a big red Attention Read help warning message as changing these settings can affect the security of your system. During installation, you were asked if you want the primary user to automatically log in. If you change your mind, you can enable or disable that option and select the primary user in this tab. You can also check the insecure setting of Enable Password-Less Logins and select which users have this ability. You can specify which username is pretyped in for you in the Preselect User section; options are none, previous, or a specified user account. If the Focus password check box is checked, the cursor will place itself in the password type-in box. You can also choose whether or not to be automatically logged in should an X server crash abruptly end your current session.
PolicyKit[47] is a framework for managing which user level processes are allowed to interact with processes running with system privileges. This means that it would be rare for anyone other than a KDE application developer to make changes within this configuration module. Any changes should be well researched and made at your own risk as they could affect the operation and security of your computer.
Figure 7-31 shows a screenshot of the PolicyKit Authorization configuration module with some of its options expanded.

Warning
Don't change any of these settings unless you know what you are doing!
KDE4 uses PowerDevil to manage laptop power management. The Power Management module, seen in Figure 7-32, is used to configure the laptop's power settings.
Tip
If you aren't running PC-BSD on a laptop, you can prevent the PowerDevil service from starting in System Settings

The General Settings tab allows you to configure warning notifications and to assign profiles to specific actions. If you click Configure Notifications, you will see the screen in Figure 7-33. For each action in the Title column, you can configure a variety of events.
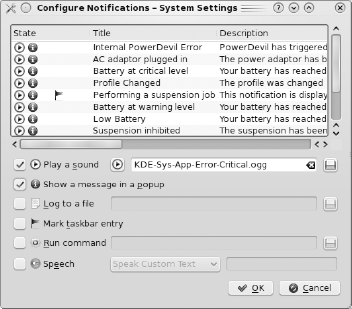
Figure 7-33. Configuring laptop power warning notifications in the Power Management configuration module
By default, the only profile that shows in the Profile Assignment drop-down menus is the performance profile that has been created for you. You can view and edit the default profile as well as create your own in the Edit Profiles menu, seen in Figure 7-34.

This screenshot shows the Actions settings. You can also click the Screen and CPU and System tabs toward the bottom of the menu to view and modify their settings. The four icons in the lower-left corner of this menu allow you to create a new profile, delete the selected profile, and import or export the selected profile.
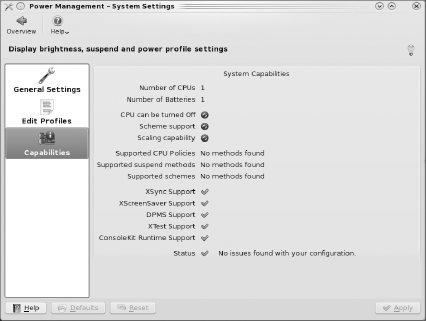
The Capabilities menu shows you what PowerDevil thinks your laptop hardware is capable of. A screenshot from a laptop is seen in Figure 7-35; your laptop's capabilities may differ.
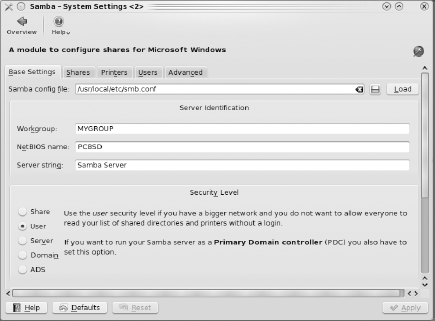
Samba allows PC-BSD, Linux, Mac OSX, and Windows systems to share files and printers. Samba can also allow your PC-BSD system to act as a Windows domain controller or a member of an Active Directory domain. Samba uses the smb.conf configuration file to control access to the network's shared resources. The Samba configuration module, seen in Figure 7-36, provides a frontend to this configuration file, allowing you to quickly browse and enable the options you need for your network. Note that you still need to understand the configuration file to get the most out of the available options.
Note
Entire books have been written about Samba because it is a powerful tool with a lot of configuration possibilities. We provide only a brief introduction to the configuration tool in this section. To actually understand the configurations, you will want to spend some time reading the documentation available from http://www.samba.org/.
Tip
If the options in this module are greyed out, restart the module from Kickoff
PC-BSD creates a MYGROUP workgroup for you; if your system is part of an existing Windows workgroup, change this setting to the workgroup's name. If there are other computers in the same workgroup, you can browse the workgroup's resources by typing smb:/ into Konqueror or Dolphin. You should understand the available Security Levels in a Windows network before changing from the default setting of User.
The Shares tab allows you to fine-tune what gets shared in the network. By default, a homes share is created for you. If you double-click the share, a very comprehensive Add/Edit Share menu becomes available, as seen in Figure 7-37. Remember: change these settings only if you know what you are doing.
Tip
You can create additional shares in Dolphin, using the instructions for sharing a folder in the "Installing from Another PC-BSD System" section in Chapter 8.

The Printers and the Users tabs are expected to work in a future version of PC-BSD. They will allow an administrator to fine-tune the permissions of printer shares and Samba users.
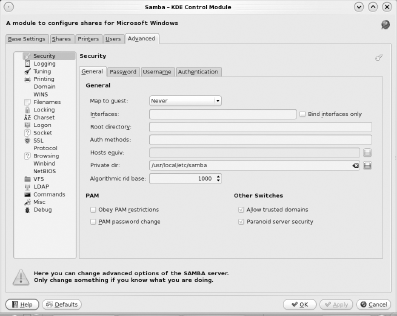
The Advanced tab, seen in Figure 7-38 literally contains hundreds of Samba options. If what you want to configure isn't in any of the other tabs, it is probably here.
PC-BSD uses the cron service to schedule tasks. cron understands two types of scheduled tasks, or crontabs: tasks a user wants to schedule and tasks that are used to maintain the operating system. Operating system maintenance tasks are known as system cron. Only the superuser can edit the system cron and rarely does so. Users can schedule their own tasks.
Tip
Systems that use the cron scheduler read "crontab" files to determine which tasks to run at what time. Power users can edit these files directly. Task Scheduler provides an easy to use interface for editing the underlying crontab files.
Figure 7-39 provides a screenshot of Task Scheduler.
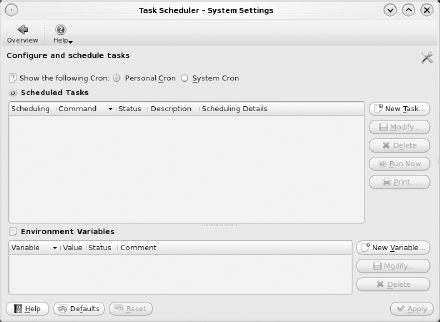
By default, the Personal Cron area will be empty until you add a task. If you click the System Cron button, you can view the scheduled operating system tasks. The tasks will be greyed out to remind you that you should not modify the system cron.
To schedule a personal task, click New Task to see the menu shown in Figure 7-40.

This menu makes it easy to browse to an application or custom script to run. You can then fine-tune which months, days, hours, and minutes the task will run. Note that you can select multiple items. For example, you can set the task to run at 1:15 AM as well as 19:15 PM. If you click the Custom Selection drop-down menu, you can choose to run the task at the specified time intervals.
This chapter concludes Part 2, which covered every aspect of using PC-BSD. You now know how to customize your desktop, find and launch applications, perform common computing tasks, and use all the System Settings configuration modules.
Part 3 concentrates on software: getting it, keeping it up-to-date, and uninstalling it. We'll start with the software management system that is unique to PC-BSD: the push button installer.
[35] pf is unique to BSD operating systems. See the pf Guide (http://www.openbsd.org/faq/pf/) if you want to learn more about this firewall.
[36] http://en.wikipedia.org/wiki/Network_address_translation
[37] Wikipedia provides a good introduction to zeroconf (http://en.wikipedia.org/wiki/Zeroconf).
[38] These settings are needed if security has been configured on the wireless router. Ask your Internet provider or the person who set up the wireless configuration settings if you cannot connect to the wireless network.
[39] If you find that the boot menu goes by too quickly to read it, press the spacebar. It will pause the menu until you make a selection.
[40] How to do so is beyond the scope of this book. See http://www.freebsd.org/doc/en_US.ISO8859-1/books/handbook/kernelconfig.html for more details.
[41] See the Kontact User Guide http://docs.kde.org/stable/en/kdepim/kontact/index.html for more information on how to configure and use Kontact.
[42] Start your research at http://pim.kde.org.
[43] Wikipedia provides a good introduction to CDDB (http://en.wikipedia.org/wiki/Cddb).
[44] See http://strigi.sourceforge.net/ for more information about Strigi.
[45] See http://techbase.kde.org/Development/Architecture/KDE4/Solid for a description of Solid.
[46] See the KDM Handbook at http://docs.kde.org/stable/en/kdebase-workspace/kdm/index.html for more information about configuring KDM.
[47] See http://techbase.kde.org/Development/Tutorials/PolicyKit/Introduction for more information about PolicyKit.