By now, you are probably comfortable enough with your PC-BSD system to start looking under the hood at some of your system's settings. Chapters 6 and 7 will introduce you to the System Settings utility and walk you through its configuration modules. These modules allow you to configure every aspect of your PC-BSD system's behavior.
Chapter 6 will concentrate on the general settings any user is allowed to make. Chapter 7 will concentrate on the more advanced settings that are usually performed by the superuser. It should be noted that most of the settings found in the Systems Settings utility apply to other operating systems running KDE4. We will let you know as we come across the configuration modules that are specific to PC-BSD.
System Settings can be launched from Kickoff
Figure 6-1 shows the System Settings menu on a PC-BSD system.

Note
The order of the icons in the System Settings menu may vary depending upon your language settings, but the functionality will be the same.
The System Settings menu is divided into sections, with each section containing icons representing a configurable module. This chapter will discuss the modules in the Look & Feel, Personal, and Computer Administration sections. Chapter 6 will discuss the Network & Connectivity section as well as the sections found in the Advanced tab.
Tip
Power users can launch individual modules from the command line. Type kcmshell4 --list to see the list of modules with brief descriptions; then type kcmshell4 name_of_module to launch the specified module's menu.
The modules in this section allow you to change the appearance of your KDE4 desktop.
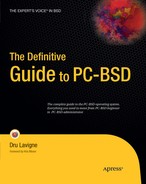
Figure 6-2 shows the configuration screen you receive when you double-click the Appearance module.
Tip
Once you've entered a configuration module's menu, click the Overview button in the top-left corner if you want to go back to the main System Settings menu.
You can spend a fair bit of time previewing and trying out the various Appearance options. We'll provide a brief overview of each to get you started:
- Style:
A widget style controls the color and look of components such as tabs, radio buttons, check boxes, and status bars. Several widget styles are installed for you. If you select one from the drop-down menu, you'll see its effect in the Preview pane. If you don't like the new look after clicking Apply, try another style.
- Colors:
Several color schemes are installed for you, and you can watch their Preview as you go through the menu of choices. The Get New Schemes button will connect you to the Color Schemes section of
www.kde-look.orgso you can browse for additional schemes. The rest of the tabs in this section allow you to fine-tune the selected color scheme.- Icons:
Several themes control the look of icons that have already been installed for you. A preview of each theme is shown above the selection menu. You also have the option to Get New Themes from the Icon Themes section of
www.kde-look.org. Use the Advanced tab to control the size of the icons and to configure their effect and transparency.- Fonts:
These font settings apply to every application you launch in KDE. You can set different fonts and sizes for toolbars, menus, window titles, taskbars, and desktops as well as configure your anti-alias settings. If you click Adjust All Fonts, it will apply the same font to all settings. If you don't like that, click Reset. If you really mess up your font selections, click Defaults to return to the original KDE settings.
- Windows:
Several window decoration themes are available for preview. You can also decide whether to show window button tooltips (the description you see when you hover over a button in a window's title) and adjust the location of the buttons on a window's title bar. Note that these settings apply to all windows. To apply to an individual window, see the Configuring Windows section in Chapter 3.
- Splash Screen:
When KDE starts, you see several icons bouncing in the middle of your desktop as it loads. This screen allows you to change that theme, as well as Get New Themes from the Splashscreens section of
kde-look.org.- GTK Styles and Fonts:
When graphical applications are created, they use something known as a widget toolkit to control the look of the window and its buttons. KDE4 applications use the QT toolkit, but many applications, such as Firefox and GIMP, use the GTK toolkit. If you find that some application windows look "ugly," see whether they look better to you after selecting another style from the drop-down menu. You can also install the Firefox and Thunderbird scrollbar fix in this menu.
- Emoticons:
Many applications, such as instant messaging and Skype, support emoticons. This menu allows you to configure and get new emoticon themes from the Emoticons section of
kde-look.org.
This module allows you to configure desktop effects, multiple virtual desktops, screen edge actions, screen savers, and launch feedback. Figure 6-3 shows the Desktop settings module.

Following is an overview of the configuration options available in each of the icons in the left panel:
- Desktop Effects:
These were discussed in detail in Chapter 3.
- Multiple Desktops:
By default, four virtual desktops are created for you. This menu allows you to change and rename the number of virtual desktops. Accessing your virtual desktops is discussed in Chapter 3.
- Screen Edges:
This configuration screen allows you to enable active screen edges. Once activated, your screen edges will support actions such as switching between virtual desktops by hovering your mouse near the edge of your screen.
- Screen Saver:
Use this menu to select, configure, and test your screensaver. There are dozens of built-in screensavers that have been sorted into categories. You can choose to start the screensaver after a specified period of inactivity and to require a password to stop the screensaver. Advanced Options allow you to configure the screen to lock when you hover your mouse over a specified screen corner. Additional screen savers are available from the Screensaver section of
kde-look.org.- Launch Feedback:
This screen allows you to configure the cursor that appears while an application is launching. You can also configure the timeout before being notified that an application is taking too long to launch.
Tip
You can disable the launch feedback cursor for a specific application in Menu Editor in the General tab of the application. Menu Editor is discussed in detail in Chapter 4.
Figure 6-4 shows a screenshot of the Notifications module.

In the Applications tab, the Event source provides a drop-down menu to select the specific application to configure. Once selected, the configurable actions for that application are displayed in the State window of the screen. Select a state to configure which notification you would like to receive. For example, if you select PowerDevil
Note
Speech-to-Text must be configured before the system can speak the message. See the Accessibility section later on in this chapter for instructions on how to enable and configure this feature.
The System Bell section allows you to use the system bell instead of system notification. If you check this option, you can then set the volume, pitch, and duration of the bell.
This module provides another view of the settings discussed in detail in the Windows Actions section of Chapter 3. Figure 6-5 shows the layout of this configuration module.

This section of System Settings contains modules to configure your personal, accessibility, and language preferences. These settings apply only to your user account, meaning that users sharing the same system can use different personal settings.
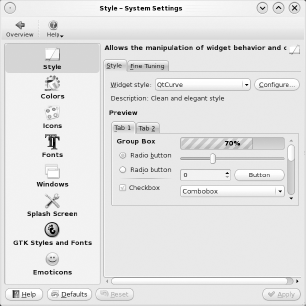
Figure 6-6 provides a screenshot of this module.
The Password & User Account section allows you to associate an image with your name that will show in the login screen after you use the Leave button to log out or switch user accounts. You can browse for an image that KDE will automatically scale for you. This configuration section also allows you to change your password; it will prompt you for your current password first.
The information you provide in the User Information section is used by some programs, such as the default user created by KMail.
Have you ever noticed that bullets appear when you type your password into the login screen? Use the At Password Prompt option to configure KDE to show one, three, or no bullets for each character in your password.
The Paths menu is shown in Figure 6-7. You can change the default location that applications search through when looking for specific types of files. Any paths you change should remain somewhere within your home directory.

Tip
The contents of the Autostart directory are configured in the Autostart configuration module discussed in Chapter 7.
KDE4 provides many configuration options to ease the computing experience for disabled users. The KDE Accessibility Project (http://accessibility.kde.org/) provides a good overview of KDE's accessibility features as well as additional resources.
Figure 6-8 shows the configuration menu for the Accessibility module.

The tabs in the Accessibility panel allow you to configure the following:
- Bell:
If you have difficulty hearing the system bell, use a customized bell that contains the path to a sound to play. Deaf users can configure a visible bell that will either invert or flash the screen. These settings will apply to any configured Notifications, as discussed earlier in this chapter.
- Modifier Keys:
This menu allows you to enable sticky keys. This is useful if you have problems holding down a modifier key (such as Ctrl, Alt, or Shift). Once sticky keys are enabled, you can let go of the modifier key and it will remain active until you press another key. For example, you can start KRunner by clicking Alt, letting go, and then pressing F2 instead of having to press Alt+F2 simultaneously. This tab also allows you to activate a bell whenever a locking key (Caps Lock, NumLock, or Scroll Lock) is toggled on or off.
- Keyboard Filters:
This tab allows you to activate and configure slow and bounce keys to assist users with limited hand mobility. Slow keys tell the computer to ignore unintended keystrokes because there is a configured time delay before a keystroke is accepted. Bounce keys tell the computer to ignore repeated keystrokes within a set time frame.
- Activation Gestures:
This tab allows disabled and nondisabled users to share the keyboard during the same session. Sticky and slow keys can be turned off after a period of inactivity, and notifications can be configured for when an accessibility feature is turned on or off.
The Text-to-Speech module contains the following tabs:
Tip
The KTTS Handbook provides a detailed overview of using the text-to-speech subsystem and is available from http://docs.kde.org/stable/en/kdeaccessibility/kttsd/index.html.
- General:
By default, text-to-speech is disabled. Checking the box to Enable Text-to-Speech System will start the KTTSD service for you.
- Talkers:
Click the Add button to configure the language and synthesizer used by the text-to-speech talker. When selecting the Synthesizer, select either Festival Interactive or Festival Lite because FreeTTS is currently not supported. While Festival Lite supports only one voice, the Festival talker supports several voices.
Figure 6-9 shows the Select voice menu for the Festival synthesizer. Once you select a voice, click Test to see whether you like the sound of the voice.

Once a talker is configured, you can use the KMouth program to speak for you.
Note
The KMouth Handbook at http://docs.kde.org/stable/en/kdeaccessibility/kmouth/index.html contains detailed instructions for configuring and using Kmouth.
- Filters:
Filters are advanced features that allow you to preprocess the text before it is spoken. The Filters section of the KTTS Handbook provides examples for creating your own filters.
- Interruption:
This tab allows you to set a message or sound to be played before and after interruptions (when a spoken warning interrupts the text being spoken, for example).
- Audio:
This tab allows you to set a location to store audio files. This means that KDE will store any text read by the text-to-speech reader as an audio file, allowing you to replay it again. Files will have names like kttsd-J-SS, where J is the job number and SS is the sentence number.
Warning
Audio files can take up a lot of disk space, so take the time to periodically remove the files you don't use. Uncheck the Keep audio files box in the Audio tab to stop file creation.
- Jobs:
As seen in Figure 6-10, this screen can be used to speak the contents of the Clipboard or a text file. Buttons are provided to navigate to the previous or next sentence. When speaking, the contents of the text being spoken will be displayed in the Current Sentence panel.

Figure 6-11 shows the Default Applications module, which controls which applications are used for common tasks.

The default e-mail client is KMail. In this example, I've selected Use a different email client; then pressed the ... button to browse for the application I want to use instead.
Table 6-1 summarizes the default applications used by KDE programs that support the specified functionality.
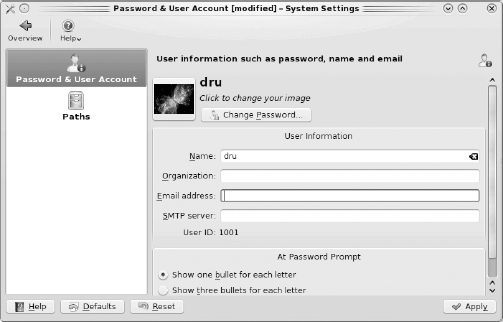
This module allows you to configure your language, keyboard layout, and spell checker. These settings will be used by all applications in KDE. Figure 6-12 shows the module's menu.
The bottom portion of the Country/Region & Language section provides a preview of your currently applied settings. You can use this screen's tabs to change the following:
- Locale:
Either click the word change... next to the Country or region, or click Add Language to select the desired locale.
- Numbers:
Use this tab to change the decimal symbol, thousands separator, positive and negative signs, and to select the numbers set.
- Money:
Here you can change the currency symbol, its location to the numeric value (such as before or after), and the number of digits after the decimal symbol.
- Time & Dates:
Here you can select the calendar system, time and date formats, and first day of the week.
- Other:
Use this tab to select your paper format setting and the metric or imperial measuring system.
The Keyboard Layout section provides tabs allowing you to configure the following:
- Layout:
Your current keyboard layout was selected during the PC-BSD install. If you want to change it, click the Enable keyboard layouts button to select a different keyboard model or layout.
- Switching Options:
By default, the selected layout applies to all applications (Global). Use this tab if you want to configure the keyboard layout to affect only the current desktop, application, or window. You can also configure shortcuts for switching between layouts.
Tip
KDE will not let you change some shortcuts, such as Ctrl-Shift and Alt-Shift. If you receive an error indicating that your shortcut is not supported by Qt, select another shortcut.
- Advanced:
This tab contains hundreds of keyboard behavior options sorted into categories. Spend some time browsing the options to see whether any interest you.
The Spell Checker section allows you to set the default language for editors that use spellcheck. It also provides options to skip uppercase and run-together words. To use spellcheck in an editor, select Spelling from its Tools menu.
This section contains modules that allow you to configure items such as the date and time, your display and fonts, keyboard and mouse actions, and multimedia.
Note
Most of the settings in this section can be modified using your regular user account. However, some settings, such as changing the system time, require you to input the administrative password.
A screenshot of this module is seen in Figure 6-13. The default settings were selected during the PC-BSD install.

If you check Set date and time automatically, your system will automatically adjust itself by syncing with a network time protocol (NTP) server on the Internet. You can select which server to use from the NTP server drop-down menu just above the clock.
Use the single forward and back arrows to scroll through the months in the selected year's calendar, and use the double arrows to scroll through previous and upcoming years. In the clock area, use the up and down arrows or your mouse scroll to change the hour, minute, and seconds; or type in the desired value.
Local time zones are listed alphabetically. You can scroll through the list to pick the city closest to your geographic area.
Figure 6-14 shows a screenshot of the Display module. The Size and Orientation settings will vary according to the features provided by your video card driver.

This module allows you to configure the following:
- Size & Orientation:
This tab allows you to change the display size (currently shown as 1024×768), the refresh rate, and the orientation.
- Power Control:
If your laptop display or monitor supports it (most modern hardware does), you can check the Enable display power management check box and set the standby, suspend, and power off times.
- Gamma:
This tab provides sliders for red, green, and blue settings so you can calibrate your monitor's contrast and brightness settings.
Warning
Don't calibrate your monitor unless you know what you are doing.
- Multiple Monitors:
If your system has multiple video cards connected to multiple monitors, you can use this tab to configure KDE to spread your desktop across all of the monitors.
Tip
The site www.dualmonitorbackgrounds.com/ has a large selection of wallpaper designed for dual monitors. To save a wallpaper, right-click its image and select Save Image As from the menu. Chapter 3 contains instructions for changing your desktop wallpaper.
This module allows you to preview, configure, and add fonts. Figure 6-15 shows a screenshot of this module. This system currently has 40 fonts installed.

Expand the arrow next to a font's name to view which fonts are installed—such as bold, italic, or regular. Right-click any font and you will have an option to delete, print, or open it in the font viewer application. If you purchase or download a font from the Internet, use the Add button to browse to the path in which you saved the font.
This module makes it easy for you to configure several useful responses to keyboard input. Figure 6-16 shows the initial Input Actions menu.

This menu will change if you select an option in the left panel. Click the Settings button to return to the original menu. If you check the Gestures check box, you can associate mouse movements with actions.
Spend some time expanding each category to see which options it provides. If you click an action, the comment will provide a brief description. Depending upon the option, it may also provide a trigger tab where you can configure a keyboard shortcut and/or an action tab where you can launch a command or fine-tune the action.
An example of a useful Input Action is found under Preset Actions
The Edit button
Use the Reset button if you decide you want to return your system to the default Input Actions settings.
Warning
Reset will delete any actions or groups you have created.
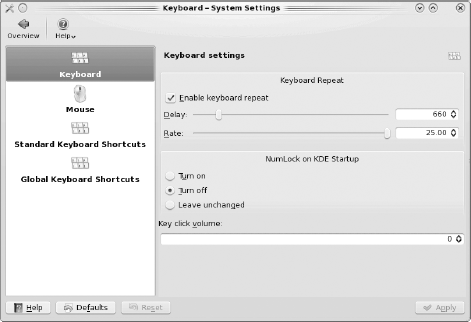
This module allows you to configure keyboard and mouse behavior as well as keyboard shortcuts. Figure 6-17 provides a screenshot of this module.
This module provides tabs to configure the following:
- Keyboard:
If you tend to make mistakes as you type, you'll want to enable keyboard repeat. If you don't, you will have to press Backspace for every character you want to redo. You might have to experiment with the delay (not too slow) and the rate (not too fast) to find a speed that works for you when you hold down Backspace. If your keyboard has a NumLock section and you use it often, configure KDE to activate these keys for you. If you like to hear yourself type, adjust the key click volume.
- Mouse:
This menu allows you to specify right- or left-handed button order, reverse scroll direction, and specify whether a single or a double click opens files and folders. You can also preview and install mouse cursor themes, set various intervals, and configure the NumPad keys to act as a mouse.
Tip
A useful setting for laptops with touchpads is to lower pointer acceleration to about 1.5 and pointer threshold to 0 in the Advanced tab of the Mouse panel.
- Standard Keyboard Shortcuts:
Allows you to view and customize default shortcut keys. In Figure 6-18, the Add Bookmark action has been selected. It shows that this action is currently using the default shortcut of Ctrl-B. If you select Custom, click the None button, which will change to Input. Press the keys you want to use for the shortcut, and the Input word will change to show your new shortcut.
- Global Keyboard Shortcuts:
This section allows you to view and change the default shortcuts for specific applications. Click the KDE component scroll-down menu to select the application to configure. The File drop-down menu lets you select from additional component schemes, set all shortcuts in this section to none, and remove a component from this menu. A filter bar is included if you know which action you want to configure for the selected component.

Figure 6-19 provides a screenshot showing KWin as the currently selected component. You might want to spend some time browsing the actions available for each component to see whether any shortcuts would be useful to you.

This module allows you to view the sound card and backend driver being used by the multimedia subsystem. If you have multiple sound cards, you can specify their order for each category. For example, you can configure the card attached to your speakers for Video and another card attached to your headphones for Communication. Otherwise, these settings should "just work" and are typically left as-is.
Figure 6-20 shows that this PC-BSD system uses an Intel 82801AA AC'97 (snd_ich) sound card.
Tip
On PC-BSD (and FreeBSD systems), sound card drivers start with snd_, and the man page for the driver name will tell you the type of sound card and the driver's capabilities. In the previous example, I could type man snd_ich in Konsole or man:/snd_ich in Dolphin's navigation bar or Konqueror.
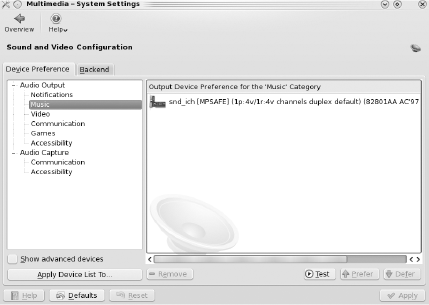
You can test your sound device by highlighting it and clicking the Test button. If you click the Apply Device List To... button, you can see which categories the device is applied to without having to click each category individually in the left pane.
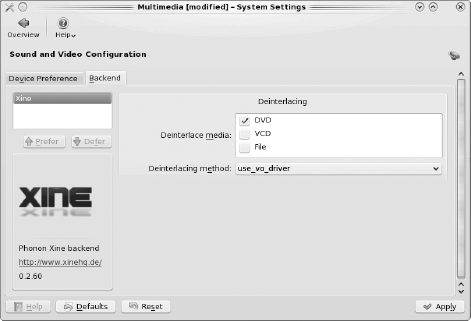
The backend tab is seen in Figure 6-21. The KDE4 multimedia network is known as Phonon and it depends on a backend engine to play various audio and video formats. PC-BSD installs the Xine backend engine for you. If you are curious about interlacing, its Wikipedia entry (http://en.wikipedia.org/wiki/Deinterlacing) provides a good introduction.
Note
See www.xine-project.org/home for more information about Xine.
This chapter introduced you to several of the configuration modules in the System Settings utility. You learned how to customize the look and feel of your system, configure accessibility features, customize your keyboard layout and language, and manage your fonts. You've also learned how to customize your display, input actions, and keyboard and mouse.
We'll discuss the rest of the configuration modules in the next chapter.