In Chapter 3, we spent a fair bit of time customizing the look and feel of your PC-BSD system. In this chapter, we'll get down to work and show you how to find and access your files and applications. We'll include plenty of tricks and tips so you can find what you need quickly and in ways that are intuitive to you.
In Chapter 3, you learned how to create folder views to see and access the contents of a directory. But how do you get an overview of all of the files and directories on your system?
KDE4 provides a comprehensive file manager, known as Dolphin. To access Dolphin, click the Kickoff icon and select File Manager from the Favorites menu.
Tip
Remember, you can also add Dolphin to your desktop or taskbar by right-clicking the word Dolphin in Kickoff and selecting Add to Desktop or Add to Panel from the pop-up menu.
Figure 4-1 provides a screenshot of Dolphin with a file selected.

Note the red – next to the sometext.txt file, indicating that it is the currently selected file whose contents are displayed in the Information panel.
Directories in Dolphin are represented by the folder icon. If you use your mouse to hover over an icon, the Information panel will display its contents and give you some information about the selected file or folder. If you double-click an icon, you will either see its contents (if it is a folder) or launch an application capable of opening the file. Use the back and forward buttons to navigate between a selected folder and its contents.
Right-clicking an icon will open a pop-up menu with several options. The available options vary depending upon whether the icon represents a directory or file, and by type of file. Many of the options are intuitive so we will discuss only the ones you may not be familiar with. Here are options for directories:
- Open in New Tab:
Tabs provide a useful view to focus on a folder's contents and allow you to view several files or folders at once. You can open as many tabs as you wish. To close a tab, click on its orange X.
- Add to Places:
This will add the directory to the Places panel on the left, allowing easy access to that directory. For example, you may find it useful to add your Downloads or Music folder if you access these directories often.
- Open with:
Allows you to view the contents of a directory or open a file with the specified application. If the application you would like to use is not in the list, select Other and browse for the application.
The following actions are also available:
Subversion: Subversion allows you to keep up-to-date with a "repository" of files on another system. Subversion is discussed in more detail in Chapter 15.[31]
Archive/Sign/Encrypt/Decrypt: Chapter 5 will show you how to setup encryption keys so you can protect the contents of a folder. You can also perform these actions on individual files.
Open Terminal Here: Will open Konsole so you can type into a command prompt.
Start a Slideshow: Allows you to view the contents of a folder as a slideshow. Press Esc to end the slideshow and return to your original screen.
You should experiment with the Icons, Details, Columns, Preview, and Split buttons to see which view you prefer. For example, split view makes it easy to drag and drop contents between folders.
Tip
The second column will be empty in Column view until you double-click an icon in the first column. You can use your mouse in Details view to change the width of the Name, Size, and Date columns. Right-click that area to select from a menu of possible details you can view.
Dolphin provides additional options through the menus below the title bar. Most of these options are intuitive so we will highlight some useful features:
File

View
Tools
Tools
Tools
Help
Places allow you to quickly access the data locations you use most frequently. You can right-click any folder and select Add to Places. Once a folder is added to Places, it is also added to the Kickoff
The default Places include Home, Network, Root, and Trash. These are discussed below.
By default, Dolphin will present you with the contents of your home folder. When you create your own files or folders, you should save them somewhere within your home folder. This makes it easier to find and backup your own data. It also prevents you from inadvertently modifying or deleting important files needed by the operating system. To create a new file or folder, simply right-click any empty area within the Home view and select Create New from the pop-up menu.
If there are other computers in your home or work network, this portion of Places allows you to browse the resources being shared by those computers. Figure 4-2 shows a screenshot of Network Places. If you double-click the Network icon, you will see the computers in your network. If you double-click the Samba Shares icon, you'll see the network's workgroup; you can browse the workgroup to see which network shares are available.

If you hover over each icon in Network Places and read the text at the bottom of your screen, you'll see that each shortcut is actually a link to one of these three KIO slave protocols:
network:/
zeroconf:/
smb:/
In KDE, a KIO slave controls one of nearly 50 supported protocols, with each protocol providing access to a type of resource. For example, the network KIO slaves seen in Network Places provide quick access to resources on different types of networks.
Another way to take advantage of KIO slaves in Dolphin is to check View
Commonly used KIO slave protocols are listed in Table 4-1. It is worth spending some time typing each into Dolphin's navigation bar to see which protocols are useful to you. Don't forget to include the :/ after the name; for example, with an audio CD in your drive, type audiocd:/ to view the contents of the CD (don't just type audiocd).
Table 4-1. Useful KIO Slave Protocols
Protocol | Description |
|---|---|
audiocd:/ | Show tracks on an audio CD. |
bookmarks:/ | Display Konqueror (KDE's default web browser) bookmarks. |
desktop:/ | Access the files in the Desktop folder. |
floppy:/ | Access the floppy drive. |
fonts:/ | View installed fonts. This is a very quick way to access both your personal and system fonts. |
ftp:// | Note the double slash. Provides quick access to the files on a specified ftp server. |
imap:/ | Can be used by power users to connect to the specified IMAP mail server. |
ldap:/ | Can be used by power users to connect to the specified LDAP server. |
mailto:/ | Open a mail program (Kmail by default) to compose an email. |
man:/ | Can be used by power users to read system documentation. If you know the name of the command whose documentation you'd like to read, put it after the /. For example, type man:/ls to read the documentation for the ls command. |
network:/ | View other computers on the network. |
nfs:/ | Can be used by power users to connect to the specified NFS share. |
nntp:/ | Can be used by power users to connect to a specified news server. |
programs:/ | Quickly browse installed applications. |
settings:/ | Access advanced and general system settings. |
sftp:// | Can be used by power users to securely transfer files to/from the specified computer over SSH. Note the double slash. In Split view, you can drag and drop files between systems once the connection has been established. |
Browse Samba[a] and Windows shares. | |
trash:/ | View contents of trashcan. |
webdav:/ | Can be used by power users to access shared files on a web server using WebDAV.[b] |
zeroconf:/[c] | View other computers using zeroconf. |
[a] Samba allows you to access shares on Windows computers. See [b] The Wikipedia entry for WebDAV provides a good introduction: [c] The Wikipedia entry on zerofconf provides a good introduction: | |
All of the protocols listed in Table 4-1 also work if you type them into KDE's web browser, Konqueror. More Konqueror tips are discussed later in this chapter.
Tip
Once you have accessed a resource using a KIO slave protocol in Dolphin, if you find it handy, right-click on an empty space in its view and select Add to Places to create a shortcut to the resource.
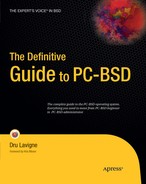
The Add Network Folder in Network Places allows you to create your own network folders. If you double-click this icon, you will launch the Network Folder Wizard seen in Figure 4-3.
Select the type of network folder you would like to create and click Next. You will then be prompted for further information (such as the address of the server you would like to connect to). This is similar to mapping a network drive in Windows, but you are able to connect to a wider variety of network services.
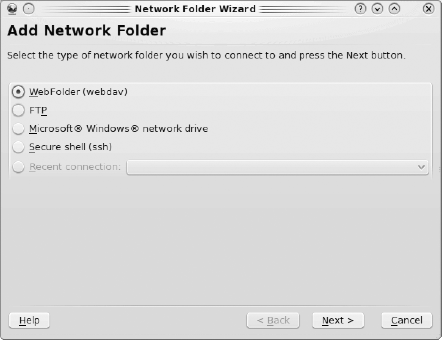
In Dolphin, Root Places refers to the root, or beginning, of the operating system's file system, not to the administrative user's home directory (the administrative user is also known as root). In other words, it allows you to see all of your system's parent folders. Figure 4-4 shows a screenshot of Root Places with the Icons view selected.
Most of the folders are system folders, meaning their contents are needed by the operating system. You should leave these folders as-is unless you are an administrator and understand the changes you are making.
If you have used Linux before, you probably recognize some of the folder names. However, the contents of the folders may be different from what you are used to on your Linux system. man:/hier will explain the contents of all of the folders except PCBSD and Programs, which are unique to the PC-BSD operating system. Table 1 in the Appendix provides an overview of each folder and indicates which folders should be left as-is.
You probably recognize the concept of a trash or recycle bin. By default, any files you delete using Dolphin will be placed in Trash and stay there until you empty it. If you click on Trash, you can view your recently deleted files. Right-click a file to either Restore it or permanently Delete it, as seen in Figure 4-5:

Note
Any file you delete from the command line does NOT go into Trash, meaning it is instantly deleted.
You can also access Trash Places by double-clicking the Trashcan icon in your taskbar. If you right-click the Trashcan icon in the taskbar, you can quickly and permanently delete all of the files in Trash Places by selecting Empty Trashcan. Figure 4-6 shows the configuration menu you receive when you select Trashcan Settings from the Trashcan icon's right-click menu.

Konqueror is KDE's built-in web browser; it can be accessed from Kickoff
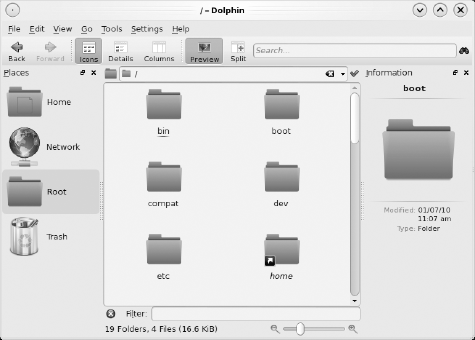
The first time you open Konqueror, you will see a screen similar to Figure 4-7.
The top portion of Konqueror looks like a web browser as it provides a toolbar of icons, a location bar where you can type in an Internet URL, and a search bar. The middle section provides links to quickly access your Home folder, trashcan, network folders, and your web bookmarks. In other words, anything you can do in Dolphin, you can also do in Konqueror. If this is your first time using Konqueror (or if you only have used Konqueror for web browsing), take a few minutes and click on the link entitled Next: An Introduction to Konqueror.
You can also access your files using Konqueror's location bar. Try typing file:/ . If you pause slightly after the slash, all of the folders on your system will appear in the scroll-down menu. You can either select one, or keep typing. The more you type, the more Konqueror narrows down the folder and file names that match the path you have typed. Once you have selected or typed the path to the desired file, Konqueror will display it for you using a plugin for an application that understands the file format. For example, if you select a text file, Konqueror will display the text and allow you to modify the text. Konqueror will add a Save and Save As icon to the toolbar so you can save your changes to the file. If you select a graphic, Konqueror will add Zoom icons to the toolbar to assist you in viewing the image. Konqueror has been designed to display many types of files and to modify the icons in the toolbar so that they make sense for the type of file being displayed. For some file formats, such as Office documents or PDF files, Konqueror will open the file in an external program.
If you explore Konqueror's menus, you'll find all kinds of intriguing options that deal with files and web browsing. Here are a few examples to get you started:
If a website gives an error stating that your browser is unsupported, try setting Tools
If you have a bunch of tabs open that you aren't finished with, but you need to shutdown your system, click File
To translate a webpage, select the to and from languages from Tools
To see your file system while you browse the Internet, select Settings

We have barely scratched the surface of all of the cool things you can do in Konqueror. Spend some time poking about—you may find that you can access anything you want on your PC-BSD system from this one utility!
KRunner is a handy way to start applications. Figure 4-9 shows the KRunner interface. While it looks quite simple, KRunner has some pretty nifty built-in features.
Press Alt-F2 to launch KRunner. If you know the name of the application you would like to start, type its name into the dialog box. If you're not sure of the name of the application, start typing a search term and KRunner will present you with a list of applications that match, as seen in Figure 4-10. The down arrow to the right of the type-in box can be used to scroll through recently launched programs.

KRunner isn't limited to just finding and launching applications. You can also use it as a
- Calculator:
Type in your equation using * for multiplication, / for division, + for addition, and − for subtraction. Put the = sign before the equation and don't use any spaces. Figure 4-11 shows the result of multiplying 12 and 1024.
- Unit converter:
Need to convert miles to kilometers? Try typing "100 miles in km." Typing "100 euros in ca" will convert euros to Canadian dollars. KRunner supports several types of unit conversions. Try typing the unit that you know and KRunner will respond with a list of what it is able to convert to.
- Web shortcut:
If you type gg:bsd, KRunner will open a tab in your default browser and display Google's (gg:) results for the search term "bsd." If you prefer to instead see the Wikipedia entry for the term bsd, type wp:bsd. You can view other existing web shortcuts and create your own in Konqueror


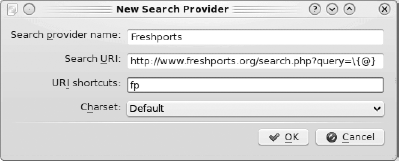
To create a new web shortcut, click on New. Figure 4-13 shows the values you would input to map "fp:" to Freshport's search utility (Freshport is discussed in more detail in Chapter 9). Note that the Search URI always ends in {@} as this tells Konqueror to add the search phrase you type after the shortcut. After pressing OK, the new shortcut will show up in the Web Shortcuts menu. Don't forget to check its box and press Apply in order to start using the shortcut in KRunner.
Tip
If you check the Enable Web shortcuts box, web shortcuts will also work within Konqueror. Otherwise, they will only work with KRunner.
KRunner supports other operations using a plugins system. You can configure which plugins are available by clicking on the wrench button on the far left of KRunner. Figure 4-14 shows some of the available plugins. If one sounds interesting, click its informational button (to the right of the plugin name) to receive a short description of the plugin.
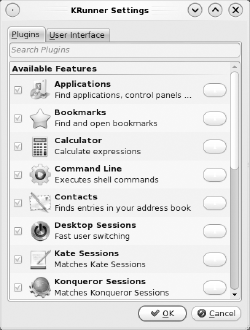
Click on the User Interface tab if you would like to preview an alternate KRunner interface.
The button next to KRunner's configure button that looks like a square with a squiggly line in the middle is the Show System Activity button. Clicking this button will show a screen similar to Figure 4-15—your screen will differ depending upon which applications you have running on your system.

If your system is running slowly, you can use this utility to determine if an application is slowing things down. Check out the CPU% column. Things are normal if the number is quite low. If the number is very high, that application is slowing your system down.
Tip
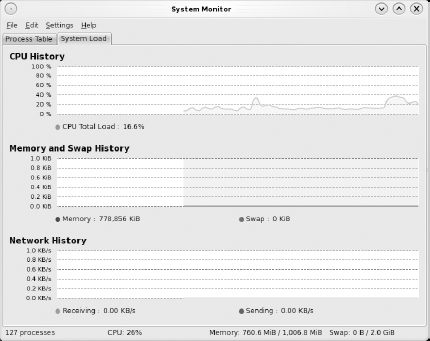
You can also type ksysguard into KRunner. This will open up a similar window, but will add a System Load column, as seen in Figure 4-16.
Kickoff, the right flame icon in the far left corner of your taskbar, provides another way to view and launch your applications.
Tip
In addition to the Kickoff application that was pre-installed in the taskbar panel, there are two Application Launcher widgets (Kickoff style and traditional style) and a QuickLaunch widget. Any of these can be added to a panel or your plasma workspace. The Quicklaunch widget allows you to quickly launch the applications contained in your Favorites.
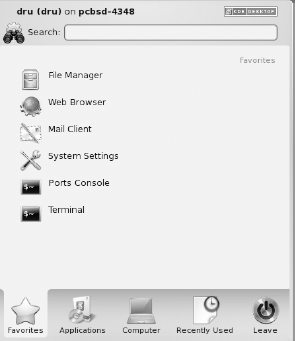
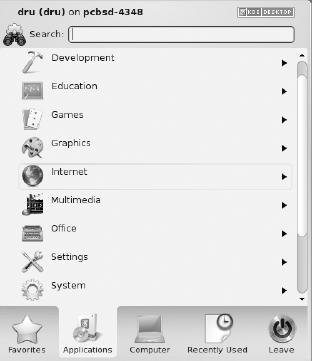
This section will concentrate on the Kickoff style application launcher. Figure 4-17 shows the menu you see when you click on Kickoff.
If you type in a search phrase, Kickoff will display any applications that match by name or description.
The bottom of Kickoff contains five icons:
- Favorites:
If you right-click an item in Kickoff, you have the option of adding it to your Favorites menu. If you right-click an item in Favorites, you can add it to your Desktop or Panel or remove it from Favorites.
- Applications:
This utility sorts your installed applications into categories, as seen in Figure 4-18. If you click on a category, the menu will slide in the direction of the arrow; use the arrows to browse back and forth between a category and its list of applications.
- Computer:
Provides quick access to System Settings, KRunner, and Dolphin's Places.
- Recently Used:
Provides quick access to recently used applications and documents.
- Leave:
Provides quick access to logout, lock, switch user, restart, and shutdown functions.
If you right-click the Kickoff icon, you will access a menu of the following choices:
- Menu Editor:
Allows you to customize Kickoff's categories and which applications appear in which categories. This is discussed further in the next section.
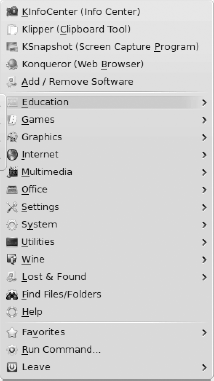
- Switch to Classic Menu Style:
Allows you to view and launch applications using the previous KDE style. Figure 4-19 shows the Classic Menu. The top five applications (without arrows) represent the past five applications used on this system.
- Application Launcher Settings:
These allow you to change the Kickoff icon, switch tabs on hover, show applications by name, and set a keyboard shortcut to launch Kickoff.
- Remove this Application Launcher:
If you do so, you can re-add the Application Launcher widget at a later time.
Tip
If you ever lose the PC-BSD flame icon and want to reapply it to Kickoff, use Application Launcher Settings
KDE provides the ability to modify the categories and applications that appear in Kickoff. Figure 4-20 shows a screenshot of Menu Editor, the utility provided for this purpose. Right-click the Kickoff icon to open the Menu Editor.

Each of the categories found in Kickoff's Application panel will appear in Menu Editor's left frame. Click on the arrow next to a category to see its list of applications. If you highlight an application, the right frame will activate, allowing you to modify its settings. In Figure 4-20 the KBlocks application in Games
- Name & Description:
These are searched whenever you type a search phrase in Kickoff, so it can be useful to use descriptions that make sense to you. For example, if you have difficulty remembering the name of the software used to burn CDs, make sure its description contains "burn" so you can search for that term.
- Icon Source:
Click on the graphic to change the application's icon. Figure 4-21 shows the browse menu that opens for this purpose.
- Comment:
Only shows in Menu Editor. This can be useful if you have multiple versions of an application.
- Command:
Power users can add switches to modify a program's behavior.
- Enable launch feedback:
If checked, you'll see a little bouncy icon while the application is starting.
- Place in system tray:
This will place an icon for the application in the system tray when you open the application.
- Only show in KDE:
If checked, the application will show in KDE application launchers but not in other desktop environments, such as GNOME.

The Advanced tab allows power users to configure these items:
- Work path:
The location where the application starts.
- Run in terminal:
Check this box if you are adding a command line application.
- Run as a different user:
Check this box and type in "root" if the application needs to start as the super user.
- Current shortcut key:
Allows you to set or change the shortcut key to launch the application.
While in Menu Editor, you can cut, copy, paste, or delete any category or application. You can also add a new item, submenu, or separator through the menus, icons, or by right-clicking. This allows you to customize Kickoff to meet your needs.
This chapter has shown you the many ways you can find files and launch applications within KDE. Chapter 5 will further explore the applications available on your PC-BSD system and demonstrate how to perform common tasks.