Now that you've successfully installed PC-BSD, you'll want to become familiar with your new system. Part 2 of this book will show you how to customize your PC-BSD environment, perform common computing tasks, and configure every aspect of your system. You'll discover a lot of cool features as you work your way through the chapters in Part 2. These chapters are also handy to refer to whenever you're wondering "How do I do this?"
PC-BSD version 8.0, the focus of this book, uses the KDE4 (KDE version 4) desktop environment by default.
Tip
In Windows, the desktop is part of the operating system. This means that you can customize your desktop, but you can't install a different desktop. In open source, the desktop is separate from the operating system, meaning you can choose which desktop environment to install and use. PC-BSD pre-installs the KDE desktop for you—later in this chapter we'll show you how to change desktop environments if you decide that you would like to try another desktop.
Like PC-BSD, KDE[23] is a free software project with its own large user community. The goal of KDE is to provide a desktop that includes commonly used applications that can be run on computers running Linux, BSD, Windows, or Mac OSX. This project wishes to make its software available to anyone, including the disabled and those who speak a language other than English.
Note
The reader can find many more resources for using the KDE desktop at the KDE website. We recommend the KDE 4.0 Visual Guide.[24]
Because the desktop is separate from the operating system, you may find KDE on other free operating systems, such as some versions of Linux. Much of the information found in Part 2 of this book also applies to other operating systems running KDE4. However, PC-BSD adds some extra utilities that you will not find on other operating systems. As we come across these utilities, we will tell you so that you will know which features came with KDE and which are unique to PC-BSD.
When you first log into your PC-BSD system, and before you start any of your own customizations, your desktop will look similar to Figure 3-1:
The KDE desktop has several components: the plasma panel, the plasma workspace, and the plasma dashboard. Each component is introduced below.
Along the length of the bottom of your desktop is a gray taskbar, which is known as the KDE4 plasma panel, but which is commonly referred to as the taskbar. As seen in Figure 3.1 the default plasma panel on a PC-BSD system contains several icons. If you hover your mouse over any icon in the taskbar, you will see some information about the application that icon represents. You can click on any icon to open its associated application, or right-click the icon to receive a menu of options.
Working from left to right, the default taskbar contains the following icons:
- Kickoff:
In most versions of KDE, this is a white letter K on a blue background. On PC-BSD systems, the PC-BSD logo (which looks like a flame) is used instead. Kickoff is the KDE application launcher and is discussed in detail in Chapter 4.
- Show the Desktop:
If you have several windows open, you can click this button to quickly minimize all windows. Click the icon again to return the windows to the desktop.
- Show the Plasma Dashboard:
Click to start the plasma dashboard. Using the plasma dashboard is explained in the next section.
- Device Notifier:
This icon will notify you when a new device or media, such as a USB thumb drive or DVD, is inserted.
- Pager:
This icon looks like four squares, where each square represents a virtual desktop. Think of a virtual desktop as an area where you can group the applications you have opened in a way that makes sense to you. For example, you could use one virtual desktop for gaming and another virtual desktop as your productivity area for doing work. Simply click on the squares to switch between virtual desktops.
- Digital Clock:
Click on the clock to access the multi-year calendar and click again to close the calendar. If you right-click the clock and select Digital Clock Settings, you can configure its appearance or change the time zone.
- System Tray:
This area of the panel is to the left of the digital clock and appears to be in its own rectangle. It is preceded by an arrow, which lets you expand the system tray to see all of its icons. By default, the system tray contains the following icons:
KMixer: If you click on the speaker icon, you'll see a slider, which you can use to adjust sound volume. You can also hover over the icon and adjust the volume with the scroll wheel of your mouse. If you click on the Mixer button below the slider, you'll be presented with more sliders to fine-tune your sound settings.
Tip
If you have problems with sound in an application, open Mixer
Klipper: This clipboard tool keeps a history of your copy operations so you can paste into other applications.
PC-BSD Update Manager: This utility is found only on PC-BSD systems and is used to keep your operating system and installed applications up-to-date. It is discussed in detail in Chapter 8.
KOrganizer: This is KDE's calendar and reminder utility. KOrganizer supports many other features, including integration with KDE's personal information management program (Kontact), journaling, and blogging. To learn more about KOrganizer, click on its icon, then press F1 to access the KOrganizer Handbook.
Notifications: Click this icon to receive a list of currently running or recently completed jobs, such as file downloads.
Tip
To access any application's Help or Handbook, press F1 from within that application's window.
Two icons appear after the system tray:
- Trash:
Click this icon to see which deleted files have been saved to the trash bin. Trash is discussed further in Chapter 4.
- Plasma:
This icon looks like a color palette. It is used to configure widgets, and to add additional panels. These are discussed in detail later in this chapter.
The area above the plasma panel is known as the plasma workspace. This is the area that users typically associate with their desktop wallpaper. By default, the PC-BSD workspace contains four useful icons:
- PC-BSD Official Website:
This icon is a handy way to access the PC-BSD forums, online documentation, and other resources available from the PC-BSD website. We'll discuss these resources in Chapter 11.
- Ports Console:
This icon allows you to install FreeBSD ports and packages. Chapters 9 and 10 detail how to use Ports Console.
- Software Manager:
This utility allows you to easily install software and is unique to PC-BSD. Individual applications that can be installed using the PC-BSD's Software Manager are known as PBIs.[25] How to install PBIs is discussed in detail in Chapter 8.
- Users Handbook:
As you read through Part 2 of this book, you'll find that the plasma workspace is very customizable.
This component is invisible until you either click the Show the Plasma Dashboard icon in the taskbar or press Ctrl+F12. If you have any applications, they, along with the taskbar, will disappear from view and your screen will look similar to the one in Figure 3-2. Don't panic. You can either click anywhere within the plasma workspace or press Ctrl+F12 again to return to your previous view.
Tip
If you don't see the menu in the upper right-hand corner, click on the plasma icon (the one that looks like a color palette).
The Dashboard can be used to add widgets or change folder view settings, both of which are described in more detail in this chapter. While these settings can be configured elsewhere, using the Dashboard provides an uncluttered workspace for making your changes.
Now that we know what the default desktop looks like, it is time to customize! Figure 3-3 shows a panel that has seen several changes. Kickoff has been moved closer to the system tray, 12 application shortcuts have been added to the left of Kickoff, and several applications have been opened and minimized—these show to the left of the K3B icon. A news reader has been added to the system tray (square orange icon next to Kickoff), most of the default system tray applications have been removed, and a calendar widget has been added, which shows that the date is currently the 6th.

To remove an icon, simply right-click it and select Remove this Icon from the pop-up menu. It will instantly be removed from the panel.
To remove an icon from the system tray, right-click it and select Quit. A pop-up message will ask if you want to start the application the next time you login. If you select Start, it will disappear now and reappear the next time you login. If you click Do Not Start, it will stay out of the system tray. If you click Cancel, it will cancel the quit operation and remain in the system tray.
Kickoff can be used to add application icons to the plasma panel. Doing so allows you to quickly access your favorite applications. Simply click on the icon in the taskbar to start the application. If you know the name of the application you would like to add, type its name into Kickoff. In this example, we'll add the Yahtzee game.
Click on Kickoff and begin to type the word yahtzee into the Search box. Once Yahtzee appears in the menu, right-click its entry in the menu and select Add to Panel as seen in Figure 3-4. An icon will be added to your taskbar; click on the icon to start playing Yahtzee.

Note that the pop-up menu provides two other options to quickly access the selected application. If you select Add to Favorites, Yahtzee will be added to a Favorites menu in Kickoff as seen in Figure 3.5:

If you select Add to Desktop, an icon will be added to your plasma workspace. This is similar to creating a desktop shortcut in Windows.
If you wish, you can add an application in all three places since you are not limited to just one choice.
If you don't know the name of the application you would like to add but know what type of application you want to use, try using Kickoff's search feature. For example, if you want to burn a CD but don't know which utility to use, type in the search term cd. If you hover over the results, you'll receive a description of the program. Figure 3-6 returns two search results. Hovering over K3b shows that it is used for CD and DVD burning. Hovering over KsCD shows that it is a CD player.
Tip
Your search results may vary, depending upon which software you installed during or after the installation of PC-BSD.

If you still can't find a suitable application, click on Applications within Kickoff and browse through the various categories to see if any of the applications look interesting. We'll show you how to install additional applications in Chapter 8.
To change an icon's graphic, right-click the icon and select either Icon Settings or Properties from the pop-up menu. On the General tab, you'll see a picture of the icon in the upper left-hand corner. Click on the picture to access the Icon Source screen shown in Figure 3-7. The default is to show the icons for Applications. Click on Applications to access the menu to select a different type of icon. If you have a set of icons that you have downloaded from elsewhere, click the Other icons button to browse to the location where you saved your icons.

A KDE widget, also known as a plasmoid, is a small program that has only one purpose. There are widgets that show the time, monitor a laptop's battery status, or show the current temperature. There are several ways to add widgets in KDE:
Press Ctrl+F12 to access the Dashboard. This will add the widget to the plasma workspace.
Right-click the plasma workspace and select +Add Widgets from the pop-up menu. This will add the widget to the plasma workspace.
Click or right-click the plasma icon in the upper right corner of your screen and select +Add Widgets from the pop-up menu. This will add the widget to the plasma workspace.
Click the plasma icon in the plasma panel and select +Add Widgets from the menu. This will add the widget to the taskbar.
Tip
Widgets can be unlocked (the default) or locked. If widgets are locked, you will see Unlock Widgets instead of Add Widgets. Once you click on Unlock Widgets, you can then add a widget using any of the above methods.
In this example, we'll add a widget to the taskbar. Figure 3-8 shows the Add Widgets screen with All Widgets selected to show additional choices. Note that you can browse through all widgets or select a category of widgets to browse. You can also see which widgets are currently running.

If you highlight a widget and click Add Widget, its icon will be added to the plasma panel. You can then click on the icon in the panel to access the associated application.
Most widgets have their own configuration settings. Right-click a widget's icon to access its pop-up menu. If you decide that you no longer want the widget in your panel, select the Remove option in its right-click menu.
Figure 3-8 indicates that is possible to Install New Widgets. If you click on that button, you can choose to Download New Plasma Widgets or Install Widget from Local File. If you click on the Download option, you'll see an installer menu similar to Figure 3-9:
This menu allows you to sort widgets by Latest, Most Downloads, or Highest Rated. You can also enter a search phrase.
If you prefer, you can use your web browser to search through the hundreds of widgets (plasmoids) available from kde-look.org. If you find a plasmoid you like, download it and use the Install Widget from Local File menu option to browse to the location where you saved the widget.
Tip
Browsing through kde-look.org can become addictive and time consuming! It contains thousands of free plasmoids, themes, wallpapers and other eye-candy for your KDE desktop.
You may have noticed when you clicked on the plasma icon to add a widget that there were several other settings, as seen in Figure 3-10:

Moving from left to right then bottom to top, these settings allow you to do the following:
- Screen Edge:
Move the position and size of the taskbar. Click on Screen Edge and continue to hold down as you drag your mouse to a corner of your screen. If you don't like the new position of the taskbar, drag it to a different corner until you find a position you like. You can also use the three slider arrows in the bar between the taskbar and the settings to adjust the length of the taskbar.
- Height:
Adjust the height of the task bar. Click on Height and continue to hold down with your mouse as you increase or decrease the height of the taskbar. Increasing the height will also increase the size of any icons, making the taskbar easier to read. Adjust until you find a height that works for you.
- +Add Widgets:
Add single-use applications as described in the previous section.
- Add Spacer:
Separate areas of the taskbar. For example, you could separate your graphics utilities from your web browsers. Click on Add Spacer and a box with two gray lines will appear next to the plasma icon. Click on the box and four arrows will appear. Drag the box to the area of the task bar where you'd like the space to appear, then click elsewhere to let go of the box. The box will be replaced by a space on the taskbar. If you don't like its position, you can right-click the space to Remove it and try again.
- Lock Widgets:
Prevent taskbar icons from being added or removed. The plasma icon will also disappear, meaning panel settings cannot be modified. Simply right-click any icon and select Unlock Widgets when you need to make changes to the taskbar.
If you click on More Settings, you'll find the following:
- Remove this Panel:
If you select this option, you will be asked if you really want to remove this panel. If you do, you can add another panel by right-clicking the plasma icon in the upper right-hand corner of your screen and selecting +Add Panel. However, the new panel will be empty and you'll have to re-add all of your icons and widgets.
Tip
If you accidently remove the original panel, you'll find several of the original icons in the +Add Widgets screen. Kickoff is listed as Application Launcher and the virtual desktop pager is listed as Pager.
- Maximize Panel:
If after adjusting your task bar it no longer extends to the edge of your screen, clicking this option will extend it for you.
- Visibility:
Select one of four choices: Windows go below, Windows can cover, Auto-hide, or Always visible. The currently selected option will be highlighted with a gray bar. For example, in Figure 3-10, Always visible is the current visibility option being used. If you select Auto-hide, the taskbar will disappear until you hover the mouse near its location. If you select Always visible, the section of an open window that is dragged near the panel will disappear.
Note
You can configure a window to override the panel's Always visible setting by right-clicking the window's title bar

- Panel Alignment:
Select one of three choices: Right, Center, or Left. Changing a setting changes the position of the slider arrows used to adjust the placement of the taskbar.
In KDE, a folder view provides convenient access to the contents of the directories that you use most often. A folder view can appear as a movable area that sits on top of your workspace; it is transparent, meaning you can still see your wallpaper and other icons underneath the folder view. This section will show you how to add folder views to your workspace or panel, configure folder views, add contents to a folder view, and customize your folder view settings.
In KDE, folder views are widgets. To add a new folder view to your desktop, right-click the plasma workspace
You can also add a folder view to the plasma panel by clicking on the taskbar's plasma icon

If you hover your mouse anywhere in a plasma workspace folder view, a toolbar appears on the folder view's right edge.
Tip
If the toolbar does not appear, widgets are locked. Unlock widgets to access the toolbar.
This toolbar contains four icons. Moving from the top down, these icons allow you to do the following:
- Resize:
This icon is a square with arrows. Move your mouse while holding down on this square until the folder view is the desired size.
- Rotate:
This icon looks like a circular arrow. Move your mouse while holding down on this icon and the folder view will rotate in either direction.
- Configure:
This icon looks like a wrench. Click on the icon to open the Folder View Settings seen in Figure 3-12. You can change the directory the folder view represents by selecting another directory in the Show a place drop-down menu or you can Specify a folder by using the browse for directory icon.
- Remove:
The letter X will immediately remove the folder view without asking you first. Don't worry—it is easy to create another folder view if you do this by mistake!

To add an application to a folder view, highlight the application in Kickoff and use your mouse to drag it to the folder view. A pop-up menu will ask if you want to copy the application, link a shortcut, or cancel the operation.
If you have created multiple folder views, you can drag and drop any type of icon between folder views. Highlight the icon and drag it with your mouse to the other folder view. A pop-up menu will ask if you want to move, copy, link, or cancel the operation.
Regardless of whether the folder view is on your workspace or panel, if you right-click the folder view you will access a menu of further options. These allow you to do the following:
Create New:
Folder: Note that this is a subdirectory of the folder view, not another folder view.
Text file: After giving the file a name, double-click on the new file's icon to add text to the file.
HTML file: After giving the file a name, right-click the new file's icon to Open with Kwrite, if you want to edit HTML tags manually. Alternately, if you have an html editor, select Open With from the right-click menu and select the editor from your installed applications. If you double-click the icon, it will open the HTML file in your web browser.
Link to Location (URL): type in the URL and give the link a useful name. Whenever you wish to go to that website, simply double-click the link icon.
Link to Application: In the General tab, select an icon and give the link a useful name. Then click on the Application tab and use the browse button to find the application you wish to create a shortcut to. Once the link is created, you can start that application from your folder by double-clicking on its icon. This is similar to making a shortcut in Windows.
Link to Device: This allows you to create a shortcut to the following devices: CD-ROM, CDWRITER, camera, DVD-ROM, floppy, hard drive, another file system (listed as MO Device in the right-click menu), a remote directory on another open source operating system (NFS), and ZIP device.
- Undo:
This option allows you to undo your last operation. Note that Ctrl+z appears next to this menu item. In KDE, keyboard shortcuts are listed next to their function in a menu. In other words, you can also press Ctrl+z to undo your last copy operation. In Chapter 7 we will show you how to create your own shortcuts.
- Paste:
Ctrl+v will also paste your last copy/cut operation from the clipboard into the currently selected file. If you press Ctrl+v multiple times, it will re-paste the text each time.
- Icons:
This option does not appear in the menu if the folder view is in the taskbar. If the folder view is on the plasma workspace, it allows you to
Sort Icons: By name, size, type, or date. If you uncheck Folders First, subdirectories will be sorted with the other files; otherwise, they will be listed before files.
Align to Grid: If this option is unchecked, you can drag your icons anywhere and they may become cluttered over time. Checking this box will keep the icons neatly aligned.
Lock in Place: If this option is checked, the icon will always bounce back to its original position, even if you try to move it.
- Refresh View:
This option can be used to refresh the folder view if you make a change that doesn't immediately show in the view (e.g., add files to a subdirectory or edit a file).
- Open with Dolphin:
Dolphin is KDE's explorer utility, similar to Windows Explorer or Gnome Nautilus. Dolphin is discussed in detail in Chapter 4.
- Folder View Settings:
This is another way of accessing the settings available from the wrench icon of the folder toolbar.
- Remove this Folder View:
This option immediately removes the folder view.
- Folder View or Panel Options:
These allow you to do the following.
+Add Widgets: Another way to add a widget.
+Add Panel: Another way to add a panel.
Run Command: Only available if the folder view is on the plasma workspace. It starts KRunner, which is discussed in detail in Chapter 4.
Lock Widgets: Prevents changes to widgets and panels until Unlock Widgets is selected in Desktop Options.
Lock Screen: Only available if the folder view is on the plasma workspace. It prevents access to the desktop unless you unlock the screen using your password. This is handy if you need to leave your desktop when other users are around.
Leave: Only available if the folder view is on the plasma workspace. Logout of your desktop session.
Folder View Settings: Only available if the folder view is on the plasma workspace. It allows you to set the desktop's appearance. This is discussed in more detail later on in this chapter.
Panel Settings: Only available if the folder view is on the plasma panel.
Remove this Panel: Only available if the folder view is on the plasma panel.
Every application you start in KDE opens in its own window. The top of the window is known as the title bar and will contain the name of the application. If you grab the title bar with your mouse, you can drag the window to any location in your workspace.
Tip
You can also use a folder view's title bar to move the folder view.
If you double-click the title bar, the window will maximize, or take up your entire screen. If you double-click the title bar again, it will return to its original size. If you hover near a corner of the window, a double arrow will appear. You can then use your mouse to resize the window to the desired size.
By default, a window's title bar lists the name of the application as its title. To the left of the title is the On all desktops button; to the right of the title are the minimize, maximize/restore, and close buttons. Those buttons represent the following functions:
- On all desktops:
Allows you to access the window from any virtual desktop. The default is to only show the window on the current virtual desktop.
- Minimize:
Minimizes the window to the taskbar. Click on the minimized window to return it to your workspace.
- Maximize/Restore:
Makes the window fullscreen or restores a maximized window to its original size.
- Close:
Terminates the application. If the application has any unsaved changes, such as an editor, it should prompt you to save your changes.
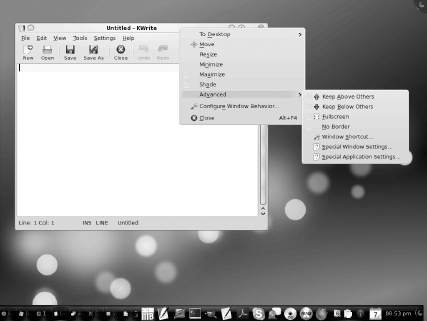
You can access many window settings by right-clicking a window's title bar. Figure 3-13 shows a listing of the Advanced settings.
The settings found by right-clicking a window's title bar allow you to do the following:
- To Desktop:
Check which virtual desktops you would like the window to appear in.
- Move:
Allows you to easily move the window with the mouse. Click the window when you are finished to stop the move.
- Resize:
Allows you to change the size of the window with the mouse. Click when you are finished to stop the resizing.
- Minimize/Maximize:
Provides the same function as the minimize/maximize icons in the title bar.
- Shade:
Hides the window and just shows the title bar. Right-click the title bar and uncheck shade to see the window again.
- Advanced:
This option includes the following settings.
Keep Above Others: The window will stay above other windows. This can be handy when you are working in one window and need to view information from another window. You may have to resize or move your windows since the other windows will stay below this window. If you set two windows to this setting, click on the window you want to see and it will become the top window; click on the other window for it to jump to the top.
Keep Below Others: This window will always stay below other windows, meaning you may have to move or resize it to see its contents.
Fullscreen: In fullscreen mode, the window's title bar, all other windows, and the panel disappear. A dialog message will remind you to press Alt+F3 to access the menu settings so you can toggle off fullscreen mode.
No Border: This mode removes the title bar. Use Alt+F3 to access the title bar again.
Window Shortcut: This allows you to create a shortcut for launching the window. If there is currently no shortcut, the shortcut dialog will say None. Click on the word None and it will change to the word Input. Type in your shortcut (e.g., Alt+d) and the word Input will change to your shortcut. If you don't like that shortcut, click it again and the word will change back to Input so you can try again. Be aware that window shortcuts are only for the lifetime of the window. When you close the window, the shortcut disappears.
Special Window/Application Settings: These settings are discussed in the next section.
The remaining settings after Advanced include
- Configure Window Behavior:
These settings are detailed in a following section.
- Close:
Provides the same function as the X in the title bar.
Figure 3-14 shows the menu and informational message you receive when you select a window's Advanced

You'll find that there are dozens of settings you can apply that affect only the window or application that you are configuring. If a setting looks interesting, check its box. This will activate its Do Not Affect drop-down menu of options. Most options deal with when to apply the change and if the change should be temporary or permanent. Some settings, such as Position and Desktop, will activate a third column where you can either type in a value or select from a list of options.
If you change a setting, press OK to see if you like the change. If not, simply go back into Special Window Settings and try again.
There are many reasons, besides curiosity, for wanting to change a window's special settings. As an example, have you ever opened a window and wished that it had opened in a different location in your workspace or opened at a different size? Special Window Settings allow you to specify exactly where and at what size that window will open, either now or permanently.
Figure 3-15 shows the menu you receive when you right-click a window's title bar and select Configure Window Behavior.

This section discusses the configurations available for each option listed in the left frame of this menu.
KDE supports many effects that can transform your computer from merely useful to cool. Effects include animating a window when it is opened, minimized, maximized, or closed. Unlike Special Window Settings, effects apply to all windows, not just the window that opened the Configure Window Behavior menu. This video[26] contains a tour of some of the most popular desktop effects.
By default, effects are turned on, and if your video card supports it, compositing will be enabled. If so, spend some time in the All Effects tab to see which effects appeal to you. To try out an effect, check its box. Each effect includes
a wrench icon, which lets you change its configuration or return it to its default configuration.
an informational icon, which provides a brief description of the effect and contact information for the person who created the effect.
Note
Some video cards do not support desktop effects. If compositing is disabled and Resume Compositing fails, or if you receive an error message when you press Apply to try out an effect, you'll need to do some homework to see if your video card can be configured to work with desktop effects. See Chapter 11 to learn how to get help from the PC-BSD community.
If you know the name of the effect you would like to enable, type its name into the search bar on the All Effects tab to quickly find that effect. Some popular desktop effects include
- Present Windows:
Provides an overview of your open windows. Once you have enabled this effect, you can arrange all of your open windows side-by-side by pressing the top-left corner of the workspace with your mouse or by pressing Ctrl+F9. Ctrl+F10 will show the windows from all virtual desktops.
- Desktop Cube Animation:
Each virtual desktop is a side of a cube that can be rotated to select and switch to a virtual desktop.
- Desktop Grid:
Displays all of your virtual desktops or workspaces in a grid so you can easily drag windows between virtual desktops or select a virtual desktop. Once this effect is activated, Ctrl+F8 shows the grid. The desktop grid also supports animations.
- Taskbar Thumbnails:
Enables live previews of minimized windows when you move the mouse over an entry in the taskbar.
- Translucency:
Allows you to see the contents of a window even if another window is covering it. This effect supports several configuration settings, such as making drop-down menus translucent.
There are many ways to add animation to window events such as minimizing, closing, or moving. Try Explosion, Wobbly Windows, Fall Apart, and Magic Lamp.
This section allows you to configure the look and feel of window titles. It contains two tabs:
- Window Decoration:
The appearance of a window's title bar is controlled by a theme. The default theme is Nitrogen. If you click on this word, you'll see a list of other themes. If you select a theme, the bottom of the screen will show you a preview of what the title bar will look like. If you then click Apply, you'll notice that all of the title bars in any open windows will change to the new theme. Depending upon the theme, there will be several settings that you can change. These include the window title border size, where in the title the window's name appears, and whether you want stripes on either side of the window title.
- Buttons:
This tab allows you to customize the positions of the window title buttons. You can drag and drop to change the order of the buttons and press Apply to try out the new button positions.
This section contains two tabs:
- Titlebar Actions:
This tab allows you to configure what happens when you double-click the title bar (the default is to maximize the window) or roll the mouse wheel over the title. You can also configure your mouse buttons to raise or lower active and inactive windows.
- Window Actions:
This tab allows you to configure how you bring an inactive window into focus with your mouse buttons. You can also configure a modifier key, such as Alt or Ctrl, to work with your mouse buttons to configure an action such as raise or resize the window.
Tip
While you can have many windows open on your workspace, only one window is considered active or "in focus," meaning it will accept input. When you click on an inactive window, it comes into focus and becomes the active window. Watch the title bar of your windows—depending upon your theme, the title bar of the active window will look slightly different from the inactive windows.
This section allows you to configure a delay when you activate a window and provides some controls for window switching on multiple virtual desktops.
This section provides the following options for when you move a window:
It also allows you to set the size of the snap zone.
This section allows you to do the following:
- Enable hover:
When you shade a window (by choosing that option after right-clicking the title bar) the window disappears and you only see the title bar until you un-shade it. If you enable hover before shading a window, the window will reappear if you hover your mouse near the title bar.
- Placement:
Indicates where a window will be placed when it is started. The default Smart option will try to start the window in a section of the workspace not occupied by another window.
If you right-click your workspace and select Folder View Settings, you will see a menu similar to Figure 3-16.

The Appearance portion of this menu allows you to set the following:
- Desktop Type:
The default type is Folder View, meaning that your desktop will look like a traditional desktop, with the contents of your Desktop directory showing as icons on your workspace. If you change to Desktop view, the icons will disappear. This setting will affect all of your virtual desktops.
- Theme:
Several themes are already installed for you. You can select a different theme from the drop-down menu. Desktop themes affect the look of panels and folders and provide a preview of their look. If you click on the New Theme button, it will open a window where you can browse and search through plasma themes at
kde-look.org.- Wallpaper Type:
KDE4 supports different types of wallpapers. Each option will show you a preview of the current selection. The configuration options that appear depend upon the type of wallpaper you select:
Color: When selected, click on the Color bar that appears to select the color. To create a custom color, click on a colored area in the left-hand square and it will show up in the little square next to its HTML value. If you like that color, click on Add to Custom Colors. You can also click on the eyedropper icon, then click on a color from another window, and save that selection as a custom color.
Virus: When selected, it will let you browse for an image and set an update interval and maximum number of viruses. Once you Apply, the wallpaper will change to your picture and the viruses will slowly eat it over time.
Mandelbrot: Allows you to select three colors and the mandelbrot quality.
Weather: This type of wallpaper gives you a view of the local weather anywhere in the US, UK, and Canada. Select the provider, type in a city, and click Search to receive a list of matching cities. Once you apply, your desktop should change to a picture representing the current weather conditions. If it doesn't, try another city.
Pattern: Allows you to select from several patterns and to customize the foreground and background colors.
Image: Allows you to browse for an image, and choose its position and a border color. Note that the border only shows in certain positions.
Slideshow: Lets you select a directory of images and configure how often the images change.
Globe: Lets you choose from several map themes, the type and quality of map, and the type of rotation.
Several of the wallpaper types provide a Get New Wallpapers button to allow you to browse through kde-look.org's wallpapers. If you install a wallpaper, it will be added to the drop-down selection menu for that type of wallpaper.
As you have seen throughout this chapter, KDE is a highly customizable desktop environment with many features. While KDE is the default PC-BSD desktop, it is not the only desktop that was installed for you.
There are several reasons for switching desktop environments:
KDE is resource-intensive and may run too slowly on older computer hardware.
Some users don't like all of the bells and whistles provided by KDE and prefer a simpler desktop.
Some users are curious or want to switch desktops "just because they can."
You will need to logout in order to switch your desktop. Click Kickoff
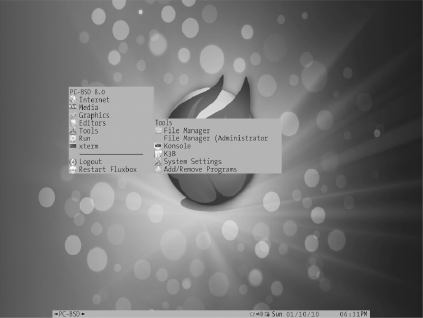
Fluxbox[27] is a light-weight desktop that is well suited to older hardware or users who prefer a desktop with less eye-candy than KDE. Select Fluxbox from the session type menu, then input your username and password to login. Figure 3-17 shows a default fluxbox session. Right-clicking the workspace produced the application launcher menu seen in the center of this figure.
The fluxbox taskbar contains fewer icons than the KDE taskbar, but it still provides access to Kmixer, Klipper, and the PC-BSD system updater tool. Most of the applications available from a KDE session should also work in fluxbox, though you will have to manually start them from the command line if they are not listed in the application menu.
Tip
If you need to switch your keyboard layout in fluxbox to support your alphabet, see http://fluxbox-wiki.org/index.php?title=Switch_Keyboard_layout.
If you'd like to try a desktop with absolutely no bells and whistles, select TWM[28] from the session type menu.
Tip
Unless you select another option in the session type menu when you login, PC-BSD will automatically start your last desktop environment.
Figure 3-18 shows a TWM session.
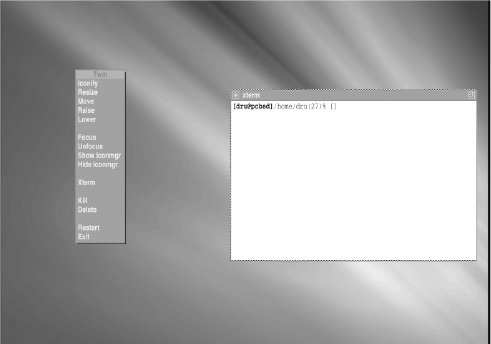
When you first start TWM, all you will see is your wallpaper. Click on the desktop and hold down your mouse to see the green rectangular application launcher menu. If you drag your mouse down to Xterm, it will start a command prompt for you, but it expects you to drag the new window to the desired location. In other words, you'll see what looks like a grid, which will only turn into the white command window after you drag it to a location. As you can see from the limited choices in the application launcher menu, TWM is designed for the person who likes to type commands.
Open source is known for providing many choices. Some users prefer the GNOME[29] (pronounced gi-nome) desktop environment. GNOME provides many of the same features as KDE, but uses a different layout. Like KDE, GNOME is an open source project with a large community of users. Many Linux desktops use GNOME instead of KDE.
While PC-BSD doesn't install GNOME for you, it is easy to install and try out GNOME on your PC-BSD computer. To install GNOME, make sure you are connected to the Internet. Click on the Software Manager icon on the Desktop or open Software Manager from Kickoff
Tip
Software Manager is discussed in detail in Chapter 8.
Type the word gnome into the Search bar, and you should receive search results similar to Figure 3-19. Note that the size of this PBI is large; like KDE, GNOME is a very feature-rich desktop.

Click the download icon, then OK to the pop-up message that asks if you want to install GNOME. The status of your download will show in the Installed Software tab. When the download is complete, the installation of the GNOME PBI will start. Click Next through each of the installation screens to complete the install (the meaning of each installation screen is detailed in Chapter 8). Due to its size, it will take several minutes for the installation to complete.
Figure 3-20 shows the informational message you receive after GNOME is finished installing, indicating that you need to logout of your KDE session to start using GNOME.

To logout of your session, click Kickoff

GNOME provides two taskbar panels, one at the bottom and one at the top of the screen. The application launcher is located next to the GNOME foot in the upper left-hand corner. Like KDE, GNOME provides its own set of applications, meaning the Application menu will differ significantly from Kickoff's application menu.
This book does not cover how to use or customize the GNOME desktop. We recommend that interested readers refer to the GNOME User Guide.[30]
There are literally hundreds of open source desktop managers. Xwinman.org provides a list of the more popular desktops, including their descriptions and screenshots.
As of this writing, PC-BSD provides PBIs for the Enlightenment, KDE3, GNOME, and XFCE desktops. The x11-wm category of the FreeBSD ports collection provides nearly 150 desktops. Refer to Chapters 8 through 10 for detailed instructions on installing PBIs and software from the FreeBSD ports collection.
Note
While you can install and run other desktop environments on your PC-BSD system, PC-BSD is optimized for KDE4. Most other desktops will not provide icons for PC-BSD specific graphical utilities, meaning you will have to access these utilities from the command line. Installing an alternate desktop from the FreeBSD ports collection is an exercise best left to power users or users who are experimenting on a test computer or within a virtual environment.
This chapter has introduced you to the components of the KDE4 desktop and how you can customize these components. It has also described alternative desktop environments for those users who would like to try non-KDE4 desktops.
In the next chapter, we'll learn how to launch applications using Kickoff as well as how to customize Kickoff's menus.
[23] http://www.kde.org
[24] http://www.kde.org/announcements/4.0/guide.php
[25] PBI is short for Push Button Installer.
[26] http://video.google.com/videoplay?docid=344124698954082445#
[27] http://www.fluxbox.org/
[28] http://xwinman.org/vtwm.php
[29] See http://gnome.org
[30] http://library.gnome.org/users/user-guide/2.26/