Chapter 5 discussed some of the software that is available to perform common tasks using your PC-BSD system. Part 3 of this book will show you all the ways you can find, install, and manage software. This chapter covers the Push Button Installer (PBI) system.
PBI is the name of the software management system that is unique to PC-BSD. An application that you can install using this software management system is also called a PBI. For example, you might see references to someone installing the Firefox PBI. If you ever come across a file with a .pbi extension, it is an application that can be installed using the PBI software manager.
As you go through Part 3 of this book, you'll discover that there are many different ways to install software on your PC-BSD system. Whenever possible, you should use the PBI system because it provides the following advantages:
PBI software is easy to install. You simply find the application in Software Manager and click it to install.
PBI software is easy to uninstall using Software Manager.
Software Manager will tell you when newer versions of your installed applications become available and it will allow you to easily upgrade to the new versions.
PBI software has been pretested to run on PC-BSD, meaning it should "just work."
Software Manager ensures that no other applications are affected when you install or uninstall PBI software. This means that you won't accidentally overwrite or delete libraries or dependencies needed by the operating system or other applications.
The rest of this chapter demonstrates how to use Software Manager to manage PBIs.
To access the PBI system, simply double-click the Software Manager icon on the default Desktop.
Tip
You can also find Software Manager in Kickoff
When starting Software Manager, you will be prompted for the superuser password because only the administrative account can install software. You also need to be connected to the Internet because Software Manager will attempt to connect to the PC-BSD software repository at pbidir.com. Figure 8-1 shows a screenshot of Software Manager.

If the connection to pbidir.com is successful, you will see the available software categories loaded in the Software Browser tab.
Software Manager contains the following tabs:
- Software Browser:
Allows you to browse for PBIs. Using its built-in search feature is discussed in the following section, "Installing a PBI."
- Installed Software:
Shows you which PBIs are already installed, and allows you to update or remove installed PBIs.
- System Updates:
Allows you to check for, review, and install operating system updates. They are discussed in more detail in the "Update Manager" section later on in this chapter.
Software Manager also provides a Configuration button that contains the following tabs:
- Mirrors:
Specifies which PBI server on the Internet to connect to. You can also specify a custom mirror if you have created your own web server to host PBIs.
- Software:
Allows you to keep a copy of downloaded PBIs after installation. This is discussed further in the section titled "Installing from Another PC-BSD System."
- System:
Allows you to automatically install available updates.
- Misc:
Allows you to specify an alternate temporary directory to store downloaded PBIs.
The next section will demonstrate how to install a PBI using Software Manager.
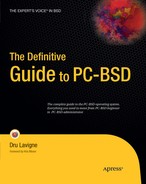
The Software Browser tab of Software Manager can be used to browse for and install PBIs. In the example seen in Figure 8-2, the user has entered a search phrase of firefox, and the search results show that there are two Firefox PBIs available.
If you don't know the name of the application you want to install or want to get an idea of which PBIs are available, you can instead click a software category. In the example shown in Figure 8-3, the user clicked the left arrow to return to the software categories screen. The user then clicked the Web Browsers category to see which web browsers were available.

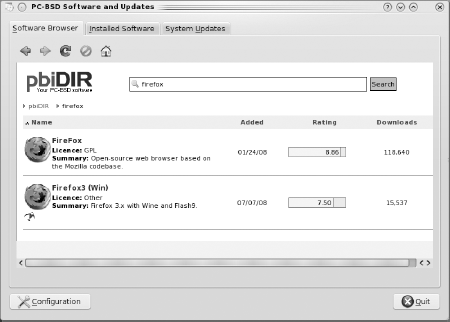
If the user clicks an application, they will see more information. Figure 8-4 shows the information for the Opera web browser.
Each PBI contains a description, the name of the organization (vendor) that creates the software, its rating among PBI users, the number of downloads since the PBI became available, the date the PBI was added to the repository, the license the software is released under, the e-mail address of the person who created the PBI, and the version number of the PBI. If you want to install the software, click either the DOWNLOAD hyperlink or the download icon that contains the green arrow.
Tip
PBIs tend to be large because they contain everything needed to run the application. If you have several PC-BSD systems in your network, consider downloading the PBIs you need to a shared folder on one system. Instructions on how to do so are in the section called "Installing from Another PC-BSD System" later in this chapter.
When you click to install the application, a pop-up message will ask if you want to install the selected PBI. Click OK and the Installed Software tab will open, showing the progress of the installation. Figure 8-5 shows that the gtkpod PBI is currently downloading.

Tip
Should the Internet connection fail during the download, the message in the Installed Software tab will change to "Download failed! Please try again later." When you regain your Internet connection, right-click the message and select Retry Download to resume the installation. The message will remain until either the installation is complete or you use the Remove button to remove it.
Once the download is complete, the installer will begin, as seen in Figure 8-6.

Click Next to continue. The installer will tell you where the application will be installed, how much disk space it requires, and how much space is available, as seen in Figure 8-7.

Figure 8-7. PBI installer showing amount of disk space needed and available for application installation
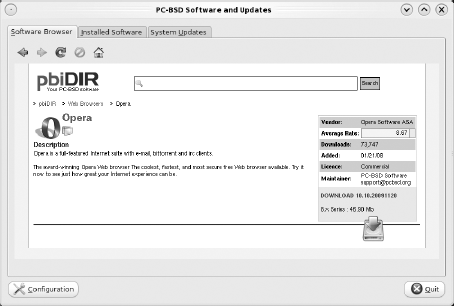
Click Next to start the installation. A progress meter will display while it is installing. When finished, the PBI will indicate its location in the Kickoff menu, as seen in Figure 8-8, and then will provide you with an installation complete message, as seen in Figure 8-9. The default is to start the application when the installer exits.

gtkpod, along with its version number, will now show in the Installed Software tab of Software Manager.
During the installation, you were asked if you wanted to install any software from the installation DVD. If you didn't install then, but want to now, simply insert the DVD and wait until Device Notifier pops up with the label of the DVD. You can then access the contents of the DVD from Dolphin.
While in Dolphin, click the DVD's label name in the Places panel. You will find the applications that came with the DVD in the extras
By default, Software Manager will download and install PBIs without permanently saving a copy of the downloaded PBI. If you want to save a copy of the PBI so it is available to other PC-BSD systems in your network, you will need to change this default. You can do so by clicking the Configuration button in Software Manager and then clicking the Software tab, as seen in Figure 8-10.

Check the box Keep downloaded software in Temporary Directory. The location of that directory is in the Misc tab and by default is set to /usr/local/tmp. If you change this default directory to a folder in your home directory, you can easily share your PBIs with other PC-BSD users in your network. In the Misc tab, click the folder icon next to the Temporary file directory to browse to a folder you want to share.
In Figure 8-11, I highlighted dru's home directory and then clicked the New Folder button to create a new folder called software. Once I click OK, /home/dru/software will show as the new temporary file directory.

To share this directory so it is accessible to other PC-BSD computers in the network, open up Dolphin. Click Home in the Places panel; then highlight the software folder. Right-click and select Properties from the menu. Click the share tab and then the Configure File Sharing button. You will be prompted for the administrative password, and then you will see the menu shown in Figure 8-12.
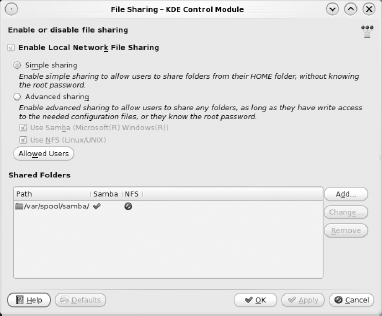
Because the folder you want to share is in your home directory, you can keep the default of Simple sharing. Click the Add button to open the Share Folder screen seen in Figure 8-13. You can then browse to the folder you want to share (in this example, /home/dru/software).
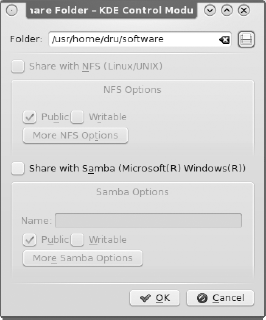
Once the folder is selected, check the box to Share with Samba (Microsoft(R) Windows(R)). This will add the Name of the folder—it will be capitalized, and if the original name was greater than eight characters, it will be reduced to eight characters. This will allow the folder to be shared with any computer that understands Samba. You should leave the Writable box unchecked unless you want other computers to be able to add files to this folder. When finished, press OK, and your folder will show in the Shared Folders list.
You can check that your changes worked from Dolphin. Click Network in Places and then Samba Shares
Tip
We have demonstrated sharing a folder so other PC-BSD users can access your downloaded PBIs. You can use the folder-sharing instructions to share the contents of any folder. Your shared folder should be accessible to any computer running PC-BSD or any version of Microsoft.
If you already have a copy of a downloaded PBI saved in the temporary directory, you can install it directly from Dolphin without downloading it all over again within Software Manager. You might run across this situation if you install a PBI, remove it, and then decide you want to install it again.
Open up your PBI temporary directory in Dolphin, right-click the PBI, and select Open with PBI Launcher from the menu. After typing the administrative password, the PBI installation will proceed as usual.
To uninstall a PBI, highlight it in the Installed Software tab and either right-click and select Uninstall or click the Remove button. You will receive a warning asking if you want to remove this application. Once you press Yes, the application will be uninstalled, removed from the Installed Software tab, and removed from its location in the Kickoff menu. Its entire directory will be removed from /Programs. If the application stored data in your home directory, it might ask if you want to remove it when the application is uninstalled.
The Installed Software manager tab in Software Manager can be used to update PBIs whenever a newer version becomes available. The Status section will indicate which versions are available. Figure 8-14 indicates that this system can upgrade from Firefox version 3.5.5 to version 3.5.6.
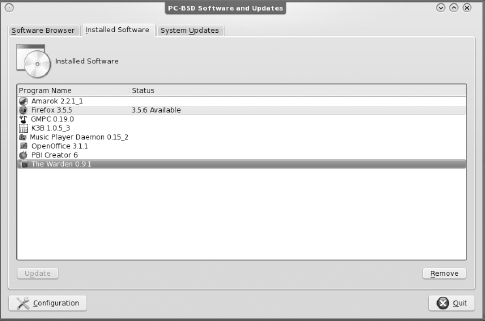
If an update is available, simply highlight the PBI you want to update and click the Update button. It will uninstall the old PBI for you and then download and install the newer version. When finished, the new version number will show in the Program Name.
Tip
If you ever accidentally remove the desktop icon for an installed PBI, right-click the application in the Installed Software tab of Software Manager. Click Install Desktop Icons, and it will re-add the icon to your desktop.
Update Manager is used to notify you when newer versions of PBIs become available and when patches are available for your operating system. The system tray includes an icon for Update Manager. When your PBIs and operating system are up-to-date, the icon for Update Manager appears as a green shield with a white checkmark. If updates are available, the icon changes to a red shield with a white X.
If you right-click the Update Manager icon in the system tray, you can do the following:
- Start the Update Manager:
Launches Software Manager. You can then use the Installed Applications tab to update any PBIs whose status shows that there is a newer version available and use the System Updates tab to update the operating system, as discussed in this section.
- Check for updates:
Causes the icon to change to a green circular arrow as it connects to the PC-BSD update server to see whether any updates are available. When finished, a pop-up menu will indicate if your system is completely up-to-date or if updates are available.
- Run at startup:
If checked, Update Manager will automatically check for updates whenever you start KDE. If unchecked, you can manually check whenever you want by clicking Check for updates.
- Quit:
This will remove Update Manager from the system tray. You can still manually start Update Manager from Kickoff

The System Updates tab of Software Manager is used to install operating system patches. Figure 8-15 shows that the SSL Security Update is available for a PC-BSD system.
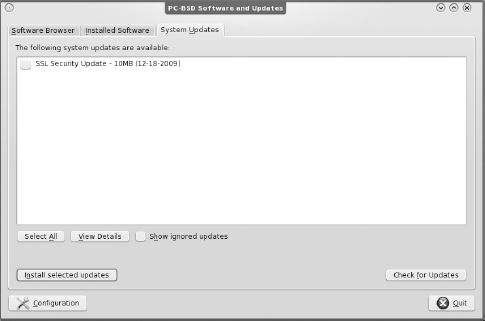
If you highlight the entry, the View Details button will explain the reason for the update. An example of an older update is seen in Figure 8-16.

To apply the update, check the box next to it or click the Select All button to apply all security updates. A progress bar, seen in Figure 8-17, will show you which update is currently being downloaded or applied.

Some updates will require the system to reboot, and Update Manager will present a pop-up message to remind you to reboot for those changes to take effect. Update Manager will not automatically reboot for you. This means that you can continue to do other things with your computer while the system is being updated, without worrying about losing the data you are currently working on.
We mentioned at the beginning of this chapter that the PBI software management system is the best way to install applications on your PC-BSD system. While the PBI system offers many of the most popular software applications, not every application will have a PBI. If you can't find a PBI of your favorite application, you have a few choices available to you:
Install its FreeBSD package, as described in Chapter 9.
Install its FreeBSD port, as described in Chapter 10.
Ask that someone within the PC-BSD community create the PBI. Chapter 11 discusses how to ask for help within the community.
Create the PBI yourself. How to do this is demonstrated in Chapter 12.
This chapter introduced you to PC-BSD's PBI system. Its Software Manager makes it easy to find, install, remove, and update software. The next two chapters will introduce you to FreeBSD's packages and ports collections. Both of these collections allow you to access a much larger collection of software, but also require a bit more knowledge on your part.