
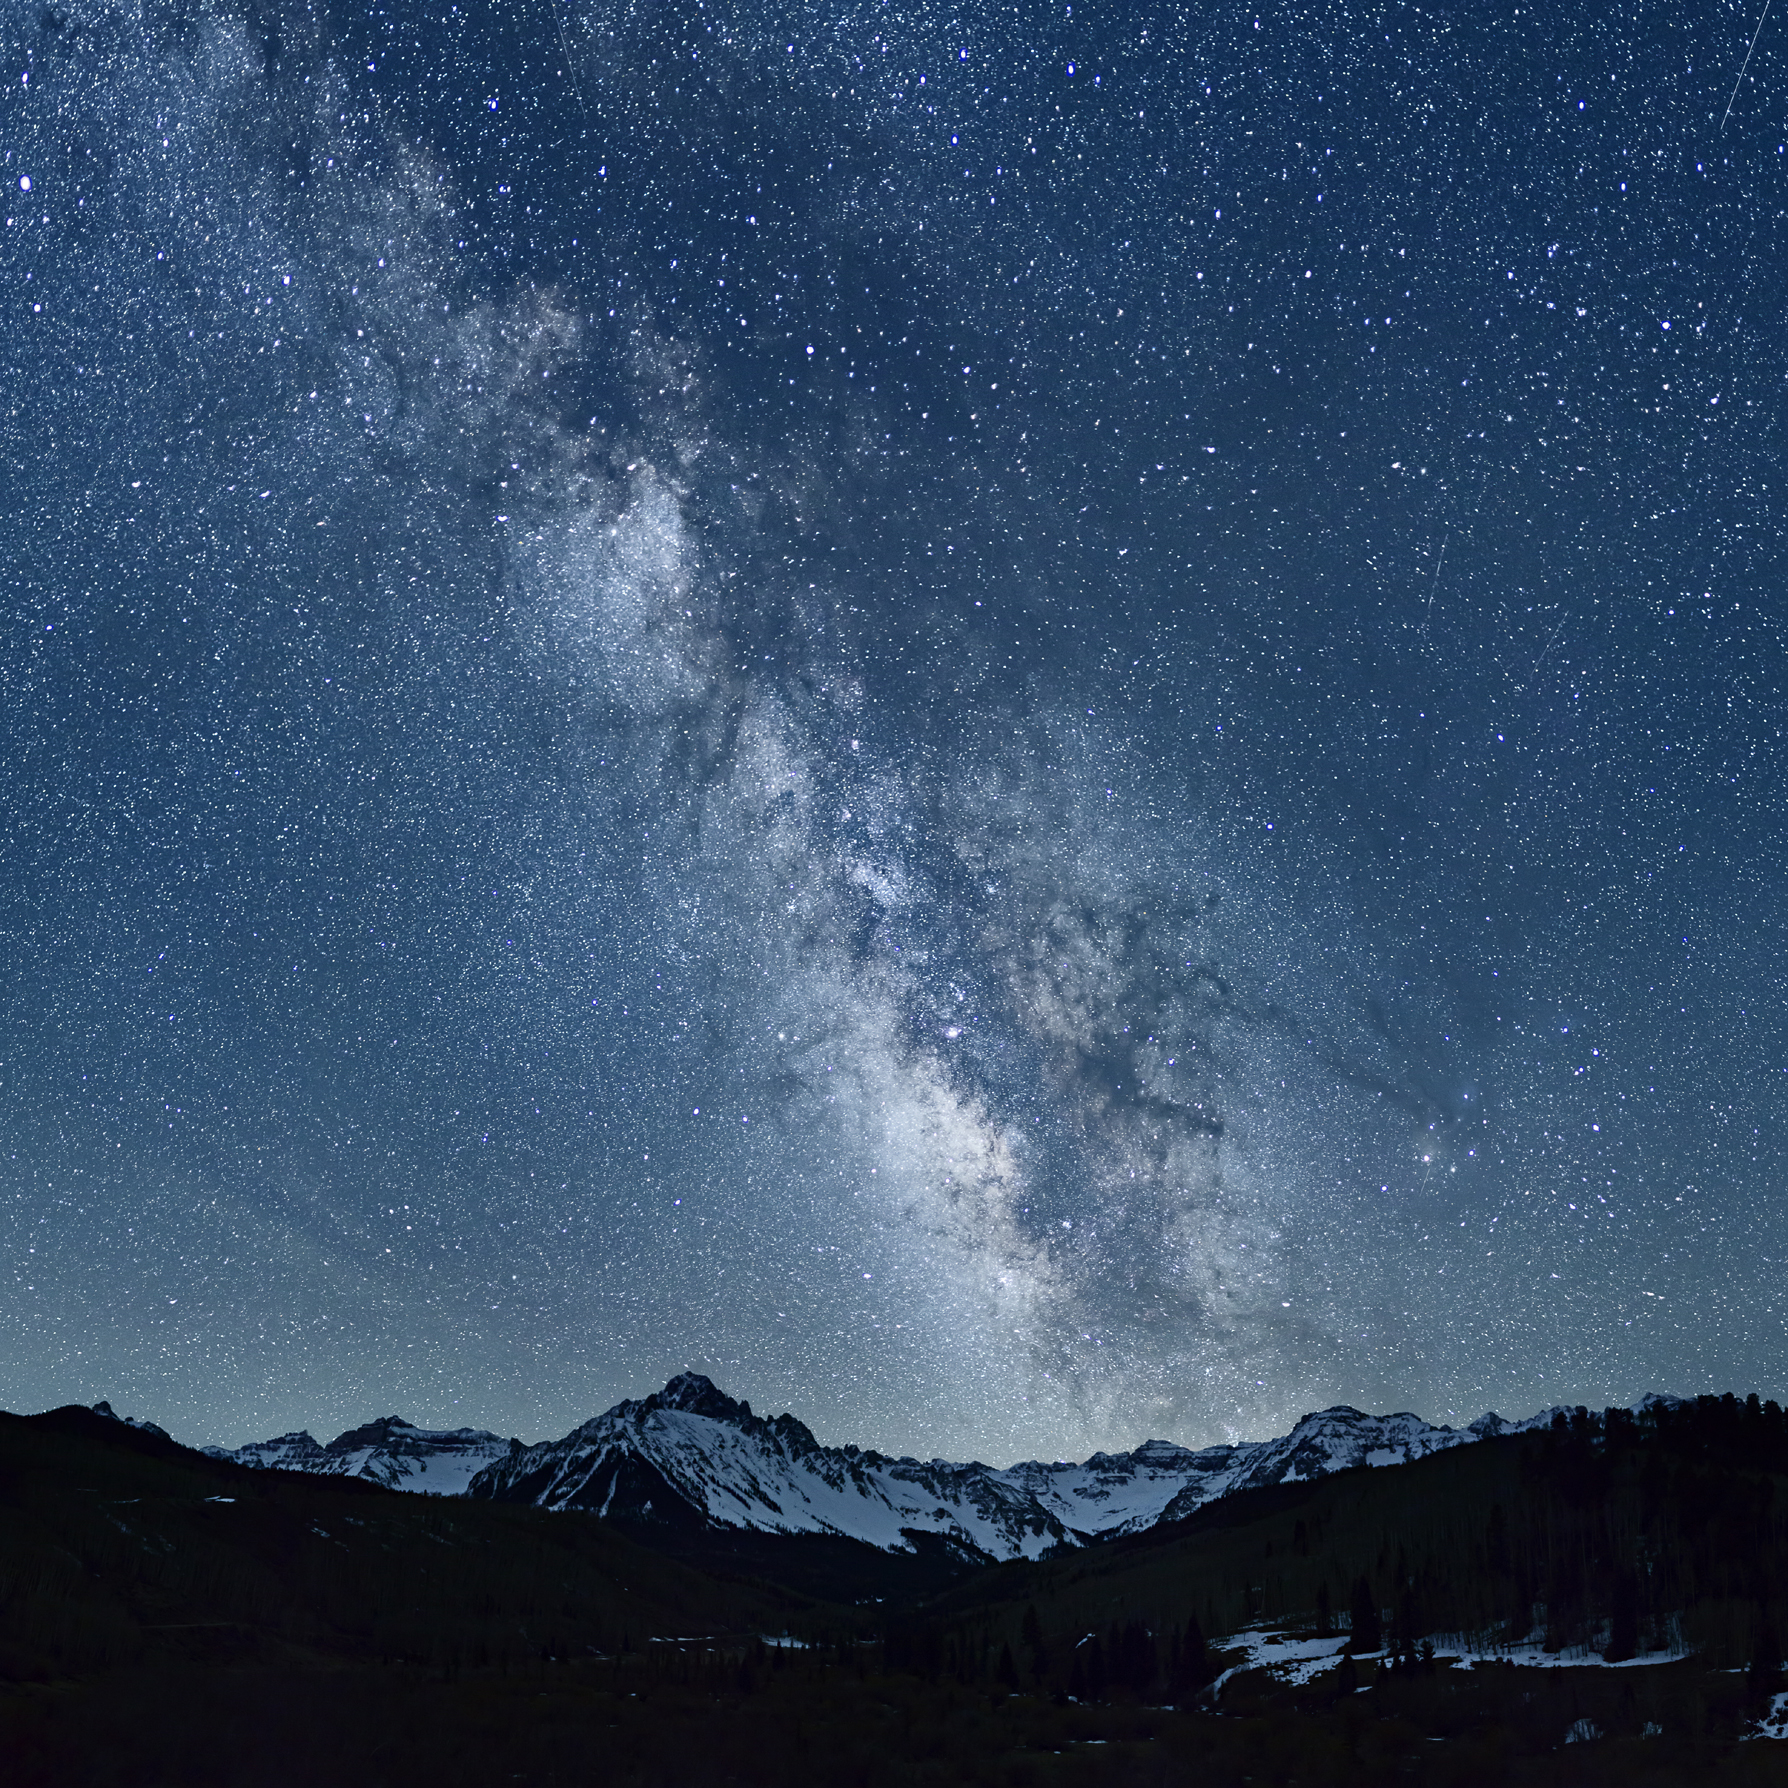
FIGURE 9-1 Milky Way over Mt. Sneffels, Mount Sneffels Wilderness, Colorado
9 The Landscape at Night
Today’s high-end DSLRs have made it possible to make landscape photographs at night that were simply impossible in the film era. Film lacked the sensitivity to record the night sky as we see it, with apparently stationary stars. Exposures on even the fastest (most sensitive) film were usually so long that the stars made visible streaks as the earth rotated, rather than being rendered as points of light. True, some photographers used tracking devices to counteract the earth’s rotation, but these were specialized tools not widely used by most shooters. The sensors in today’s best DSLRs, by contrast, are so sensitive at their highest ISOs that photographers can capture the night sky using exposures short enough to record the stars as pinpricks of light. In short, we can now use readily available equipment to make photographs that capture some of that sense of wonder we all felt as children gazing up at the star-filled night sky.
Photographing the Milky Way
Of all the wonders of the night sky, the most spectacular subject for photographers who lack a telescope is surely the Milky Way. The only hardware required is a sturdy tripod, a DSLR with good high-ISO capabilities, and a wide-angle lens—the faster the better. This chapter will provide the other key ingredient: the information you need to make your own spectacular photos of the Milky Way.
Let’s start with a refresher on your college astronomy class. We live in the Milky Way Galaxy, which is shaped like a plate, not a sphere. Our solar system lies part way between the center and the rim. The Milky Way is the band of light formed by billions of very distant stars that you see as you look along the galactic plane. You can see the Milky Way every clear, moonless night of the year, but it’s not equally bright in all directions. If you look away from the center of the galaxy, you are looking through a region with relatively few stars. If you look toward the center of the galaxy, however, your line of sight leads past many more stars, plus clouds of interstellar gas and dust, so the Milky Way is much brighter and has more interesting structure.
The center of our galaxy, the most photogenic part of the Milky Way, lies in the direction of the constellation Sagittarius. Like any celestial object, Sagittarius appears to rise and set as the earth rotates. Sagittarius always rises at an azimuth of 125 degrees and sets at an azimuth of 236 degrees at the latitude of Denver, but the time of rising and setting varies throughout the year. Sagittarius is most prominent in late spring, summer, and early fall (roughly April 1st to October 15th), and is not visible in winter because it is only above the horizon during the day.
Even the brightest part of the Milky Way is relatively dim. Get as far away from city lights as possible, and shoot on a clear, moonless night when the sky is as dark as it will get. That means shooting during the interval between astronomical dusk and astronomical dawn, when the sun is more than 18 degrees below the horizon. There are many websites and phone apps that provide moonrise and moonset times and the times of astronomical dusk and dawn.
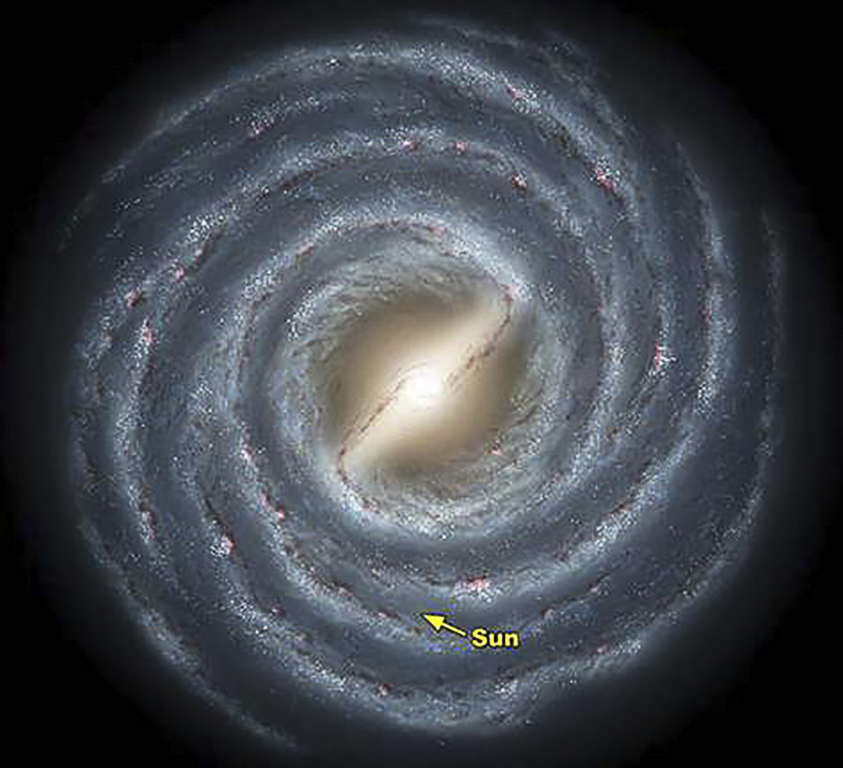
FIGURE 9-2 An artist’s conception of the Milky Way Galaxy, viewed from above. Image courtesy of NASA.
The sky is always brightest near the horizon. It gets darker as you look higher into the sky. That’s true at night as well as during the day. To make the best part of the Milky Way stand out against a dark sky, shoot when Sagittarius is as high in the sky as possible. Sagittarius reaches its highest elevation above the horizon, an altitude of 24 degrees as seen from the latitude of Colorado, when it is due south. As with any landscape, the best Milky Way photographs include more than sky. When planning your shoot, think about compositions in which you are looking roughly south at something interesting. Arches, sandstone towers, and dramatic peaks make good land elements. You don’t need to worry much about foregrounds; the depth of field is so shallow at the wide-open aperture you’ll be using that you won’t want anything in the frame closer than about 15 feet, even with a 16mm lens. See the table below for the depth of field of selected lenses focused at infinity.
Depth of Field for Selected Lenses Focused at Infinity

To nail down the position of Sagittarius more precisely, download a desktop astronomy program. Skygazer (my current favorite), Stellarium, and Starry Night are three of the top contenders today. There may be others by the time you read this. The best of these programs can pinpoint the position of Sagittarius at a particular time on any particular night, anywhere in the world. They can also show you the angle the Milky Way makes with the horizon, which varies depending on the time of night and the season of the year. For example, in the Northern Hemisphere, the Milky Way arcs up and left when Sagittarius transits. Transit is the time when the constellation is due south and as high in the sky as it will get, which is normally a good time to shoot. You’ll generally want to position your most important land element—the mountain, tower, or arch—in the bottom-left part of the frame so that the Milky Way arcs up and over it. Like all constellations, Sagittarius is large in an angular sense. The brightest gas clouds in the Milky Way are actually about 10 degrees to the right of the position that Skygazer reports for Sagittarius. You’ll need to take this into account if you want to position the Milky Way precisely, as I usually do. (Hey, my dad was a civil engineer—couldn’t you tell?)
Focusing and Composing at Night
Once you arrive at your chosen location, you face the next challenge: focusing at night. Auto-focus is useless; turn it off completely so you don’t accidentally trigger it. Nor can you simply set the lens to the infinity mark. That’s usually not sharp enough either. Most modern lenses rotate past the infinity mark to allow you to focus at infinity even in extremely hot or cold conditions, so you can’t just turn the lens barrel until it reaches its physical limit. Instead, point the camera toward a bright star, set the lens to infinity to get close to proper focus, engage live view, magnify the view to 10×, and focus manually on the star. You may need to disable exposure simulation in your live-view menu to actually see a star. If you arrive at your shooting location before dark, use live view to focus on something at infinity during daylight hours. In either case, be sure to tape the lens to lock-in infinity focus, then check focus again by shooting a test frame. Include a bit of the skyline when testing at night. It’s often easier to check the sharpness of the skyline than the sharpness of a star.
Once you’re confident you’re focused at infinity, you can compose your shot. It’s easier to compose if you first let your eyes adapt to the dark. I use the red LEDs on my headlamp when working at night to preserve my night vision as much as possible. Even better is to use no light at all by learning how to find the appropriate buttons on your camera by touch. Composition is largely a matter of guess-and-check, since you probably won’t be able to see the Milky Way clearly through the viewfinder, although you may be able to distinguish horizon from sky. Level the camera left-to-right with a hotshoe level or your in-camera level (if you have one), point it in approximately the right direction, and shoot a test frame. Adjust as needed and try again.
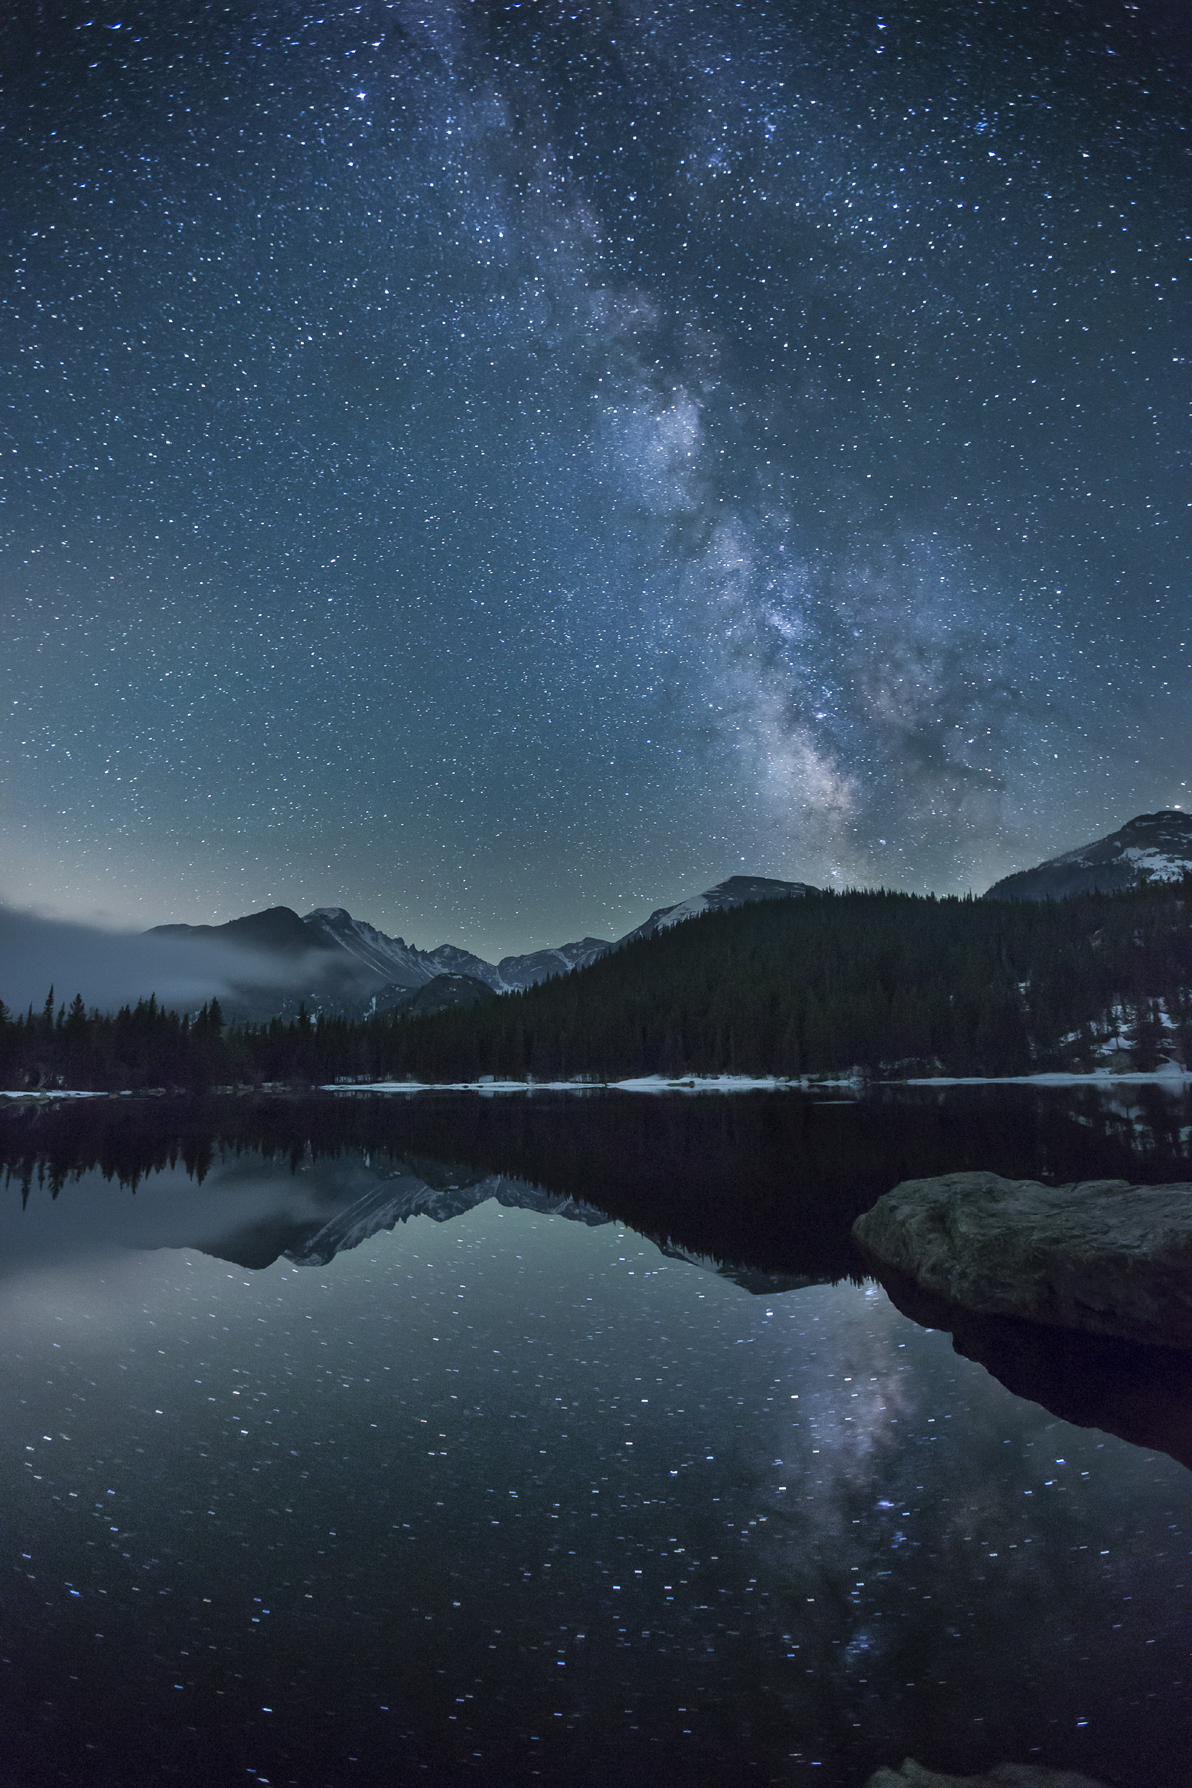
FIGURE 9-3 The Milky Way and Longs Peak reflected in Bear Lake, Rocky Mountain National Park, Colorado. I shot two frames with a 16mm lens at f/2.8, ISO 6400, and merged them with the modified Rembrandt Solution. I exposed the sky frame for 30 seconds and the land frame for 90 seconds.
A good starting-point exposure for the Milky Way on a moonless night is 30 seconds, f/2.8, ISO 6400. But here’s the catch: you need a 16mm lens on a full-frame camera to use such a long exposure without the stars forming streaks due to the rotation of the earth. The shorter the focal length, the longer the exposure you can use before the stars move noticeably. Refer to the maximum shutter speed chart (next page) to determine the longest non-streaking exposure you can use with different focal-length lenses. If you don’t have this chart with you, you can divide 500 by the focal length of your lens to determine the longest acceptable shutter speed. For example, if you’re using a 20mm lens, your longest non-streaking exposure according to the 500 rule would be 25 seconds.

FIGURE 9-4 The Milky Way over the Maroon Bells, Maroon Bells-Snowmass Wilderness, Colorado. I shot two frames with a 24mm lens at f/1.4, ISO 6400, and merged them with the modified Rembrandt Solution. I exposed the sky frame for 20 seconds and the land frame for 80 seconds.
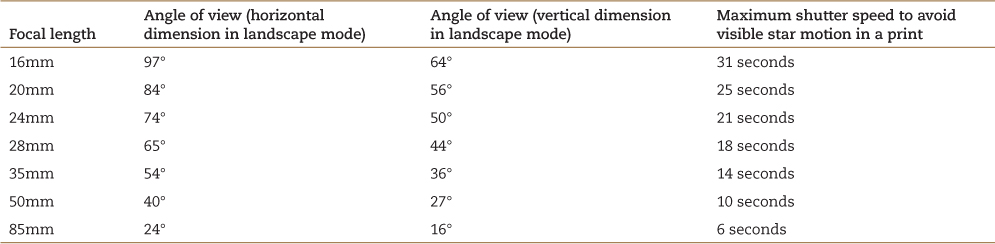
Maximum Shutter Speed Chart
This chart lists the longest shutter speed you can use with different focal-length lenses before the stars make noticeable streaks. The chart assumes you are using a full-frame camera with a sensor the size of a 35mm slide. If you are using a camera with a “sub-full-frame” or APS-C sensor, multiply the focal length printed on the lens by the appropriate crop factor or multiplication factor, then use the result as the focal length for the purpose of this chart. For example, if you are using a 16mm lens on a camera with a 1.5 crop factor, multiply 16 by 1.5 to get 24. The longest exposure you can make with that lens without visible star motion is 21 seconds. Note that this chart assumes you are viewing a print made at normal resolution for a high-quality print (file resolution of 240 to 300 ppi). If you zoom in to 100 percent on your monitor, you will see some very short star trails.
Holding Detail in the Land
You’ll find that with today’s cameras, capturing the Milky Way by itself is relatively easy. Creating a compelling landscape photograph with detail in the land (rather than letting the land fall into black silhouette) is much more difficult. At high ISOs, even with today’s best cameras, it’s very difficult to open up deep shadows without generating unacceptable noise and peculiar color shifts. If there’s lots of snow on the ground, you can get minimal detail in the land from starlight. To obtain more detail, shoot as long as 20 minutes before astronomical dusk or 20 minutes after astronomical dawn. The full moon will provide great detail in the land but it will wash out the Milky Way. A good compromise is to shoot when the moon is 15 to 30 percent illuminated and lighting the scene from the side. Avoid backlighting. Shooting by moonlight and shooting before astronomical dusk and after astronomical dawn create a tradeoff: brighter land means a dimmer Milky Way and vice-versa. You can try shooting at ISOs above 6400 if your camera offers them, but the noise may be intolerable. The image on your LCD will probably give you a false impression of how much land detail you’ve actually captured. Go into your menus and turn down the LCD’s brightness, and be sure to check your histogram.

FIGURE 9-5 Looking south at the Collegiate Peaks and the Milky Way from the summit of Missouri Mountain, Collegiate Peaks Wilderness, San Isabel National Forest, Colorado. One frame, 17mm lens, 30 seconds, f/2.8, ISO 6400, shot eight minutes after astronomical dawn.
Another approach to holding detail in the land is to throw money at the problem. Let me explain. The brightness of the image you can make at night in a single exposure before the stars make visible streaks depends on three factors: the highest ISO you can use without generating unacceptable noise; the focal length of the lens (the shorter the focal length, the wider the angle of view and the longer you can leave the shutter open); and the maximum aperture of the lens. The camera you use determines the first factor, but the last two are determined by the lens. Currently, the lens with the best combination of short focal length and large maximum aperture is a 24mm f/1.4. Expensive (but top-quality) versions of this lens are available from Canon and Nikon.
A 21-second exposure with a 24mm f/1.4 lens, shot wide open, will give you the best possible detail in the land without visibly streaking stars. If the land is composed of rock and snow, you should be able to get all the detail you need in a single exposure. If the land contains large areas of evergreen forests, which suck up light like black velvet, you’ll probably want to turn to a modified version of the Rembrandt Solution even when using the best available lens.
As with the daylight version of the Rembrandt Solution, the basic idea is to shoot one frame for the highlights and one frame for the shadows, then combine the two images in Photoshop. At night, the idea is to shoot a frame with a shutter speed long enough to record detail in the land, ignoring the resulting star trails, then combine the correctly exposed land image with a correctly exposed sky image, taken with a short-enough exposure that the stars are sharp. Unfortunately, the standard version of the Rembrandt Solution allows star streaks from the good-shadow image to bleed through the sharp stars in the good-highlight image. Here’s how to solve that problem.
Start the same way you’d do for the regular Rembrandt Solution, by stacking the two images as layers in Photoshop. One more time, here’s the drill: if you have Lightroom, select both images, then choose Photo>Edit In>Open as Layers in Photoshop. If you don’t use Lightroom, start from Bridge (which ships with Photoshop). Select both images, then choose Tools>Photoshop>Load Files into Photoshop Layers. If you don’t use Bridge, start from Photoshop itself. Choose File>Scripts>Load Files into Stack and navigate to the appropriate files. Whichever method you use, the next task is to drag the dark (good-sky) layer to the top of the layer stack if it’s not already there.
Here’s where the procedure for the modified Rembrandt Solution diverges from the standard version. Choose the Quick Selection tool and select the sky. You don’t need to get too fussy about making a perfect selection. Next, expand the selection by choosing Select>Modify>Expand. I usually expand the selection by 250 to 300 pixels when working with files from my 22-mega-pixel 5D Mark III, but you may need to experiment to see what value works best for your particular image and for the resolution of your camera.

FIGURE 9-6 The Milky Way over Forest Canyon and the Continental Divide from the Rock Cut on Trail Ridge Road, Rocky Mountain National Park, Colorado. Stitched together from six pairs of images (two rows, three images per row), all shot with a 16mm lens, f/2.8, ISO 6400; all sky frames exposed for 120 seconds; all land frames exposed for 30 seconds; each pair merged with the modified Rembrandt Solution prior to stitching.
With the top layer (the good-sky layer) active, add a layer mask by clicking the third icon from the left at the bottom of the Layers panel (the one shaped like a square with a circle inside). The image will look awful.
With the new mask targeted, go to the Properties panel and feather the mask by the same amount you expanded the selection. That should blend the good sky and good land images in a believable way.
As I discussed in chapter 7, the advantage of using this approach to feathering the mask is that you can reopen the image later and adjust the feathering if need be. The disadvantage is that you can’t effectively refine the mask by painting on it. The same feathering value you’ve applied to the mask as a whole will also apply to the brush you choose to paint on the mask. If you choose a 30-pixel brush, for example, it will have a 250- to 300-pixel feather applied to it. That makes the edge of the brush so soft it’s useless.
If you decide you need to refine the mask by painting on it, you’ll need to take a slightly different approach. Instead of feathering the mask in the Properties panel, choose Filter>Blur>Gaussian Blur. Set a radius equal to the value you used to expand the selection. Now you can paint on the mask with predictable results. The only disadvantage of this approach (a minor one) is that once you save and close the image, the mask can only be modified by further painting and/or blurring.
Processing Milky Way Images
If you are shooting with a daylight white balance, you may be startled by the yellow-green color of the sky in your Milky Way shots. Even on the darkest night, the sky is never completely black. Instead, it exhibits a faint greenish glow caused by a variety of processes high in the atmosphere. We don’t see the night sky as green, of course; in fact, we don’t really see color at night at all unless we’re looking at an object bright enough to excite the cones in our retinas. A few photographers show the night sky as their cameras record it when set to a daylight white balance. The majority of them, however, including myself, choose to change the white balance to restore the blue-black color we imagine the night sky to be.
The following are the basic steps I follow when editing a photograph of the Milky Way:
1. I start in the Basic Panel in Lightroom, where I usually set the color temperature to about 3,200 degrees K and the tint to 10 to give the sky a blue/black color. The exact settings vary depending in part on how much light pollution from nearby cities has affected the color of the sky.

FIGURE 9-7 An unprocessed image of the Milky Way from the summit of La Plata Peak, shot with a daylight white balance
2. In the Lens Corrections panel’s Basic tab, I check Enable Profile Corrections and Remove Chromatic Aberrations.
3. In the Noise Reduction section of the Detail panel, I set Luminance to about 50 while examining the image at 100% magnification. The goal is to minimize noise while still retaining as much fine detail as possible. The exact value will vary depending on your camera and the ISO value you set.
4. The next step is to increase contrast in the sky to make the Milky Way stand out more. As a general rule, you don’t want to increase contrast globally; that just makes the dark land even darker. For that reason, I use the Linear preset for Point Curve in the Tone Curve Panel, then add contrast to the sky using Lightroom’s Adjustment Brush. For additional contrast, you can open the image in Photoshop, select the sky with the Quick Selection tool, and add a Curves adjustment layer. Pull the shadow portion of the curve down and push the highlight region up to add contrast.
5. While in Photoshop, you may wish to brighten the stars by using Unsharp Mask (Filter>Sharpen>Unsharp Mask) with a low amount setting and a high radius. I find that a setting of 30 for each value often works well. To confine the adjustment to the sky, make the good-sky layer a Smart Object (right-click on the layer and choose Convert to Smart Object). Now when you apply the filter, it will be applied as a Smart Filter, which will be accompanied by its own mask. Paint on the mask with black where you wish to hide the effect. As an alternative to this Unsharp Mask technique you can paint on Clarity with the Adjustment Brush back in Lightroom.
Shooting Milky Way Panoramas
Single-frame photographs of the Milky Way are beautiful, but the Milky Way offers other photographic possibilities as well. Look closely with dark-adapted eyes, and you’ll see that the Milky Way forms a gigantic arch in the sky that extends from horizon to horizon. This arch is far too large, in an angular sense, to be captured in a single frame, even with the widest recti-linear (non-fisheye) lens. The best way to shoot it is as a stitched panorama with a multi-row panorama head.
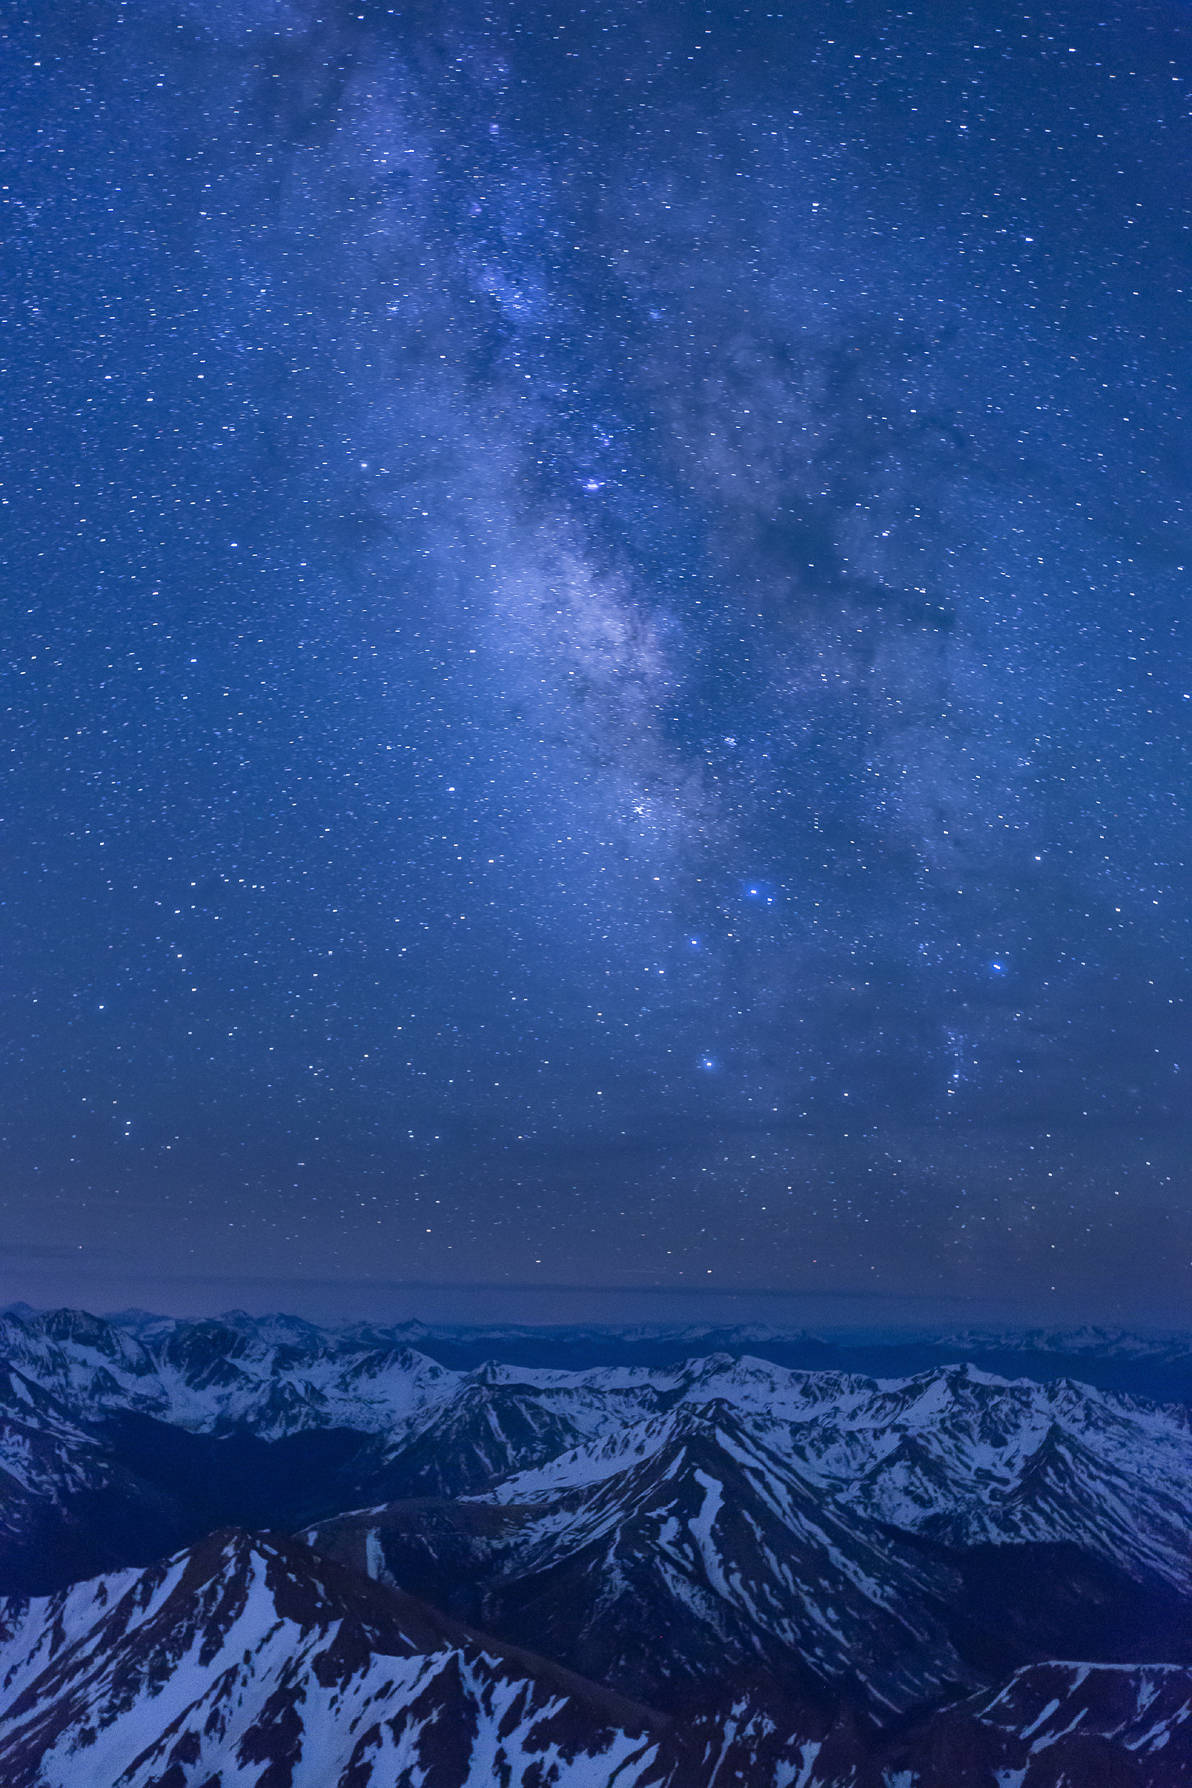
FIGURE 9-8 The processed version of the image in Figure 9-7
Shooting a Milky Way panorama is easiest in the spring just after Sagittarius has risen high enough to be above any foreground mountains. At that time of year, the Milky Way arch is relatively compact. The high point of the arch will be due east and considerably lower in the sky when the sky is fully dark and Sagittarius is in the right position than it will be later in the summer. For example, the top of the arch is roughly 50 degrees above the eastern horizon on April 1st at the ideal time of night but closer to 90 degrees on September 1st.
I discussed the tripod hardware needed for multi-row panoramas in chapter 8. My go-to lens for Milky Way panoramas is my 24mm f/1.4, which gives me the best land detail possible in a single frame, without showing star streaks. My second choice is my 50mm f/1.4, which gives me even higher resolution because it requires more frames to cover the height and width of the panorama. The disadvantage of using this lens is the greatly reduced depth of field. When focused at infinity, my 24mm lens at f/1.4 gives me about 66 feet to infinity; my 50mm lens at f/1.4 gives me 282 feet to infinity.
The problem of holding adequate detail in the land is exacerbated when you’re trying to stitch together a panorama. Now you not only need to capture detail in a single frame, you also need to capture detail in exactly the same way in all frames so they will stitch together properly. My solution is to use the modified Rembrandt Solution I described previously, being certain to use the exact same settings for expanding the selection and feathering the selection edge for each pair of good-shadow and good-highlight images.
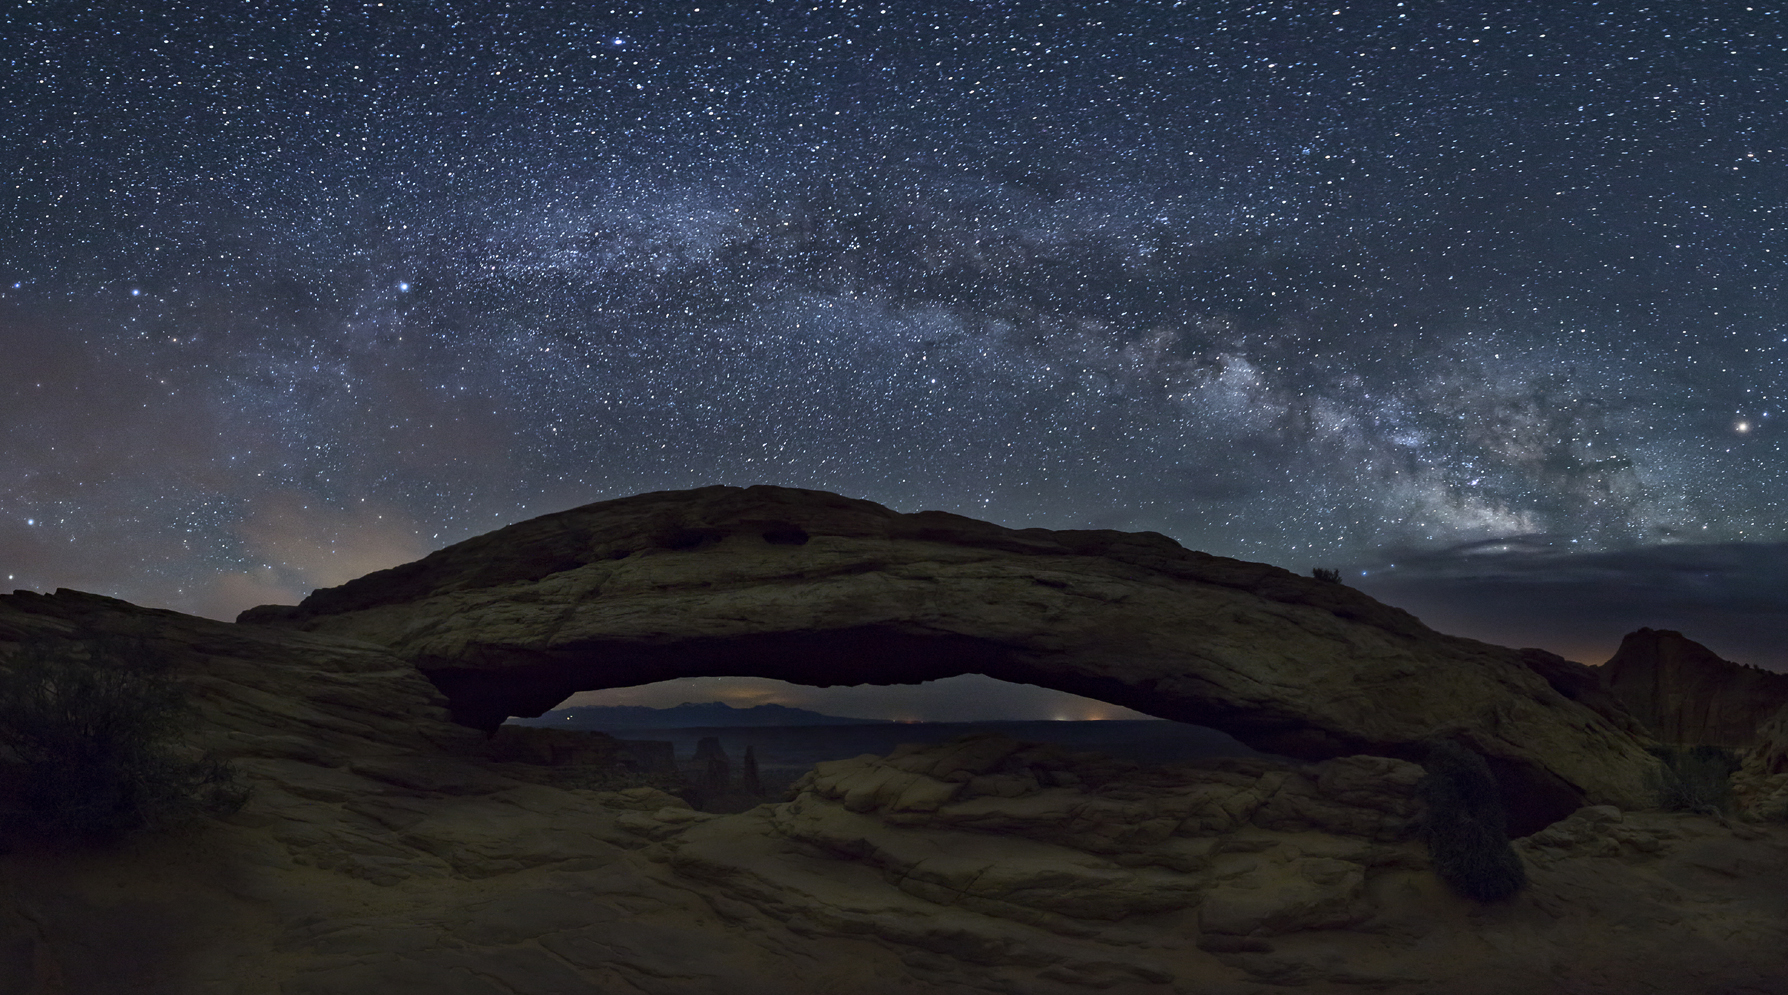
FIGURE 9-9 The Milky Way over Mesa Arch, Canyonlands National Park, Utah. I created this image by shooting two complete, separate panoramas with a 16mm lens. Each panorama consisted of eight images (two rows, four images per row). One panorama was exposed for sky (30 seconds, f/2.8, ISO 6400); the second was exposed for land (120 seconds, f/2.8, ISO 6400). I merged the two panoramas manually in Photoshop, which was difficult because the two panoramas didn’t align perfectly. A better solution would have been to shoot two frames at each camera position (one for sky, one for land), merge each pair with the modified Rembrandt Solution, then stitch the resulting composite images.

FIGURE 9-10 The Milky Way over Longs Peak from the Emerald Lake Trail after an April snowstorm, Rocky Mountain National Park, Colorado. Multi-row panorama, 10 frames (two rows, five frames per row), 16mm lens, 20 seconds, f/2.8, ISO 6400.
I only need to do this for component images that contain the skyline—in other words, images where I want to blend properly exposed sky with properly exposed land. For component images that only contain land, I use only the good-shadow exposure in the stitched panorama. For component images that only contain sky, I use only the good-highlight exposure. I usually only have all-land or all-sky images if I’m using the 50mm lens, which has a relatively narrow angle of view. Once I’ve prepared all the Rembrandt Solution images, I flatten them and save them as TIFFs under a new name in a new folder along with all the land-only or sky-only images (if any), also saved as TIFFs. Then I point my favorite stitching program at the folder full of images and let ’er rip.
Here’s one additional tip for assembling a multi-row panorama. As I mentioned above, I always check Enable Profile Corrections in the Basic tab of the Lens Correction panel in Lightroom. This will correct some, but not all, of the light falloff in the corners of a 24mm f/1.4 or 50mm f/1.4 lens shot wide-open. Areas of your panorama that have uniform tone, such as the sky or an evenly lit snowfield, can show odd, repetitive variations in brightness because the corners of the component frames are darker than the centers. To fix this, I usually add some additional vignette correction by going to the Profile tab of the Lens Correction panel and moving the Vignetting slider toward higher values. You’ll need to experiment to see what is required for your lenses; I use a value of 190 for my Canon 50mm f/1.4 when shooting wide open. Beware of opening up the corners so much that you create unacceptable noise and color shifts.
Don’t let the technical details of a complex Milky Way shoot overwhelm the experience of being there. Take a moment during the shoot to turn off your headlamp and soak in the beauty of the night sky. It’s the best way I know to truly appreciate the immensity of our universe.
Photographing Star Trails
Back in the film era, the standard approach to capturing the night sky without employing a telescope with a tracking mount was to open the shutter and leave it open for a very long time. During that long exposure, which could extend for hours, the stars would make graceful streaks across the film as the earth rotated. Although recent DSLRs can now capture the night sky as we see it, with stationary stars, it’s still lots of fun to create photos of star trails.
The direction you point the camera controls the shape of your star trails. Point your camera due north and include Polaris, the North Star, if you want your star trails to form concentric circles. Point your camera due south and include the ecliptic, the apparent path of the sun and planets through the sky, and you’ll get a very different pattern. Stars right on the ecliptic will form trails that are nearly straight. Stars above and below the ecliptic will form trails that bend away from the ecliptic. Point your camera east or west and the stars will form trails leaning to the south (up and right as you face east; up and left as you face west).
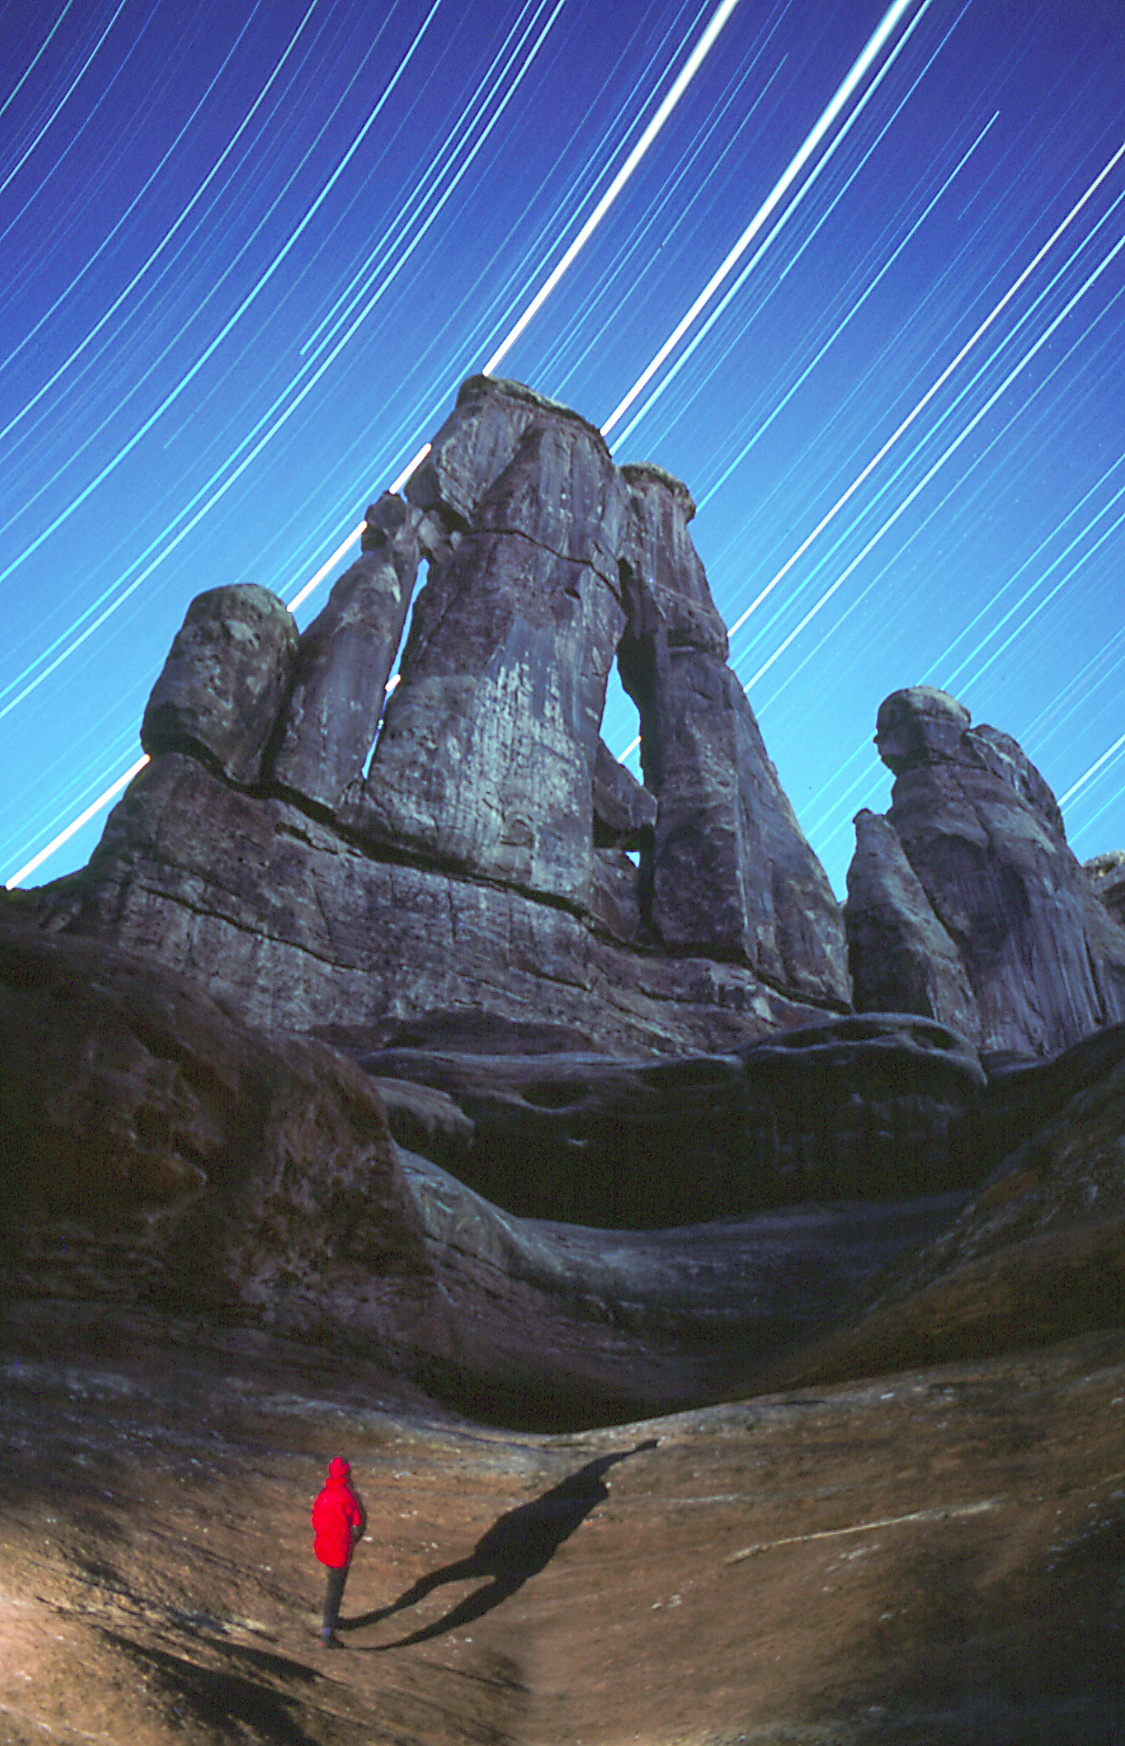
FIGURE 9-11 Cora Randall at Druid Arch, Canyonlands National Park, Utah. 24mm lens, 10-hour exposure, f/2.8, Kodachrome 64, with flash fill for foreground.
Most subjects are easier to capture digitally than on film, but star trails are an exception. The easiest way to shoot star trails is still with an old film camera and color slide film. Pick a clear, moonless night, mount the camera on a solid tripod, open the shutter at astronomical dusk and close it again at astronomical dawn. An aperture of f/2.8 or f/4 usually works well. This approach will create beautiful star trails, but probably capture no detail in the land. To get detail in the land, try opening the shutter a little before astronomical dusk or leave it open after astronomical dawn. You’ll have to experiment with your favorite film to determine exactly when to open and close the shutter to provide detail in the land without washing out the sky.
Alas, this simple technique generates unmanageable noise if you try it with a DSLR. The standard digital approach is to make many long exposures with the shortest possible gap in between, stack the exposures, then blend them together so the star trails show through. At a minimum, you’ll want to do 30-second exposures, but beware: two hours of 30-second exposures adds up to 240 frames. Stacking 240 high-megapixel images in Photoshop creates an unwieldy file that can reach 30 gigabytes or more in size. If each image has one or two hot pixels, and you stack 240 of them, as I did in one star-trails shot, you get hundreds of hot pixels in the final image. It took me half an hour to retouch all the hot pixels, and about 45 minutes each time I saved the file.
You’ll simplify your life if you use the longest exposures your camera will tolerate without generating unacceptable noise. If possible, try to use exposures in the two- to four-minute range. Test your own gear to determine the longest exposure you can use without generating intolerable noise.
As for the other exposure parameters, try f/2.8 to f/4, ISO 200–400, depending on how many stars you want to capture. Higher ISOs and wider apertures will create more closely spaced star trails. Shooting at f/2.8, ISO 1600 will generate so many star trails you’ll practically have more stars than sky. It’s an effect you may consider cool, or it may strike you as over the top.
An intervalometer will allow you to program the exposure length, number of exposures, and interval between exposures, which should be one second. Start your star-trails sequence around nautical dusk, before the sky is totally dark, if you want a frame with some detail in the land.
After downloading all your exposures to your computer, your next task is to blend them so the complete star trails show through. There’s lots of free or low-cost software out there that will do that. My preference, however, is to use Photoshop. In Lightroom, choose all the component images, then choose Photo>Edit In>Open as Layers in Photoshop.
The simple method of blending all the images so the star trails show through is to select all the layers (click the top layer, then Shift-click the bottom layer) and change the blend mode to Lighten. The Lighten blend mode compares the pixel in the target layer to the pixel directly underneath. If the pixel underneath is lighter, Photoshop allows that pixel to shine through. This will make all the star trails appear.
You can paint directly on your component images with black to remove unwanted elements in the land portion of the image, such as hikers who pass through your shot with their headlamps. There’s no need to be fussy when painting, since everything black will be ignored by the Lighten blend mode. Identify the files with issues in Lightroom, then return to your layered file in Photoshop and locate the offending files. Turn off the eye icon for all layers but the target layer. You can usually Alt-click on the target layer’s eye icon to turn off all other layers with one click. Alt-click again to turn them on again. If that doesn’t work, right-click on the eye icon and choose Show/Hide All Other Layers.

FIGURE 9-12 Star trails over the Mummy Range, Rocky Mountain National Park, Colorado. 70 2-minute exposures with a 16mm lens, f/2.8, ISO 200.

FIGURE 9-13 A jet trail across a two-minute exposure
Removing Jet Trails
The night sky is busier than you might think. During a two-hour star-trails sequence, you’re guaranteed to have the lights of passing jets make long, continuous trails through the image. You can remove these jet trails with the Spot Healing Brush or Clone Stamp tool, of course, but that’s tedious and can result in a blotchy look. In some cases, there’s an easier way. First, identify the files that have jet trails and open them one at a time in Photoshop. Now choose the Pen tool. Click to place an anchor point at the beginning and end of the jet trail. This will create a straight path between the two anchor points.
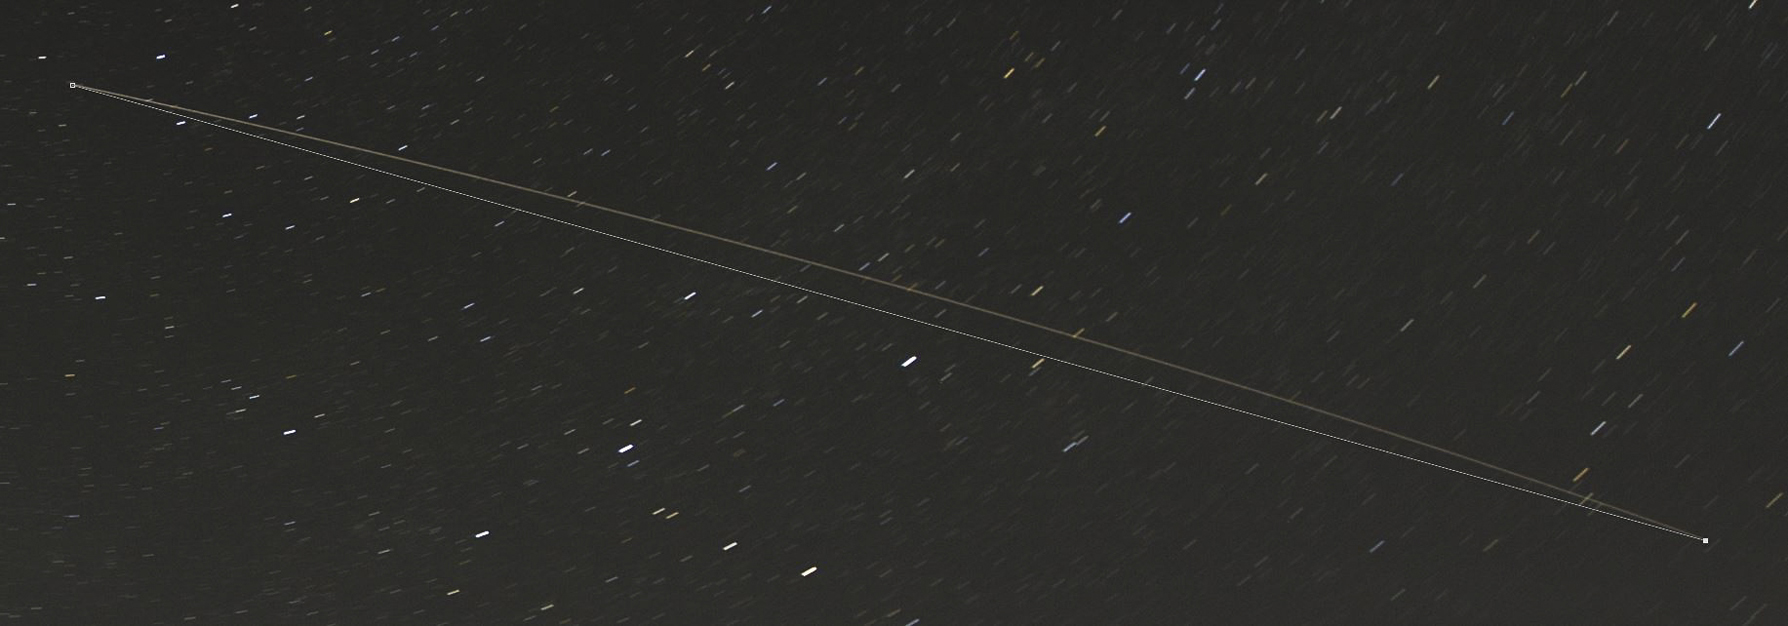
FIGURE 9-14 The initial path after placing the first two anchor points
If the jet trail is perfectly straight, go to the next step. If not, switch to the Add Anchor Point tool and click to place a third point in the middle of the path (which will not be aligned along the jet trail yet). Click and hold on the new anchor point, and drag the point to the jet trail. Drag the ends of the handles that appear to make the path coincide with the jet trail. Initially, the two handles are linked; moving one handle will adjust the other simultaneously. To adjust them individually, hold down Alt while you drag a handle. Once you’ve decoupled the two handles, you don’t need to hold down Alt to continue to adjust them individually. In fact, holding down Alt a second time will recouple them. All this handle-dragging can be a bit tricky the first time you try it.
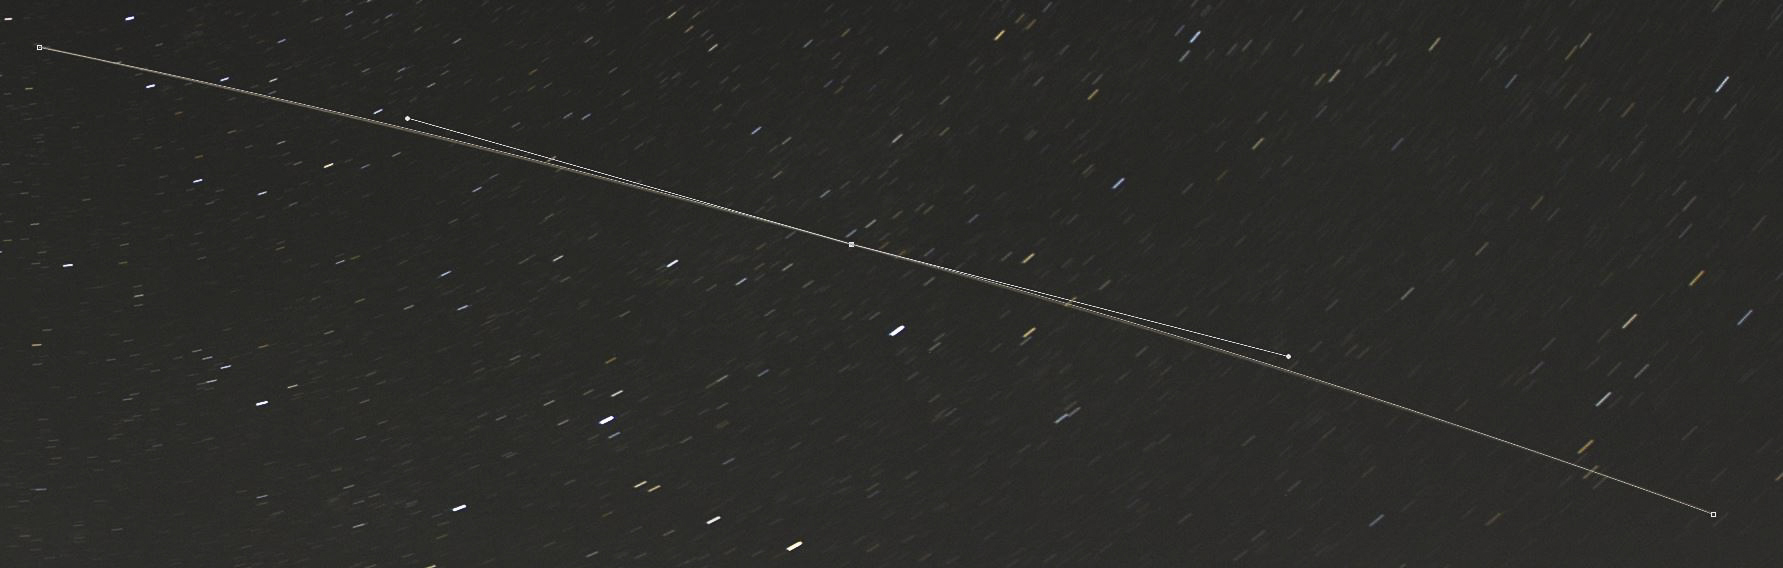
FIGURE 9-15 The path after placing the central anchor point, dragging it to coincide with the jet trail, and adjusting the handles to align the path with the jet trail
Once the path coincides with the jet trail, choose the Spot Healing Brush. Select a hard-edged brush that’s just a bit larger than the jet path. Be sure Content-Aware is selected as the Type. You don’t actually use the Spot Healing Brush in the conventional manner; you just want to make sure the options are set correctly. Now, in the Paths panel, right-click on the work path you just created and choose Stroke Path. Be sure to choose the Spot Healing Brush in the Tool drop-down box. Click OK and the jet trail will disappear. You can now delete the work path. Do this for all your problem images before loading them into the layered Photoshop file.
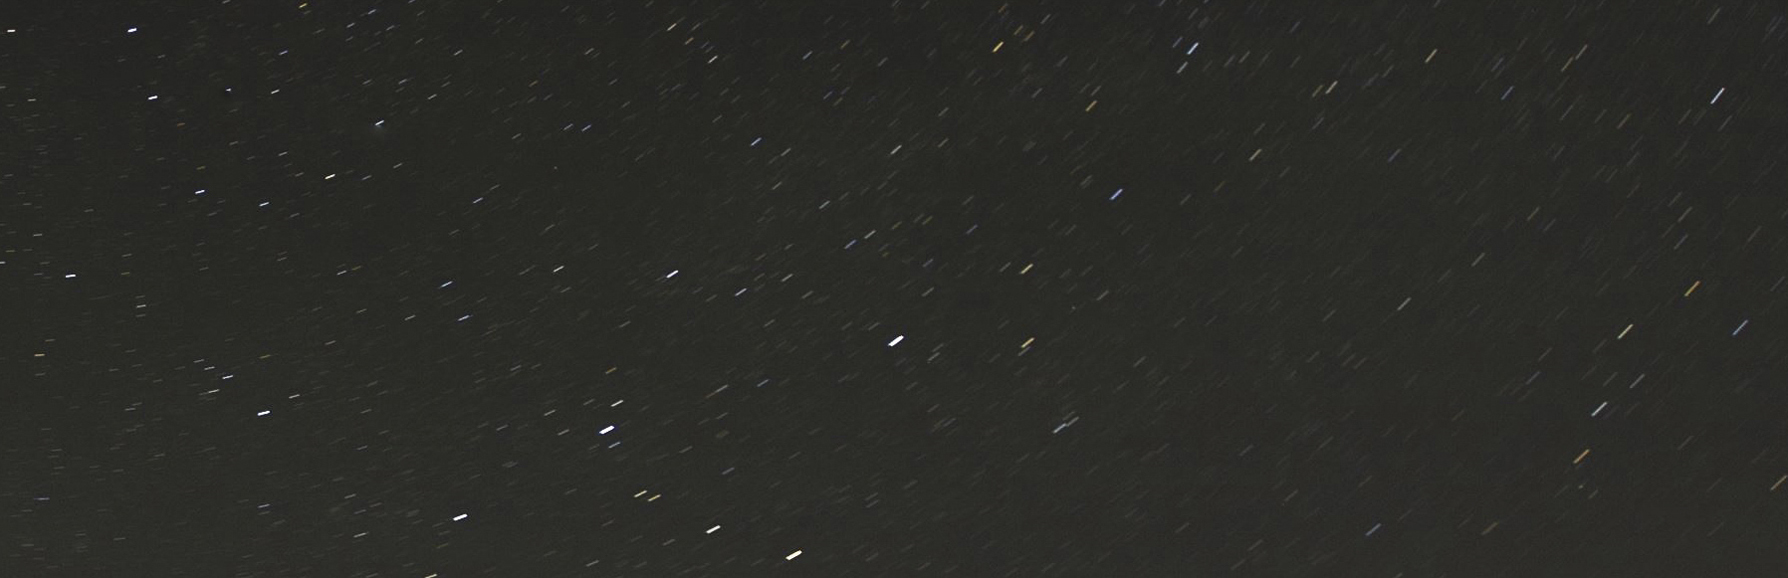
FIGURE 9-16 The star field after removal of the jet trail
Closing the Gaps
The simple approach of using the Lighten blend mode to reveal star trails has one disadvantage. Every star trail will show a tiny gap in between exposures. These gaps are not noticeable on the web or in a small print, but are rather annoying in a large print.
You might think that these gaps are inevitable; after all, there is a one-second interval between each exposure. However, nature photographer Floris Van Breugel has pointed out that these gaps will disappear if you use the Screen blend mode instead of Lighten. He has developed a slick technique for eliminating the gaps. First, set all your RAW files to neutral settings, with all settings in the Basic panel set to zero (no change in Exposure, Contrast, Highlights, Shadows, etc.). Set the Tone Curve to linear. Yes, the images will look bad. We’ll fix that later.
Now select all the images and choose Photo>Edit In>Open as Layers in Photoshop. Make the first layer above the bottom layer of the stack active. Hit Control-J to make a copy. Choose the next layer above the new copy layer and make a copy of it. Make a copy of every other layer in the stack except the top layer. Do not make a copy of the top and bottom layers. Now target the top layer in the stack. Change the blend mode to Screen. You should see the star trails lengthen and the image get lighter. Hold down Shift and click the next layer below to highlight both the top and next-to-top layers simultaneously. Press Control-E to merge the two layers. Change the blend mode of the new merged layer to Lighten. Target the next layer below and change the blend mode to Screen. Again the star trails should lengthen. Hold down Shift and click the next layer below so you have two layers selected simultaneously. Press Control-E to merge the two layers. Change the blend mode of the new merged layer to Lighten. Repeat this procedure all the way down the stack. Each time you change the blend mode to Screen at the start of another repetition of this procedure, the star trails should lengthen. If they don’t, you’ve done something wrong. Back up in the History panel until you know you’re above where you made the mistake and try again. The photo at the end of the procedure will look flat and dull since you used a linear conversion of the RAW data. Increase contrast and adjust color and density to taste.
Photographing the Aurora
Words cannot truly convey the awesome experience of watching the aurora swirl across the sky. The aurora can be seen most frequently in the auroral zones, doughnut-shaped regions centered on the magnetic poles, so unfortunately for photographers based in between the southern and northern auroral zones, it’s mainly an experience reserved for those willing to travel. Both the southern and northern auroral zones offer an excellent chance to see the aurora, but the northern zone is far more accessible to photographers in North America. Two recommended destinations with relatively easy logistics are Yellowknife, in Canada’s Northwest Territories, and Fairbanks, Alaska. Iceland is another popular aurora destination, but the weather is notoriously bad.
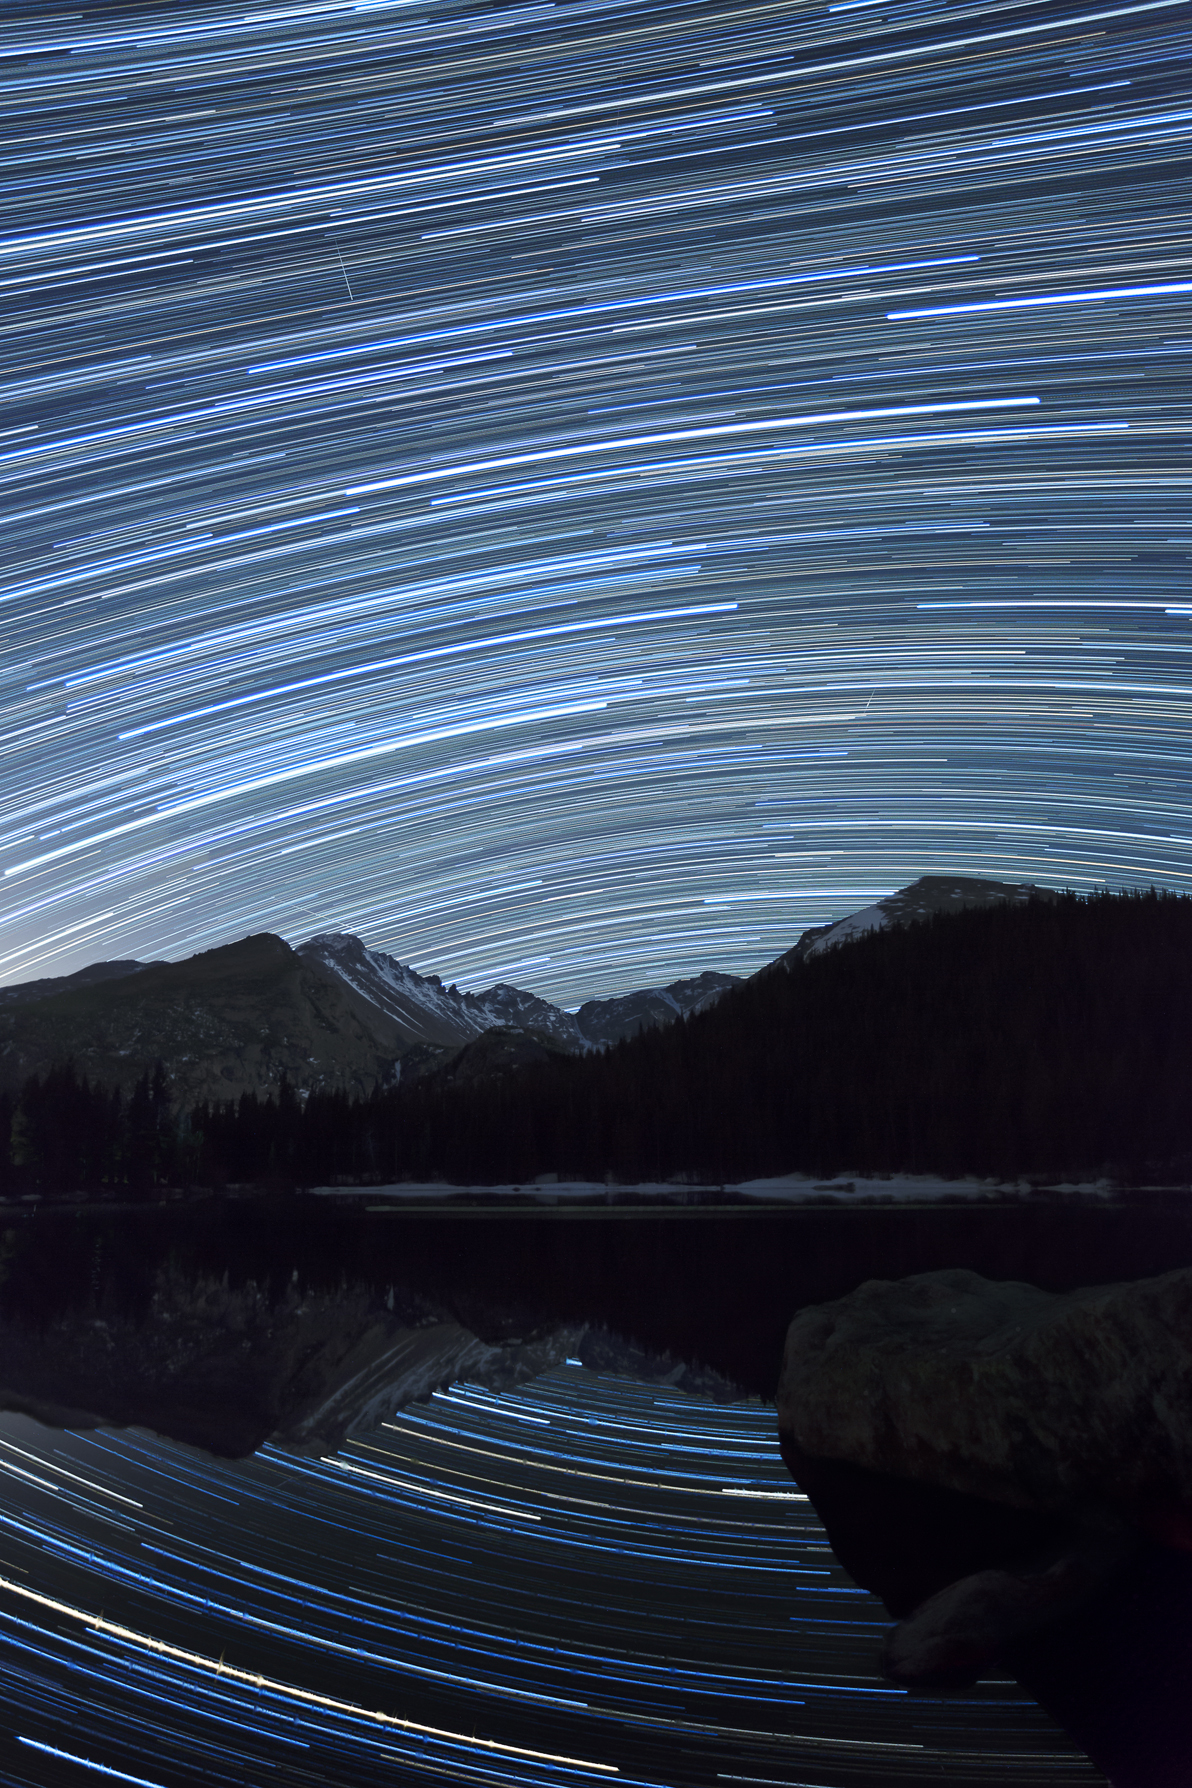
FIGURE 9-17 Star trails over Bear Lake, Longs Peak, and Glacier Gorge, Rocky Mountain National Park, Colorado. 24mm lens, 243 30-second exposures, f/2.8, ISO 1600.

FIGURE 9-18 Aurora over pond along the Prelude Lake Nature Trail, Prelude Lake Territorial Park, Northwest Territories, Canada. 25mm lens, 13 seconds, f/2.8, ISO 6400.
To see the aurora most vividly, the sky must be dark, which precludes arctic destinations in the summer months. Auroral activity tends to peak around the fall and spring equinoxes, which means late September and late March are good times for a trip. The most vivid displays often erupt in the hours around midnight, but they can occur at any time of night.
In Canada and Alaska the aurora most commonly appears in an arc of sky from northwest to southeast (moving clockwise around the compass). The ideal shooting location allows you to photograph in any direction within that 180-degree arc.
Unlike the Milky Way, which moves slowly, the aurora is in constant motion. Use the shortest shutter speed you can, consistent with good overall exposure, to keep the fine structure in the aurora from becoming smeared in your image. With an aurora of average brightness, a good starting-point exposure is about 10 seconds, f/2.8, ISO 3200. Check your histogram to be sure you are capturing adequate detail without blowing out the highlights (which is surprisingly easy to do). Engage the blinking highlight warning to double-check that you aren’t clipping the highlights. Turn your LCD brightness to its lowest setting to avoid getting a false impression about how much detail you’ve actually recorded. As always, your histogram is your best guide to correct exposure, not the image on your LCD.
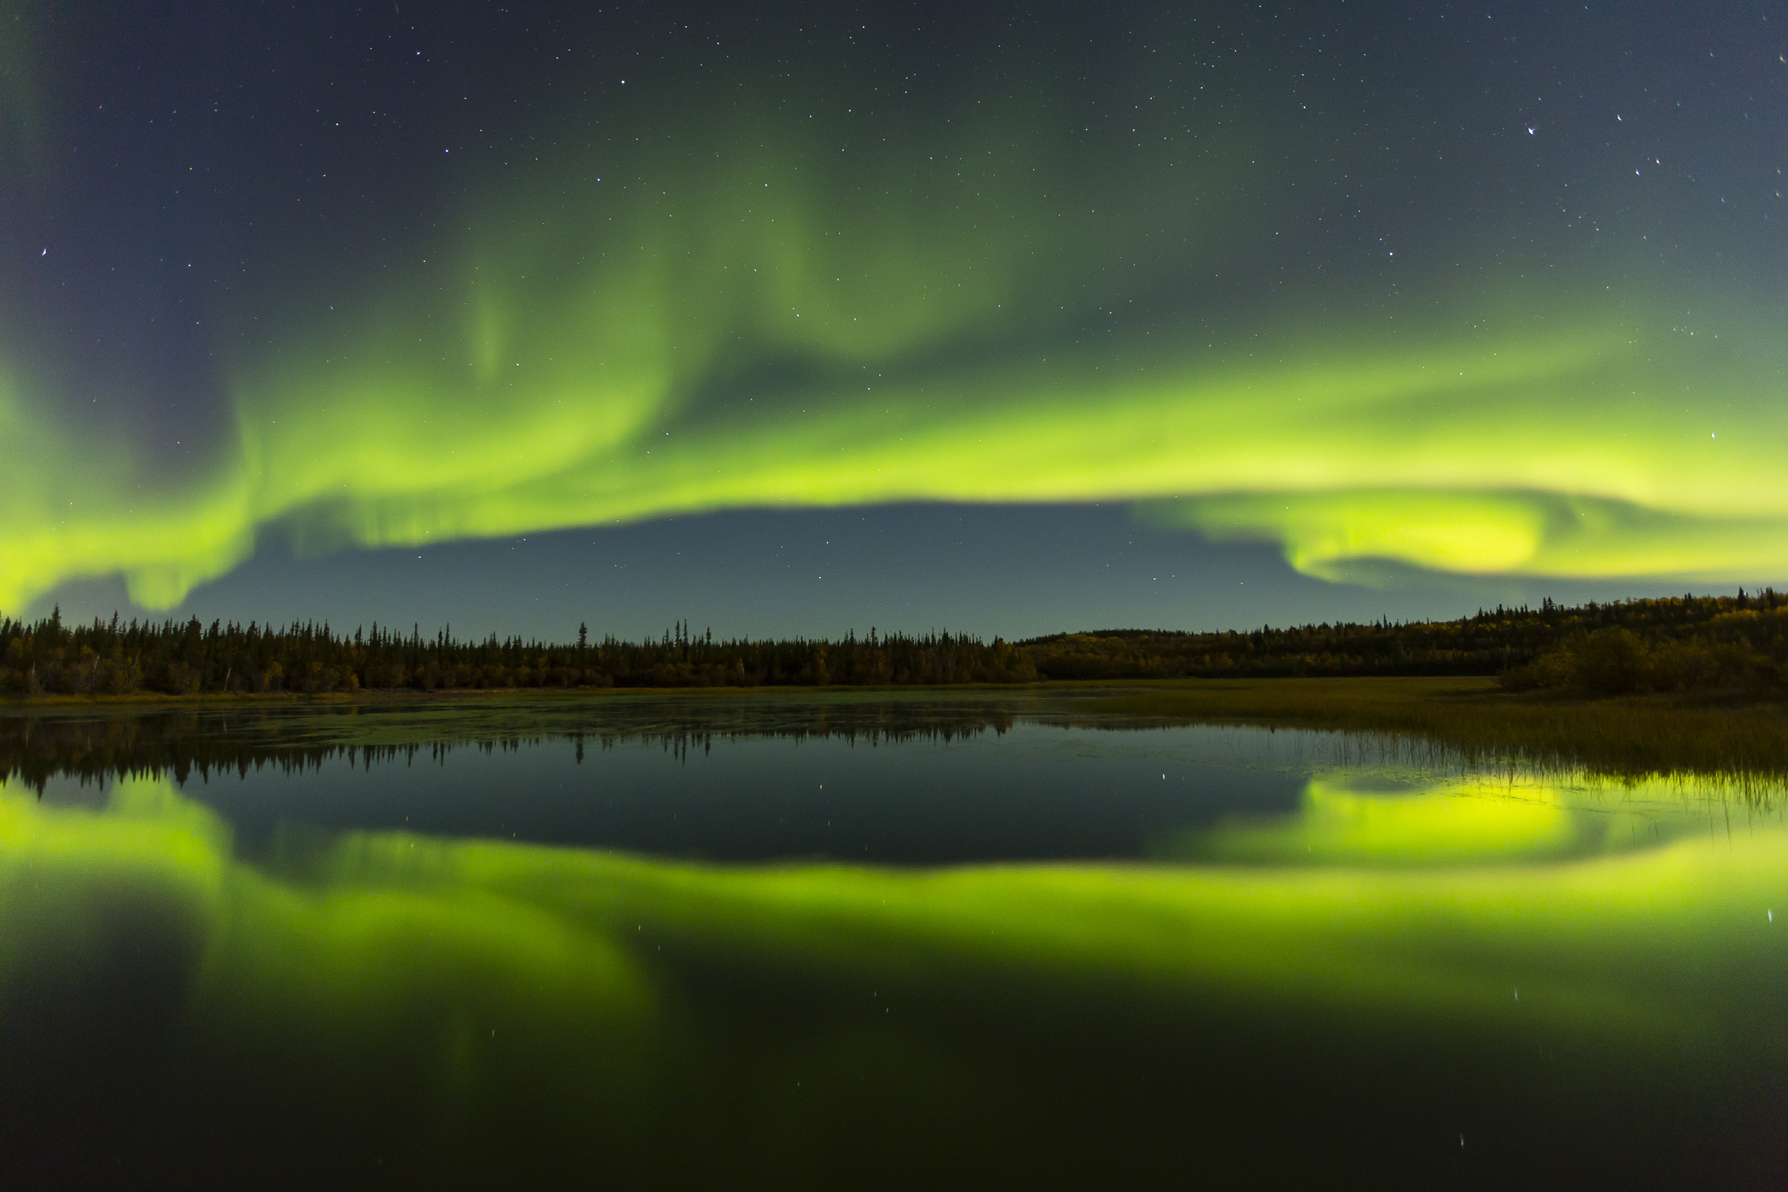
FIGURE 9-19 Aurora over Prosperous Lake, Prosperous Lake Territorial Park, Northwest Territories, Canada. 17mm lens, 5 seconds, f/2.8, ISO 3200.
The aurora’s constant motion means you’ll need to compose each shot separately while looking through the lens. You can’t just point the camera in the general direction of the aurora and leave it set to that position. In order to see through the lens, your eyes must be as dark-adapted as possible, which means you should use a headlamp with red LEDs just as you should when shooting the Milky Way. Be sure to turn it off before making the exposure. At high ISOs, the light of even the dimmest headlamp will turn your foreground bright red. Be sure to remove any filters from your lens. Filter coatings can generate interference patterns in your image that are difficult or impossible to remove.

FIGURE 9-20 Aurora over Prosperous Lake, Prosperous Lake Territorial Park, Northwest Territories, Canada. 17mm lens, 5 seconds, f/2.8, ISO 3200.
You’ll want to focus carefully at infinity using the procedure I described for shooting the Milky Way. Once you’ve achieved critical focus, shoot a test frame, check that it’s sharp, then tape the focus ring on the lens to prevent accidentally changing the focus. Then double-check the focus with another test frame. While you’ve got the tape out, put a couple of squares over the LED that lights up when your camera is writing data to the card. You should also tape the “active” light on your intervalometer, if yours is so equipped. When you’re fully dark-adapted, those lights are an annoyance. I’ve even seen the intervalometer’s blinking “active” light cast a perceptible red tint over the foreground.
When the aurora is good, it’s big (in an angular sense). I used my Canon 16-35mm f/2.8 lens exclusively when shooting the aurora during a recent trip to Yellowknife. I made about two-thirds of my aurora photos at 16mm.
Modern cameras are so sensitive at high ISOs that they can actually give you a fairly accurate meter reading from a bright aurora. I typically use manual exposure mode, but bias the exposure toward the plus side by one stop or occasionally more. For my Canon 5D Mark III, I discovered that the light of the full moon shining directly into the eyepiece, or even bouncing off my cheek and into the eyepiece, could alter the exposure. For that reason, I always set the exposure in manual mode while looking through the camera, and used my black-gloved hand to prevent stray moonlight from entering the eyepiece while metering.
One final tip: in cold weather, avoid breathing on either the viewfinder or the front element of your lens, and check both frequently for frost or condensation.
Can Night Photographs be Authentic?
Throughout my 20-year career as a landscape photographer, I have tried to make images I considered authentic. I have always told my customers, “What you see in my prints is what I saw through the lens.” Then I bought a camera with an extraordinarily sensitive sensor, the Canon 5D Mark III, and started shooting landscapes on moonless nights when the only light sources were starlight and sky glow. The images revealed an amazing abundance of stars as well as the detailed structure of the Milky Way. Suddenly I faced a conundrum: how can I claim that my prints reveal what I saw through the lens when it’s so dark that I can’t see anything through the lens?
In a way, the problem is ironic. For decades I have battled the limitations of the capture medium. My philosophy was never, “What you see in my prints is what the film recorded.” That was always unsatisfying because my eyes could always see much better detail in the highlights and shadows than film could capture. A good DSLR has much better dynamic range than transparency film, but it’s still not as good as my eyes. High-dynamic-range techniques make it possible to capture an even wider range of brightness levels than my eyes can see, but also introduce their own problems, since our visual system doesn’t see high-contrast scenes in a simple, linear way. As we’ve seen, turning an HDR image into something our visual system finds believable is fraught with challenges.
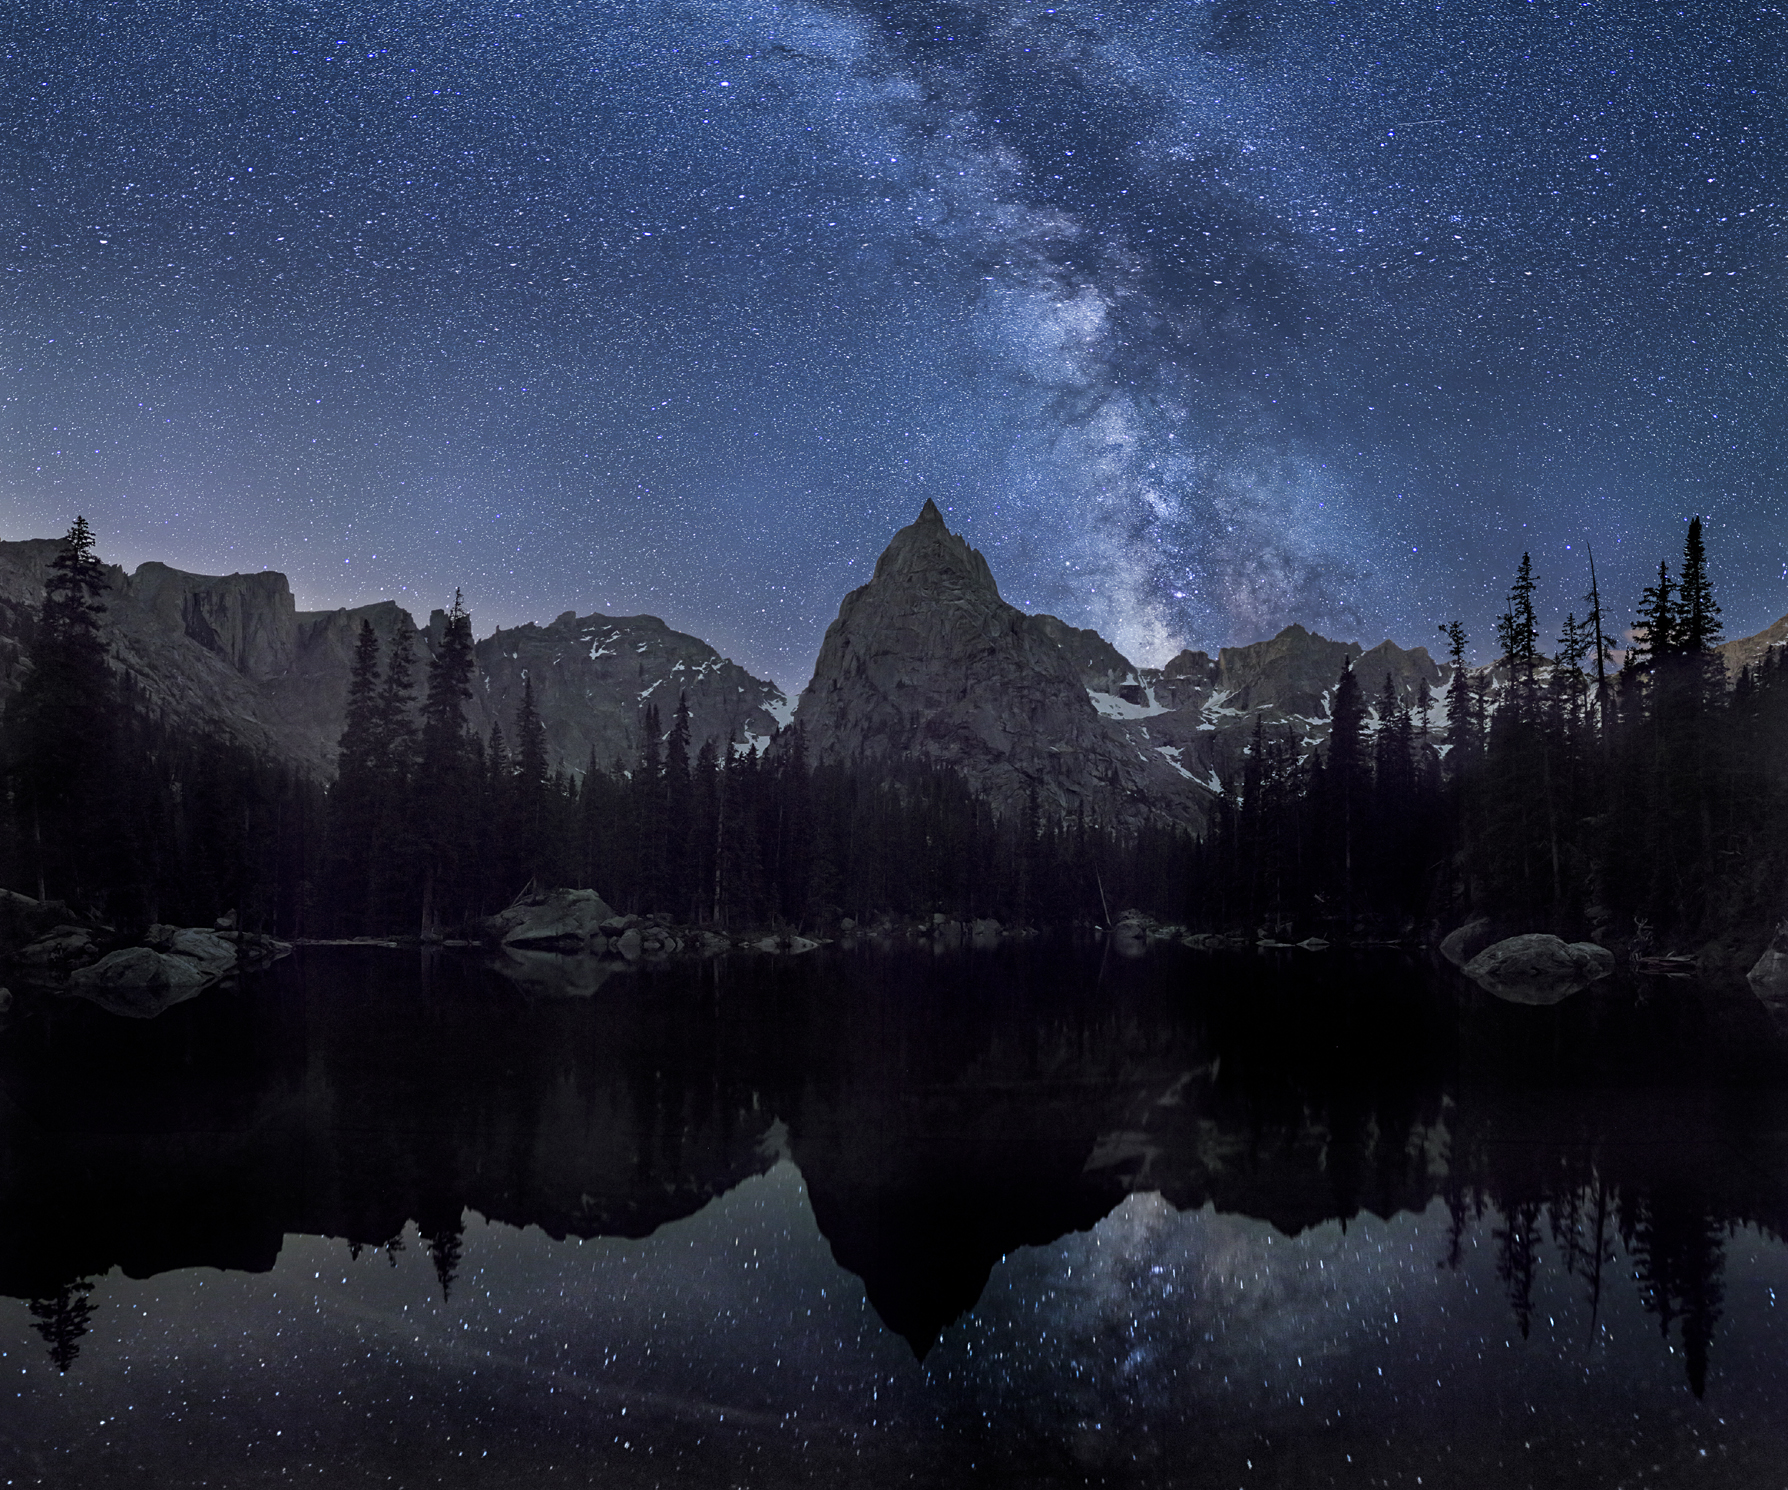
FIGURE 9-21 Lone Eagle Peak and the Milky Way reflected in Mirror Lake, Indian Peaks Wilderness, Colorado. Multi-row panorama, 24 frames (four rows, six frames per row), 50mm lens, 13 seconds, f/1.4, ISO 6400.
Now for the first time I had a camera that was better than my visual system, at least in terms of its ability to record extremely faint light with a long exposure at a very high ISO. My new camera also revealed something less appealing about the moonless night sky: light pollution from nearby cities, coupled with naturally occurring sources of light high in the atmosphere, meant that the sky was actually a muddy greenish-yellow-brown, not the pleasing midnight blue we think we see at night. Recreating that nighttime feel requires changing the white balance in Lightroom to about 3,200 degrees Kelvin, a setting normally reserved for shooting under the yellow-orange light of old-fashioned incandescent bulbs.
At first I was stymied. How could I justify changing the white balance away from the daylight white balance I always used for photographing landscapes during the day? Then I did a bit of research into human night vision.
Our retinas have two types of light-sensitive cells, rods and cones. Cones are for color; rods can only detect luminance values, or shades of gray. Rods are much more sensitive to light than cones, so they are most active at night when our cones become inactive. On a truly dark, moonless night, we are essentially color-blind unless we’re looking at something that generates light and reactivates our cones, such as a bright star.
Why, then, do we think of the night sky as being a deep blue? The concept of memory colors, which I discussed in chapter 7, may give us a clue. We tend to remember the colors of certain very familiar objects, such as the sky, as being different from what they actually were. Perhaps that intimate, lifelong association of the color blue with the sky helps us imagine that the night sky is blue even when it’s too dark to distinguish colors, and even when the actual color is far from blue. Shooting in color at night is like shooting in black-and-white during the day. What shade of gray best represents midday blue sky? Or Longs Peak? Or a weathered tree? Any shade of gray that looks good! In a similar way, what shade of blue best represents the moonless night sky? Any shade of blue that looks good!
When working at night, I use a bright white headlamp to navigate to my shooting location. Only the brightest stars are visible—the Milky Way can’t be seen when the headlamp is on. Once I arrive, I switch to my headlamp’s red LEDs to let my eyes adapt to the dark. When they are fully dark-adapted, a process that normally takes 20 to 30 minutes, the true glory of the night sky begins to become apparent. I can see the Milky Way clearly, as well as many more stars. Given the limitations of human vision, my goal when editing images shot at night is to re-create that nighttime feel rather than make an objective record of what I actually saw.

FIGURE 9-22 A swirling aurora cradles the full moon, Prosperous Lake, Prosperous Lake Territorial Park, Northwest Territories, Canada. Single-row panorama with five frames, 17mm lens, 4 seconds, f/2.8, ISO 3200.