
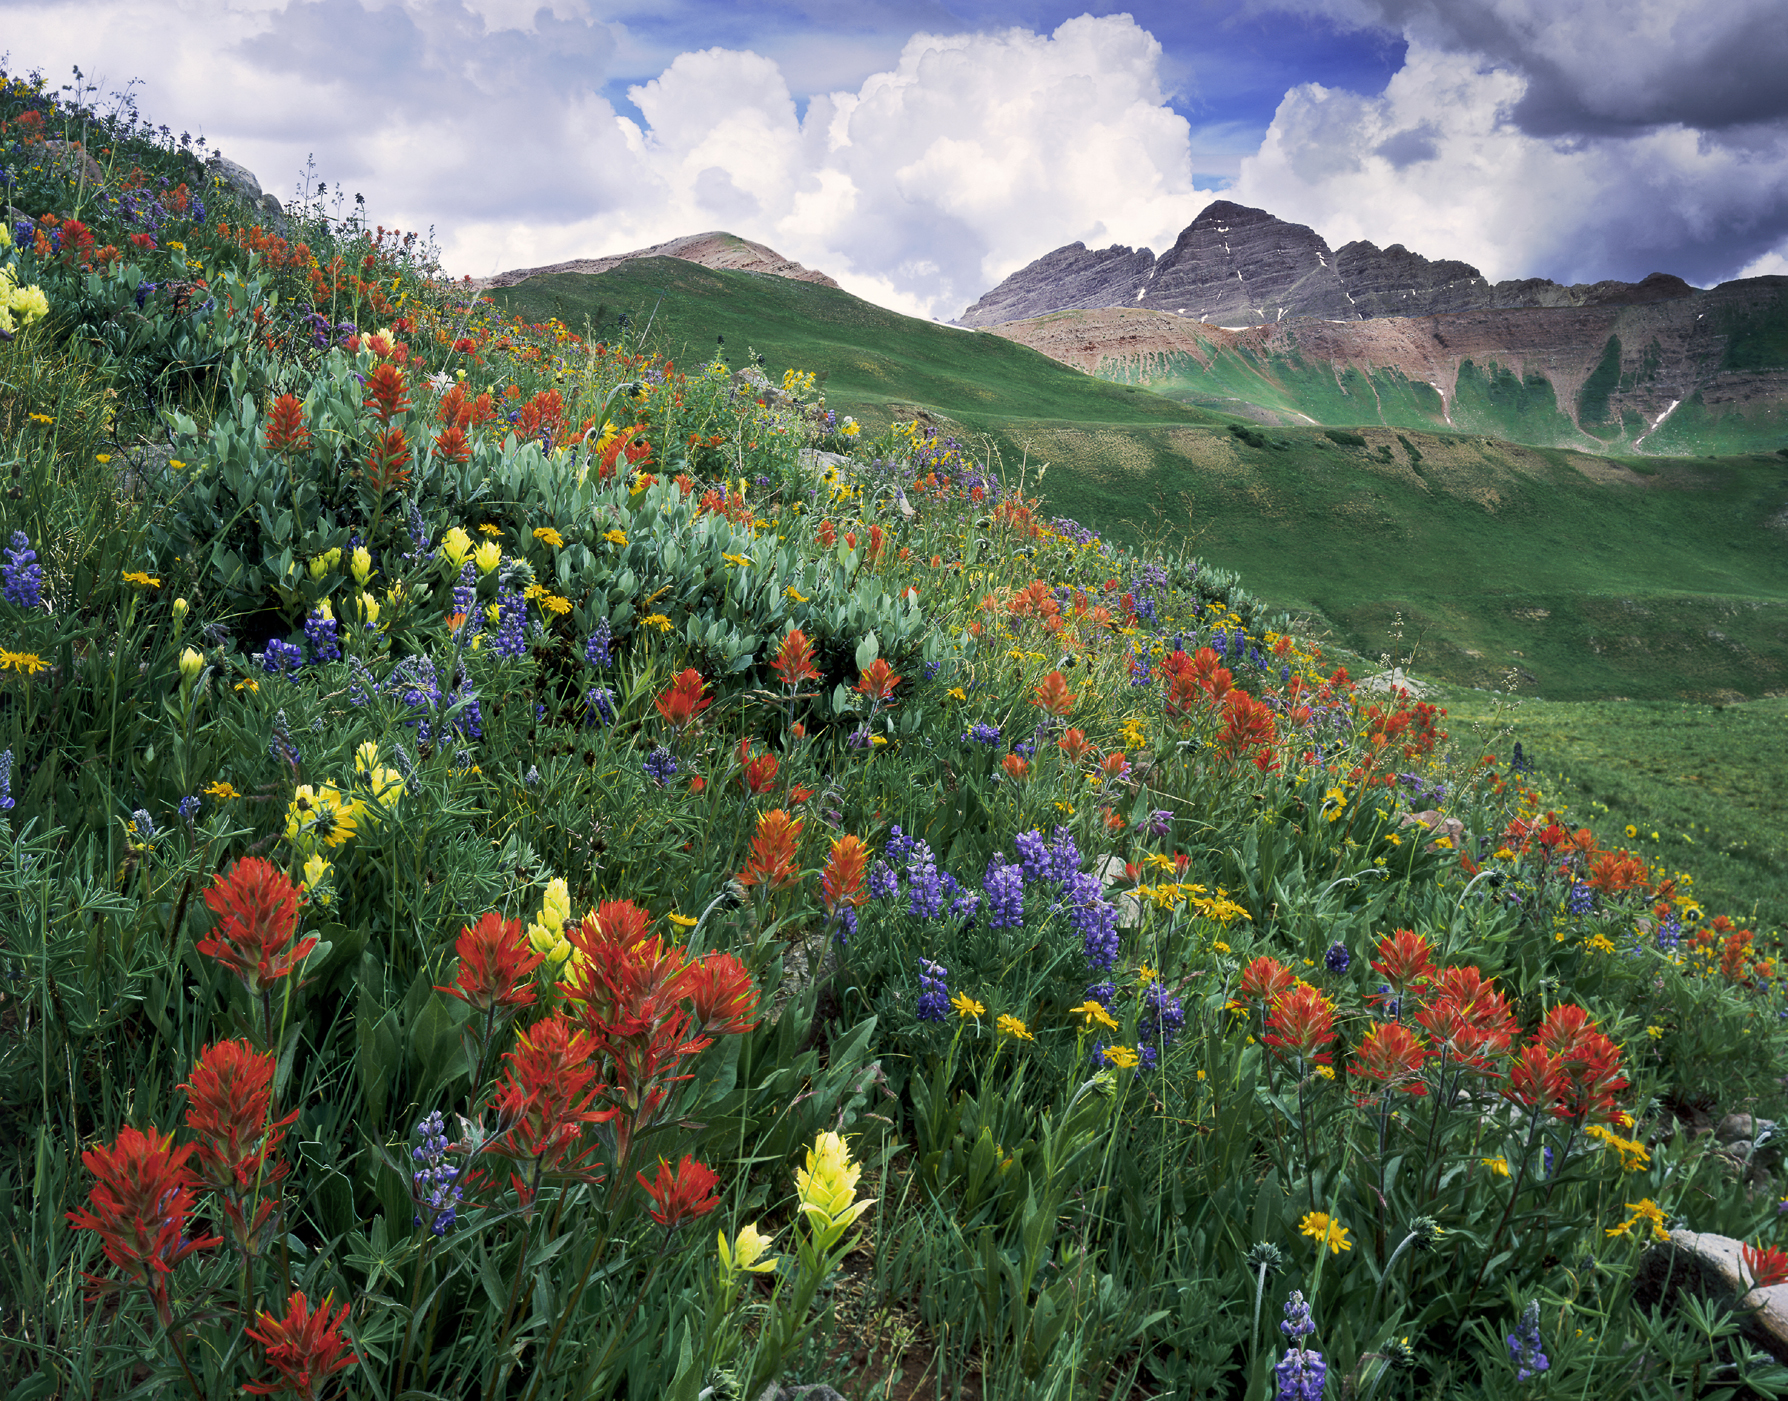
FIGURE 2-1 Maroon Peak from West Maroon Basin, Maroon Bells-Snowmass Wilderness, Colorado
2 In Search of Extraordinary Landscapes
The basin surrounding the headwaters of the East Fork of the Crystal River, below Hasley and West Maroon Passes, holds the richest flower fields I’ve ever seen in Colorado. When I first visited this basin in the Maroon Bells-Snowmass Wilderness for a three-day backpacking trip in July 1999, I spent a lot of time walking past these incredible flower fields in the pouring rain, thinking, “I sure wish I could shoot that.” I returned to the area in July 2001. For several days I explored the basin, dodged thunderstorms, and shot various groups of flowers. Finally I discovered a spectacular field of lupine and red and yellow Indian paintbrush a short distance below Hasley Pass. The famed Maroon Bells, twin 14,000-foot peaks, rose in the background. As storm clouds gathered to the west, I exposed half a dozen sheets of film with my Zone VI 4 × 5 field camera, then stashed the camera gear and bolted for camp as the sky darkened with ominous clouds. Shortly after reaching my tent, the skies opened and rain fell in torrents for three hours. The next morning, after a brief respite, the summer monsoon returned in earnest. I packed up camp and headed for home, happy that I had produced at least one image that captured West Maroon Basin’s lush beauty. I called it Maroon Peak from West Maroon Basin.
As this anecdote shows, great landscape photography is often one percent inspiration and 99 percent perspiration. I spent two separate weeks in West Maroon Basin before I came up with my favorite image from the area. It’s rarely productive to randomly select a trail and head out in the middle of the day in hopes of making a great photograph the instant you find a beautiful scene. You generally have to scout for these locations, which involves a lot of walking and looking. I spend much more time scouting than I do behind the camera actually clicking the shutter.
Some people like shooting intimate landscapes: closeups of flowers, beautiful little waterfalls and cascades, or interesting weathered trees. Intimate landscapes are fine, and I shoot them when I find them, but I am most interested in the grand wilderness landscape. When I’m scouting, I’m usually looking for a compelling foreground that integrates seamlessly with a strong mid-ground and background. I also pay close attention to the potential for great light. This chapter will teach you how to search for a striking subject, which is always your first task. Finding that subject, however, is only the beginning of creating an evocative image.
You’ll probably find that you produce your best images in areas that inspire you. For me, that often means the mountains of Colorado, my home state. For you, that may mean the serpentine sandstone canyons of the southwest or the imposing granite bluffs of the Maine seacoast. Perhaps you’re interested in capturing the lush green serenity of the rainforests of the Pacific Northwest. As you search for subjects, whether halfway around the world or in your own backyard, let your emotional reaction to a scene be your starting point. Then apply the technical skills you’ll learn in this book to craft an image that will evoke the same emotion in a receptive viewer.

FIGURE 2-2 I spent several days scouting Utah’s Arches National Park before locating this view of the Fiery Furnace and the La Sal Mountains
A diligent photographer who lives near a beautiful area should always have better photos of that location than one who has to travel a long distance to visit. It’s exciting and fun to go to new and far-flung locations on every trip, but repeat visits to a promising nearby site in every season often reveal new possibilities and result in better images. Many of my best images have been made in areas with which I’m intimately familiar. It takes time to get to know a place—to find the most beautiful lakes, impressive sea stacks, and lush meadows. It’s usually much better to have three nights in a promising location than to have one night in three different locations. Thorough scouting can help you find secret pockets of summer wildflowers, colorful autumn maple groves, and intriguing formations of snow and ice in winter. Guidebooks, online resources, and magazine articles can help, of course, as can rangers or other land-management personnel, but there’s no real substitute for logging miles in your hiking boots. I’ve often felt that I’ve walked 20 miles for every good shot I’ve managed to take. On some occasions I photograph from the road, but such drive-by shooting rarely produces truly fresh imagery.
Working close to home also makes it easy to return again and again to a special location until you capture the image that matches your vision. For example, I’ve always enjoyed the view of Longs Peak from Many Parks Curve, a pullout along Trail Ridge Road in Rocky Mountain National Park. At 14,259 feet, Longs Peak is the highest mountain in Rocky Mountain National Park and the only Fourteener north of I-70. The problem was that the view from the road had no interesting foreground. Then one day I noticed a rocky outcrop flanked by trees just a hundred yards below the road. By themselves, the outcrop and trees were uninteresting. But what if they were covered with newly fallen snow? And what if that white, reflective snow was lit by warm sunrise light?

FIGURE 2-3 I spent over a week in this area during three trips spanning several years before making this image of columbine and roseroot in Silver Creek Basin, Maroon Bells-Snowmass Wilderness, Colorado
I snowshoed down to the knoll, shot a compass bearing to the horizon at the point where the sun would rise on winter solstice, then checked the map. The foothills along the horizon were lower than Many Parks Curve, which meant that my foreground would get light at the moment of sunrise, when the light was warmest. If the foothills had been higher, the sun would have had to rise over those obstacles and the light reaching my foreground would have been white. I shot a second bearing to Longs Peak, then calculated the difference: 54 degrees. I’d need my widest 4 × 5 lens, a 72mm optic with an angle of view of 77 degrees, to span the gap comfortably and give Longs Peak and the rising sun “room to breathe” inside the composition. As I envisioned it, the left side of the frame would show the rising sun through a gap in the snow-laden trees, while Longs Peak would dominate the right side of the frame. I’d need a wet snow near winter solstice and light winds so the snow wouldn’t be blown out of the trees. Ideally the storm would end at night, leaving a clear dawn. If the storm cleared midday, the sun could easily melt the snow out of the trees before sunrise the next day. It took several years and several failures before all the elements came together, but when they finally did, I was able to make the image I call Longs Peak from Many Parks Curve.
A good landscape photographer is also a good naturalist. That means understanding the seasonal changes in the area where you’re shooting. In the Colorado Rockies, for example, the first tundra flowers appear in early June, but the most showy tundra flowers, the alpine sunflowers, don’t appear until late June or early July. The columbine, Indian paintbrush, and heartleaf arnica usually peak in mid- to late July. A heavy snow year can delay the cycle by weeks. Not all flowers bloom every year. An exceptional year for alpine sunflowers, for example, is followed by several years when you’re lucky to find even a handful of them. Shooting in areas close to your home helps you track the progression of the seasons and time your shoots to capture the peak of the bloom or the height of the fall color.
Reflections of a scene off the surface of a body of water are another subject where it’s helpful to shoot close to home, since it may take many visits to find a day of complete calm, when the reflection is most mirror-like. Often the wind is calmest right at sunrise, before the heat of the sun has a chance to warm the air and start its turbulent daily dance. The smaller the body of water, the better the chance of a perfect reflection. If the main body of water is too rippled, look for coves along the shore that may be calmer. Outlets and inlets, where the water flows gently, freeze up last in the fall and open up first in the spring. Sometimes they can offer interesting possibilities. Even windy days can sometimes offer reflection shots if the pool of water is small enough. I once shot a reflection on a day so windy I could hardly stand up. The strong wind was creating waves that, at irregular intervals, would push water up through a hole in an ice patch near shore to form a tiny, temporary pool that would calm down almost instantly when the wind lulled. By shooting in the lulls when the pool was full of water, I was able to capture a good reflection. Trying to shoot a reflection in the main body of water, which was ice-free, would have been hopeless since the wind never stopped long enough to allow the whole lake to become still.

FIGURE 2-4 Longs Peak from Many Parks Curve, Rocky Mountain National Park, Colorado
When scouting for flowers, remember that density trumps breadth. In other words, you’re usually better off shooting a small but dense group of flowers, perhaps only a foot or two across, than you are shooting a broader, but less dense, grouping. No matter how dense the cluster of flowers, composing a grand landscape that includes the background is challenging if they are growing on a steep slope. If you try to shoot them from a position uphill from the flowers, looking straight down the slope, you have to place the tripod extremely low to the ground and use a very wide-angle lens to include both flowers and distant peaks. Usually the result of using such a wide angle is that the distant peaks shrink into insignificance and the (often-boring) mid-ground valley looms too large. If you shoot from below, looking straight up the slope, you lose the sense of perspective. Often the hillside looks flat, with very foreshortened peaks or crags at the top. Every picture element seems to lie in one plane, which reduces visual interest. Shooting across a steep slope is usually the best bet, but you can still easily end up with a region that lacks visual interest in the bottom corner of the frame closest to the flowers.

FIGURE 2-5 Longs Peak and Glacier Gorge from Bear Lake at sunset, Rocky Mountain National Park, Colorado. It took many tries before I captured this combination of a sharp reflection, shapely clouds, and sunset light.
Keep other seasons in mind as you’re scouting. A shot that doesn’t work well when you discover it may be superb with a different lighting angle at a different time of year. At the latitude of Boulder (40 degrees north), the angle of sunrise (and sunset) varies by more than 60 degrees from summer solstice, usually June 21st, to winter solstice, usually December 21st. To be precise, the angle of sunrise varies from 58 degrees to 120.6 degrees; the angle of sunset varies from 239.4 degrees to 302 degrees. That’s a huge difference in the angle of light on your subject, as you can see in figure 2-7. I always carry a compass, a topographic map, and a printout of sunrise and sunset angles with me when I’m scouting. The first thing I do when I discover a promising subject is to use the compass to determine precisely where the sun will come up and where it will go down. I currently use a desktop application called Heavenly Opportunity (PC only) for this kind of printout, but you can find the same information in several places on the web and in various smart-phone apps.

FIGURE 2-6 Golden peas and the Flatirons from Chautauqua, Boulder Mountain Parks, Colorado. This relatively small but dense group of flowers was more photogenic than broader but less dense groups of flowers nearby.
Here’s an illustration of this approach. Once while hiking with my wife, Cora, in Colorado’s Indian Peaks Wilderness in July, I came across a stream above Lake Isabelle and noticed that I could see the plains to the east through a notch in the foothills. Any time you’re in the mountains and can see the plains either to the east or west, you’ve got potential for great light on your foreground. In this case, I envisioned warm sunrise light illuminating the stream as it flowed toward the rising sun. I shot a compass bearing to the notch and wrote the bearing down in the notebook I always carry. When I got home, I looked up when the sun would rise at the same bearing as the notch, and learned it would occur both in early September and mid-April. In mid-April the stream would still be snow-covered and frozen, but early September seemed promising. I returned twice that year and once again a year later before making my favorite image of this location, which I call Sunrise above Lake Isabelle. In addition to making notes on promising locations, it’s extremely helpful to grab a few handheld compositional study frames to remind yourself what a location looks like. Even if you don’t have your best camera with you, you can always take some shots with your phone.
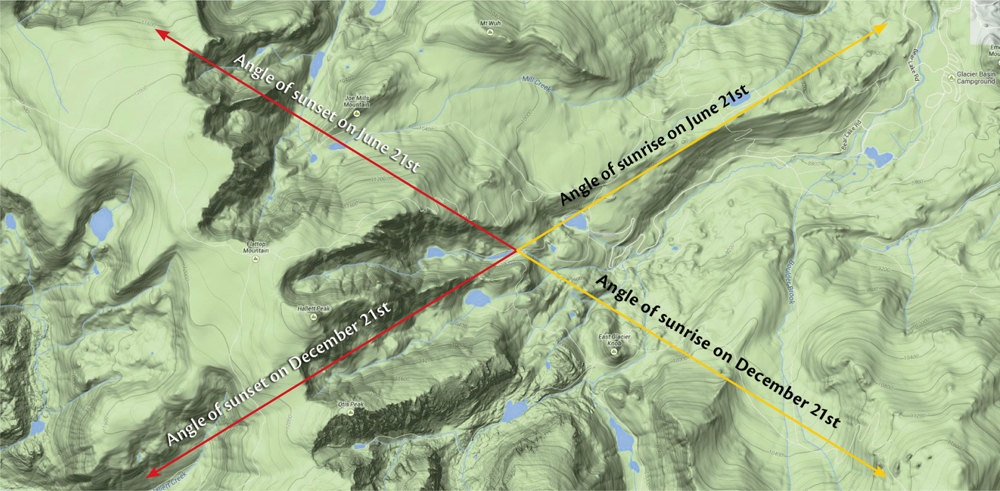
FIGURE 2-7 This illustration, which is based on a screenshot from The Photographer’s Ephemeris, shows how the angle of sunrise (and sunset) varies by more than 60 degrees from winter solstice to summer solstice at 40 degrees north latitude, the latitude of Boulder
Your primary task when scouting is to locate great foregrounds that integrate with superb backgrounds, but you should also keep a look out for new vantage points, whether they are 100 yards away or across the valley. Once while scouting the huge aspen groves along the road in the Kebler Pass area near Crested Butte, Colorado, I spotted a group of unusual red aspen high above the road at the base of Marcellina Mountain. I could have photographed the grove and Marcellina Mountain from the road, but I wondered if a better image was possible. I checked my topographic map, and saw that the grove had to be at an elevation of 8,600 feet. Examining the map further, I saw that there were no tall peaks between the grove and the point on the western horizon where the sun would set in late September. If the evening was clear, the red aspen would be bathed in orange light, which would create intense color in my shot. I could also tell from the map that the red aspen grove would offer a great view of 12,432-foot East Beckwith. I endured a skin-shredding bushwhack through steep Gambel oak thickets to reach the grove and confirm my theory, then repeated the trek that evening to take the shot, which I call East Beckwith at Sunset.

FIGURE 2-8 Sunrise above Lake Isabelle, Indian Peaks Wilderness, Colorado

FIGURE 2-9 East Beckwith at Sunset, Kebler Pass area, Colorado
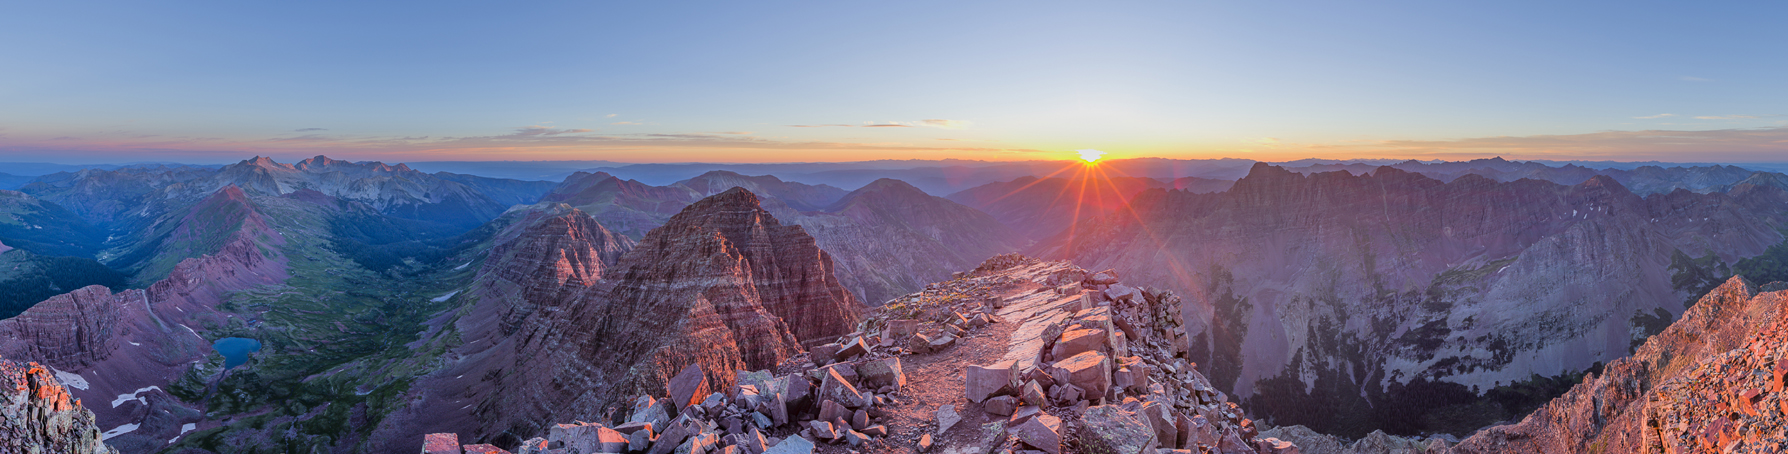
FIGURE 2-10 Sunrise panorama spanning 180 degrees, taken on the summit of South Maroon Peak, Maroon Bells-Snowmass Wilderness, Colorado. I left my campsite 4,000 feet below the summit at 11 p.m. and climbed for six hours in the dark in order to reach the top before sunrise.
As I’ll detail in subsequent chapters, most good landscape photographs are made early or late in the day. The local geography determines whether the shot will work better at sunrise or sunset. The eastern slope of the Rockies near my home in Boulder, for example, tends to be a sunrise location because the most interesting sides of the peaks face east, toward the rising sun; at sunset they’re in deep shade. Scouting sunrise shots is harder than scouting sunset ones. In the morning, you’ve got about half an hour between the time it’s light enough to see and the time when you need to start setting up your camera. If an area is too big to scout in half an hour, you can’t really scout a sunrise and shoot it effectively on the same day. You need to scout in advance, during the midday hours when the light is typically less interesting, then return at sunrise. Sunset shots are easier since you can conceivably scout and shoot on the same day—and you don’t need to get up insanely early.
One of the dirty little secrets of landscape photography, especially landscapes in the wilderness, is that as fun and exciting as it can be, it’s also a lot of hard work. I’ve often gotten up at 1 a.m. or 2 a.m. to be in the right place to shoot a sunrise. My motto for sunrise shoots is simple: sleep is for photographers who don’t drink enough coffee. The earliest I’ve ever started was 11 p.m., which is when I left my camp at Crater Lake in the Maroon Bells-Snowmass Wilderness and started a six-hour climb up South Maroon Peak. I arrived on the summit 45 minutes before sunrise, in time to set up and shoot South Maroon Peak Panorama. (All these early starts have led me to formulate the first dictum in Randall’s Rules of Landscape Photography: never eat breakfast before midnight. If you have to get up before midnight to do a photo shoot, eat dessert.)
Of course, if your subject is a long way from your camp or car, you’d better be prepared for some serious nighttime route finding and hiking. I carry a map, compass, altimeter, and GPS receiver, as well as a powerful LED headlamp with extra batteries. Since I’m frequently shooting alone, I also carry a tiny backup headlamp, complete with its own spare battery. For detailed treatises on backpacking and backcountry navigation, please see my books Outward Bound Backpacker’s Handbook and Outward Bound Map & Compass Handbook, both published by Globe Pequot Press.

FIGURE 2-11 Crestone Needle and the southern peaks of the Sangre de Cristo Range from the summit of 14,294-foot Crestone Peak at sunrise, Sangre de Cristo Wilderness, Colorado
Getting to know an area also entails studying its weather patterns. A subject that is mundane under clear blue skies can be magical with the right atmospherics: the interplay of mist, fog, cloud, and landscape. In summer along the California coast, for example, fog develops almost every night and burns off again by noon. That transition, as the fog banks break up and the sun begins to spotlight the ground through holes in the clouds, can be a spectacular time to shoot. Almost everyone has felt their spirits lift as a gray day gives way to sunshine. A photograph that captures that feeling can be quite compelling. In the deserts of southern Utah, day after day of blue skies can result in images that all look the same. Landscape photographer Tom Till, who lives in Moab, the heart of red-rock country, told me his solution: “I wait for storms and go shoot when storms come.” In winter that may mean the rare significant snowfall; in summer that may mean waiting for the arrival of the summer monsoon, the annual influx of moist air that produces spectacular late-afternoon thunderstorms.
The transition from one weather system to another can produce unique images in mountain areas as well. Across the entire continental United States, most major storms track from west to east, following the prevailing winds. All winter long, these storms hammer Colorado’s Continental Divide, particularly the Front Range, which includes the Indian Peaks Wilderness and Rocky Mountain National Park. The high winds scour the snow from the peaks and trees, leaving behind a stark landscape that’s more harsh than beautiful. Occasionally, however, particularly in March and early April, these storms reverse course. Moist air pours in from the east, hits the foothills of the Rockies, rises and cools. These upslope storms sometimes dump as much as 20 or 30 inches of snow on the eastern side of the Continental Divide. Often these storms have light winds, so the snow plasters every peak and loads every tree, transforming the landscape overnight into a winter wonderland. I’ve learned to wait patiently for those days when upslope storms clear out, then do whatever it takes to be in the right place early in the morning so I can shoot the scene before the sun melts the snow from the trees and the prevailing westerly winds reestablish themselves and begin scouring the peaks once more.
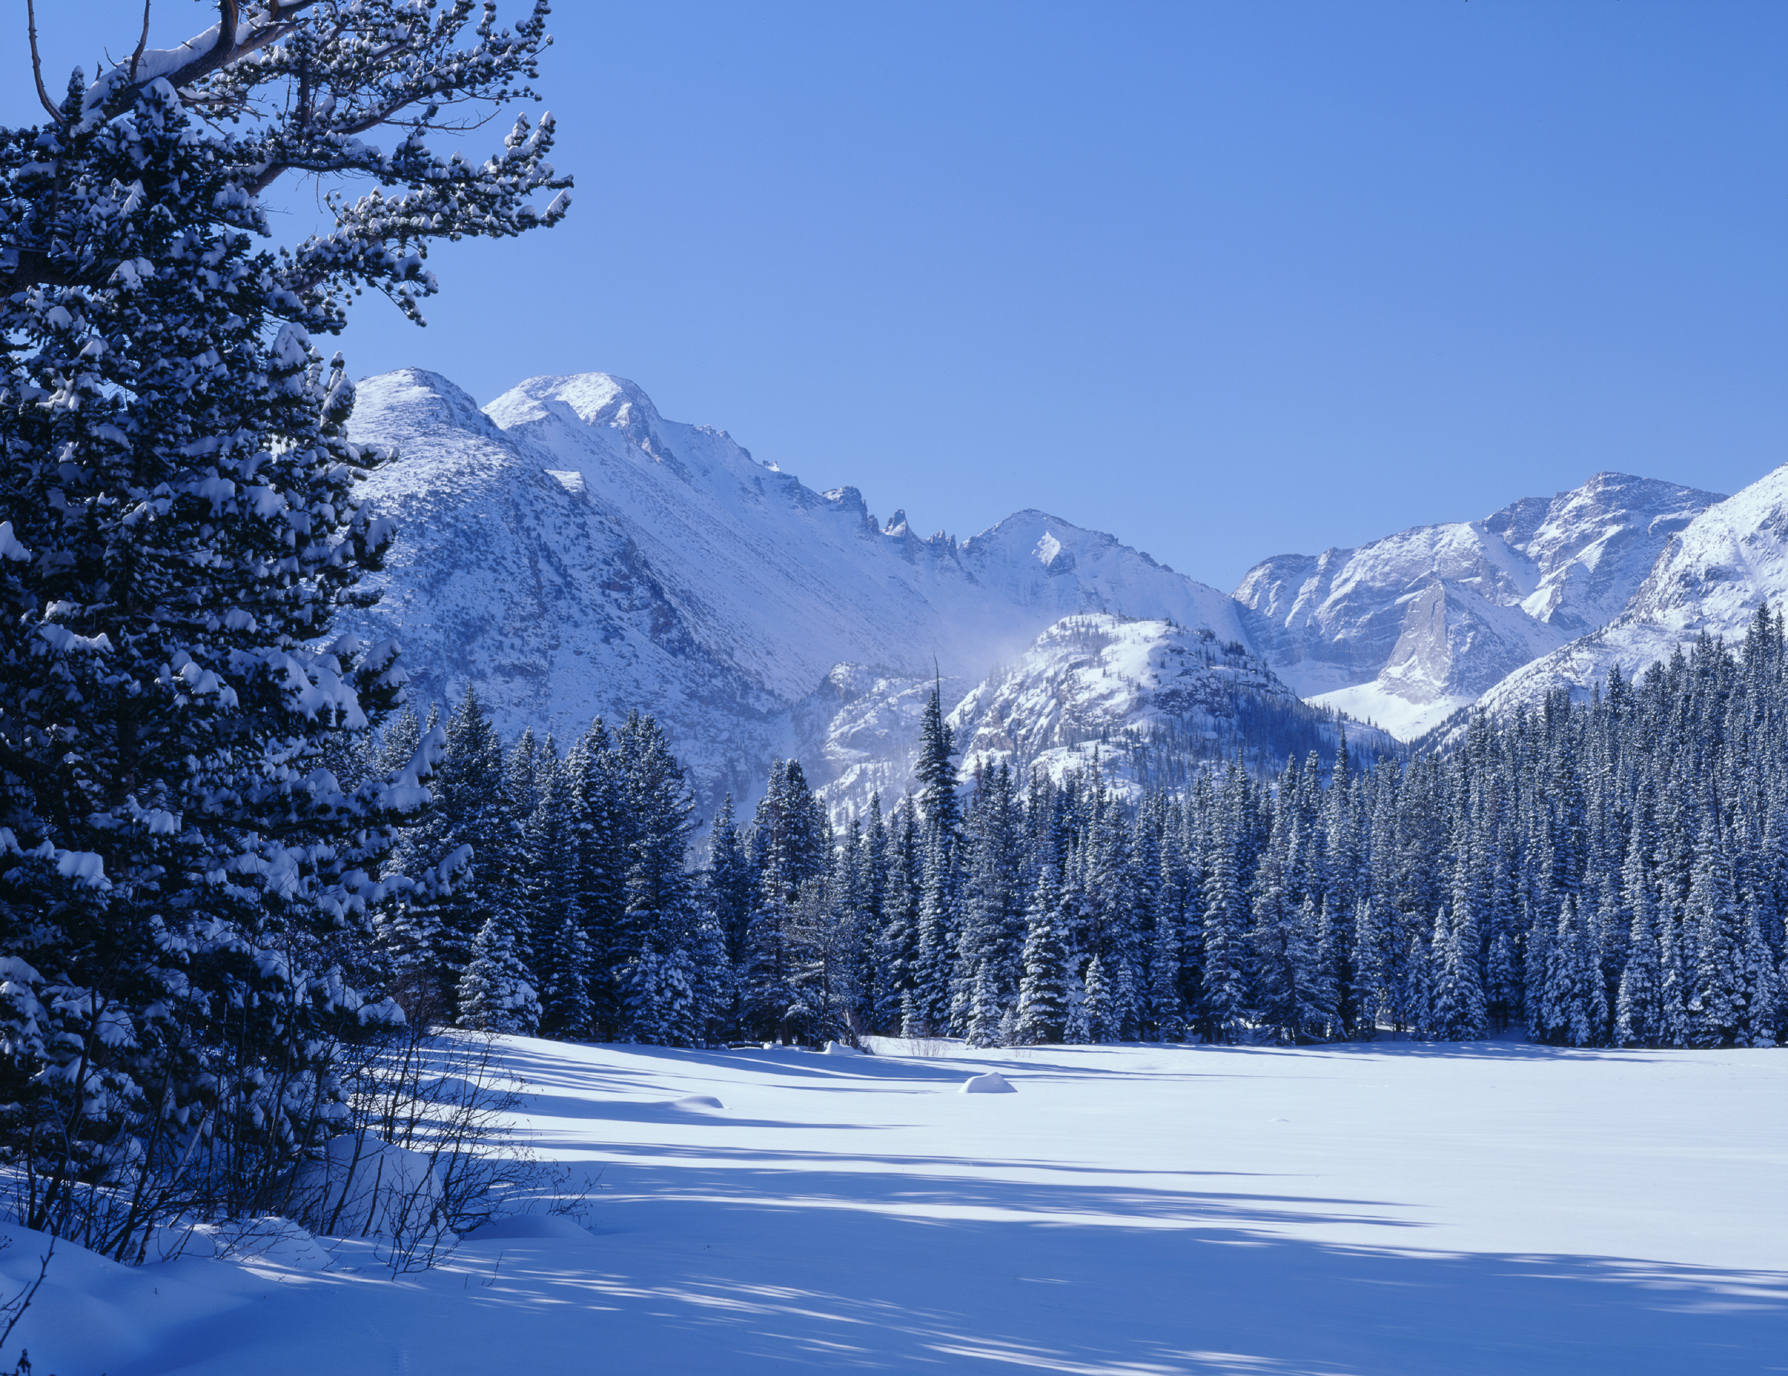
FIGURE 2-12 Longs Peak and Glacier Gorge from Bear Lake after an upslope snow, Rocky Mountain National Park, Colorado
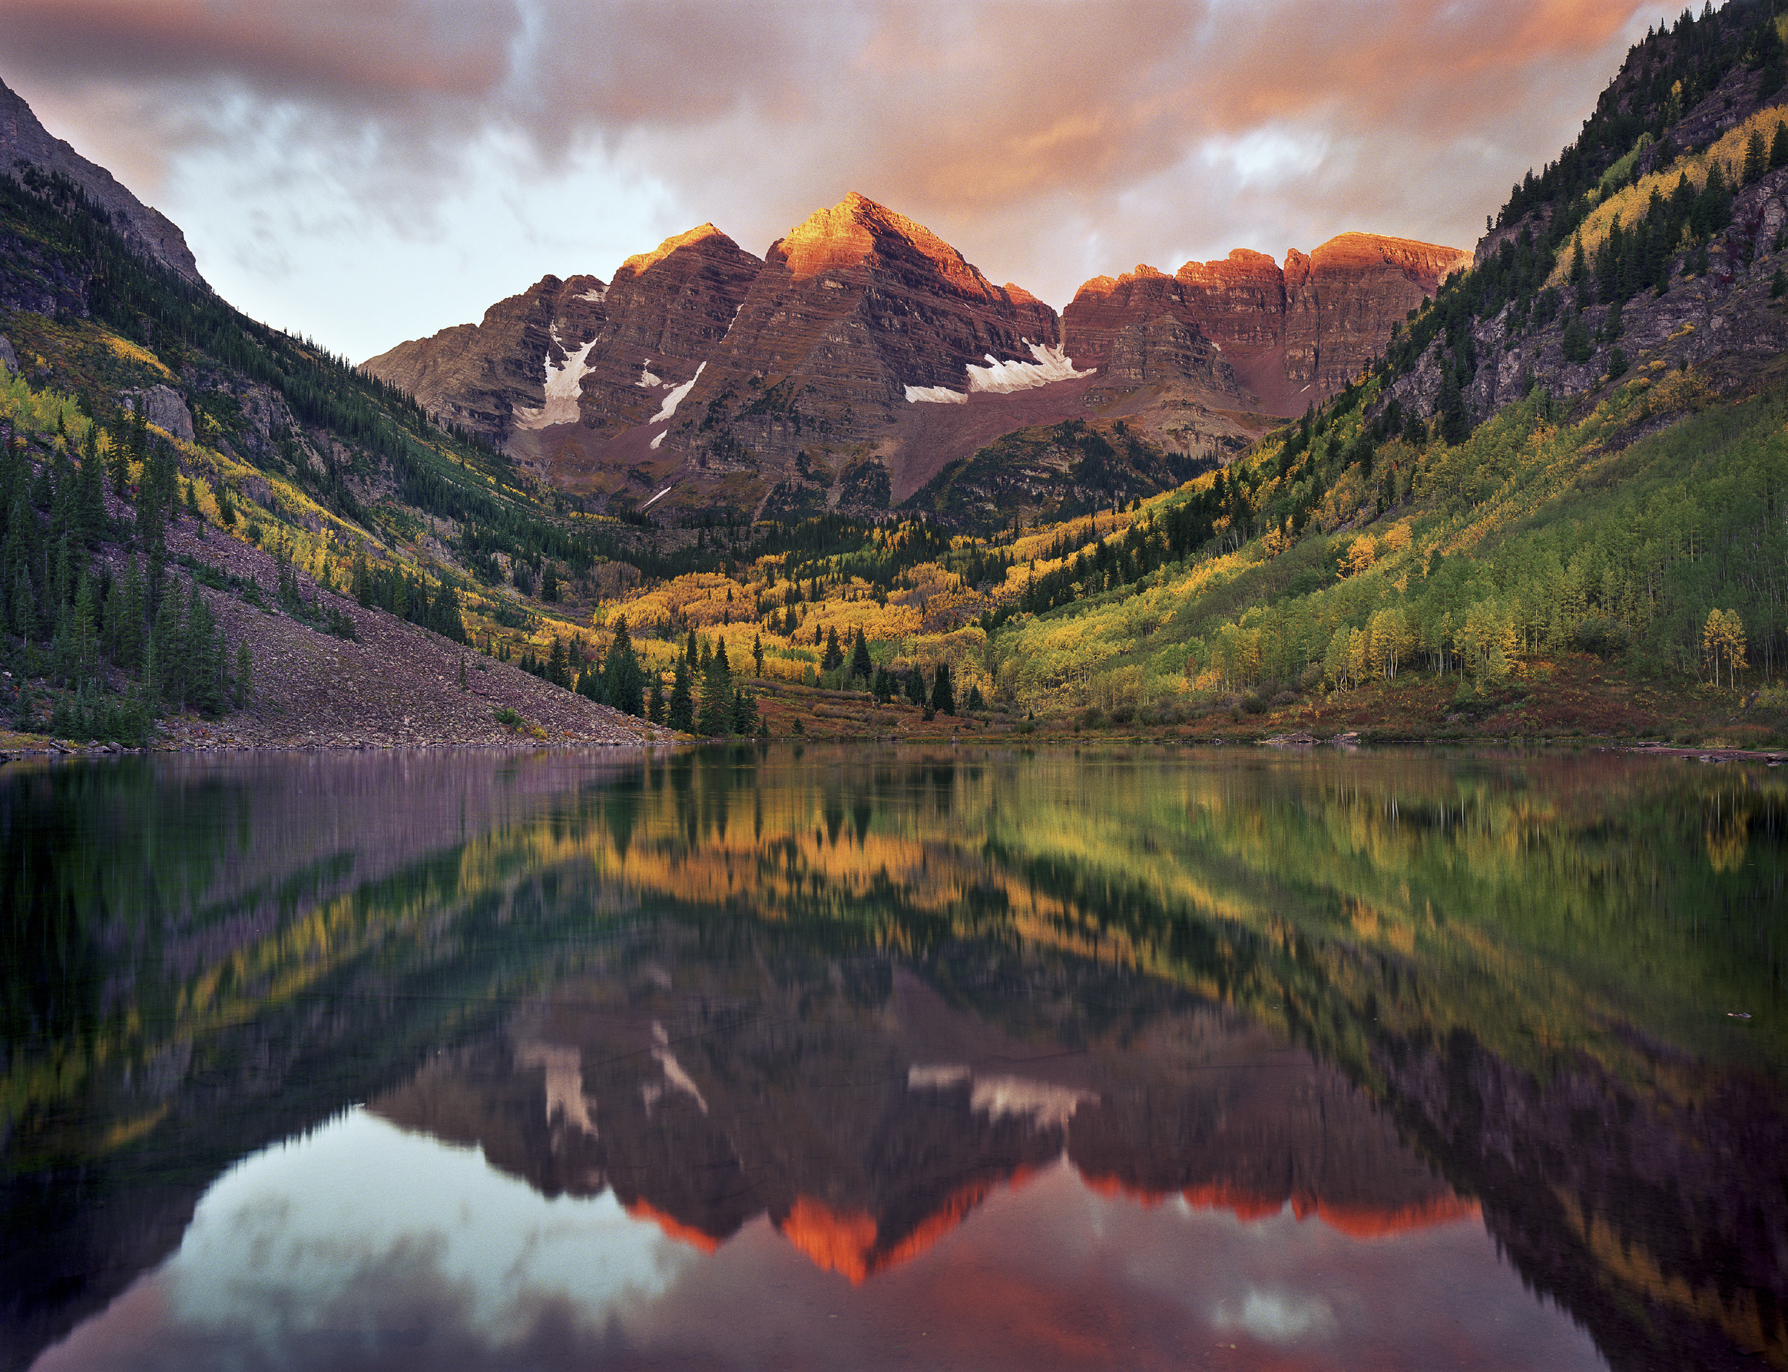
FIGURE 2-13 I have shot sunrise at Maroon Lake, in the Maroon Bells-Snowmass Wilderness, Colorado, at least a dozen times. This is the closest I’ve come to an ERNI—an exceptional rendition of a natural icon.
No matter where you’re shooting, remember that in many ways bad weather can be good weather—particularly when you can combine it with good light. I’ll explain why the day right after a storm can produce spectacular light in chapter 4.
Sometimes all your scouting will be for naught, and the best shot will turn out to be the one that’s been staring you in the face all along. That’s the case with the famous view of the Maroon Bells reflected in Maroon Lake. I once spent an entire day scouring the valley of Maroon Creek, hiking off-trail to the tops of obscure knolls, looking for that secret location that no one else had discovered. If it exists, I didn’t find it. The best shot of the Maroon Bells is from Maroon Lake. So how do you create a fresh image of one of the most heavily photographed locations in Colorado? Shoot an ERNI: an exceptional rendition of a natural icon. Unless you’re a lot luckier than I am, sometimes the only way to make something exceptional is to go back again and again until something interesting happens with the light, the clouds, and the atmospherics: a gathering or clearing storm, fresh snow, mist rising off the lake—something to lift the image from cliché to extraordinary.
This chapter has focused on the process of scouting broad areas that you’ve identified as promising. That’s certainly a sound approach, but in some cases you can create photographs that are even more powerful by visualizing a specific image, then going out in search of the precise location that matches your vision. That’s the subject of the next chapter.