
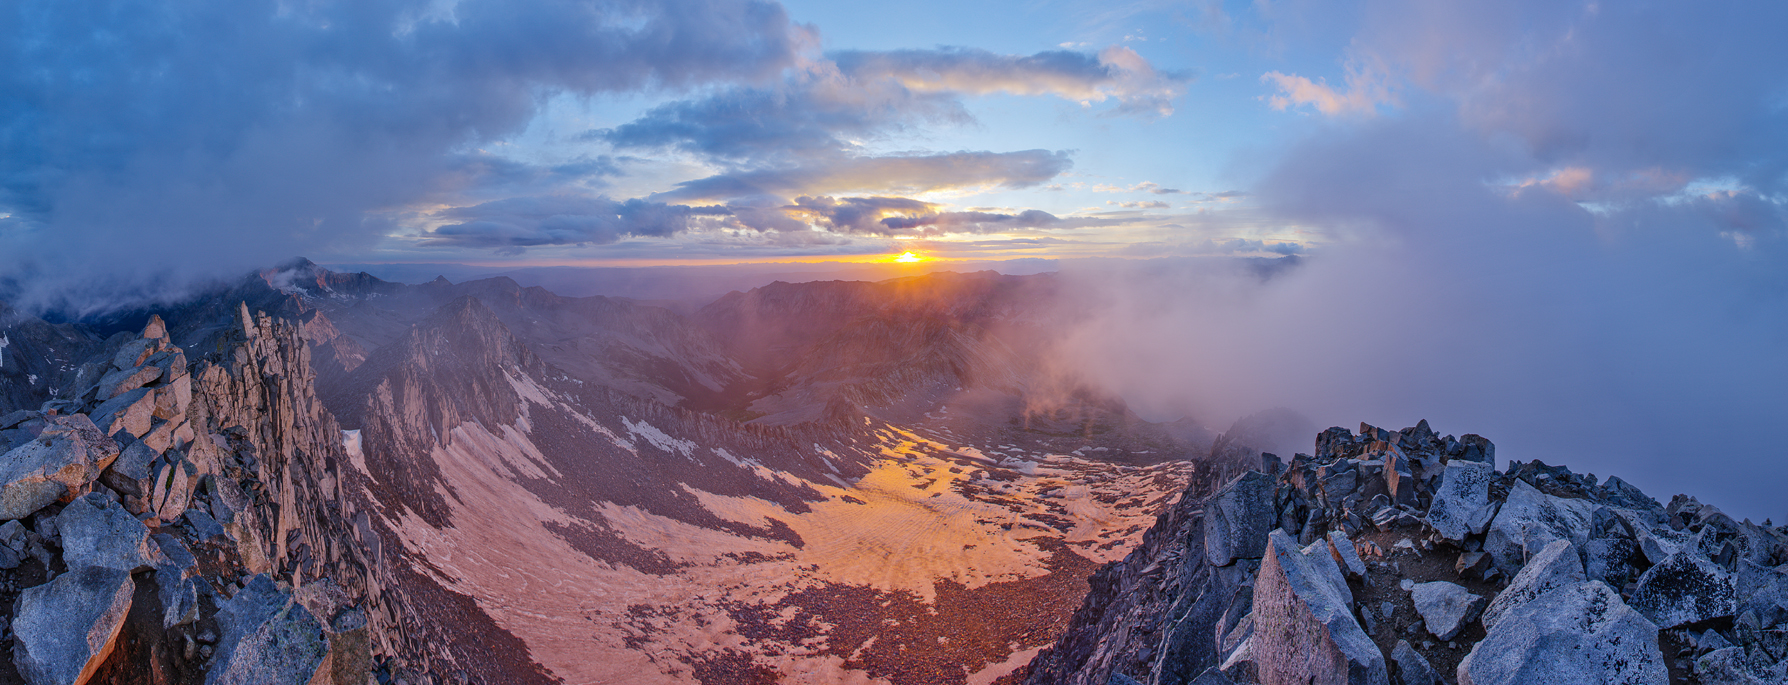
FIGURE 8-1 Misty sunrise from the summit of Snowmass Mountain, Maroon Bells-Snowmass Wilderness, Colorado
8 Take a Walk on the Wide Side
It’s a wide, wide world out there. Certain subjects just cry out to be photographed in a panoramic format. Many of my favorite images from my “Sunrise from the Summit” project, in which I photographed sunrise (or sunset) from the summit of all 54 of Colorado’s 14,000-foot peaks, are panoramas. Something about that ultra-wide angle of view, sometimes as much as a full 360 degrees, captured the exhilarating, humbling, and awe-inspiring experience of being a tiny speck on top of the world.
The easiest way to shoot a panorama is to take a single frame and crop it to whatever aspect ratio works best for the subject. There’s no law that says that an image composed within a 3:2 frame must be shown with that same aspect ratio. However, there are two disadvantages to creating a panorama with only a single frame. First, your shot is limited to the angle of view of your widest lens. For my 16mm lens, that’s 97 degrees—wide, but not as wide as I often want. The second disadvantage concerns print size. Panoramas look good printed big, but the biggest print you can make is limited by the resolution of the single frame. The solution is to shoot a series of images, rotating the camera between shots so each frame overlaps the next, and then stitch all the frames together with appropriate software. With this approach, it’s possible to create enormous panoramas—as much as 360 degrees wide—with great quality.
Setting up a Single-Row Panorama
The simplest panoramas to create consist of a single horizontal row of images. The key to shooting a single-row panorama that can easily be stitched together later is proper setup of the camera and tripod in the field. If you do a careful job there, the actual stitching of single-row panoramas is straightforward.
First, level the base of the tripod head by adjusting the length of the tripod legs. Check your work using your tripod’s built-in level (if you have one) or a handheld level. You’re leveling the plane on which the tripod head rotates as you pan across the scene. This is a crucial step; get it wrong, and a horizon that should be straight and level will look like a roller-coaster track. Next, level the camera forward, backward, and left to right using the in-camera level or a level in the hot shoe. I normally orient the camera vertically, which requires me to take more images to cover the width of the panorama, but it also gives me higher resolution in the final image. If the closest part of your subject is 50 yards away or more, this completes the physical setup.
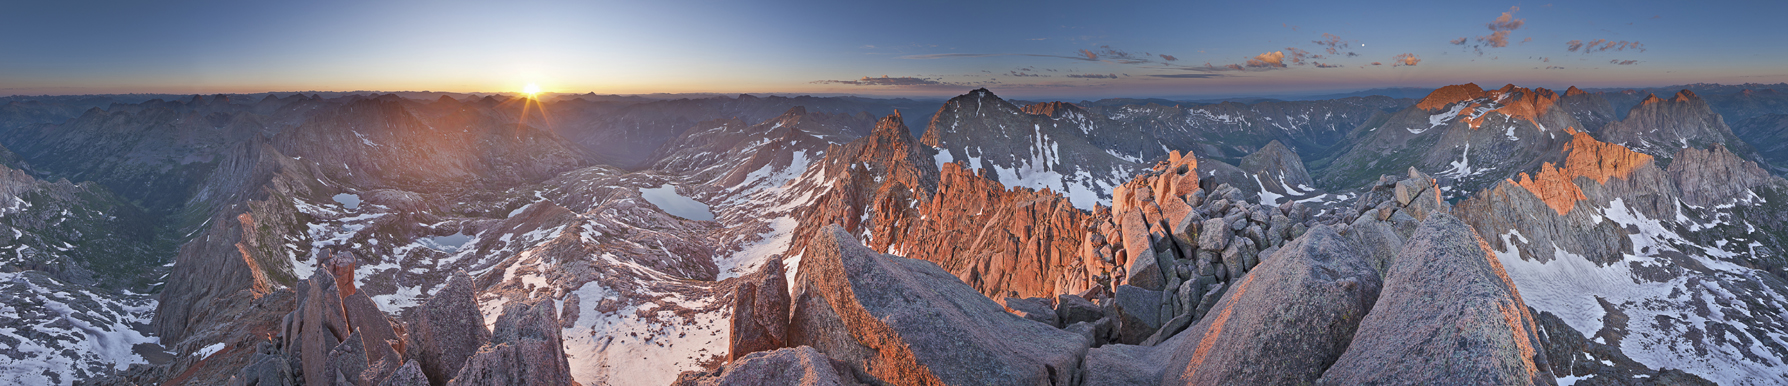
FIGURE 8-2 Full 360-degree panorama of moonset at sunrise from the summit of 14,059-foot Sunlight Peak, Weminuche Wilderness, San Juan Mountains, Colorado. Single-row panorama, 12 component images, 24mm tilt-shift lens in portrait orientation. I created each component image from a bracketed set of three images merged using the Rembrandt Solution. Today I would use the HDR technique described in Shooting and Processing High-Contrast Panoramas.
Of course, the most interesting panoramas are typically those that include a strong foreground. If your composition includes elements close to the camera, there’s another step required for setup: positioning the camera so it rotates around the nodal point of the lens. This step is necessary to prevent foreground elements from moving in relation to background elements as you rotate the camera, a phenomenon called parallax. To demonstrate this, hold up one finger and close one eye. Rotate your head back and forth while holding your finger stationary. Your finger will seem to move in relation to the background. This is because your eye is not centered on your head’s axis of rotation. Rotating the camera when its eye (the lens) is not centered over the axis of rotation (the center of the tripod head) produces a similar result. Trying to assemble a panorama with serious parallax errors will befuddle even the smartest stitching software.
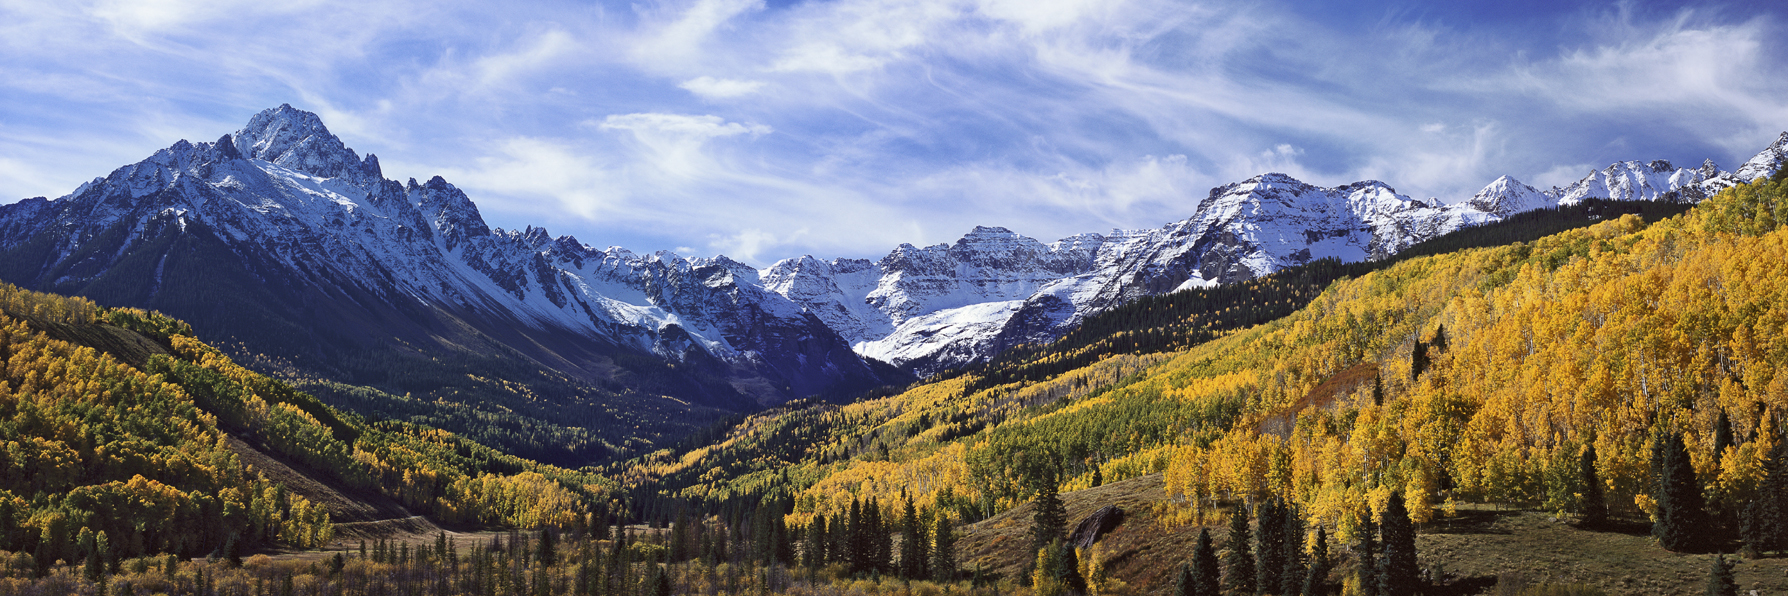
FIGURE 8-3 Mt. Sneffels and the Sneffels Range from County Road 7, near Ridgway, Colorado, shot on 4×5 film and cropped to a panoramic format
Rotating the camera around the nodal point of the lens requires purchasing some kind of specialized panorama head. The Really Right Stuff Pano Elements Package that I currently use is shown in figure 8-4. The package consists of two parts: the nodal slide, on which the camera is mounted, and the panning clamp, which is mounted on the tripod head. The L-bracket bolted to the bottom and side of the camera was an essential but separate purchase. Once the panning clamp is leveled using the normal ballhead controls, you don’t need to touch those controls again. The panning clamp allows the camera to pan back and forth with a level plane of rotation. By design, leveling the panning clamp also levels the camera left to right and front to back at the same time. This greatly simplifies setup. No more tedious adjusting of the length of each tripod leg to make the plane of rotation parallel to the ground, then leveling the camera as a separate step!
Finding the Nodal Point
Here’s how to find the nodal point of your lens. First, create a situation in which some part of the subject is close to the lens, say, 18 inches or two feet away, while the background is at least 50 yards away. One easy setup is to tie a string to a branch or some other high support where you can see past the string to a well-defined landmark like a building or streetlamp. Hang a weight from the string to keep it from blowing in the wind. Now set up and level your camera as previously described. Adjust the nodal slide until you’ve positioned the center of the lens approximately over the axis of rotation of your tripod head. Now rotate the camera left to right. If the string appears to shift to the right in relation to the background, slide the camera forward (away from you as you look through the camera). If the string appears to shift to the left in relation to the background, slide the camera backward (toward you as you stand behind the camera). Find the position on the nodal slide at which the string appears to remain stationary in relation to the background as you pan the camera from left to right. You only need to noodle over nodal points once: this is a one-time test that will not need be repeated so long as you use the same camera and lens.
If you’re working with a zoom, you should test several representative focal lengths, say, 16mm, 20mm, 24mm, 28mm, 35mm, and 50mm. You don’t need to test every millimeter change in focal length. You may find that you don’t have enough travel on the nodal slide to rotate a 70mm lens around the nodal point, but you’re not likely to be shooting panoramas with very close-in foregrounds with a 70mm lens. Write the results on a small card and put the card in your camera bag. I printed mine on an adhesive label and attached it to the nodal slide itself, then protected the label with a clear peel-and-stick laminate available at any office-supply store.

FIGURE 8-4 A single-row panorama setup showing the nodal slide and panning clamp
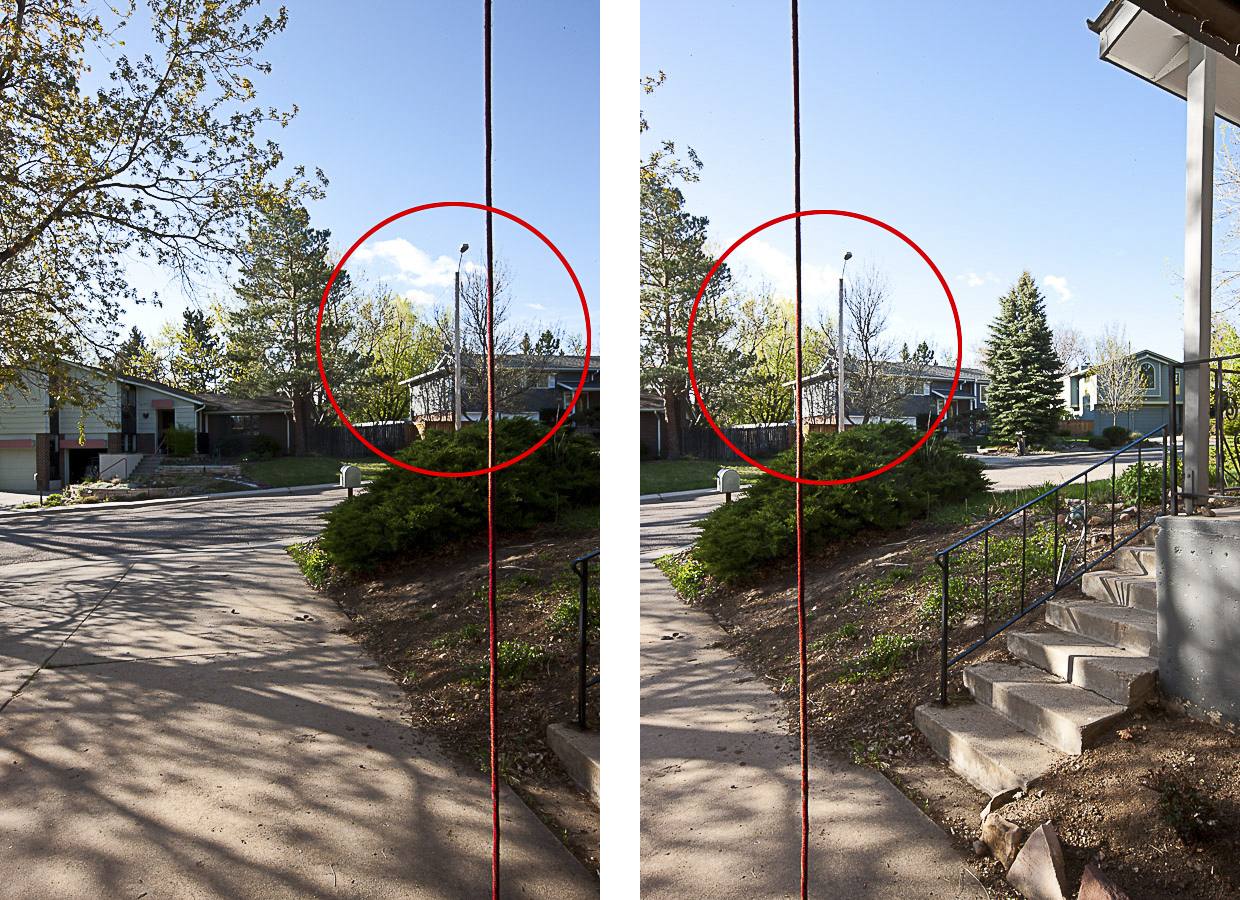
FIGURE 8-5 This pair of photographs demonstrates what happens when you rotate the camera with the axis of rotation passing through the camera body rather than the nodal point of the lens. Notice that the string appears to the right of the distant streetlamp in the image on the left, but to the left of the streetlamp in the image on the right.

FIGURE 8-6 This pair of photographs demonstrates what happens when you rotate the camera with the axis of rotation passing through the nodal point of the lens. Notice how the string remains in the same place in relation to the distant streetlamp in both frames.
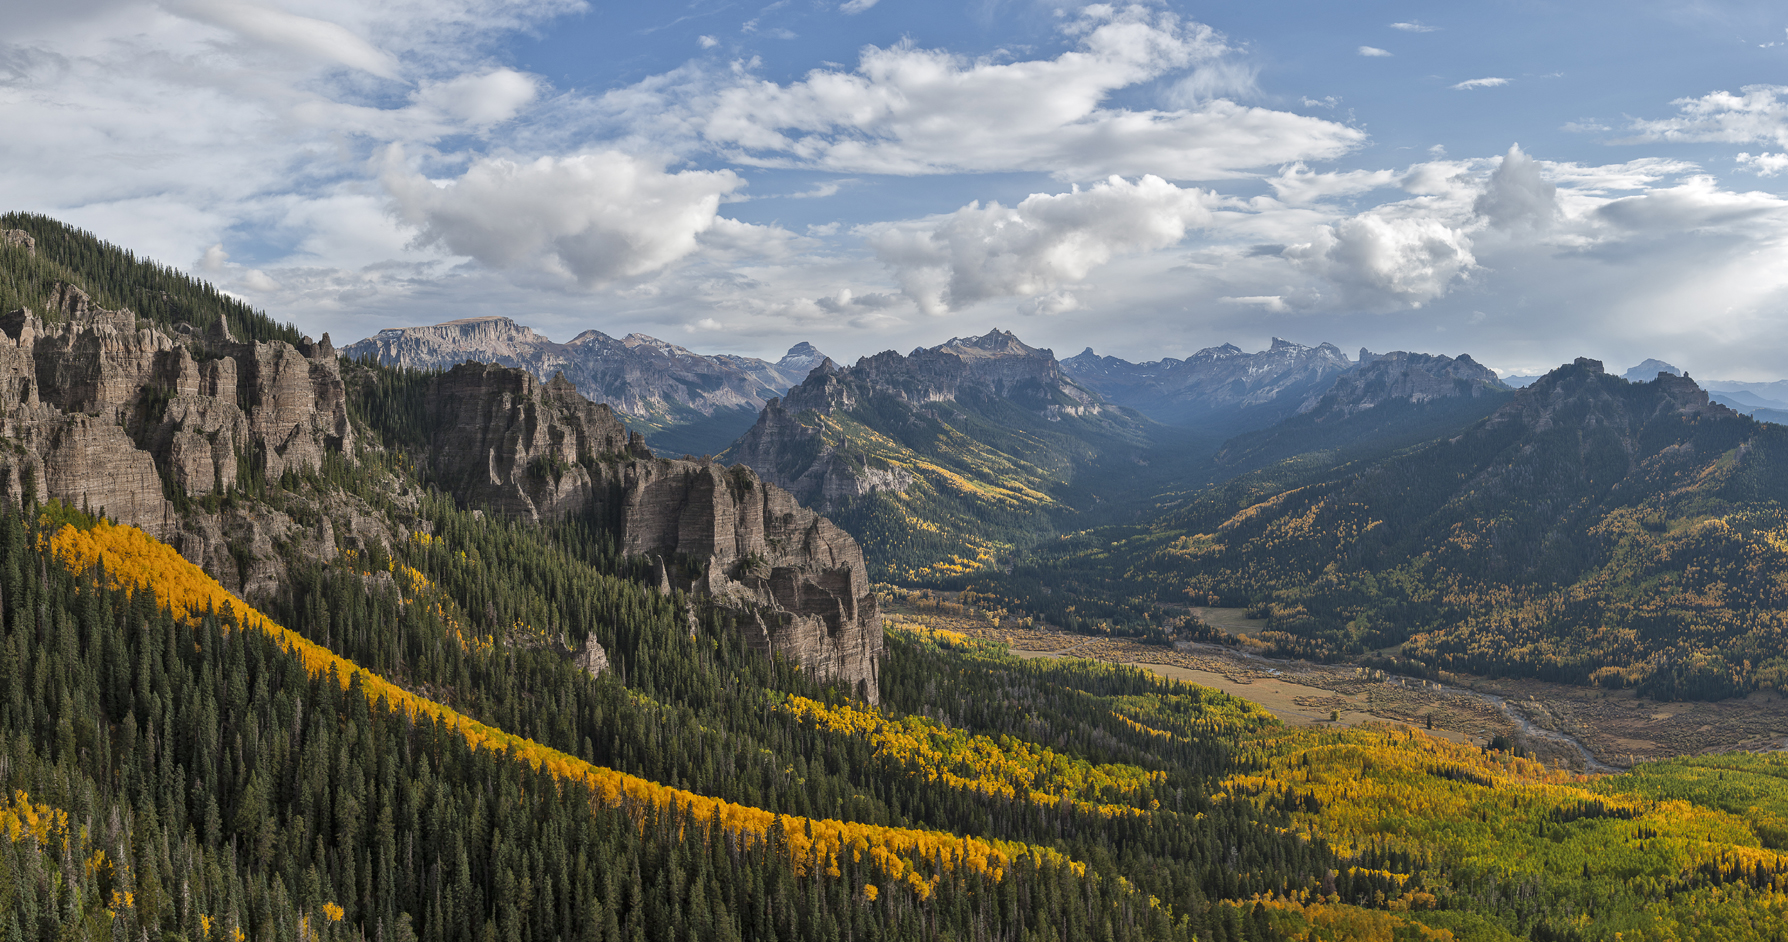
FIGURE 8-7 Uncompahgre and Wetterhorn Peaks from an overlook along the Alpine Trail, Uncompahgre Wilderness, Colorado. Single-row panorama, three frames, 35mm lens in portrait orientation.
Camera Settings for Single-Row Panoramas
After perfecting your composition, leveling your camera, and positioning the nodal slide correctly, turn your attention to the camera controls. All controls should be on manual. Use manual exposure, manual white balance, manual ISO selection, and manual focus. Any change in exposure, color, depth of field, or focus point can make it impossible to stitch the images together. If possible, choose an exposure that will work for all frames in your panorama. If that’s not possible, use the exposure strategy I’ll discuss in the following sections. Compose generously, particularly with wide angles. When initially stitched together, the panorama will have scalloped edges. You’ll need to crop it to give it a rectangular shape, so you’ll lose some image area. You also have the option to use Content-Aware Fill in Photoshop to fill in the transparent area around the edges. This creates a rectangular panorama that doesn’t require cropping. The software must invent pixels to do this, however, and the results can be bizarre. It’s better to compose generously and crop away the scalloped edges.
Rotate the camera between shots so that each frame overlaps the next by about 30 percent. You don’t need to use precisely the same amount of overlap for each successive frame. However, I prefer to rotate the camera by a precise number of degrees using the scale on the panning clamp and the table of lens rotation positions (left). It’s quicker to use the scale when the light is changing fast than it is to look through the camera as I pan to the next camera position.

Stitching Panoramas
You can use Photoshop, as well as many other programs from simple and cheap to complex and expensive, to stitch your single-row panoramas together. At this time, you cannot stitch panoramas with Lightroom. If you have both Lightroom and Photoshop, however, you can select your images in Lightroom, then choose Photo>Edit In>Merge to Panorama in Photoshop. If you have Photoshop but not Lightroom, first open Bridge and select the images you want to stitch together. Then choose Tools>Photoshop>Photomerge. In the Photomerge dialog box, shown in figure 8-8, choose Cylindrical as the layout option, and tick the boxes for Vignette Removal and Geometric Distortion Correction. (Blend Images Together will already be ticked by default; leave it ticked.) Click OK, and Photoshop will produce your stitched panorama. If you’ve done everything right in the field, the result should be perfect, with no stitching errors, such as odd, blurry discontinuities in the boundaries of objects that should be smooth.

FIGURE 8-8 The Photomerge dialog box in Photoshop. The Cylindrical layout choice and the three checkboxes that should be ticked are circled.
Shooting and Processing High-Contrast Panoramas
If you’re shooting a very wide panorama, you’ll probably have a broad range of light intensities across the scene. In those situations, HDR will be the only viable way to capture good detail in both the shadows and highlights. I start by setting the best compromise exposure for the frame that will be the middle of my panorama (unless that frame includes the sun, in which case I exclude the sun when metering). Normally I use the exposure recommended by the camera as a starting point. As with all panoramas, I set all camera controls to manual. Then I rotate the camera to the starting position, usually at the left end of the panorama. When the light hits, I shoot a three-frame bracket set with a two-stop bracket interval, so my exposures are –2, 0, and +2. I check my histogram for each bracketed set to make sure I’ve got the detail I want in the highlights and shadows. If necessary, I’ll use exposure compensation to set the starting point for my bracketed set at –1 or +1 to ensure my lightest frame has good shadow detail and my darkest frame has good highlight detail.
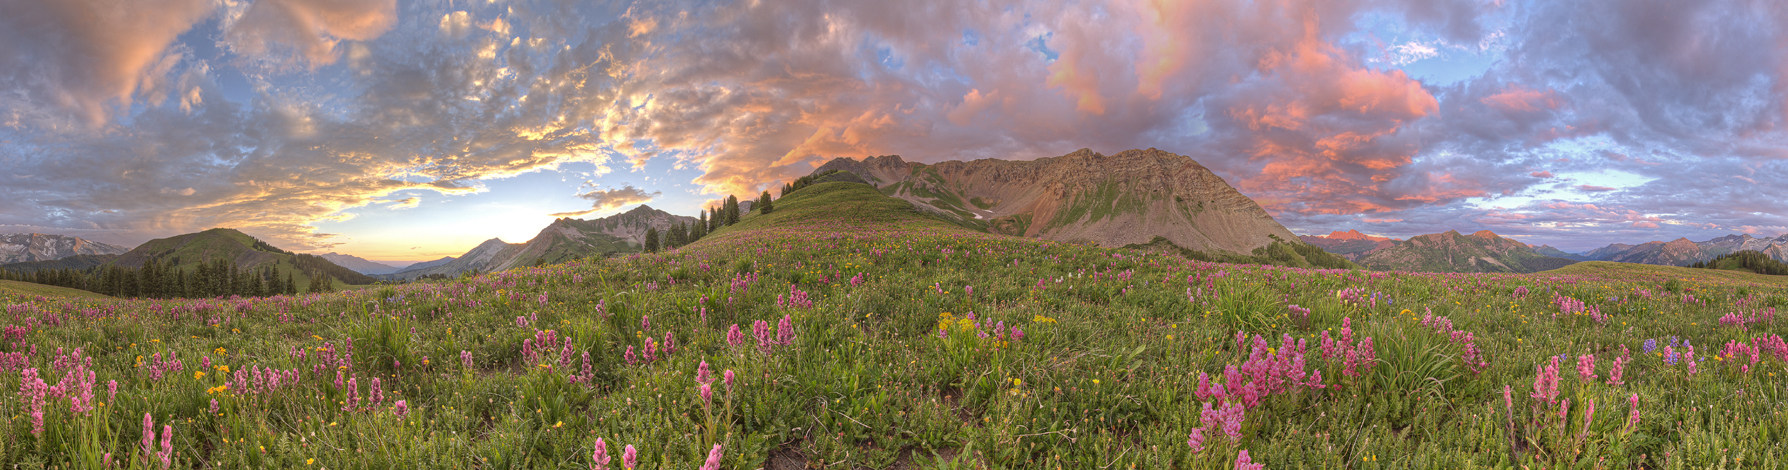
FIGURE 8-9 Full 360-degree panorama of Indian paintbrush and Meadow Mountain at sunset, Maroon Bells-Snowmass Wilderness, Colorado. Single-row panorama, 11 component images, 20mm lens in portrait orientation. I handled the high contrast by using the HDR technique described in Shooting and Processing High-Contrast Panoramas.

FIGURE 8-10 Nearly 180-degree sunrise-to-moonset panorama from the summit of 14,087-foot Windom Peak, Weminuche Wilderness, Colorado. Single-row panorama, six frames, 20mm lens in portrait orientation. I handled the high contrast by using the HDR technique described in Shooting and Processing High-Contrast Panoramas.
After downloading the files, I merge each bracketed set into a 32-bit TIFF using appropriate software, such as the Merge to 32-bit HDR plugin for Light-room that I described in chapter 6. Then I use Photoshop to stitch the 32-bit TIFFs into one giant panorama, still in 32-bit TIFF format. Note that you cannot export the images from Lightroom to stitch them in Photoshop and still preserve the 32-bit format because Lightroom will export them as 8-bit or 16-bit files (depending on your setting in Preferences—I recommend 16-bit). Once the 32-bit files have been created, you’ll need to go to Bridge to select them and start the merging process using Tools>Photoshop>Photomerge. Finally, I tone-map the stitched 32-bit TIFF in Lightroom.
On occasion I’ve seen the stitching algorithm in Photoshop produce unacceptable results when stitching 32-bit files. In one case, the stitched image had a large section of blown-out sky even though the component images for the panorama had plenty of highlight detail. If you encounter a similar problem, try opening all of the 32-bit component images in Lightroom’s Develop module. Be sure Auto-Sync is enabled, so that any change you make to one image will be applied to all the component images. Highlight the image with the most contrast (the one with the sun in the frame, for example) and begin editing it while keeping an eye on how your changes are affecting the other images. The challenge is finding a group of settings that works adequately for all of the component images, even though they may have very different degrees of contrast. This may require some trial and error. Once you’re satisfied, go back to the Library module, select all the images, and choose Photo>Edit In>Merge to Panorama in Photoshop. Lightroom will convert your 32-bit files to 8-bit or 16-bit files, respecting all the Develop settings you applied, and send them over to Photoshop, which should stitch them into the final panorama with no further unpleasant surprises.
If you’re shooting a 360-degree panorama, be sure to start the sequence by shooting the frame you’ll want on the left side of the finished panorama. You’re shooting a full circle, but the starting point still matters. By the time you work your way around the circle, enough time will have elapsed that clouds and sky color may no longer match up across the boundary between the first and last frames.
Photoshop sometimes seems to have a mind of its own when stitching 360-degree panoramas. Rather than starting the stitch with the frame you shot first (the one you want on the far left side of the panorama), it will pick an image from the middle of the sequence and start stitching from there. To solve this problem, locate the first image you shot (the one that will end up on the far left side of the finished panorama). Then locate the last image in the sequence (the one that will eventually end up on the far right). In the final panorama, the right edge of the far right image should end where the left edge of the leftmost image begins. Crop the right side of the rightmost image so it only overlaps the leftmost image by about five percent. Now when Photoshop stitches the images together, it will start with the correct image.
Multi-Row Panoramas
Multi-row panoramas are stitched together from an array of images rather than a single row. For example, you might shoot four rows of images, with each row containing ten images. The completed array would have four rows and ten columns. Single-row panoramas are much easier to set up, shoot, and stitch together than multi-row panoramas, so why would you ever want to shoot a multi-row panorama?
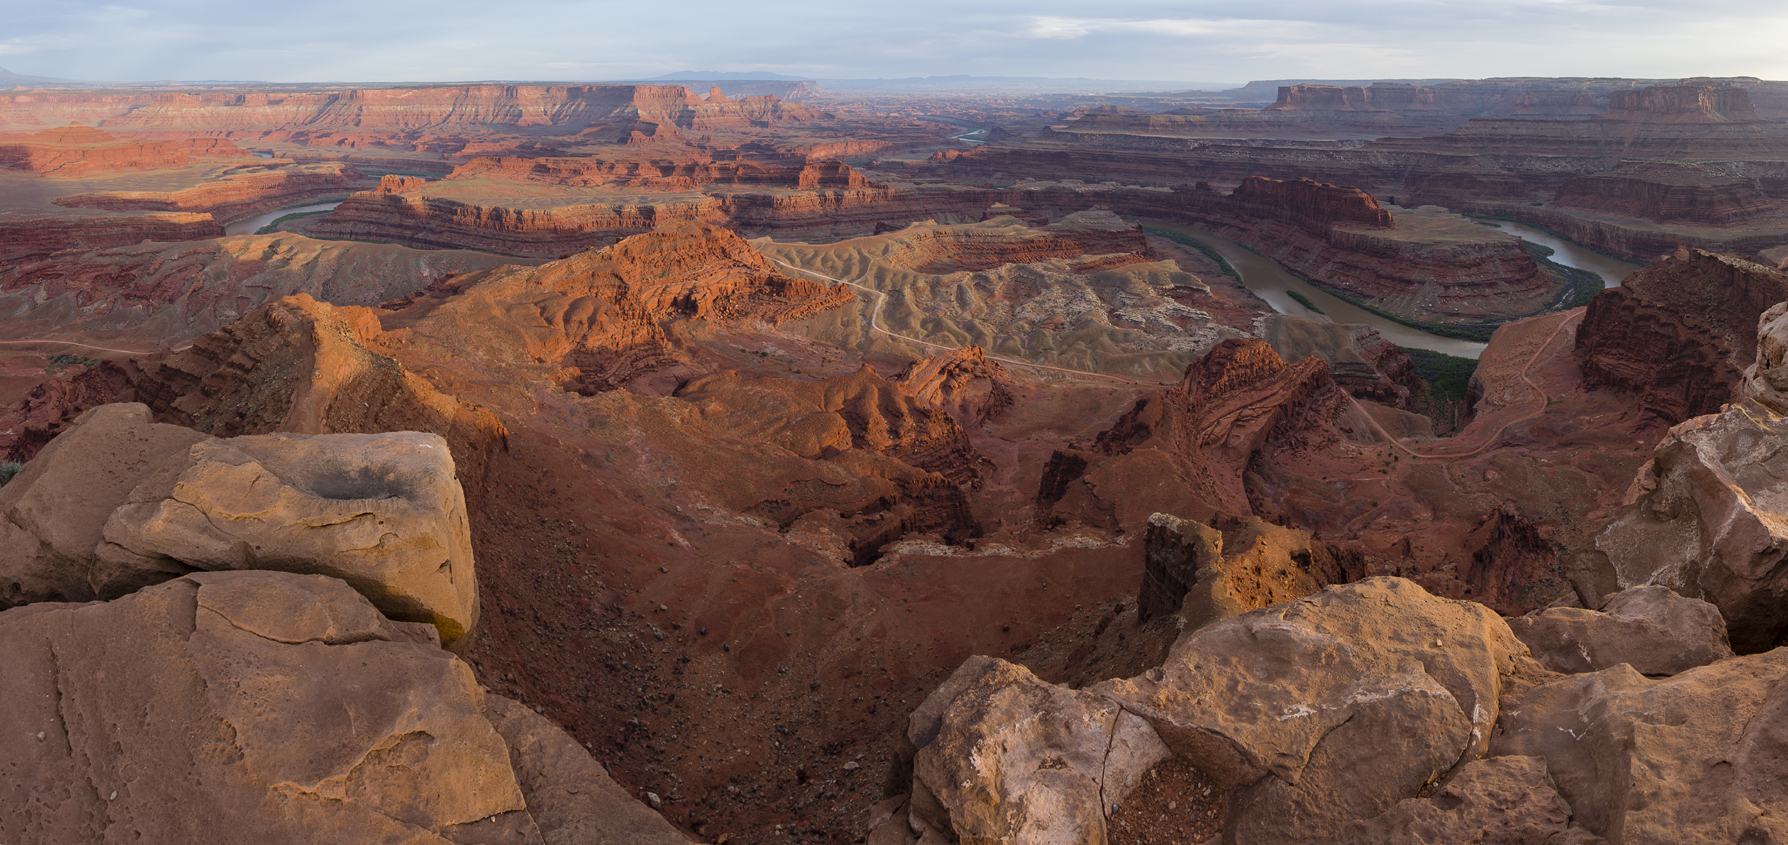
FIGURE 8-11 Panorama from Dead Horse Point, Dead Horse Point State Park, Utah. Single-row panorama, six frames, 35mm lens in portrait orientation.

FIGURE 8-12 Milky Way panorama over Missouri Mountain and the Sawatch Range from the summit of Huron Peak, Collegiate Peaks Wilderness, Colorado. Multi-row panorama, 40 frames (four rows, 10 frames per row), 50mm lens in portrait orientation, each frame exposed at 13 seconds, f/1.4, ISO 6400.
There are two main reasons to consider shooting multi-row panoramas: mind-boggling resolution and the ability to shoot subjects that are both taller and wider than your widest lens can encompass. Multi-row panorama hardware also makes it easy to keep the plane of rotation horizontal when you’re shooting single-row panoramas in which you point the lens up or down. In conjunction with fast lenses, multi-row panorama gear also opens up intriguing possibilities when shooting the Milky Way, as I’ll discuss in the next chapter.
By stitching together multiple rows, you can create enormous files from which you can make huge prints with excellent quality. For example, I recently shot a Milky Way panorama from the summit of 14,003-foot Huron Peak. I used a 50mm lens and a multi-row panorama setup to shoot four rows with 10 images each. The complete panorama measures 15,513 × 27,784 pixels—big enough to make a 51 × 92 inch print at 300 ppi. The same shot illustrates the second virtue of multi-row panoramas: going wide both horizontally and vertically. Single-row panoramas let you go as wide as you want horizontally, even as wide as 360 degrees, but you are limited in vertical angle of view by the angle of view of your widest lens. The single-row panorama hardware I use automatically levels the camera from front to back. This limitation prevents me from pointing the camera down to look into a deep canyon or up to see more of the sky. Even with my widest lens, I can only look up 48 degrees or down 48 degrees (half the angle of view of my widest lens, since the camera is level from front to back). The Milky Way is a perfect example of a subject that is both wide and tall; a complete panorama can easily span an angle of 145 degrees left to right and 85 degrees vertically. Under the right circumstances, you could shoot a single-row Milky Way panorama using a 16mm lens on a full-frame camera and pointing the camera up, but ideally you would still use the same hardware and software required to shoot a multi-row panorama.
There are many ways to fudge the recommendations I’ve provided here. However, all of them come with the risk that the images will fail to stitch. You don’t want to blow some magnificent opportunity by using an unreliable shooting procedure. I prefer to use and teach methods that I know will work.
You can see my current multi-row panorama setup, which was made by Really Right Stuff, in figure 8-13. This hardware lets you shoot multi-row panoramas while keeping the plane of rotation level. As with a single-row panorama, you must rotate the camera around the nodal point as you pan from left to right. You can find the nodal points of your lenses for a multi-row setup using the same procedure you used for single-row panoramas. In addition to positioning the camera correctly from front to back using the nodal slide, you’ll also need to position the camera correctly from left to right, so the pivot point of the rotating base passes through the center of the lens. It will be easier to stitch together your multi-row panorama if you use precisely the same increment of rotation while panning the camera horizontally, as well as when you position the “pitch” of the camera (the degree to which it is pointing up or down) in between each row. For example, when using a 50mm lens and a full-frame camera set vertically, I pan the camera 20 degrees in between each frame and use a 30-degree pitch in between rows. This gives exactly the same amount of overlap between each frame both horizontally and vertically.
As with single-row panoramas, you must use manual exposure, manual focus, manual white balance, and manual ISO so that the component images will stitch together seamlessly.
Whenever you shoot a panorama (either single-row or multi-row) with your camera tilted up or down rather than dead level, you’re throwing a curve ball at Photoshop. Sometimes it will still hit a home run; other times, it will strike out. At this time, Photoshop is particularly unreliable when it comes to stitching multi-row panoramas and panoramas shot with tilt-shift lenses. For that, you need high-end, specialized stitching software. Although features vary from program to program, in general these specialized programs have two major advantages over Photoshop. The first is that some programs let you define the grid in which the individual frames will be placed. For example, you can specify how many rows and columns the grid has, the spacing in degrees between images both vertically and horizontally, the sequence in which you shot the images, and the pitch of the first row. This information allows the software to create a rough layout of the images, which is particularly useful if adjacent frames contain nothing but sky with no overlapping subject elements that the software can match up.
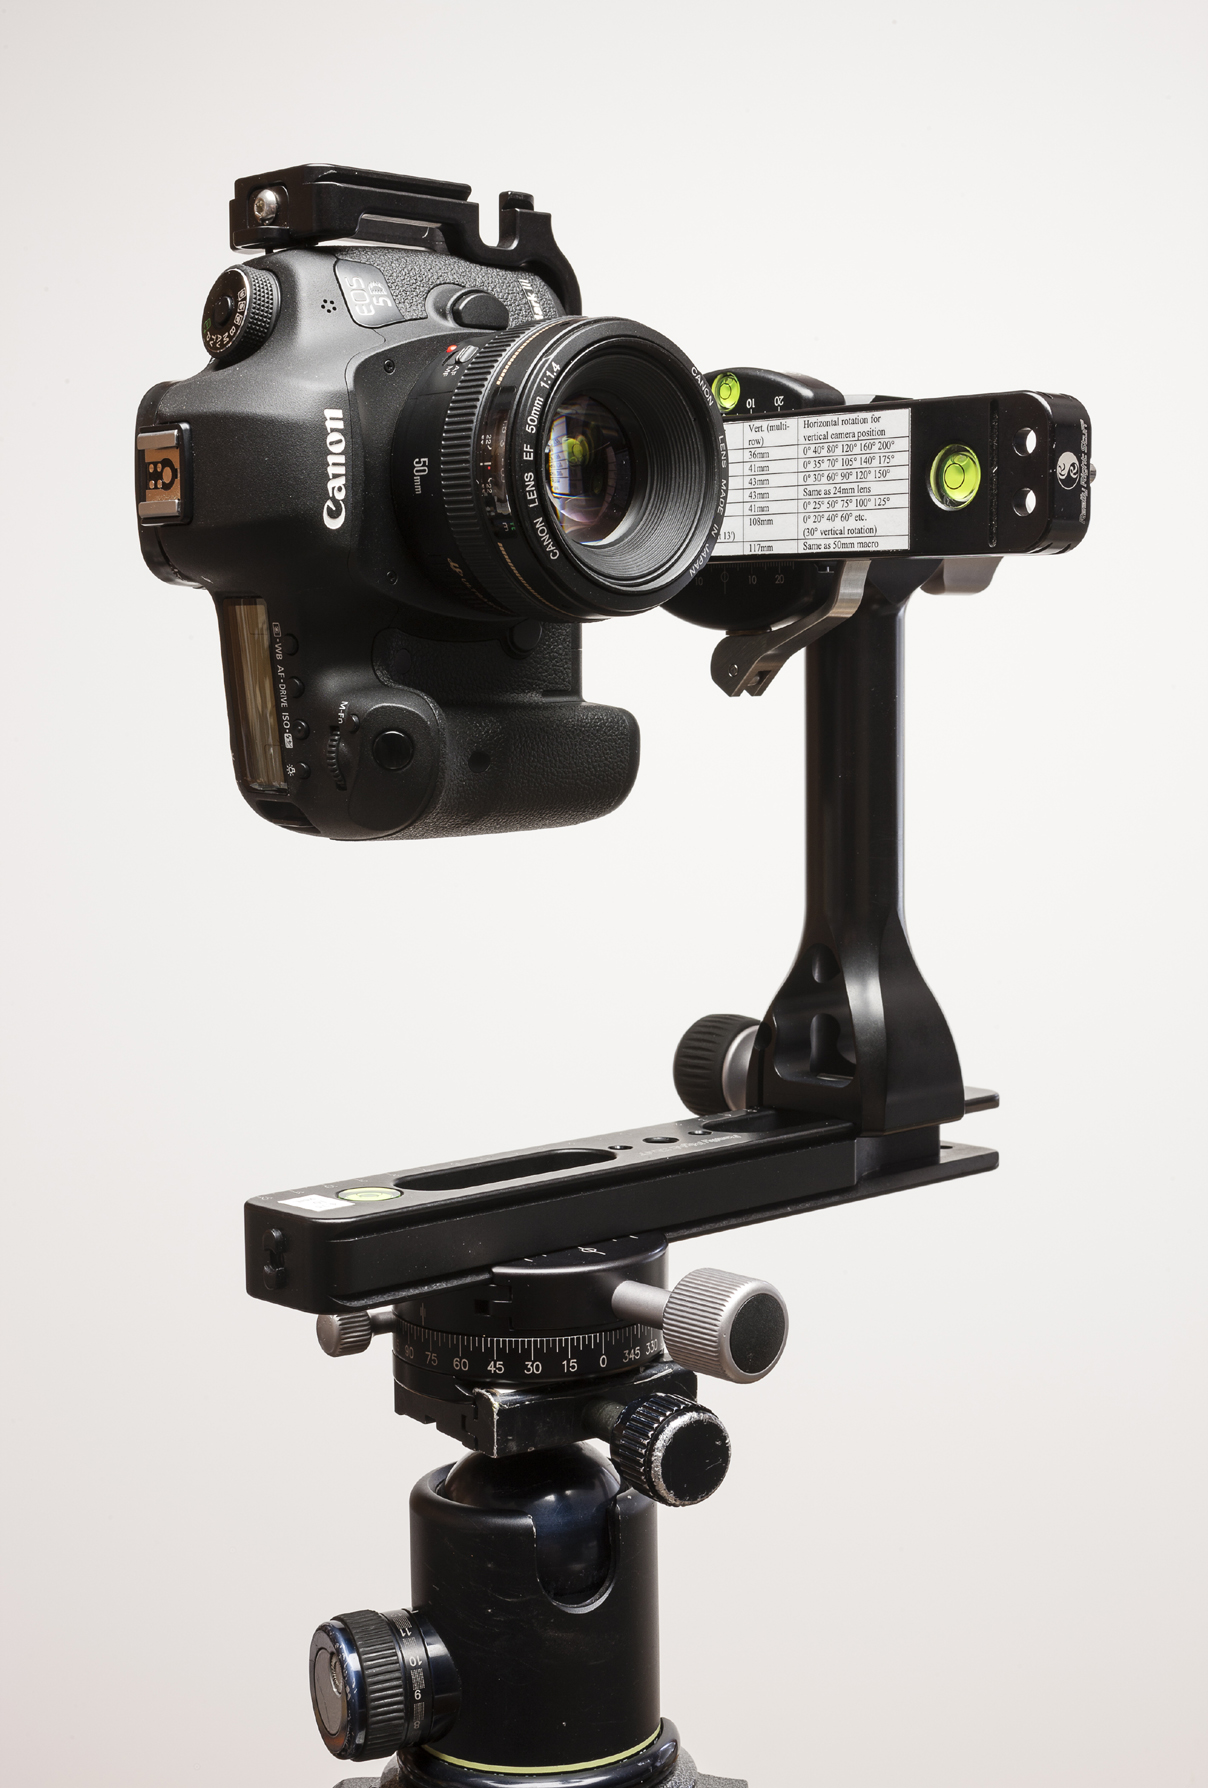
FIGURE 8-13 My current multi-row panorama setup
The second advantage of some advanced programs is that you can add control points manually. Control points, which always come in pairs, mark the identical point in the overlapping portions of two adjacent frames. For example, the summit of Longs Peak might appear on the right side of one frame and the left side of the adjacent frame. By adding control points to the top of the summit cairn in both frames, you’re telling the software to make those two points match up in the final panorama. If you can add three or more pairs of control points to each pair of images, you’ve given the software a good idea of how to match up the various subject features. The software does its best to add control points automatically, but the ability to add additional control points manually makes it possible to complete difficult stitches that might otherwise require hours of tedious retouching by hand.
Learning to shoot and stitch panoramas from multiple frames will open up a new world of photographic possibilities. No longer are you limited to seeing the world through the rectangular frame defined by your viewfinder, with its rigid 2:3 aspect ratio. That view, as pleasing as it may be, is only the starting point in your search for the most evocative possible composition. Take a walk on the wide side, and you’ll never again be content to see the world in just one way.

FIGURE 8-14 Full 360-degree panorama of moonrise at sunset from the 14,083-foot summit of Mt. Eolus, San Juan Mountains, Colorado. Single-row panorama, 12 component images, 24mm tilt-shift lens in portrait orientation. I created each component image from a bracketed set of three images merged using the Rembrandt Solution. Today I would use the HDR technique described in Shooting and Processing High-Contrast Panoramas.