
SharePoints (http://www.hornware.com/sharepoints/) helps you set up AppleShare and Samba under Jaguar through Tiger by making it easy to control the many complicated elements for sharing any arbitrary folder and setting up new user accounts.
Tip
For additional information about using SharePoints, the developer suggests the write-up at http://www.osxguide.com/modules.php?op=modload&name=News&file=article&sid=63&mode=&order=0. Also, check out the discussion forums for the product at http://www.hornware.com/.
First, download the latest version of SharePoints from HornWare’s Web site. It’s old-style shareware, meaning that the program works with full functionality at no cost, but the developer asks for a donation of any size. SharePoints comes in two versions, both in the same download: a preference pane or a stand-alone application. They work identically; it’s up to you to decide which you prefer.
Note
SharePoints’s developer expects to have any necessary Tiger updates to his software finished within a few weeks of Tiger shipping. Check before downloading to see if his current version causes problems under Tiger and check back for the Tiger-updated releases.
To install the application, drag it into your Applications folder, and then launch it. To install the preference pane, quit System Preferences if it’s running, drag the SharePoints preference pane into /Library/PreferencePanes, and launch System Preferences.
Let’s walk through the three important missing file-sharing functions in Tiger and how to accomplish them with SharePoints: disabling guest access, creating file-sharing-only users, and turning any folder into a shared volume.
To eliminate the security hole of allowing anyone access in AppleShare, you must turn off guest access. I described the tedious way back in Share Files with AppleShare. Here’s a simpler method.
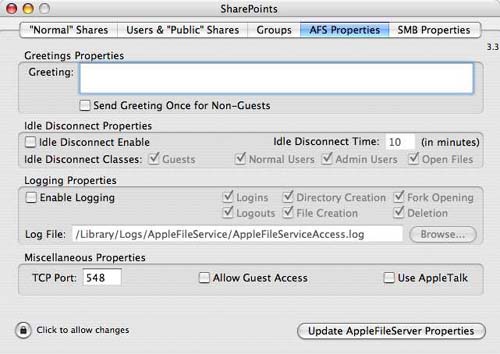
Click the AFS Properties tab, and uncheck Allow Guest Access (Figure 40). Click the Update AppleFileServer Properties button to restart the AppleShare server and reflect your change.
SharePoints enables you to create a special kind of user, a “file-sharing user,” that doesn’t have a regular Mac OS X account; this special user doesn’t have a Desktop, application access, and a home directory. Instead, a file-sharing user can log in and be assigned to groups with access to various shared folders, but receives substantially fewer privileges.
A type of user account I recommend throughout this ebook is a joint account in which a group of trusted people are given the same user name and password so they can edit the same files and not worry about permissions. This is usually the best and simplest option. Let’s create a joint user account using SharePoints:
Run SharePoints. (You will be prompted for your administrator password at least once during this process depending on how long you take to complete it.)
Click the Groups tab. First, you must create a group for a new joint user account that’s not one of the other groups on the file server by entering the group’s name (
tbusers, as shown in Figure 41) and clicking Get Next GID to have the group automatically assigned the next numerically highest, unique, group identification number.Click Add New Group. The group shows up in the list at right.
Click the Users & “Public” Shares tab.
In this tab, you create a joint user account that’s a member of the group you just created. Enter the user name (
tbuserin my example), click Get Next UID to create a unique user identification number, and choose the group you just made (tbusers, in my case) from the Group pop-up menu (Figure 42).Click Add New User and you’re first prompted to make sure you want to add a file sharing-only user, and then for the password for that new user (Figure 43).
Next, you need to add a shared folder that’s particular to this joint account and set its permissions so only your just-created user and group can access it. As you can see in Figure 44, I created a folder in my Documents folder, which I named
tidbits. (I made the folder in the Finder by opening the Documents folder and choosing File > New Folder [Shift-Command-N], then renaming that new foldertidbits.) In SharePoints, I modified the new folder’s permissions so that only thetbuserandtbusersgroup (which comprises justtbuser) can access it.To finish up, click Create New Share, after which you still need to restart the server, which you can do within SharePoints, too. Click the AFS Properties tab and click Update AppleFileServer Properties and/or click the SMB Properties tab and click Update Samba (SMB) Server Properties to implement your changes.


That’s it! There’s no question that this process is more involved than the basics of turning on AppleShare in Panther, but the rewards are well worth the extra effort.
It’s impossible to share any arbitrary folder in Mac OS X via AppleShare as a volume, a simple operation in Mac OS 7 through 9, but SharePoints brings back the ease of doing so. Sharing an arbitrary folder as a volume in Samba requires editing a text file, so this method proves easier for Samba setups too. SharePoints even lets you create the same shared folder at the same time for both AppleShare and Samba file sharing, eliminating complexity there as well. Here are the steps for using SharePoints to share any folder via AppleShare or Samba:
Click the “Normal” Shares tab (Figure 45).
In the Share Name field, enter the name you want to appear as the volume name.
In the Directory field, type a Unix directory path or click Browse and choose a folder or volume.
Because you can share any folder as either or both an AppleShare and a Samba volume, choose Disabled or Shared from the AppleFileServer (AFS) Sharing or Windows (SMB) Sharing pop-up menus depending on whether you need to share it via one method or the other or both.
Click Create New Share in the lower right corner of the dialog. (This button reads Update Share in Figure 45 but changes contextually based on your current selection or action.)

You’ve now created a new, shared folder that works exactly like any other AppleShare or Samba volume—and without editing a single configuration file.
You can edit a shared folder’s information by selecting it from the list in the “Normal” Shares tab, changing the properties, and then clicking the Update Share button.
To get more advanced, click the Show File System Properties little round button (shown at right in Figure 45) to open the File System Properties pane and set access permissions. Check Inherit Permissions from Parent (at the far left) so all files and folders created in the share will match the permissions you set. If you allow members of a group to access a shared volume, you probably want them to be able to read and write all files created in that volume. This inheritance ensures that the permissions allow them that flexibility.