
Now that you’ve had the chance to read about every conceivable way to share files, you can learn about the complementary action: accessing those shared files. Let’s walk through mounting volumes or browsing for files on each of the major operating system versions, starting with Tiger.
To mount a server from the Finder, choose Go > Connect to Server (Command-K) to bring up the Connect to Server dialog. In Jaguar, you saw all local AppleShare and Samba volumes; starting with Panther and continuing with Tiger, to achieve a mount, you can:
Use the Favorites List: Select a server from the list.
Browse for an AppleShare or Samba volume: Click the Browse button, and see Mount via Network Browser, a few pages later for more info and troubleshooting tips.
Enter a Samba name: For Samba volumes, you may enter the Samba name of the volume, such as
SHAREDPC.Enter an exact server address: Enter a scheme, (
ftp://for FTP,http://for WebDAV, and so on) followed by a server name or IP number. You enter the server’s address just as you would in a Web URL. See Table 4 (next page) for examples. You can even build a password into the URL in the form:scheme://user:[email protected]/path.Passwords with special characters, like an @, break this method, however.
Tip
If you stored your server password in the Keychain, you can enter just scheme://[email protected] to mount the server; Panther will prompt you to use the Keychain password if you haven’t opened the Keychain earlier in the current session.
Table 4. Schemes for Mounting Servers
Protocol Type | Scheme Name | Example |
|---|---|---|
AppleShare | afp:// |
|
FTP | ftp:// |
|
WebDAV | http:// |
|
Samba | smb:// |
|
NFS | nfs:// |
|
Tip
If you type a host name, Bonjour name, or IP address into the Server Address field without a scheme and click Connect, Panther and Tiger automatically try AppleShare Filing Protocol (AFP).
Tip
As I noted earlier, Mac OS X’s built-in FTP client is lousy. Use a real FTP program like Interarchy (http://www.interarchy.com/) or Fetch (http://fetchsoftworks.com/) instead. Interarchy and Fetch (starting with version 5) have the added benefit of handling SFTP (Secure FTP), too.
Mounting .Mac Volumes via WebDAV
I noted in iDisk that you can mount .Mac iDisk volumes via WebDAV. Here are some additional details on the particulars of this method (thanks to James J. Rogers).
In the Finder, choose Go > Connect to Server.
Enter the following, substituting the .Mac member name of the person whose iDisk you want to mount for
membername.http://idisk.mac.com/membernameNext, the WebDAV File System Authentication dialog appears (Figure 27), just as it does for any password-protected WebDAV volume. Enter the appropriate .Mac member name (not a full email address) and password. Check Remember Password (Add to Keychain) to avoid re-entering the name and password in the future.
Click OK, and the iDisk mounts in the Finder.
You can connect to another .Mac public folder, whether password protected or not, using the same method. Instead of the URL above, use:
http://idisk.mac.com/membername/publicIf you are prompted for a user name and password, enter
publicin the Name field and the password provided by that user in the Password field. You should provide this information for your .Mac account to anyone who needs to access your public folder.

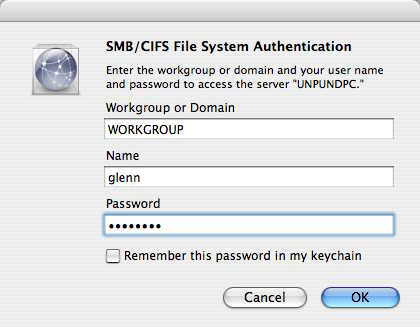
Tiger prompts you for a password as needed depending on the protocol. For instance, if you try to connect to a Samba server, you see a dialog like the one in Figure 28.
Note
Because we’re in the Unix world, once you mount a file server in Tiger, it has a local path: /Volumes/servername. That path is available via Terminal and Unix programs. In the Finder, choose Go > Go to Folder (Command-Shift-G) and enter /Volumes.

Select the script you just saved as Old Hard Mount from the Finder Scripts submenu of the Script menu on the menu bar. This brings up the Jaguar-style Connect to Server dialog box, with a twist: a pop-up menu that lets you choose which kinds of servers you see.
Figure 29.
Tiger offers a few extra options when logging in to an AppleShare volume via Connect to Server. Click the Gear icon in the login dialog to see a menu and then choose Options to view these choices (Figure 30).
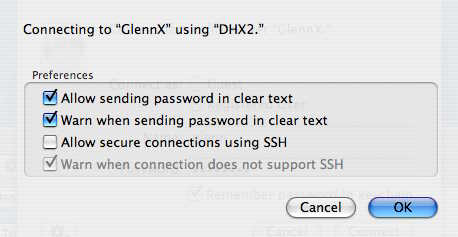
Here’s how I suggest you handle each checkbox in the dialog:
For ease of reconnection, check Add Password to Keychain; after that, you must enter your Keychain password only once (usually as part of logging in) to access password-protected shared volumes without entering each individual password.
I don’t recommend allowing clear text passwords; this is required only when connecting to certain older or non-Apple AppleShare servers. If you must allow them because you are connecting to an older AppleShare server that can’t handle encrypted passwords, Checking Allow Clear Text Password and Warn When Sending Password in Clear Text lets you be sure that you know when your password could be intercepted.
The Allow Secure Connections Using SSH option tunnels your AppleShare connection using Secure Shell (SSH), a strong encryption technology built into Mac OS X that unbreakably encrypts all the traffic you send to and from the server. Unfortunately, you can’t use SSH between ordinary Tiger systems: the AppleShare server must be operating on a computer with Tiger Server installed and Remote Login turned on in the Services pane of the Sharing system preferences.
If you’re on a network without wireless connections or that uses a robust wireless security standard, you probably have no worries and thus no need to use SSH. But if you’re connecting remotely to an AppleShare volume at a coffee shop or on an academic network, you should assume there could be snoopers and choose the strongest options: an SSH-enabled Mac OS X Server and don’t connect unless you can establish an SSH connection.
A researcher writing independently on SecurityFocus’s BugTraq moderated mailing list discovered a fundamental problem with Apple’s use of SSH starting in Mac OS X 10.3.2: If you check the SSH option for an AppleShare server, your Mac doesn’t complain if it can’t successfully make an SSH connection; instead it drops down to an insecure connection without a warning. That’s bad, since you would be using an insecure connection while believing that it was secure. (Mac OS X 10.3.4 “fixed” this problem by showing an alert that announces that the server doesn’t support secure connections and asks you to cancel or continue. At least that’s progress.)
Worse, because the SSH option also doesn’t provide a way to ensure that the server you think you’re connecting to is actually the server you’re connecting to through a technique known as “checking the fingerprint,” SSH-protected AppleShare connections are susceptible to so-called “man-in-the-middle” attacks. In a man-in-the-middle attack, the miscreant inserts a computer on the network that masquerades as the server you want to reach, passing all traffic to the desired server and returning the answers, but recording everything—including passwords—that it sees.
There’s no solution to this man-in-the-middle vulnerability at the moment except to ensure that your network is physically secure and that SSH is enabled on all the AppleShare servers machines to which you are connecting. A VPN (virtual private network) would bypass this flaw in some cases, as would a manually created SSH connection, but both require a substantial investment in effort.
After you mount a volume, an icon shows up on the Desktop to represent the volume. Like any other item in the Finder, you can select either the volume or any folder within it and copy files to and from them, and you can navigate to items within mounted volumes through any Open or Save dialog.
Tip
To make your server volume easily accessible in the future, drag your server volume, or any folder inside it, to the Finder’s Sidebar or Toolbar, or to the Dock’s right-hand (if you view the Dock horizontally) or lower (if you view the Dock vertically) division.
More interestingly, you can also make an alias that points to the shared volume or a nested folder on the volume, and use the alias to later remount the volume without re-entering any user information (assuming you’ve stored your password in the Keychain). To make the alias, select the volume or a folder within it, and press Command Option while dragging the item onto the Desktop or into a local folder. (You can also choose File > Make Alias [Command-L], but that creates the alias at the same level as the item instead of in a new location you choose.)
Tip
You can add aliases of server volumes to the Startup Items pane in the Accounts system preferences to mount servers automatically at startup.
If you change your network settings or move to another network, the alias may fail, prompting an error and giving you a chance to cancel or delete the alias. (The third option, to fix the alias, doesn’t work without mounting the original volume again.)
Tip
Reader Hans M. Aus discovered that having an identically named AppleTalk zone and a Samba workgroup prevented him from seeing AppleShare volumes reliably. The zones would come and go for no reason, rendering the server volumes intermittently accessible. The problem disappeared when his system administrator gave the zones unique names—they had previously been identical except for capitalization.
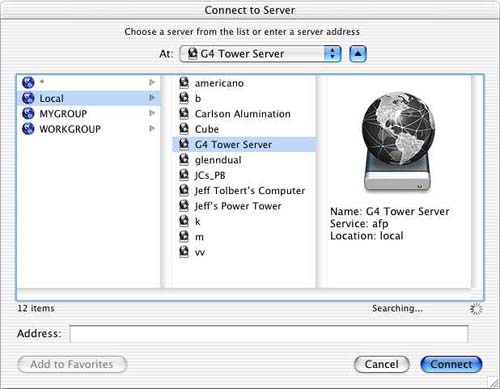
You can view the Network browser by clicking the Network icon in any Finder window. Or, you can display it by clicking the Browse button in the Connect to Server dialog described earlier.
Tiger’s (and Panther’s) version of Network browser works more effectively in some ways than it did in Jaguar. But only volumes on the local network announcing themselves via AppleShare or Samba appear in the list of servers in the browser, so you won’t see FTP or WebDAV servers in the list (Figure 31). I recommend using the multi-column view (the far right View button in Finder window toolbars) for ease of understanding your navigation level.

To mount a volume, either double-click it in the Network browser or, in column view, select it and click the Connect button in the rightmost column. You’re presented with a normal login window for that server type, and after you enter your details, you can choose the volume from a list just as with Connect to Server. After choosing the volume, the icon appears in the sidebar and on the Desktop.
You can use the NFS Manager application, noted in Share Files with NFS, to connect to shared NFS directories. If you use NFS Manager, the NFS volume appears at a path that you specify, but not on the Desktop.
Terminal offers a host of ways to connect to file servers. If you’re a Terminal demon (or daemon), try entering man and a command from Table 5 to read about precisely how the command works.
None of these command-line options make sense unless you spend all your time in Terminal or are writing scripts that call file services.
If you’re desperate to have AppleShare volumes on your Desktop that are soft mounted—that gracefully appear as needed and don’t cause OS X to complain when they’re not available—you can use the mount_afp command in the Terminal with the -o automount flag, as in:
mount_afp -o automount
“afp://;AUTH=No%20User%20Authent@myserver/guestVolume” /Volumes/guest
For more on soft mounting, see the explanation in Access Shared Volumes with Panther.
Any time you check the Remember This Password checkbox in My Keychain for a file server, Mac OS X stores the password along with the file server’s location and other attributes in a Keychain entry. The Keychain is a secure method for keeping account information, including a user name and password, for commonly used accounts.
For instance, the Keychain can store a password for a Web site or an AppleShare file server.
Note
Apple used to label the checkbox that controlled whether a password was stored in the Keychain or not with several different phrases. In Tiger, the labeling is clear and consistent: everywhere within the Finder where you can choose to store a password in the Keychain the label is Remember This Password in My Keychain.
Keychain management takes place in Keychain Access, which you can find in the Applications/Utilities folder. In Tiger, Apple dramatically improved the organization of the Keychain Access interface by sorting passwords into categories by server type and allowing you to easily search for any part of a password’s associated data (Figure 32). (Remarkably, no previous version allowed any searching; thank you, Spotlight!)

Keychain Access provides several key types of information for managing file sharing and related passwords. You can retrieve these kinds of information within the program:
View basic info about a server: From the Category list, under Password, select the server type, such as AppleShare. Then, at the right, select the server.
View detailed info about a server, including your password: From the Category list, under Password, select the server type, such as AppleShare. Then, at the right, double-click the server to open an info window (Figure 33). To view the password, check the Show Password box. Tiger prompts you for your account password or the Keychain password—these are identical unless you’ve set up a separate Keychain—and then allows you to choose to avoid entering the password again while in the program. You can also change the password while you’re editing that field.
View still more detailed info and control Keychain password prompting: From the Category list, under Password, select the server type, such as AppleShare. Then, at the right double-click the server. Click the Access Control tab and select a radio button to set whether or not you are prompted for the Keychain password when you need to access that item from the listed applications (Figure 34). In the figure, you can see that the Unix program afp_mount is what the Finder uses behind the scenes to mount an AppleShare volume.
Delete a stored password: Select it in the Keychain Access main view and press Delete or choose Edit > Clear.


Later versions of Panther and Tiger deal with access to shared volumes identically, so flip back to Access Shared Volumes with Tiger if you are running a version of Panther before 10.3.3. If you’re running Panther 10.3.0 through 10.3.2, keep reading in this section.
Panther 10.3.0 through 10.3.2 created a split in the way that you mount shared file servers compared to earlier versions of Mac OS X— and even System 6 through Mac OS 9.2! Apple then reversed course in 10.3.3 and almost entirely eliminated this split. Let me walk you through the original Panther methods and then the revised mounting process, which is the only method that’s available in Tiger, too.
Under Jaguar and all previous releases, all file servers were hard mounted. A hard-mounted file server appears as an icon on the Desktop (assuming you have that option turned on in the Panther Finder’s Preferences window), and is for most purposes exactly like a local hard disk. But with hard-mounted servers, if the server becomes unavailable—your network connection goes down, the server crashes—your Finder can lock up for quite some time, even under Panther, until it decides to release the missing server.
Mac OS X 10.3.0 through 10.3.2 added an interesting, but flakey, new option for servers on a local network, long available in Unix: soft mounting. A soft-mounted server is more like a folder. Instead of it showing on the Desktop, you browse to it using the Network browser: there is no Desktop or sidebar icon to show you that a soft-mounted volume is available on your Mac. If the server or your network becomes unavailable, Panther doesn’t complain or pause even when you try to access the unavailable server—it just isn’t there any more. When the server becomes reachable once again, you can browse that folder and find the server’s contents in it.
Note
The contents of hard- and soft-mounted servers appear and work the same; only the mounting process and reconnection behavior is different.
In practical use, soft mounting is a disaster: you can’t store a password with a server, you are never sure if a server is actually mounted, you can simultaneously hard and soft mount a server, and Samba volumes aren’t available for browsing by workgroup. Plus, the Unix path is different than hard-mounted volumes. These are just a few of the problems.
Fortunately, Apple listened to users’ confusion and complaints, and eliminated almost all the peculiarities of soft mounting by removing soft mounting entirely from the Finder in Mac OS 10.3.3. (It remains available for Unix experts via the command line; see Connect via Terminal).
I recommend immediately updating to Mac OS 10.3.3 or later if you’re still running 10.3.0, 10.3.1, or 10.3.2.
Warning!
In the unlikely event that you liked soft mounting in versions 10.3 to 10.3.2 of Panther, you’re in for a rude awakening. After upgrading to 10.3.3, none of your soft mounted volumes are available! You must go back to each volume, mount it (being sure to save the password in the Keychain), and create an alias in a place you can find. These volumes will now mount when you navigate to them, but aren’t instantly available as they were with soft mounting.
Jaguar and Tiger access shared files similarly even though their interfaces are slightly different. The main difference is the appearance of the Connect to Server dialog in the Finder.
Tiger splits browsing and connecting to a server into two separate areas; Jaguar presents these actions in the same place, and both browsing and connecting result in icons for hard-mounted servers appearing on the Desktop. To mount a server, from the Finder, choose Go > Connect to Server (Figure 35).
If a desired server doesn’t appear in the server list, you must enter an appropriate URL for it in the Address field. See Table 4, earlier, to learn more about what you can enter here.
If you’re running Mac OS 9, it’s easy to access Jaguar, Panther, and Tiger AppleShare servers, although you need additional software to access shared files via other protocols.
Here’s what to do for AppleShare:
From the Apple menu, choose the Chooser. Make sure AppleTalk is set to Active.
Tip
If you can’t see a Panther server via AppleTalk, make sure its AppleTalk discovery is turned on; that setting is disabled by default in Mac OS X 10.3 to 10.3.2, but restored to on by default in 10.3.3 and all later versions. See Turn on AppleTalk.
In the Chooser, click AppleShare (Figure 36). The Chooser lists local AppleShare file servers.
Tip
If you’re missing the AppleShare icon in the Chooser, the AppleShare extension on your Mac has been disabled or deleted. To restore it, look for a file called AppleShare in the Extensions (Disabled) folder inside the active Mac OS 9 System Folder. If it’s there, use Extensions Manager (Apple menu > Control Panels > Extensions Manager) to turn the extension back on. If it’s missing altogether, you may have to reinstall Mac OS 9 to regain your use of AppleShare.
If the server is listed, select it and click Connect. Otherwise, to connect to a server that’s shared but not listed, click the Server IP Address button and enter the server’s IP address (Figure 37).


If your sharing is based on Samba alone, perhaps because of Windows or Unix users, a Mac OS 9 computer requires Dave, commercial software from Thursby Software Systems (http://www.thursby.com/). Dave also enables Mac OS 9 machines to share their own volumes over Samba and share their printers with Windows machines.
To access files via FTP, Mac OS 9 users must stick with an FTP client such as Interarchy (http://www.interarchy.com/) or Fetch (http://fetchsoftworks.com/). For WebDAV, there’s a program called Goliath (http://www.webdav.org/goliath/), and of course, for normal Web downloads, any Web browser will do. It’s unlikely you’d want to access files via NFS in Mac OS 9, but if you do, check out MacNFS, a commercial package from Thursby Software (http://www.thursby.com/products/macnfs.html).
Windows XP can connect to Samba, FTP, and WebDAV servers out of the box, and it supports AppleShare with a little extra software. All these servers show up as icons in the My Network Places dialog; AppleShare servers show only if the extra software is installed. They are not mounted on the Desktop per se, because Windows doesn’t work that way, but they are available like any other folder or disk.
To connect to a Tiger volume via Samba from Windows XP:
In any window in Windows XP, enter the IP address or Samba shared name of your Tiger volume preceded by backslashes, such as
\foo.example.com, and press Enter.When prompted, enter a user name and password.
Windows presents the shared folders for that user in a window (Figure 38).

To connect to a Tiger volume using WebDAV or FTP from Windows XP:
From the Start menu, click My Network Places.
In the My Network Places dialog, click the Add a Network Place link at the top left.
In Add Network Place wizard, click Next. Then select Choose Another Network Location and click Next.
Enter the FTP or WebDAV address (Figure 39).

As noted in AppleShare, earlier, you likely can connect a Windows machine via AppleShare, but you’ll need help in the form of for-fee packages such as Thursby Software’s Dave (http://www.thursby.com/products/dave.html) or PCMacLAN from Computer Associates (http://ca.miramar.com/Products/PC_MACLAN/).