
Simply turning on file sharing in Tiger requires only a few clicks in the Services pane of the Sharing system preferences. Although this section explains how to use the Services pane, you may wish to review the details about the service you are about to turn on first. You can turn on four file sharing services from the Services pane:
Personal File Sharing, which is AppleShare (see Share Files with AppleShare for details)
Windows Sharing, which is Samba (see Share Files with Samba for more information)
Personal Web Sharing, which turns on the local Web server (see Share Files over the Web or Share Files with WebDAV for more)
FTP Access, which is just what it says (see Share Files with FTP to learn important configuration information)
NFS requires additional configuration, which I give some pointers about in Share Files with NFS, but I find the method too dangerous to recommend to anyone who is not already an experienced system administrator.
Working in the Services pane (Figure 5), you manage each service by either checking or unchecking the box to the left of the service name, or by selecting the service’s name and clicking the Start or Stop button on the right side of the pane.

Tip
The On checkbox doesn’t respond with the same speed as normal checkboxes because it hides the startup or shutdown process for the associated service. There’s often a very short delay that makes you want to click again because you think the box didn’t notice your click.
Note
Apple’s explanation in the Services pane of what each service does and how to access a service as a network resource after you’ve turned it on is quite cogent, and I expand on it in Access Shared Files.
In order to be reachable, any computer acting as a file server must be turned on and not in sleep mode. Although this seems obvious when stated this plainly, it can cause consternation if you use ordinary machines on your network as servers, as most of us do. Several readers of the Panther version of this ebook wrote in with mysterious problems about servers disappearing, and reappearing later, which we tracked down to sleep options on the Energy Saver preference pane.
In sleep mode on a Mac, the processor cycles down and the monitor switches to a low-power mode. When it’s asleep, the computer will respond to a key press or mouse click, but network access doesn’t automatically wake the machine.
Note
Macs can be woken out of sleep if they receive a “magic packet” over the network—like a sleeping prince receiving the kiss from the brave princess that wakes him. But this magic kiss has two parts:
First, you must open the Energy Saver preference pane, click Show Details (if necessary), click the Options tab, and check Wake for Ethernet Network Administrator Access.
Second, you need a way to send the magic packet from another Mac. Unfortunately, Apple doesn’t offer a way to have one Mac automatically wake another by trying to connect over the network to a shared volume. But you can do it manually—use the free Wake550 to wake up a sleeping remote server from another Mac (http://www.tc.umn.edu/~olve0003/wake550.html).
Follow these steps to turn off automatic sleep in Jaguar, Panther, and Tiger:
Open the Energy Saver preference pane, and if necessary, click the Sleep tab.
If you are using a laptop, if necessary, click Show Details; then choose Power Adapter from the Settings For pop-up menu.
Drag the slider under the text “Put the computer to sleep when it is inactive for” all the way to the right to Never. (Selecting “Put the hard disk(s) to sleep whenever possible” is fine but will cause an annoying delay for infrequently used file servers, which must spin sleeping drives up when you access them.)
If you want to put your Mac to sleep in the future, choose Sleep from the Apple menu, press the power button on a recent Apple monitor, or press Control-Eject and either click the Sleep button or press S. Remember to wake it before using it on the network as a server again.
After you set up any necessary accounts and any configure your firewall options, it’s time to turn on AppleShare (see AppleShare, earlier, to review the pros and cons of AppleShare). There’s a sensible order to starting AppleShare file serving:
Review what will be shared and set your accounts up correctly. See “What’s shared,” next.
Consider installing a shareware utility, called SharePoints, which provides more sophisticated options, including a shared folder. See Share any folder and Appendix A: Share with SharePoints.
If desired, turn off guest access by editing a configuration file or using the SharePoints utility. See Turn off guest access.
Turn on AppleShare and consider turning on SSH (and turn on AppleTalk as well, if necessary). See Turn on AppleShare and Turn on AppleTalk.
When someone logs in as a guest or a user without administrative privileges and mounts an AppleShare volume, he sees only a limited set of directories; users with administrator privileges have greater access to a system’s folder structure. Let’s look at what each type of user can see and do—guests, normal users, and administrators.
By default, when you turn on AppleShare, the ~/Public/ folder of each user account on the system is shared as a volume when any guest or normal user without administrator privileges logs in. The Public folder is read only (Figure 6). Inside the Public folder is the Drop Box folder, which is write only (Figure 7). A normal user also sees his home folder as an accessible volume. If you’re using a single account for a group of users, the Documents folder in the home directory might be the ideal place to share files.


An administrator can change the permissions on any user’s Public folder and any user can change her own Public folder’s permissions to allow not just reading but also writing in that directory. Keep in mind that by default any guest can access that directory, so enabling write access on a user’s Public folder may open it up for any guest as well. (See Turn off guest access or Appendix A: Share with SharePoints.)
Here’s how to change permissions on a Public folder to allow reading and writing:
Log in as the user who owns the Public folder and select the Public Folder in a Finder window.
Choose File > Get Info (Command-I) to open the Info window (Figure 8).
Click the expansion triangles as necessary to open the Ownership & Permissions category and the Details subcategory. Then, choose Read & Write from the Others menu.

A user with an account that has Allow This User to Administer This Computer checked in the Security pane of the Accounts system preferences doesn’t merely see other users’ Public folders as AppleShare volumes, but instead sees a list of the local hard disks and his own user directory on the startup disk. The administrator can, of course, mount the startup hard disk’s volume and navigate through the /Users folder into any user’s Public and Sites folders.
Note
It might seem at first glance that administrators lack special privileges to access the folders of users on the same machine: even when they navigate to the users’ folders in the users’ home directories, the users’ non-public folders are locked. Looks are deceiving. By selecting any users’ locked folders on a volume mounted over AppleShare, for instance, and choosing File > Get Info, clicking the Details expansion triangle in the Ownership & Permissions section, and making themselves the owner (among one of many methods), an administrator can gain access to any users’ files. It’s not straightforward, but it is an option.
What if you want to share a folder other than the Public folder as a volume? In Mac OS 9 and earlier, you could share any folder within an unshared volume. The shared folder would show up as a separate item to mount. Mac OS X doesn’t offer this feature via its built-in sharing controls.
However, a shareware program called SharePoints provides Mac OS X with terrifically granular ways to share folders with both AppleShare and Samba. It also helps you set up users and groups and control guest access. Because SharePoints works with AppleShare and Samba, involves a separate download, and requires that you understand some technical fine points—not to mention requires a shareware fee for its ongoing use—I provide configuration details in Appendix A: Share with SharePoints. I recommend using SharePoints.
There’s a fundamental problem with Tiger’s built-in AppleShare server: when you enable it, a guest user—one without a user name and password—can connect and view or copy files from any user’s Public folder. This is a security hazard, and one I think Apple should offer an easy way to disable through a checkbox.
Tip
Disabling guest access is just a checkbox in SharePoints! See Appendix A: Share with SharePoints.
Follow this procedure for turning off default AppleShare guest access:
Warning!
Tiger no longer stores its plist configuration files in plain text format as Mac OS X did in Panther and earlier releases. Now, whenever a program or system service accesses a plist file, it converts it to a binary format if it’s not already in that format. You can revert a plist file to text for editing, but this means starting in Terminal to make that conversion. (Thanks to Scott Knaster, fellow Take Control author, for this warning.)
On the Desktop, open the
/Library/Preferencesfolder.Find the file named
com.apple.AppleFileServer.plistand copy it to the Desktop by pressing Option while dragging. (You cannot edit it in place.)Open the file in any text editor. (The sidebar Tools for Editing Configuration Files has tips on choosing and using a text editor.)
Launch Terminal.
Type
cd ~/Desktop/Type
plutil -convert xml1 com.apple.AppleFileServer.plistFind the lines in the file that read:
<key>guestAccess</key>

<true />
Change
<true />to<false />Save the file.
Drag the original
com.apple.AppleFileServer.plistfile to the Trash or save it in a backup location elsewhere.Move your edited version back into
/Library/Preferences.If you’ve already turned on Personal File Sharing, restart it by stopping it and then starting it in the Sharing preference pane. This process also converts the file back into its binary format.
As noted in Turn On File Sharing, to enable AppleShare, open the Services pane of the Sharing system preferences, select Personal File Sharing, and click the Start button.
AppleTalk can be active only on a single network interface at a time in the regular version of Tiger; Tiger Server can offer AppleTalk over all interfaces at once. If you click the AppleTalk tab in any of your network interfaces in the Network preference pane and then check Make AppleTalk Active, that action deactivates AppleTalk on all the other network interfaces. Because you might have an Ethernet interface that has a static Internet protocol (IP) number, while your Wi-Fi interface could be simultaneously active but with a private, nonroutable IP address, make sure you’ve activated AppleTalk for the correct interface.
Note
Panther versions 10.3 through 10.3.2 had AppleTalk turned off by default. Apple turned AppleTalk on by default starting in version 10.3.3. If you’re running an older version of Panther or if you upgraded but still find AppleTalk still unavailable, make it active by navigating to the Applications/Utilities folder and launching Directory Access. In Directory Access, check AppleTalk in the Services pane and click Apply.
Note
To find out about connecting to your AppleShare server from other computers, skip ahead to Access Shared Files.
As you may recall from SMB (Server Message Block) or Samba, earlier, Samba is how Windows shares files, and Tiger’s version works in a way that Windows and other Samba clients are quite happy with.
Tip
Samba is best used on a local network, not over the Internet. Samba ports are often blocked by network administrators and ISPs, and are typically disabled in default firewall configurations. If you have another option for sharing files to remote users, try it.
After setting up any desired user accounts and turning on your firewall service, it’s time to start sharing files with Samba. Here’s an overview of what to do:
Review what will be shared and set up your accounts and folders correctly. See “What’s shared in Samba,” next, and don’t hesitate to check out Appendix A: Share with SharePoints, if you start wondering if there’s a better way.
If desired, turn on guest access. See Turn on guest access.
Turn on Samba; see Turn on Samba, and be sure to add access to accounts that remote users are allowed to access.
You may be able to avoid problems with certain characters in filenames that Samba can’t understand; see Avoid file naming problems.
Tip
In Jaguar, you had to enable an option under Accounts for each user to let them log in via Samba from another machine. In Panther, with Windows Sharing on, all users have this option set automatically. In Tiger, just to mix things up, a new dialog provides a new way to give users login access: In the Services pane of the Sharing preferences pane, after you turn on Windows Sharing, click the Enable Accounts button that appears.
Tiger’s default configuration of Samba does not offer guest access: only users with accounts can log in and view folders. By default, a registered user sees as volumes only his home directory and the Public folders of other users.
To use Samba effectively, I recommend changing the default so that you share only specific folders for specific projects. To accomplish this, you must carry out three tasks:
Set up a new account for all Samba-sharing users to access.
Make it so Samba understands that it should share the folder,
/Users/Shared. You could create and use another folder, but/Users/Sharedis often the easiest.Turn off the ability of a registered user to see the Public folders of other users.
I describe how to handle these tasks in Share a specific folder and Disable public folders, both coming soon.
Tip
SharePoints manages Samba services as well as AppleShare, and is much easier to use than following these instructions. If you are less technically inclined, I suggest that you skip quickly to Appendix A: Share with SharePoints.
After creating a normal new user account, if you don’t want to use /Users/Shared, create a folder that this new user will own. For instance, if you have a new user named remote and you create a folder at the root level of your disk called SharedFiles, you can set remote as the owner of SharedFiles by selecting the folder in the Finder and choosing File > Get Info (Command-I). Then choose Remote from the Owner pop-up menu as shown in Figure 9.

Once you decide either to use /Users/Shared or to create a new folder and give it the desired permissions, you must modify Samba’s smb.conf file to share your folder as a Samba volume. The smb.conf file contains information about which directories are shared.
At the end of the smb.conf file, you can add any number of new directories to be shared that can be accessed by anyone with a login account that corresponds to the user or group associated with that directory.
If you need help with the basics of editing a configuration file, read the sidebar How to Edit the Samba Configuration File (next). Right after the sidebar, you’ll find directions for making the necessary edits.
Here’s the template for adding folders through the configuration file:
[VolumeName]
comment = Name Of Volume
path = /path/to/folder
browseable = yes
read only = no
create mode = 0750
VolumeName must be one short word; this is the name of the volume as it appears in a list of available mountable volumes to a Samba client. The comment line displays in some Samba clients along with the volume’s name. The path must be the absolute Unix path to a folder. For instance, if your Samba-sharing user name is remote and you want to share /Users/Shared, you would enter:
path = /Users/Shared/Warning!
You can use a tilde (~) to signify your home directory (as in ~/Documents), but a tilde really means the current home directory. If another user works on the same computer, that user’s Documents directory would be shared if he or she has Windows Sharing enabled.
If you set read only to yes, people who log in will be unable to delete or upload files.
The create mode setting of 0750 is a specific set of Unix permissions that translates into “make any file created in this directory owned by the owner of this directory while making it readable by anyone who has the right to browse this directory but not readable or writable by guests.”
Note
The create mode setting uses base eight, or octal, values that have a large number of specific meanings that are well beyond our scope here, but will be part of Take Control of Permissions in Tiger. That ebook is slated for publication in 2005.
If you already turned Samba on, after editing its configuration file, you must restart Samba by turning it off and then on again for those changes to take effect.
To follow my recommendation for disabling Public folders for all users, which is enabled by default, locate these lines in the configuration file:
[homes]
  comment = User Home Directories
  browseable = no
  read only = no
Simply place a semicolon at the beginning of each line to comment it out and then save the file.
You can remove a single line from smb.conf and change the name that your computer appears under on the local network for Samba sharing.
Line 42 of the default file reads:
; Using the Computer Name to compute the NetBIOS
name.  Remove this comment to override
Delete that line and modify the contents of the next line to the name you want your computer to appear as:
netbios name = spaghetti-feedMake sure that the name is 15 characters or fewer, and do not use any special characters except for dashes. Restart the Samba server by turning it off and on again.
Samba has a guest mode, which is disabled by default in Tiger, and surprisingly complicated to set up. After long studying and tweaking, I’ve determined that not all clients or Samba servers, including Tiger’s, support guest access in the same way, and there’s a simpler solution.
Create an account called guest with the password of guest or anonymous, and create a directory owned by guest with read-and-write permissions. You still need to publicize the user name and password to those who require access, but it won’t cause the same hair-pulling that a true Samba guest account would.
As noted in Turn On File Sharing, you turn on Samba in the Sharing preference pane’s Services pane by selecting Windows Sharing and clicking the Start button.
Tip
Some changes you make might require restarting the Samba server, which is most easily done by selecting Windows Sharing and clicking Stop, waiting for the status to show it has halted, and then clicking Start.
You next need to choose which accounts are allowed to log in remotely to access files via Samba; this feature is new in Tiger. Apple warns you that Samba passwords are stored less securely, which is a good reminder.
Follow these steps to enable accounts for Samba sharing:
Click the Enable Accounts button.
For each account that you want to allow remote access to, check its box (Figure 10) and enter that account’s password when prompted.
Click Done.

Certain versions of Samba are more restrictive than others about which characters they can handle. I’d like to generalize, but the documentation about various Samba servers doesn’t make it crystal clear whether older or newer servers are more or less restrictive, or just configured to be more or less restrictive. Let’s just say that your mileage may vary. Many characters that you can use to name a file or folder under Mac OS X make certain versions or configurations of Samba barf.
In the past, I found more exceptions and problems than I find today using Jaguar, Panther, Tiger, and Windows XP. I cant find a definitive list of characters that Samba clients (and servers) don’t like, but it appears to include /:*?"<>|[]. I was once unable to copy my Björk MP3s to a Samba file server because of the ö, but in more recent testing starting with Jaguar, it worked fine.
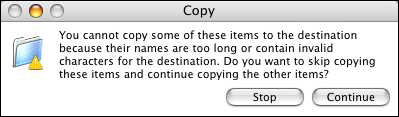
If you try to copy files or folders from Tiger to a Samba file server that have names that include characters that Samba doesn’t like, Tiger provides a clearly written error message—a big improvement from Panther—indicating that the file or files can’t be copied (Figure 11). It offers to let you bypass those illegally named files by clicking Continue.
Similarly, avoid renaming a file or folder on the shared Samba volume with an illegal name; if you try to do so, Tiger will retort with a suggestion (Figure 12).

Avoid naming files on your shared Tiger volume that are illegal under Samba for best results. Samba displays files containing illegal characters with an alternative, DOS-like short file name. For instance, foo/tiddly under Tiger becomes FOOTI~NE when viewed on the shared volume.
Tip
Samba has a variety of methods to control how it copes with long and odd file names, which are documented in Using Samba, by Robert Eckstein, David Collier-Brown, and Peter Kelly. Remarkably, Apple has included the entire text of this book with Mac OS X. To see it on any Mac running Panther or later, visit this URL: file:///usr/share/swat/using_samba/toc.html.
Tiger’s built-in Web server is a slightly modified version of Apache 1.3 (http://httpd.apache.org/). As I discussed in Web, by default, Tiger’s Web server is a read-only method of providing Web pages and file downloads. After you turn on your firewall, you can start sharing files over the Web. Here’s an overview of what to do:
Turn on Personal Web Sharing as described in Turn On File Sharing, earlier.
Check out the default
index.htmlpages that you’ve made available, and start serving Web pages or downloadable files using the default directories. See “What’s shared over the Web” (just ahead) and Share files and folders.If you don’t want to use the default directories, configure Apache to use a different one. See Share files and folders.
Tip
Some changes you make might require restarting the Web server, which is most easily done by selecting Personal Web Sharing and clicking Stop, waiting for the status to show it has halted, and then clicking Start.
The first time you turn on Personal Web Sharing, Tiger shares /Library/WebServer/Documents as the main URL for your machine, as well as the ~/Sites folders for all users as paths under the main URL. Apple also makes the Apache manual available at http://localhost/manual.
Tip
Localhost is the default name for your local machine, equivalent to the Internet loopback (or point-to-self) address of 127.0.0.1.
All user directories are shared, so you may want to configure Apache to share folders from only specific user directories.
Tip
Placing aliases in the Finder for files or folders located in a folder above Apache-shared folders doesn’t share those files or directories. However, creating Unix symbolic links in Terminal will work.
To view the default page (index.html, located in /Library/WebServer/Documents) that comes up for your enabled Web server at its root level, enter any one of the following in a Web browser’s Location or URL field:
Your machine’s IP address (e.g.,
http://192.168.1.10)Your machine’s exact domain (e.g.,
http://foo.example.com)http://localhosthttp://bonjour.name
Tip
The Bonjour name, such as http://glenndual.local, is shown in the Sharing preference pane underneath the Computer Name field.
If you want to see the home page for a user on your system (the index.html file in the ~/Sites folder for that user), enter any of the previous four options plus ~username. For example, to see the home page found in /Users/glenn/Sites/ for a user with the short name glenn, view http://localhost/~glenn or http://bonjour.name/~glenn.
It’s easy enough to share files via the Web. You can place files directly in your Sites folder, preferably inside a folder you create to hold files for download, and provide people with the exact path, like http://foo.example.com/~remote/files/arch.zip.
If you provide people with the precise path, you avoid the necessity of making HTML pages. However, you can create Web pages in software such as Adobe GoLive or Macromedia Dreamweaver, or by hand, that points to files to download through hyperlinks. Or, you can toggle an option in the server’s configuration file that allows a visitor to see all the files in a directory; by default, Tiger disables this feature for security reasons. (The tip about the Indexes option in the following steps explains how to do this.)
Tiger’s built-in choices for which folders to share might be too prescriptive for you, especially if you’re serving entire Web sites from the Web server. You can change the defaults, however, and add other folders just by adding some directives to the configuration file (called httpd.conf). It’s a little complicated because of the number of steps and the requirement of editing the configuration file in a text editor. Here’s what to do:
Turn off Web sharing: If the Web server is running on the machine you’re reconfiguring, open the Sharing preference pane, click the Services tab, select Personal Web Sharing, and click Stop or uncheck its box.
Get ready to edit
httpd.conf: In the Finder, choose Go > Go to Folder (Command-Shift-G) and enter/etc/httpd/. In the/etc/httpdfolder, select the file namedhttpd.conf; then choose File > Get Info (Command-I), and open the Ownership & Permissions expansion triangle. At some point in this process, depending on recent activities, you will be prompted to and should enter your administrator password to proceed. Open the Details section, and click the lock next to it. From the Owner menu, select your account name. This will temporarily allow you to edit the file.Note
Some readers have reported that even with permissions being changed, they were unable to save a modified
httpd.conffile. If that happens to you, save the file to the Desktop, and then drag it back into the/etc/httpddirectory, entering your administrator password when requested in order to overwrite the file.Back in the Finder, open the
httpd.conffile in any text editor.Scroll down to around line 611, to the part of the file that reads “Aliases: Add here as many...”. Here’s where you add the additional directory you want to share. Above the line
Alias/icons/ "/usr/share/httpd/icons/"insert the following:Alias /urlpath/ "/path/to/your/directory/" <Directory "/path/to/your/directory"> AllowOverride None Order allow,deny Allow from all </Directory>
Tip
That trailing slash in
/urlpath/is important! If you try to access, for instance,http://localhost/urlpath(no trailing slash), your Web server will report an error. You can add a second Alias directive on a separate line with the slash removed to make both work.Tip
An option that you can add to the
httpd.conffile allows any visitor to see all the files in a directory as a listing in the Web browser. To enable this feature, add the following line immediately before theAllowOverrideline in the configuration shown just previously:Options IndexesTo allow directory listing for users’ individual Sites folders, first find the line in the
httpd.conffile that begins:#<Directory /Users/*/Sites>Then remove the hash mark (
#) from the start of that line and the 11 lines that follow.Change
/urlpath/to the path you want in the URL for this area. For example, to make the URLhttp://example.com/widgets, change/urlpath/to/widgets/. This name doesn’t have to be the same as your actual directory; it can be anything you want.In its two instances, change
/path/to/your/directory/to the Unix path to the directory you want to share. For example, if the files you want to share are located in/Users/glenn/Public/Special/Items/, then use that exact text as the path in both theAliasline and the<Directoryline.Save and close the file. In the Finder, go back to the Info window for
httpd.confand set the owner back to system.In the Sharing preference pane, start Personal Web Sharing.
Launch a Web browser and test your URL.
Tip
For more information, read “Location, Location, Location: Tips for Storing Web Site Files,” a well-written article by Patrick Crowley with a fair amount of technical detail at http://www.macdevcenter.com/pub/a/mac/2003/05/16/web_files.html.
The built-in FTP software in all Mac OS X releases since Jaguar is an Apple-modified version of FTP software that works fine with other Unix and Linux variants. Unfortunately, when Apple modified the code so it worked with their particular idea of how FTP should function with Mac OS X users and accounts, they introduced a number of problems. For instance, it works well for one purpose only: user logins and guest access to specific user folders for uploading and downloading. If you want to set up a secure and configurable FTP server for any other purpose, you will likely run into trouble. The fact that it’s difficult to turn off guest FTP service shows how little effort Apple put into making FTP a robust part of Mac OS X; they just put it in because it was available.
Another good point: Security Update 2004-09-07 broke Apple’s built-in FTP software because the included FTP server was misconfigured. Apple fixed the problem in a security update a few weeks later, but the fact that the component was tested so minimally (if at all) shows how little attention Apple is paying to FTP.
In light of these problems, I recommend that you avoid Apple’s built-in FTP server software.
Note
To turn off Apple’s built-in FTP server, open the Sharing pane in System Preferences. Click the Services tab and uncheck FTP Access.
Tip
Read FTP (File Transfer Protocol) to review common FTP setups.
Let me tell you about a much, much better and vastly easier and safer way to operate FTP on the Macintosh. You need the free Pure-FTPd, a sophisticated and superb package that’s a bear to configure by hand. Fortunately, you can use PureFTPd Manager, by Jean Matthieu Schaffhauser, to help with configuration. PureFTPd Manager provides not only a graphical user interface to this free FTP server software, but also a fully compiled and configured version of Pure-FTPd. PureFTPd Manager works under Mac OS X 10.2 and 10.3; the developer hasn’t released a Tiger-compatible version at the time of this writing, but expects to do so.
Note
Earlier versions of the Panther edition of this ebook had detailed instructions on hacking together Mac OS X’s lukemftpd/tnftpd server—same server, different names over its lifetime—to accomplish only parts of what I wanted to tell you about. I removed those directions from this ebook because the combination of Pure-FTPd and PureFTPd Manager is remarkably superior and simple to use.
Download PureFTPd Manager from http://jeanmatthieu.free.fr/pureftpd/ and follow its installation directions. (If you are running Jaguar, follow the instructions in the Read Me section of the installer for version 10.2. Panther and Tiger users use the default installation.)
When you launch PureFTPd Manager for the first time, it asks you for your administrative password because its Setup Assistant will change some directories and needs the password to carry out those operations. After you log in, the Setup Assistant appears. (As you work through the Setup Assistant, if you have specific knowledge of Unix user and group permissions, you might modify some of these settings. However, the defaults are quite good and you should stick with them if you don’t know what you are doing and I don’t instruct you otherwise. Also, you can skip any step by checking the Skip checkbox.) The following steps help you work through the Setup Assistant:
Note
You can’t bypass the assistant: you can check Skip or use defaults for each of these steps, and you must reach Step 6 and click Configure to run the actual manager software.
Introduction (Step 1 of 6): The first screen presents an overview of the assistant’s functions.
Anonymous Access (Step 2 of 6): Choose your settings for anonymous FTP (Figure 13). Pure-FTPd can isolate anonymous and regular users to special folders; this is called “chroot” for “change root” in Unix parlance, and is often a huge hassle to set up. With PureFTPd Manager, though, it’s easy. If you want to turn on anonymous FTP, just click Continue. If you won’t need anonymous access, check Skip Anonymous Account Setup and click Continue. You can turn on anonymous access later.
Virtual Users (Step 3 of 6): Virtual Users let you separate your Mac OS X users from FTP-only users (Figure 14). It’s a nice feature when you have remote access that you want to keep isolated from your main computer’s file system. If you want to turn on Virtual Users, click Continue. Otherwise, check the Skip box and then click Continue.
Server Logging (Step 4 of 6): Tracking statistics and balancing Pure-FTPd’s needs against the rest of your system are both useful options, so I recommend that you leave those checkboxes selected. However, if you are running just an FTP server on the computer on which you’re installing this software, uncheck the option for fairly sharing processor resources. Click Continue.
System Settings (Step 5 of 6): In most cases, you want Pure-FTPd to launch every time the system launches. If you need to launch it manually just when an FTP need arises, uncheck Automatically Launch PureFTPd at System Startup. The program doesn’t have an option to omit creating virtual users and hosts directories, but that shouldn’t cause you problems even if you don’t use either feature. Click Continue.
Conclusion (Step 6 of 6): The final screen shows a summary of your choices. Click Configure to implement them and launch PureFTPd Manager.


You can run through this assistant again at any time from the Server Status pane of PureFTPd Manager by clicking Easy Setup Assistant.
Surely, anonymous FTP is one of the greatest uses of the Internet. With anonymous FTP, users don’t need special accounts. This has been particularly difficult to set up securely under Mac OS X, and PureFTPd and the manager software finally gives us that clean ability.
To turn on anonymous FTP access using PureFTPd Manager, follow these steps:
In the Preferences window, open the Anonymous pane.
Tip
Open PureFTPd Manager’s preferences just as you would open the preferences in any Mac OS X application—choose Preferences from the PureFTPd menu (Command-,). You can also access them by clicking the Preferences button on the toolbar. You can change the buttons along the top to your most common ones in the same way that you can in System Preferences. For instance, drag Authentication to the top to make it available when you display the contents of a different pane (see the set of six icons on the top of Figure 15).
If you followed the default setup with the Setup Assistant (as I explained in the steps just previously), Disable Anonymous Access is unchecked (Figure 15). Note that you can check that box to turn off anonymous access if and when you need to.
I recommend the following settings:
Check Disable Upload unless you’re positive that anonymous users need to upload files. If so, your best bet is to create the anonymous account’s file directory on a separate hard drive or disk partition from your boot disk. This will keep a malicious user from filling up your computer. (You can also set a preference to prevent this; see Other options, later.)
Uncheck Anonymous Users Can Create Directories because there is usually no reason to let just anyone create a directory.
Check Anonymous Can’t Download Files Uploaded by Anonymous to protect your anonymous FTP server from becoming a pirated software or warez hijacked repository. This happens quite frequently.
Set Speed Limits to a percentage of your overall speed to prevent FTP users from overwhelming your Internet connection. If you have 768 Kbps DSL, you might set Upload and Download to 512 or 256.
To apply the settings, close the Preferences window.

A virtual user in PureFTPd Manager can optionally have access only to directories with a particular login name in the location you have chosen. This allows you to create users without creating a full Mac OS X login account. To create a virtual user, follow these steps:
Click the User Manager button in the PureFTPd Manager toolbar.
Click the New button (in the toolbar). A new entry appears in the Virtual Users list at the left.
In the General pane, enter the basic details for this user, such as a full name (used to display information in the Server Status dialog), a user name (in the Login field), and a password (Figure 16).
If you want to set the Home Directory to something other than the default, click Choose. Checking Restrict User Access to His Home Directory allows a user of either gender to view only the files in that directory and deeper. Unchecking it gives access to the entire computer. Restrict Time Access is a terrific option if you want certain users to have access just during work hours or at night. Checking Disabled keeps all the settings in place, but disables the account as long as the box is checked.
Click the Virtual Folders tab to add directories that a user can view or have read/write access to that would otherwise be unavailable, because the user would be restricted to a home directory.
Click the Transfers tab to set a variety of quotas and limits, such as maximum storage size for that user. I highly recommend setting a megabyte limit—even a quite large one—if the user’s home directory is on your boot disk.
Click the Other tab to create a banner message that this user sees on login if his FTP client displays banners; some don’t, such as Fetch.
Also in the Other pane, you can set the IP Restrictions fields in order to limit or exclude from access just specific IP ranges or addresses. This can be useful if you see abuse or if you’re working just with a specific set of people with static addresses.
Choose File > Save (Command-S) or click the Save button to save these changes and have them applied. (You’ll be prompted if the server needs to be restarted.)
Tip
You can modify the default virtual user folder area in PureFTPd Manager’s preferences. In the Mac OS X preference pane click the Choose button to the right of the Virtual Users Base Directory field (Figure 17).


Mac OS X users have access to Pure-FTPd with their existing user names and passwords via a system called pam, which is used for authentication. You can disable access for all OS X users, not just a subset, through PureFTPd Manager. Here are the steps:
One of PureFTPd Manager’s neatest features is the capability to easily create (or import) an SSL/TLS certificate, which is required for a form of encrypted and secured FTP called FTP-SSL/TLS. (Find out what this is by reading the sidebar Secure FTP (SFTP) vs. FTP-SSL/TLS.)
Tip
If you need to create self-signed certificates, certificate authorities, and other interesting kinds of cryptographic identity documents for more services than just FTP, you can now use Tiger’s new Certificate Assistant. Access Certificate Assistant by launching Keychain Access (found in the Applications/Utilities folder) and choosing Certificate Assistant from the Keychain Access application menu. If you follow the steps to create a self-signed certificate, you can then import it into PureFTPd Manager.
Follow these steps to set up or import an SSL/TLS certificate with PureFTPd Manager:
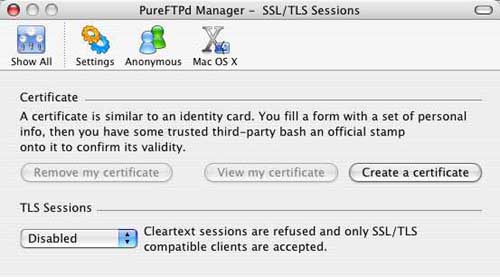
Open the SSL/TLS Sessions preference pane (Figure 18).
Click Create a Certificate to open the Create a Certificate dialog (Figure 19).
If (and only if) you are importing an existing certificate, one that you created using your own software or a certification authority (CA) such as VeriSign, click Import a Certificate. After selecting the certificate file, you’re done and you can skip the rest of these steps.
To create a certificate that isn’t validated by anyone else, but is perfectly fine for personal use or use with colleagues, click Go Self-Signed!
Warning
If you use a self-signed certificate, the FTP client used to access your FTP server must allow self-signed certificates. And be aware that some of these FTP clients may prompt you to confirm that the certificate is valid before allowing a connection for the first time. (Web browsers using SSL/TLS bypass this by using a third-party that has its own validity installed in the browser; this third-party, a certificate authority, vouches for the certificate.)
In the next dialog, enter values in every field (Figure 20). These values aren’t cross-checked—you can enter “nonsense” in every field but the two-letter ones and it will work. But, I suggest that you include useful details. When I create a certificate like this, I set the Certificate Validity (in Days) field to 3000, because I don’t want to create a new one each month. You can also increase the number of bits in the certificate; this decreases the chance of the certificate being broken, as unlikely as that now seems.
Click Generate My Certificate. On slower machines, it might take a moment before the certificate is finished and you’re returned to the preference pane.
From the TLS Sessions menu, leave Disabled selected, if you don’t want to allow SSL/TLS sessions; otherwise, choose Mixed Mode to allow clients that support FTP-SSL/TLS to use it or choose TLS Only in order to restrict access to just those clients with TLS support. That last option might be useful only for very specific projects in which security is paramount.


Although PureFTPd Manager can show the completed certificate— click View My Certificate in the SSL/TLS preference pane—it doesn’t show a fingerprint, a short sequence of hexadecimal numbers that sort of summarizes the certificate’s contents (Figure 21).

If you’re not scared of Terminal, you can extract the fingerprint by following these steps:
In PureFTPd Manager, open the SSL/TLS Sessions preference pane.
Click View My Certificate.
Copy the part that starts with the line that contains
BEGIN CERTIFICATEall the way through the line that containsEND CERTIFICATE.Launch Terminal.
Type
pico pureftpd.certto run a simple Terminal text editor and create a file namedpureftpd.cert.Press Command-V to paste the text in.
Press Control-O to write the file out; then press Control-X to exit pico.
Now, type at the Terminal prompt:
openssl x509 -noout -in pureftpd.cert
  -fingerprint
The resulting output is the fingerprint. You can distribute it to others in order to confirm that the FTP server that a user has connected to is really yours—not one disguised as yours.
Pure-FTPd can offer different files for different FTP server names that you set up. For instance, you could run Pure-FTPd on a single computer that acted as the FTP server for both ftp.glennf.com and ftp.tidbits.com. The only limitation is that, unlike with a Web server, each FTP server must have a unique IP address. (Web server software can feed out a different Web site at the same server IP address because the HTTP protocol lets a browser explain which server it wants. This feature is missing from FTP, so you must pair a host name for the FTP server with a unique IP address.)
Pure-FTPd calls these different servers virtual hosts, and you can configure them in PureFTPd Manager. Here are the steps:
Click the Virtual Hosts button on the toolbar to open the Virtual Hosts window (Figure 22).
Click New (located just right of the Virtual Hosts button) to create an empty virtual host. An entry for it appears in the Virtual Hosts lists at the left.
Enter the name (for reference only), the IP address, and the root directory of the virtual host. The root directory is the start of the path from which files will be fed on that virtual host. If the IP address isn’t set up on your computer, PureFTPd Manager will add the IP address to the network interface you select, like
en0for your primary Ethernet interface, or the one built into your computer. PureFTPd lets you add any IP address, not just legitimate ones for your network; see the Giant Warning, next.Giant Warning!
In testing PureFTPd Manager, I invented an IP address to create a fake virtual server. I failed to delete this virtual server after testing it. Every time I rebooted my Macintosh thereafter, I could not reach any computers that were located on any address starting with the first number in that fake server’s IP address! It took some figuring to understand what I’d done wrong. Deleting the fake virtual server eliminated the problem. This problem might bite you if you have a mobile machine that’s using virtual servers.
Click the Save button (on the toolbar).

Using PureFTPd Manager, you can control Pure-FTPd in a number of interesting ways; here are some that may be useful for your particular purpose:
Limit usage: You can use the Settings preferences pane to restrict the number of simultaneous sessions, number of users per IP address, and the timeout for an FTP session to expire.
Disable upload: In the Options preferences pane, you can limit how full your hard disk can become and halt uploads when that threshold is reached. If you put your FTP upload directory or directories on your boot disk, this limit can keep your system from becoming unusable—a full boot disk can crash or otherwise disable a system.
Use a database to manage virtual users: PureFTPd Manager has hooks in the Authentication preferences pane for configuring Pure-FTPd to talk to database (MySQL and PostgreSQL) and LDAP servers. You could tie FTP access into a Web-based system that would create users along with Web accounts, for instance, or control account features.
As noted in NFS (Network Filesystem), you should consider security requirements carefully before turning on NFS. To turn it on, you must either use commands in Terminal or, preferably, the €15 shareware NFS Manager, version 2.5 of which has been updated for Tiger (http://www.bresink.com/osx/NFSManager.html).
Because turning on NFS is such a different animal and such an involved process, I don’t recommend it to anyone but an experienced system administrator. Like certain kinds of munitions that are dangerous to even tell people how to manufacture, NFS isn’t a reasonable file-sharing option for the vast majority of users. If you’re committed to NFS, use NFS Manager and read its documentation—and be careful!
As I described in WebDAV inside a Web Server, Apple uses the open source Apache Web server for Personal Web Sharing in Tiger. Apple’s Apache version includes modules and settings for all the bells and whistles, but turns off options that users don’t typically need. Turning WebDAV on within Tiger requires a little configuration.
After you turn on your firewall and create any necessary users, you can set up and turn on WebDAV. In a nutshell, the process includes:
Edit a file called
httpd.confto set the folder that hosts WebDAV files (see “General configuration,” next).Change the settings for each WebDAV server you configure and create the user password file so the correct users have controlled access; see Set up users.
Secure WebDAV using a third-party product or by following detailed instructions for configuring an SSL-enabled server; see Secure WebDAV with SSL.
Turn on and test WebDAV; see Start and test WebDAV.
Configuring WebDAV is similar to setting up a regular Apache Web server; these steps will seem largely familiar from Share Files over the Web.
Turn off Web sharing: If the Web server is running on the machine you’re reconfiguring, open the Sharing preference pane, click the Services tab, select Personal Web Sharing, and click Stop or uncheck its box.
Get ready to edit httpd.conf: In the Finder, choose Go > Go to Folder (Command-Shift-G) and enter
/etc/httpd/. From the/etc/httpddirectory, select the file namedhttpd.conf; then choose File > Get Info (Command-I), and open the Ownership & Permissions expansion triangle. At some point, you will be prompted to enter your administrator password to proceed, and you should do so. Open the Details section, and click the lock next to the Owner menu. From the Owner menu, select your account name. This procedure temporarily allows you to edit the file.Back in the Finder, open
httpd.confin any text editor.Remove the initial hash sign (
#) from the following lines; this “uncomments” the lines and tells Apache to read them as configuration instructions:#LoadModule dav_module libexec/httpd/libdav.soand (somewhat later in the file; I recommend searching for it)
#AddModule mod_dav.cDefine the directory that will have WebDAV support: For instance, you can use the predefined
/Library/WebServer/Documentsdirectory—scroll down to find this line:<Directory "/Library/WebServer/Documents">Just below that line, insert the following lines (the text
/webdavin the Location directive can be changed to any directory within/Library/WebServer/Documents):DavLockDB /Library/WebServer/Documents/DAVLocks/davlockdb <Location /webdav> DAV On AllowOverride None Options None AuthType Basic AuthName "My WebDAV Server" AuthUserFile "/etc/httpd/davusers" <LimitExcept GET HEAD OPTIONS> require user webadmin </LimitExcept> </Location>
Note
You can also use the Alias feature discussed in Share files and folders with Apache to map any URL path to a given directory. Put the above code inside the alias before the
</Directory>tag and omit the<Location...>and</Location>tags.Make sure that any files in the directory you chose have the correct permissions. In the Finder, select the directory, choose File > Get Info (Command-I), expand the Ownership & Permissions section, and open Details. Select www from the Owner pop-up menu and set owner access to Read & Write; set the same owner and access with the Group menu. Finally, click Apply to Enclosed Items.
In the Finder, inside
/Library/Webserver/Documents/create a folder calledDAVLocksand another calledwebdav. Copy any files you want to share into thewebdavdirectory. For both new folders, choose File > Get Info and repeat the process of setting the Owner and Group to www and access to Read & Write, and be sure to click Apply to Enclosed Items.
You’ve completed setting up Apache to access a specific directory using its WebDAV support. But now we need to add users before turning on the server and testing the setup.
Because we’re allowing both read and write access to files on a Web server, you should specifically enable users through a user name and password, just as with any other kind of file server.
Warning
WebDAV employs no encryption or security by default: user names and passwords that you use with a WebDAV server are sent in the clear unless you have an SSL-enabled Web server that is running WebDAV.
The require user webadmin line that you added in Step 5 (just previously) to httpd.conf restricts access to the user named webadmin. Just putting that user’s name in the configuration file doesn’t allow that user access: you must also create a password for that user, and a password file in which to store that password, along with passwords for other users:
Run Terminal (in
/Applications/Utilities)sudo htpasswd -c /etc/httpd/davusers webadminWhen prompted, enter the password for your administrator account, and then enter the password you want to set for this user. You have now set the password that will allow the user named
webadminto access the WebDAV server.To add more users, repeat Steps 2 and 3 for each user changing just
webadminto whatever additional names you listed in thehttpd.conffile.
WebDAV runs under an ordinary Web server. Turning on SSL (Secure Sockets Layer) security on the Web server protects account information (user names and passwords), files, and metadata from interception by others on the same wired or wireless network as the client or server computers.
To run a secure Web server you have to accomplish these tasks:
Obtain an SSL Web server certificate:
You can purchase one from a company like GoDaddy or Thawte, and let them provide the third-party verification, known as certificate authority (CA). The certificate authority tells a browser that the Web site is at the address it declares it is.
You can also create a self-signed certificate, as discussed earlier in Create (or import) an SSL/TLS certificate in “Share Files with FTP.” Tiger offers a self-signed certificate creation tool within Keychain Access (
Applications/Utilities).
Configure your Apache server: You must change the configuration of your Apache server to load the SSL information and properly interact with browsers that want to use encrypted connections. For the least amount of effort, you might look into Tenon iTools 7, which can manage and install SSL certificates (http://www.tenon.com/products/itools-osx/, $349). More Terminal-oriented users could consider reading a long, detailed, set of instructions on how to turn on the SSL modules that enable encrypted document transfers (http://www.modssl.org/docs/2.8/ssl_overview.html).
Inform your users: Tell your users to connect using the scheme
https://instead ofhttp://or to enable the SSL option in their WebDAV browsers or clients.Tip
If you use a self-signed certificate, your users may see a certificate message that warns them that your certificate isn’t validated by a certificate authority: Mac users can accept that message and not see it in the future; Windows XP users must disable a setting that validates certificates! One way around this is to create your own certificate authority using Keychain Access’s Certificate Assistant and then import that authority into any Windows XP machine that needs access to an SSL-protected WebDAV server.
Start WebDAV access by returning to the Services pane in the Sharing system preferences and clicking the Start button for Personal Web Sharing. If the preference pane never shows it running—that is, the Start button remains dimmed and never changes its text to Stop nor becomes clickable again—look in /etc/httpd for httpd.conf.bak(which is a backup copy of the original httpd.conf file) and compare it against your revised file to see if you changed something I didn't tell you to.
Next, test your WebDAV server in the Finder. Choose Go > Connect to Server (Command-K). Enter http://localhost/webdav.
Tip
As I described in Share Files over the Web, you can also enter the machine’s IP address, Rendezvous name, or full host and domain name followed by /webdav.
The Finder prompts for a user name and password. Once you enter them, the Finder mounts the WebDAV server on your Desktop. Try copying files to and from the directory. If you can’t mount or copy files to the WebDAV server, check your changes to httpd.conf carefully and check how you created the password file, fix any errors, and restart the server again.
Tip
A stunningly clear explanation of using WebDAV with iCal—which can publish to WebDAV servers, written by Greg Westin, is available at http://www.gregwestin.com/webdav_for_ical.php. Although it’s particular to setting up your own server for iCal, the tips and background information supplement my advice here.