Learning Swift and Xcode
For the most part, all programming languages perform the typical tasks any computer needs to do—store information, compare information, make decisions about that information, and perform some action based on those decisions. The Swift language makes these tasks easier to understand and accomplish. The real trick with Swift (actually, the trick with most programming languages) is to understand the symbols and keywords used to accomplish those tasks. This chapter continues the examination of Swift and Xcode so you can become even more familiar with them.
A Newcomer
As you may know, Swift has not been around for long. Development of the Swift language began about four years ago by Chris Lattner, and on September 9, 2014, Swift 1.0 was officially released. Swift borrows many ideas from Objective-C, but it also incorporates many features used by modern programming languages. Swift was designed from the ground up to be accessible to the average programmer.
Currently, there are two main types of programming languages. Compiled languages such as Objective-C and C++ are known for being rigid and requiring certain syntax. Compiled languages are also significantly faster in execution. Interpreted languages, such as Ruby, PHP, and Python, are known for being easier to learn and code but slower in their execution. Swift is a language that bridges the gap between the two. Swift incorporates the flexibility that makes interpreted languages so popular with the performance required for demanding applications and games. In fact, Apple claims that Swift applications will perform faster than those written in Objective-C. In some of Apple’s tests, Swift performed almost four times faster than Python and 40 percent faster than Objective-C.
Understanding the Language Symbols
Understanding symbols is a basic part of any programming language. Symbols are punctuation used to portray specific meanings in source code. Understanding the symbols of a language is required to be able to use the language. Here are some of the symbols and language constructs used in Swift, most of which you’ve already encountered in one way or another:
- {: This is the begin brace. It’s used to start what’s commonly referred to as a block of code. Blocks are used to define and surround a section of code and define its scope.
- }: This is the end brace. It’s used to end a block of code. Wherever there is a begin brace ({), there must always be an accompanying end brace (}).
- []: These are the open and close brackets. They are used in the declaration and consumption of arrays.
- func methodName() -> String: This is how a Swift function is defined. The word methodName, of course, can represent any name. The word String can also change. It represents what type of information the method returns. In this example, String indicates the method will return a string, or a group of characters (data types were introduced in Chapter 3 and will be covered in more depth in later chapters). This will be discussed more later in the chapter.
Figure 6-1 shows an example of Swift code.

Figure 6-1. Example of Swift code
Line 1 represents a Swift function. The empty parentheses, (), indicate that this function does not receive any variables. The fact that the parentheses are not followed by -> signifies that this function does not return any type of data and, if invoked, would not return a value to the caller.
The end of line 1 and line 4 are the braces that define a block of code. This block is what defines the method. Every method has at least one block.
Line 2 creates a constant named hello. As you learned in previous chapters, a constant is a value that cannot change or is constant. The value of the constant hello is assigned “Hello World!” Because you assign hello to a String value, hello becomes a String and can use any method related to Strings (recall that you first saw strings in Chapter 3). Line 3 could be rewritten as follows:
let hello: String = "Hello World!"
Line 3 is a call to the println function. You pass the method the object in order to print the hello String object.
Although it does look a little cryptic to someone who is just learning Swift, the simple and terse syntax doesn’t take too much time to learn.
Swift was built from the ground up to be object-oriented. It incorporates the best parts of Objective-C without the constraints of being compatible with C. It also takes some of the best features of a scripted language. The following are some of the concepts that make Swift object-oriented. Don’t worry if some of these terms seem unfamiliar; they will be discussed in later chapters (Chapters 7 and 8 cover the basics).
- Pretty much everything is an object.
- Objects contain instance variables.
- Objects and instance variables have a defined scope.
- Classes hide an object’s implementation.
Note As you saw in Chapter 5, the term class is used to represent, generically, the definition or type of an object. An object is created from the class. For example, an SUV is a class of vehicle. A class is a blueprint of sorts. A factory builds SUVs. The results are SUV objects that people drive. You can’t drive a class, but you can drive an object built from a class.
So, how do these concepts translate to Swift? Swift is flexible in the implementation of classes.
Note Even though in Swift a single file may contain many different classes, a programmer will want to separate the code into different files to make access easier.
Let’s look at a complete definition of a Swift class called HelloWorld (Figure 6-2).

Figure 6-2. HelloWorld class
In the preceding example, a class called HelloWorld is being defined. This class has only one method defined: logMessage. What do all these strange symbols mean? Using the line numbers as a reference, you can review this code line by line.
Line 1 contains a compiler directive, import Foundation. For this little program to know about certain other objects, you need to have the compiler read other interface files. In this case, the Foundation file defines the objects and interfaces to the Foundation framework. This framework contains the definition of most non-user-interface base classes of the iOS and Mac OS X systems. You will not be using any Foundation framework–specific objects in this example, but it is a default part of any new Swift file.
The actual start of the object is on line 4, as follows:
class HelloWorld {
HelloWorld is the class. If you wanted HelloWorld to be a subclass of a logging class you had created, such as LogFile, you would change the declaration as follows:
class HelloWorld: LogFile {
Line 6 contains a method definition for this object, as follows:
func logMessage() {
When you’re defining a method, you must decide whether you want the method to be a type or an instance method. In the case of the HelloWorld object, you are using the default method type, which is an instance. This method can be used after the object is created. If the word class is added before the func, the method can be used before the object is created, but you will not have access to variables in the object. If you changed logMessage to a type method, it would be as follows:
class func logMessage() {
Lines 7 and 8 contain the body of the method. You learned about the details of the statements earlier in the chapter.
That’s the complete description of class HelloWorld; there’s not a whole lot here. More complicated objects simply have more methods and more variables.
But wait, there is more. Now that you have a new Swift class defined, how is it used? Figure 6-3 shows another piece of code that uses the newly created class.

Figure 6-3. Calling a Swift method
The first line defines a constant called myHelloWorld. It then assigns the constant to an instance of the HelloWorld class. The second line simply calls the logMessage method of the myHelloWorld object. Those who have spent time in Objective-C will quickly see how much shorter and efficient both the class declaration and the object creation are in Swift.
Note Instantiation makes a class a real object in the computer’s memory. A class by itself is not really usable until there is an instance of it. Using the SUV example, an SUV means nothing until a factory builds one (instantiates the class). Only then can the SUV be used.
Method calls can also accept multiple arguments. Consider, for example, myCarObject.switchRadioBandTo(FM, 104.7). The method here would be switchRadioBandTo. The two arguments are contained in the parentheses. Being consistent in naming methods is critical.
Writing Another Program in Xcode
When you first open Xcode, you’ll see the screen shown in Figure 6-4.

Figure 6-4. Xcode opening screen
You should always keep the screen in Figure 6-3 visible at the launch of Xcode. Until you are more comfortable with Xcode, keep the “Show this window when Xcode launches” checkbox selected. This window allows you to select the most recently created projects or create a new project from scratch.
Creating the Project
You are going to start a new project, so click the “Create a new Xcode project” icon. Whenever you want to start a new iOS or Mac OS X application, library, or anything else, use this icon. Once a project has been started and saved, the project will appear in the Recent list on the right of the display.
For this Xcode project, you will choose something simple. Make sure the iOS Application is selected. Then select Single View Application, as shown in Figure 6-5. Then simply click the Next button.

Figure 6-5. Choosing a new project from a list of templates
There are several types of templates. These templates make it easier to start a project from scratch in that they provide a starting point by automatically creating simple source files.
Once you’ve chosen the template and clicked the Next button, Xcode presents you with a dialog box asking for the project’s name and some other information, as shown in Figure 6-6. Type a product name of Chapter 6. The organization identifier needs to have some value, so we used com.innovativeware. Also make sure the Devices drop-down is set to iPhone.

Figure 6-6. Setting up the product name, company, and type
Once you’ve supplied all the information, click the Next button. Xcode will ask you where to save the project. You can save it anywhere, but the desktop is a good choice because it’s always visible.
Once you’ve picked where to save the project, the main Xcode screen will appear (see Figure 6-7). In the leftmost pane is the list of source files. The right two-thirds of the screen is dedicated to the context-sensitive editor. Click a source file, and the editor will show the source code. Clicking a .storyboard file will show the Screen Interface editor.

Figure 6-7. The Xcode 7 main screen
The first app is going to be simple. This iPhone app will contain a button. When the button is clicked, your name will appear on the screen. So, let’s start by first looking more closely at some of the stub source code that Xcode built for you. The nice thing about Xcode is that it will create a stub application that will execute without any modification. Before you start adding code, let’s look at the main toolbar of Xcode, as shown in Figure 6-8.
![]()
Figure 6-8. The Xcode 7 toolbar
At first glance, there are three distinct areas of the toolbar. The left area is used to run and debug the application. The middle area displays status as a summary of compiler errors and warnings. The far-right area contains a series of buttons that customize the editing view.
As shown in Figure 6-9, the left portion of the toolbar contains a Play button that will compile and run the application. If the application is running, the Stop button will not be grayed out. Since it’s grayed out, you know the application is not running. The scheme selection can be left alone for now. Schemas will be discussed in more detail in Chapter 13.

Figure 6-9. Close-up of the left portion of the Xcode toolbar
The right side of the Xcode toolbar contains buttons that change the editor. The three buttons represent the Standard editor (selected), the Assistant editor, and the Version editor. For now, just click the Standard editor button, as shown in Figure 6-10.

Figure 6-10. Close-up of the right portion of the Xcode toolbar
Next to the editor choices are a set of View buttons. These buttons can be toggled on and off. For example, the one chosen in Figure 6-10 represents the current view shown in Figure 6-7, a list of the program files on the left third of the screen, the main editor in the middle third, and the Utilities in the right portion of the screen. Any combination, or none, can be chosen to help customize the main workspace window. The last button opens the Utilities area. Chapter 13 discusses this button. For now, let’s get back to your first iPhone app.
Click the ViewController.swift file, as shown in Figure 6-11. The editor shows some Swift code that defines a ViewController class.

Figure 6-11. Looking at the source code in the Xcode editor
You will notice two functions in the code. viewDidLoad is called immediately after a view is loaded and can be used for setting up the view. This is a good place to put code that sets up labels, buttons, colors, and so on. didReceiveMemoryWarning is called when your application is getting low on memory. You can use this function to decrease the amount of memory required by your application.
Note For now, you’re simply going to add a few lines of code and see what they do. It’s not expected that you understand what this code means right now. What’s important is simply going through the motions to become more familiar with Xcode. Chapter 7 goes into more depth about what makes up a Swift program, and Chapter 10 goes into more depth about building an iPhone interface.
Next, you’ll add a few lines of code into this file, as shown in Figure 6-12. Line 13 defines an iPhone label on the screen where you can put some text. Line 15 defines the method showName. You’ll be calling this method in order to populate the iPhone label. A label is nothing more than an area on the screen where you can put some text information.

Figure 6-12. Code added to the ViewController.swift file
Caution Type the code exactly as shown in the example, including case. For instance, UILabel can’t be uilabel or UILABEL. Swift is a case-sensitive language, so UILabel is completely different from uilabel.
You will notice that the code you added has @IBOutlet and @IBAction in front of them. These attributes are necessary when connecting objects with the interface designer. IBOutlet allows you to control an interface object with code. IBAction allows you to execute code when something happens in the interface such as tapping a button.
Note IBOutlet and IBAction both start with IB, which is an acronym from Interface Builder. Interface Builder was the tool used by NeXT and then Apple for building user interfaces.
You now have the necessary code in place, but you don’t yet have an interface on the iPhone. Next, you’re going to edit the interface and add two interface objects to your app.
To edit the iPhone’s interface, you need to click the Main.storyboard file once. The .storyboard file contains all the information about a single window or view. Xcode 7 also supports .xib (pronounced zib) files.
Note Each .xib file represents one screen on an iPhone or iPad. Apps that have multiple views will have multiple .xib files, but many different views can be stored in each storyboard file.
You will use Xcode’s interface editor to connect a UI object, such as a Label object, to the code you just created. Connecting is as easy as clicking and dragging.
Click the last view button in the upper-right part of the screen, as shown in Figure 6-13. This opens the Utilities view for the interface. Among other things, this Utilities view shows you the various interface objects you can use in your app. You’re going to be concerned with only the right-most objects: Button and Label. Figure 6-14 shows the Object Library. There are other libraries available, but for now you will be using only the third one from the left.

Figure 6-13. The iPhone interface you’re going to modify

Figure 6-14. The Object Library
The first step is to click the Button object in the Utilities window. Next, drag the object to the iPhone view, as shown in Figure 6-15. Don’t worry; dragging the object doesn’t remove it from the list of objects in the Utilities view. Dragging it creates a new copy of that object on the iPhone interface.

Figure 6-15. Moving a Button object onto the iPhone view
Next, double-click the Button object that was just added to the iPhone interface. This allows you to change the title of the button, such as to Name, as shown in Figure 6-16. Many different interface objects work just like this. Simply double-click, and the title of the object can be changed. This can also be done in the actual code, but it’s much simpler to do in Interface Builder.

Figure 6-16. Modifying the Button object’s title
Once the title has been changed, drag a Label object to right below the button, as shown in Figure 6-17.

Figure 6-17. Adding a Label object to the iPhone interface
For now, you can leave the label’s text as “Label” since this makes it easy to find on the interface. If you clear the label’s text, the object will still be there, but there is nothing visible to click in order to select it. Expand the size of the label by dragging the center white square to the right, as shown in Figure 6-18.

Figure 6-18. Expanding the label’s size
Now that you have a button and the label, you can connect these visual objects to your program. Start by right-clicking (or Control-clicking) the Button control. This brings up a connection menu, as shown in Figure 6-19.

Figure 6-19. Connection menu for the Button object
Next, click and drag from the Touch Up Inside connection circle to the View Controller icon, as shown in Figure 6-20. Touch Up Inside means the user clicked inside the Button object. Dragging the connection to the View Controller connects the Touch Up Inside event to the ViewController object. This causes the object to be notified whenever the Button object is clicked.

Figure 6-20. Connecting the Touch Up Inside event to the object
Once the connection is dropped, a list of methods that can be used in your connection is displayed, as shown in Figure 6-21. In this example, there is only one method, showName :. Selecting the showName: method connects the Touch Up Inside event to the object.
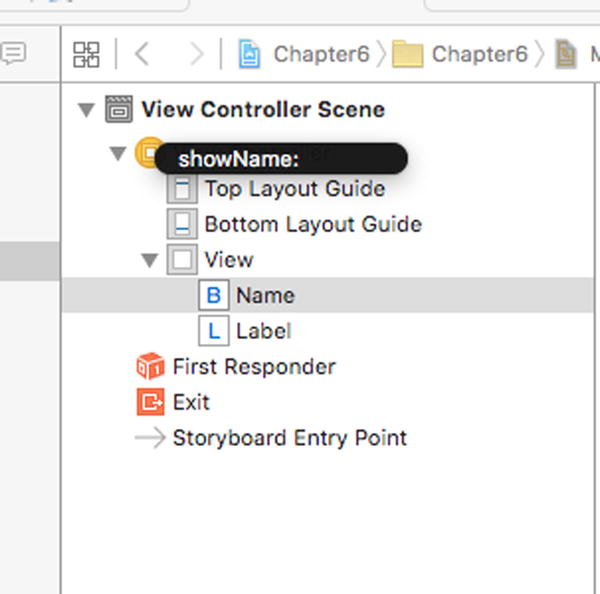
Figure 6-21. Selecting the method to handle the Touch Up Inside event
Once the connection has been made, the details are shown on the button’s connection menu, as shown in Figure 6-22.

Figure 6-22. The connection is now complete
Next, you create a connection for the Label object. In this case, you don’t care about the Label events; instead, you want to connect the ViewController’s nameLabel outlet to the object on the iPhone interface. This connection basically tells the object that the label you want to set text on is on the iPhone interface.
Start by right-clicking the Label object on the iPhone interface. This brings up the connection menu for the Label object, as shown in Figure 6-23. There are not as many options for a Label object as there were for the Button object.

Figure 6-23. Connection menu for the Label object
As mentioned, you are not here to connect an event. Instead, you connect what’s referred to as a referencing outlet. This connects a screen object to a variable in your ViewController object. Just like with the button, you should drag the connection to the View Controller icon, as shown in Figure 6-24.

Figure 6-24. Connecting the referencing outlet to the object
Once the connection is dropped on the View Controller icon, a list of outlets in your ViewController object will be displayed, as shown in Figure 6-25. Of the two choices, you want to choose nameLabel. This is the name of the variable in the ViewController object you are using.

Figure 6-25. Selecting the object’s variable to complete the connection
Once you’ve chosen nameLabel, you’re ready to run your program. Click the Run button (which looks like a Play button) at the top-left corner of the Xcode window (see Figure 6-6). This will automatically save your files and start the application in the iPhone Simulator, as shown in Figure 6-26.

Figure 6-26. The app running, before and after the button is clicked
By clicking the Name button, the label’s text will change from its default value of “Label” to “My Name is Brad!” or whatever value you entered. If you want to, go back into the interface and clear the default label text.
Summary
The examples in this chapter were simple, but ideally they’ve whetted your appetite for more complex applications using Swift and Xcode. In later chapters, you can expect to learn more about object-oriented programming and more about what Swift can do. Pat yourself on the back because you’ve learned a lot already. Here is a summary of the topics discussed in this chapter:
- The origins and brief history of the Swift language
- Some common language symbols used in Swift
- A Swift class example
- Using Xcode a bit more, including discussing the HelloWorld.swift source file
- Connecting visual interface objects with methods and variables in your application object
Exercises
- Clear the default text of “Label” in the program and rerun the example.
- Change the size of the Label object on the interface to be smaller in width. How does that affect your text message?
- Delete the referencing outlet connection of the label and rerun the project. What happens?
- If you think you have the hang of this, add a new button and label to the ViewController object and to the interface. Change the label from displaying your name to displaying something else.