
Making Decisions, Program Flow, and App Design
One of the great things about being an iOS developer is you get to tell your devices exactly what you want them to do and they do it—your devices will do tasks over and over again without getting tired. That’s because iOS devices don’t care how hard they worked yesterday, and they don’t let feelings get in the way. These devices don’t need hugs.
There is a downside to being a developer: you have to think of all the possible outcomes when it comes to your apps. Many students love having this kind of control. They enjoy focusing on the many details of their apps; however, it can be frustrating having to handle so many details. As mentioned in the introduction to this book, there is a price to pay for developing apps, and that price is time. The more time you spend developing and debugging, the better you will get with all the details, and the better your apps will perform. You have to pay this price to become a successful developer.
Computers are black and white; there are no shades of gray. Your devices produce results, many of which are based on true and false conditions.
In this chapter, you learn about computer logic and controlling the flow of your apps. Processing information and arriving at results are at the heart of all apps. Your apps need to process data based on values and conditions. To do this, you need to understand how computers perform logical operations and execute code based on the information your apps have acquired.
Boolean logic is a system for logical operations. Boolean logic uses binary operators such as AND and OR and the unary operator NOT to determine whether your conditions have been met. Binary operators take two operands. Unary operators take one operand.
We just introduced a couple of new terms that can sound confusing; however, you probably use Boolean logic every day. Let’s look at a couple of examples of Boolean logic with the binary operators AND and OR in a conversation parents sometimes have with their teenage children:
“You can go to the movies tonight if your room is clean AND the dishes are put away.”
“You can go to the movies tonight if your room is clean OR the dishes are put away.”
Boolean operators’ results are either TRUE or FALSE. In Chapter 3, we briefly introduced the Boolean data type. A variable that is defined as Boolean can contain only the values TRUE and FALSE.
var seeMovies: Bool = false
In the preceding example, the AND operator takes two operands: one to the left and one to the right of the AND. Each operand can be evaluated independently with a TRUE or FALSE.
For an AND operation to yield a TRUE result, both sides of the AND have to be TRUE. In the first example, the teenager has to clean his or her room AND have the dishes done. If either one of the conditions is FALSE, the result is FALSE—no movies for the teenager.
For an OR operation to yield a TRUE result, only one operand has to be TRUE, or both conditions can be TRUE to yield a TRUE result. In the second example, just a clean bedroom would result in the ability to go to the movies.
Note In Objective-C and other programming languages, Boolean variables can hold integer variables; 0 represents FALSE, and any nonzero value represents TRUE. Swift’s strong type checking doesn’t allow this. Boolean variables in Swift can be assigned only true or false.
A NOT statement is a unary operator. It takes just one operand to yield a Boolean result. Here’s an example:
“You can NOT go to the movies.”
This example takes one operand. The NOT operator turns a TRUE operand to a FALSE and a FALSE operand to a TRUE. Here, the result is a FALSE.
AND, OR, and NOT are three common Boolean operators. Occasionally, you need to use more complex operators. XOR, NAND, and NOR are common operations for iOS developers.
The Boolean operator XOR means exclusive-or. An easy way to remember how the XOR operator works is the XOR operator will return a TRUE result if only one argument is TRUE, not both.
Swift does not have these operators built in, but consider that NAND and NOR mean NOT AND and NOT OR. After evaluating the AND or OR argument and the results, simply negate the results.
Truth Tables
You can use a tool to help you evaluate all the Boolean operators called a truth table, and it is a mathematical table used in logic to evaluate Boolean operators. They are helpful when trying to determine all the possibilities of a Boolean operator. Let’s look at some common truth tables for AND, OR, NOT, XOR, NAND, and NOR.
In an AND truth table, there are four possible combinations of TRUE and FALSE.
- TRUE AND TRUE = TRUE
- TRUE AND FALSE = FALSE
- FALSE AND TRUE = FALSE
- FALSE AND FALSE = FALSE
Placing these combinations in a truth table results in Table 4-1.
Table 4-1. An AND Truth Table
|
A |
B |
A AND B |
|---|---|---|
|
TRUE |
TRUE |
TRUE |
|
TRUE |
FALSE |
FALSE |
|
FALSE |
TRUE |
FALSE |
|
FALSE |
FALSE |
FALSE |
An AND truth table produces a TRUE result only if both of its operands are TRUE.
Table 4-2 illustrates an OR truth table and all possible operands.
Table 4-2. An OR Truth Table
|
A |
B |
A OR B |
|---|---|---|
|
TRUE |
TRUE |
TRUE |
|
TRUE |
FALSE |
TRUE |
|
FALSE |
TRUE |
TRUE |
|
FALSE |
FALSE |
FALSE |
An OR truth table produces a TRUE result if one or both of its operands are TRUE.
Table 4-3 illustrates a NOT truth table and all possible operands.
Table 4-3. A NOT Truth Table
|
A |
NOT A |
|---|---|
|
TRUE |
FALSE |
|
FALSE |
TRUE |
A NOT flips the bit or negates the original operand’s Boolean value.
Table 4-4 illustrates an XOR (or exclusive-or) truth table and all possible operands.
Table 4-4. An XOR Truth Table
|
A |
B |
A XOR B |
|---|---|---|
|
TRUE |
TRUE |
FALSE |
|
TRUE |
FALSE |
TRUE |
|
FALSE |
TRUE |
TRUE |
|
FALSE |
FALSE |
FALSE |
The operator XOR yields a TRUE result if only one of the operands is TRUE.
Table 4-5 illustrates a NAND truth table and all possible operands.
Table 4-5. A NAND Truth Table
|
A |
B |
A NAND B |
|---|---|---|
|
TRUE |
TRUE |
FALSE |
|
TRUE |
FALSE |
TRUE |
|
FALSE |
TRUE |
TRUE |
|
FALSE |
FALSE |
TRUE |
Table 4-6 illustrates a NOR truth table and all possible operands.
Table 4-6. A NOR Truth Table
|
A |
B |
A NOR B |
|---|---|---|
|
TRUE |
TRUE |
FALSE |
|
TRUE |
FALSE |
FALSE |
|
FALSE |
TRUE |
FALSE |
|
FALSE |
FALSE |
TRUE |
The easiest way to look at the NAND and NOR operators is to simply negate the results from the AND and OR truth tables, respectively.
Comparison Operators
In software development, you can compare different data items using comparison operators. These operators produce a logical TRUE or FALSE result. Table 4-7 shows the list of comparison operators.
Table 4-7. Comparison Operators
|
Operator |
Definition |
|---|---|
|
> |
Greater than |
|
< |
Less than |
|
>= |
Greater than or equal to |
|
<= |
Less than or equal to |
|
== |
Exactly equal to |
|
!= |
Not equal to |
Note If you’re constantly forgetting which way the greater than and less than signs go, use a crutch we learned in grade school: if the greater than and less than signs represent the mouth of an alligator, the alligator always eats the bigger value. It may sound silly, but it works.
Now that we’ve introduced Boolean logic and comparison operators, you can start designing your apps. Sometimes it’s important to express all or parts of your apps to others without having to write the actual code.
Writing pseudocode helps a developer think out loud and brainstorm with other developers regarding sections of code that are of concern. This helps to analyze problems and possible solutions before coding begins.
Pseudocode
Pseudocode refers to writing code that is a high-level description of an algorithm you are trying to solve. Pseudocode does not contain the necessary programming syntax for coding; however, it does express the algorithm that is necessary to solve the problem at hand.
Pseudocode can be written by hand on paper (or a whiteboard) or typed on a computer.
Using pseudocode, you can apply what you know about Boolean data types, truth tables, and comparison operators. Refer to Listing 4-1 for some pseudocode examples.
Note Pseudocode is for expressing and teaching coding ideas. Pseudocode will not execute!
Note that ! switches the value of the Boolean it’s applied to; so, using ! makes a TRUE value into a FALSE and makes a FALSE value into a TRUE.
Often, it is necessary to combine your comparison tests. A compound relationship test is one or more simple relationship tests joined by either && or || (two pipe characters).
&& and || are verbalized as logical AND and logical OR, respectively. The pseudocode in Listing 4-2 illustrates logical AND and logical OR operators.
Optionals and Forced Unwrapping
Chapter 3 introduced optionals. Optionals are variables that might not contain a value. Since optionals may not contain a value, you need to check for that before you access them.
You start by using an if statement to determine whether the optional contains a value by comparing the optional against nil. If the optional has a value, it is considered to be “not equal to” nil, as shown in Listing 4-3.
Line 4 in Listing 4-3 checks to see whether the optional variable is not equal to nil. In this example, the someInteger value is absent, and it is equal to nil, so line 8 code is executed.
Now that you have added a check to make sure your optional does or doesn’t contain a value, you can access its value by adding an exclamation mark (!) to the end of the optional’s name. The ! means you have checked to ensure the optional variable has a value and use it. This is called forced unwrapping of the optional’s value. See Listing 4-4.
Note Displaying the contents of a variable in a print function is done with (youVariable!).
Optional Binding
You can find out whether an optional contains a value and, if so, assign a temporary constant or variable to that value in a single action. See Listing 4-5. This is called optional binding. Optional binding can be used with if and while statements to determine whether an optional has a value and, if so, extract the value to a constant or variable.
If you want to assign the optional to a variable so you can manipulate that variable, you can assign the optional to a var, as shown in Listing 4-6.
Notice in Listings 4-5 and 4-6 you didn’t need to use the !. If the conversion was successful, the variable or constant was initialized with the value contained within the optional, so the ! was not necessary.
Implicitly Unwrapped Optionals
There are instances after the value is first set when you know that an optional will always have a value. In these instances, it’s useful to remove the need to check and unwrap an optional every time it needs to be accessed. These kinds of optionals are called implicitly unwrapped optionals.
Because of the program’s structure, you know that the optional has a value, so you can give permission for the optional to be safely unwrapped whenever it needs to be accessed. The ! is not needed every time you use it; instead, you place an ! after the optional’s type when you declare it. Listing 4-7 shows the comparison between an optional String and an implicitly unwrapped optional String.
Note The following will trigger runtime exceptions: trying to access implicitly unwrapped optionals when they don’t contain a value and attempting to unwrap an optional that does not contain a value.
Flowcharting
After the design requirements are finalized, you can create pseudocode sections of your app to solve complex development issues. Flowcharting is a common method of diagramming an algorithm. An algorithm is represented as different types of boxes connected by lines and arrows. Developers often use flowcharting to express code visually, as shown in Figure 4-1.

Figure 4-1. Sample flowchart showing common figures and their associated names
Flowcharts should always have a start and a stop. Branches should never come to an end without a stop. This helps developers make sure all of the branches in their code are accounted for and that they cleanly stop execution.
Designing and Flowcharting an Example App
We have covered a lot of information about decision-making and program flow. It’s time to do what programmers do best: write apps!
The app you have been assigned to write generates a random number between 0 and 100 and asks the user to guess the number. Users have to do this until the number is guessed. When users guess the correct answer, they will be asked if they want to play again.
The App’s Design
Using your design requirements, you can make a flowchart for your app. See Figure 4-2.

Figure 4-2. Flowchart for guessing a random number app
Reviewing Figure 4-2, you’ll notice that as you approach the end of a block of logic in your flowchart, there are arrows that go back to a previous section and repeat that section until some condition is met. This is called looping. It enables you to repeat sections of programming logic—without having to rewrite those sections of code over—until a condition is met.
Using Loops to Repeat Program Statements
A loop is a sequence of program statements that is specified once but can be repeated several times in succession. A loop can repeat a specified number of times (count-controlled) or until some condition (condition-controlled) occurs.
In this section, you’ll learn about count-controlled loops and condition-controlled loops. You will also learn how to control your loops with Boolean logic.
Count-Controlled Loops
A count-controlled loop repeats a specified number of times. In Swift, this is a for loop. A for loop has a counter variable, which enables the developer to specify the number of times the loop will be executed. See Listing 4-8.
The loop in Listing 4-8 will loop ten times. The variable i starts at zero and increments at the end of the } by one. The incrementing is done by the i++ in the for statement; i++ is equivalent to i = i + 1. Then i is incremented by one to ten and checked to see whether it is less than ten. This for loop will exit when i = 10 and the } is reached.
Note It is common for developers to confuse the number of times they think their loops will repeat. If the loop started at 1 in Listing 4-8, the loop would repeat nine times instead of ten.
In Swift, for loops can have their counter variables declared in the for loop declaration. See Listing 4-9.
You use the for-in loop to iterate over collections of items, such as ranges of numbers, items in an array, or characters in a string.
Listing 4-10 prints a few entries in the ten times table.
Condition-Controlled Loops
Swift has the ability to repeat a loop until some condition changes. You may want to repeat a section of your code until a false condition is reached with one of your variables. This type of loop is called a while loop. A while loop is a control flow statement that repeats based on a given Boolean condition. You can think of a while loop as a repeating if statement. See Listing 4-11.
The while loop in Listing 4-11 first checks whether the variable isTrue is true—which it is—so the {loop body} is entered where the code is executed. Eventually, some condition is reached that causes isTrue to become false. After completing all the code in the loop body, the condition (isTrue) is checked once more, and the loop is repeated. This process is repeated until the variable isTrue is set to false.
Infinite Loops
An infinite loop repeats endlessly, either because of the loop not having a condition that causes termination or because of the loop having a terminating condition that can never be met.
Generally, infinite loops can cause apps to become unresponsive. They are the result of a side effect of a bug in either the code or the logic.
Listing 4-12 is an example of an infinite loop caused by a terminating condition that can never be met. The variable x will be checked with each iteration through the while loop but will never be equal to 5. The variable x will always be an even number because it was initialized to zero and incremented by two in the loop. This will cause the loop to repeat endlessly. See Listing 4-13.
Coding the Example App in Swift
Using your requirements and what you learned, try writing your random number generator in Swift.
To program this app, you have to leave the playground and do this as a Mac Console app. Unfortunately, at this time, a playground doesn’t enable you to interact with a running app, so you can’t capture keyboard input.
Note You can download the complete random number generator app at http://forum.xcelme.com. The code is in the topic of Chapter 4.
Your Swift app will run from the command line because it asks the user to guess a random number.
- Open Xcode and start a new project. Choose the Command Line Tool project. See Figure 4-3.

Figure 4-3. Starting a new Command Line Tool project
- Call your project RandomNumber (see Figure 4-4). Ensure that the Language drop-down is Swift. Save the project anywhere you prefer on your hard drive.

Figure 4-4. Project options for RandomNumber
- Open the main.swift file. Write the code in Listing 4-14.
In Listing 4-14, there is new code that we haven’t discussed before. The first new line of code (line 15) is as follows:
randomNumber = Int(arc4random_uniform(101))
This line will produce a random number between 0 and 100; arc4random_uniform() is a function that returns a random number.
The next line of new code is on line 19:
input = NSString(data: NSFileHandle.fileHandleWithStandardInput().availableData, encoding:NSUTF8StringEncoding)!
This enables you to get keyboard input for the user. We will talk about this syntax in later chapters.
The next new line of code is on line 21:
userGuess = Int(input)
Int takes a string initializer and converts it to an integer.
Nested if Statements and else if Statements
Sometimes, it is necessary to nest if statements. This means that you need to have if statements nested inside an existing if statement. Additionally, it is sometimes necessary to have a comparison as the first step in the else section of the if statement. This is called an else if statement (recall line 27 in Listing 4-14).
else if (userGuess > randomNumber)
Removing Extra Characters
Line 20 in Listing 4-14 is as follows:
input = input.stringByReplacingOccurrencesOfString("
", withString: "", options: NSStringCompareOptions.LiteralSearch, range: nil) //strip off the /n
Reading keyboard input can be difficult. In this case, it leaves a remnant at the end of your string, , and you need to remove it. This is a newline character that is generated when the users press the Return key on their keyboards.
Improving the Code Through Refactoring
Often, after you get your code to work, you examine the code and find more efficient ways to write it. The process of rewriting your code to make it more efficient, maintainable, and readable is called code refactoring.
As you review your code in Swift, you will often notice that you can eliminate some unnecessary code.
Note As developers, we have found that the best line of code is the line that you don’t have to write—less code means less to debug and maintain.
Running the App
To run your app, click the Play button at the top left of your screen in your Swift project. See Figure 4-5.

Figure 4-5. The console output of the Swift random number generator app
Note If you’re not seeing the output console when you run your app, make sure you have selected the same options at the top-right and bottom-right corners of the editor (choose View ![]() Debug Area
Debug Area ![]() Activate Console). See Figure 4-5.
Activate Console). See Figure 4-5.
Design Requirements
As discussed in Chapter 1, the most expensive process in the software development lifecycle is writing code. The least expensive process in the software development lifecycle is gathering the requirements for your application; yet, this latter process is the most overlooked and least used in software development.
Design requirements usually begin by asking clients, customers, and/or stakeholders how the application should work and what problems it should solve.
With respect to apps, requirements can include long or short narrative descriptions, screen mock-ups, and formulas. It is far easier to open your word processor and change the requirements and screen mock-ups before coding begins than it is to modify an iOS app. The following is the design requirement for one view of an iPhone mobile banking app:
- View: Accounts view.
- Description: Displays the list of accounts the user has. The list of accounts will be in the following sections: Business Accounts, Personal Accounts and Car Loans, IRA, and Home Equity Loans.
- Cells: Each cell will contain the account name, the last four digits of the account, the available balance, and the present balance.
A picture is worth a thousand words. Screen mock-ups are helpful to developers and users because they can show how the views will look when they are completed. There are many tools that can quickly design mock-ups; one of these tools is OmniGraffle. See Figure 4-6 for an example of a screen mock-up used for design requirements generated by OmniGraffle.
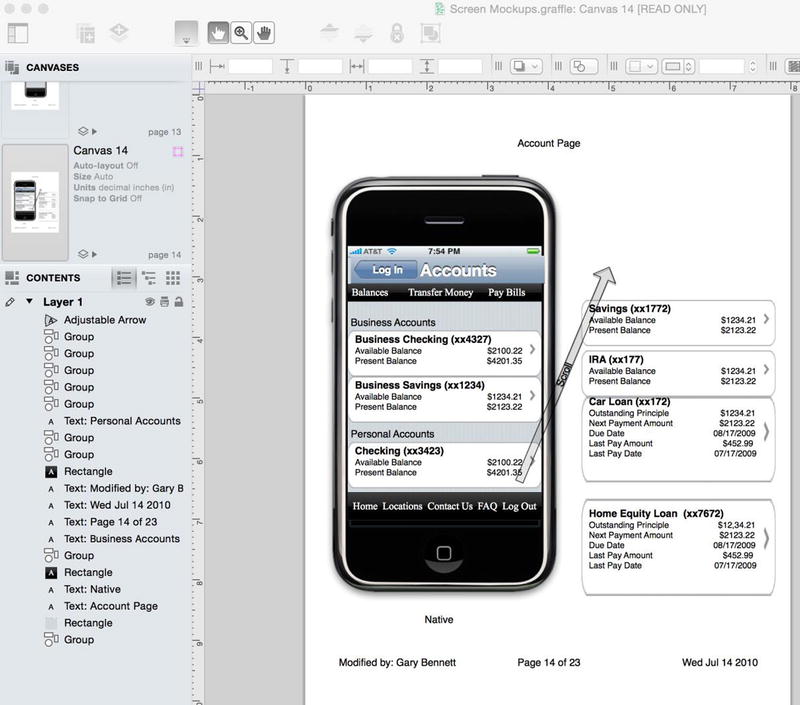
Figure 4-6. Screen mock-up for a mobile banking app using OmniGraffle and the Ultimate iPhone Stencil plug-in. This mock-up was done for the original Woodforest Banking app in 2010
Many developers believe that design requirements take too long and are unnecessary. There is a lot of information presented on the Accounts screen in Figure 4-6. Many business rules can determine how information is displayed to the users, along with all of the error handling when things go bad. When designing your app, working with all the business stakeholders at the beginning of the development process is critical to getting it right the first time.
Figure 4-7 is an example of all stakeholders being involved in your app’s development. Having all stakeholders involved in every view from the beginning will eliminate multiple rewrites and application bugs.

Figure 4-7. Woodforest Mobile Banking app as it appeared on the App Store in 2015; compare this with the app requirements Accounts screen in Figure 4-6
Additionally, Apple recommends that developers spend at least 50 percent of their development time on the user interface’s design and development.
Balsamiq also has great tools for laying out your iOS app’s look. See Figure 4-8.

Figure 4-8. Balsamiq.com web site for creating wireframe mock-ups
Summary
This chapter covered a lot of important information on how to control your applications; program flow and decision making are essential to every iOS app. Make sure you have completed the Swift example in this chapter. You might review these examples and think you understand everything without having to write this app. This will be a fatal mistake that will prevent you from becoming a successful iOS developer. You must spend time coding this example. Developers learn by doing, not by reading.
The terms in this chapter are important. You should be able to describe the following:
- AND
- OR
- XOR
- NAND
- NOR
- NOT
- Truth tables
- Negation
- All comparison operators
- Application requirement
- Logical AND (&&)
- Logical OR (||)
- Optionals and forced unwrapping
- Optional binding
- Implicitly unwrapped optionals
- Flowchart
- Loop
- Count-controlled loops
- For loop
- Condition-controlled loops
- Infinite loops
- while loops
- Nested if statements
- Code refactoring
Exercises
- Extend the random number generator app to print to the console how many times the user guessed before guessing the correct random number.
- Extend the random number generator app to print to the console how many times the user played the app. Print this value to the console when the user quits the app.