Swift Classes, Objects, and Methods
If you haven’t already read Chapter 6, please do so before reading this one because it provides a great introduction to some of the basics of Swift. This chapter builds on that foundation. By the end of this chapter, you can expect to have a greater understanding of the Swift language and how to use the basics to write simple programs. The best way to learn is to take small programs and write (or rewrite) them in Swift just to see how the language works.
This chapter covers what composes a Swift class and how to interact with Swift objects via methods. It uses a simple radio station class as an example of how a Swift class is written. This will impart an understanding of how to use a Swift class. This chapter also teaches you how to formulate a design for objects that are needed to solve a problem. The chapter touches on how to create custom objects, as well as how to use existing objects provided in the foundation classes.
This chapter expands on Chapter 6’s topics and introduces some of the concepts described in detail in Chapter 8.
Creating a Swift Class
Classes are simple to create in Swift. Generally a class will be contained in its own file, but a single file can hold many classes if desired.
Here is a sample of the first line from a class’s declaration:
class RadioStation
Here, the class name is RadioStation. Swift classes, by default, do not inherit from a superclass. If you want to make your Swift class inherit from another class, you can do this like so:
class RadioStation: Station
In this example, RadioStation is now a subclass of Station and will inherit all of the properties and methods of Station. Listing 7-1 shows the full definition of a class.
Instance Variables
Listing 7-1 shows a sample class with two different properties: name and frequency. Line 1 imports the UIKit class definitions (more on that in a bit). Line 3 starts the definition of the class by defining its name (sometimes called the type). Lines 5 to 6 define the properties for the RadioStation class.
Whenever the RadioStation class is instantiated, the resulting RadioStation object has access to these properties, which are only for specific instances. If there are ten RadioStation objects, each object has its own variables independent of the other objects. This is also referred to as scope, in that the object’s variables are within the scope of each object.
Methods
Almost every object has methods. In Swift, the common concept to interact with an object is calling a method on an object, like so:
myStation.band()
The preceding line will call a method name band on an instance of the RadioStation class methods can also have parameters passed along with them. Why pass parameters? Parameters are passed for several reasons. First (and most common), the range of possibilities is too large to write as separate methods. Second, the data you need to store in your object is variable—like a radio station’s name. In the following example, you will see that it isn’t practical to write a method for every possible radio frequency; instead, the frequency is passed as a parameter. The same applies to the station name.
myStation.setFrequency(104.7)
The method name is setFrequency. Method calls can have several parameters, as the following example illustrates:
myStation = RadioStation.init(name: "KZZP", frequency: 104.7)
In the preceding example, the method call consists of two parameters: the station name and its frequency. What’s interesting about Swift relative to other languages is that the methods are essentially named parameters. If this were a C++ or Java program, the call would be as follows:
myObject = new RadioStation("KZZP", 104.7);
While a RadioStation object’s parameters might seem obvious, having named parameters can be a bonus because they more or less state what the parameters are used for or what they do.
Using Class Methods
A class doesn’t always have to be instantiated to be used. In some cases, classes have methods that can actually perform some simple operations and return values before a class is instantiated. These methods are called type methods. In Listing 7-1, the method names that start with class are class methods.
Class methods have limitations. One of their biggest limitations is that none of the instance variables can be used. Being unable to use instance variables makes sense since you haven’t instantiated anything. A class method can have its own local variables within the method itself but can’t use any of the variables defined as instance variables.
A call to a class method would look like this:
RadioStation.minAMFrequency()
Notice that the call is similar to how a method is called on an instantiated object. The big difference is that instead of an instance variable, the class name is used. Class methods are used quite extensively in the Mac OS X and iOS frameworks. They are used mostly for returning some fixed or well-known type of value or to return a new instance of an object. These types of class methods are referred to as initializers. Here are some initializer method examples:
    1.  NSDate.timeIntervalSinceReferenceDate() // Returns a number
    2.  NSString(format:"http://%@", "1000")  // Returns a new NSString object
    3.  Dictionary<String, String>()//Returns a new Dictionary object.
All of the preceding messages are class methods being called.
Line 1 simply returns a value that represents the number of seconds since January 1, 2001, which is the reference date.
Line 2 returns a new NSString object that has been formatted and has a value of http://1000.
Line 3 is a form that is commonly used because it actually allocates a new object. Typically, the line is not used by itself, but in a line like this:
var myDict = Dictionary<String, String>()
So, when would you use a class method? As a general rule, if the method returns information that is not specific to any particular instance of the class, make the method a class method. For example, the minAMFrequency in the preceding example would be the same for all instances of any RadioStation object—this is a great candidate for a class method. However, the station’s name or its assigned frequency would be different for each instance of the class. These should not (and indeed could not) be class methods. The reason for this is that class methods cannot use any of the instance variables defined by the class.
Using Instance Methods
Instance methods (lines 29 to 35 in Listing 7-1) are available only once a class has been instantiated. Here’s an example:
|
1 2 3 |
var myStation: RadioStation // This declares a variable to hold the RadioStation Object. myStation = RadioStation() // This creates a new object. var band = myStation.band() // This method returns the Band of the Station. |
Line 3 calls a method on the RadioStation object. The method band returns a 1 for FM and a 0 for AM. An instance method is any method that does not contain the class declaration before it.
Using Your New Class
You’ve created a simple RadioStation class, but by itself it doesn’t accomplish a whole lot. In this section, you will create the Radio class and have it maintain a list of RadioStation classes.
Creating Your Project
Let’s start Xcode (see Figure 7-1) and create a new project named RadioStations.

Figure 7-1. Open Xcode so you can create a new project
- Launch Xcode and select “Create a new Xcode project.”
- Make sure you choose an iOS application and select the Single View Application template, as shown in Figure 7-2.

Figure 7-2. Selecting a template in the new project window
- Once you’ve selected the template, click the Next button.
- Set the product name (application name) to RadioStations.
- Set the company identifier (a pretend company will do) and set the device family to iPhone (as shown in Figure 7-3). Make sure Swift is selected in the Language drop-down list.

Figure 7-3. Naming the new iPhone application
- Click the Next button, and Xcode will ask you where you want to save your new project. You can save the project on your desktop or anywhere in your home folder. Once you’ve made your choice, simply click the Create button.
- Once you’ve clicked the Create button, the Xcode workspace window should be visible, as shown in Figure 7-4.

Figure 7-4. The workspace window in Xcode
Adding Objects
Now you can add your new objects.
- First, create your RadioStation object. Right-click the RadioStations project and select New File (as shown in Figure 7-5).

Figure 7-5. Adding a new file
- The next screen, shown in Figure 7-6, asks for the new file type. Simply choose Swift File from the Source group, and then click Next.

Figure 7-6. Selecting the new file type
- The next screen asks you where to create the files and what you want to name the file. Enter RadioStation for the file name and then simply click the Create button, since the location in which Xcode chooses to save the files is within the current project, as shown in Figure 7-7.

Figure 7-7. Choosing where to create your new files
- Your project window should now look like Figure 7-8. Click the RadioStation.swift file. Notice that the stub of your new RadioStation class is already present. Now, fill in the empty class so it looks like Listing 7-1, your RadioStation Swift file.

Figure 7-8. Your newly created file in the workspace window
Writing the Class
Now that you have created your project and your new RadioStation.swift file, you are ready to begin creating your class.
- The class file you’ll use here is the same one you used at the beginning of this chapter and it will work perfectly for the radio station application. Click the RadioStation.swift file, and enter the code in your class, as shown in Figure 7-9.

Figure 7-9. The RadioStation class file
We will come back to a few items in Figure 7-9 and explain them further in a moment; however, with the RadioStation class defined, you can now write the code that will actually use it.
- Click the ViewController.swift file. You’ll need to define a few variables for this class to use, as shown in Figure 7-10.

Figure 7-10. Adding a RadioStation object to the View Controller
Lines 13 to 15 are going to be used by your iOS interface to show some values on the screen (more on these later). Line 17 defines the variable myStation of type RadioStation. Lines 19 to 24 contain the required init method. In Swift, classes do not require an initializer method, but it is a good place to set the default values of your object. This method sets up the variables used in that class. Also, don’t forget to include the curly braces ({ ... }).
Creating the User Interface
Next, the main window has to be set up in order to display your station information.
- Click the Main.storyboard file. This file produces the main iPhone screen. Click the Object Library icon, as shown in Figure 7-11.

Figure 7-11. Adding a Label object to your iPhone screen
- Drag and drop three Label objects onto the screen, as shown in Figure 7-12. The labels can be aligned in any manner, or as shown in Figure 7-12.

Figure 7-12. All three Label objects on the iPhone screen
- You’re going to need space, however. Once the Label objects are on the iPhone screen, double-click each Label object in order to change its text so that the iPhone screen looks something like Figure 7-12.
- Next, add a Button object to the screen, as shown in Figure 7-13. This button, when clicked, will cause the screen to be updated with your radio station information.

Figure 7-13. Adding a Button object to the screen
- Just like with the Label object, simply double-click the Button object in order to change its Title to My Station. The button should automatically resize to fit the new title.
- Next, you need to add the Label fields that will hold the radio station information. These fields are situated just after the existing Label objects, as shown in Figure 7-14. Once the Label object is placed, it needs to be resized so that it can show more text, as shown in Figure 7-15.
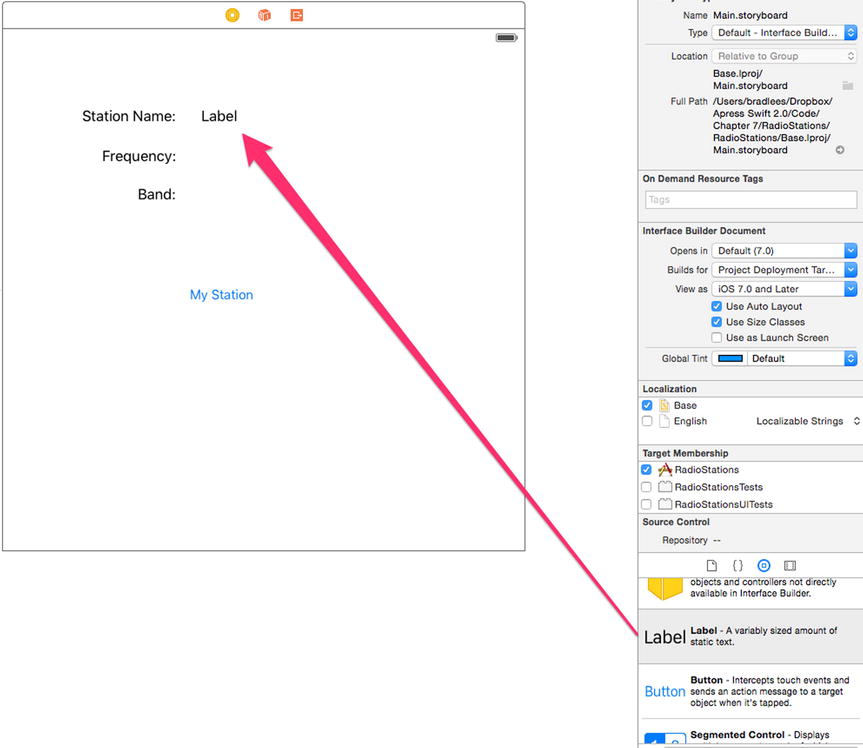
Figure 7-14. Adding another Label object

Figure 7-15. Stretching the Label object
Note Stretching the Label object allows the Label’s text to contain a reasonably long string. If you didn’t resize the Label object, the text would be cut off (since it wouldn’t fit), or the font size would get smaller.1
- Repeat adding and sizing a Label object next to the existing Frequency and Band Labels, as shown in Figure 7-16. It’s okay to leave the default text of the label set to “Label” for now.

Figure 7-16. Adding another Label object
Hooking Up the Code
Now that all the user interface objects are in place, you can begin to hook up these interface elements to the variables in your program. As you saw in Chapter 6, you do this by connecting the user interface objects with the objects in your program.
- Start by connecting the Label object by station name to your variable, as shown in Figure 7-17. Right-click (or Control-click) the View Controller object and drag it to the Label object next to the “Station Name” text to bring up the list of outlets.

Figure 7-17. Creating a connection
- When the connection is dropped from the View Controller icon, another small menu will be shown. Click the instance variable name that you want to display in this Label object—in this case, you want the stationName instance variable, as shown in Figure 7-18.

Figure 7-18. Connecting the Label to your stationName variable
- Now, the interface Label object is connected to the stationName instance variable. Whenever you set the instance variable’s value, the screen will also be updated. Repeat the previous connection steps for Frequency and Band.
To hook up your button, you need a method in the ViewController class to handle this. You could go to the ViewController.swift file and add it there. There is also a shortcut to adding @IBOutlet methods. In the Xcode toolbar, click the Assistant Editor icon shown in Figure 7-19 (it looks like two circles).

Figure 7-19. The Assistant Editor icon
After clicking the Assistant Editor icon, a second window will pop open showing the ViewController source. Right-click and drag the button to the code window, as shown in Figure 7-20.

Figure 7-20. Using the Assistant editor to create your method
- When you release the mouse, a little window will pop up, as shown in Figure 7-21. Make sure to change the Connection type to Action.

Figure 7-21. Creating the action
Select Action and set the name to buttonClick. Xcode will now create your method for you.
Finish your method by adding the code shown in Figure 7-22.

Figure 7-22. Finished buttonClick method
Let’s walk through the code you just added. First, on line 37, you’ll notice the IBAction type. This lets Xcode know that this method can be called as a result of an action. So, when you go to connect an action to your application, you will see this method.
Lines 38 and 39 both set the text fields to the values found in your RadioStation class. Line 38 is as follows:
stationName.text = myStation.name
The stationName variable is what you just connected to the user interface Label object, and myStation.name is used to return the name of the station.
Line 39 effectively does the same thing as line 38, but you have to first convert the double value (the station’s frequency) to a String. The @"%.1f means that you convert a floating-point value and should see only one digit after the decimal point.
Lines 41 to 45 make use of both the instance variables and the class methods of the RadioStation class. Here, you simply call the method band() on the myStation object. If so, the station is an FM station and band() will return a 1; otherwise, assume it’s the AM band. Lines 42 and 44 show the band value on the screen.
Tip The Button sends the Touch Up Inside event whenever a user touches the inside of the button and then releases—not until the users lifts their finger is the event actually sent.
Running the Program
Once the connection has been made, you’re ready to run and test your program! To do this, simply click the Run button at the top left of the Xcode window, as shown in Figure 7-23.

Figure 7-23. Click the Play button to run your program
If there are no compile errors, the iPhone Simulator should come up, and you should see your application. Simply click the My Station button, and the radio station information will be displayed, as shown in Figure 7-24.

Figure 7-24. Showing your radio station information
If things don’t quite look or work right, retrace your steps and make sure all the code and connections described in this chapter are in place.
Taking Class Methods to the Next Level
In your program, you haven’t taken advantage of all the class methods for RadioStation, but this chapter does describe what a class method is and how it is used. Use that knowledge to try a few of the exercises mentioned at the end of this chapter. Just play around with this simple working program by adding or changing class or instance methods to get an idea of how they work.
Accessing the Xcode Documentation
There is a wealth of information provided in the Xcode developer documentation. When Xcode is opened, select Help ![]() Documentation and API Reference (see Figure 7-25) to open the Documentation window.
Documentation and API Reference (see Figure 7-25) to open the Documentation window.

Figure 7-25. The Xcode Help menu
Once it’s opened, the search window can be used to look up any of the Swift classes you’ve used in this chapter, including the String class documentation, as shown in Figure 7-26.

Figure 7-26. Xcode documentation
There are several different things to discover about the String class shown in Figure 7-26. Go through the documentation and the various companion guides that Apple provides. This will give you a more thorough understanding of the various classes and the various methods supported by them.
Summary
Once again, congratulate yourself for being able to single-handedly stuff your brain with a lot of information! Here is a summary of what was covered in this chapter:
- Swift classes review
- Class methods
- Instance methods
- Creating a class
- Limitations of using class methods versus instance methods
- Initializing the class and making use of the instance variables
- Making use of your new RadioStation object
- Building an iPhone app that uses your new object
- Connecting interface classes to instance variables
- Connecting user interface events to methods in your class
Exercises
- Change the code that creates your RadioStation class and make the station’s name much longer than what can appear on the screen. What happens?
- Change the current button and add a new button. Label the buttons FM and AM. If the user clicks the FM button, show an FM station. If the user clicks the AM button, display an AM station. (Hint: you’ll need to add a second RadioStation object to the ViewController.swift file.)
- Clean up the interface a little by making sure that the user doesn’t see the text “Label” when the iPhone application first starts.
- Fix the issue by using the interface tool.
- How could you fix this by adding code to the application instead?
- Add more validation to the @IBAction func buttonClick(sender: AnyObject) method. Right now, it validates FM ranges but not AM ranges. Fix the code so that it also validates an AM range.
- If the radio station frequency is out of bounds, use the existing labels to display some type of error message.
______________________
1By using either code or Interface Builder, you can customize how the Label object reacts to text that is too large to fit. The behavior described is based on typical defaults for the Label object.