Storing Information
As a developer, there will be many different situations when you will need to store data. Users will expect your application (app) to remember preferences and other information each time they launch it. Previous chapters discussed the BookStore app. With this app, users will expect your application to remember all of the books in the bookstore. Your application will need a way to store this information, retrieve it, and possibly search and sort this data. Working with data can sometimes be difficult. Fortunately, Apple has provided methods and frameworks to make this process easier.
This chapter discusses two different formats in which data will need to be stored. It discusses how to save a preference file for an iOS device and then how to use a SQLite database in your application to store and retrieve data.
Storage Considerations
There are some major storage differences between the Mac and the iPhone, and these differences will affect how you work with data. Let’s start by discussing the Mac and how you will need to develop for it.
On the Mac, by default, applications are stored in the Applications folder. Each user has their own home folder where preferences and information related to that user are stored. Not all of the users will have access to write to the Applications folder or to the application bundle itself.
On the iPhone and iPad, developers do not need to deal with different users. Every person who uses the iPhone has the same permissions and the same folders. There are some other factors to consider with the iPhone, though. Every application on an iOS device is in its own sandbox. This means that files written by an application can be seen and used only by that individual application. This makes for a more secure environment for the iPhone, but it also presents some changes in the way you work with data storage.
Preferences
There are some things to consider when deciding where to store certain kinds of information. The easiest way to store information is within the preferences file, but this method has some downsides.
- All of the data is both read and written at the same time. If you are going to be writing often or writing and reading large amounts of data, this could take time and slow down your application. As a general rule, your preferences file should never be larger than 100KB. If your preferences file starts to become larger than 100KB, consider using Core Data as a way to store your information.
- The preferences file does not provide many options when it comes to searching and ordering information.
The preferences file is really nothing more than a standardized XML file with accompanying classes and methods to store application-specific information. A preference would be, for example, the sorting column and direction (ascending/descending) of a list. Anything that is generally customizable within an app should be stored in a preferences file.
Caution Sensitive data should not be stored in the preference file or in a database without additional encryption. Luckily, Apple provides a way to store sensitive information. It is called the keychain. Securing data in the keychain is beyond the scope of this book.
Writing Preferences
Apple has provided developers with the NSUserDefaults class; this class makes it easy to read and write preferences for iOS and Mac OS X. The great thing is that, in this case, you can use the same code for iOS and Mac OS X. The only difference between the two implementations is the location of the preferences file.
Note For Mac OS X, the preferences file is named com.yourcompany.applicationname.plist and is located in the /Users/username/Library/Preferences folder. On iOS, the preferences file is located in your application bundle in the /Library/Preferences folder.
All you need to do to write preferences is to create an NSUserDefaults object. This is done with the following line:
var prefs: NSUserDefaults = NSUserDefaults.standardUserDefaults()
This instantiates the prefs object so you can use it to set preference values. Next, you need to set the preference keys for the values that you want to save. The BookStore app example will be used to demonstrate specific instructions throughout this chapter. When running a bookstore, you might want to save a username or password in the preferences. You also might want to save things such as a default book category or recent searches. The preferences file is a great place to store this type of information because this is the kind of information that needs to be read only when the application is launched.
Also, on iOS, it is often necessary to save your current state. If a person is using your application and then gets a phone call, you want to be able to bring them back to the exact place they were in your application when they are done with their phone call. This is less necessary now with the implementation of multitasking, but your users will still appreciate it if your application remembers what they were doing the next time they launch it.
Once you have instantiated the object, you can just call setObjectforKey to set an object. If you wanted to save the username of sherlock.holmes, you would call the following line of code:
prefs.setObject("sherlock.holmes", forKey: "username")
You can use setInteger, setDouble, setBool, setFloat, and setURL instead of setObject, depending on the type of information you are storing in the preferences file. Let’s say you store the number of books a user wants to see in the list. Here is an example of using setInteger to store this preference:
prefs.setInteger(10, forKey: "booksInList")
After a certain period of time, your app will automatically write changes to the preferences file. You can force your app to save the preferences by calling the synchronize function, but this should only be used if you cannot wait for the next synchronization interval such as if you app is going to exit. To call the synchronize function, you would write the following line:
prefs.synchronize()
With just three lines of code, you are able to create a preference object, set two preference values, and write the preferences file. It is an easy and clean process. Here is all of the code:
var prefs: NSUserDefaults = NSUserDefaults.standardUserDefaults()
prefs.setObject("sherlock.holmes", forKey: "username")
prefs.setInteger(10, forKey: "booksInList")
Reading Preferences
Reading preferences is similar to writing preferences. Just like with writing, the first step is to obtain the NSUserDefaults object. This is done in the same way as it was done in the writing process:
var prefs: NSUserDefaults = NSUserDefaults.standardUserDefaults()
Now that you have the object, you are able to access the preference values that are set. For writing, you use the setObject syntax; for reading, you use the stringForKey method. You use the stringForKey method because the value you put in the preference was a String. In the writing example, you set preferences for the username and for the number of books in the list to display. You can read those preferences by using the following simple lines of code:
var username = prefs.stringForKey("username")
var booksInList = prefs.integerForKey("booksInList")
Pay close attention to what is happening in each of these lines. You start by declaring the variable username, which is a String. This variable will be used to store the preference value of the username you stored in the preferences. Then, you just assign it to the value of the preference username. You will notice that in the read example you do not use the synchronize function. This is because you have not changed the values of the preferences; therefore, you do not need to make sure they are written to a disk.
Databases
You have learned how to store some small pieces of information and retrieve them at a later point. What if you have more information that needs to be stored? What if you need to conduct a search within this information or put it in some sort of order? These kinds of situations call for a database.
A database is a tool for storing a significant amount of information in a way that it can be easily searched or retrieved. When using a database, usually small chunks of the data are retrieved at a time rather than the entire file. Many applications you use in your daily life are based on databases of some sort. Your online banking application retrieves your account activity from a database. Your supermarket uses a database to retrieve prices for different items. A simple example of a database is a spreadsheet. You may have many columns and many rows in your spreadsheet. The columns in your spreadsheet represent different types of information you want to store. In a database, these are considered attributes. The rows in your spreadsheet would be considered different records in your database.
Storing Information in a Database
Databases are usually an intimidating subject for a developer; most developers associate databases with enterprise database servers such as Microsoft SQL Server or Oracle. These applications can take time to set up and require constant management. For most developers, a database system like Oracle would be too much to handle. Luckily, Apple has included a small database engine called SQLite in iOS and OS X. This allows you to gain many of the features of complex database servers without the overhead.
SQLite will provide you with a lot of flexibility in storing information for your application. It stores the entire database in a single file. It is fast, reliable, and easy to implement in your application. The best thing about the SQLite database is that there is no need to install any software; Apple has taken care of that for you.
However, SQLite does have some limitations that, as a developer, you should be aware of.
- SQLite was designed to be used as a single-user database. You will not want to use SQLite in an environment where more than one person will be accessing the same database. This could lead to data loss or corruption.
- In the business world, databases can grow to become very large. It is not surprising for a database manager to handle databases as large as half a terabyte, and in some cases databases can become much larger than that. SQLite should be able to handle smaller databases without any issues, but you will begin to see performance issues if your database starts to get too large.
- SQLite lacks some of the backup and data restore features of the enterprise database solutions.
For the purposes of this chapter, you will focus on using SQLite as your database engine. If any of the mentioned limitations are present in the application you are developing, you may need to look into an enterprise database solution, which is beyond the scope of this book.
Note SQLite (pronounced “sequel-lite”) gets its name from Structured Query Language (SQL, pronounced “sequel”). SQL is the language used to enter, search, and retrieve data from a database.
Apple has worked hard to iron out a lot of the challenges of database development. As a developer, you will not need to become familiar with SQL because Apple has taken care of the direct database interaction for you through a framework called Core Data that makes interacting with the database much easier. Core Data has been adapted by Apple from a NeXT product called Enterprise Object Framework, and working with Core Data is a lot easier than interfacing directly with the SQLite database. Directly accessing a database via SQL is beyond the scope of this book.
Getting Started with Core Data
Let’s start by creating a new Core Data project.
- Open Xcode and select File
 New Project. To create an iOS Core Data project, select Application from the menu on the left. It is located underneath the iOS header. Then select Single View Application, as shown in Figure 11-1.

Figure 11-1. Creating a new project
- Click the Next button when you’re done. The next screen will allow you to enter the name you want to use. For the purposes of this chapter, you will use the name BookStore.
- Near the bottom, you will see the checkbox called Use Core Data. Make sure this is checked and then click Next, as shown in Figure 11-2.

Figure 11-2. Using Core Data
Note Core Data can be added to any project at any point. Checking that box when creating a project will add the Core Data frameworks and a default data model to your application.
- Select a location to save the project and click Create.
Once you are done with that, your new project will open. It will look similar to a standard application, except now you will have a BookStore.xcdatamodeld file. This file is called a data model and will contain the information about the data that you will be storing in Core Data.
The Model
In your BookStore folder on the right, you will see a file called BookStoreCoreData.xcdatamodeld. This file will contain information about the data you want stored in the database. Click the model file to open it. You will see a window similar to the one shown in Figure 11-3.

Figure 11-3. The blank model
The window is divided into four sections. On the left you have your entities. In more common terms, these are the objects or items that you want to store in the database.
The top-right window contains the entity’s attributes. Attributes are pieces of information about the entities. For example, a book would be an entity, and the title of the book would be an attribute of that entity.
Note In database terms, entities are your tables, and the attributes of the entities are called columns. The objects created from those entities are referred to as rows.
The middle window on the right will show you all the relationships of an entity. A relationship connects one entity to another. For example, you will create a Book entity and an Author entity. You will then relate them so that every book can have an author. The bottom-right portion of the screen will deal with fetched properties. Fetched properties are beyond the scope of this book, but they allow you to create filters for your data.
Let’s create an entity.
- Click the plus sign in the bottom-left corner of the window, or select Editor Add Entity from the menu, as shown in Figure 11-4.

Figure 11-4. Adding a new entity
- On the left side, name the entity Book.
Note You must capitalize your entities’ names.
- Now let’s add some attributes. Attributes would be considered the details of a book, so you will store the title, author, price, and year the book was published. Obviously, in your own applications, you may want to store more information, such as the publisher, page count, and genre, but you want to start simple. Click the plus sign at the bottom right of the window, or select Editor Add Attribute, as shown in Figure 11-5. If you do not see the option to add an attribute, make sure you have selected the Book entity on the left side.
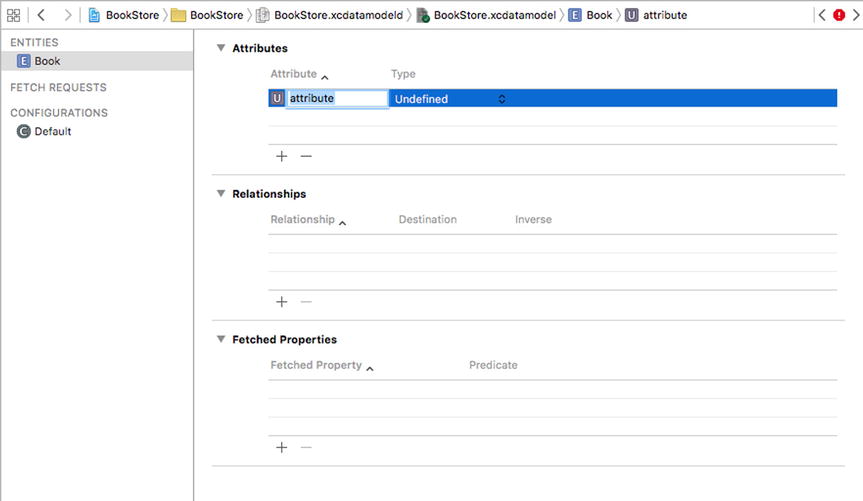
Figure 11-5. Adding a new attribute
- You will be given only two options for your attribute, the name and the data type. Let’s call this attribute title. Unlike entities, attribute names must be lowercase.
- Now, you will need to select a data type. Selecting the correct data type is important. It will affect how your data is stored and retrieved from the database. The list has 12 items in it and can be daunting. We will discuss the most common options and, as you become more familiar with Core Data, you can experiment with the other options. The most common options are String, Integer 32, Decimal, and Date. For the title of the book, select String.
String: This is the type of attribute used to store text. This should be used to store any kind of information that is not a number or a date. In this example, the book title and author will be strings.
Integer 32: There are three different integer values possible for an attribute. Each of the integer types differ only in the minimum and maximum values possible. Integer 32 should cover most of your needs when storing an integer. An integer is a number without a decimal. If you try to save a decimal in an integer attribute, the decimal portion will be truncated. In this example, the year published will be an integer.
Decimal: A decimal is a type of attribute that can store numbers with decimals. A decimal is similar to a double attribute, but they differ in their minimum and maximum values and precision. A decimal should be able to handle any currency values. In this example, you will use a decimal to store the price of the book.
Date: A date attribute is exactly what it sounds like. It allows you to store a date and time and then performs searches and lookups based on these values. You will not use this type in this example.
- Let’s create the rest of the attributes for the book. Now, add price. It should be a decimal. Add the year the book was published. For two-word attributes, it is standard to make the first word lowercase and the second word start with a capital letter. For example, an ideal name for the attribute for the year the book was published would be yearPublished. Select Integer 32 as the attribute type. Once you have added all of your attributes, your screen should look like Figure 11-6.
Note Attribute names cannot contain spaces.

Figure 11-6. The finished Book entity
Note If you are used to working with databases, you will notice that you did not add a primary key. A primary key is a field (usually a number) that is used to uniquely identify each record in a database. In Core Data databases, there is no need to create primary keys. The Framework will manage all of that for you.
Now that you have finished the Book entity, let’s add an Author entity.
- Add a new entity and call it Author.
- To this entity, add lastName and firstName, both of which are considered strings.
Once this is done, you should have two entities in your relationship window. Now you need to add the relationships.
- Click the Book entity, and then click and hold on the plus sign that is located on the bottom right of the screen. Select Add Relationship, as shown in Figure 11-7. (You can also click the plus under the Relationships section of the Core Data model.

Figure 11-7. Adding a new relationship
- You will be given the opportunity to name your relationship. You usually give a relationship the same name as the entity to which it derived from. Type in author as the name and select Author from the Destination drop-down menu.
- You have created one half of your relationship. To create the other half, click the Author entity. Click the plus sign located at the bottom right of the screen and select Add Relationship. You will use the entity name that you are connecting to as the name of this relationship, so you will call it books. (You are adding an s to the relationship name because an author can have many books.) Under Destination, select Book, and under Inverse, select the relationship you made in the previous step. In the Utilities window on the right side of the screen, select the Data Model Inspector. Select To Many for the type of the relationship. Your model should now look like Figure 11-8.

Figure 11-8. The final relationship
Note Sometimes in Xcode, when working with models, it is necessary to press the Tab key for the names of entities, attributes, and relationships to update. This little quirk can be traced all the way back to WebObjects tools.
Now you need to tell your code about your new entity. To do this, hold down Shift and select the Book entity and the Author entity and then select Editor ![]() Create NSManagedObject Subclass from the Application menu. Your screen should look like Figure 11-9.
Create NSManagedObject Subclass from the Application menu. Your screen should look like Figure 11-9.

Figure 11-9. Adding the managed objects to your project
This screen allows you to select the data model you would like to create managed objects for. In this case, you have only a single data model. In some complicated applications, you may have more than one. Managed objects represent instances of an entity from your data model. Select the BookStore data model and click Next.
You will now be presented with a screen to select the entities to create managed objects, as seen in Figure 11-10. Select both and click Next.

Figure 11-10. Select the entities to create managed objects
Select the storage location and add it to your project, as seen in Figure 11-11. You need to select the Options button on the bottom to see more information. Make sure your language is set to Swift. By default, it is still Objective-C. You should not need to change any other defaults on this page. Then click Create. You will notice that four files have been added to your project. Book+CoreDataProperties.swift and Author+CoreDataProperties.swift contain the information about the book and author entities you just created. Book.swift and Author.swift will be used for logic relating to your new entities. These files will need to be used to access the entities and attributes you added to your data model. These files are fairly simple because Core Data will do most of the work with them. You should also notice that if you go back to your model and click Book, it will have a new class in the Data Model Inspector. Instead of an NSManagedObject, it will have a Book class.

Figure 11-11. Select the save location for your new managed objects
Let’s look at some of the contents of Book+CoreDataProperties.swift:
import Foundation
import CoreData

extension Book  {

    @NSManaged var title: String?
    @NSManaged var price: NSDecimalNumber?
    @NSManaged var yearPublished: NSNumber?
    @NSManaged var author: Author?

}
You will see that the file starts by including the Core Data framework. This allows Core Data to manage your information. This file contains an extension to the Book class. An extension allows you to add new properties and functionality to an existing class. By creating the Book class and the Book+CoreDataProperties.swift file, Xcode allows the developer to separate the attributes from the basic logic. The superclass for the new Book object is NSManagedObject. NSManagedObject is an object that handles all of the Core Data database interaction. It provides the methods and properties you will be using in this example. Later in the file, you will see the three attributes and the one relationship you created.
Managed Object Context
You have created a managed object class called Book. The nice thing with Xcode is that it will generate the necessary code to manage these new data objects. In Core Data, every managed object should exist within a managed object context. The context is responsible for tracking changes to objects, carrying out undo operations, and writing the data to the database. This is helpful because you can now save a bunch of changes at once rather than saving each individual change. This speeds up the process of saving the records. As a developer, you do not need to track when an object has been changed. The managed object context will handle all of that for you.
Setting Up the Interface
The following steps will assist you in setting up your interface:
- In the BookStore folder in your project, you should have a Main.storyboard file. Click this file and Xcode will open it in the editing window, as shown in Figure 11-12.

Figure 11-12. Creating the interface
- There should be a blank window. To add some functionality to your window, you need to add some objects from the Object Library. Type table into the search field on the bottom right of the screen. This should narrow the objects, and you should see Table View Controller and Table view. Drag the Table view to the view, as shown in Figure 11-13.

Figure 11-13. Adding the Table view
- You now have a Table view. You will need to stretch the Table view to fill your view. To create cells in your Table view, you need to add a UITableViewCell. Search for cell in your Object Library, and drag a Table view cell to your table. You now have a table and a cell on your view, as shown in Figure 11-14.

Figure 11-14. Adding the Table view cell
- Select the cell, and in the Attributes Inspector on the right side, set Style to Basic. Also, set the identifier to Cell. The identifier is used for when your Table view contains multiple styles of cells. You will need to differentiate them with unique identifiers. For most of your projects, you can set this to Cell and not worry about it, as shown in Figure 11-15.

Figure 11-15. Changing the style of the cell
- When using a Table view, it is usually a good idea to put it in a Navigation Controller. You will be using the Navigation Controller to give you space to put an Add button on your Table view. To add a Navigation Controller, select your View Controller in the Scene box, which is the window to the left of your storyboard that shows your View Controllers (your View Controller will have a yellow icon next to it). From the Application menu, select Editor Embed In Navigation Controller, as shown in Figure 11-16.

Figure 11-16. Embedding a Navigation Controller
- You will now have a navigation bar at the top of your view. You will now add a button to the bar. This type of button is called a UIBarButtonItem. Search for bar button in your Object Library and drag a Bar Button item to the top right of your view on the navigation bar, as shown in Figure 11-17.

Figure 11-17. Adding a Bar Button item to the navigation bar
- Select the Bar Button item and change the System item from Custom to Add. This will change the look of your Bar Button item from the word Item to a plus icon, as shown in Figure 11-18.

Figure 11-18. Changing the Bar Button item
- Now you have created the interface, you need to hook it up to your code. Hold down the Control key and drag your Table view to the View Controller in the Document Outline, as shown in Figure 11-19.

Figure 11-19. Connecting the Table view
- A pop-up will appear allowing you to select either the data source or the delegate, as shown in Figure 11-20. You will need to assign both to the View Controller. The order in which you select the items does not matter, but you will have to Control-drag the Table view twice.

Figure 11-20. Hooking up the Table view
- Now your Table view should be ready to go. You need to hook up your button to make it do something. In the top right of your Xcode window, click the Assistant Editor button (it looks like two circles). This will open your code on the right side and your storyboard on the left side. Now Control-drag your Add button to the View Controller code on the right, as shown in Figure 11-21.

Figure 11-21. Adding an action for your Button object
- It does not matter where you place the Add button in your code as long as it is in your class and outside of any methods. It should be after your class properties just for organization. When you let go, you will be prompted for the type of connection you are creating. Set Connection to Action. Then add a name for your new method, such as addNew, as shown in Figure 11-22.

Figure 11-22. Changing the type and name of the connection
- You also need to create an outlet for your Table view. Drag your Table view from the View Controller scene to the top of the code (just under the class definition, as seen in Figure 11-23). Make sure the connection is set to Outlet and name the Table view myTableView. You will need this outlet later to tell your Table view to refresh.

Figure 11-23. Creating an outlet for the Table view
The interface is complete now, but you still need to add the code to make the interface do something. Go back to the Standard editor (click the list icon to the left of the two circles icon in the top right of the Xcode toolbar) and select the ViewController.swift file from the file list on the left side. Because you now have a Table view you have to worry about, you need to tell your class that it can handle a Table view. Change your class declaration at the top of your file to the following:
class ViewController: UIViewController, UITableViewDelegate, UITableViewDataSource {
You added UITableViewDelegate and UITableViewDataSource to your declaration. This tells your controller that it can act as a table view delegate and data source. These are called protocols. Protocols tell an object that they must implement certain methods to interact with other objects. For example, to conform to the UITableViewDataSource protocol, you need to implement the following method:
func tableView(tableView: UITableView, numberOfRowsInSection section: Int) -> Int
Without this method, the Table view will not know how many rows to draw.
Before continuing, you need to tell your ViewController.swift file about Core Data. To do this, you add the following line to the top of the file just under import UIKit:
import CoreData
You also need to add a managed object context to your ViewController class. Add the following line right after the class ViewController line:
var managedObjectContext: NSManagedObjectContext!
Now that you have a variable to hold your NSManagedObjectContext, you need to instantiate it so you can add objects to it. To do this, you need to add the following lines to your override func viewDidLoad() method:
let appDelegate: AppDelegate = UIApplication.sharedApplication().delegate as! AppDelegate
managedObjectContext = appDelegate.managedObjectContext as NSManagedObjectContext
The first line creates a constant that points to your application delegate. The second line points your managedObjectContext variable to the application delegate’s managedObjectContext. It is usually a good idea to use the same managed object context throughout your app.
The first new method you are going to add is one to query your database records. Call this method loadBooks.
 1 func loadBooks() -> [AnyObject]{
 2              let fetchRequest = NSFetchRequest(entityName: "Book")
 3              var result = [AnyObject]()
 4              do {
 5                  result = try managedObjectContext!.executeFetchRequest(fetchRequest)
 6               } catch let error as NSError {
 7                        NSLog("My Error: %@", error)
 8               }
 9               return result
10 }
This code is a little more complex than what you have seen before, so let’s walk through it. Line 1 declares a new function called loadBooks, which returns an array of AnyObject. This means you will receive an array that can contain any type of objects you want. In this case, the objects will be Book. You then return the array once you have it loaded.
You will now need to add the data source methods for your Table view. These methods tell your Table view how many sections there are, how many rows are in each section, and what each cell should look like. Add the following code to your ViewController.swift file:
1 func numberOfSectionsInTableView(tableView: UITableView) -> Int {
 2         return 1
 3     }
 4
 5
 6     func tableView(tableView: UITableView, numberOfRowsInSection section: Int) -> Int {
 7         return loadBooks().count
 8     }
 9
10     func tableView(tableView: UITableView, cellForRowAtIndexPath indexPath: NSIndexPath)
       -> UITableViewCell {
11         let cell = tableView.dequeueReusableCellWithIdentifier("Cell") as UITableViewCell?
12         let book: Book = loadBooks()[indexPath.row] as! Book
13         cell?.textLabel!.text = book.title
14         return cell!
15     }
In line 2, you tell your Table view that it will contain only a single section. In line 7, you call a count on your array of Book for the number of rows in your Table view. In lines 11 to 14, you create your cell and return it. Line 11 creates a cell for you to use. This is standard code for creating a cell. The identifier allows you to have more than one type of cell in a Table view, but that is more complex. Line 12 grabs your Book object from your loadBooks() array. Line 13 assigns the book title to your textLabel in the cell. The textLabel is the default label in the cell. This is all you need to do to display the results of your loadBooks method in the Table view. You still have one problem. You do not have any books in your database yet.
To fix this issue, you will add code to the addNew method you created earlier. Add the following code inside the addNew method you created:
1     @IBAction func addNew(sender: AnyObject) {
2         let book: Book = NSEntityDescription.insertNewObjectForEntityForName
                            ("Book", inManagedObjectContext: managedObjectContext) as! Book
 3         book.title = "My Book" + String(loadBooks().count)
 4         do {
 5             try managedObjectContext!.save()
 6         } catch let error as NSError {
 7             NSLog("My Error: %@", error)
 8         }
 9         myTableView.reloadData()
10     }
11 }
Line 2 creates a new Book object for your book in the database from the Entity name and inserts that object into the managedObjectContext you created before. Remember that once the object is inserted into the managed object context, its changes are tracked, and it can be saved. Line 3 sets the book title to My Book and then sets the number of items in the array. Obviously, in real life, you would want to set this to a name either given by the user or from some other list. Lines 4-8 save the managed object context.
In Swift 2.0, error handling has been changed. Now you try and then throw an error when you perform an operation that might cause an error. Line 9 tells the UITableView to reload itself to display the newly added Book. Now build and run the application. Click the + button several times. You will add new Book objects to your object store, as shown in Figure 11-24. If you quit the app and relaunch it, you will notice that the data is still there.

Figure 11-24. The final app
This was a cursory introduction to Core Data for iOS. Core Data is a powerful API, but it can also take a lot of time to master.
Summary
Here is a summary of the topics this chapter covered:
- Preferences: You learned to use NSUserDefaults to save and read preferences from a file, on both iOS and OS X.
- Databases: You learned what a database is and why using one can be preferable to saving information in a preferences file.
- Database engine: You learned about the database engine that Apple has integrated into OS X and iOS and its advantages and limitations.
- Core Data: Apple provided a framework for interfacing with the SQLite database. This framework makes the interface much easier to use.
- Bookstore application: You created a simple Core Data application and used Xcode to create a data model for your bookstore. You also learned how to create a relationship between two entities. Finally, you used Xcode to create a simple interface for your Core Data model.
Exercises
- Add a new view to the app for allowing the user to enter the name of a book.
- Provide a way to remove a book from the list.
- Create an Author object and add it to a Book object.