Creating User Interfaces
Interface Builder enables iOS developers to easily create their user interfaces using a powerful graphical user interface. It provides the ability to build user interfaces by simply dragging objects from Interface Builder’s library to the editor.
Interface Builder stores your user interface design in one or more resource files, called storyboards and XIBs. These resource files contain the interface objects, their properties, and their relationships.
To build a user interface, simply drag objects from Interface Builder’s Object Library pane onto your view or scene. Actions and outlets are two key components of Interface Builder that help you streamline the development process.
Your objects trigger actions in your views, and the actions are connected to your methods in the app’s code. Outlets are declared in your .swift file and are connected to specific controls as properties. See Figure 10-1.

Figure 10-1. Interface Builder
Note Interface Builder was once a stand-alone application that developers used to design their user interfaces. Starting with Xcode 4.0, Interface Builder has been integrated into Xcode.
Understanding Interface Builder
Interface Builder saves the user interface file as a bundle that contains the interface objects and relationships used in the application. These bundles previously had the file extension .nib. Version 3.0 of Interface Builder used a new XML file format, and the file extension changed to .xib. However, developers still call these files nib files. Later Apple introduced storyboards. Storyboards enable you to have all of your views in one file with a .storyboard extension.
Unlike most other graphical user interface applications, XIBs and storyboards are often referred to as freeze-dried because they contain the archived objects themselves and are ready to run.
The XML file format is used to facilitate storage with source control systems such as Subversion and Git.
In the next section, we’ll discuss an app design pattern called Model-View-Controller. This design pattern enables developers to more easily maintain code and reuse objects over the life of an app.
The Model-View-Controller Pattern
Model-View-Controller (MVC) is the most prevalent design pattern used in iOS development, and learning about it will make your life as a developer much easier. MVC is used in software development and is considered an architectural pattern
Architectural patterns describe solutions to software design problems that developers can use in their code. The MVC pattern is not unique to iOS developers; it is being adopted by many makers of integrated development environments (IDEs), including those running on Windows and Linux platforms.
Software development is considered an expensive and risky venture for businesses. Frequently, apps take longer than expected to write, come in over budget, and don’t work as promised. Object-oriented programming (OOP) produced a lot of hype and gave the impression that companies would realize savings if they adopted its methodology, primarily because of the reusability of objects and easier maintainability of the code. Initially, this didn’t happen.
When engineers looked at why OOP wasn’t living up to these expectations, they discovered a key shortcoming with how developers were designing their objects: developers were frequently mixing objects in such a way that the code became difficult to maintain as the application matured, the code moved to different platforms, or hardware displays changed.
Objects were often designed so that if any of the following changed, it was difficult to isolate the objects that were impacted:
- Business rules
- User interfaces
- Client-server or Internet-based communication
Objects can be broken down into three task-related categories. It is the responsibility of the developer to ensure that each of these categories keeps their objects from drifting across other categories.
As objects are categorized in these groups, apps can be developed and maintained more easily over time. The following are examples of objects and their associated MVC category for an iPhone banking application:
Model
- Account balances
- User encryption
- Account transfers
- Account login
View
- Account balances table cell
- Account login spinner control
Controller
- Account balance view controller
- Account transfer view controller
- Logon view controller
The easiest way to remember and classify your objects in the MVC design pattern is the following:
- Model: Unique business or application rules or code that represent the real world
- View: Unique user interface code
- Controller: Anything that controls or communicates with the model or view objects
Figure 10-2 represents the MVC paradigm.

Figure 10-2. MVC paradigm
Neither Xcode nor Interface Builder forces developers to use the MVC design pattern. It is up to the developers to organize their objects in such a way to use this design pattern.
It is worth mentioning that Apple strongly embraces the MVC design pattern, and all of the frameworks are designed to work in an MVC world. This means that if you also embrace the MVC design pattern, working with Apple’s classes will be much easier. If you don’t, you’ll be swimming upstream.
Human Interface Guidelines
Before you get too excited and begin designing dynamic user interfaces for your app, you need to learn some of the ground rules. Apple has developed one of the most advanced operating systems in the world with iOS 9. Additionally, Apple’s products are known for being intuitive and user-friendly. Apple wants users to have the same experience from one app to the next.
To ensure a consistent user experience, Apple provides developers with guidelines on how their apps should look and feel. These guidelines, called the Human Interface Guidelines (HIG), are available for the Mac, iPhone, iPad, and Apple Watch. You can download these documents at http://developer.apple.com, as shown in Figure 10-3.

Figure 10-3. Apple’s Human Interface Guidelines for iOS devices
Note Apple’s HIG is more than recommendations or suggestions. Apple takes it very seriously. While the HIG doesn’t describe how to implement your user interface designs in code, it is great for understanding the proper way to implement your views and controls.
The following are some of the top reasons apps are rejected in Apple’s iTunes App Store:
- The app crashes.
- The app violates the HIG.
- The app uses Apple’s private APIs.
- The app doesn’t function as advertised on the iTunes App Store.
Many new iOS developers find this out the hard way, but if you follow the HIG from day one, your iOS development will be a far more pleasurable experience.
Creating an Example iPhone App with Interface Builder
Let’s get started by building an iPhone app that generates and displays a random number, as shown in Figure 10-4. This app will be similar to the app you created in Chapter 4, but you’ll see how much more interesting the app becomes with an iOS user interface (UI).

Figure 10-4. Completed iOS random number generator app
Note You can read, learn, and follow the HIG before you develop your app, or you can read, learn, and follow the HIG after your app gets rejected by Apple and you have to rewrite part or all of it. Either way, all iOS developers will end up becoming familiar with the HIG.
- Open Xcode and select Create a New Project. Make sure you select Single View Application for iOS, then click Next, as shown in Figure 10-5.

Figure 10-5. Creating an iPhone app based on the Single View Application template
- Name your project RandomNumber, select Swift for the language and iPhone for the Device, click Next, and save your project, as shown in Figure 10-6.

Figure 10-6. Naming your iPhone project
- Your project files and settings are created and displayed, as shown in Figure 10-7.

Figure 10-7. Source files
Although you have only one controller in this project, it’s good programming practice to make your MVC groups at the beginning of your development. This helps remind you to keep the MVC paradigm and not put all of your code unnecessarily in your controller.
- Right-click the RandomNumber folder and then select New Group, as shown in Figure 10-8.

Figure 10-8. Creating new groups
- Create a Models group, a Views group, and a Controllers group.
- Drag the ViewController.swift file to the Controllers group. Drag the Main.storyboard and LaunchScreen.storyboard files to the Views group. Having these groups reminds you to follow the MVC design pattern as you develop your code and prevents you from placing all of your code in the controllers, as shown in Figure 10-9.

Figure 10-9. MVC groups with controller and storyboard files organized
Developers have found it helpful to keep their storyboard and XIB files with their controllers as their projects grow. It is not uncommon to have dozens of controllers and XIB files in your project. Keeping them together helps keep everything organized. Using storyboards resolves many of the issues of having lots of XIBs.
- Click the Main.storyboard file to open Interface Builder.
Using Interface Builder
The most common way to launch Interface Builder and begin working on your view is to click the storyboard or XIB file related to the view, as shown in Figure 10-10.

Figure 10-10. Interface Builder in the workspace window
When Interface Builder opens, you can see your scenes displayed on the canvas. You are now able to design your user interface. First you need to understand some of the subwindows within Interface Builder.
The Document Outline
The storyboard shows all the objects that your view contains. The following are some examples of these objects:
- Buttons
- Labels
- Text fields
- Web views
- Map views
- iAd banner views
- Picker views
- Table views
Note You can expand the width of the Document Outline to see a detailed list of all your objects, as shown in Figure 10-11. To get more real estate for the canvas, you can shrink or hide your file navigator.

Figure 10-11. The Document Outline:’s width is expanded to show a detailed view of all the objects in your storyboard
The Library
The Library is where you can exploit your creativity. It’s a smorgasbord of objects that you can drag and drop into the View.
- The Library pane can grow and shrink by moving the window splitter in the middle of the view, as shown in Figure 10-12.

Figure 10-12. Expand the Library pane to see more controls and slide the splitter to resize the window with the mouse
For Cocoa Touch objects, the Library contains the following (see Figure 10-13):
- Controls
- Data views
- Gesture recognizers
- Objects and controllers
- Window and bars

Figure 10-13. Various Cocoa Touch objects in the Library pane
Inspector Pane and Selector Bar
The Inspector pane enables you to change the properties of the controls to make your objects follow your command. The Inspector pane has six tabs across the top, as shown in Figure 10-14.
- File inspector
- Quick Help inspector
- Identity inspector
- Attributes inspector
- Size inspector
- Connections inspector

Figure 10-14. The Identity Inspector and Selector Bar
Creating the View
The random number generator will have three objects in the view: one label and two buttons. One button will generate the seed, another button will generate the random number, and the label shows the random number generated by the app.
- Drag a label from the Library Pane Controls section to the View window.
- Drag two buttons from the Library window to the View window.
- Click the top button and change its title to Seed Random Number Generator.
- Click the bottom button and change its title to Generate Random Number, as shown in Figure 10-15.

Figure 10-15. Placing objects in the view
Now you get to use a great feature of Xcode. You can quickly and easily connect your outlets and actions to your code. Xcode actually goes one step further; it will create some of the code for you. All you have to do is drag and drop.
- Click the Assistant Editor icon at the top right of the screen. This will display the associated .swift file for the view selected in the storyboard or the XIB file, as shown in Figure 10-16.

Figure 10-16. Using the Assistant editor to display the .swift file
Note If the correct associated .swift file doesn’t appear when you click the Assistant Editor icon, make sure you selected and highlighted the view.
Using Outlets
Now you can connect your label to your code by creating an outlet.
- Control-drag from the label in the view to the top of your class file, as shown in Figure 10-17.

Figure 10-17. Control-dragging to create the code for the randomNumber outlet
A pop-up window will appear. This enables you to name and specify the type of outlet.
- Complete the pop-up as shown in Figure 10-18 and click the Connect button.
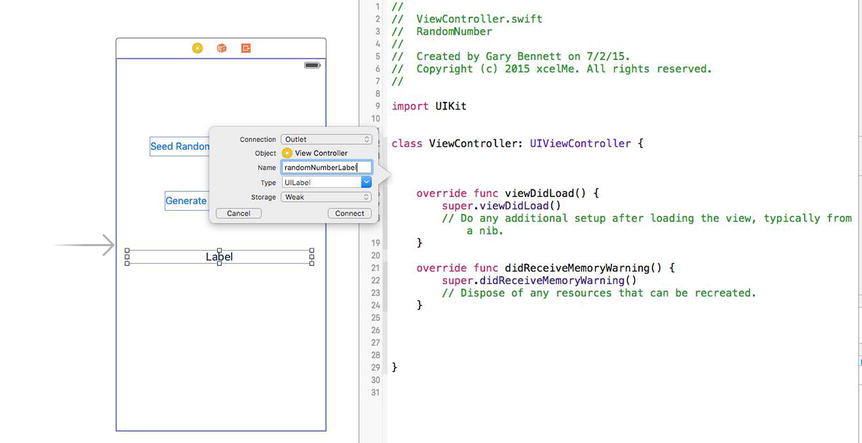
Figure 10-18. Pop-up for randomNumber outlet
The code is created for the outlet, and the outlet is now connected to the Label object in your Main.storyboard file. The shaded circle next to line 15 indicates the outlet is connected to an object in the Main.storyboard file, as shown in Figure 10-19.

Figure 10-19. Outlet property code generated and connected to the Label object
There is a declaration that may be new to you called IBOutlet, commonly referred to simply as an outlet. Outlets signal to your controller that this property is connected to an object in Interface Builder. IBOutlet will enable Interface Builder to see the outlet and enable you to connect the property to the object in Interface Builder.
Using the analogy of an electrical wall outlet, these property outlets are connected to objects. Using Interface Builder, you can connect these properties to the appropriate object. When you change the properties of a connected outlet, the object that it is connected to will automatically change.
Using Actions
User interface object events, also known as actions, trigger methods.
Now you need to connect the object actions to the buttons.
- Control-drag from the Seed Random Number Generator button to the bottom of your class. Complete the pop-up as indicated in Figure 10-20 and click the Connect button. Make sure you change the connection to an action and not an outlet.

Figure 10-20. Completing the pop-up for the Seed method
- Repeat the previous steps for the Generate Random Number button (see Figure 10-21).

Figure 10-21. Generate and Seed actions connected to their Button objects
The Class
All that is left is to complete the code for your outlet and actions in the .swift file for the controller.
Open the ViewController.swift file and complete the seed and generate methods, as shown in Figure 10-22.

Figure 10-22. The seed and generate methods completed
There is some code you should examine a bit further. The following line seeds the random generator so that you get a random number each time you run the app. There are easier ways of to do this, but for the purposes of this section, you just want to see how actions and outlets work.
srandom(CUnsignedInt(time(nil)))
In the following code, the property text sets the UILabel value in your view. The connection you established in Interface Builder from your outlet to the Label object does all the work for you.
randomNumber.text
There are just two more things you need to do now. Select Main.storyboard and then click Show the File Inspector in the Inspector Pane toolbar. Deselect Use Auto Layout. A message box will appear; click Disable Size Classes. This will enable you to easily view your controls on your iPhone simulator, as shown in Figure 10-23.

Figure 10-23. Disabling Auto Layout
Lastly, center your objects in the view and expand your Label object. Also, select the center alignment property for the label. This will center your text in the Label object, as shown in Figure 10-24.

Figure 10-24. Centering your objects
That’s it!
To run your iPhone app in the iPhone simulator, click the Play button. Your app should launch in the simulator, as shown in Figure 10-25.

Figure 10-25. The completed random number generator app running in the iOS simulator
To seed the random function, tap the Seed Random Number Generator button. To generate the random number, tap the Generate Random Number button.
Summary
Great job! Interface Builder saves you a lot of time when creating user interfaces. You have a powerful set of objects to use in your application and are responsible for a minimal amount of coding.
Interface Builder handles many of the details you would normally have to deal with.
You should be familiar with the following terms:
- Storyboard and XIB files
- Model-View-Controller
- Architectural patterns
- Human Interface Guidelines (HIG)
- Outlets
- Actions
Exercises
- Extend the random number generator app to show a date and time in a Label object when the app starts.
- After showing a date and time label, add a button to update the data and time label with the new time.