Object-Oriented Programming with Swift
Over the past 15 years, the programming world focused on the development paradigm of object-oriented programming (OOP). Most modern development environments and languages implement OOP. Put simply, OOP forms the basis of everything you develop today.
You may be asking yourself why we waited until Chapter 5 to present OOP using Swift if it is the primary development style of today. The simple answer is that it is not an easy concept for new developers. This chapter will go into detail about the different aspects of OOP and how they affect your development.
Implementing OOP into your applications correctly will take some front-end planning, but you will save yourself a lot of time throughout the life of your projects. OOP has changed the way development is done. In this chapter, you will learn what OOP is. OOP was initially discussed in the first chapter of this book, but this chapter will go into more detail about it. You will revisit what objects are and how they relate to physical objects you find in the world. You will look into what classes are and how they relate to objects. You will also learn the steps you need to take when planning your classes and some visual tools you can use to accomplish these steps. When you have read this chapter and have worked through the exercises, you will have a better understanding of what OOP is and why it is necessary for you as a developer.
At first, objects and object-oriented programming may seem difficult to understand, but the hope is that as you progress through this chapter, they will begin to make sense.
The Object
As discussed in Chapter 1, OOP is based on objects. Some of the discussion about objects will be a review, but it will also go into more depth. An object is anything that can be acted upon. To better understand what a programming object is, you will first look at some items in the physical world around you. A physical object can be anything around you that you can touch or feel. Take, for example, a television. Some characteristics of a television include type (plasma, LCD, or CRT), size (40 inches), brand (Sony or Vizio), weight, and cost. Televisions also have functions. They can be turned on or off. You can change the channel, adjust the volume, and change the brightness.
Some of these characteristics and functions are unique to televisions, and some are not. For example, a couch in your house would probably not have the same characteristics as a television. You would want different information about a couch, such as material type, seating capability, and color. A couch might have only a few functions, such as converting to a bed or reclining.
Now let’s talk specifically about objects as they relate to programming. An object is a specific item. It can describe something physical like a book, or it could be something such as a window for your application. Objects have properties and methods. Properties describe certain things about an object such as location, color, or name. Conversely, methods describe actions the object can perform such as close or recalculate. In this example, a TV object would have type, size, and brand properties, while a Couch object would have properties such as color, material, and comfort level. In programming terms, a property is a variable that is part of an object. For example, a TV would use a string variable to store the brand and an integer to store the height.
Objects also have commands the programmer can use to control them. The commands are called methods. Methods are the way that other objects interact with a certain object. For example, with the television, a method would be any of the buttons on the remote control. Each of those buttons represents a way you can interact with your television. Methods can and often are used to change the values of properties, but methods do not store any values themselves.
As described in Chapter 1, objects have a state, which is basically a snapshot of an object at any given point in time. A state would be the values of all the properties at a specific time.
In previous chapters, you saw the example of the bookstore. A bookstore contains many different objects. It contains book objects that have properties such as title, author, page count, and publisher. It also contains magazines with properties such as title, issue, genre, and publisher. A bookstore also has some nontangible objects such as a sale. A sale object would contain information about the books purchased, the customer, the amount paid, and the payment type. A sale object might also have some methods that calculate tax, print the receipt, or void the sale. A sale object does not represent a tangible object, but it is still an object and is necessary for creating an effective bookstore.
Because the object is the basis of OOP, it is important to understand objects and how to interact with them. You will spend the rest of the chapter learning about objects and some of their characteristics.
What Is a Class?
We cannot discuss OOP without discussing what a class is. A class defines which properties and methods an object will have. A class is basically a cookie cutter that can be used to create objects that have similar characteristics. All objects of a certain class will have the same properties and the same methods. The values of those properties will change from object to object.
A class is similar to a species in the animal world. A species is not an individual animal, but it does describe many similar characteristics of the animal. To understand classes more, let’s look at an example of classes in nature. The Dog class has many properties that all dogs have in common. For example, a dog may have a name, an age, an owner, and a favorite activity. An object that is of a certain class is called an instance of that class. If you look at Figure 5-1, you can see the difference between the class and the actual objects that are instances of the class. For example, Lassie is an instance of the Dog class. In Figure 5-1, you can see a Dog class that has four properties (Breed, Age, Owner, and Favorite Activity). In real life, a dog will have many more properties, but these four are for this demonstration.

Figure 5-1. An example of a class and its individual objects
Planning Classes
Planning your classes is one of the most important steps in your development process. While it is possible to go back and add properties and methods after the fact (and you will definitely need to do this), it is important that you know which classes are going to be used in your application and which basic properties and methods they will have. Spending time planning your different classes is important at the beginning of the process.
Planning Properties
Let’s look at the bookstore example and some of the classes you need to create. First, it is important to create a Bookstore class. A Bookstore class contains the blueprint of the information each Bookstore object stores, such as the bookstore’s name, address, phone number, and logo (see Figure 5-2). Placing this information in a class rather than hard-coding it in your application will allow you to easily make changes to this information in the future. You will learn the reasons for using OOP methodologies later in this chapter. Also, if your bookstore becomes a huge success and you decide to open another one, you will be prepared because you can create another object of class Bookstore.

Figure 5-2. The Bookstore class
Let’s also plan a Customer class (see Figure 5-3). Notice how the name has been broken into First Name and Last Name. This is important to do. There will be times in your project when you may want to use only the first name of a customer, and it would be hard to separate the first name from the last if you didn’t plan ahead. Let’s say you want to send a letter to a customer letting them know about an upcoming sale. You do not want your greeting to say, “Dear John Doe.” It would look much more personal to say, “Dear John.”

Figure 5-3. The Customer class
You will also notice how the address is broken into its different parts instead of grouping it all together. The Address Line 1, Address Line 2, City, State, and Zip are separate. This is important and will be used in your application. Let’s go back to the letter you want to send to customers about an upcoming sale.
You might not want to send it to all of the customers who live in different states. By separating the address, you can easily filter out those customers you do not want to include in your mailings.
We have also added the attribute of Favorite Book Genre to the Customer class. We added this to show you how you can keep many different types of information in each class. This field may come in handy if you have a new mystery title coming out and you want to send an e-mail alerting customers who are especially interested in mysteries. By storing this type of information, you will be able to specifically target different portions of your customer base.
A Book class is also necessary to create the bookstore (see Figure 5-4). You will store information about the book such as author, publisher, genre, page count, and edition number (in case there are multiple editions). The Book class will also have the price for the book.

Figure 5-4. The Book class
You can add another class called Sale (see Figure 5-5). This class is more abstract than the other classes discussed because it does not describe a tangible object. You will notice how we have added a reference to a customer and a book to the Sale class. Because the Sale class will track sales of books, you need to know which book was sold and to which customer.

Figure 5-5. The Sale class
Now that you know the properties of the classes, you need to look at some methods that each of the classes will have.
Planning Methods
You will not add all of the methods now, but the more planning you can do at the beginning, the easier it will be for you later. Not all of your classes will have many methods. Some may not have any methods at all.
Note When planning your methods, remember to have them focus on a specific task. The more specific the method, the more likely it is that it can be reused.
For the time being, you will not add any methods to the Book class or the Bookstore class. You will focus on your other two classes.
For the Customer class, you will add methods to list the purchase history of that client. There may be other methods that you will need to add in the future, but you will add just that one for now. Your completed Customer class diagram should look like Figure 5-6. The line near the bottom separates the properties from the methods.

Figure 5-6. The completed Customer class
For the Sales class, we have added three methods. We added Charge Credit Card, Print Invoice, and Checkout (see Figure 5-7). For the time being, you do not need to know how to implement these methods, but you need to know that you are planning on adding them to your class.

Figure 5-7. The completed Sale class
Now that you have finished mapping out the classes and the methods you are going to add to them, you have the beginnings of a Unified Modeling Language (UML) diagram. Basically, this is a diagram used by developers to plan their classes, properties, and methods. Starting your development process by creating such a diagram will help you significantly in the long run. An in-depth discussion of UML diagrams is beyond the scope of this book. If you would like more information about this subject, smartdraw.com has a great in-depth overview of them; see http://www.smartdraw.com/uml-diagram/. Omnigroup (www.omnigroup.com) provides a great UML diagram program for Mac OS X called Omnigraffle.
Figure 5-8 shows the complete diagram.

Figure 5-8. The completed UML diagram for the bookstore
Implementing the Classes
Now that you understand the objects you are going to be creating, you need to create your first object. To do so, you will start with a new project.
- Launch Xcode. Select File
 New Project.
 - Select iOS on the left side. On the right side, select Master-Detail Application. For what you are doing in this chapter, you could have selected any of the application types (see Figure 5-9). Click Next.

Figure 5-9. Creating a new project
- Enter a product name for your project. We will use the name of BookStore. You will also have to enter a company name and a company identifier. The company identifier is usually com.companyname (i.e., com.innovativeware). Leave the checkboxes on this screen as they appear by default. You will not be worrying about Core Data right now; it’s discussed in Chapter 11. Also, leave the current language selection set to Swift. Click Next to select a location to save your project and then save your project. You can use the name BookStore or any other project name you want.
- Select the BookStore project from the Project navigator on the left side of the screen (see Figure 5-10). This is where the majority of your code will reside.

Figure 5-10. Selecting the bookStore folder
- Select File New File.
- From the pop-up window, select Source under the iOS header and then click the Swift File on the right side (see Figure 5-11). Then click Next.

Figure 5-11. Creating a new Swift file
- You will now be given the opportunity to name your file (see Figure 5-12). For this exercise, you will create the Customer class. For now, name the file Customer. Click Create.

Figure 5-12. Creating the file
Note For ease of use and for understanding your code, remember that class names should always be capitalized in Swift. Object names should always start lowercase. For example, Book would be an appropriate name for a class, and book would be a great name for an object based on the Book class. For a two-word object, such as the book’s author, an appropriate name would be bookAuthor. This type of capitalization is called lower camel case.
- Now look in your main project folder; you should have a new file. It is called Customer.swift.
Note If you had created a class in Objective-C, Customer.h and Customer.m files would have been created. The .h file is the header file that contains information about your class. The header file lists all of the properties and methods in your class, but it does actually contain the code related to them. The .m file is the implementation file, which is where you write the code for your methods. In Swift, the entire class is contained in a single file.
- The Customer.swift file should now be selected, and you will see the window shown in Figure 5-13. Notice it does not contain a lot of information currently. The first part, with the double slashes (//), consists of comments and is not considered part of the code. Comments allow you to tell those who might read your code what each portion of code is meant to accomplish. All you have done this far in Swift is create a file. You now need to add the code to the file to actually create a class. In your Swift file, type the following:
class Customer {

}
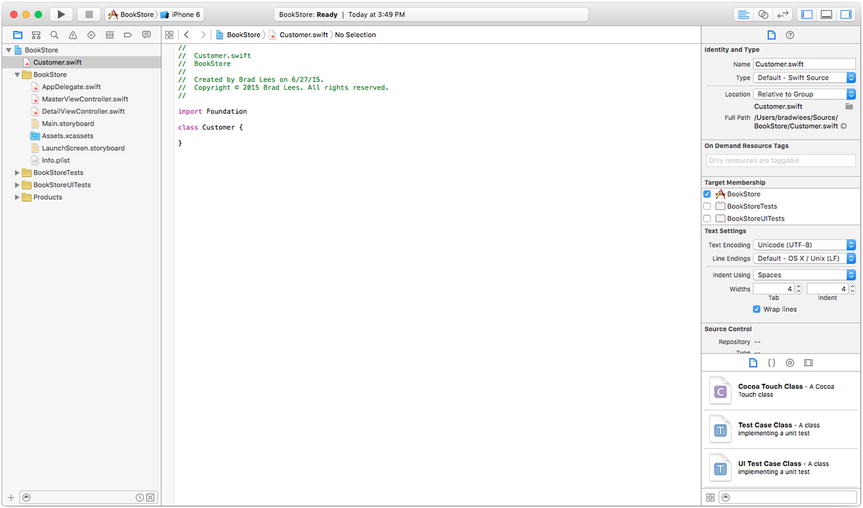
Figure 5-13. Your empty customer class
This is all that is needed to create a Customer class.
Note In Swift, a class does not need to be in its own file. Many classes can be defined in a single Swift file, but this can be difficult to maintain when your project contains a lot of classes. It is usually cleaner and more organized to have a separate file for each class.
Now let’s transfer the properties from the UML diagram to the actual class.
Tip Properties should always start with a lowercase letter. There can be no spaces in a property name.
For the first property, First Name, add this line to your file:
var firstName = ""
This creates an object in your class called firstName. Notice you did not tell Swift what type of property firstName is. In Swift, you can declare a property and not specify the type, and a property can be assigned a type based on the value we initially assign it. By giving the property an initial value of "", you tell the Swift compiler to make firstName a String. In Swift, all non-optional properties require a default value either when they are declared or in the class initializer. We will discuss optionals later in this book.
Note In Objective-C, all properties are required to declare a type. For example, to create the same firstName property, you would use the following code:
NSString *firstName;
This declares an NSString with the name firstName. In Swift, you can declare only a variable and allow the system to determine the type.
Since all of the properties will be vars, you just need to repeat the same procedure for the other ones. When that is complete, your Swift file should look like Figure 5-14.

Figure 5-14. The Customer class interface with properties
Now that the class declaration is complete, you will need to add your method. Methods should be contained in the same class file and location as the properties. You will add a new method that returns an array. This code will look as follows:
func listPurchaseHistory() -> [String] {

        return ["Purchase 1", "Purchase 2"]
}
This code might seem a little confusing. The empty parentheses tell the compiler that you are not passing any parameters to the method. The -> tells the system what you return from your method. [String] tells you that you are returning an array of strings. In the final version, you will actually want to return purchase objects, but you are using String for now. This code will not yet compile because you do not return an array, so you added a return of a simple array. That is all that needs to be done in the Swift file to create the class. Figure 5-15 shows the final Swift file.

Figure 5-15. The finished Customer class Swift file
Inheritance
Another major quality of OOP is inheritance. Inheritance in programming is similar to genetic inheritance. You might have inherited your eye color from your mother or hair color from your father, or vice versa. Classes can, in a similar way, inherit properties and methods from their parent classes, but unlike genetics, you do not inherit the values of those properties. In OOP, a parent class is called a superclass, and a child class is called a subclass.
Note In Swift, there is no superclass unless specifically stated.
You could, for example, create a class of printed materials and use subclasses for books, magazines, and newspapers. Printed materials can have many things in common, so you could define properties in the superclass of printed materials and not have to redundantly define them in each individual class. By doing this, you further reduce the amount of redundant code that is necessary for you to write and debug.
In Figure 5-16, you will see a layout for the properties of a Printed Material superclass and how that will affect the subclasses of Book, Magazine, and Newspaper. The properties of the Printed Material class will be inherited by the subclasses, so there is no need to define them explicitly in the class. You will notice that the Book class now has significantly fewer properties. By using a superclass, you will significantly reduce the amount of redundant code in your programs.

Figure 5-16. Properties of the super- and subclasses
Why Use OOP?
Throughout this chapter, we have discussed what OOP is and have even discussed how to create classes and objects. However, it’s also important to discuss why you want to use OOP principles in your development.
If you take a look at the popular programming languages of the day, all of them use the OOP principles to a certain extent. Swift, Objective-C, C++, Visual Basic, C#, and Java all require the programmer to understand classes and objects to successfully develop in those languages. In order to become a developer in today’s world, you need to understand OOP. But why use it?
OOP Is Everywhere
Just about any development you choose to do today will require you to understand object-oriented principles. On Mac OS X and in iOS, everything you interact with will be an object. For example, simple windows, buttons, and text boxes are all objects and have properties and methods. If you want to be a successful programmer, you need to understand OOP.
Eliminate Redundant Code
By using objects, you can reduce the amount of code you have to retype. If you write code to print a receipt when a customer checks out, you will want that same code available when you need to reprint a receipt. If you placed your code to print the receipt in the Sales class, you will not have to rewrite this code again. This not only saves you time but often helps you eliminate mistakes. If you do not use OOP and there is a change to the invoice (even something as simple as a graphic change), you have to make sure you make the change in your desktop and mobile applications. If you miss one of them, you run the risk of having the two interfaces behave differently.
Ease of Debugging
By having all of the code relating to a book in one class, you know where to look when there is a problem with the book. This may not sound like such a big deal for a little application, but when your application gets to hundreds of thousands or even millions of lines of code, it will save you a lot of time.
Ease of Replacement
If you place all of your code in a class, then as things change in your application, you can change out classes and give your new class completely different functionality. However, the modified class can still interact with the rest of the application in the same way as your current class. This is similar to car parts. If you want to replace a muffler on a car, you do not need to get a new car. If you have code related to your invoice scattered all over the place, it makes it much more difficult to change items about a class.
Advanced Topics
We have discussed the basics of OOP throughout this chapter, but there are some other topics that are important to your understanding.
Interface
As discussed in this chapter, the way the other objects interact is with methods. In Swift, you can set access levels on your methods. Declaring a method private will make it accessible only to objects derived from it. By default, Swift methods are internal and can be accessed by any object or method in the current module. This is often called the interface because it tells other objects how they can interact with your objects. Implementing a standard interface throughout your application will allow your code to interact with different objects in similar ways. This will significantly reduce the amount of object-specific code you need to write.
Polymorphism
Polymorphism is the ability of an object of one class to appear and be used as an object of another class. This is usually done by creating methods and properties that are similar to those of another class. A great example of polymorphism that you have been using is the bookstore. In the bookstore, you have three similar classes: Book, Magazine, and Newspaper. If you wanted to have a big sale for your entire inventory, you could go through all of the books and mark them down. Then you could go through all of the magazines and mark them down and then go through all of the newspapers and mark them down. That would be more work than you would need to do. It would be better to make sure all of the classes have a markdown method. Then you could call that on all of the objects without needing to know which class they were as long as they were subclasses of a class that contained the methods needed. This would save a bunch of time and coding.
As you are planning your classes, look for similarities and for methods that might apply to more than one type of class. This will save you time and speed up your application in the long run.
Summary
You’ve finally reached the end of the chapter! Here is a summary of the things that were covered:
- Object-oriented programming (OOP): You learned about the importance of OOP and the reasons why all modern code should use this methodology.
- Objects: You learned about OOP objects and how they correspond to real-world objects. You also learned about abstract objects that do not correspond to real-world objects.
- Classes: You learned that a class determines the types of data (properties) and the methods that each object will have. Every object needs to have a class. It is the blueprint for the object.
- Creating a class: You learned how to map out the properties and methods of your classes.
- Creating a class file: You used Xcode to create a class file.
- Editing a file: You edited the Swift file to add your properties and methods.
Exercises
- Try creating the class files for the rest of the classes you mapped out.
- Map out an Author class. Choose the kind of information you would need to store about an author.
For the daring and advanced:
- Try creating a superclass called PrintedMaterials. Map out the properties that a class might have.
- Create classes for the other types of printed materials a store might carry.