Security
In this chapter, we’ll discuss how implementing proper security can provide protection from many of the risks discussed in previous chapters. We’ll see how using good passwords is a basic line of defense, and how locking down elements of an account prevents information from being seen by the wrong person. We’ll also discuss some new threats in this chapter, inclusive to fake accounts, doxxing, and how search engines can display considerable amounts of information available on social media sites and other online resources.
Keywords
Social networking; social media; communications; privacy; security; fake accounts; passwords; doxxing; locking down accounts; content; comments; verifying security
Information in This Chapter:
Security
Not everyone takes security seriously. It’s not uncommon for people to create a social media account and never look beyond the default settings. In the same way, they’ll buy a mobile device, computer, or some other equipment to access those sites and accept that it’s set up in a way that best protects them. Often, the default settings provide the greatest ease of use but are also the least secure. It’s never a good idea to trust someone else has your security in mind, so you should check and configure these settings yourself. Fortunately, in reading this book, you’ve already shown how you’re willing to do that.
Security is a trade-off. The more you lock down a social media account, restrict content from appearing on your profile page, and prevent people from accessing photos and other content, the less chance people will have finding you in searches. This not only means people you’d rather avoid, but also any old friends and family members you’d like to connect with. A decision can make your social media use more secure, but it can cost you functionality and/or ease of use.
The trade-off of security applies to almost anything you can think of in technology, accounts, network access, equipment, and content. As we’ve seen throughout this book, and discuss further in this chapter, there are many threats on the Internet and many tactics, settings, and tools to protect you and your systems. The level of security you choose to use is subjective, where it’s up to you how much and how little you use. Ultimately, you need to decide how much you’re willing to expose yourself to risks, and what level of vulnerability you can live with.
Keeping track of accounts
When you’re exploring the different social media sites available, it’s easy to create accounts and forget the ones you don’t use. This can leave a security hole, especially if you’ve set up posts on one site to automatically tweet an update or publish to another site. If a hacker gained access to it, it could be confusing at first trying to figure out why strange posts were appearing, not realizing it was coming from another site. Since you haven’t used that account for awhile, when you do realize what’s happening, you might also realize you’ve forgotten the username and password for the site.
To keep track of your accounts, you should consider creating a master list. It should state the URL of the site, the account name, and password. Keeping a master list of administrator passwords is a practice of IT departments in organizations, in which administrator accounts and passwords are documented and stored in a secure location. It’s important that you don’t keep it someplace where people will be able to read it or as a document on your computer. If it’s stored as an electronic document on your computer or network, as in the case of a spreadsheet or Word document, you can add an extra small measure of security by password protecting it. As changes occur, update the list so the information is there when you need it.
The other benefit of keeping a list of accounts and passwords is that it shows you where the same passwords are being used on multiple sites. If a site was hacked, your credentials could be compromised, and the hacker could now potentially gain access to any site using the same passwords. When this occurs, you’d need to change the passwords on any sites using them. In referring to your list of passwords, look for ones used multiple times, and then change them so a unique password is used on each site.
Security reviews
Threats change, so security needs to change and address them. Even if you’ve done everything right in configuring your security settings, there’s no guarantee that new settings won’t be introduced or old settings may be reset. Changes can occur anywhere. It may be on your computer or other devices used to access the Internet, or on the sites themselves.
Social media sites often make changes to their security to address identified or potential issues. While some sites notify you of updates and new settings, others may implement them without your knowledge, leaving you unaware of what’s happened. How often this happens, and whether you’re notified depends on the site. Because of this, you should review your settings from time to time to ensure they’re configured the way you intended.
When a social media site changes its security, it can affect the options that are available. While you may have thought security was set up properly, the options may have changed. In some cases, the changes may reset your security settings to their default settings or provide additional options that may need to be set. The site may decide to turn on a setting that you don’t want or make the option available and turned off. To benefit from the available security options, you need to review them and make sure they’re set properly.
Being that social media involves using a computer or other devices, you also need to review how they’re protected. You should evaluate the effectiveness of any security tools used to protect your computer, network, and mobile devices. Antivirus software needs to have signature files updated on a regular basis so it can identify any potential threats and block, quarantine, or remove them accordingly. To ensure you’re protected, you should check the software to ensure it’s being updated automatically, and that your system is being scanned on a regular basis.
The operating system and software installed on a system will need to be updated from time to time. Doing so will patch any known vulnerabilities, which can be exploited by malicious software. This applies not only to your computer but also to any mobile devices you use.
It’s equally important to reevaluate strategies used to keep your organization and employees secure. The Social Media Officer should work with the IT department to provide information on changes that have occurred, and the IT staff should be aware of the social media sites being used when configuring security settings on equipment. Browsers, operating systems, and other tools may be updated, so it’s necessary to identify and resolve any issues that could occur in using social media on these devices.
Businesses also need to audit their security so they’re aware of changes in requirements. A company may have initially been fearful in using social media but now wants the sites accessible in the workplace. Conversely, they may have allowed users free reign over the social networking sites they visit but now want to limit access due to a number of incidents. These require changes to the existing firewall rules, how users are trained to use Internet resources, and may require changes to existing policies.
Security strategies
One of the major benefits and problems of social media is that you don’t need any additional hardware or software to begin using it. Despite the hidden costs we’ll discuss in Chapter 11, a person can simply create an account and begin using it. This allows employees to bypass the normal channels of employing new technology, along with any risk assessment and safeguards provided by an IT department. So long as they’re able to go online and access social media sites, they’re essentially out of your control.
The purpose of a social media security strategy is to give people the ability to do what’s needed without compromising security. In creating one, you need to identify what areas need to be secure, how security will be achieved, and who will be responsible. The strategy should encompass any areas related to using social media, inclusive to the corporate workstations people may use, mobile devices issued to employees, network security, and firewall restrictions.
The security of corporate networks and computers is maintained by members of an IT department, who can grant or deny the ability to access features, resources, and perform certain actions. Because public social media sites are external to your network, this level of control doesn’t extend to those sites. Don’t expect the same level of support for an external site that you would for your intranet Web site or another network resource.
There is greater control over private social networking sites that your company may use. For example, if they have sites created with SharePoint, the Administrator can control who within the organization can view, contribute and approve content added to pages, as well as documents and other files that are uploaded. Because applications deployed to this environment may have their own security controls, the IT staff may have granular control over what people can do. In creating a security strategy, you’ll need to identify what sites are effected (e.g., Facebook, Twitter, or your corporate intranet) and create rules and procedures that are applicable to them.
The other area where the IT department needs to be consulted is in relation to the firewall settings. A firewall is a hardware and/or software security system that controls what is allowed to pass in and out of the network and will use content filtering features or tools to look at the content to determine if it should be allowed. It blocks unwanted content through rules that are created and looks at the data packets entering or leaving the network to determine whether they match those rules. For social media use, content filtering tools like Websense (www.websense.com) could be used to allow or block sites like Facebook and Twitter, or sites that fall into specific categories, such as social networking. It’s important to work with the network administrator in your IT department so that the security settings can be configured to allow employees to access the sites.
If you want people to use certain apps, the IT department will also need to be aware of these requirements. For example, some apps use Adobe Flash, which means it needs to be installed on the computer being used. In other cases, the site may use HTML 5 to deliver content, which isn’t supported by all browsers. Because employees probably (and should) have restrictions on what they can install on corporate computers, the IT staff would need to have these programs installed.
The level of support an IT department gives is another important topic to discuss, as social media can be accessed from home computers and personal mobile devices. A Social Media Officer may feel that the IT department’s help desk should provide social media support to employees, but the IT staff may have a different opinion. They’re probably not going to suddenly provide technical support to equipment that isn’t owned by the company. They also wouldn’t want to touch a personal mobile phone or tablet brought into the office, as the company could be liable for infringing on someone’s personal privacy and any problems occurring later with the device.
This isn’t to say that a company should ignore the fact that employees will use personal devices to access social media or the potential risk. As we’ve mentioned in previous chapters, an employee could fall victim to social engineering and give away their password or other sensitive information, or have their home computer infected with a virus or malware. To prevent this, the company should train employees on security-related issues and also look into corporate discounts for them to purchase antivirus software and other security tools for home use.
Fake accounts
Like it or not, fake accounts are part of the social media landscape. People will create accounts with false information for a variety of reasons, many of which are innocuous. A person may create accounts to have additional neighbors or allies needed in a game, or as a parody to satirize a person or an organization. Some people will also use false information when creating their account to hide their true identity, whether as a defensive measure or to make it more difficult for police to trace back their actions.
A common reason why people create fake accounts is because they wouldn’t otherwise be allowed on a site. The person may be banned from a site or chat room, or unable to create a legitimate account because it would violate the Terms of Service. As we mentioned in Chapter 4, according to a 2011 survey by Consumer Reports, approximately 7.5 million of the minors who use Facebook were younger than 13, and of this, more than 5 million of them were 10 and under. Younger users create fake accounts to access to the site, providing a bogus birthdate to bypass the age restriction. If the fake account is removed, many people will simply get a new email address and create a new fake account.
Hacking an account isn’t the only way to pose as another person. It’s common for new accounts to be created by someone posing as another person. I can visit your page on Facebook and download your profile picture or use an editing tool like Editor by pixlr.com (www.pixlr.com/editor/) to obtain and edit the photo using the URL of the picture. Looking at the personal information you’ve allowed to be visible, I could duplicate it in a new profile. Viola … I now appear to be you. Once this is done, any disparaging remarks I make under that account will be attributed to you by the general public, damaging your reputation, costing you clients, and making you the target of public outrage.
Sometimes, online impersonation can lead to tragic events. In 2010, David Russell created a fake account on Facebook, pretending to be a popular British musician. He began seducing a 19-year-old woman named Maricar Benedicto and convinced her to travel from California to England. Once there, he took her to a secluded forest, blindfolded her, slit her throat, and attempted stabbing her to death. He was sentenced to 17½ years for kidnapping and attempted murder.
In using social media, you need to realize that the person you’re interacting with may not be the person they say they are. If a family member or friend tries to add you as a connection, try to email or phone them and confirm the request is real. If it’s a long-lost friend or someone you have limited contact with, then temporarily add them to a Facebook list that gives restricted access. Once you’ve confirmed who they are, you can remove them from the list and give them greater access to your Timeline, blog, or page.
Brandjacking
Brandjacking is a term that refers to someone creating a false representation of your brand. The site, page, or account appears to belong to you or your organization or individual but has been created by someone else. It may be created as a parody, protest, or to pose as a legitimate company and sell counterfeit products.
In some cases, brandjacking is an attempt to squat on a good Twitter name in the hopes the actual owner will pay for it. This is similar to cybersquatting, in which people would register good domain names that might be wanted by businesses or major organizations. As it’s illegal and most sites won’t allow the transfer of account names, attempting to take on an account name for this purpose is pointless.
An example of brandjacking occurred in 2008, when a Twitter account called @ExxonMobilCorp was created with the appearance of belonging to the multinational oil and gas giant, Exxon Mobil Corporation. It showed the company logo and appeared to be representative of the company. It was eventually found to be a fake, with Exxon having no idea who was behind the account. Even when a brandjacked account does no visible damage, it can make the actual company appear incompetent and not in control of how they’re represented.
Brandjacking as part of an attack
Brandjacking can also be part of a multipronged attack, incorporating other tactics to attack an organization or individual. Such attacks aren’t limited to big corporations. It can happen to anyone, even those who seem to revel in negative attention.
The Westboro Bapist Church (WBC) is an independent church noted for its antigay movement, inclusive to a Web site called godhatesfags.com and picketing funerals of murdered homosexuals. They are also known for picketing the funerals of those who have died in military service. In 2012, the WBC announced that they were going to picket funerals of those killed in the Sandy Hook Elementary School shooting. The announcement of picketing the funerals of 20 children and 6 staff members attracted public attention and also that of a hacktivist group called Anonymous.
Anonymous became vocal about the WBC on social networking sites. Conversation about it started on the Anonymous News Network Facebook page, and through a hashtag campaign they started called #OpWestboro. Tweets called for people to stop protesters, leading to walls of people arriving at the funerals to shield mourners from WBC protesters. Anonymous stepped up their attack and called for people to obtain and share information about WBC’s membership. Within hours, the call for action achieved results. Links to sites like Pastbin (www.pastebin.com/ARASaC1h) showed the names, addresses, phone numbers, and work locations of WBC members. A hacker named CosmoTheGod hacked the Twitter accounts of church spokesperson Shirley Phelps-Roper and the pastor’s son Fred Phelps Jr.
In 2013, it was news outlets reported that Anonymous had hacked the WBC’s Facebook page, but this wasn’t the case. The WBC was actually brandjacked. The Westboro Baptist Church page on Facebook appears to be legitimate, with some markings of a hacked page, including a blurb that attributes the church leaders as the names of various hackers. Some of the posts on the brandjacked page promote tolerance, recognize the sacrifice of those killed in combat, and encourage people to sign a petition for the US government to recognize the WBC as a hate group.
Defensive profiles to prevent impersonation
Even if you or your organization don’t use social media, it is important to set up profiles for the business and key members of your organization. If you don’t, there is always the possibility that someone else will. By setting up fake profiles, someone can impersonate a business entity and its spokespeople, sending out false information and publicly embarrassing them.
There have been a number of cases where businesses, celebrities, and other people have been impersonated on social media sites. One notable case from 2009 involved St. Louis Cardinals manager Tony La Russa, where a fake Twitter account was created posing as him. Tweets involved a number of disparaging and vulgar comments against him and the team intended to cause public embarrassment. After an attempt to notify Twitter, La Russa sued Twitter in the first case of a celebrity lawsuit against the social media site. How the case ended depends on who you listen to. It was reported the two had come to a settlement involving Twitter paying La Russa’s legal fees and making a donation to his Animal Rescue Foundation, but Twitter says this is untrue.
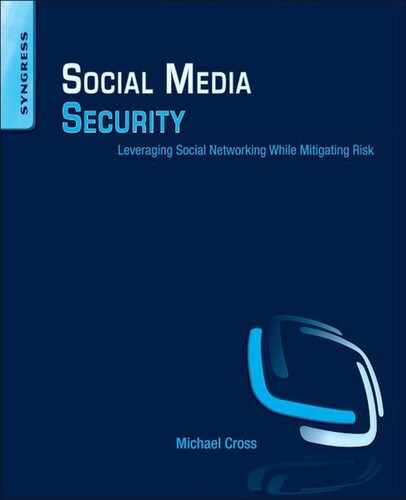
Two days after the initial report, Twitter said the settlement details were erroneous and went on to announce a new verification program, where a person could apply online and have their Twitter account verified as being legitimate. As seen in Figure 10.1, any verified accounts have a blue check mark on them. Since the verification program became active, Twitter has since closed it to the public and only uses for business partners and “highly sought users in music, acting, fashion, government, politics, religion, journalism, media, advertising, business, and other key interest areas.” Facebook offers similar verification with comparable limitations.

While the verification program helps people identify they’re following a legitimate account, it isn’t foolproof. In 2012, a fake account was created for Wendi Deng, the wife of News Corp Chief Executive Rupert Murdoch, and was verified by Twitter with the blue tick mark. Some of the tweets that were followed included flirting with celebrities, and the account was followed thousands of people who thought it was the real person. By the time the verified account was announced as fake, the incident proved more embarrassing for Twitter, who lost credibility in their ability to verify the legitimacy of their accounts.
Another way people fake Twitter verification is by adding an image of the blue check mark on their profile page’s background or header photo. At first glance, the profile will appear to have been verified because it includes a blue tick. However, as seen in Figure 10.2, to determine a profile is really verified, hover your mouse over the blue check mark and the words “Verified account” will appear. If it doesn’t do this, then the person has merely included the blue tick in their header photo and the account isn’t really verified.
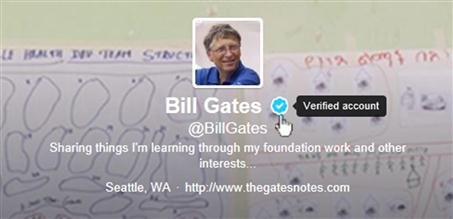
Figure 10.2 A verified account profile shows the words “verified account” when you hover over the blue check mark.
Twitter of course isn’t the only place where fake accounts impersonating others can be created. Accounts have been created to impersonate businesses and individuals on MySpace, Facebook, and countless other social media sites. As we saw in Chapter 7, when we discussed the tragic case of Megan Meier, profiles can also be created on social networking sites for fictitious people for dubious or malicious reasons.
Reporting fake accounts on Facebook
While you’ll find many fake accounts on Facebook, they aren’t actually allowed. If you find an account pretending to be you or impersonating someone else, you can report them. You can also report pages that have been created that are impersonating or harassing you.
1. Click on the gear-shaped icon of the fake Timeline, which appears beside the Message button. Click Report Page from the menu that appears.
2. When the dialog box appears, make the appropriate selection from the list to report the page or account. Click Continue, and follow the instructions to file a report.
If you don’t have an account on Facebook and find a page or profile impersonating you, Facebook provides the ability to report it. However, they don’t make it easy. When you’re logged off of Facebook, you can go to www.facebook.com/help and search for information on reporting a page, and follow the link www.facebook.com/help/contact/?id=169486816475808. On this page, you’ll be presented with three options:
1. Someone is using my email address on their account.
2. Someone created an account for my business or organization.
3. Someone created an account pretending to be me or a friend.
After selecting the option that applies to you, you would then continue through a series of steps to report the page.
Reporting inappropriate profiles on LinkedIn
LinkedIn also provides methods of reporting fake or inappropriate accounts. When a profile is flagged as inappropriate, it’s later reviewed by the site. To flag a profile, you would do the following:
1. On the person’s profile, click on the down arrow next to the Send a Message button.
2. When the menu appears, click Flag as inappropriate.
3. When the dialog box appears, select the reason it’s inappropriate from the drop-down menu.
4. Optionally, you can provide additional details in the Details field.
Fake profiles can also be reported through an online Notice of False Profile form. If you believe someone has posted inaccurate or unlawful information on their profile, you could fill out the form and submit a claim regarding the problem. Unfortunately, finding the claim form isn’t easy, although you can find it by searching for “False Profile Policy” at http://help.linkedin.com or visiting http://help.linkedin.com/app/answers/detail/a_id/30200 and clicking on the link to report the person.
Passwords
Passwords are an important part of security, especially when it comes to social media sites. As we mentioned, many sites like Facebook, Twitter, LinkedIn, Tumblr, and so on ask two things to log on:
Since your username may be visible for anyone to see, and your email address is generally treated as public knowledge, the only thing really preventing someone from accessing your account is the password. To protect yourself, it’s vital that secure passwords are used on all social media accounts, especially Facebook and Twitter. Many other social media sites like Pinterest allow you to log on using your Facebook or Twitter account, so if these are compromised, countless others will be as well.
You also don’t want to use the same password on multiple sites. If your password is compromised on one site, then someone with that password can use it to successfully log on to any other sites you’re a member of. You might not think it very important if your site on LinkedIn was compromised, as financial information isn’t stored on there. However, it may provide the work employment history needed for a credit card or loan application, and if the same password was used to access banking or credit card sites, you’d have an even more serious problem.
Bad passwords
In creating passwords, you don’t want to use ones that are weak or easy to guess. Although you’ve probably heard this one before, many people don’t follow this rule and continue to use passwords that are uninspired. SplashData (www.splashdata.com), a provider of password management software, compiled a list of common passwords in 2012 from password lists posted on the Internet by hackers. Of these, the top 10 were:
If an attacker were to use password cracking tools, it wouldn’t take long to break them. For some, it won’t even take long to guess. Except for one, all of the passwords are either numbers or letters (not a combination of both), do not use upper and lower case letters, and do not contain any special characters using symbols on your keyboard. They contain words found in the dictionary and patterns that password recovery software checks to crack your password.
Commonly used passwords have common characteristics, which can be broken down into different categories. As we mentioned in Chapter 7, these similar features make them easier to guess when social engineering tactics are applied, so you’ll want to avoid passwords that consist of:
• Keyboard rolls like qwerty, asdf, 12345
• Letter and/or number combinations like 11111, abc123, or 345abc
• Names (inclusive to first names or first initial followed by surname)
• Favorites (car, team, sport, athlete, band, song, movie character, actor, etc.)
• Affiliations (including religious words like god, jesus, etc., schools and clubs)
When common passwords are used, a person will sometimes add a number to the end. This may be due to password restrictions, which require a combination of letters and numbers, or because the person thinks that by adding these, the password is suddenly secure. Some of the common numerical extensions include:
Good passwords
While looking at the elements of a bad password can tell you a lot, there are a number of qualities that make a strong, secure password. The best passwords should contain the following:
• Does not contain any words found in the dictionary
• Does not contain the name of your company, your username, or real name
• At least eight characters (although more is better) consisting of the following:
• Uppercase letters, such as A, B, C, etc.
• Lowercase letters, such as a, b, c, etc.
• Numbers, such as 0, 1, 2, 3, 4, etc.
• Special characters, which are symbols found on your keyboard like: ` ~ ! @ # $ % ^ & * ( )_ -+={ } [ ] | : ; " '<>, . ? /
There are many ways to create a password that’s complex and difficult to crack, but it is important to create one that you’ll remember. You’ve probably known someone who created a difficult password, wrote it on a sticky note, and attached it to their monitor. The worst I’ve seen was when I walked into a large public office and saw the name of an application and its associated username/password written on a whiteboard in large letters. These are terrible breaches of security. Anything you create should be memorable, stored in password management software, or documented and kept in a safe place.
A good trick to create complex passwords that you’ll remember is to create a meaningful sentence and use the first letter of each word. For example, “Today I will use Facebook with a complex password” becomes TIWUFWACP. To make it stronger, you can use a combination of upper and lowercase letters. If we were to use the grammar of the sentence, it becomes TIwuFwacp. However, you could also use a pattern of making the first and last few letters uppercase and then leave the rest lowercase, so that it becomes TIWufwACP. In looking at this, you can see how quickly it becomes complex but remains memorable.
You can expand on this technique and increase a password’s complexity by adding numbers and special characters. If we’re to continue using the same password, we could add punctuation to the sentence, adding an exclamation point to the end making it TIWufwACP! We could also add a meaningful number to make it even stronger. For example, I started dating my wife in 1993, so I could make the password 93TIWufwACP! Even though this last item is unrelated to our core sentence, it’s memorable enough for me to remember. By using a number that’s meaningful to you, it will be easy to include as you think of your sentence and type the first letter of each word.
If your password is compromised, a hacker could use it indefinitely, which is why you should change your password on a regular basis. Unfortunately, many do not. Even on corporate networks, it’s not uncommon to see the same Administrator or system password used for years at a time. You’ll often find that the password security for user accounts is better, as there are network policies that force people to change it, often every 90 days. Because social media sites generally don’t require a person to change their password on a recurring basis, it’s up to you to follow good practices and change it every few months. Obviously, if you do change it more frequently that’s great.
When a password is changed, it should be different from previous passwords. After all, if I cracked your password and you flip-flopped between using two different passwords, half the time your compromised password will allow me access. It would only be a matter of time before you reused your old password, and attackers count on this.
If you want to see whether a password is strong and difficult to crack, there are tools on the Internet to check the strength of a password. For example, Microsoft has a tool at www.microsoft.com/security/pc-security/password-checker.aspx, which will not store any password entered on the page but will show you whether it’s secure. As seen in Figure 10.3, as you enter a password into a box, the page shows you whether it’s strong or not. In this case, the password entered was “Password1”. Even though a number of the requirements for creating a good password were met, the checker still found it weak because it wasn’t very complex and used a word found in the dictionary.

Hacking 101
Obtaining passwords aren’t as difficult as you might think. People may make the mistake of sharing their passwords with others or use settings that can make your account less secure. There are also many password recovery tools on the Internet. By running these programs, you can retrieve passwords from different programs and systems with little effort.
The easiest way to get into someone’s account is to open a browser after someone else has logged into a social networking site. If you checked the checkbox to remember you or leave you logged when you logged onto the account, the next person who opened the browser and went to the social media site would automatically be logged on. Even if you had stringent security limiting what others can see, that person would be able to see all of your information and settings because they’re logged on as you.
There are many programs on the Internet that allow you to recover passwords stored in Web browsers, which you may have forgotten. One such tool is NirSoft’s WebBrowserPassView (www.nirsoft.net/utils/web_browser_password.html), which enables you to recover passwords from Internet Explorer, Mozilla Firefox, Google Chrome, Safari, and Opera. To determine the browser versions you can recover passwords from, you should visit the site and look at the latest version.
When running the program, you’re presented with a graphical user interface that lists the URL, username, and password, as well as the browser it was acquired from. If you wanted to be covert in obtaining passwords using WebBrowserPassView, you could save the program to a USB stick and create a batch file containing the following code:
IF NOT EXIST LOGRESULTS/nul (mkdir LOGRESULTS)
In running the batch file, it would create a folder on the USB called LOGRESULTS and store a Web page in it named Passwords.html. You could slip the USB stick into a computer, run the batch file, and walk away. At your leisure, you could open the HTML file and view a listing of the sites, usernames, and passwords the person visited. You could then use this information to gain access to the person’s accounts on Twitter, Facebook, LinkedIn, Gmail, or any number of other social networking, mail, banking, or credit card sites.
Keyloggers are another common way of acquiring a person’s passwords and monitoring their activity. For example, Blazing Tools Perfect Keylogger (www.blazingtools.com/bpk.html) is a tool that can be installed on a computer and has features to run on Windows startup and that hide it so the person is unaware it’s installed. After installing it on a machine, you can see a textual display of every key they pressed on their keyboard, showing you the sites they visited and the passwords they typed. You can also take screenshots at intervals to see everything the person saw on different dates and times. If you won’t have access to the computer to retrieve this information, you can have it email it to you or upload it to an FTP server at specified intervals.
Of course, it’s even easier if someone’s already acquired the passwords for you. While the common depiction of a hacker is a lone individual pounding away at a keyboard, you’d be surprised how much they interact with one another online. If a hacker manages to acquire a list of usernames and passwords, such as by downloading a database from a site, he or she might decide to share it with others. For example, in June 2012, 6.5 million LinkedIn and 1.5 million eHarmony (www.eharmony.com) passwords were uploaded to a Russian hacking site. This allowed others to download and decipher the encrypted passwords, which as we discussed in Chapter 3 isn’t that difficult to do with the right software.
Verification for password resets
Twitter provides a feature that adds an extra layer of protection when resetting a password. By default, all that’s needed to reset a password is your account name. If you have this set, when you forget your password, you’ll also need to enter your email address or phone number as additional confirmation of your identity. To set this verification feature, follow these steps:
Protecting your account with two-step verification
As we’ll saw in Chapter 7, some social network accounts provide a notification feature, which allows you to be emailed or texted when someone logs on using your account. There are also features that will restrict who can log on from a computer or device that hasn’t previously been used to access your account. When this is set, a person will need to enter a code to log on from an unknown browser.
Facebook provides a Login Approval feature that will send a security code to your mobile phone when you log on using an unknown browser. When you receive the code, you must then enter it in addition to a username and password to access the account. To set this feature on Facebook, do the following:
1. Click on the gear-shaped icon in the upper right-hand corner of the page. When the menu appears, click Account Settings.
2. In the left pane of the page, click Security.
3. In the Login Approval section, click Edit.
4. When the section expands, click on the Require a security code to access my account from unknown browsers checkbox so it appears checked.
5. When the dialog box appears, click Get Started.
6. Click on the option that describes the type of phone you use (i.e., Android, iPhone, iPod Touch, or Other). Click Continue.
7. If you haven’t previously activated Code Generator to get security codes on your phone, open the Facebook app on your phone, tap on the menu button, and then scroll down to Code Generator. After tapping Active, return to your computer and click Continue.
On Twitter, you can also set up your account to use a verification code when logging in. To use this feature, you need to add a phone to your Twitter account and have the Twitter mobile app installed on your mobile phone. Once this is done, you can activate the feature by doing the following:
1. Click on the gear-shaped icon in the upper right-hand corner, and click Settings on the menu that appears.
2. Scroll down to the Account Security section, and click the Require a verification code when I sign in checkbox so it appears checked.
Once you’ve set the feature, a step-by-step process will begin similar to what we previously discussed with Facebook. You’ll be sent a message to your phone, which you use to confirm the process. Once complete, you’ll need to enter your username, password, and a six-digit code that’s sent each time to your phone when you try to access the account.
LinkedIn also has a two-step verification logon process that can be activated through the settings of your account. To activate this, you’ll need to have the LinkedIn mobile app installed on your mobile phone and perform the following steps:
1. Click on your name in the upper right-hand corner of the page. When the menu appears, click Settings.
2. Scroll down the page, and click on the Account tab.
3. Click Manage security settings.
4. In the Two-step verification for sign-in section, click Turn On.
5. Select the Country you reside in from the drop-down list.
6. Enter the phone number of your mobile phone. The number won’t appear in your profile.
Privacy and information sharing
An important part of social media security is the privacy of personal and sensitive information.
According to a 2012 report by Consumer Reports, 13 million Facebook users in the United States don’t use privacy controls, meaning that the details about them are visible for anyone to see. Accepting the defaults and never changing your privacy settings exposes your information to other Facebook users and makes it available to anyone using a search engine.
Locking down personal information
When you set up an account, you’re asked to provide information about yourself. Some of this may be kept private and retained by the site in case there’s a problem. For example, if your account was compromised, they might want your phone number so they could call you and help clear up the matter. However, some of the personal information may appear on your profile page and available to anyone who searches for it or looks at your profile.
In Chapter 3, we showed you how to lock down personal information on a LinkedIn account, and many of the same principles apply to other sites. To protect yourself, you’ll want to review the personal and contact information appearing on your profile. Settings may be available to lock down who can view the information, and you can simply delete a lot of the details about yourself so there’s no chance of it ever being seen by others. What you choose to make available to others often depends on your situation. If you run a business, you’ll want people seeing the location of the business, phone number, and other details. For personal use, you probably don’t want others seeing this or only a select number of people. As we’ll see in the sections that follow, Facebook provides a number of options for securing this information.
Contact information on Facebook
The contact information in the About section of your Facebook profile allows you to provide numerous ways for people to reach you. If you’ve provided this information and the security settings aren’t configured, you could advertise your address, phone number, and other facts that someone can use to find you. If you think people don’t share sensitive information like this, browse some Facebook profiles and you’ll be amazed how much some people share with the public.
While you might be tempted to remove everything, some information may need to be handled differently, and you’ll want to limit who can view it. For example, if you have a mobile phone setup for use with your account, you might want to leave that information for apps to function. Instead, you would select the audience who will be able to see that information and set it to an extremely limited audience so that those you don’t want viewing this information won’t see it. To secure contact information on your Facebook account, do the following:
1. Click on your name in the upper right-hand corner.
2. When your Timeline appears, click on the About tab below your cover picture.
3. Scroll down to the bottom of the section and click See All.
4. In the Contact Information section, click the Edit button.
5. In the Email section, click on the Friends icon to the right of each email address, and change the audience to one you’re willing to share that address with.
6. Click on the Hide from Timeline icon beside each email address, for any email addresses you don’t want publicized on your page, click Hide from Timeline so the email address doesn’t appear on your Timeline.
7. In the Contact Information section, click the Edit button.
8. In the Mobile Phone section, click on the icon to the right of the section and choose Only Me from the drop-down list.
9. In the Other Phones section, remove any phone numbers.
10. In the IM Screen Names section, click on the icon to the right of the section and select an audience that you want to allow instant messaging with, such as Friends.
11. Unless the profile is for a business and you want people to know the address, remove the information from the Address, City, Zip, and Neighborhood fields.
As we discussed in Chapter 3, you should limit access to your email address on your profile pages or change the settings to limit its visibility. Because LinkedIn, Twitter, Facebook, and other sites allow users to send messages to one another, you will still be able to communicate with other users without relying on a people contacting you directly via email. If you really want an email address on your page, you might consider the alternative of creating a second email account; one to log on with and another to post on your page so that people can email you directly.
Basic information on Facebook
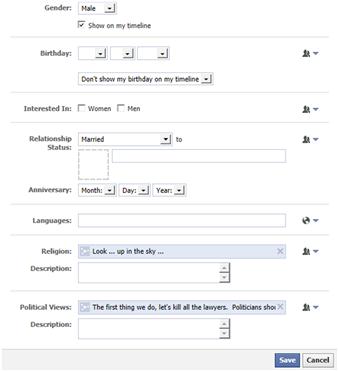
The basic information in the About section of your profile allows you to provide a considerable amount of information about who you are. As seen in Figure 10.4, the Basic Information section provides fields to reveal your gender, birthday, marital status, anniversary, languages, sexual preference, religious and political views. In looking at this, you can see that much of the information is related to protected statuses and could be used to discriminate against you if an employer or someone influential viewed it. It could also be useful for scraping information used in your password, or for identity theft as it provides answers to personal questions you might find on a credit card or loan application.
To secure basic information on your Facebook account, do the following:
1. In the About section of your Timeline that we were previously in, go to the Basic Information section and click on the Edit button.
2. When the screen shown in Figure 10.4 appears, if you don’t want your Gender showing on your Timeline, click on the Show on my timeline checkbox so it’s unchecked.
3. In the Birthday section, click on the drop-down list below the birthdate fields. The most secure solution would be to select Don’t show my birthday on my Timeline. However, if you want people wishing to see your birthday, select Show only month & day on my Timeline. After all, people don’t need to know the year of your birth to wish you a Happy Birthday.
4. If you don’t want your Relationship Status showing, click on the drop-down menu and select “---”. If you want to limit visibility for this section, you can also click on the icon to the right, and select the audience.
5. In the Anniversary fields, click on the Year dropdown so that it isn’t showing a year. If you don’t want any of this information showing, change the fields so that a Month and Day aren’t selected.
6. If there are any Languages that you don’t want listed, which could reveal your nationality, leave the field blank.
7. Remove any religions that you don’t want others seeing from the Religion field.
8. Remove any political affiliations or views that you don’t want others seeing from the Political Views field.
Alternatively, you can select the icon shaped like a person to the right of each section, and select an audience who can view this information. However, you should consider removing information that you don’t want others seeing, as someone accessing your account would be able to see this information regardless of the audience.
Likes on Facebook
You might not realize it, but what you like says a lot about you. You may not have stated your religious beliefs in your Facebook profile, but according to the 2012 report by Consumer reports, a projected 7.7 million people have liked a page on Facebook that shows a religious affiliation. Similarly, your basic information may not have mentioned whether you’re interested in men or women, but an estimated 2.3 million liked a page that indicates their sexual orientation. Looking at what a person has Liked on Facebook can tell you about a person’s interests, activities, places they frequent, and much more.
As we saw in Chapter 9, Facebook allows you to configure lists of audiences, and these can be used to control who sees sections of information on your profile. To use these lists to control the visibility of what you’ve Liked, do the following:
1. Click on your name in the upper right-hand corner of Facebook.
2. When your Timeline appears, click on the More tab below your cover photo, and click Likes from the menu that appears.
3. Click on the Edit icon in the upper right corner of the Likes section, and then click Edit Privacy on the menu that appears.
4. The Edit Privacy of Likes dialog box will appear, shown in Figure 10.5. Beside each item, click on the icon to the right, and click the name of the audience who will be allowed to view that information.

The Likes section of your profile isn’t the only place where your interests are shown. After you completed the previous steps, you may have noticed there were a large number of sections on the page below the Likes section. In scrolling down, you’ll see sections showing the TV shows, Books, Movies, and Music you like. For each of these, you should do the following:
Privacy shortcuts
As we saw in Chapter 9, and discuss further in this chapter, there are numerous settings you can use to lock down your account and make it secure. Privacy settings can be configured through the Privacy Settings and Tools page, where you can control who can see your information and content, who can contact you, and who can look you up. To make it even easier accessing these settings, Facebook added Privacy Shortcuts in 2013. These shortcuts provide an easy way to find and configure the privacy settings and allow you to make changes quickly from a drop-down menu.
In the upper right-hand corner of the page, you’ll see a lock-shaped icon. When clicking on it, a menu appears with various questions like “Who can see my stuff?,” “Who can contact me?,” and “How do I stop someone from bothering me?” Clicking on a question related to a privacy issue you’re concerned about provides additional options, which you can use to configure your privacy settings. At the bottom of the menu, you can click the See More Settings link, which takes you directly to the Privacy Settings and Tools page that we discussed in Chapter 9.
Doxxing
Doxxing is a technique that involves tracing information about a person by using Internet sources. By using various sites and tools, you can obtain significant amount of personal and even financial data. The term “doxxing” comes from the word “docs” (short for documents), and referrers to the act of tracing a person’s information through available online documentation and/or uploading the revealing information to a public site or forum (such as one related to hacking). Someone doxxing a person may acquire bits of information and compile the sensitive information into a comprehensive profile about you. Once a hacker acquires the data, they may use it against a person or dump the information and related documents on a site for others to use.
If this sounds something that is overly complicated or requires significant skill, rest assured it isn’t. If you think it’s illegal to look up information about people on the Internet, it’s not. The technique involves searching public records on the Internet and is no more illegal or immoral than using Google (which can be used as a doxxing tool) for searching. Where it does become illegal is when you reveal that information and/or place another person at risk. Doxxing is a serious threat when an unscrupulous person conducts the search and uses it to publicly embarrass or coerce someone, put them in possible harm, or for when used for such illegal activities as stalking, hacking, identify theft, fraud, blackmail, and so on.
An example of doxxing occurred on March 11, 2013, when a group of hackers posted information about celebrities and political figures on the site Exposed.su. The .su domain suffix was a top-level domain that was reserved for use by the no longer existent USSR, and an increasing number of sites have registered to use this suffix for illegal activities. As seen in Figure 10.6, when initially discovered and reported, www.exposed.su was used to post personal and financial information on such celebrities and public figures as Kim Kardashian, FBI Director Robert Mueller, Hillary Clinton, Los Angeles Police Department (LAPD) Chief Charlie Beck, Mel Gibson, Ashton Kutcher, Donald Trump, Al Gore, and others.

By clicking on links on this site, you could view pages of the different celebrities and see such information as their full names, birthdates, social security numbers, current and previous addresses, phone numbers, and a copy of their credit reports. While still being investigated at the time of this writing, if you’re wondering how someone can get your credit report, this can be acquired through a site like annualcreditreport.com, which allows a person to access his or her own credit report for free (or someone else’s if you have the right information). As you can see by the counter on the site, it was viewed 215,656 times when the screenshot was taken on March 12, 2013 but was over half a million people the next day. You’ll also note that the hackers advertised to follow them on a Twitter account and gave the opportunity to follow tweets for additional information.
You might think that once discovered, they would have stopped and shut down or walked away from the site. Not a chance. On March 13, 2013, additional personal and financial information was added to the site on such people as Kanye West, Tiger Woods, and Bill Gates.
Doxxing 101
The basic techniques of doxxing are relatively simple, and there are videos showing how to do it on content communities like YouTube. Using these techniques, you can search what information is on the Internet about you and your organization and can reveal potential threats to your security.
You and others you know have probably searched for information about yourself on Google or other search engines. In doing so, you may have found photos, links to sites mentioning you, or other information. However, there are other search engines that provide more detailed information, which index data sources that standard search engines do not. These can include Web pages, court records, property records, news articles, databases, documents, social media sites, and other sources on the Web. The searches may also result in finding current and previous addresses, phone numbers, and other contact information related to a person. The end result gives you more comprehensive results than a simple Google search and provides links to other sites where you can acquire additional information.
To illustrate how this works, go to Pipl (www.pipl.com) and enter your email address into the first field on the screen. Alternatively, you could also search using a name, phone number, or a username that you use in chat rooms or online gaming (inclusive to any online games played on X-Box or Playstation). To narrow the search, you can also enter a location (i.e., city, state/province, or country) into the Location field. After entering the information, click on the button to begin the search. When the search results appear, you’ll see information related to what you entered. If results appear, you know where information appears about you on the Internet and should consider changing security settings and removing anything that could be considered a risk for you (i.e., phone numbers, addresses) on those sites. Once done, you should check again at a later date to ensure such information no longer appears in search results.
The human flesh search engine
The Human Flesh Search Engine is a phrase that’s commonly associated with Internet use in China, in which crowdsourcing is used to research and share information on people, often to publicly humiliate them or for the purpose of vigilantism. Using microblogging sites like Weibo, social networking sites, blogs, and other forums, users of the sites collectively look for information and share it. They may form a manhunt to find a particular person, expose political corruption or extramarital affairs, or other social unacceptable behavior or criminal acts. The resulting exposure is sometimes followed by the person or organization being the focus of defamation, hate email, threats, cyberattacks, and/or real-life consequences when their employers or families are informed about what happened.
In 2013, the Human Flesh Search Engine proved incredibly effective when a Chinese tourist visiting Egypt photographed graffiti scratched into a sculpture in the 3500-year-old Luxor Temple. The graffiti said “Ding Jinhao was here,” and a photo of it was shared on Weibo and shared almost 90,000 times by outraged users. Within a day, the vandal was identified as 15-year-old Ding Jinhao from Nanjing, East China’s Jiangsu Province. His parents went to the media outlets and publicly apologized for their son, and the Web site of the boy’s former school was hacked so that you had to click “Ding Jinhao was here” to enter the site.
As we’ve seen in previous chapters, a public rallying to gather information to address an acknowledged or perceived injustice isn’t limited to one country. Unfortunately, while there has been some positive results from this, there have also been people mistakenly accused of crimes they’ve had nothing to do with. In Chapter 6, we discussed how the Reddit campaign “Find Boston Bombers” attempted to identify the bomber of the Boston Marathon, resulting in false accusations that caused innocent people to be harassed. While it may start with the best of intentions, the results of the Human Flesh Search Engine aren’t always accurate.
Facebook graph search
In 2013, Facebook introduced Facebook Graph Search, which allows you to search by different categories of information. Using it, you can search Facebook for people, photos, places, and interests using preconfigured search parameters or by entering your own criteria. Depending on the security and privacy settings on your account, you’d be surprised at the search results you’re appearing in.
When you click on the search bar at the top of a Facebook page, you’re presented with a drop-down menu of items you might like to search for. This includes such things as photos of your friends, music and movies you might like, and games your friends play. Once the list is presented, you can click on one of the categories to view results. The tool is easy enough for a child to use and becomes a little creepy when you realize that it allows others to see information and images that might have been forgotten or unnoticed. For example, if you went through other people’s photos and clicked Like on certain ones, you could view them at any time by using the search bar’s menu item to view photos you’d previously liked. Essentially, it’s the same as creating an album of other people’s photos.
Searching in Facebook also allows you to find very specific information about groups of people. It’s great to use for finding people you’re looking for, but it comes with a share of risk. For example, let’s say you were looking for a potential date and wanted to see the unattached friends of your friends. Using the tool, you could search for “Friends of my friends who are single” and be presented with a list of matches. If you entered “Women who live in North Hollywood, California and who are single and like Serial Killers,” you be presented with a list of people in the city you mentioned, who had the marital status you were looking for. Of course, if you considered how the tool could be used in the wrong hands, it could be very dangerous appearing in a shopping list of people matching those parameters.
What appears to people in Facebook Graph Search is based on the information you’ve provided on your profile, and the privacy settings you’ve configured on elements of your account. If you want to limit what others can see, you should lock down your account as we discussed earlier in this chapter. What people see in the results is largely up to you.
Controlling exposure to search in Facebook
As we discussed in Chapter 9, social networking sites commonly provide settings that allow you to control whether the posts you make are public or limited to certain groups of friends, followers, and acquaintances. Based on the visibility of the information you publish, it can effect whether search engines will see what you’ve posted or tweeted.
Facebook provides a setting that will prevent search engines like Google or Bing from linking to your Timeline. By appearing in search results, a person could click on a link to your page and view any content you’ve made visible to the public. To prevent your Timeline from appearing in search results, follow these steps:
1. Click on the gear-shaped icon in the upper right-hand corner of your screen. When the menu appears, click Privacy Settings.
2. In the Who can look me up? area of the page, go to the section entitled Do you want other search engines to link to your timeline? Click on the Edit link.
3. When the area expands click on the checkbox, so it no longer appears checked.
Facebook also provides settings that prevent people from looking you up based on your email address or phone number. By default, anyone can search for you on Facebook using this information. To prevent such searches, go to the Who can look me up? area of your Privacy Settings, which you just finished using, and do the following:
Content security
The details you add to your profile aren’t the only pieces of information that need to be protected. There are sections of your Timeline that you’d probably rather hide, so the information isn’t readily available to others. Once set, you’ll want to verify that the settings are correct, and a mistake hasn’t been made that allows others to see the content you’ve added through your account.
You also need to be concerned about the content and comments posted by others. If you have a blog, you don’t want trolls making rampant comments that could be embarrassing or reveal personal information. Similarly, you don’t want people posting inappropriate or sensitive details about your life on your Timeline. To control this, you’ll want to use the settings available through your account to control the visibility of what others say and share.
Preapproving or turning off comments
If you have embarrassing or offensive comments posted on your page, you can delete the comments and block the user. As we saw in Chapter 9, blocking users prohibits them from visiting your page, preventing them from bothering you. Of course, they could simply create another account on the site and continue their efforts. If that happens, then consider making a complaint to the site or contacting police if behavior becomes harassing or threatening.
In some cases, you might expect negative comments and want to have greater control over what other people say. This may be the case if you’re posting content while doing damage control, such as during a scandal or time you’re getting negative publicity. If other people’s comments are a serious concern, a number of sites provide the ability to turn off comments or require them to be preapproved before they’re viewed publicly.
Some social media sites, such as blog sites like WordPress and content communities like YouTube, provide the ability to control how comments are handled. One way is for comments to be preapproved before they’re published, so that only the ones you’ve confirmed are appropriate are seen by others. Comments can also be turned off, preventing anyone from posting an opinion. While this certainly kills the possibility for social interaction, it does allow you to maintain your YouTube channel or blog as an information source, without having to worry about what others do on it.
On YouTube, you can configure the default settings of your account by logging in and going to http://www.youtube.com/account_defaults. When visiting this URL, you can scroll down the page until you see a section entitled Comments and responses. By default, all of the options in this section are turned on, but you can click on any of the checkboxes to uncheck them and turn them off. Options in this section are:
• Allow comments, which has a dropdown beside it allowing you to choose whether All comments or only those comments that are Approved will be published.
• Users can view ratings for this video.
• Allow video responses, which has a dropdown beside it that allows you to choose whether All responses or only those that are Approved will be published.
Once you configure these settings, they become the default settings for any videos that are uploaded to your YouTube channel.
WordPress also has settings that control how comments are handled on your blog. On the Discussion Settings page of your settings, you can configure when you’ll be notified about new comments, and whether people are allowed to post comments on new articles. These settings are important, as they keep you aware about interest in your blog and controls how people interact with it.
Your blog can be configured so that comments don’t automatically appear as soon as someone makes them. For most situations, you should have it set so that the first comment a person makes on your blog must be approved before it appears to others. Unless someone’s persistent in bothering you, or you’re extremely concerned about the comments people make, this should be adequate. For more restrictive control over comments, you can also set it so that every comment must be preapproved before others will see it. To configure this, do the following:
1. After logging onto your blog, hover your mouse over your name in the upper left-hand corner and click Dashboard.
2. In the left pane, click Discussion.
3. Scroll down to the section entitled Before a comment appears.
4. To preapprove comments, click on the An administrator must always approve a comment checkbox so it appears checked.
5. To have only the first comment a person makes approved, click on the Comment author must have a previously approved comment checkbox so it appears checked.
Stop people from posting on your timeline
By default, anyone you add as a friend has the ability to post content to your Timeline. If you ever have a problem, or you’re concerned over what people add to the Timeline of a business account, you’ll probably want to change this. Limiting the access so that only you can post to your Timeline doesn’t affect your friend’s ability to make comments on posts, such as status updates or photos you’ve added. To restrict security so that only you can add to your Timeline, do the following:
1. Click on the gear-shaped icon in the upper right-hand corner of the page, and click Account Settings on the menu that appears.
2. In the left pane of the page, click Timeline and Tagging.
3. In the Who can add things to my timeline? Section, click on the Edit link.
4. When the area expands, click on the button and select Only Me from the menu.
Another way to control the content that appears on your Timeline is to restrict the posts friends tag you in. If a friend uploads a picture to their Timeline and tags you in it, it will appear on your Timeline and show that you were tagged in the photo. Depending on the content, this could be a good or a bad thing. After all, you might not want coworkers seeing a photo of you having a night on the town or family seeing a picture someone took at a party. To prevent unwanted content from being published on your Timeline, you can set your account so that you have to review any posts friends tag you in before they appear on your Timeline:
1. On the Timeline and Tagging page, go to the Who can add things to my timeline? section. Click on the Edit link.
2. When the area expands, click on the button and select Enabled from the menu.
Controlling what others see
Even if you allow others to post content or tagged content to appear on your Timeline, you have some control over who will see it. The Timeline and Tagging page allows you to specify the audience that has access to view this content. As we discussed in Chapter 9, the lists you use can be customized to specific groups of people you’ve added as friends.
It’s important to remember that these settings only limit the visibility of content on your own Timeline. It doesn’t affect others seeing the same content posted to another person’s Timeline. To restrict who can see the posts you’ve been tagged in, you would perform the following steps:
1. On the Timeline and Tagging page, go to the Who can see things on my timeline? section.
2. Click on the Edit link beside Who can see posts you’ve been tagged in on your timeline.
3. When the area expands, click on the button and select the appropriate audience from the menu.
Restricting who can see the content others have posted on your timeline is also controlled through the Who can see things on my timeline? section. To modify these settings, perform the following steps:
Controlling tags
When a tag is added to a photo or other content you’ve posted, the person who’s tagged and their friends are able to view it. When someone you’re not friends with adds a tag, you’re asked to review it. If you don’t approve it, then the tag isn’t set. However, by default this doesn’t apply to friends. If a friend tags content, it’s immediately available for their friends to view. This can be a problem if that person is friends with people you don’t want seeing the content.
To force any tags to be reviewed, even those that are set by friends, you would use the settings on the Timeline and Tagging page:
1. Scroll down to the How can I manage tags people add and tagging suggestions? section. Click on the Edit link.
2. When the area expands, click on the button and select Enabled.
The settings for controlling tags aren’t all restrictive. On any posts that you’re tagged in, you can also extend the audience to lists of people who are your friends. Maybe you want a list of family members to be included in an audience, so they can see photos you’ve been tagged in. If they aren’t already in the audience, you can change the settings so that they’re automatically added:
1. On the Timeline and Tagging page, scroll to the How can I manage tags people add and tagging suggestions? section.
2. Click on the Edit link beside When you’re tagged in a post, who do you want to add to the audience if they aren’t already in it.
3. When the section expands, click on the button and select the appropriate audience from the menu.
Hiding sections of a timeline
Facebook allows you to hide different sections on your Timeline so that others won’t see them. This keeps areas that reveal your interests, likes, notes, events, places you’ve been, and other pieces of information from being displayed on the Timeline for others to see. While individual stories from apps, Likes, and other activities may still appear in your Timeline, the section itself won’t be visible.
As you add certain apps to your Timeline, they may add a section on you Timeline revealing information about what you’ve done on Facebook or other sites. For example, if you joined Pinterest or Foursquare, you may have authorized an app on Facebook to log on to those sites. This gives it the ability to post information from their site in the section that’s been added to the Timeline, which may reveal more than you’re comfortable with sharing. To hide sections, do the following:
1. Hover your mouse over one of the sections, such as the About box on the left side of your Timeline. When the edit icon shaped like a pencil appears, click on it and then click Edit Sections when the menu appears.
2. When the Edit Sections dialog appears, you’ll see a list of sections. Click on the checkbox beside the name of one you want to hide, so that it’s unchecked.
Some sections like About, Photos, and Friends cannot be hidden. For these, you’ll need to change the audience who can view that content, as we discussed in Chapter 9 when we told you how to control the privacy of Photos and how to restrict who can see your friends. In changing the audience, these areas will still appear on the Timeline, but the information in them will be hidden from view.
Seeing through the eyes of others
Understanding what others can and cannot see is a basic concept for managing the security of content you’ve posted. You can configure settings, but you’ll never know if it’s set correctly if you don’t check it. Just because you think the public can’t see it doesn’t mean it’s true.
A simple method of seeing what the public sees is to visit your page without logging into the site. If I visit my page on LinkedIn, Twitter, or any other social media site without logging in, I’ll be presented with the content that’s only available to the public. Visiting the page in this way is especially easy if you’ve created a custom URL. As we saw in Chapter 3 and discuss further in Chapter 11, sites like LinkedIn and Facebook allow you to create vanity URLs, which will take people directly to your page.
Facebook provides you with an easy way to identifying how others see your pages. Using a link, you can view the public content on your page or as a specific user. If you’re concerned what a friend can see, or a person who’s been added to a particular list can view, you can use this feature to see what they see. To use this feature, follow these steps:
1. Click on the Privacy Shortcut icon that looks like a padlock in the upper right-hand corner of the page.
2. When the menu appears, click Who can see my stuff?
3. When the section expands, click on the View As link in the What do other people see on my timeline? section.
When you’ve clicked on the View As link, your Timeline will change to display what is visible to the public. You’ll also notice a black bar appear at the top of the screen stating “This is what your timeline looks like to: Public.” To see how your Timeline appears to another user, you can click on the View As Specific Person link next to this in the black bar. A box will appear where you can enter the name of a friend. A list of friends will display as you type, and when you select one, you’ll see your Timeline as it appears to the selected person.
By checking your settings, you’ll be assured that the efforts you’ve made to secure your information are correct, and no adjustments need to be made. Because security and privacy settings can change, you should periodically use this feature to see what the public and specific people you’ve added as Friends can see on your Timeline. By being proactive, there’s less chance the wrong person will see information you thought was private.
Bibliography
1. Adegoke, Y. (2012, January 4). Twitter embarrassed by fake Wendi Murdoch account. Retrieved March 15, 2013, from Reuters:<http://www.reuters.com/article/2012/01/04/us-wendimurdoch-twitter-idUSTRE80305620120104>.
2. Consumer Reports. (2011, May 10). CR survey: 7.5 million Facebook users are under the age of 13, violating the site’s terms. Retrieved April 12, 2013, from Consumer Reports:<http://pressroom.consumerreports.org/pressroom/2011/05/cr-survey-75-million-facebook-users-are-under-the-age-of-13-violating-the-sites-terms-.html>.
3. Consumer Reports. (2012, May 3). 13 million U.S. Facebook users don’t use privacy controls, risk sharing updates beyond their “friends.” Retrieved July 29, 2012, from Consumer Reports:<http://pressroom.consumerreports.org/pressroom/2012/05/my-entry.html>.
4. FAQs about Verified Accounts. (n.d.). Retrieved March 15, 2013, from Twitter:<https://support.twitter.com/articles/119135-faqs-about-verified-accounts>.
5. La Russa, Twitter Settle Lawsuit. (2009, June 5). Retrieved March 15, 2013, from NBC Sports:<http://nbcsports.msnbc.com/id/31105703/>.
6. Middleton, R. (2011, October 5). Man who slit throat of American girl he met on Facebook and lured to Northamptonshire jailed for life. Retrieved July 12, 2013, from Northhampton Chronical and Echo:<http://www.northamptonchron.co.uk/news/crime/man_who_slit_throat_of_american_girl_he_met_on_facebook_and_lured_to_northamptonshire_jailed_for_life_1_3117269>.
7. Not Playing Ball. (2009, June 8). Retrieved March 15, 2013, from Twitter:<http://blog.twitter.com/2009/06/not-playing-ball.html>.
8. Wong, H. (2013, May 29). Netizen outrage after Chinese tourist defaces Egyptian temple. Retrieved June 26, 2013, from CNN:<http://www.cnn.com/2013/05/27/travel/china-egypt>.
9. Worst Passwords of 2012—and How to Fix Them. (2012, October 23). Retrieved March 12, 2013, from SplashData:<http://www.splashdata.com/press/PR121023.htm>.