Policies and Privacy
In using social media, there are number of ways to protect yourself and others and to ensure that people know what they should and should not do. Policies can be used to clarify how social media is to be used in an organization and how these policies can be used to help manage risks. An important type of policy addresses privacy. Potential privacy issues should be mitigated through a combination of policies, security settings, and awareness of risks. By taking the proper steps, you, employees in your company, and clients will be better protected and have a better experience using social media.
Keywords
Social networking; social media; communications; privacy; security; policies; blocking; apps; location tracking; geotags
Information in This Chapter:
Policies
While there are tools and methods to mitigate potential threats, the key element in addressing many of the risks associated with social media is user behavior. Through training and enforceable policies, users learn not to use social media for unauthorized nonbusiness purposes, and its proper usage as a work-related tool.
A policy is a set of directives that addresses a particular aim or goal and provides information on how to accomplish it properly. It allows employees to gain insight on the decisions their employer has made on important areas of the business and the courses of action you need to follow to adhere to those decisions. Policies will generally include or reference procedures, which are a set of steps or guidelines that employees can use to follow the policy properly.
As with other policies, a social media policy provides information on what a person can and cannot do, and how the business expects it to be used and its expectations carried out. Because social media can have a far-reaching effect across an organization, a wide variety of other policies will also need to be updated. You may find that social media use will impact existing policies dealing with workplace harassment, corporate conduct, records retention, and other areas of the business. By not mentioning social media in these policies and its effect on a particular issue, a policy could be considered invalid when it’s violated through social media.
Pros and cons
As with anything, policies have a number of pros and cons associated with them. They can make a person’s life easier or be so complex or pointless that they’re never used. In deciding whether to implement a policy, you need to determine if a policy is needed or whether issues are covered effectively in existing policies.
A benefit of having good policies is that it can provide a mechanism to prevent legal issues. If the policy provides information on legislation or regulations that the company must follow, then outlining them in a policy will provide employees with the information they need to adhere to those rules. In Chapter 8, we discussed a number of laws and regulations that are designed to protect the privacy of clients and to control how information is handled. By explaining relevant portions of a law or regulation and how it applies to social media, an employee is less likely to violate those restrictions. Explaining this not only protects the employee but also makes the organization less vulnerable to litigation, fines, or other penalties.
Established policies and procedures help to protect the company from liability, as it shows the organization has made a formal attempt to achieve compliance with standards or laws. It shows that the business tried to communicate the importance of a rule and showed how to comply with it. With this in mind, if the policy has been written simply to protect the business and consists of difficult to follow legal jargon or impossible to achieve procedures, it can also be used to show why compliance wasn’t achieved.
Policies can enhance professionalism, as they outline a consistent way of doing business, which carries from one employee to another. Any business will experience times when employees leave their current position and a new person takes over the job. Even if the last person in the job stays for a time to train the new person, he or she may forget to train the new person on certain things. After all, no one remembers everything, so they may overlook certain rules or the related procedures of how the company wants a particular course of action to be followed. Policies provide a remedy for this, as they’re a documented reference of business practice, and often provide information on the procedures and laws that relate to that work.
Policies should never become a replacement for effective management. They aren’t meant to make supervisors automatons that recite rules verbatim or make them unable to make proper business decisions. At times, management will need to decide when a policy doesn’t apply or failed to address an issue. For example, your policy may state that the social media person is the one with access to an account, but you might need to violate this rule by having your IT staff access the account during a security breach. Policies should provide guidance and support and clarify how to deal with specific issues. They’re meant to be weighed with common sense and applied appropriately.
Creating a policy
Policies have common features that should be universal regardless of what they’re addressing. A good policy is relevant to a particular purpose, concise, and clear in expressing its ideas. It should provide understandable actions and guidelines to achieve a goal or deal with a problem or a situation.
For a policy to work, it needs to be timely and current. If you’re reading a social media policy that addresses the company’s use of a site that no longer exists or your company no longer uses, it isn’t much help. Because of this, the policy should be reviewed annually, and each version of it should have a date when it was last reviewed, when it’s to be reviewed next, and a version number. In looking at the policy, people will know whether they’re looking at the current version.
The first part of your policy should explain its purpose. Is it to promote your public image, provide a way to engage customers, or all of these reasons? Explaining why the policy exists enables people to understand why it’s important and why they should follow it.
Identifying the purpose might expose a need to create multiple policies, so that you’re meeting the requirements of various departments. For example, a corporate social media policy would address how to use accounts to represent the business, while a Human Resources policy would outline how social media is used to recruit potential employees and issues related to background checks. If the purposes of your social media policy are diverse enough, consider creating multiple ones.
Definitions of common terms are another important section of a policy. Just because you understand terms like social media, social networking, and content communities doesn’t mean everyone else does. If you don’t include clear definitions of the terms used in a policy, you’re giving people an excuse not to follow it. If they break the rules, they can simply say that they didn’t understand what it was talking about.
The bulk of a policy will explain the correct way of using social media and adhering to the business’ expectations. It would be here that you answer such questions as:
• Who is the official spokesperson of the company through Twitter, Facebook, and other sites? Is it a particular department or a specific position that’s held by someone?
• What are the names and URLs of official accounts? This helps to clarify whether a tweet or post was the official voice of the company or the ramblings of a coworker or fake account.
• What restrictions are there in engaging customers and followers of your social media presence? To comply with regulations, you may be restricted from posting information about a person’s account, so customers should be referred to a call center or help desk.
• Who owns the content? As we’ll discuss later in this section, ownership of the content that’s created and posted should belong to the company and not violate any copyright or intellectual property agreements.
Online social behavior
A social media policy should address online or social behavior. This identifies how you expect employees to conduct themselves online and outlines what can be communicated and when. As we discussed in Chapter 5, basic rules of netiquette can also help a person understand how to behave online and represent the business in a manner that won’t offend others or incite negative comments.
A social media policy should also address personal use. Regardless of whether the business likes it or not, employees will continue to use Facebook, Twitter, and other social networks. Employees will comment on political, religious, or other topics that a business would not address through its corporate accounts, and an organization should respect your right to do so. However, this becomes a problem if employees used personal accounts to conduct business such as when a sales representative tried to attract new customers online. To remove your business from personal views, your policy should recommend separate business and personal accounts. If a personal comment is made on an account that identifies your relationship to the organization, the employee should state that it is not necessarily the views of the business.
Enforcing policies
One of the biggest problems with policies is when they aren’t enforced. According to a report by the Ponemon Institute, 65% of the IT professionals surveyed believed that their organizations didn’t enforce acceptable use policies for social media or were unsure. The top reasons that they weren’t enforced were:
• Lack of governance and oversight (44%)
• Other security issues were a priority (43%)
• Insufficient resources to monitor compliance with the policy (41%)
An important step in enforcing policies is to provide a mechanism for reporting violations or filing a complaint. It may be by notifying a supervisor or manager, informing a department like Human Resources, or telling a union representative. By showing the process for how violations are to be reported, people will have a better understanding how to report them, and managers will be able to handle complaints accordingly.
Information on who to notify may also be found in other documents such as a risk register. As we discussed in Chapter 8, when you assess risks, you need to identify the probability and impact of a potential threat and determine how to mitigate and address potential problems. This information may be documented in a risk register with details on who is to be notified and take action when a problem occurs. Table 9.1 gives you an idea of some of the information you’ll see in a risk register. By referring to it when needed, you can see what needs to be done, by whom, and within what time frame.

Policies should provide information on how they’re to be enforced. A policy may contain a blanket statement that any violations may result in disciplinary action, up to and including termination of employment. It may also provide options, which managers can use as part of a disciplinary process. The employee could receive a verbal or written warning, suspension with or without pay, a fine or penalty, or in extreme or recurring violations be fired. If policies are enforced in a fair and equal manner, then employees will recognize it and take the rules seriously.
It’s also important for employees to recognize how they’re protected when reporting violations of policy or possible crimes that have been committed. For example, section 806 of the Sarbanes–Oxley Act provides protection for “whistleblowers” of publicly traded companies who report or assist in investigations where fraud or a violation of legislation or specific regulations has occurred. The act states that no member of a company “may discharge, demote, suspend, threaten, harass, or in any other manner discriminate against an employee in the terms and conditions of employment because of any lawful act done by the employee.”
Under no circumstances should any disciplinary measures violate existing legislation, regulations, labor laws, or contracts. If elements of a policy are shown as illegal or in violation of your contract, it makes the policy unenforceable. Any actions taken to enforce the policy could leave a company vulnerable to a civil dispute and possible fines from government labor agencies.
Getting people to read it
Even though a considerable amount of work may go into creating a policy, it doesn’t serve a purpose if people are unaware of it or doesn’t read it. Larger organizations may have hundreds of policies providing directives on countless issues and activities. Trying to read all of these is a pointless endeavor, and employees simply won’t retain all of that information. To ensure that people understand policies that relate to their job, managers need to identify which ones their staff should be aware of and communicate that they’re to read and understand those ones. In reality, anything beyond those few are the ones that they’ll refer to as needed.
While organizations create policies to communicate their directives, they need to identify how people will access them and be aware of changes. In small businesses, you can let people know at staff meetings or by pinning a copy on a bulletin board. For larger organizations, communicating that there are new or updated polices can be more challenging. A business may save copies on a shared network drive, but employees won’t know when they’re updated unless they look at the date and time the document was last modified. You can send out emails, but they may be forgotten over time or lost in more pressing day-to-day messages. By using an intranet Web site that’s only accessible to employees, people can have easy access to updates on policies. For example, sites built with Microsoft SharePoint will allow employees to set alerts on changes and list new documents that have been uploaded.
Organizations also need to know if an employee actually read a policy. You could simply send a corporate communication saying they must read a policy and/or have employees sign a printed document stating they’ve read and understood it. The policy could also be made into an electronic form and have a checkbox that users must check to indicate compliance. If you made this form into a portal to your intranet, it could be a mandatory step to read and acknowledge the policy before entering the site. You could also make the policy into a Microsoft Infopath form with checkbox or button to indicate they’ve read and acknowledged the policy. The InfoPath form could be set up to add the time and date it was completed and has a workflow that automatically saves and/or emails a completed copy to a supervisor. As you can see, there are numerous options for controlling whether employees have reviewed the policies and confirmed their understanding.
Policies affected by social media
Social media can impact existing policies in ways you haven’t considered. Employees create and publish their own content, access social media sites in the workplace, and use the Internet in ways that hadn’t been previously considered when the policies were developed. When social media becomes a part of how your company does business, the policies need to reflect this change.
A social media policy should refer any other procedure or procedures that may be applicable. You want to keep any policy concise and understandable so copying and pasting sections from other policies will lengthen it needlessly. There are many other policies that can be affected by social media and cross-referencing them may be necessary.
Acceptable use
Many companies have an Acceptable Use Policy (AUP) that outlines the proper use of computers, networks, Internet, software, and other technologies. As you might expect, this type of policy is created by IT departments that focuses on systems they manage or control access. The AUP addresses the employee’s responsibilities in using corporate equipment and their access to information systems provided through the company.
When a company creates a social media presence, the person responsible for it may be issued a mobile phone with apps that allow him or her to connect to social media sites. The AUP may need to be updated to mention these mobile devices and how additional apps can’t be installed on them. Adding apps that aren’t approved increases the chance of malicious software being installed, expose personal information, and could cause issues with the devices.
While the AUP will state that equipment should only be used for business purposes, it should also mention social media accounts. It should state that only business social media accounts should be used on mobile phones and other devices issued by the company. If a person uses an app to connect to both the business account and a personal account, there is a greater chance the person will accidently make a personal tweet or post using the wrong account.
Antidiscrimination and antiharassment
No organization should allow a work environment to become intolerable by undermining and devaluing the people who work and do business there. Discrimination occurs when a person is treated differently, in an unfair or unjust manner, on the basis of a defining characteristic. A person may be the targeted because of their race, skin color, national origin, religion, sex, sexual orientation, age, disability, marital status, or other identifiable characteristics or protected statuses. Harassment is a course of comments or actions that are unwanted and should be known to be unwelcome by any reasonable person. In an effort to make a clear statement that such behavior isn’t tolerated, policies that provide a set of standards and expectations for employees should be created.
When a person is excluded, intimidated, or degraded in an organization, it has a negative effect on everyone. The person who’s the target of a comment or action may feel humiliated or belittled, while those seeing the behavior may feel uncomfortable being in the workplace. It can poison the environment making it intolerable to work there.
From the standpoint of an employer, this can also have a negative impact on the business. An employee who’s bullied or discriminated against will be preoccupied with the way he or she is treated and may spend a considerable amount of time documenting the events. Morale will suffer, and employees may also have lower productivity out of concern for a coworker or that they may be treated the same way. If it’s a current or prospective client, vendor, or supplier who experiences this treatment, it may cost the company their business. Those suffering from the behavior may also file complaints against the harasser(s) and even file a lawsuit against the employer.
While some businesses may create separate policies to address types of harassment, organizations may create a single antidiscrimination and antiharassment policy. Such policies are used to show how the behavior is inacceptable in the workplace, and that staff, coworkers, vendors, customers, and other individuals cannot be treated this way.
As we saw in Chapter 7, harassment and bullying aren’t limited to face-to-face encounters. Online harassment and cyberbullying can involve derogatory or prejudiced comments on blogs, posts, or tweets, or embarrassing or demeaning photos posted on content communities or social networks. The content may appear on intranet sites that are accessible to employees or on public sites where the harassment or discrimination extends out of the workplace.
Another type of harassment is sexual harassment in which a person is targeted by unwanted attention, inclusive to comments about gender, physical attributes, or advances for sexual favors. Both men and women can be victims, just as harassers may be of the same or a different gender. When harassment is of a sexual nature, it may be verbal, physical, or related to comments and other content posted online.
When a person’s conduct is unwelcome and recurring, it can be extremely distressing. However, even a single instance may be enough to violate a policy or existing laws, or to press criminal charges against a harasser. For example, if your manager threatened your job unless you went on a date or provided sexual favors, or a coworker touched you in an inappropriate manner, you would want to report it. You don’t need to wait for repetitive behavior and risk threats to your safety or employment.
As with other forms of harassment, sexual harassment also has a cyber-aspect. An employee may make sexual comments about a fellow employee in posts or on a blog, or display inappropriate content in the office. If you allow employees to access social media from their workstations, they may be able to access images or videos that contain nudity or pornographic content. Even if the IT department has restricted such content from most sites, a person could still use Twitter to view such images making employees, customers, or others with access to the area uncomfortable.
Failing to mention Internet usage in such policies could give the impression that their conduct online is exempt. Because harassment and discrimination isn’t acceptable in real life or electronic forms, it needs to be indicated in your policy. The behavior is the same regardless how it’s shown.
Confidentiality
Sometimes, a job requires you to keep certain information secret. The company may have a trade secret such as a recipe or process that’s needed for the business to survive. In other cases, an agency or business may have access to a client’s personal, medical, criminal, or financial information, creating a need for privacy. If the information ever got out publicly, it could cause embarrassment, put a person’s safety at risk, or cause a possible loss for the organization or client.
For information to stay private, the people with access to it need to understand what they can’t share or discuss with others. Agreements that address information disclosure are sometimes needed to serve as contracts between an employer and employee, or parties doing business together. Confidentiality agreements or nondisclosure agreements are used to outline what a person isn’t allowed to discuss outside of the workplace or the course of their duties. The discussion of privileged information includes verbal, written, or electronic means of communication.
In many cases, the need for confidentiality is a legal requirement. For example, as we saw in Chapter 8, legislation like the Health Insurance Portability and Accountability Act is designed to protect a patient’s privacy. Unfortunately, while health-care workers should know better than to publish anything that could identify a patient on social media sites, it hasn’t stopped it from happening, resulting in many hospitals blocking employees from using social networking sites at work.
Tri-City Medical Center in Oceanside, California, has experienced several problems over the years with social media. In 2007, five nurses and five other staff were fired after taking photos using their mobile phones of patient x-rays and a suicidal patient, which was then posted on Facebook. In 2010, the hospital faced further embarrassment when several nurses were found to be discussing patients on Facebook. Five nurses were fired as a result, and the hospital required its employees to sign an agreement that stated “Even if the patient is not identified by name or by the medical record number the information you disclose may identify that patient.”
Intellectual property
Agreements or policies may also need to be created that protect work products, so they are clearly the intellectual property of the business. After all, in paying employees to do work, you don’t want them leaving with it under the belief that they can now sell it to a competitor or use it for their own purposes. You should clearly establish that any systems, processes, templates, or methods created by the employee on company equipment and/or during company time are owned by the organization.
As we discussed in Chapter 8, the use of intellectual property is a serious concern for businesses. People in an organization need to understand that the logos, trademarks, account names, and other elements used in a social media presence are the properties of the business. Just because you wrote a blog entry or created a brilliant infographic, the content is owned by the business and not the creator. Similarly, just because you found an image on Google Images or some other site doesn’t mean that it’s public domain and can be used without the explicit written permission of the owner.
Records retention
As we discussed in Chapter 6, organizations will archive and retain records to comply with legislation or industry regulations. A document may need to be active for a certain number of years, archived in case someone needs to refer to it, and finally deleted. Records retention policies are used to provide employees with the information and procedures needed to preserve records for specific periods of time.
The policy provides rules that are used to identify which documents need to be kept and for how long. To facilitate records retention, organizations will use Enterprise Content Management (ECM), which the Association for Information and Image Management International (www.aiim.org) defines as “strategies, methods and tools used to capture, manage, store, preserve, and deliver content and documents related to organizational processes.” Larger organizations may organize and store the data in ECM systems running on servers, which will automate the process of archiving and purging data based on rules associated with different types of documents.
Because a record is a record regardless of its location or format, the content you post on social media sites can be considered as a record that needs to be retained and archived. For example, let’s say you created a graph about sales and saved it as an image. It might need to be available to people as an active document for a year, archived for two, and then finally deleted. Whether you save the graph to a network server, ECM system, or upload it to a social networking site, the same rules apply.
Moonlighting
Moonlighting is a term for secondary employment outside of one’s regular job. It may be a second job you have or may be a part-time business you’ve started. Organizations often have policies regarding secondary employment. While some may prohibit it, however, many recognize that a position elsewhere gives the employee additional skills and experience that can be beneficial to the organization.
When secondary employment is allowed, policies commonly state that it must be legal, doesn’t damage the organization’s reputation, and will not use company resources. Obviously, no employer wants to see his staff using LinkedIn at work to find a second job or posting ads for a part-time business on corporate blog or profile page of their intranet social networking site. Like church and state, you want to keep your secondary job separate from your primary one.
Moonlighting policies commonly stress that your secondary employment can’t be in conflict with your regular job. An example of this occurred in Manukau, New Zealand in 2012, when the manager of a salon went to post a status update on the salon’s Facebook page only to find an employee’s Facebook page open on the work computer. Entries on the page of Ammy Hull, a beauty therapist at the salon, showed that she was seeing clients at her home. The case went before the Employment Relations Authority, and Hull was ordered to pay a “nominal amount” in damages. By poaching customers and treating them at home, it caused a loss of business for the salon that was seen as a breach of good faith.
If you’re unsure whether a private business or secondary employment might be in conflict with your regular job, you’ll often find a policy that states if there’s a possible conflict, the employee must get written permission. In doing so, the business is aware of the second job, and you’re assured they don’t have a problem with it.
Noncompete and nonsolicitation agreements
When a person leaves a company, they may have their own social media accounts that have friends and followers who are existing customers. With this information, important clients could be coaxed away from your company, costing you their business. By having partners and employees sign an agreement that restricts them from using this information, you can avoid ex-employees from soliciting customers away from doing business with you. Even if they have the contact information for existing clients, they won’t be able to solicit their business without violating the agreement and facing penalties or a possible lawsuit.
Similar to this, a noncompete agreement is a document that restricts employees from using insider knowledge of your business to become competitive. After immediately leaving your company, you don’t want a partner or employee using their knowledge to start their own business and using what they’ve learned against you. The agreement may set conditions saying they can’t compete within a specific geographic space and/or within a set amount of time after leaving the company.
Code of conduct and ethics
A Code of Conduct or Code of Ethics is a policy that addresses how colleagues or employees interact with each other and clients. While used in businesses, you’ll also find these codes in schools and venues like conferences. The code of conduct allows students and attendees to understand how they’re expected to behave and how to report problems.
A code of conduct provides guidelines on behavior during business hours and may have information related to other policies, describing issues of harassment or confidentiality. The code may also provide ethical guidance on how to deal with clients, such as by telling employees not to accept gifts from vendors or suppliers as it may be considered a bribe or influence purchases.
How not to report a violation
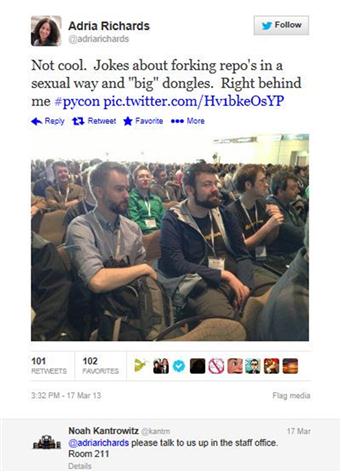
Social media may be a great way of sharing information, but it’s not the way to report a policy violation. An example of using social media to register a complaint was seen in March 2013 at PyCon, an annual Python developer conference in Santa Clara, California. During the conference, Adria Richards overheard two developers sitting behind her, who were making jokes about dongles and forking. The jokes were sexual innuendo, and while the tech terms sound like dirty words, they’re actually not. Finding it inappropriate, she decided not to tell them she was offended. Instead, she took a photo of the developers (and others surrounding them), and as seen in Figure 9.1, tweeted a complaint to the PyCon hashtag
PyCon approached Richards, who pointed out the developers who made the remarks. The pair was taken out of the conference, the matter was discussed privately, and the developers apologized. As a result of the incident, PyCon updated their code of conduct. It provides information on how to properly report harassment or inappropriate behavior by contacting a member of the conference or hotel staff. PlayHaven, the employer of one developer, also took action by later firing their employee.
Richards was also fired from SendGrid, where she worked as a developer evangelist. While SendGrid stated they respect her right to report inappropriate behavior, however, they did not agree with how she did it. CEO Jim Franklin wrote in a blog that “Publicly shaming the offenders—and bystanders—was not the appropriate way to handle the situation.”
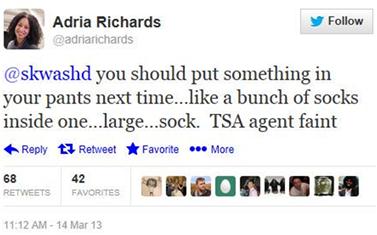
The incident became a point of controversy. The situation and related firings were debated on social media sites and became heated. After firing Richards, SendGrid experienced a Distributed Denial of Service (DDoS) attack. People also noted that while Richards claimed she was taking a stand against the sexist comments and jokes with sexual overtones, as seen in Figure 9.2, she had made them herself during the week of the conference, prior to the incident.
As is the way of the Internet, additional information about Richards appeared on sites. Her previous history at conferences was reported by tech conference organizer Amanda Blum, who wrote on a blog (http://amandablumwords.wordpress.com/2013/03/21/3/) about Richards’ past conduct. During a New York conference, there had been a session by Danielle Morrill (www.daniellemorrill.com) called “Getting the Money Shot,” which jokingly made reference to thinking like a porn director while creating a screencast. Richards took offense, but didn’t say anything to the speaker or conference organizers. Instead, in a podcast, she threatened to boycott the conference for promoting porn, and when speaking at a session, spent her time talking about how porn had no place at the conference.
Privacy
As we’ve seen throughout this book, privacy issues on social networking sites are a serious concern. Your privacy can be at risk through the facts you provide, what’s revealed by others, and what you allow people to see. As we’ll see in the sections that follow, by limiting the availability and visibility of personal data, you can prevent it from becoming public or being seen by the wrong people.
Your own worst enemy
If you wanted to point a finger at who’s the worst culprit at violating your privacy, you’d probably be pointing at yourself. In the 2010 Consumer Reports State of the New Survey, they found that large numbers of people post a significant amount of personal information on social networking sites. In it, they found that 56% of Facebook users and 52% of all social network users posted information that could put them at risk and expose them to potential problems. As seen in Table 9.2, a wide variety of data can be obtained from the social networks used by a person, and when combined together, it can create a comprehensive profile about them.
Table 9.2
Information People Post About Themselves on Social Networking Sites
| Facebook (%) | All Social Networks (%) | |
| First and last name | 84 | 80 |
| Photos of themselves | 63 | 57 |
| Email address | 51 | 49 |
| Birthdate with year | 42 | 38 |
| Birthdate without year | 30 | 26 |
| Photos of children | 24 | 21 |
| Names of friends, family members, or associates | 19 | 16 |
| Employer | 17 | 16 |
| Names of children | 16 | 13 |
| Street address of their home | 7 | 8 |
| Cell phone number | 7 | 6 |
| Home phone number | 4 | 4 |
| Information that they are home or away | 3 | 3 |
What friends say about you
Even if you’re careful with your information, your friends may not be. They may post comments or photos that reveal sensitive or embarrassing information that you would never consider publishing on the Internet. When you do notice them doing this, you’ll need to make the effort of asking them to remove the content or deleting comments yourself.
The people you’re friends with on social networks can say a lot about you. People tend to be friends with comparable interests, education, and other similarities. If most of your friends went to a particular school, it could indicate your alma mater. If many of them worked in the same field or for the same employer, it could signify that you were in the same profession and they were coworkers. By looking at the qualities of your social networking friends, you’ll find that it can reveal a lot about you.
According to a 2010 study, researchers found that they could infer information about a person based on what was known about their social networking friends. Using information from as little as 20% of users, the algorithm they created that could identify the personal attributes of a person with a high degree of accuracy. Some of the details they could infer included a person’s education level, hometown, the university he or she attended, and other facts.
Using Facebook lists
Facebook allows you to organize people you’ve added as friends in lists. Using these lists, you can group people together to control how you see their posts and whether they can see yours. While you can create custom lists, there are ones created with your Facebook account, including:
• Close Friends, where you’d add people whose posts are a priority to you. If a person is added to this list, you’ll see more of their posts in the newsfeed and get notifications of when they post.
• Acquaintances, where you’d add people whose posts you don’t really care to follow. If a person is added to this list, their posts will show up less frequently in your newsfeed.
• Restricted, where you’d add people you’ve added as friends, but should only see public content.
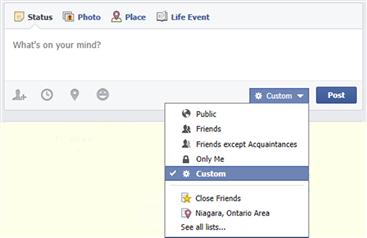
When you make a post in Facebook, you can choose who will see it using the audience selector. As seen in (Figure 9.3), by clicking on the drop-down list beside the post button, you can select whether the post will be Public, only visible to people you’ve added as Friends, seen only by you, or visible to lists of people. If you wanted the post to appear to your friends, but not those in the Acquaintance list, you would select Friends except Acquaintances. To see additional lists of people, you’d click the See all lists … menu item at the bottom.
As we’ll discuss later, you can change the default settings of the content you post so that only certain audiences will see your posts when you make them. In changing the default settings, you won’t have to change the audience on every post you make so that certain people are excluded.
Create new lists
While the few lists provided by Facebook is a start, it isn’t comprehensive enough to group together people who have commonalities. You might want to group your coworkers into a list, so a post is only visible to those you work with. By creating this list, you could click the Custom menu item on the audience selector and make a post visible to everyone except those on the coworkers list. By creating new lists, you have granular control over who will see the posts you make. To create a new list, you would do the following:
1. Visit the Timeline of the person you want to add to the list. Click on the gear-shaped icon in the lower right hand of their cover photo, beside the message button.
2. When the menu appears, click New List.
3. When the Create New List box appears, click Next.
4. In the List Name box, type the name of your new list.
5. From the list of options below, select who will be able to see this list. To prevent others from seeing the list and who’s on it, select Only Me.
Restricted list
The Restricted list is probably the list you’ll want to use most often. There are times when you’ll add someone as a friend, even though you don’t want the person to view most information on your Timeline. The person may be a boss or coworker you felt obligated to add, or someone you’ve added to gain additional allies or neighbors in a game. The person may be someone you’re uncomfortable unfriending, as it might cause a confrontation if they noticed you’d removed them. By adding the person to the Restricted list, you’ll continue to appear as friends, but the person will only be able to see public content on your Timeline.
The Restricted list can be accessed through the Manage Blocking page we discussed previously in this chapter. By going to the Restricted List section, you would click on the Edit List link. This will display a list of people currently on the list. By clicking on a picture of someone you don’t want on the list, they’ll be removed. By selecting Friends from the drop-down list in the upper left-hand corner, you can add people to the Restricted list by clicking on their names. A check mark will appear on the photo of each person you’ve added to the list.
Restricting who can see your Facebook posts
Rather than changing the audience of individual posts on Facebook, you can also control who will see your content by default. In changing the default settings, you can modify whether your future posts will be visible to everyone or only specific audiences. To access the default settings for posts you would go into the Privacy Settings and Tools section of your account. To access this area:
When the page appears, you’ll see a number of options in an area entitled Who can see my stuff? The first part of this section is titled Who can see your future posts? It’s used to set the default groups who will see any posts made on your Timeline. By clicking the Edit link, you’ll see the area expand to show a Customize button. Clicking this button displays a menu of possible audiences:
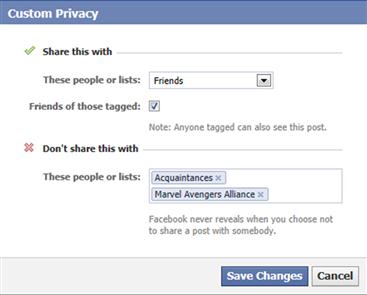
You can select an individual group from the menu or click Custom to display a dialog box where you can restrict multiple lists of people. As shown in Figure 9.4, the top section allows you to choose people or lists who will be able to see the posts you share from a drop-down list. By clicking the Friends of those tagged checkbox, anyone who is tagged in a post will also be able to see it. In the bottom section, you can type the names of people or lists who will not see your posts. As you type in the name in this field, Facebook will show you a list of possible matches, which you can select for inclusion. To remove a person or list, you would click on the “X” beside their name. Once you’re finished securing who will see your posts, click Save Changes.
Alternatively, you can also modify these settings by clicking on the Privacy Shortcuts icon, which is shaped like a padlock and appears in the upper right-hand corner of the page. By clicking Who can see my stuff?, the menu expands to show additional options. By clicking Who can see my future posts? menu item, you can select different groups who can see your posts.
You can also control who can see individual posts. If you’re making a status update and want it to appear only to specific people, you can use the audience selector button. This button appears next to the Post button on your status update and provides a drop-down list of potential audiences that you can choose from. In using this, only the lists of people you select will see the post.
Limiting past posts
Changing the default settings will control who can see your future posts, but it doesn’t affect previous posts in your Timeline. If you’re concerned about previous posts being available for everyone to see, you’ll need to change the visibility of past posts.
If you’ve used older Facebook apps on a mobile phone that didn’t provide an in-line audience selector for the posts you created, then these posts would be visible to everyone. To change who can see these posts, you would use an option in the Apps Settings section of your account by doing the following:
1. Click on the gear-shaped icon in the upper right-hand corner of the page.
2. Click Account Settings on the menu that appears.
3. In the left pane, click on Apps.
4. Scroll down until you see the section entitled Old versions of Facebook for mobile. Click the Edit link.
5. When the area expands, click on the button and select the audience that you want to view these old posts.
Facebook also allows you to change the audience of all your past posts that were visible to the Public or Friends-of-Friends. In using it, everything previously posted on your Timeline that was seen by these groups will only be visible to Friends. It is however a one-way process, so you can’t revert your past posts to the previous audiences once this is used. To change them, you’d need to manually go through each post, and change the audience from Friends to something else. To limit the audience of past posts, do the following:
1. Click on the gear-shaped icon in the upper right-hand corner of your page, and click Privacy Settings on the menu that appears.
2. In the Privacy Settings and Tools section of your account, you will see an area entitled Limit the audience for posts you’ve shared with friends-of-friends or Public. Click on the Limit Past Posts link.
3. When the section expands, click on the Limit Old Posts button.
4. Confirm the change, and Facebook will automatically modify the audiences associated with your previous posts.
Restricting who can see your friends and who you follow
When someone visits your Timeline, they’ll be able to see a box containing thumbnail images of your friends, and any lists and people you’re following. This can cause privacy issues, as others will be able to see those you’ve accepted friend requests from, and those you’re following. To restrict the visibility of this information, do the following:
1. Click on your name in the upper right-hand corner of the page.
2. Scroll down the page, until you see the Friends box in the left pane, which shows photos of your friends.
3. Hover your mouse over the Friends box, and you’ll see an edit icon shaped like a pencil. Click on the icon, and when the menu appears, click Edit Privacy.
4. When the Edit Privacy dialog appears, click on the drop-down list below Friends List. Select the list of people who should see your friends.
5. Click on the drop-down list below Following. Select the list of people who should see your followers.
Even if you restrict who can see your friends and followers, it won’t be completely hidden. If someone visits your Timeline, they’ll see any mutual friends. You will also appear in the friend’s list of anyone you’re friends with.
Protecting your tweets
By default, any of the tweets you make are public. Anything you say can be read by anyone, even if they don’t have a Twitter account. For some, this is exactly the kind of behavior you want from Twitter. If you have a hashtag campaign, or using it to promote your brand, you’ll want everyone to read what you have to say.
Twitter has the ability to send private tweets, which only go to followers you’ve approved. This is the best option for people who use Twitter to communicate with friends, colleagues, and others who are approved followers of your account. In using this setting, the tweets won’t appear in any search results and can’t be retweeted by others. Also, if anyone tries to follow you, you’ll have to grant permission for the person to become a follower. To protect your tweets, follow these steps:
1. Click on the gear-shaped icon in the upper right-hand corner of the page, and click Settings on the menu that appears.
2. Scroll down until you see the Tweet Privacy section. Click on the Protect my tweets checkbox so it appears checked.
3. Click the Save Changes button.
4. When prompted, enter your password and click Save Changes.
Unfortunately, this is an all or nothing process. If you protect your tweets, only the ones you make after enabling the setting. Any tweets you made prior to this are still public and will appear in search results. If you decide you don’t want your tweets protected anymore and disable the setting, then all of your tweets become public, regardless of whether they were previously protected.
Checking the risk of a site
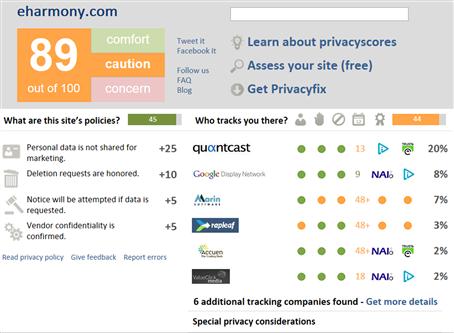
Privacy Score (www.privacyscore.com) is a tool that allows you to check the privacy risk of using a site. By entering the URL of a site on the page, it will provide a score of how it handles personal and tracking information. As seen in Figure 9.5, using the site, you can see a site’s overall score out of 100, who tracks you when visiting the site, how long information on you is retained, user anonymity, and links to view the site’s privacy policies. By hovering over areas of the page, you can view information on how the scores were represented and make an educated decision on whether you want to visit or sign-up with the site.
Another useful tool for determining privacy issues with the sites you’re using is Privacyfix (www.privacyfix.com). The app is available for Firefox and Chrome, and will review privacy settings on Facebook, LinkedIn, and other sites you use. The app is also available on the Chrome Web Store (https://chrome.google.com/webstore). As seen in Figure 9.6, after installing it on your browser, you can log on to sites and review potential privacy issues with your settings. By clicking links beside each issue, you can automatically fix them.
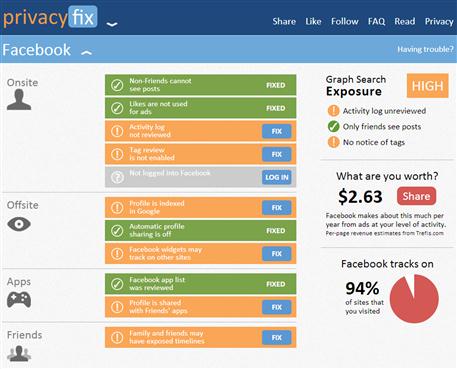
What is interesting about Privacyfix is that it provides estimates of how much various sites make from your activity, and the percentage of sites you’re tracked on. It also provides easy to view information on how exposed you are based on your security and privacy settings. As you change your privacy settings, it’s useful to review the findings to determine whether your exposure has minimized or whether there are still issues.
By turning on the Privacyfix healthbar, you’ll be able to view potential risks as you visit sites. The tool will use your current URL to identify the ratings associated with the site, and trackers that gather information on the sites you’re visiting. To view results of a site, you would click on the healthbar icon beside your address bar in Chrome, and a display similar to that in Figure 9.7 would appear. To block tracking attempts, you would click on Block in the Ad Trackers section. The other sections provide important information regarding the site’s policies on data sharing and other concerns you should be aware of.

Blocking sites through the browser
There are times when you’ll come across a site that’s of particular concern, and you won’t want anyone accessing it from your computer. If you’re using a multiuser computer such as one shared by your family, you can block the site from being accessed through the browser. On Internet Explorer, do the following:
1. Click on the Tools menu, and then click Internet Options.
2. When the Internet Options dialog box appears, click on the Content tab.
3. In the Content Advisor section, click the Enable button.
4. Click on the Approved Sites tab.
5. In the Allow this Web site field, enter the URL of the site you want to block.
7. When you’re done adding sites you want to block, click OK.
The Ratings tab of the Content Advisor dialog also allows you to control the kinds of content that users are allowed to see in the browser. You can set rating levels to enforce parental control, or if you have a small business that wants to restrict employees from accessing certain types of content. Using a slider control on the tab, you can set the level of restriction, so that users are prevented from seeing such things as nudity, sexual material, depictions of violence, or even content that sets a bad example for young children.
Controlling the content viewed by someone is an issue that can be of great importance to a parent, school, or other locations where inappropriate content isn’t allowed. In browsing the Internet, you can find images and video showing excessive violence and pornography, sites that promotes hate, or other content unsuitable for a child. If a young child sees this, it could be emotionally damaging and have a long-term impact on their development as a person and how they viewed the world.
Parental control software
As we discussed in Chapter 7, there are a number of monitoring tools that can also control what a person can and cannot see. By installing parental control software, you can block pornography, mask profanity, and perform other actions that will censor the kinds of sites a child can visit. Norton Family (https://onlinefamily.norton.com/familysafety) and Net Nanny (www.netnanny.com) are both popular products with a range of features, inclusive to controlling the time a child spends online, the sites they can visit, and the ability to send you alerts or reports of a person’s activity. Such software is configurable to allow children and others using the computer to only see what you’re comfortable allowing them to see.
Blocking users
Sometimes, there are people who cause too many problems or who you don’t trust. You might have someone constantly posting inflammatory comments, badgering you, or being a general nuisance. When this occurs, one way to deal with them is to be rid of them. If all else fails and it gets too much, you may have the ability to block the person or restrict their access. As we’ll see in the sections that follow, many sites provide the ability to block a user so that they can’t post to your page or contact you.
Blocking users on Facebook
When you block a user on Facebook, the person won’t be able to see what’s posted on your Timeline, can’t tag you, or invite you to events or groups. They also won’t be able to add you as a friend or start a conversation with you. It removes almost all contact with the person through Facebook itself.
Facebook allows you to block anyone, regardless of whether it’s a friend or not. You don’t need to add them or accept a friend request prior to blocking them. As we’ll see shortly, you provide an email address or name, and if multiple accounts are found, a list of potential matches is displayed so you can pick the person you want to block. This allows you to be proactive and block people before they cause actual problems.
There are however exceptions to the rule. Even if a person is blocked, you’ll still see them in any groups the two of you participate in, and it won’t block them in apps or games used by the two of you. For example, if the person was your neighbor in a game, you’d still see them in the game. If the game provided the ability to chat with others, as in the case of games like Farmville or Yoville, they could still start a conversation with you through those games.
To block users in Facebook, you would follow these steps:
1. Click on the gear-shaped icon in the upper right-hand corner of the page, and click Account Settings on the menu that appears.
2. In the left pane, click Blocking.
3. When the Manage Blocking page appears, as shown in Figure 9.8, scroll down to the Block users section.
4. In the Block users field, type the name or email of the person you want to block, and click the Block button.
5. Because there may be more than one user with the name you entered, a dialog box will appear showing you a list of possible people to block. Find the person you want to block, and click the Block button.
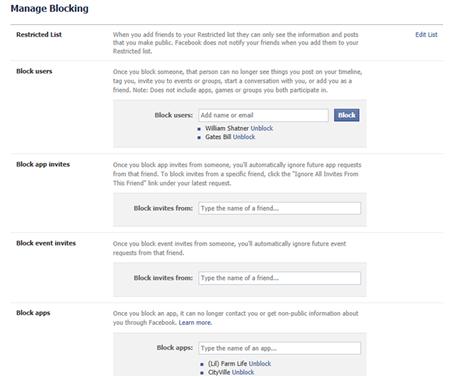
Figure 9.8 Manage blocking settings on Facebook.
Unblocking users
Once you’ve blocked a person or app, they will appear in a list beneath the appropriate section. For example, if you blocked a user, his or her name appears under the Block users section. To unblock a person, simply click on the Unblock link beside the name, and click the Confirm button when prompted.
Blocking invites
Sometimes, you may not want to completely block a person, but don’t want to get invitations to play games or use a particular app. Many games require a person to have neighbors or allies, so people will send invitations to their friends to play so they can advance in the game. After awhile, the requests can become annoying. By blocking the invites, you don’t need to be rude and tell the person to stop, and get the relief of never receiving a request.
Blocking invitations for apps can be done in two ways. When you receive an invite to use an app, you can click Ignore All Invites from this friend on the request. However, doing this only blocks app invites from that one person. To block all invites for a particular app, you would do the following:
1. On the Manage Blocking page, scroll down to the Block app invites section.
2. In the Block invites from field, type the name of the friend to ignore. As you type, a listing of friends will display that you can select from. Select the name.
Event invites are another type of invitation you may receive in Facebook, where you’re invited to a particular event hosted by a friend. While it sounds friendly enough, not all events are welcome ones. People a long distance away may invite you to events you’d never travel to, invite you to parties where products are sold, or send invitations to events you’d never agree to attend. Rather than constantly decline them, you can block the person’s invites and never have to see them. This is done through the following steps:
1. On the Manage Blocking page, scroll down to the Block event invites section.
2. In the Block invites from field, type the name of the friend to ignore. As you type, a listing of friends will display that you can select from. Select the name.
As we saw with users, the names of blocked individuals are listed in the area where you’ve blocked them. To unblock a particular person, click on the link beside their name.
Blocking users on Twitter
Twitter also allows you to block users. If your tweets are public, they’ll still be able to see what you’ve tweeted, but it will prevent them from doing certain actions. They won’t be able to follow you, see your profile picture in their Timeline, or add you to lists. Also, any replies or mentions they make won’t appear in your mentions tab. To block a user, do the following:
Blocking users on YouTube
If you post videos on YouTube, you may have a problem with other users. To prevent them from contacting you through private messages or posting comments on your videos or Channel, you can do the following:
1. Go to their channel page. You can reach this by clicking on their name beneath one of the videos they uploaded, or by going to the URL www.youtube.com/user/<username>, where<username>is their actual account name.
3. Click on the flag icon, and when then menu appears, click on the Block User menu item.
Blacklisting users on WordPress
While a private blog allows you to control who can see what you’ve posted, most blogs are public so everyone can read what’s said. Because of this, you can’t directly block users on sites like WordPress. You can however prevent a known troublemaker from posting comments.
As we’ll see in Chapter 10, WordPress provides complete control over moderating the comments that people make and allows you to preapprove comments before they’re posted. It also allows you to add certain words to a list, which is used to mark comments as SPAM instead of holding them for moderation. Unless you review the SPAM that attempted to be posted on your blog, no one will see what the troublemaker had to say. To add a person to the blacklist, do the following:
1. After logging in, you’re taken to your Dashboard. If you’re already logged in, hover your mouse over your username in the upper left-hand corner, and click Dashboard from the menu that appears.
2. In the left pane, hover your mouse over Settings, and then click Discussion on the menu that appears.
3. Scroll down until you see the Comment Blacklist section. In the box, enter the name and email of the person you want to block on separate lines.
You should note that while you could add the IP address used by a troll to the blacklist, it often isn’t a good idea. An IP address is used to identify your computer on a network like the Internet, allowing communication to take place between your machine and servers. An Internet Service Provider will issue an IP address to a computer for a limited time, so if you blacklisted a troll’s IP address, there’s no guarantee he or she would have it the next time they went on the Internet.
Controlling app privacy
On social media sites, certain information is public. On Facebook, this includes your name, username, gender, profile picture, cover picture, and networks. If it wasn’t public, then you wouldn’t be able to see other people and add them as friends, contacts, or colleagues.
In the same way that people can view certain information, it’s also accessible to apps. This allows games to show others who are playing, send gifts, and send invites to those not playing. Some apps wouldn’t function or provide the social aspects you’d expect if they couldn’t view this information.
If an app on Facebook wants additional permission, it will need to ask for it. For example, it’s common for apps to request permission to post to your wall or send email to you. It may need this so that you can ask friends for help with games, notify you, or simply to advertise the app and coax more people to use it.
Unfortunately, when you install an app on social networking sites, you’re initially left with the choice of allowing it or not. When you install an app on Twitter, it will inform you of the permissions you’re allowing, but your choice is to either sign in and accept the app or cancel the install. However, just because you’ve installed an app doesn’t mean that you’re stuck with it. You can revoke access to an app after it’s installed. Some sites will also allow you to edit the permissions given to an app or block access to ones you’re concerned about.
Managing apps on Facebook
The apps you install on Facebook can be managed through the Apps Settings page. To view this page, do the following:
1. Click on the gear-shaped icon in the upper right-hand corner, and click Account Settings on the menu that appears.
On the page, you’ll see a section called Apps You Use, with a list of apps that have been installed. The list may not be complete, but if you scroll down, you’ll see a link at the bottom of the list entitled Show All Apps. Clicking this link will expand the list to show every app you’ve installed.
By clicking on the Edit link beside the name of an app, it will expand and show you detailed information about the app, its use, and the permissions it has to your account. The first line of this expanded area shows when the app was last used. As we’ll discuss later in this chapter, if you haven’t used it for some time, you should consider removing it completely to limit the number of apps accessing your account (Figure 9.9).
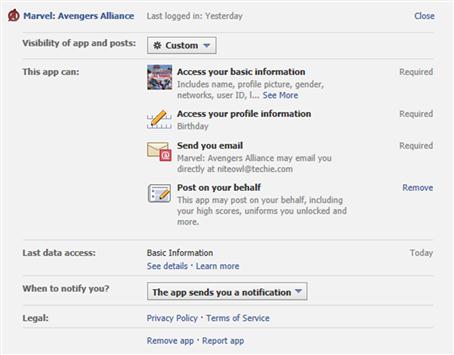
The Visibility of app and posts section allows you to control who will be able to see the app and any posts it makes. By clicking on the button, you’re provided with a drop-down list of possible audiences. As we’ll see later in this chapter, the audience you choose may be everyone (i.e., public), only you, or other lists of Facebook users that you’re willing to share the information with.
The section(s) below this will show you the permissions given to the app. The privileges an app uses will vary, but you’ll commonly see that it needs to access your basic information, which is public. It may also have other requirements based on what it does, such as needing to send you email, access specific profile information, and so on. If you installed the Hootsuite app on your Facebook account to manage social media, you’d see it requires the ability to manage pages, post on your behalf, access messages on a page, and manage advertisements. In using the tool (which we discussed in Chapter 5), these permissions make perfect sense. However, if a privilege makes no sense, such as a calculator app needing your current city, address, or other information, you should question it and consider removing it or not installing it to begin with.
You should always review privileges that an app requests but aren’t required for it to function. For example, while you can control the visibility of the app and any posts it makes, do you really want it to make posts? Some apps will make a considerable number of posts of activities to promote its use, and there are many games that have been on Facebook that post significant requests for items needed by a player. If you don’t want the app to perform an action or view information that isn’t needed, click on the Remove link beside that privilege.
You should also be wary of allowing an app to make read requests or access your friend’s data. By making read requests, apps have been able to access private communications in a person’s mail. Being able to access a friend’s data gives the app a pipeline to the information you have access to. This could include the person’s political views, current location, and other private information. When an app requests such permissions, you’ll see the types of information it wants to access or actions it wants to perform below the privilege. After reviewing what’s being accessed, you can then decide whether having the app is worth sharing that information.
Determining what privileges to give may require some forethought and research. Try and think why the privilege is needed. If it wants to access your data even when you’re not logged on, is it a reasonable request? If you’re unsure, click on the Privacy Policy link in the Legal section at the bottom of the area you expanded to view the app’s information.
If you’re concerned how often the app is connecting to your account, you can see this in the Last data access section. Here you’ll see what information was accessed and when. By clicking the See details link, a dialog box will appear providing details of what specific information on your account was accessed.
Finally, apps may want to contact you by sending a notification. By clicking on the drop-down list in the When to notify you section, you can select whether or not the app can email you notifications. This is an important feature, especially if you’re dealing with a game that’s bombarding you with updates and notifications of gifts sent to you.
Checking the privacy of apps before you install
As we saw earlier in this chapter, Privacy Score is a useful site for determining the privacy risk of a Web site you plan to visit or sign-up with. The URLs of various apps on Facebook and other sites can also be entered to identify possible privacy issues before you install them. A version of Privacy Score that addresses Facebook app privacy is also available at https://apps.facebook.com/privacyscoreapps.
Removing apps
Just as you’ll sometimes want to prune back other areas of your online presence, it’s a good idea to occasionally review the apps you’ve installed. Over time, you’ll find that the apps you installed previously may no longer be used, meaning there’s no point for it to have access to your personal information and privileges to your account. Rather than keeping them, it’s better to remove the ones that are no longer useful.
On the Apps Settings page of Facebook, you can click the “X” to the right of an app’s name to remove any that you recognize as no longer being used. If you’re unsure, you can click on the Edit link to the right of the app’s name to expand the area and view more information. By looking at the top line, you’ll see the date you last logged into it. If it’s been a considerable amount of time since it was last used, and you don’t see yourself using it in the future, click the Remove App link at the bottom of the area showing this app’s information.
If you don’t use apps on Facebook, log on to other sites using your Facebook account, or use plug-ins or applications that interact with your account, you could also consider turning off the app platform on your Facebook account. This will prevent you from using apps on Facebook, so you should seriously consider whether you want to remove this functionality from your account. On the first line of the Apps You Use section of the Apps Settings page, you’ll see an option asking if you Use apps, plug-ins, games, and Web sites on Facebook and elsewhere? If you click the Edit link beside this, it will expand the area, and display a Turn Off Platform button. Clicking this button shuts down integration with third-party apps.
Twitter doesn’t provide the granular control over apps that Facebook does, but it does also allow you to remove any app you’ve installed. Once removed, the app will no longer have privileges to access your account. To revoke privileges from an app, do the following:
1. In the upper right-hand corner, click on the gear-shaped icon, and click Settings.
2. On the left pane of the page, click Apps.
3. When the Applications page appears, you’ll see a list of apps that have access to your account. Each app will show when you approved it and the permissions it’s been given. For each app you want to remove, click the Revoke access button beside the apps name.
Blocking apps in Facebook
Facebook provides the ability to block apps, so that it can’t access information that isn’t public and will be unable to send messages to contact you. Blocking apps is done through the Manage Blocking page as we discussed earlier in this chapter. To block an app, you would follow these steps:
1. Click on the gear-shaped icon in the upper right-hand corner of the page, and click Account Settings on the menu that appears.
2. In the left pane, click Blocking.
3. When the Manage Blocking page appears, scroll down to the Block apps section.
4. In the Block Users box, type the name of the app to block, and click the Block button.
Unblocking apps
After blocking an app, its name will be listed in the Blocking apps section. If you change your mind and want to unblock an app, simply click on the Unblock link beside the app’s name, and click the Confirm button when prompted.
Location awareness
It’s common for mobile devices to have a location tracking feature that uses GPS or the nearest Wi-Fi hotspot to determine your location, and even show where you are as you’re moving. The feature does have benefits. As we discussed in Chapter 6, apps like Lookout Security and Antivirus, Norton Mobile Security, and AVG Antivirus for Android can use this feature to find lost and stolen devices. Location tracking can also be an issue when you consider others may be able to track where you are using this feature.
Rather than risk a breach of privacy, many turn off location tracking on their mobile devices. According to a 2012 study by Pew Internet and American Life Project, 19% of cell phone owners turn off the location tracking feature out of concern others will be able to access information on where they are. Those most likely to turn off the feature are people between the ages of 25 and 34 (32%) and parents (25%).
The concern for privacy is a valid one. If you’re worried about an ex-spouse, someone you had a bad relationship with, or someone else of concern, you need to be wary of revealing your location. If someone wanted to monitor you and track your activity, a person with access to your device could install an app that tracks its location. The person could also try and acquire your password to a site that shows where a device is, which is why you should change your passwords to such sites every few months or whenever you’re concerned of a security breach.
Being aware of your location and situation
In using location-aware apps, it’s important to consider where you are and your situation. Depending on the apps you use, your location could broadcast your home address, where you work or go to school, or whether you’re far from home. If you were on vacation or out for an evening, a tweet or post that includes your location would show that your house is empty and unattended. As we’ve mentioned before in previous chapters, advertising this is like putting a sign on your front lawn saying no one’s home, and it’s an open opportunity for robbery.
Other people seeing your location can also make for some hard to explain situations. You might tell your spouse you were going to one place, but checking your location would reveal that you were somewhere else. It could also jeopardize a person’s job if an employer or coworkers saw their colleague was frequenting a bar on company time or enjoying the beach on a sick day. If you think this is farfetched, you should realize that some apps, SMS messages, and data contained in photos can contain GPS coordinates that could be used to identify an exact location. As we’ll discuss later in this chapter, searching for these coordinates in Google can reveal where you are in Google Maps or other sites.
Depending on your career, revealing your location could be dangerous. The US military advises service members and their families about using social media and stresses that they shouldn’t reveal any information that could put an operation or soldiers at risk. Facts about the leave and return dates of service members, their names, and locations could be used to piece together information on troop movements, and the identities of those involved. If a soldier had location tracking turned on while deployed, it could be used to view the real-time movements of troops. You lower the possibility of problems by controlling the details you reveal online.
Location-based social networks
It’s common for social networks to provide options to show your location, and there are many apps that use location tracking. However, there are some social networking sites that are built to use location awareness as part of its basic functionality. One of the most popular location-based social networks is Foursquare (www.foursquare.com). Using it, you can view venues that are close to your physical location, view comments about a business, and “check in” to show that you visited it.
As with many social networking sites, Foursquare has had features and bugs that have created controversy over privacy issues. In 2010, a developer named Jesper Anderson found a security hole in Foursquare allowing him to log who had checked into venues in San Francisco over a three-week period. What he realized is that when a Foursquare user checks into a location, a photo of the person appeared on a page for that location. It didn’t matter how a person had configured their privacy settings, the page always showed a random selection of 50 people who had recently been there. Writing a script, he loaded this information on locations in San Francisco, logged changes in recent visitors, and recorded the differences. It allowed him to record 875,000 check-ins and create a history of where people had gone within that period of time. Once Foursquare became aware of the privacy leak, they fixed the problem so that the “who’s here now” section of the venue page adhered to the privacy settings of the user.
It wasn’t the first time the “who’s here” information raised privacy issues. Girls Around Me (www.girlsaround.me) is an app that has caused controversy around the location-based social network. The app collected data from Foursquare to show users where women and men were located nearby, and provided photos and other information found in their Facebook profiles. Using it, you could scan for women, men, or a location to find people you wanted to meet. Looking at photo previews, you could then pick someone you liked and then do homework on them through information on their Facebook page.
Privacy concerns caused Foursquare to prevent the app from accessing its data and changed how they showed the “who’s here” information on a venue. Rather than showing everyone within an area, you can only view who else is checked into a place. If you’re not checked into the venue, then you’ll only see people you’ve added to your social circle and a total number of people who are checked in there.
However, this isn’t to say that similar functionality isn’t available elsewhere. Banjo (www.ban.jo) is another app that uses other social networks to compile data on people. The app connects to your Twitter, Facebook, LinkedIn, Instagram, Google+, or Foursquare account to find people near you. It will display photos of them on a map so you can see how far away they are from your location and allows you to review recent tweets, posts, and photos that are public.
Removing location information from Facebook
When you post a new status update, Facebook will display the last location you specified. As shown in Figure 9.10, the last location I specified in a post was “Nowhere.” To remove the location, hover over the location button at the bottom left of the status and click the “X.” The location won’t appear in your update.
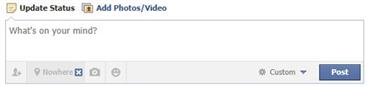
If you wanted to provide a new location, you could click on the same button again and enter a new place. However, as we’ve mentioned, the less people know about where you are, the safer you’ll often be.
Removing location information from Twitter
Twitter provides several settings to control whether location information appears in your tweets. In the account settings, you can opt into having a location added to your tweets. By default, this feature is turned off in Twitter. If turned on, when you make a tweet, you can click on a location icon to select a location you’re tweeting from or search for a neighborhood or city. You also have the option of turning it off for individual tweets. Third-party apps can also be used to tweet your exact location such as an address or coordinates.
If you have been tweeting your location, the information about where you’ve been is stored with each tweet. Anyone viewing your past tweets could see where you go, when, and even possible addresses or coordinates of your home, friend’s houses, or other places you frequent. To turn this feature off and remove about where you’ve been from previous tweets, do the following:
Hiding events
When you accept an invitation to an event, it will state where and when it occurs, so others will be able to see when and where you are at a given time. To prevent others from viewing the events you’re attending, you hide the Event section on your profile page. To modify the visibility of Events, do the following:
Privacy of photos
Photos can reveal a considerable amount of information. When taking a photo, it can have recognizable features in the background that show where you are. Aside from the obvious identifiers like standing in front of a business sign or having your kids posing beside a school logo, even the most innocuous photos could be enough to identify where they were taken.
As we saw in Chapter 7, using Google you can search for an image and find similar matches. While we’ve already discussed how it can be used to identify a person, it can also be used to identify a place. If you used Google Image Search to find visually similar images to a photo showing a building, storefront, or other landmarks, it could return results of other images. In looking at the page where the photo originated, you might find a name or address of where the photo was taken.
People and locations can also be identified by the comments and tags people make. While we discuss tagging in Facebook in Chapter 10, you should consider setting audiences on who can view the albums of photos you upload to Facebook. By doing the following, you can limit who can view the photos decreasing the chance that someone will provide more information than you intended:
1. In Facebook, click on your name in the upper right-hand corner of the page.
2. Beneath your cover photo, click on the Photos tab.
3. When the Photos page appears, click on Albums.
4. In the lower right-hand corner beneath an album, click on the gear-shaped icon, and choose the audience who will be able to view the photos.
Geotags
Geotagging is a process of adding GPS information to a photo, showing the latitude, longitude, and other geographic attributes about where the photo is taken. If you have a newer digital camera or smartphone, it may have the ability to automatically add this information to your photos. Geotags are useful if you use programs to organize your photos by location or want to pinpoint exactly where it was taken. Unfortunately, it can also be a serious privacy concern if others look at the photo and use the information to determine your home address or places you frequent.
When a digital photo is taken with a camera that supports geotags, it will save additional information about the photo in the photo’s metadata, which is basically additional data about the data. It will store facts about the type of camera used, lens, aperture, flash, and other details like the latitude, longitude, and altitude. If the image was uploaded to a content community or social networking site, anyone could download the image and see this information. By entering the GPS coordinates provided into Google Maps or the GPS system in your car, you could get the exact address and directions to where the photo was taken.
Viewing the information stored in a photo isn’t difficult. Called Exchangable Image File (EXIF) data, it can easily be retrieved using sites like Jeffrey’s EXIF Viewer (http://regex.info/exif.cgi). Here you can enter the URL of a photo or upload a copy and see the information stored in the image.
The GPS coordinates and other details in a photo can also be viewed in Windows by simply looking at its properties. By right-clicking on a photo and clicking Properties on the menu that appears, a dialog box providing information related to the image appears. As seen in Figure 9.11, by clicking on the Details tab, you’d be able to see a GPS section providing the coordinates of the photo’s location.
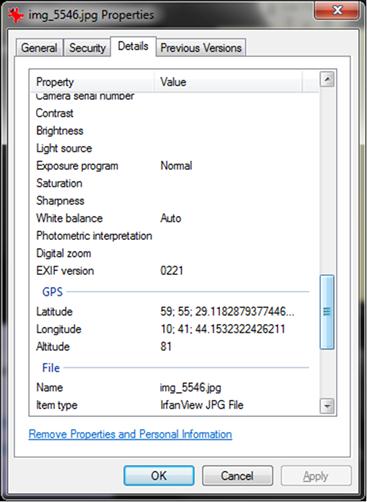
Fortunately, Windows makes it easy removing the geotagged data. By clicking on the Remove Properties and Personal Information link on this tab, a dialog box appears that allows you to select what details you’d like to remove. If you’d like to keep everything as it is, but want a second copy of the image to post on Facebook, the dialog box also provides the option of making a sanitized copy that’s had every possible property removed.
Of course, the best way to avoid having images with this information available on the Internet is not to have it included in the image’s metadata. You should check your manual to see if the camera or phone supports saving geotagged or EXIF data, and change your camera or privacy settings on the device so it’s turned off. On an iPhone, you would do this as follows:
1. On the home screen, tap the Settings icon.
If you have any apps that use the camera on your mobile device such as Instagram or Facebook Camera, you should disable location services on them as well. Camera apps that support geotagging could still add the GPS information after the photo was taken, so it’s always best to disable this feature so you don’t accidentally reveal your location.
Bibliography
1. Forking and Dongle Jokes Don’t Belong At Tech Conferences. (2013, March 18). Retrieved July 29, 2013, from Andria Richards:<http://butyoureagirl.com/14015/forking-and-dongle-jokes-dont-belong-at-tech-conferences/>.
2. Backhouse, M. (2013, May 17). Moonlighting beauty therapist caught by social media trail. Retrieved July 29, 2013, from New Zealand Herald:<http://www.nzherald.co.nz/nz/news/article.cfm?c_id=1&objectid=10884381>.
3. Blum, A. (2013, March 21). Adria Richards, PyCon, and How We All Lost. Retrieved July 29, 2013, from Amanda Blum:<http://amandablumwords.wordpress.com/2013/03/21/3/>.
4. Boyles, J. L., Smith, A., & Madden, M. (2012, September 5). Privacy and data management on mobile devices. Retrieved July 29, 2013, from Pew Internet & American Life Project:<http://pewinternet.org/Reports/2012/Mobile-Privacy/Main-Findings/Section-2.aspx>.
5. Brodkin, J. (2013, March 21). How “dongle” jokes got two people fired—and led to DDoS attacks. Retrieved July 29, 2013, from arstechnica:<http://arstechnica.com/tech-policy/2013/03/how-dongle-jokes-got-two-people-fired-and-led-to-ddos-attacks/#.UUxk6WZm8B0.pocket>.
6. Franklin, J. (2013, March 21). A Difficult situation. Retrieved July 29, 2013, from SendGrid:<http://blog.sendgrid.com/a-difficult-situation/>.
7. Hennessy-Fiske, M. (2010, August 8). When Facebook goes to the hospital, patients may suffer. Retrieved July 22, 2013, from Los Angeles Times:<http://articles.latimes.com/2010/aug/08/local/la-me-facebook-20100809>.
8. MC&FP Office of Military Community Outreach. (n.d.). Military community and family policy: Social media guide. Retrieved July 29, 2013, from Military One Source:<http://www.militaryonesource.mil/12038/MOS/ResourceGuides/Social_Media_Guide.pdf>.
9. Mislove A, Viswanath B, Gummadi KP, Druschel P. You are who you know: Inferring user profiles in online social networks. WSDM '10 Proceedings of the third ACM international conference on web search and data mining New York, New York: Association for Computing Machinery (ACM); 2010; pp. 251–260.
10. Noller, J. (2013, March 20). PyCon’s response to an inappropriate incident on March 17th. Retrieved July 29, 2013, from PyCon:<http://pycon.blogspot.ca/2013/03/pycon-response-to-inappropriate.html>.
11. Ponemon Institute. (2011, September). Global survey on social media risks. Retrieved June 13, 2013, from Websense:<http://www.websense.com/assets/reports/websense-social-media-ponemon-report.pdf>.
12. PR Newswire. (2010, May 4). Consumer reports survey: 52 Percent of social network users post risky information. Retrieved June 19, 2013, from PR Newswire:<http://www.prnewswire.com/news-releases/consumer-reports-survey-52-percent-of-social-network-users-post-risky-information-92748344.html>.
13. PyCon. (2013). PyCon 2013. Retrieved July 29, 2013, from Code of Conduct:<https://us.pycon.org/2013/about/code-of-conduct/>.
14. Richards, A. (2013, March 13). @adriarichards Twitter Account. Retrieved July 29, 2013, from Twitter:<https://twitter.com/adriarichards/status/313417655879102464>.
15. Richards, A. (2013, March 14). @adriarichards Twitter Account. Retrieved July 29, 2013, from Twitter:<https://twitter.com/adriarichards/status/312265091791847425>.
16. Sarbanes–Oxley Act Section 806: Whistleblower Protection. (n.d.). Retrieved July 28, 2013, from SOX-Online:<http://www.sox-online.com/act_section_806.html>.
17. Singel, R. (2010, June 29). White hat uses Foursquare privacy hole to capture 875 K check-ins. Retrieved May 23, 2013, from Wired:<http://www.wired.com/threatlevel/2010/06/foursquare-privacy/>.
18. What is Enterprise Content Management (ECM)? (n.d.). Retrieved July 29, 2013, from Association for Information and Image Management (AIIM) International:<http://www.aiim.org/What-is-ECM-Enterprise-Content-Management>.