
Windows SharePoint Services 3.0 is basically an extension of the ASP.NET2.0 framework, a platform to build collaborative solutions. Just like ASP.NET, where you have all kinds of starter kits, WSS 3.0 offers something similar with a number of starter templates, such as team sites, wikis, blogs, etc. Just as WSS 3.0 is built on ASP.NET, Microsoft Office SharePoint Server (MOSS) 2007 is an extension of WSS and provides additional features, such as enhanced portal capabilities, improved search, and the business data catalog. Because both WSS and MOSS are based on ASP.NET, you can tweak, tune, customize, enhance, and extend the core SharePoint platform to meet your organization’s needs. In this chapter, you will learn about the SharePoint Object Model, which defines how SharePoint works and provides you with the core API for modifying SharePoint for your needs.
Tip
Although the content of this chapter is important for administrators to understand in a general sense, some knowledge of programming and ASP.NET is required to completely understand this material.
In a sense, everything is possible, but you will need a solid understanding of both ASP.NET2.0 and the SharePoint object model in order to create customized solutions for your business needs. There are a number of ways to leverage the power of the SharePoint object model, including:
Building custom Web Parts
Building application pages, located in the _layouts virtual directory, that are compiled into a single DLL and can contain code
Building feature activation event handlers
Accessing SharePoint from ASP.NET web applications and web services
Building Windows Forms applications to provide rich user interfaces for SharePoint
Creating console applications for performing batch operations against SharePoint
Creating event handlers for lists, libraries, sites, and content types
Creating SharePoint workflow applications
This chapter provides an overview of the object model, focusing on the ways you can use the object model to enhance and extend SharePoint. The chapter also includes information and instructions on how to package and deploy your custom components.
Basically, all SharePoint development starts with the
Microsoft.SharePoint.dll, which you can find in the
C:Program FilesCommon FilesMicrosoft Sharedweb server
extensions12ISAPI directory. This assembly is the core of the
Windows SharePoint Services object model. It contains the Microsoft.SharePoint namespace, which is an obvious starting point
for exploring the SharePoint object model.
In the Microsoft.SharePoint namespace, you
will find two of the core objects from which you start when developing against
SharePoint: SPSite and SPWeb. The SPSite object represents a SharePoint site collection, consisting
of a top-level site and all of its subsites. Conversely,
SPWeb represents a specific site within a collection.
You need to start with a reference to SPSite
and then find your particular SPWeb site of
interest.
One common way to leverage SharePoint is to connect to a SharePoint site from
an external program, such as a desktop application or independent ASP.NETweb
site. In order to get a reference to a SharePoint site, you must create an
instance of SPSite. To get a reference to an
SPSite object for a specific site
collection from within an application external to SharePoint (e.g., a console
application or an ASP.NETweb site), you can use the SPSite constructor by passing in either an absolute URL or the
site collection GUID. The URL can be a SharePoint Portal Server site, a Windows
SharePoint Services site, or a Windows SharePoint Services site collection. I
have used the absolute URL to instantiate the SPSite object in this code sample:
	//Dispose must be called when creating objects with the new operator
	SPSite sitecollection = new SPSite("http://moss");
	Console.WriteLine(sitecollection.ContentDatabase.ToString( ));
	SPSite.Dispose( );
	Console.ReadLine( );

	//using construct
	using (SPSite sitecollection = new SPSite("http://moss");)
	{
	  Console.WriteLine(sitecollection.ContentDatabase.ToString( ))
	}
Note that the SharePoint object model contains a
number of managed objects—most important in this instance are SPWeb and SPSite—which use unmanaged code to do the heavy lifting. If you
create one of these objects yourself with the constructor method, you should
make sure that you add in the necessary code to explicitly dispose of the object
when you have finished using it. You can do
this by explicitly calling the Dispose method
or through the use of the C# using construct
(as shown in the previous code listing). Failure to dispose of the object can
result in unusual behavior, such as high memory usage or frequent recycling of
the SharePoint application pool. It is recommended to use the Dispose method instead of simply calling the
object’s Close method. For more information
about this subject, take a look at the MSDN white paper “Best Practices: Using
Disposable Windows SharePoint Services Objects.”
If you are already working within the SharePoint context, perhaps building a
custom Web Part, you need to use a different technique to access the site
collection. The static SPControl class, which
is a member of the Micrsoft.SharePoint.WebControls
namespace, provides the methods necessary to
access the Web Part’s container. You will need to call the GetContextSite method and pass in the current
HttpContext. This method will return the
site collection where the Web Part is currently running:
	public class SiteInspector : WebPart
	    {
	        protected override void RenderContents(System.Web.UI.HtmlTextWriter writer)
	        {
	            SPSite sitecollection = SPControl.GetContextSite(this.Context);
	            writer.Write(sitecollection.ContentDatabase.ToString( ));
	        }
	    }
When you are using the SPControl object to
get access to the SharePoint object model, you should not dispose the object
yourself, since the SharePoint application will handle this for you. Calling the
Dispose or Close method when using the SPControl will give a violation error.
Warning
Remember that SharePoint Web Parts run by default in a partially trusted
environment, which means that they have limited access to certain resources.
Windows SharePoint Services is, by default, configured with
WSS_Minimal trust—meaning that the previous code
will give a Microsoft.SharePoint.Security.SharePointPermission when
deployed to the bin folder. You should create a custom
policy file or deploy your Web Part to the Global Assembly Cache (GAC).
Assem-blies installed in the GAC run with full trust.
In order to access a particular site within the site collection, you will need
a reference to an SPWeb
object, which represents a single SharePoint
site. There are different methods to access an SPWeb object. You can use the AllWebs property of the SPSite
class to return all sites within the site collection, or one of the GetSubwebsForCurrentUser methods to return all the
subsites for the current user. Within a Web Part it is even easier, since you
can use the GetContextWeb method of the
SPControl class to return an SPWeb object that represents the current web site,
as follows:
SPWeb site = SPControl.GetContextWeb(this.Context);
After constructing the SPWeb object, the
developer can access the information of the site using the public properties of the SPWeb object, as displayed in Table 28-1.
Table 28-1. Public properties for the SPWeb object
|
Name |
Description |
|---|---|
|
|
Specifies whether anonymous access is allowed for the site |
|
|
Returns the user who has created the site |
|
|
Gets the |
|
|
Boolean value that specifies whether a site has unique permissions |
|
|
The Locale ID (LCID) for the language used on the site |
|
|
Gets the |
|
|
Gets the parent web site for the site |
|
|
Gets a reference to an |
|
|
Gets the regional settings ( |
|
|
The name of the theme applied to the site |
|
|
Title for the web site |
|
|
Gets the absolute URL for the site |
|
|
Gets the name of the site definition used to create the site |
The Properties property is of type Microsoft.SharePoint.Utilities.SPPropertyBag,
which is an extension of the System.Collections.Specialized.StringDictionary class. The
property bag is a hash table with the key
strongly typed to string. In this property bag, you can store any object by
name. This way you can add your own properties to SharePoint sites. If you take
a look at the Properties of a SharePoint
site, you will notice that it already contains a number of key-value pairs, as
demonstrated by the code in this listing:
	using System;
	using System.Collections.Generic;
	using System.Text;
	using System.Web.UI.WebControls.WebParts;
	using Microsoft.SharePoint;
	using Microsoft.SharePoint.WebControls;
	using Microsoft.SharePoint.Utilities;

	namespace DolmenWebParts
	{

	    public class SiteInspector : WebPart
	    {

	        protected override void RenderContents(System.Web.UI.HtmlTextWriter writer)
	        {

	            SPWeb site = SPControl.GetContextWeb(this.Context);
	            StringBuilder sb = new StringBuilder( );
	            sb.Append("<b>Title:</b> ");
	            sb.Append(site.Title.ToString( ));
	            sb.Append("<br><b>Created by:</b> ");
	            sb.Append(site.Author.LoginName.ToString( ));
	            sb.Append("<br><b>Total number of files:</b> ");
	            sb.Append(site.Files.Count.ToString( ));
	            sb.Append("<br><b>Regional settings:</b> ");
	            sb.Append(site.RegionalSettings.ServerLanguage.DisplayName.ToString( ));
	            sb.Append("<br><b>Theme:</b> ");
	            sb.Append(site.Theme.ToString( ));
	            sb.Append("<br><b>Site definition:</b> ");
	            sb.Append(site.WebTemplate);
	            sb.Append("<br><u><b>Properties:</b></u><br>");
	            SPPropertyBag props = site.Properties;
	            foreach (string key in props.Keys)
	            {

	                sb.Append("<b>");
	                sb.Append(key.ToString( ));
	                sb.Append("</b>: ");
	                sb.Append(props[key].ToString( ));
	                sb.Append("<br>");
	            }
	            writer.Write(sb.ToString( ));
	        }
	    }
	}
In SharePoint 2007, you gain a
number of new features with regard to the sites and site collections. For example, you can
now move and “re-parent” web sites within an SPSite. There are also fewer barriers across sites (SPWeb) in SharePoint 2007. In WSS 2.0 and SPS
2003, sites were silos: it was hard to share data across them. Through a variety
of new features—such as cross-web lookups and cross-site queries—it is now a lot
easier to access data across webs.
A site consists of a hierarchy of files and folders. The files are represented
through SPFile
objects and folders through SPFolder objects. A file can be a SharePoint Web
Part page, an item in a document library, or a file in a folder. The next code
sample creates a Web Part, which shows the total size of all files in a certain
SharePoint site. To display the total size, add a call to the GetTotalSize method in the Render method.
	private long GetTotalSize(SPWeb site)
	{
	  long lTotalsize = 0;

	  foreach (SPFolder folder in site.Folders)
	  {
	     lTotalsize += GetFolderSize(folder);
	  }
	  return lTotalsize;
	}

	private long GetFolderSize(SPFolder folder)
	{
	  long lFolderSize = 0;
	  foreach (SPFile file in folder.Files)
	  {

	    //Gets the size of the file in bytes,
	    //excluding the size of any webparts used in the file
	    lFolderSize += file.Length;
	  }
	  foreach (SPFolder subfolder in folder.SubFolders)
	  {
	    GetFolderSize(subfolder);
	  }
	  return lFolderSize;
	}
The SPFile object has a Properties
property—similar to SPWeb.Properties, which contains certain document metadata. These
property bags are exposed on the SPWeb,
SPFile, SPFolder, and SPListItem
classes.
There is one other method of the SPFile
that deserves special attention: RevertToContentStream. This method will return a file to its
original uncustomized state so that its logic becomes cached in memory (also
known as ghosted or uncustomized) rather than stored in the database. Once a Web
Part page gets modified with SharePoint Designer 2007, it will become a
customized page. This means that instead of being based
upon a site definition residing on the local filesystem of the web server, the
page is retrieved from the SharePoint content database. This provides for
additional overhead in the databases and causes pages to load more slowly,
although the impact is not as grave as with SharePoint 2003. The SPFile class also has a property named CustomizedPageStatus that will return an SPCustomizedPageStatus
enumeration, as shown in the next code
snippet:
	SPFile homePage = site.GetFile("default.aspx");
	if (file.CustomizedPageStatus == SPCustomizedPageStatus.Uncustomized)
	{
	   // home page is ghosted/uncustomized
	}
	else
	{
	   // home page has been unghosted/customized
	}
One of the changes in the new object
model has to do with how you manage Web Parts on a Web Part page in SharePoint.
The GetWebPartCollection method from
pre-vious SharePoint versions has been marked obsolete and should be replaced by
the GetLimitedWebPartManager
class, which returns the Web Part manager
(Microsoft.
SharePoint.WebPartPages.SPLimitedWebPartManager) associated with a
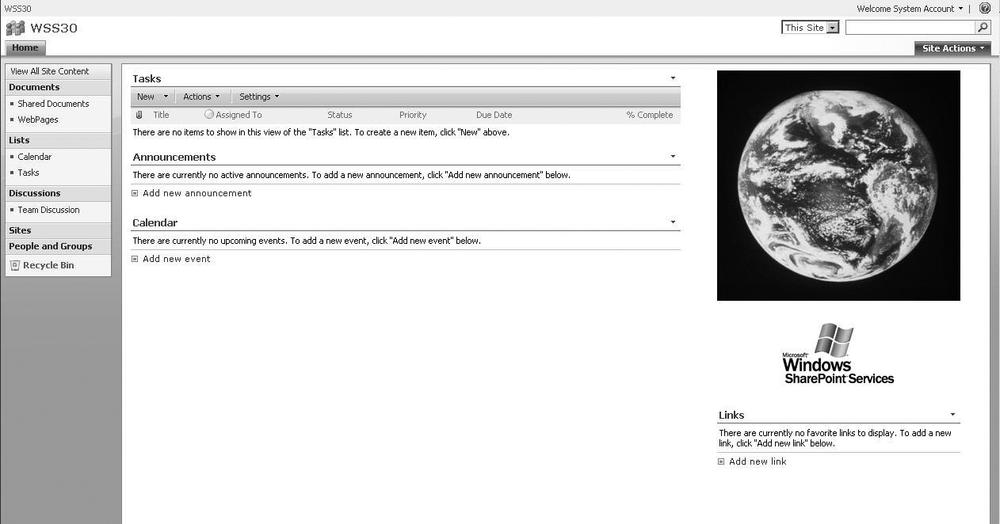
Web Part page. The next code sample will add a task Web Part in the left zone
and an image Web Part to the right zone of the home page of a SharePoint team
site. Notice that the GetLimitedWebPartManager
class uses
the PersonalizationScope.Shared parameter;
this means that the properties for the Web Parts you are manipulating can be
customized, but not personalized. In other words, the content will be the same
for every user, but each user can decide to relocate the part or minimize or
maximize it:
Create a new console project in Visual Studio 2005.
Add a reference to both the
System.Weband the Windows SharePoint Services assemblies.Add the following code:
	SPSite sitecollection = new SPSite("http://moss");
	             SPWeb site = sitecollection.OpenWeb( );
	             SPFile page = site.GetFile("default.aspx");
	             SPLimitedWebPartManager mgr = page.
	GetLimitedWebPartManager(PersonalizationScope.Shared);
	             //Add task listview Web Part to left zone
	             SPList list = site.Lists["Tasks"];
	             ListViewWebPart listViewWebPart = new ListViewWebPart( );
	             listViewWebPart.ListName = list.ID.ToString("B").ToUpper( );
	             //Set the guid using binary (base2) string representation
	             listViewWebPart.ViewGuid = list.DefaultView.ID.ToString("B").

	ToUpper( );

	             mgr.AddWebPart(listViewWebPart, "Left", 1);
	             //Add image webpart to right zone
	             ImageWebPart wp2 = new ImageWebPart( );
	             wp2.ChromeType = PartChromeType.None;
	             wp2.ImageLink = @"/_layouts/images/ipvw.gif";
	             mgr.AddWebPart(wp2, "Right", 0);
The image you are using in the image Web Part can be found under C:Program FilesCommon FilesMicrosoft Sharedweb server extensions12TEMPLATEIMAGES. Once you’ve compiled and run your code, the result should look like Figure 28-1.
In a similar fashion, you can modify existing Web Parts on pages or remove Web
Parts from a Web Part page. Other related classes are the SPUserStorage class, which maintains information
about the user of a Web Part page and the amount of space the user is consuming
in bytes, and the SPUserStorageCollection
class, which represents a collection of SPUserStorage objects used to maintain storage information for
all users of a Web Part page.
A SharePoint list is represented by the SPList class. To access all the items in a list, you will need to
use the Items property. If you want to have
access to the different fields in your list, you will need to use the Fields property. When you start from the SPWeb class, you can use the SPWeb.Lists property to return a SPListCollection object. This collection contains
an SPList object for every list on the web
site. Almost everything in SharePoint is based on a list from the standard
lists, such as the task list or calendar list, document libraries, and a number
of base catalogs.
There are a couple of enhancements to the SharePoint data storage capabilities of lists and libraries:
Use of folders in both lists and document libraries
Better versioning mechanisms, with support for minor and major versioning as well as version pruning
A two-phase Recycle Bin
Security at document and item level
An enhanced events framework
Content types
Email integration, which allows you to assign an email address to a list or library
One of the main reasons to use folders within document libraries is to overcome a limitation of SharePoint document libraries. According to capacity white papers, you will need to use folders once your number of documents exceeds 2,000. There is also a difference in how you add an item to a folder in a list or a document library. The next code sample shows how you can add a document to a folder in a document library. It retrieves a file from the local filesystem of the SharePoint server and adds it into the directory called Test within the document library Shared Documents:
	using System;
	using System.Collections.Generic;
	using System.Text;
	using Microsoft.SharePoint;
	using System.IO;

	namespace FolderOM
	{
	    class Program
	    {
	        static void Main(string[] args)
	        {
	             //Open sitecollection
	             using (SPSite sitecollection = new SPSite("http://moss"))
	             {
	                 // Get web
	                 using (SPWeb site = sitecollection.OpenWeb( ))
	                 {
	                  SPFolder doclibfolder = site.GetFolder("/Shared Documents/Test");

	                  // upload document
	                  FileStream fStream = File.OpenRead(@"c:demo.docx");
	                  Byte[] contents = new byte[Convert.ToInt32(fStream.Length)];
	                  fStream.Read(contents, 0, Convert.ToInt32(fStream.Length));
	                  SPFile uploadedFile = doclibfolder.Files.Add("demo.docx", fStream);
	                  SPListItem listitem = uploadedFile.Item;
	                  listitem["Title"] = "Demo document";
	                  listitem.Update( );
	                }
	             }
	    }
	 }
	}
Adding items to a folder in a list works a little differently, as shown by the next code sample, in which we add a new task item into a folder within a list:
	 using System;
	 using System.Collections.Generic;
	 using System.Text;
	 using Microsoft.SharePoint;
	 using System.IO;

	 namespace FolderOM
	 {
	   class Program
	   {
	      static void Main(string[] args)
	      {
	         using (SPSite sitecollection = new SPSite("http://moss"))
	         {
	             using (SPWeb site = sitecollection.OpenWeb( ))
	             {
	                //Add a task to the Demo folder within the Tasks list
	                SPList list = site.Lists["Tasks"];
	                SPFolder folder = site.GetFolder("/Lists/Tasks/Demo");
	                if (folder.Exists)
	                {
	                   SPListItemCollection items = list.Items;
	                   SPListItem item = items.Add(folder.ServerRelativeUrl,
	 SPFileSystemObjectType.File, null);
	                   item["Title"] = "Task added from code";
	                   item.Update( );
	                     }
	                 }
	             }
	         }

	    }
	 }
The user interface to create a folder within a SharePoint list is not visible by default. If you want to work with folders, you need to activate the interface by performing the next steps:
One of the major improvements in both WSS 3.0 and Microsoft Office SharePoint Server 2007 is the enhanced event handler framework. An event handler is a .NET assembly that is created to handle events triggered by user actions within SharePoint. In SharePoint Portal Server 2003, only asynchronous event handlers were supported on document libraries.
Enhancements to the event handler architecture include:
New events supported for lists, document libraries, and content types
Support for events firing at site level, such as adding users, creating lists, etc.
Support for events related to changes in list schema, such as adding a column or a content type
Feature activation events
An example of a synchronous event is the ItemDeleting event. If you add your own event handler code, the
code will be executed synchronously on the same worker thread as SharePoint
itself. This means that SharePoint will wait until your code is finished and
make sure that you haven’t canceled the event before proceeding with its own
deletion code. Your code will execute before a change is committed to the
database. After the change has been made to the database, another event,
ItemDeleted, will occur where you can
execute extra code. This code is loaded on a new worker thread and executed
asynchronously. The base class for all event hand-ling in SharePoint 2007 is the
Microsoft.SharePoint.SPEventReceiverBase
class. We will implement an event handler to catch the ItemDeleting event; therefore, we will need to
inherit from SPWebEventReceiver. Next we will
be using the new Content
Migration framework in SharePoint to back up a SharePoint site before the delete
is committed to the database.
The main classes we are going to use are SPExport, SPExportObject, and
SPExportSettings for performing the
backup. These classes in the Microsoft.SharePoint.Deployment namespaces support importing and exporting SharePoint content as well as
content dependencies such as security
settings, workflow, and other metadata. First, we are going to construct an
SPExportObject object, where we can
specify what we want to export—a file, folder, site, or site collection—by
setting the appropriate SPExportObject.Type.
Next we will need to initialize an instance of the SPExportSettings class with the required export settings and then
pass the SPExportSettings object to the
SPExport class.
Set the FileCompression property to true to
make sure that you will package all exported files into a single CAB file. Both
of these steps are shown in the following code sample:
In order to create and deploy an event handler, we need to write a class library, sign it with a strong name, deploy our assembly to the GAC on the SharePoint server, and then register the assembly with SharePoint. These steps are explained later Create a new class library project in Visual Studio 2005.
Add a reference to the Windows SharePoint Services assembly to get access to the
SPWebEventReceiverclass from which you will need to inherit.Add the necessary using statements and override the
WebDeletingvirtual method inSPWebEventReceiverbase class by adding in the following lines of code:using System; using System.Collections.Generic; using System.Text; using Microsoft.SharePoint; using Microsoft.SharePoint.Deployment; namespace EventhandlerSample { public class HandlerDemo : SPWebEventReceiver { public override void WebDeleting(SPWebEventProperties properties) { SPExportObject exportsite = new SPExportObject( ); exportsite.Type = SPDeploymentObjectType.Web; exportsite.ExcludeChildren = true; exportsite.Id = properties.Web.ID; //Specify export setting SPExportSettings settings = new SPExportSettings( ); settings.ExportObjects.Add(exportsite); settings.FileLocation = @"c:exportdata"; settings.BaseFileName = "exportdata" + properties.WebId.ToString( ) + ".cmp"; settings.FileCompression = true; settings.LogFilePath = @"c:exportdatalogssitebackup" + properties.WebId.ToString( ) + ".log"; settings.ExportMethod = SPExportMethodType.ExportAll; settings.SiteUrl = properties.FullUrl; //Run export job SPExport export = new SPExport(settings); export.Run( ); } } }
Give your assembly a strong name.
Deploy the assembly to the Global Assembly Cache (GAC) on the SharePoint server(s).
Register your event handler with the SharePoint server. In SharePoint 2003, you could use the user interface to register an event handler, but this is no longer possible. However, there are two other options. The first option is to use the new Features framework, which provides a way to package, deploy, and activate your own customizations on top of SharePoint. The second option is using the SharePoint object model to register the event handler. I will show you the second method.
Add a second project with type Console Application to your solution.
Again, add a reference to the Windows SharePoint Services assembly.
You will need the exact strong name for the class (assembly name, version, culture, and public key token):
To find the exact class and assembly name, you can use .NET Reflector.
Open .NET Reflector and click File → Open.
Select your event handler assembly and click OK.
Next, select the node for your assembly and look at the details in the bottom of the .NET Reflector screen.
Add the following lines of code to register the event handler. Change the last few lines to match the strong name for your assembly.
	private static void RegisterForWeb(string siteurl,string webname,string assembly,
	string classname)
	        {
	            using (SPSite site = new SPSite(siteurl))
	            {
	                using (SPWeb web = site.OpenWeb(webname))
	                {
	                    web.EventReceivers.Add(SPEventReceiverType.WebDeleting,
	assembly, classname);
	                }
	            }
	        }

	        static void Main(string[] args)
	        {
	            RegisterForWeb("http://moss",
	                "demosite",
	                "EventhandlerSample, Version=1.0.0.0, Culture=neutral,
	PublicKeyToken=03490ab303ed89ea",
	                "EventhandlerSample.HandlerDemo");
	        }
Tip
You can also use the .NET Reflector to take a look at how the Share-Point assemblies are implemented. Most of the assemblies are not obfuscated.
Once the event handler is registered, any user who deletes a site will have an extra safety net. Before the delete completes, your handler will create an offline export. If you need to restore the site, you have three choices:
Writing custom code using the
SPImportandSPImportSettingsclasses in the Content Migration Object Model.Using the import operation of the
stsadm.execommand-line utility. For more information, usestsadm.exe–help importorstsadm.exe–help export. With SharePoint 2003, you could do something similar with thesmigrate.execommand-line utility. This utility is no longer available, but is replaced with these new options, which provide full-fidelity (including security) site collection and subsite backups.Using the
importweb webservicemethod for the http://<Site>/_vti_bin/Sites.asmx web service.
SharePoint’s security rights are managed through permission levels, where a
permission level consists of a set of rights corresponding to the values of the
Microsoft.SharePoint.SPBasePermissions
enumeration. These permissions are
assigned to people and groups through a role assignment. Access control to the
content itself can be configured at multiple levels:
Web application:
SPWebApplicationSite collection:
SPSiteSite:
SPWebList or document library:
SPListItem or document:
SPListItem
If you need to get access to the defined permission levels, you can use the
methods and properties defined by the ISecurableObject interface (see the next section). If you need an
overview of the security rights defined for a specific site, you can use the
RoleAssigments property, which will
return an SPRoleAssignmentsCollection. This
collection shows the combination of the users or groups (SPPrincipal) and their associated security rights
(SPRoleDefinition), as shown in this code
sample:
	 using System;
	 using System.Collections.Generic;
	 using System.Text;
	 using System.Web.UI.WebControls.WebParts;
	 using Microsoft.SharePoint;
	 using Microsoft.SharePoint.WebControls;

	 namespace DolmenWebParts
	 {
	     public class SecurityRollUp : WebPart
	     {
	         protected override void RenderContents(System.Web.UI.HtmlTextWriter writer)
	         {
	             SPWeb site = SPControl.GetContextWeb(this.Context);
	             writer.Write("Site has unique permissions:" + site.
	 HasUniqueRoleAssignments.ToString( ) + "");
	             SPRoleAssignmentCollection roleassigcoll = site.RoleAssignments;
	             foreach (SPRoleAssignment roleassig in roleassigcoll)
	             {

	                 SPPrincipal principal = roleassig.Member;
	                 writer.Write(principal.Name + ":");
	                 try
	                 {

	                     SPGroup group = (SPGroup)principal;
	                     foreach (SPUser user in group.Users)
	                     {
	                         writer.Write(user.Name + ",");
	                     }
	                 }
	                 catch (Exception ex)
	                 {
	                 }

	                 SPRoleDefinitionBindingCollection roledefcoll = roleassig.
	 RoleDefinitionBindings;
	                 foreach (SPRoleDefinition roledef in roledefcoll)
	                 {
	                     writer.Write(" - "+ roledef.Description+"");
	                 }
	             }
	         }
	      }
	  }
One of the core concepts in working with security in SharePoint 2007 is the
ISecurableObject interface, which exposes
the role assignments and permissions for an object. The SPWeb, SPList, and SPListItem all implement this ISecurableObject interface. This interface exposes
the properties and methods described in Table 28-2.
Table 28-2. ISecurableObject interface properties and methods
You should use the CheckPermissions method
within code for verifying
that a user does indeed have permission to execute that part of the code. If the
user does not have sufficient permissions, an UnAuthorizedAccessException is thrown.
The DoesUserHavePermissions method should
be used to check whether the user has proper access to do something—for example,
adding links to the user interface. To use the DoesUserHavePermissions method, you will need to pass in the
SPBasePermissionsEnum flagged for the
permissions you want to verify. It is, however, also possible to pass in an
SPPermissionsGroup enumeration, which
groups the different base permissions into the predefined SharePoint permission
groups (contributor, administrator, reader, guest, etc.). In other words, with
SPPermissionsGroup, you can assert that a
user belongs to the contributor group rather than using DoesUserHavePermissions to check that the user has both read and
write access.
The next code sample shows how you can check whether a user has access to the built-in usage statistics before displaying the link:
	if (SPControl.GetContextWeb(this.Context).DoesUserHavePermissions(
	    SPBasePermissions.ViewUsageData))
	  {
	    writer.AddAttribute(HtmlTextWriterAttribute.Href,
	      "_layouts/usagedetails.aspx");
	    writer.RenderBeginTag(HtmlTextWriterTag.A);
	    writer.Write("Usage statistics");
	    writer.RenderEndTag( );
	  }
The default security context for SharePoint code is the authenticated user at
that moment. This means that when a user opens a page that has a Web Part on it
and accesses a resource that requires extra permissions, he will get an access
denied error. Sometimes it is necessary to override this default behavior. In
SharePoint 2003, this was done using impersonation, but SharePoint 2007 provides
another mechanism with the Microsoft.SharePoint.SPSecurity.RunWithElevatedPrivileges
method.
It’s important that you don’t use the SPContext.Current.Site, SPContext.Current.Web, SPControl.GetContextWeb,or SPControl.GetContextSite methods, as these security contexts are
the same as the default. Your code will still run in the context of the
user.
The Microsoft.SharePoint.SPSecurity.RunWithElevatedPrivileges method
enables you to supply a delegate method that runs a subset of code in the
context of the system account:
	using System;
	using System.Collections.Generic;
	using System.Text;
	using System.Web.UI.WebControls.WebParts;
	using Microsoft.SharePoint;
	using Microsoft.SharePoint.WebControls;

	namespace DolmenWebParts
	{
	 public class ElevatedPrivileges : WebPart
	 {
	   protected override void RenderContents(System.Web.UI.HtmlTextWriter writer)
	   {
	     SPSite sitecollection = SPContext.Current.Site;
	     SPWeb site = SPContext.Current.Web;

	     SPSecurity.RunWithElevatedPrivileges(delegate( )
	     {
	       //do things assuming the identity of the SharePoint system account
	       using (SPSite elevatedsitecoll = new SPSite(sitecollection.ID))
	       {
	           using (SPWeb elevatedsite = elevatedsitecoll.OpenWeb(site.ID))
	           {
	               writer.Write("Storage:"+elevatedsitecoll.Usage.Hits.ToString( ));
	           }
	       }
	     });
	   }
	 }
	}
When your code uses Microsoft.SharePoint.SPSecurity.RunWithElevatedPrivileges and
accesses resources outside of SharePoint—such as accessing a file on the web
server or creating a separate connection to a SQL Server database—your code will
use the SharePoint application pool account. However, when your elevated
privi-leges code performs operations within SharePoint, such as deleting a
document or creating a SharePoint list, it uses the built-in
SHAREPOINTsystem account. You should use this
technique with care because it can open potential security holes within your
SharePoint solution.
Both Microsoft Office SharePoint Server 2007 and Windows SharePoint Services
3.0 provide support for auditing. The auditing policy feature in
Microsoft Office Share-Point Server logs events and operations performed on
documents and list items. You can configure auditing to log events such as when
a person modifies a document, views a document, performs a checkin or checkout,
changes the permissions for doc-uments, or deletes a document. This auditing
policy feature is not activated for Win-dows SharePoint Services, and there is
no user interface available to work with these audit logs. Microsoft Office
SharePoint Server 2007, on the other hand, provides extensive support for
auditing using the built-in policies framework. However, the base framework is
available through the Microsoft.SharePoint.SPAudit
class. When
you activate auditing, WSS will write audit entries within the AuditData table of the SharePoint content
database.
You can enable auditing in WSS 3.0 at the site collection level or for an
individual list by updating the Audit
property of the SPSite or SPList
objects, as shown in the next code sample.
This is done by setting the AuditFlags
property, which is based on the SPAuditMaskType enumeration. These enumeration values are bitwise
flags that can be combined to configure a specific set of auditing
events:
	sitecollection = new SPSite("http://moss");
	                sitecollection.Audit.AuditFlags = SPAuditMaskType.All;
	                sitecollection.Audit.Update( );

	                site = sitecollection.OpenWeb( );
	                SPList list = site.Lists["Shared Documents"];
	                list.Audit.AuditFlags = SPAuditMaskType.Delete | SPAuditMaskType.
	CheckIn;
	                list.Audit.Update( );
Once you have enabled audit logging, you can query the audit log by creating a
new instance of the SPAuditQuery class. You
can create a query that uses the following properties to limit the results
returned:
Use
SPAuditQuery.AddEventRestriction(eventidasSPAuditEventType) to limit results returned to a specific event.Use
SPAuditQuery.RestrictToListandSPAuditQueryRestrictToListItemto filter out audit logs for specific lists or specific list items.Use
SPAuditQuery.SetRangeStartandSPAuditQuery.SetRangeEndto specify date ranges.Use
SPAuditQuery.RestrictToUserto return audit logs for a specific user.
After you’ve defined your query, you need to call the SPSite.Audit.GetAuditEntries method using the SPAuditQuery instance as an input parameter. This
method will return a SPAuditEntryCollection
class, which contains a collection of audit events that you loop over:
	using System;
	using System.Collections.Generic;
	using System.Text;
	using Microsoft.SharePoint;
	using Microsoft.SharePoint.WebControls;
	using System.Web.UI.WebControls;
	using System.Web.UI.WebControls.WebParts;
	using System.Data;

	namespace DolmenWebParts
	{
	    public class AuditPart : WebPart
	    {
	        GridView gridview;

	        protected override void OnInit(EventArgs e)
	        {
	            gridview = new SPGridView( );
	            gridview.AutoGenerateColumns = false;
	        }

	        protected override void CreateChildControls( )
	        {
	            this.Controls.Clear( );

	            SPSite sitecollection = SPControl.GetContextSite(this.Context);
	            SPWeb site = sitecollection.OpenWeb( );
	            SPList list = site.Lists["Shared Documents"];

	            SPAuditQuery query = new SPAuditQuery(sitecollection);
	            query.RestrictToList(list);
	            query.SetRangeStart(DateTime.Now.AddDays(-7));
	            query.SetRangeEnd(DateTime.Now);

	            DataTable dtAudit = new DataTable( );
	            dtAudit.Columns.Add("User",typeof(string));
	            dtAudit.Columns.Add("Eventtype", typeof(string));
	            dtAudit.Columns.Add("DocLocation", typeof(string));
	            dtAudit.Columns.Add("Occurred",typeof(DateTime));

	            DataRow drRow;

	            SPAuditEntryCollection auditcollection = sitecollection.Audit.
	GetEntries(query);
	            foreach (SPAuditEntry entry in auditcollection)
	            {
	                drRow = dtAudit.NewRow( );
	                //Convert UserId to Name
	                drRow["User"] = site.SiteUsers.GetByID(entry.UserId).Name.ToString( );
	                //Convert audit time from GreenWich Mean Time to time zone of the web
	server
	                drRow["Occurred"] = entry.Occurred.ToLocalTime( );
	                drRow["Eventtype"] = entry.Event.ToString( );
	                drRow["DocLocation"] = SPControl.GetContextWeb(this.Context).Url + "/
	" + entry.DocLocation.ToString( );
	                dtAudit.Rows.Add(drRow);
	            }


	            BoundField boundField = new BoundField( );
	            boundField.HeaderText = "User";
	            boundField.DataField = "User";
	            gridview.Columns.Add(boundField);


	            boundField = new BoundField( );
	            boundField.HeaderText = "Occurred";
	            boundField.DataField = "Occurred";
	            gridview.Columns.Add(boundField);


	            boundField = new BoundField( );
	            boundField.HeaderText = "Event";
	            boundField.DataField = "Eventtype";
	            gridview.Columns.Add(boundField);


	            HyperLinkField urlfield = new HyperLinkField( );
	            urlfield.HeaderText = "Document";
	            urlfield.DataTextField = "DocLocation";
	            urlfield.DataNavigateUrlFields = new string[] { "Doclocation" };
	            gridview.Columns.Add(urlfield);


	            gridview.DataSource = dtAudit;
	            this.Controls.Add(gridview);


	            gridview.DataBind( );
	        }
	    }
	}
You need administrator privileges to call the GetEntries method, so if you want your Web Part to also work for
other users, you must add in the SPSecurity.RunWithElevatedPrivileges method, as shown in the
previous section. For an overview of the auditing extensibility options for both Windows
SharePoint Services and Office SharePoint Server, see the SharePoint Server 2007
code sample “Item-level auditing.” [1]
The SPSiteDataQuery class extends the
possibilities of the Query class, which was
already present in WSS 2.0. Unlike the Query
class, which would only work within one site, the new SPSiteDataQuery class in combination with the GetSiteData method allows you to perform queries
against all types of lists across sites by passing in a Collaborative
Application Markup Language (CAML) query. The next example Web Part returns all
tasks within a site collection that are overdue:
	using System;
	using System.Collections.Generic;
	using System.Text;
	using System.Web;
	using System.Web.UI.WebControls;
	using System.Web.UI.WebControls.WebParts;
	using Microsoft.SharePoint;
	using Microsoft.SharePoint.WebControls;
	using System.Data;

	namespace DolmenWebParts
	{
	    public class TaskRollUpPart : WebPart
	    {
	        protected override void RenderContents(System.Web.UI.HtmlTextWriter writer)
	        {
	            GridView gridview = new GridView( ) ;
	            DataTable dtGrid;

	            string sQuery="";
	            try
	            {
	                SPSite sitecollection = SPControl.GetContextSite(this.Context);
	                SPWeb site = sitecollection.OpenWeb( );

	                SPSiteDataQuery qry = new SPSiteDataQuery( );
	                sQuery = "<Where><And><Lt><FieldRef Name='DueDate' />"
	                    + "<Value Type='DateTime'><Today /></Value></Lt><Neq>"
	                    + "<FieldRef Name='Status' /><Value Type='Text'>Completed</Value>
	</Neq></And></Where>";
	                qry.Query = sQuery;
	                qry.Lists = "<Lists ServerTemplate='107' />";
	                qry.ViewFields = "<FieldRef Name='Title' /><FieldRef Name='DueDate'/>
	<ProjectProperty Name='Title' />";
	                qry.Webs = "<Webs Scope='SiteCollection' />";

	                DataTable dtQuery = site.GetSiteData(qry);
	                dtGrid = new DataTable( );
	                dtGrid.Columns.Add("SiteTitle", typeof(string));
	                dtGrid.Columns.Add("Title",typeof(string));
	                dtGrid.Columns.Add("Duedate", typeof(DateTime));

	                DataRow drNewRow;
	                foreach (DataRow drRow in dtQuery.Rows)
	                {
	                    drNewRow = dtGrid.NewRow( );
	                    drNewRow["SiteTitle"] = drRow["ProjectProperty.Title"];
	                    drNewRow["Title"] = drRow["Title"];
	                    drNewRow["DueDate"] = drRow["DueDate"];
	                    dtGrid.Rows.Add(drNewRow);
	                }
	                gridview.AutoGenerateColumns = true;
	                gridview.DataSource = dtGrid;
	                gridview.DataBind( );
	               gridview.RenderControl(writer);
	            }
	            catch (Exception ex)
	            {
	                writer.Write("<font color='red'>"+ ex.ToString( )+ "</font>");
	            }
	        }
	    }
	}
You will need to set a couple of properties for the SPSiteDataQuery class, as shown in the previous
example:
- Lists property
A CAML string that specifies the different lists to return. The example shows how to return all lists using a specific server template. You can also pass the identifiers for specific lists to return or a
BaseType.- ViewFields property
A CAML string that defines the fields to return. Each field is represented by a
FieldReftag. A field is identified by itsIDorNameattribute. You can also retrieve certain properties for the containing list or site through theListPropertyorProjectPropertytags.- Webs property
A CAML string that defines the web sites to include in the query. This is specified by the
Scopeattribute, which has two possible values:SiteCollection(for all web sites in the same site collection) andRecursive(for all subsites of the currentSPWebobject).
Tip
Fortunately there are some tools to help you construct the CAML query, since this isn’t always intuitive. My personal favorite is the Stramit SharePoint CAML Viewer 2007, written by Renaud Comte. You can download it from CodePlex at http://www.codeplex.com/Wiki/View.aspx?ProjectName=SPCamlViewer.
Microsoft Office SharePoint Server 2007 contains some out-of-the-box Web Parts that use this cross-site query ability, such as the Documents and Tasks Roll-up Web Part on the My Site, the Data View Web Part, and the Content By Query Web Part.
To improve the performance of a large list or library, you can add an index to
a column. This index can be used by the SPSiteDataQuery class to speed up the retrieval of items. For
more information on how to set up an index, see “Indexing a List Column” in
Chapter 14.
The Features framework enables you to package SharePoint functionality (be it a SharePoint list definition, a site definition, some Web Parts, UI components, or a combination of the previously mentioned) and to deploy it in a flexible way on SharePoint 2007. The framework provides a more granular approach for adding functionality since you don’t need to wrap your new functionality in a completely new site definition.
SharePoint 2007 has been built upon this same feature framework; all the standard built-in list types are created as separate features. You will find them under C:Program FilesCommon FilesMicrosoft Sharedweb server extensions12TemplatesFeatures.
The next sample shows the feature that defines the Announcements list:
	<?xml version="1.0" encoding="utf-8"?>
	<Feature
	Id="00BFEA71-D1CE-42de-9C63-A44004CE0104"     Title="$Resources:
	core,announcementslistFeatureTitle;"    Description="$Resources:
	core,announcementslistFeatureDesc;"
	Version="1.0.0.0"
	Scope="Web"
	Hidden="TRUE"
	DefaultResourceFile="core"
	 xmlns="http://schemas.microsoft.com/sharepoint/">
	<ElementManifests>
	    <ElementManifest Location="ListTemplatesAnnouncements.xml"/> </
	ElementManifests>
	</Feature>
The Feature element can have a number of
attributes, as seen in the previous example:
- Id (required)
A GUID to identify the feature.
- Title (optional; limited to 255 characters)
The previous example references a resource file that can be found in C:Program FilesCommon FilesMicrosoft Sharedweb server extensions12Resources.The $Resources:core notation specifies that the core resource file is used.
- Version (optional)
A System.Version-compliant representation of the version of a Feature.
- Scope (required)
Possible values are Farm (farm),
WebApplication(web application), Site (site collection), or Web (web site).- Hidden (optional; default value is
FALSE) This setting specifies whether the feature is visible in the list of features on the Site Features page.
- DefaultResourceFile (optional)
Name of the resource file used.
There also is an ElementManifests element,
which points to the location of another XML file that contains the different
Elements that the feature implements. The next sample shows the
Announcements.xml file, which is found in the
ListTemplates subfolder of the Announcements
feature:
	<?xml version="1.0" encoding="utf-8"?>
	<Elements xmlns="http://schemas.microsoft.com/sharepoint/">
	    <ListTemplate
	        Name="announce"
	        Type="104"
	        BaseType="0"
	        OnQuickLaunch="TRUE"
	        SecurityBits="11"
	        Sequence="320"
	        DisplayName="$Resources:core,announceList;"
	        Description="$Resources:core,announceList_Desc;"
	        Image="/_layouts/images/itann.gif"/>
	</Elements>
The ListTemplate element defines a list
that can be provisioned in a SharePoint site. Those who have worked with
SharePoint 2003 site definitions will notice that this looks similar to the
ListTemplate section of the ONET.XML.
Tip
The xmlns attribute is required—if you
do not add it, your feature will not install. There is, however, also
another advantage: you can enable XML Intellisense in Visual Studio 2005.
The XML editor in VS2005 provides a schema cache underneath
%installdir%xmlschemas. This schema cache is used
to include standard XML schemas that are used for Intellisense and XML
document validation. To add a new schema, you can easily copy the existing
one, catalog.xml, rename it to
customcatalog.xml, and replace the existing content
with your own association declaration:
	<SchemaCatalog xmlns="http://schemas.microsoft.com/xsd/
	catalog">

	<Schema href="file://C:/Program Files/Common Files/Microsoft
	Shared/web server extensions/12/TEMPLATE/XML/wss.xsd"
	targetNamespace="http://schemas.microsoft.com/sharepoint/"/>

	</SchemaCatalog>
So, every time you edit one of the SharePoint XML files, you should change
the xmlns attribute to http://schemas.microsoft.com/sharepoint/, and VS2005 will
automatically give you Intellisense support.
Table 28-3 shows a number of different Element types that you can use.
Table 28-3. Overview of Element types
The following steps show how you can use a feature to add some custom actions to the form toolbar. This example adds a custom search action that leverages Windows Live Search:
Createa new folder called LiveSearch underneath C:Program FilesCommon FilesMicrosoft Sharedweb server extensions12TEMPLATEFEATURES.
Create a new feature.xml file within the LiveSearch folder containing the following XML snippet:
	<Feature Title="Live Search"
	  Scope="Web"
	  Id="39F4FE5B-B770-416c-B4AF-3EE710D4DA1B"
	  xmlns="http://schemas.microsoft.com/sharepoint/">
	  <ElementManifests>
	    <ElementManifest Location="Elements.xml" />
	  </ElementManifests>
	</Feature>
Create a corresponding Elements.xml file as specified in the Location attribute of the
Elements.xmlnode. If you go over the different attributes, you will notice theRegistrationIdattribute, which specifies the associated list or item content type. TheSequenceattribute specifies the ordering priority for the action, and theLocationspecifies where the UI element should be added:<Elements xmlns="http://schemas.microsoft.com/sharepoint/"> <CustomAction Id="LiveSearch1" RegistrationType="List" RegistrationId="101" Location="EditFormToolbar" Sequence="106" Title="Live Search"> <UrlAction Url="{SiteUrl}/_layouts/LiveSearch. Aspx?ListId={ListId}&ItemId={ItemId}"/> </CustomAction> <CustomAction Id="LiveSearch2" RegistrationType="List" RegistrationId="101" Location="DisplayFormToolbar" Sequence="106" Title="Live Search"> <UrlAction Url="{SiteUrl/_layouts}/LiveSearch. Aspx?ListId={ListId}&ItemId={ItemId}" /> </CustomAction> <CustomAction Title="Live Search" Sequence="10" RegistrationType="List" RegistrationId="101" Location="EditControlBlock" Id="LiveSearch"> <UrlAction Url="{SiteUrl}/_layouts/LiveSearch. Aspx?ListId={ListId}&ItemId={ItemId}" /> </CustomAction> </Elements>Create a new ASP.NETpage called LiveSearch.aspx underneath C:Program Files Common FilesMicrosoft Sharedweb server extensions12TEMPLATELAYOUTS, and add the following lines of code to this page:
	<%@ Page language="C#" AutoEventWireup="true" %>

	<%@ Import Namespace="Microsoft.SharePoint" %>

	<script runat="server" >

	protected override void OnLoad(EventArgs e)
	{
	     Guid listId = new Guid(Request["ListId"].ToString( ));
	     int itemId = Convert.ToInt32(Request["ItemId"].ToString( ));

	     SPWeb web = SPContext.GetContext(this.Context).Web;
	     SPList customList = web.Lists.GetList(listId, false);

	     SPListItem item = customList.GetItemById(itemId);
	     string url = "http://search.live.com/results.aspx?q=" + Server.
	UrlEncode(item.Title);
	    Response.Redirect(url);
	}


	</script>
After you have deployed all of the files that make up your complete feature, you will need to perform two additional steps:
In the previous section, I talked about how you can use the Features framework to extend SharePoint. But at a certain point, you will still need to deploy these features to your SharePoint servers (be it on a single server or for a complete web farm). This is where SharePoint solution packages are used. Solution packages are cabinet (.cab) files with a .wsp filename extension and a manifest file. This package can contain .NET assemblies, feature definitions, site definitions, etc. Building these SharePoint solution packages is a tedious and error-prone process; for a detailed description, take a look at http://msdn2.microsoft.com/en-gb/library/aa543741.aspx. Fortunately, there is an alter-native that uses Visual Studio 2005 extensions for WSS.
Visual Studio 2005 Extensions for WSS 3.0 (the November CTP version is available from http://www.microsoft.com/downloads/details.aspx?FamilyID=19f21e5e-b715-4f0c-b959-8c6dcbdc1057&DisplayLang=en) contains a number of tools for developing custom SharePoint applications: Visual Studio project templates for Web Parts (the successor to the Web Part project templates for WSS 2.0/SPS 2003), site definitions, list definitions, and, last but not least, a standalone utility program, the SharePoint Solution Generator. After you have installed Visual Studio 2005 Extensions for WSS 3.0 (VSEWSS), you will get the additional Visual Studio 2005 Project Templates, as shown in Figure 28-2.

An interesting feature of VSEWSS is the F5 run/debug option for the different types of projects. You can create a project and hit F5, and everything will be built and deployed to SharePoint for you (behind the scenes, it’s using all the magic from the post-build steps in VS2005). It even creates a SharePoint Solution Package (WSP file) for you.
Another great thing in VSEWSS is the SharePoint Solution Generator, which will allow you to extract all of the modifications you made, either within a browser or with SharePoint Designer 2007, and add it to a Site Definition project. In this project, you will get your modified style sheet, all the necessary XML files (ONET.XML, SCHEMA.XML, and so on), and the ASPX pages (for all of the list forms and the default one). Starting from here, you can work with it further and add extra list definitions, Web Parts, and so on.
Microsoft Office SharePoint Server 2007’s object model covers a whole lot of new areas that were not available in the previous version. The first place that developers encounter this huge increase in available functionality is when you take a look at the assemblies available for use in the Add Reference dialog box from Visual Studio 2005, which will list the next SharePoint-related references.
- Excel Services UDF Framework (Microsoft.Office.Excel.Server.UDF.dll)
This assembly provides access to the User Defined Functions within Excel Services documents.
- Excel Web Services (Microsoft.Office.Excel.Server.WebServices.dll)
This assembly provides access to the web service support built into Excel Services.
- Microsoft Content Publishing and Management (Microsoft.SharePoint.Publishing.dll)
This is the assembly that contains the enhanced publishing functionality, previously available in Microsoft Content Management Server 2002.
- Microsoft Office Server component (Microsoft.Office.Server.dll)
The main assembly for all Office SharePoint Server–specific functionality, such as the Business Data Catalog, audience and user profiles, etc.
- Microsoft Office Server DLC components (Microsoft.Office.Policy.dll and Microsoft. Office.Workflow.Tasks.dll)
Used to provide Document Life Cycle functionality in Office SharePoint Server 2007.
- Microsoft Office SharePoint Server components (Microsoft.SharePoint.Portal.dll, Microsoft.SharePoint.Portal.SingleSignOn.dll, and so on)
- Microsoft Office SharePoint Server Search (Microsoft.Office.Server.Search.dll)
This is the new, enhanced search engine functionality, available only for Office SharePoint Server 2007, which provides a scalable search model to crawl content both within SharePoint and in external content sources.
- Windows SharePoint Services (Microsoft.SharePoint.dll)
The top-level DLL contains the core object model.
- Windows SharePoint Services Search (Microsoft.SharePoint.Search.dll)
This provides access to the SharePoint search components.
- Windows SharePoint Services Security (Microsoft.SharePoint.Security.dll)
This DLL contains the security model for SharePoint.
- Windows SharePoint Services Workflow Actions (Microsoft.SharePoint. WorkflowActions.dll)
This assembly stores the workflow components and gives you programmatic access to creating and managing workflows.
The next sections take a look at some of these new namespaces.
The Business Data Catalog (BDC), a new technology within Office SharePoint Server 2007, provides access to line of business applications through metadata. Developers will define business data through metadata in XML format, and a number of out-of-the-box Web Parts provide end users with access to the data in these backend systems. Besides using these out-of-the box BDC Web Parts, you can also integrate this data within the user profiles, as a field type within SharePoint lists or libraries and within SharePoint search.
Tip
Whenever you want to connect a backend line of business system, you will need to create an XML metadata file for it, which is called the application definition file. This application definition file needs to comply with the BdcMeta.XSD XML schema, which you can typically find at Program FilesMicrosoft Office Server12.0Bin. There are, however, some tools available to create these application definition files automatically. For an example, take a look at the Metadata Manager for Office SharePoint Server at http://www.bdcmetaman.com/default.aspx.
Besides these out-of-the-box features of Office SharePoint Server 2007, it is also possible to develop custom code against the BDC. The main advantage for programming against the BDC is that the BDC provides a single approach for integrating backend systems, without developers needing to know multiple APIs. When you want to build a custom BDC application, there are two different object models to work with:
- Runtime object model
For use by BDC client applications, this model provides a standard API for reading and querying the Business Data Catalog. This object model is available through Microsoft.Portal.dll and uses the following namespaces:
Microsoft.Office.Server.ApplicationRegistry.RuntimeandMicrosoft.Office. Server.ApplicationRegistry.MetaData.- Administrative object model
This can be used to create, read, update, and delete metadata within the BDC. It is available in the following namespace: Microsoft.Office.Server. ApplicationRegistry.Administration.
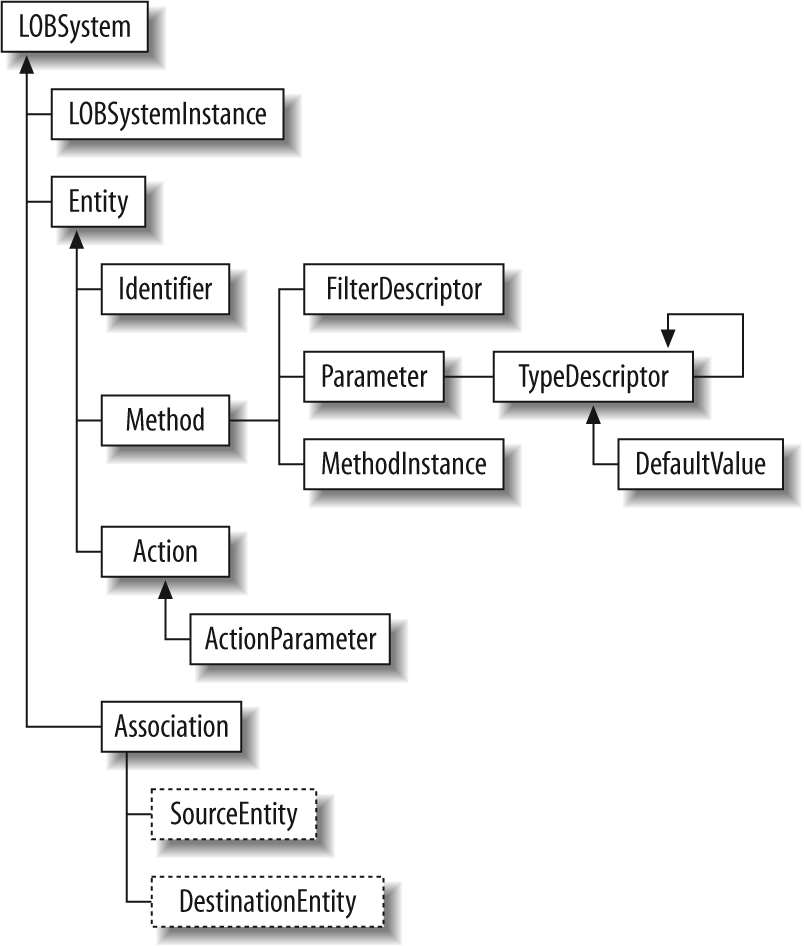
When you take a look at the object model, you will notice that the XML schema and the metadata object models map closely to one another. There are 13 metadata objects, as shown in Figure 28-3. The key objects to know are:
- LobSystem
A data source such as a database, SAP, Siebel, and so on. Within the application definition file, it is the root node.
- LobSystemInstance
A LobSystem will have exactly one connected LobSystem, which is used to define connection and authentication information.
- Entity
Defines the business objects in the backend system, such as customers and products. Entities contain Identifiers, Methods, and Actions.
- Method
Defines an operation related to an Entity, such as “Get Products.” A Method has a
MethodInstancecoupled to it that defines how to use the Method.- FilterDescriptor
Allows you to retrieve specific Entity instances by supplying Parameters.
- Actions
These provide a link-back mechanism through links.
- Association
The next example shows how you can create your own Web Part
that displays the different entities for a specific system. The Web Part uses
the application definition based on the Adventure Works BDC example in MSDN and
lists all the fields for the product entities. When you create the Web Part, you
will first need to add references to the Windows SharePoint Services assembly,
the Office.Server assembly, and the Microsoft.SharePoint.Portal assembly. You also see
that the entry point for doing BDC development is the ApplicationRegistry object, which allows you to access all the
different BDC objects, such as LobSystem,
Entity, and the associated
methods:
	using System;
	using System.Collections.Generic;
	using System.Text;
	using System.Web;
	using System.Web.UI.WebControls;
	using System.Web.UI.WebControls.WebParts;
	using Microsoft.SharePoint;
	using Microsoft.Office.Server;
	using Microsoft.Office.Server.ApplicationRegistry;
	using Microsoft.Office.Server.ApplicationRegistry.Runtime;
	using Microsoft.Office.Server.ApplicationRegistry.MetadataModel;
	using System.Data;


	namespace DolmenWebParts
	{
	    public class BDCWebPart : WebPart
	    {


	        private static DataTable GetTableFromFields(FieldCollection fieldcollection)
	        {
	            DataTable dt = new DataTable();
	            foreach (Field f in fieldcollection)
	            {
	                dt.Columns.Add(f.Name,Type.GetType(f.TypeDescriptor.TypeName));
	            }
	            return dt;
	        }
	        protected override void RenderContents(System.Web.UI.HtmlTextWriter writer)
	        {

	            NamedLobSystemInstanceDictionary lobSystems = ApplicationRegistry.
	GetLobSystemInstances();
	            LobSystemInstance lobSystem = lobSystems["AdventureWorksDWInstance"];
	            Entity product = lobSystem.GetEntities()["Product"];

	            FilterCollection filtercollection = product.GetFinderFilters();

	            IEntityInstanceEnumerator productInstanceEnum = product.
	FindFiltered(filtercollection, lobSystem);

	            DataTable dtProducts = GetTableFromFields(product.GetFinderView().
	Fields);

	            while (productInstanceEnum.MoveNext())
	            {
	                IEntityInstance productinstance = productInstanceEnum.Current;
	                DataRow drNew = dtProducts.NewRow();
	                foreach (Field f in product.GetFinderView().Fields)
	                {
	                    if (productinstance[f] != null)
	                    {
	                        drNew[f.Name] = productinstance[f];
	                    }
	                }
	                dtProducts.Rows.Add(drNew);
	            }
	           productInstanceEnum.Close();

	           GridView gvProducts = new GridView();
	            gvProducts.AutoGenerateColumns = true;
	            gvProducts.DataSource = dtProducts;
	            gvProducts.DataBind();

	            gvProducts.RenderControl(writer);
	        }
	    }
	}
If you want to start building your own custom search solutions on top of
Microsoft Office SharePoint Server 2007, you can use the new
Microsoft.Office.Server.Search.Query
object model. In your code, you should use
either the FullTextSQLQuery or the KeyWordQuery class. Common properties and methods
for these two classes are defined in the Query base class; you should, however,
never directly use this class. The decision to choose between FullTextSQLQuery and KeyWordQuery depends on the complexity of the search queries you
want to implement. With the KeyWordQuery
class, you can directly pass a keyword or a SharePoint property filter to the
search service without having to construct a full SQL query.
There is not only a new Query object
model, but also a new Search
Administration object model, which you can use to manipulate search settings.
The Enterprise
Search Administration object model is implemented in the Microsoft.Office.Server.Search.Administration
namespace, found in the Microsoft.Office.Server.Search.dll.
The main classes in the Administration object model are listed in Table 28-4.
Table 28-4. Main classes in the Search Administration object model
The next Web Part shows how you can construct your own search Web Part that
uses the FullTextSQLQuery object. Within the
GridView, which displays the search
results, you will see a column that allows you to tag a certain search result as
a best bet for the search term (you should also implement an extra check for
controlling whether a keyword already exists, but I left this out for
simplicity’s sake):
	using System;
	using System.Collections.Generic;
	using System.Text;
	using System.Web;
	using System.Web.UI;
	using System.Web.UI.WebControls;
	using System.Web.UI.WebControls.WebParts;
	using Microsoft.Office.Server.Search.Query;
	using Microsoft.SharePoint;
	using Microsoft.SharePoint.WebControls;
	using Microsoft.Office.Server;
	using System.Data;
	using Microsoft.Office.Server.Search.Administration;

	namespace DolmenWebParts
	{
	    public class DemoSearchWebPart : WebPart
	    {
	        private ImageButton btnSearch;
	        private TextBox txtQueryText;
	        private Label lblWarning;
	        private GridView gvResults;
	        private DataSet ds;


	        protected override void OnInit(EventArgs e)
	        {
	            gvResults = new GridView();
	            gvResults.RowCommand += new GridViewCommandEventHandler(gvResults_
	RowCommand);
	            gvResults.AutoGenerateColumns = false;

	            HyperLinkField colTitle = new HyperLinkField();
	            colTitle.DataTextField = "Title";
	            colTitle.HeaderText = "Title";
	            colTitle.DataNavigateUrlFields = new string[] { "Path" };
	            gvResults.Columns.Add(colTitle);

	            BoundField colAuthor = new BoundField();
	            colAuthor.DataField = "Author";
	            colAuthor.HeaderText = "Author";
	            gvResults.Columns.Add(colAuthor);

	            ButtonField colBestBet = new ButtonField();
	            colBestBet.Text = "Add as best bet";
	            colBestBet.CommandName = "BestBet";
	            colBestBet.HeaderText = "";
	            gvResults.Columns.Add(colBestBet);

	        }

	        protected override void CreateChildControls()
	        {
	            this.Controls.Clear();
	            txtQueryText = new TextBox();
	            txtQueryText.Width = 300;
	            this.Controls.Add(txtQueryText);
	            btnSearch = new ImageButton();
	            btnSearch.ImageUrl = "/_layouts/images/gosearch.gif";
	            btnSearch.Click += new System.Web.UI.ImageClickEventHandler(btnSearch_
	Click);
	            this.Controls.Add(btnSearch);
	            lblWarning = new Label();
	            this.Controls.Add(new LiteralControl("<br>"));
	            this.Controls.Add(new LiteralControl("<hr>"));
	            this.Controls.Add(lblWarning);
	            this.Controls.Add(gvResults);
	        }

	        void btnSearch_Click(object sender, System.Web.UI.ImageClickEventArgs e)
	        {
	            if (txtQueryText.Text != string.Empty)
	            {
	                this.PerformQuery(txtQueryText.Text);
	            }
	            else
	            {
	                lblWarning.Text = "Please enter a keyword";
	            }
	        }

	        void gvResults_RowCommand(object sender, GridViewCommandEventArgs e)
	        {


	            int index = Convert.ToInt32(e.CommandArgument);
	            GridViewRow row = gvResults.Rows[index];
	            HyperLink link = (HyperLink)row.Cells[0].Controls[0];
	            CreateBestBet(txtQueryText.Text, link.NavigateUrl.ToString(), link.Text);

	        }

	        private void CreateBestBet(string term, string url, string title)
	        {
	            Keywords keywordmgr = new Keywords(SearchContext.GetContext(SPContext.
	Current.Site), new Uri("http://moss"));
	            KeywordCollection keywordcoll = keywordmgr.AllKeywords;
	            Keyword keyword = keywordcoll.Create(term, DateTime.Now);
	            keyword.BestBets.Create(title,"",new Uri(url));
	        }


	        private void PerformQuery(string keyword)
	        {
	            string querytext = string.Empty;

	            querytext = "Select title, path, author from SCOPE() where FREETEXT(*,'"
	+ keyword + "')";


	            FullTextSqlQuery query = new FullTextSqlQuery(ServerContext.Current);
	            query.QueryText = querytext;

	            query.ResultTypes |= ResultType.RelevantResults;
	            query.TrimDuplicates = true;
	            query.IgnoreAllNoiseQuery = true;
	            query.EnableStemming = false;

	            ResultTableCollection resultColl = null;
	            ResultTable resultTable = null;

	            resultColl = query.Execute();
	            resultTable = resultColl[ResultType.RelevantResults];
	            if (resultTable.TotalRows != 0)
	            {
	                lblWarning.Text = "Number of results found " + resultTable.TotalRows.
	ToString();
	                ReadResultTable(resultTable);
	            }
	            else
	            {
	                lblWarning.Text = "No results found";
	            }
	        }

	        private void ReadResultTable(ResultTable results)
	        {

	            DataTable relResultsTbl = new DataTable();
	            relResultsTbl.TableName = "Relevant Results";
	            ds = new DataSet("resultsset");
	            ds.Tables.Add(relResultsTbl);
	            ds.Load(results, LoadOption.OverwriteChanges, relResultsTbl);

	            FillResultsGrid(ds);
	        }

	        private void FillResultsGrid(DataSet ds)
	        {
	            //Bind the data to the DataGrid
	            gvResults.DataSource = ds;
	            gvResults.DataBind();
	        }
	    }
	}
When you create a custom application that needs to access the
search object model, you will first need to add a
reference to Microsoft.Office.Server as well
as to the Microsoft Office SharePoint Server Component
(Microsoft.SharePoint.portal.dll) and to Microsoft
Office SharePoint Server Search
(Microsoft.Office.Server.Search.dll). You might notice
that the query syntax is similar to standard SQL queries. In this example, the
FREETEXT full-text predicate
was used, but it is also possible to use the CONTAINS predicate.
Tip
The CONTAINS full-text predicate also supports wildcard characters, whereas the FREETEXT does not.
When you execute a query, a ResultTableCollection
object is
returned, which contains a number of ResultTable objects that are easily read—as shown in the ReadResultsTable method in the example—since they
implement the IDataReader interface. The
search results returned in these ResultTables
are grouped in four categories, as defined in the Microsoft.Office.Server.Search.Query.ResultType enumeration; in
the example, we return the main result set (ResultType.RelevantResults).
Tip
The standard search Web Parts used on both the search page and the search results page are easy to customize without using any code, by modifying the Web Part properties or applying a custom style sheet to them. However, it is not possible to extend the search solution by adding your own Web Parts on the page and integrating them with the standard Web Parts through Web Part connections. The standard Web Parts communicate through hidden objects using a proprietary protocol. This means that if you want to extend the functionality, you must code the standard search functionality in your Web Part set as well.
A user profile holds information about the site users in a number of properties. This information can be used to describe users or to target information to specific groups of people (an audience). The My Profile page on the My Site is the main location where this user information is visible. The Index server also crawls this information so that it can be searched as well. Audience targeting allows content contributors to push certain content to a specific group of users, which is called an audience. An audience is defined by rules that include or exclude users. Microsoft Office SharePoint Server 2007 maintains these user profiles in SQL Server, but the information can be imported from other data sources, such as:
Active Directory
Lightweight Directory Access Protocol directories (which is not Active Directory)
Databases and enterprise applications (such as SAP or PeopleSoft), by defining a Business Data Catalog connection
The main classes are found in the Microsoft.Office.Server.UserProfiles namespaces.
There are three main objects to handle information within the User Profile store:
UserProfileAllows you to access profile properties, the My Site, personalization links, and so on.
UserProfileManagerGives access to a collection of
UserProfileobjects and allows you to create, edit, and retrieve user profile objects and properties from the user profile store.UserProfileConfigManager
The main classes are found in the Microsoft.Office.Server.UserProfiles namespace. Although Microsoft.SharePoint.Portal.UserProfiles is still
present for backward compatibility, it is better to use the new namespace.
Another important change is the support for multivalue profile properties. The IsMultivalued parameter indicates whether the
property supports multiple values. The object
model returns these values of a multivalue property as an ArrayList object of type UserProfileValueCollection. SharePoint Server 2007 also allows
you to set privacy policies on user profile properties, to restrict who can view
the property. This is done by setting the Microsoft.Office.Server.UserProfiles.Property.DefaultPrivacy
property to a specific Privacy enumeration.
The next sample code shows how you can enumerate for existing user profiles, check whether they have already
created a My Site and then create the My Site in code, and, last but not least,
modify one of the multivalue properties (Skills):
	using System;
	using System.Collections.Generic;
	using System.Text;
	using Microsoft.SharePoint;
	using Microsoft.Office.Server;
	using Microsoft.Office.Server.UserProfiles;

	namespace UserProfileDemo
	{
	    class Program
	    {
	        static void Main(string[] args)
	        {
	            using (SPSite sitecollection = new SPSite("http://moss"))
	            {

	                ServerContext context = ServerContext.GetContext(sitecollection);
	                UserProfileManager profileManager = new UserProfileManager(context);

	                foreach (UserProfile u in profileManager)
	                {
	                    //Display name and loging
	                    Console.WriteLine(u["PreferredName"].Value.ToString());
	                    Console.WriteLine(u["AccountName"].Value.ToString());
	                    if (u.PersonalSite == null)
	                    {
	                        Console.WriteLine("Personal site does not exist for " +
	u["PreferredName"].Value.ToString());
	                        u.CreatePersonalSite();
	                    }
	                    //Add entry to the My Links listing of the My Site
	                    QuickLinkManager qMgr = u.QuickLinks;
	                    qMgr.Create("Dolmen", "http://www.dolmen.be", QuickLinkGroupType.
	General, "", Privacy.Public);

	                    //Retrieve the multiple-value property skills
	                    UserProfileValueCollection valuecollection = u["SPS-Skills"];

	                    //Add a new value to a multiple-value property
	                    valuecollection.Add((object)"Communication skills");

	                    //Set privacy control to My Colleagues
	                    valuecollection.Privacy = Privacy.Contacts;
	                    u.Commit();


	                }
	            }
	            Console.WriteLine("Hit any key to continue");
	            Console.ReadLine();
	        }
	    }
	}
Office SharePoint Server also embeds InfoPath Forms Services, which allows you to create browser-enabled InfoPath forms. This means that you no longer need to have InfoPath installed on the client to fill in InfoPath forms. InfoPath Forms Services is built as a feature on top of Windows SharePoint Services 3.0 and is available in Office SharePoint Server 2007 or by installing Forms Server 2007 (separate SKU) on top of Windows SharePoint Services.
Forms Services can act as a runtime host for the InfoPath forms that you deploy to SharePoint. Forms Services can convert InfoPath forms into ASP.NETpages so that the form can be filled in within the browser, similar to how it is filled in with a full client InfoPath installation.
To extend or automate your InfoPath solutions, you will need to take a look at the two main namespaces for InfoPath Forms Services, which are:
Microsoft.Office.InfoPath.Server.AdministrationAllows you to automate template administration on the server. The most important objects are the
FormsServiceclass,FormTemplateCollection, and theFormTemplateclass. TheFormsServiceclass, the root object for InfoPath Forms Services, allows you to perform the same actions that are available on the Configure InfoPath Forms Services page in SharePoint Central Administration. TheFormTemplateclass represents an InfoPath form that has been deployed to InfoPath Forms Services.Microsoft.Office.InfoPath.Server.ControlsContains the
XmlFormViewcontrol used for rendering a form template in a custom Web Page on the server.
The next code snippet shows how you can access the administrator-approved form templates for the current SharePoint server. To use the next code snippet, you will need to add a reference to the Microsoft.Office.InfoPath.Server.dll, which is located in Program FilesMicrosoft Office Servers12.0Bin:
	protected override void RenderContents(System.Web.UI.HtmlTextWriter writer)
	        {
	            SPFarm farm = SPFarm.Local;

	            FormsService formssvc = farm.Services.GetValue<FormsService>();
	            FormTemplateCollection formscoll = formssvc.FormTemplates;
	            foreach (FormTemplate formstemplate in formscoll)
	            {

	                writer.Write("<li>"+formstemplate.DisplayName+ " (Workflow enabled:"
	+ formstemplate.WorkflowEnabled.ToString()  + ")</li>");
	            }
	        }
The samples on MSDN (see “Hosting the InfoPath 2007 Form Editing Environment in
a Custom Web Form”) show how you can embed the XmlFormView control within your own ASP.NETpages. It is also
possible to use this control within your own custom Web Parts, as shown in the
next example.
First, you need to add a reference to the
Microsoft.Office.InfoPath.Server.dll. If you take a
look at the CreateChildControls method, you
will notice that I added two event handlers. These events allow communication
between the hosting control (a web page or a Web Part in this case). The event
handler for the Close event is used to
redirect the user to another page when the InfoPath form is closed. The event handler
for the Initialize event allows you to modify
or read values within the InfoPath form during the initialization phase:
	using System;
	using System.Collections.Generic;
	using System.Text;
	using System.Web;
	using System.Web.UI.WebControls.WebParts;
	using Microsoft.Office.InfoPath;
	using Microsoft.Office.InfoPath.Server.Controls;

	namespace DCAWebParts
	{
	    public class IFPWebPart : WebPart
	    {
	        private XmlFormView viewform;
	        private string _xsnlocation = string.Empty;
	        private string _closeredirect = string.Empty;

	        [Personalizable(),WebBrowsable(),
	        WebDisplayName("Location InfoPath Template"),
	        WebDescription("URL of the web-enabled InfoPath form to display")]
	        public string XSNLocation
	        {
	            get { return _xsnlocation; }
	            set { _xsnlocation = value; }
	        }

	        [Personalizable(),WebBrowsable(),
	        WebDisplayName("Redirect URL"),
	        WebDescription("Redirect naar het sluiten van een InfoPath")]
	        public string CloseRedirect
	        {
	            get { return _closeredirect; }
	            set { _closeredirect = value; }
	        }

	        protected override void CreateChildControls()
	        {
	            base.CreateChildControls();

	            viewform = new XmlFormView();
	            if (_xsnlocation != string.Empty)
	            {
	                viewform.XsnLocation = _xsnlocation;
	                viewform.Initialize += new EventHandler<InitializeEventArgs>
	(viewform_Initialize);
	                viewform.Close += new EventHandler(viewform_Close);
	                this.Controls.Add(viewform);
	            }
	        }

	        void viewform_Close(object sender, EventArgs e)
	        {
	            //Implement redirect or some other close action
	        }

	        void viewform_Initialize(object sender, InitializeEventArgs e)
	        {
	            //Read or modify values
	        }
This chapter offered an overview of the Microsoft.SharePoint namespace, which embeds the base classes you
need in everyday SharePoint development. After that, we took a look at some of the
Office SharePoint Server class libraries.
However, this chapter has uncovered only the tip of the iceberg. There are many more development opportunities for Windows SharePoint Services and Office SharePoint Server 2007. The object model is used to create applications that support business intelligence, workflow, document lifecycle management, and content management. Remember that the Windows SharePoint Services Developer Center* [2] and the Office SharePoint Server Developer Portal† [3] provide you with access to a number of invaluable resources.