
A Meeting Workspace is a web site you can use to collect all of the materials related to a project, such as documents, agendas, and reports for a single meeting, a series of reoccurring meetings, or meetings pursuant to a long-term project. As with other elements in MOSS 2007, such as the Enterprise Report Center site template, the Meeting Workspace serves as a single interface for data from many scattered sources.
The Workspace doesn’t exist only for the sake of presenting information during the meeting; it also provides a dynamic web site for attendees to check and find out the latest information on meeting topics. Meeting Workspaces are a handy way to communicate with attendees ahead of time so they can be prepared to bring specific materials or so they have the latest updates on the agenda. The workspace could also be the dynamic repository for data related to regularly held meetings, such as staff meetings. A Meeting Workspace can exist for years or be deleted after a single meeting, depending on its purpose.
You can create a Meeting Workspace when you create an event in your calendar. This can be the calendar present in either Microsoft Windows SharePoint Services 3.0 or Microsoft Office Outlook 2007. It’s also possible to create a Meeting Workspace without creating a calendar event.
Depending on the nature of your meeting and what information you require, you can choose from among five default templates:
- Blank Meeting Workspace
Comes without any special features and can be completely customized by you. This template is typically used when the other default templates are not quite right for your needs or if you just prefer to design the workspace yourself.
- Basic Meeting Workspace
The “bare bones” workspace template, including only the Objectives, Attendees, Agenda, and Document Library Web Parts.
- Decision Meeting Workspace
Designed for meetings where information and material are reviewed pursuant to making a decision. Web Parts included are Objectives, Attendees, Agenda, Document Library, Tasks, and Decisions.
- Social Meeting Workspace
Available to organize any social occasion, such as a holiday party, birthday, or company picnic. For this purpose, the Web Parts involved are Attendees, Directions, Image/Logo, Things to Bring, Discussions, and Photo Library.
- Multipage Meeting Workspace
Used when a single web page for your Meeting Workspace is insufficient. The Web Parts available by default are Objectives, Attendees, and Agenda. However, you also have two additional web pages that are completely blank and ready for you to customize.
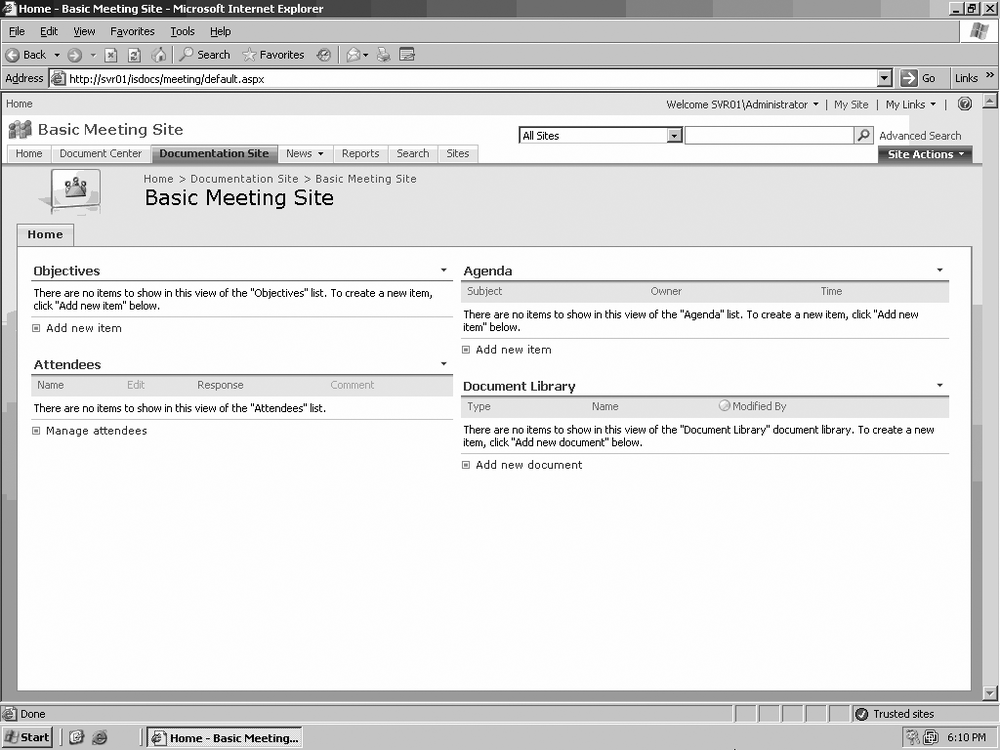
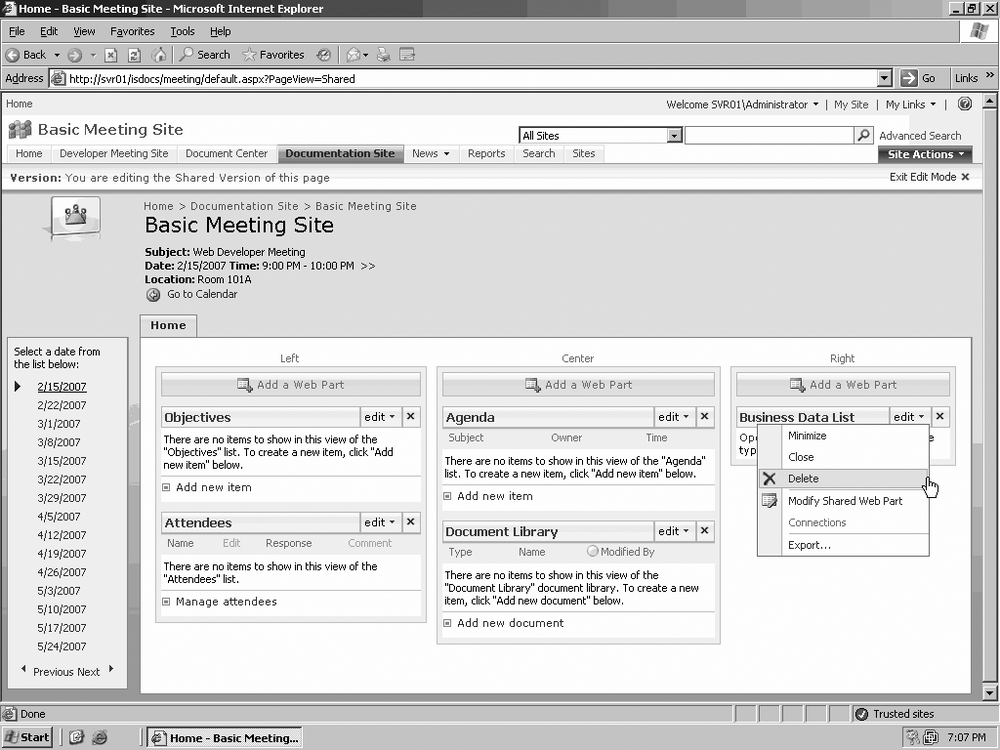
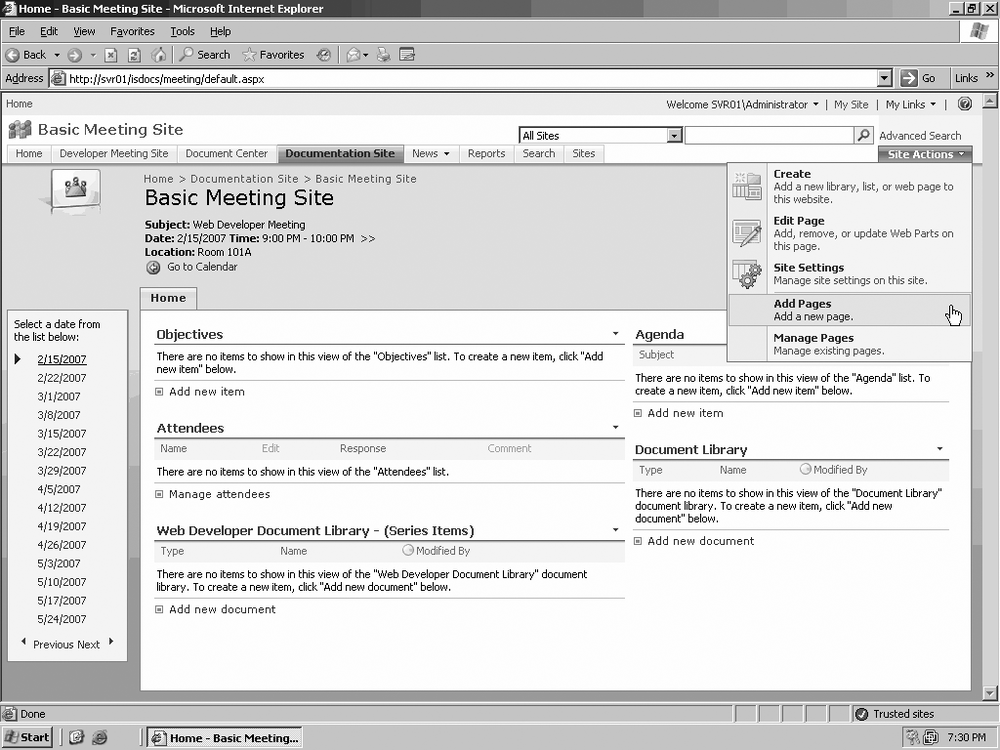
In Chapter 5, you learned how to create and manage SharePoint sites. This chapter drills down into the details of creating and managing the Meeting Workspace site. Meeting Workspace sites generally follow this format, as seen in Figure 10-1:
The top of the site’s main page contains a description of the meeting.
Page tabs are located at the top left of the main page.
The top-right corner of the page contains a menu you can use to customize the site.
The Agenda, Attendees, Document Library, and Objectives Web Parts are all contained in the body of the main page.
Besides the default elements included in a Meeting Workspace, you can add whatever Web Parts are necessary to fulfill your goals. One basic task in creating the right meeting site for your group is to choose the desired Meeting Workspace template, discussed in the previous section.
Meeting Workspace sites can be used not only during a meeting, but before and afterwards as well. During the meeting, participants can add or modify relevant documents, tasks, decisions, or the agenda for subsequent meetings.
Prior to the meeting, members can check the agenda, review any tasks recently assigned to them, and see any other changes that have been made.
After the meeting, the meeting organizer can publish the meeting’s minutes, and members can review any new tasks and add any comments about the meeting.
As with creating any other type of SharePoint site, you must have administrator or site owner privileges. Administrators and site owners can delegate site creation rights to a user or group by giving that user or group site creation rights.
Warning
Although you can assign rights to an individual, administrative best practices usually require that you create a group with those rights and then add the necessary users to that group.
On your site, click Site Actions and then select Create from the menu.
In the Web Pages column, click “Sites and Workspaces.”
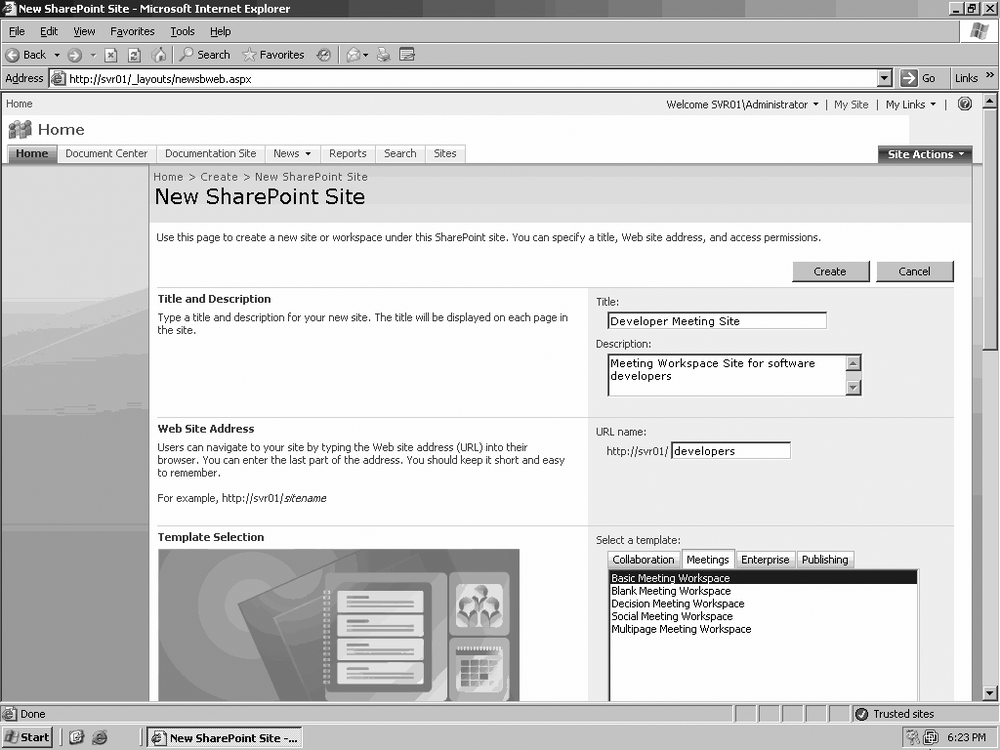
On the New SharePoint Site page, type the name of the Workspace site in the Title field.
Type a brief description of the site in the Description field.
Complete the site’s URL in the URL Name field.
Under Template Selection, click the Meetings tab and select a template from the list (Figure 10-2).
Configure Permissions, Site Navigation, and Site Categories as desired.
Click Create.
Tip
See Chapter 5 for more on site creation.
You can create a Meeting Workspace site automatically when you enter an event in your calendar. You can also create a workspace site from a SharePoint-compatible calendar and email program such as Microsoft Office Outlook 2007. This exercise will use the SharePoint calendar tool.
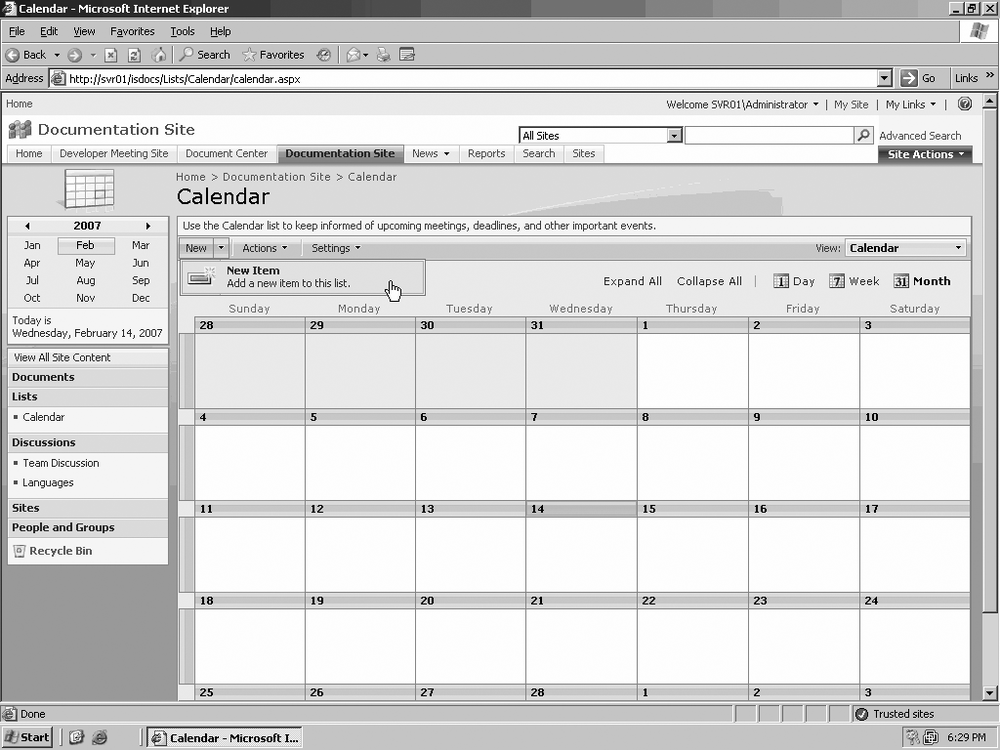
On your site, open the SharePoint calendar in one of the following ways:
Go to Quick Launch and click the calendar name.
Click on View All Site Contents and then locate and click the calendar name.
Click New to open the menu, and then click on New Item, as shown in Figure 10-3.
Enter the appropriate information for your event in the following fields:
Title
Location
Start Time
End Time
Description
If you are scheduling a recurring meeting, under Recurrence check the “Make this a repeating event” checkbox.
Set the frequency of the recurring meeting: daily, weekly, monthly, or yearly.
Set the Start date and the End date if relevant. Refer to Figure 10-4 to see what the page you created should look like.
Scroll to the bottom of the page and check the “Use a Meeting Workspace to organize attendees, agendas, documents, minutes, and other details for this event” checkbox, and then click OK.
When the New or Existing Meeting Workspace page appears, if you want to link to the Meeting Workspace, click the “Link to an existing Meeting Workspace” radio button (Figure 10-5).
Verify that all of the other information on the page is correct, and then click OK.

Once you’ve created your Meeting Workspace site, it’s time to customize it and give the site all of the details you require to satisfy your goals. You can change the content and design of the site by adding or moving Web Parts and Web Part content. Features you can include on your site are document libraries, sales contacts, productivity charts, and any other elements relevant to your meetings.

In Chapter 8, you saw how to add a List View Web Part to a Web Part page. This type of Web Part can display all or a filtered portion of a list or library, such as a sales contacts list, and can be an asset to your Meeting Workspace site.
Tip
You can also see Chapter 14 for more information about lists.
On the site, click Site Actions and select Edit Page from the menu.
Click Add Web Parts on the desired Web Part field’s title bar, as shown in Figure 10-6.
On the Add Web Parts page under Lists, check the checkbox next to the list you want to add, and then click Add.

You may want to have a wider selection of lists or libraries than those offered by default. You can expand your choices in the following way:
On the site, click Site Actions and select Edit Page from the menu.
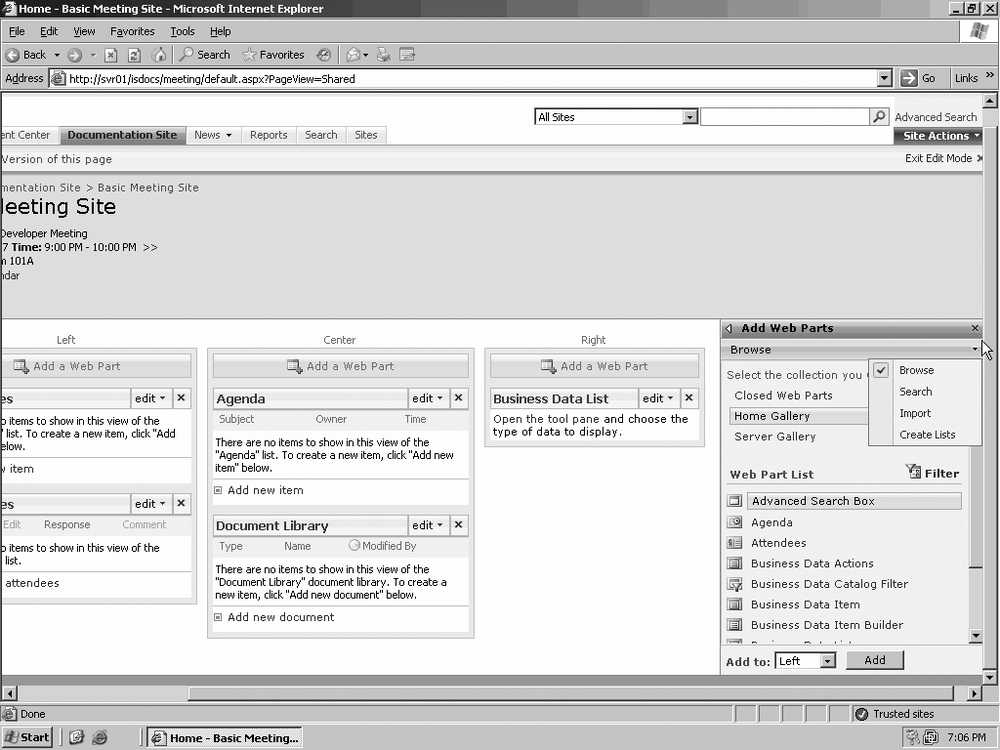
Click Add Web Parts on the desired Web Part field’s title bar and in the Add Web Parts window, click the Lists and Libraries title to show all lists and libraries, as illustrated in Figure 10-7.
Check the checkbox of the desired Web Part and click Add.
As seen in Figure 10-8, when you have completed this action, if you scroll to the far right, you can use the Add Web Parts box to Browse, Search, Import, or Create Lists. You can also select between different Web Part Galleries.
You may want to remove a list or library that you’ve added to the workspace. There are two methods available to you, described in the following sections.

This method removes the list or library view from the Web Part page; however, the original content will continue to exist in the list or library gallery:
On the Web Part page, click Site Actions and select Edit Page from the menu.
Click the menu arrow next to the appropriate Web Part title and select Delete, as shown in Figure 10-9.
When the confirmation dialog box appears, click OK.
Since you have removed only the view of the list or library, the actual content still exists. To restore it, add the appropriate Web Part to the Web Part page as outlined earlier in this chapter.
When you remove a list or library view from a Web Part page, the information still exists in SharePoint and is available for access by other sites in your site collection. On some occasions, though, you will create a list or library that is specific to your meeting or series of meetings, such as information relevant only to a particular project. Once the project is over, that list or library is no longer useful and can be permanently deleted:
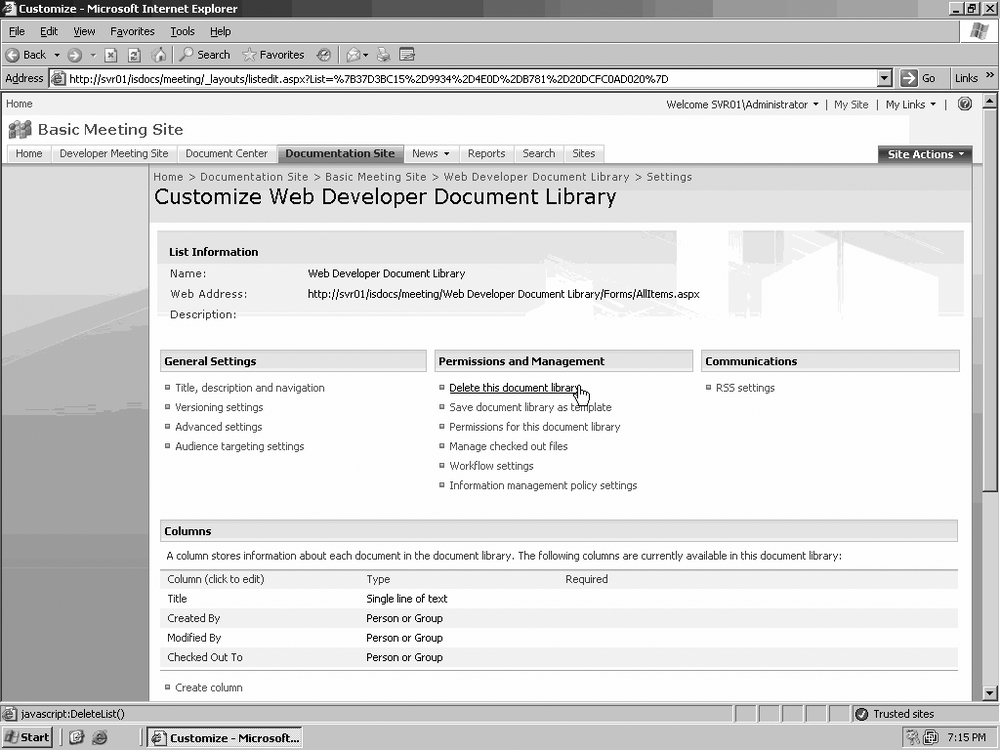
On the Web Part page, click the title bar of the list or library you want to permanently delete, and then select Settings.
Click either List Settings or Library Settings, depending on the type of Web Part you are working with.
Under Permissions and Management, click the Delete selection for the list or library you are working with, as shown in Deleting a List or Library.
Tip
For example, for a list, you’ll click “Delete this List.” For a library, your options could be “Delete this Document Library” or “Delete this Picture Library,” depending on the type of library you want to eliminate.
This list or library has now been permanently deleted from SharePoint.
Warning
Unless you are absolutely sure you will never need any information in the list or library again, it is better simply to remove the view from your workspace site rather than delete all of the data. Also, depending on the type of information you are dealing with, company policy or a legal statute may require that your organization retain that information for a certain period of time, even after it has become obsolete.
As mentioned earlier in this chapter, one of the advantages of a Meeting Workspace site is that you can share information—not just in the meeting, but at any other time as well. Lists and libraries on this workspace are not shared by default. Here is the procedure for sharing them with others:
On your workspace site, click Site Actions and select Site Settings from the menu.
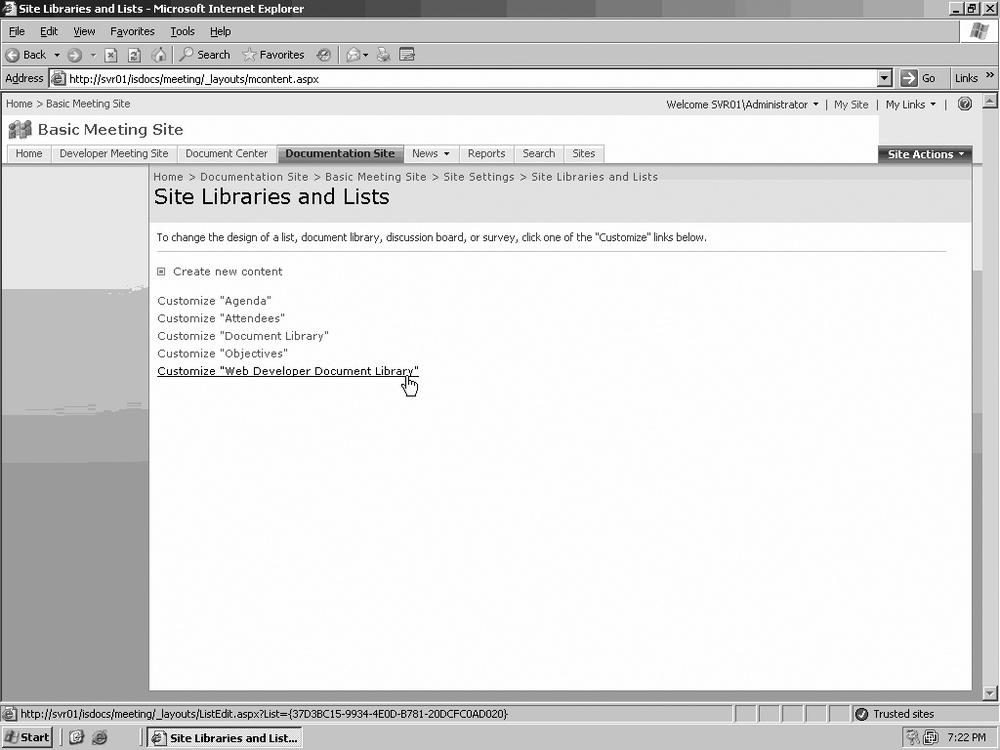
In the Site Administration column, click “Site libraries and lists,” as shown in Figure 10-11.
Click the Customize link for the list or library you want to share, as illustrated in Figure 10-12.
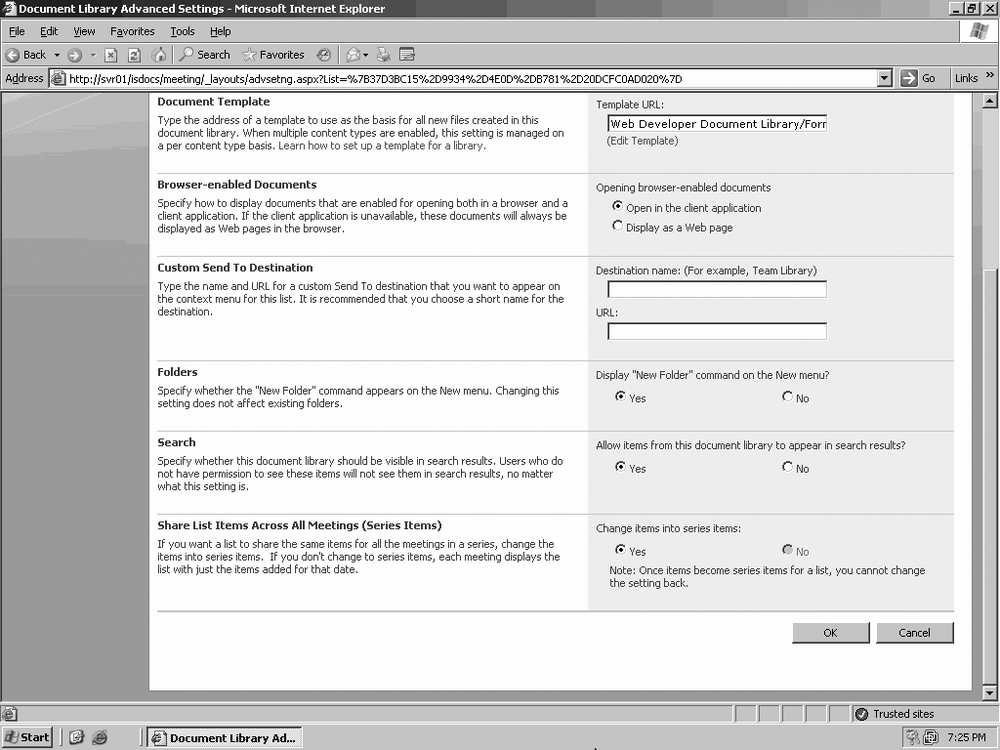
Under General Settings, click “Advanced settings.”
Scroll down and click the Yes radio button next to Share List Items Across All Meetings (Series Items), as shown in Figure 10-13.
Click OK.

Other ways you can customize this workspace site are methods common to modifying sites and Web Part pages in general. For example, you can move Web Parts around on your Web Part pages, as described in the section “Change the Layout of a Web Part Page” in Chapter 8. You can also change the theme or add or remove pictures, as explained in the section “Managing Site Themes and Images” in Chapter 7.
You may also want to take a look at Chapter 9 to see the similarities and differences between document and Meeting Workspaces, as well as Chapter 16.
So far, we’ve been working only with the default home page on a Meeting Workspace site. For many meetings, regardless of whether they are reoccurring, this might be sufficient. However, the content and processes involved in your meetings may be complex and require additional pages to organize and contain.
Fortunately, you can add up to 10 more pages to your workspace site. Rather than combining all of your activities and information on a single Web Part page, you can spread them across several pages, dedicating an entire page to documentation and another to task assignment and tracking.
You can create 10 pages for an individual meeting or for reoccurring meetings, and you can create 10 pages per specific meeting date (that is, 10 pages for the June 7th staff meeting, 10 pages for the June 14th staff meeting, and so on).
On your workspace site, click Site Actions and select Add Pages from the menu, as seen in Figure 10-14.
When the Pages task pane appears, type the name of the web page in the Page Name field.
Click one of the following options, depending on how you want this page to appear:
Click “Appears for this meeting only” if you only want the page to be visible for a single meeting.
Click “Appears for all meetings” if you want the page to be continually available (see Figure 10-15 for the results).
Once the page is created, you are free to customize it as described earlier in this chapter. You can also create another web page for your site at this time. When you have created one or more pages, you can access them on the workspace by clicking their tabs. Web page tabs are located at the top-left hand corner of any page on the workspace.
On the workspace site, click the tab of the desired web page.
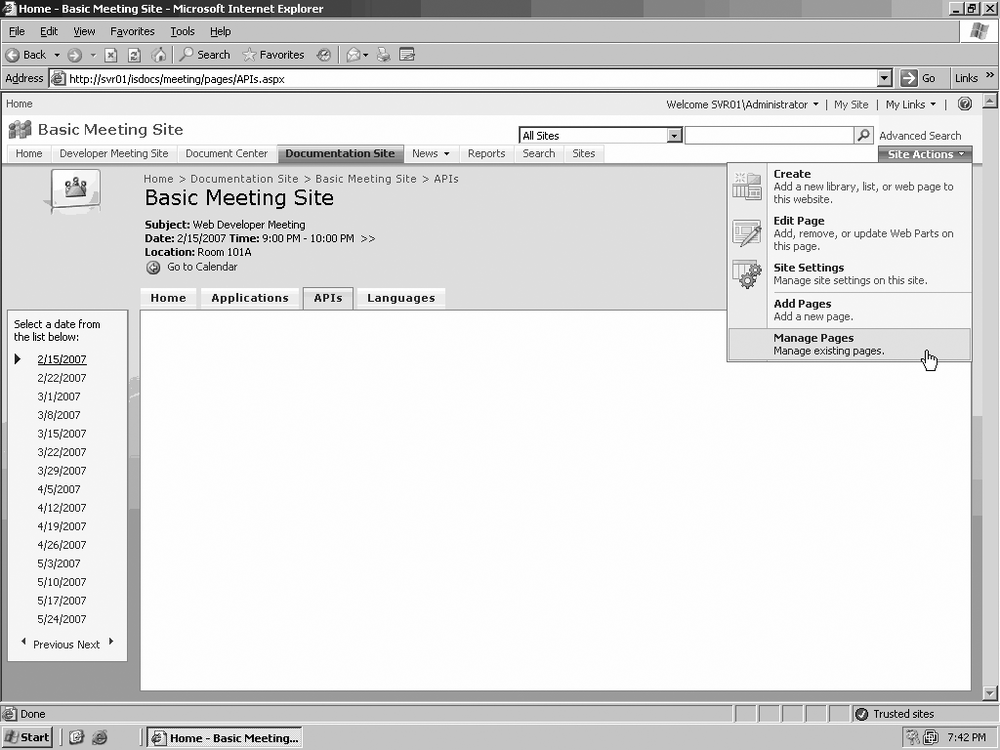
Click Site Actions and select Manage Pages from the menu, as seen in Figure 10-16.
In the Pages task pane, click the arrow next to Order, and select Settings from the list, as in Figure 10-17.
Click the current name of the web page to highlight it, and then type the new name for the page.
Click OK to save your changes.

Anyone who has ever created a web site with more than one page knows that pages are usually constructed in some sort of directory hierarchy. Some site architectures can be in the form of a complex directory tree, whereas others can have a completely flat structure with all pages and other files stored in a single folder.
By default, web pages in a workspace site are ordered by when they were created. Except for the home page, which will always be the first page, the order in which your pages appear can be changed.
If you are familiar with the Mozilla Firefox Web Browser’s tabbing function, you know you can change the order of tabs with a drag-and-drop action. Changing the order of the web page tabs in a SharePoint workspace is a bit more involved:
On the workspace, click Site Actions and select Manage Pages from the menu.
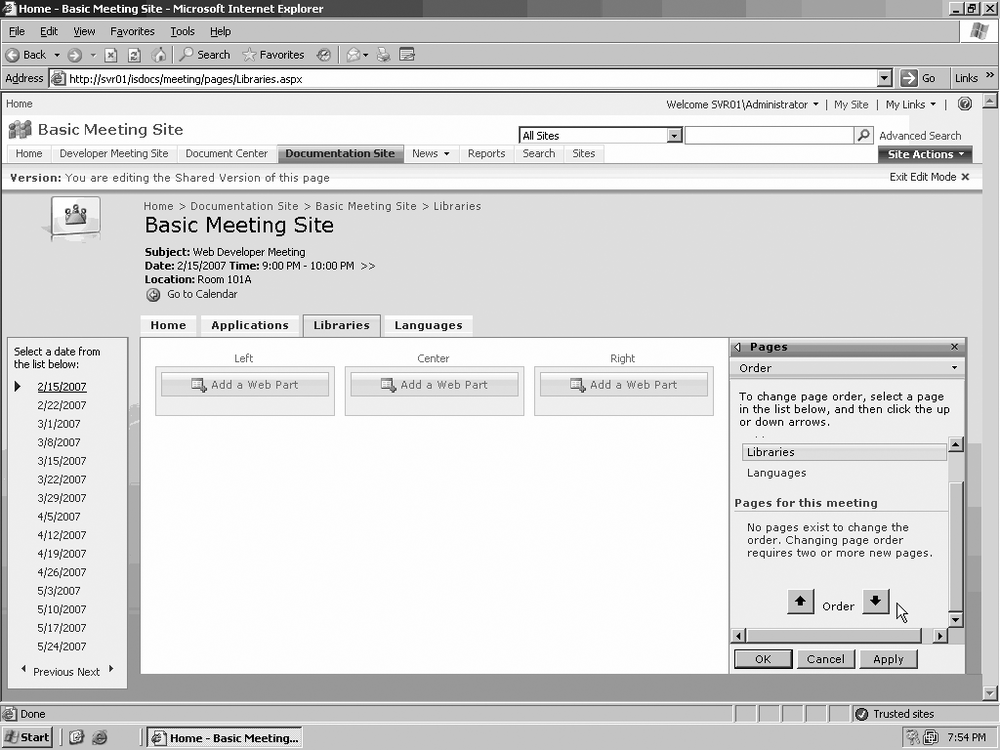
In the Pages task pane under Order, select the page you want to reorder.
Click either the Move Up or Move Down arrows as many times as necessary to place the web page where you want it, as shown in Figure 10-18.
While it’s said that “diamonds are forever,” the dynamic nature of the Web and business-related meetings guarantees that web pages are not. Deleting a web page from your workspace site is a fairly simple process. The only web page you cannot delete is the home page.
Tip
The only way you can delete the home page is by deleting the entire workspace site. See the “Delete Sites and Site Collections” section in Chapter 5 for more information.

On the workspace, click Site Actions and select Manage Pages from the menu.
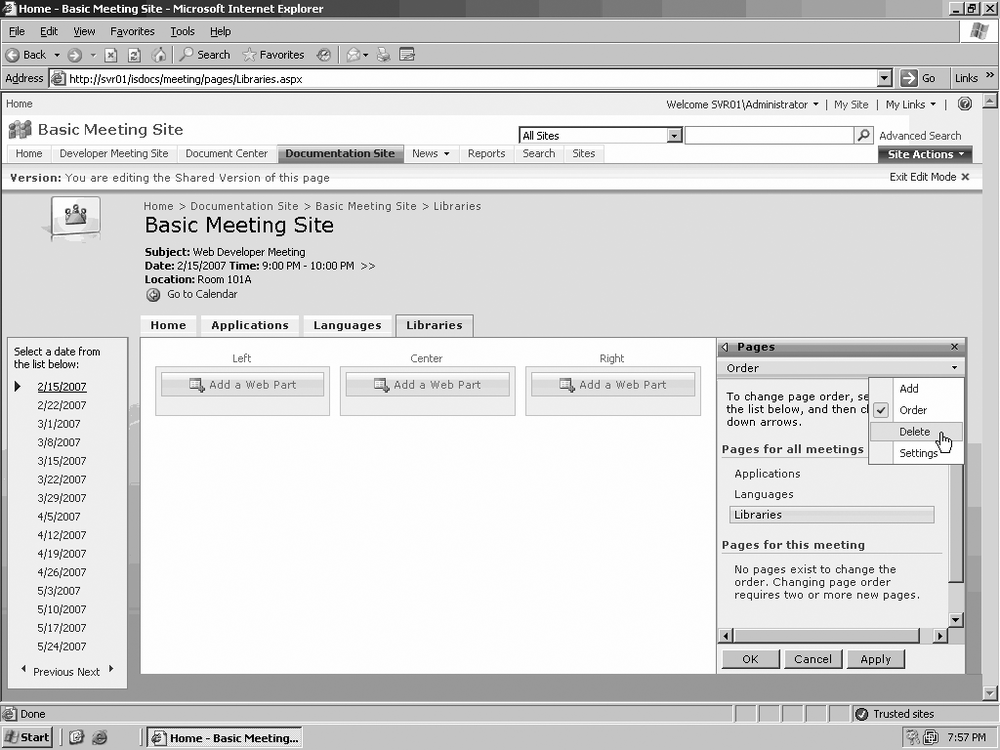
In the Pages task pane, click the arrow next to Order and select “Delete from the list,” as in Figure 10-19.
Select the page you want to delete and click Delete.
When the confirmation dialog box appears, click OK.
Very often as part of a business meeting discussion, issues arise regarding tasks that need to be done in a group or organization. While many attendees take notes either electronically or the old-fashioned way with pen and paper, information about who was supposed to do what seems to disappear sometime after the meeting is over.
One of the ways you can use your Meeting Workspace site is to create a task list, assign tasks to meeting attendees, and track the progress of those tasks to (hopefully) completion.
Before you can assign and track tasks, you need to create a basic task list to contain your content. While most Meeting Worksite templates include a Tasks List by default, this exercise will show you how to add a Tasks List Web Part. You can also follow these steps to add a Projects Tasks List Web Part to the Web Part page:
On the workspace site, click Site Actions and select Edit Page from the menu.
Click Tasks in the Add Web Parts task pane.
Scroll to the bottom of the Add Web Parts pane and in the “Add to” list, select a Web Part field on your Web Part page where you want to place the list.
Click Add to insert the Tasks List Web Part in the selected Web Part field.
Now that you have a Tasks List on your site, it’s time to start creating and assigning tasks:
On your site at the Tasks List Web Part, under Tasks, click “Add new item.”
When the Tasks page opens, add the following information:
The title of the task
Who you are assigning to the task
The priority of the task
A brief description of or instructions about the task
The start date
The due date
View this page in Figure 10-20, and then click OK to save your changes.
As part of tracking tasks, you will probably want to update them as progress is made. Sometimes while working on a task, the team member will discover something that requires a change in the parameters of the work being done. This could include changing the due date, assigning additional users to the task, or changing the instructions on how to complete the task.

On the workspace site at the Tasks List, click the name of the task you want to modify, and then click on Edit Item.
Modify any of the information on the Task page, including:
Title
Task assignment
Task priority
The description or instructions relating to the task
Due date
Status
Progress toward completion
Click OK to save your changes.
The purpose of the Attendees List is to invite members to a meeting, record who was invited, and let people who have been invited submit notes, such as suggestions for the agenda. During or after the meeting, the Attendees List can be amended to reflect who actually attended.
When you create a Meeting Workspace site under a parent site, any user who has access permissions to the parent site will automatically be able to see the Meeting Workspace site. The administrator or site owner can manually change access rights as necessary.
All attendees are part of the workspace Members group, which gives them rights to view and submit contributions to the site. The Meeting Attendees List is another way to formally advertise and record information about business meetings. Attendees can be added to the list either through a meeting invitation sent from a SharePoint compatible email or calendar program or by directly adding them to the list.
If you use an email program such as Microsoft Office Outlook 2007, when you send a meeting invitation, anyone in the To field of the email will be added automatically to the Attendees List. Subsequently, if you modify the Attendees List on the site, you will have to modify your Outlook Calendar manually, since communication doesn’t flow both ways.
You can add only valid SharePoint users to the Attendees list, and you must use either their username, domain name, or email address. Also, unlike Tasks Lists, you can only have one Attendees List on the site. If you add a second Attendees List to the site, the second list will simply be a duplicate view of the original. Any changes you make on the first list will be displayed on the second.
One interesting feature about the Attendees List is that it can’t be deleted. You can remove all of the attendees if you are the meeting organizer or site owner or hide the list view, but the list part itself remains.
Most of the Meeting Workspace templates include an Attendees List by default, so once the Meeting Workspace site is created, you can go right to work on the list.
Go to the bottom of the Attendees List and click Manage Attendees.
Click New on the toolbar.
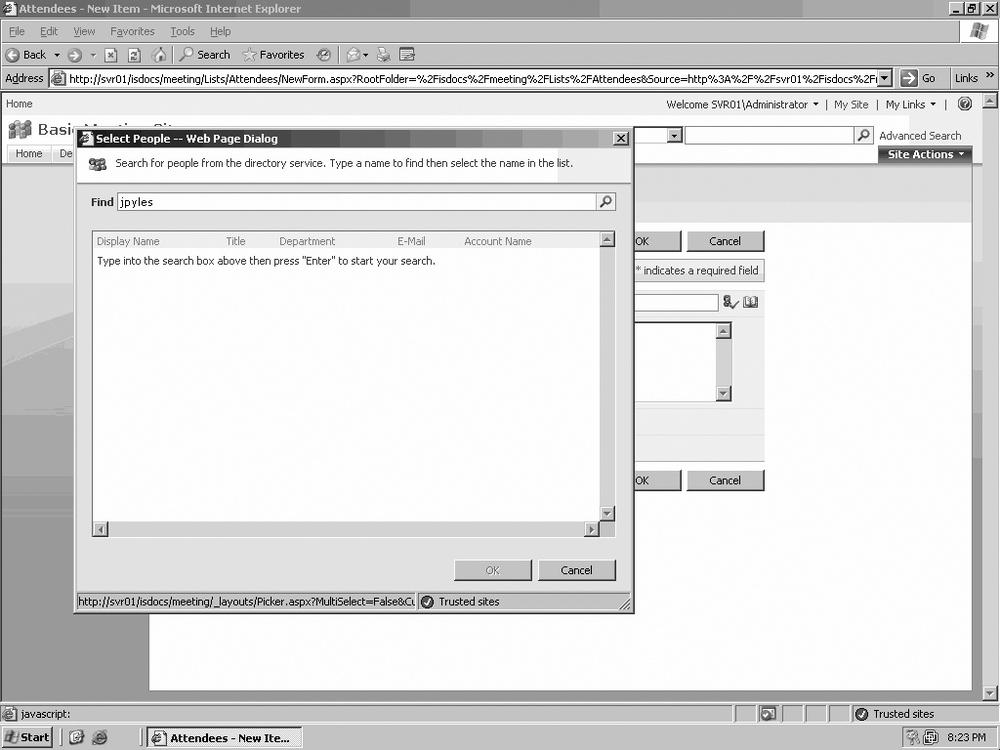
Click Browse to navigate through the directory and locate the attendee’s name; otherwise, type the name in the available field, as seen in Figure 10-21.
Add any other information relevant to the attendee, such as whether attendance is optional.
When you are finished, click OK to add the attendee to the list.
One common reason for editing the Attendees List is if an attendee didn’t show up. This keeps a record of people who were invited but didn’t attend, so you can make sure they are brought up to speed on what they missed:
On the site, at the Attendees List, click the Edit button next to the name of the attendee you want to modify.
When the page containing the attendee’s information appears, edit the fields and other elements as necessary, and then click OK to save your changes.
Although it’s possible to delete an attendee from the Attendees List, the rationale for such an action is questionable. On the surface, it seems to make sense to delete the names of people who were invited to the meeting but didn’t attend. In that way, only the names of people who were at the meeting are present on the list. However, over the course of time, memories begin to fade and you might not recall whether a particular member was invited to a meeting. If you need to keep a record of not only who attended but also who was invited to a meeting, edit the Attendee’s List to reflect that information instead of deleting the name from the list:
On the site at the Attendees List, go to the bottom of the list and click Manage Attendees.
Click on the attendee’s name to display the menu, and then select Delete Item.
When the confirmation dialog box appears, click OK to send the item to the Recycle Bin.
If Web Parts and Web Part pages are the basic building blocks for determining how and where data is presented, then Meeting Workspaces are desktops and conference rooms that allow people to organize and present all these information elements pursuant to a goal or purpose. Regardless of the business-related activity, MOSS 2007 provides the specific arena to create, develop, and record everything necessary for the particular event. You will never again need to depend upon your hastily scribbled notes or memories of a staff meeting held six months ago to determine who was assigned responsibility for a critical project or task. Use SharePoint Meeting Workspaces to organize everything from your company’s annual financial report to a coworker’s birthday party. From planning to execution, this SharePoint feature will make all your group activities more efficient and productive.