
One of the outstanding strengths of Microsoft Office SharePoint Server 2007 is the enhanced set of collaboration tools. Applications both within and outside of the Microsoft Office 2007 Suite can be used to share documents, create customized group and personal workspaces, and manage project lifecycles. Microsoft Office Outlook 2007 is a fully integrated collaborative component and can be used to provide alerts and notifications about content changes to a targeted group and to share scheduling calendars.
MOSS 2007 and Outlook work together in the following ways:
Add content from emails—such as discussions, documents, and pictures—to a SharePoint site directly from Outlook.
Synchronize events and meeting requests between the default calendar in Share-Point and your Outlook calendar.
Create a Meeting Workplace site by adding an event in Outlook’s calendar.
Set up email support for SharePoint libraries, announcements, calendar lists, and discussion boards.
Target emails to a specific SharePoint Group.
Using previous versions of SharePoint, if you wanted to add content from Outlook to SharePoint, you had to open Outlook and then launch SharePoint in a web browser. You would then have to manually add the information, usually through copy and paste. SharePoint 2007 makes it possible to directly email content to SharePoint the way you’d send an email to another person.
This feature is not enabled by default, so the site owner or administrator must go to the Central Administration page for your site and enable email support. Most SharePoint lists and libraries can be configured with their own email addresses so a site with incoming email support can receive emails and integrate their content directly into the list or library. Someone with Manage Lists rights or higher must configure an email address for the selected list or library. The following lists and libraries are able to receive content via email:
Announcements lists
Blogs
Calendar lists
Discussion boards
Document libraries
Form libraries
Picture libraries
Later portions of this chapter show hands-on exercises for getting things done, but first let’s take a look at a small overview of how MOSS 2007 and MS Office Outlook 2007 work and play together.
Not only does SharePoint allow you to manage task lists much more aggressively, but so do all the other Office 2007 applications. Outlook 2007 comes with a To-Do List in the main interface that imports tasks from the rest of the Office Suite applications, including SharePoint, letting the user view tasks assigned from multiple applications and multiple workgroups and sites in a single interface. Calendar events and flagged messages also appear in the To-Do Bar. You can also subscribe to an RSS feed in a SharePoint site, so you can get up-to-the minute updates on the status of tasks assigned to you.
Another office appliance updated for Office 2007 bridges a certain gap between Outlook and SharePoint. One Note 2007 is an electronic note-taking utility often used for meeting notes. Like pen and paper, you can use it to jot, scribble, doodle, and write down key ideas, questions, and tasks. What’s different is what you can do with the information you create.
Within OneNote, the scribbles and drawings on the page are not static objects; you can add, move, and delete any of the content you create. For example, you can rearrange your notes and organize them by groups, subjects, and tasks. Here are some other examples of what you can do with One Note:
Like other Office 2007 products, One Note can interact with SharePoint and share information. For instance, when you receive a meeting invitation in Outlook, that invitation data can be routed to both the calendars in Outlook and the calendar and announcements lists in SharePoint. The invitation data can be imported by OneNote and used to populate the notebook page. Action items in your meeting notes can be converted into tasks and exported both to Outlook’s To-Do List and into a tasks list in SharePoint. OneNote notebooks can also be stored as documents in SharePoint site libraries. You can also create an email from inside of OneNote and send it to members of your distribution list, as well as to SharePoint libraries and lists.
Later in this chapter, you’ll learn how to add information to lists, libraries, and groups from Outlook. To enable this functionality, your site owner or administrator must enable incoming email support in Central Administration.
As you will see in Chapter 21, each SharePoint user has access to a private, individualized web site within the site collection. There are default public areas of everyone’s My Site that can be accessed if the owner gives you permission. The advantage of sharing information on your My Site is that it is a less formal arena than shared team sites, and you can organize information based on individual or small workgroup needs.
Traditionally, you consider putting people on a distribution list if you want to send a broadcast email message to a team or individuals with whom you are working. Then, if you are collaborating in some sort of web-based interface, you close our mail application, open a web browser, and get to work.
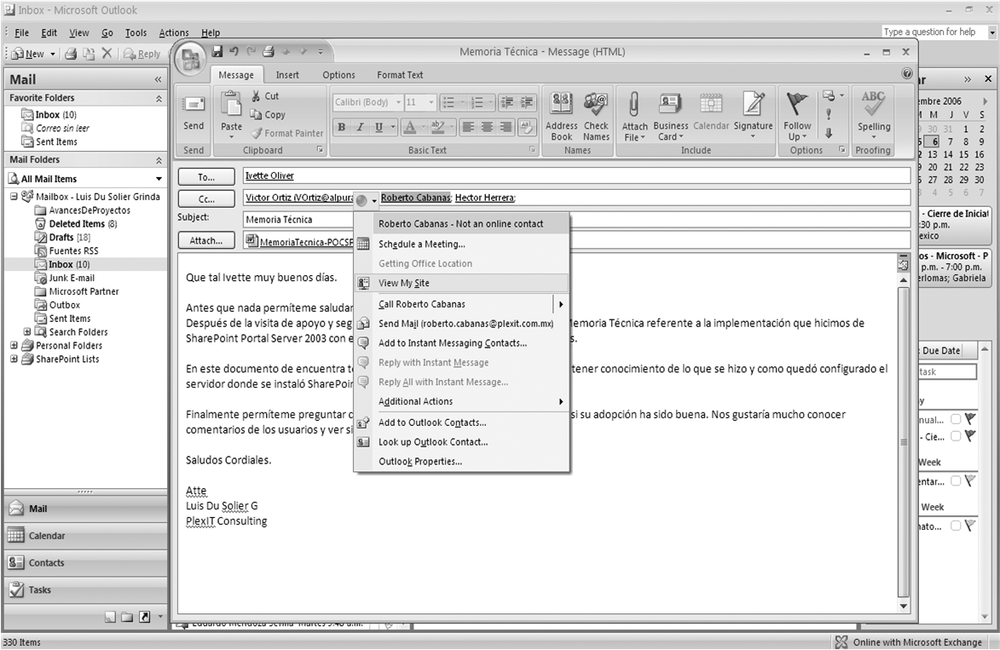
From Outlook 2007, this series of actions is unnecessary. While creating a mail message for someone you’re working with, you can click to the right of the recipient’s name to open a list and then select View My Site, as in Figure 16-1.
Once the other person’s My Site web page is open, you can view whatever information he made public, including additional contact information, shared documents, their colleagues list, and a list of their site memberships, as in Figure 16-2.
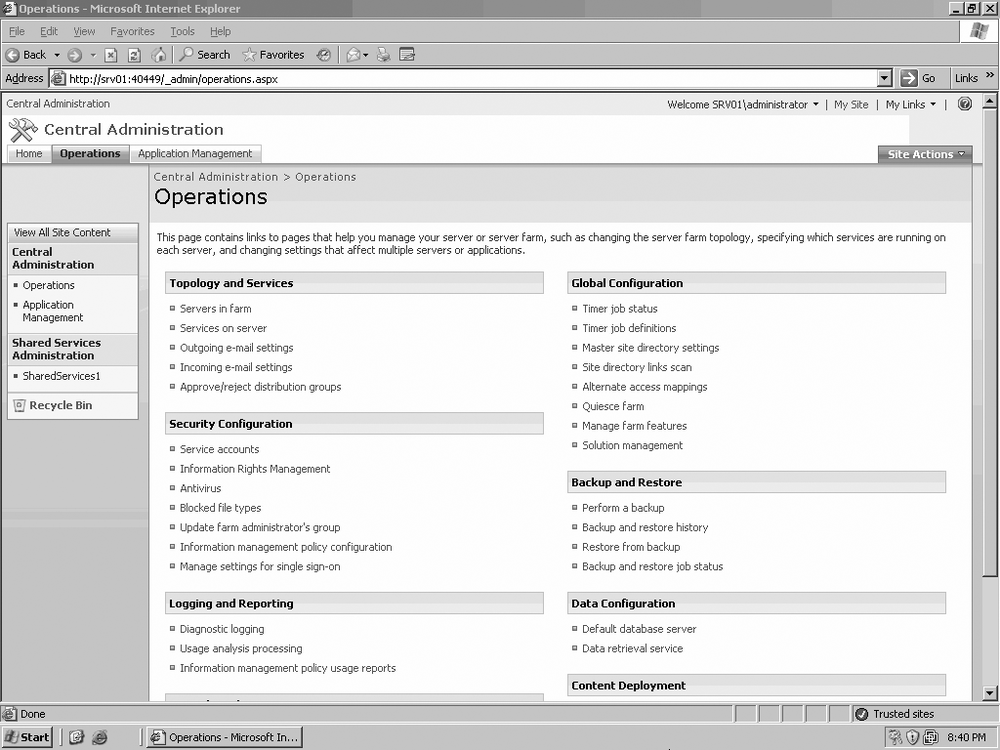
Before you can take advantage of the benefits of using Outlook with SharePoint, your administrator must enable email support in Central Administration. Figure 16-3 shows the Central Administration page.
Tip
To open the SharePoint Central Administration Web Application:
On the server hosting MOSS 2007, click Start and then click All Programs.
Click Microsoft Office Server and then click SharePoint 3.0 Central Administration.
If prompted, type your username and password in the dialog box and press Enter to open Central Administration.

On the Central Administration page at the Home tab, click the Operations tab to open the page shown in Figure 16-4.
Under “Topology and Services,” click “Incoming e-mail settings.”
On the Configure Incoming E-Mail Settings Page under “Enable incoming e-mail,” click the Yes radio button to enable email support.
Under Settings mode, click Automatic to automatically receive all your settings from the SMTP service, or click Advanced if you are using an email drop folder to receive mail.
In the Directory Management Service section under “Use the SharePoint Directory Management Service to create distribution groups and contacts?,” click No, Yes, or Use Remote.
If you click Yes, you will need to configure the following:
Specify a container where new distribution groups will be created (for example, OU=ContainerName, DC=domain, DC=com).
Specify the location of the SMTP mail server (for example, server.sharepoint.example.com).
Select Yes or No for “Accept messages from authenticated users only?”
Select Yes or No for “Allow creation of distribution groups from SharePoint sites?”
Select Distribution group request approval settings.
If you click No, the Directory Management Service will not be able to connect SharePoint to your company’s user directory, and you will not be able to create email distribution groups from within SharePoint.
If you select “Use remote” to indicate you want to use an alternate SMTP source, you will need to configure the following:
Specify the Directory Management Service URL (for example, http://server:adminport/_vti_bin/SharepointEmailWS.asmx).
Specify the location of an SMTP service.
Select Yes or No for “Accept messages from authenticated users only?” and for “Allow creation of distribution groups from SharePoint sites?”
Under Incoming E-Mail Server Display Address, enter a display address into the available field—for example, [email protected].
If you are using an E-Mail Drop Folder instead of SMTP, specify the location of the folder—for example, c:inetpubmailrootdrop.
Click OK.

Once email support is enabled in Central Administration at the top-level site, any subsites created under the portal site will inherit that support. To use Distribution Lists with SharePoint, enable the SharePoint Directory Management Service in Central Administration as well. If these conditions are satisfied and you choose to create a new group when creating a new subsite, the following actions occur:
You will be offered the option of creating an email distribution list and the opportunity to set an email address for that list.
Any users you add to the group are automatically added to another group called Members and also added to the distribution list. Any changes made to either Members or the distribution list will synchronize.
During the site creation process, both the teamsite discussion board and calendar will have email support enabled and be automatically assigned email addresses.
Although the process for enabling incoming email support for the appropriate lists and libraries is similar, there are differences depending on the specific content container. See the “Introduction” section of this chapter for the names of the lists and libraries that support incoming email.
Click the name of the announcements list to open it, and then click Settings and select List Settings.
Under Communications, click “Incoming email settings.”
In the Email section, click Yes to enable email support.
Type the email alias to be used to send email traffic to the list in the available field.
In the E-Mail Attachments section, click Yes to archive email attachments or No to discard email attachments.
In the E-Mail Message section, click Yes to save the original email as an attachment or No to discard the original email.
In the E-Mail Meeting Invitations section, click Yes to archive meeting invitations in the announcements list.
In the E-mail Security section, configure the available settings to determine whether to receive emails just from site members or from any email address.
Click OK to finish.
You can see an example of how this page is set up in Figure 16-5.

Open the calendar list by clicking on its name, as in Figure 16-6, and then click Settings and select List Settings.
Under Communications, click “Incoming email settings.”
In the E-Mail section, click Yes to enable email support.
Complete the email address to be used to send email traffic to the list in the available field.
Tip
An example is calendar@domain_name.com. The suffix of the address will already exist, and all you will need to provide is the prefix or “username,” such as “calendar.”
In the E-Mail Attachments section, click Yes to archive email attachments or No to discard email attachments.
In the E-Mail Meeting Invitations section, click Yes to archive meeting invitations in the calendar list.
Tip
Step 5 in this exercise is the same as step 7 in the previous exercise, "Enabling Email Support for an Announcements List.” Because SharePoint email handlers are aware only of the individual email they manage, it’s possible to send a meeting invitation to both an announcements list and a calendar list and have it archived in both locations. The same is true if the invitation is sent to a discussion board. See the subsequent exercise, “Enabling Email Support for a Discussion Board” for details.
In the E-Mail Security section, configure the available settings to determine whether to receive emails just from site members or from any email address.
Click OK to finish.

After opening the desired discussion board, click on Settings and select List Settings.
Under Communications, click “Incoming e-mail settings.”
In the E-Mail section, click on Yes to enable email support.
Type the email alias to be used to send email traffic to the list in the available field.
In the E-Mail Attachments section, click Yes to archive email attachments or No to discard email attachments.
In the E-Mail Message section, click Yes to save the original email as an attachment or No to discard the original email.
In the E-Mail Meeting Invitations section, click Yes to archive meeting invitations in the discussion board.
In the E-Mail Security section, configure the available settings to determine whether to receive emails just from site members or from any email address.
Click OK to finish.
Tip
See Chapter 11 for more information about discussion groups.
You can also enable email support for a discussion board when you are creating it, as shown in Figure 16-7.
Click Settings, and then click Library Settings.
In the E-Mail section, click Yes to enable email support.
In the E-Mail Address field, type a unique name for the library’s email address.
In the E-Mail Attachments section, under “Group attachments in folders,” select Yes for one of the following:
Save all attachments in root folder
Save all attachments in folders grouped by email subject
Save all attachments in folders grouped by email sender
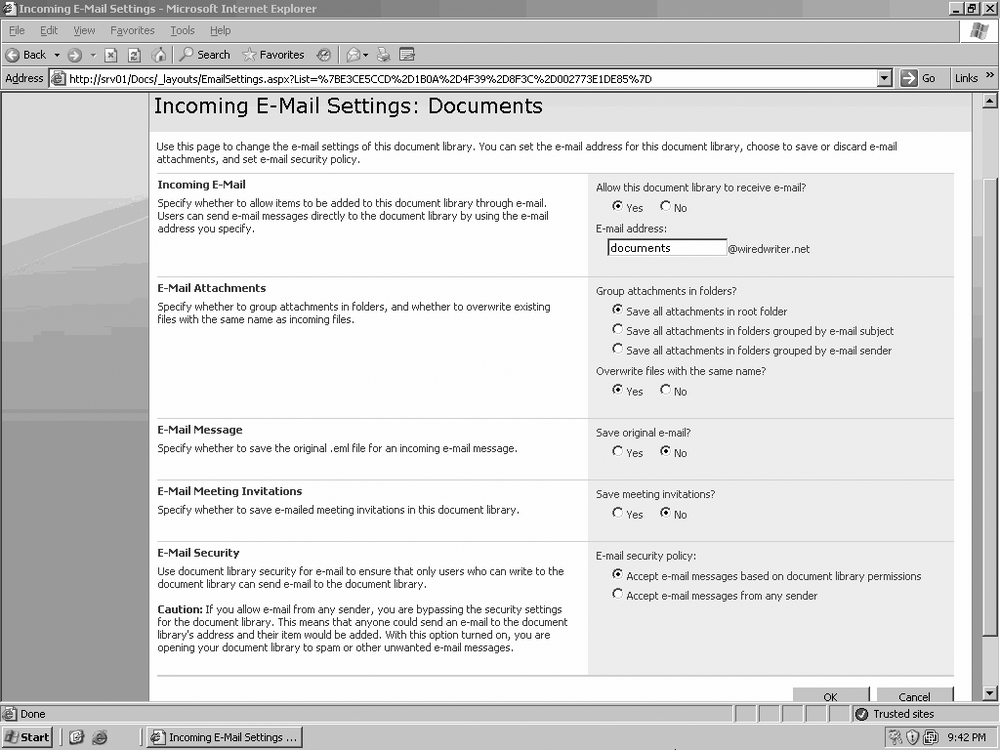
To have the attachment overwrite existing files with the same name, click the Yes radio button, as shown in Figure 16-8.
Warning
If you do not make this selection and then try to save an attachment with the same name as a library document, the following sequence of events will occur:
The system will add four randomly generated digits to the end of the attachment’s name to create a unique name.
If action 1 fails, the system will add a globally unique identifier (GUID) to the end of the attachment’s name to create a unique name.
If action 2 fails, the attachment is discarded.
In the E-Mail Message section, click Yes to save the original email as a separate document in the library or No to discard the original email.
In the E-Mail Meeting Invitations, select whether to save email invitation attachments as documents or to discard them.
In the E-Mail Security section, configure the available settings to determine whether to receive emails just from site members or from any email address.
Click OK to finish.

Now that the desired lists and libraries have been set up to receive emails, it’s time to put the process in action. Here are the basics of sending email content to various lists and libraries:
You can send emails to multiple lists, libraries, and distribution lists either by adding multiple names in the To: field separated by commas, or by using the To:, Cc:, and Bcc: fields to send your content to different addresses.
Once content is shared between a library and Outlook, it can be checked out for editing from either interface. If you need to work on any SharePoint documents offline, you can create a connection to Outlook directly from the library and save an offline copy there. This is useful for frequent travelers who don’t always have access to a reliable Internet connection.
Once the offline document has been edited and a connection has been established between Outlook and SharePoint, the two versions of the document can be synchronized so the versions in Outlook and SharePoint are the same. Figure 16-9 shows you how to initiate the connection to Outlook from a document library.
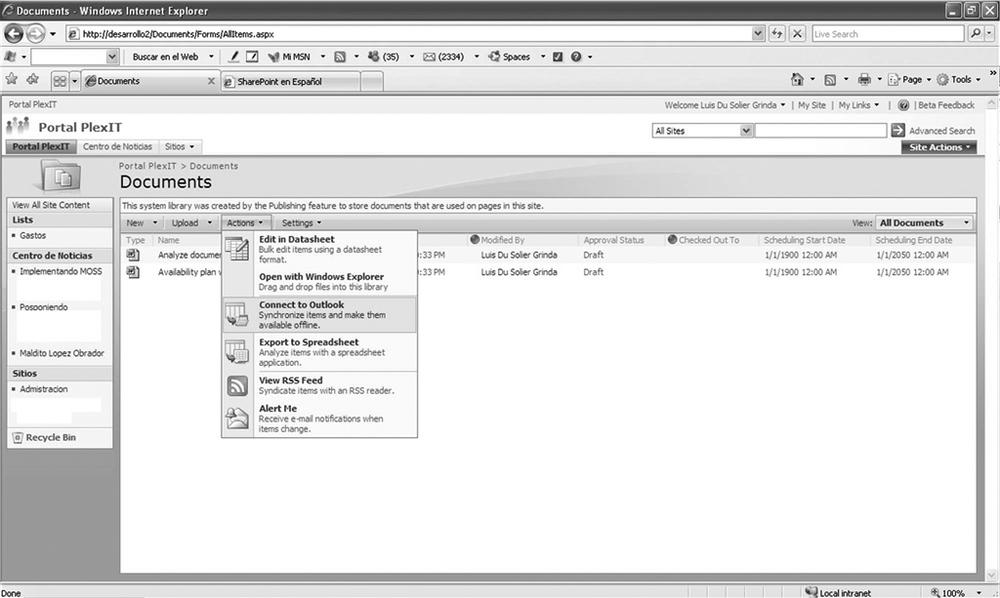
In the open document library, click Actions and select “Connect to Outlook” from the list.
When the confirmation dialog box opens, asking if you want to connect the library to Outlook (Figure 16-10), click Yes.

The version of this document already in Outlook will be synchronized with the newer version in SharePoint. You can now edit it offline and when you are ready, synchronize the two documents again, updating the one in SharePoint with the changes you made. Figure 16-11 shows the offline SharePoint document in Outlook.

SharePoint 2007 offers five different Web Parts to manage Outlook Web Access:
My Calendar
My Contacts
My Inbox
My Mail Folder
My Tasks
Outlook Web Access is really a function of Microsoft Exchange Server 2007 and Outlook 2007 together, since there are both server and client components. When the client software is installed on the user’s computer and configured to use an Exchange 2007 server, the user will enjoy a wide variety of benefits in accessing email from a web browser interface.
SharePoint 2007 provides the previously mentioned Web Parts to integrate Outlook Web Access features within SharePoint sites and pages, so the user never has to leave the site in order to use the latest Outlook web features.
Tip
Access to a mail account on an Exchange 2007 Server is necessary to use Outlook Web Access Web Parts.
A feature new to Web Access 2007 is the ability to configure SharePoint and Windows File Share Integration with Outlook Web Access. This allows Web Access users to access documents in SharePoint libraries. Unlike what you read about earlier in “Synchronizing SharePoint and Outlook Documents,” Outlook Web Access users can only access a Read-Only copy of SharePoint documents. This means that Web Access users can’t edit offline copies of documents stored either in SharePoint libraries or in Windows file shares.
Your email-enabled groups, libraries, and lists can receive emails routed through the server hosting the SharePoint site collection or via another server such as Microsoft Exchange Server. There are a few advantages to having mail routed through a separate server rather than being sent directly to SharePoint:
- Authentication
The SMTP service on the SharePoint server cannot require users sending email to authenticate to the system, but Exchange does have this ability. If you are using Exchange for your mail services, the site owner or administrator and go to Central Administration in SharePoint and select the option of accepting mail only from authenticated users.
- Spam filtering
Exchange has the capacity to filter unwanted mail traffic, preventing unsolicited mail from being received by SharePoint and perhaps subsequently posted to lists and libraries.
Regardless of the mail server option you select, if you are going to enable mail support for your site, take adequate security precautions to prevent your system from having viruses, adware, and spam introduced into SharePoint through mail traffic.
As you can see, SharePoint, Outlook, and all other Office 2007 products are fully integrated to provide seamless transfer of information between applications. You no longer have to think of the Outlook email and calendaring application as something separate from SharePoint. You can perform all of the familiar Outlook-related tasks from inside either Outlook or SharePoint. Regardless of whether you happen to be sitting in front of an open Outlook or SharePoint interface, you can quickly and simply schedule a meeting, send an email to a distribution group, or any other related task.