
InfoPath is an XML-based electronic forms development product that Microsoft first released with its Office 2003 series. InfoPath was originally designed to be used as an effective data collection tool. The objective was to provide the end user with the ability to quickly build and deploy a form with an intuitive user interface. Since its introduction, the product has come a long way, with Microsoft enhancing both the built-in features and the development platform for building complex form solutions.
Prior to the introduction of the Office 2007 system, the InfoPath client application, like other Office products, had to be installed on every user’s computer. In order to develop and use a form, the form had to be designed using InfoPath, and the resulting form template hosted in a network file share, or installed in individual users’ machines, or uploaded into a form library in SharePoint, from where users could then fill up the forms. Filling up the form required InfoPath to be installed on the client machine.
With the advent of the Office 2007 system, Microsoft introduced a new server-side runtime to host InfoPath forms known as InfoPath Forms Services. InfoPath Forms Services is integrated into Office SharePoint 2007 as part of the Enterprise site collection Feature, and it is also available as a separate product called Forms Server 2007. Forms Server 2007/InfoPath Forms Services is built on top of WSS 3.0 as an ASP.NET 2.0 application, and its main purpose is to host InfoPath 2007 forms on the web browser, making it more widely accessible. The procedure to develop the form remains mostly the same, and is enhanced with the new features of InfoPath 2007, some of which are highlighted in the “Improvements in InfoPath 2007” section of this chapter. Once the form is hosted within InfoPath Forms Services, users can fill out the form using the browser and no longer need the InfoPath client application.
The main objective of this chapter is to explore the major configuration aspects of InfoPath Forms Services and some of the key integration features between SharePoint 2007 and InfoPath 2007. InfoPath 2007 introduces a lot of new data access, design, and deployment features. The new features discussed in this chapter are focused on the integration of InfoPath 2007 and SharePoint 2007.
In this chapter, you will learn to:
Configure InfoPath Forms Services
Deploy InfoPath Forms to SharePoint 2007 using the following options:
Deploy directly to the Form Library
Deploy the form template as a site content type
Administrator-approved form template deployment
Configure Property Promotion and Property Demotion
Develop and deploy Document Information Panels
Tip
This chapter assumes that you are familiar with designing InfoPath forms. A detailed review of InfoPath forms design and all the new features associated with the design of the forms are beyond the scope of this chapter. For further information about the new features with InfoPath 2007, visit http://office.microsoft.com/en-us/products/default.aspx.
Previous releases of InfoPath had their own limitations, the first and foremost being that each client machine required InfoPath to be installed locally. Some other limitations include:
Developing a connected InfoPath form raised some technical challenges and was complicated for end users.
Developers did not have an integrated development platform.
The product did not integrate tightly with other Office products, such as Word and Excel.
InfoPath 2007 extends the capabilities of its predecessor in different segments, such as added controls, deployment features, integration, and programmability. Some of the new capabilities of the product include:
The ability to covert Word and Excel documents into InfoPath form templates.
The ability to web-enable an InfoPath form using InfoPath Forms Services or Forms Server 2007.
Embedding InfoPath forms into Office products such as Outlook.
Design once—the ability that lets the form be built once and rendered in different modes and devices.
Document Information Panel, an InfoPath form that is hosted inside Microsoft Word 2007, Excel 2007, or PowerPoint 2007, which can be used to edit document properties.
Logic inspector, a component that provides a visual view of all rules embedded in the form.
The ability to publish InfoPath form templates to a SharePoint form library or as a site collection content type.
Reusable code sections called Template Parts.
Integrated development environment inside Visual Studio 2005 using Visual Studio Tools for Office (VSTO).
The ability to host InfoPath forms in custom applications.
Information Rights Management—the ability to protect sensitive data in the forms.
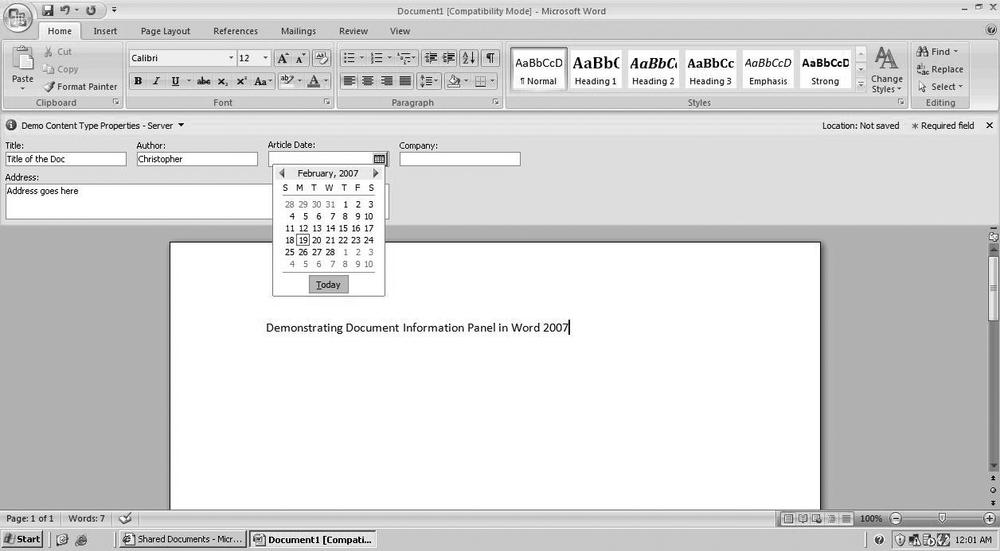
One of the new integration features of InfoPath 2007 with other Office products (Word, Excel, and PowerPoint) is the Document Information Panel (discussed later in the “Forms Deployment” section of this chapter). This panel is an InfoPath 2007 form that allows users to edit metadata properties for documents within SharePoint. The Document Information Panel displays within the Office application (such as Word, Excel, and PowerPoint), and presents an intuitive user interface for collecting metadata. Since the panel is an InfoPath 2007 form, it can take advantage of the rich features of InfoPath 2007, such as built-in controls and rules to validate the data. Figure 20-1 depicts an InfoPath 2007 Document Information Panel within Word.
Let’s take a quick look at the main components of the InfoPath form and the InfoPath Forms Services architecture. The objective of this section is to provide an overall understanding of how the different components work.
An InfoPath form template (.xsn) file is actually a CAB file containing different components files. The following are some of the files contained inside the .xsn:
- .xsf
A manifest file that provides the basic definition of other form files
- .xsl
Defines the transformation for data into different views
- .xsd
Defines the data source schema
- .dll
Carries the custom logic built into .NET or COM
- .htm and other resource files
Custom HTML resource files and other resources for the form
When a form template is uploaded using administrative deployment (discussed later in this chapter), the template is stored in the content database of the site. Office Forms Services provide a server-side runtime environment for InfoPath Forms Services. While running on the browser, all rules, validation, and calculations are executed in the browser using a client-side script. All business logic is executed in the server. So, when the browser requests business logic execution, a postback is executed using low-cost XMLHTTP. FormsServer.aspx is an InfoPath Forms Services page that accesses the form’s data from the content database and renders it to the client. Internally, InfoPath Forms Services consists of four components that are responsible for rendering this .xsn file on the browser:
- ASP.NET modules
Return HTML to the browser
- InfoPath Forms Services HTTP Handler
Forwards requests from IIS to Page Generator
- Converter
Responsible for converting the .xsn file into .aspx pages
- Page generator
Communicates with external data sources and is responsible processing postback data from the browser and maintaining session state
This section discusses some of the main configuration elements of InfoPath Forms Services.
The InfoPath Forms Services server-level configuration options are located in the SharePoint Central Administration → Application Management page. Figure 20-2 depicts the configuration section within the Application Management page.

Let’s discuss the “Manage form templates” and the “Configure InfoPath Forms Services” options of the Forms Services configuration page in a little more detail.
This section allows administrators to perform the following actions:
- Activate a form template to a site collection
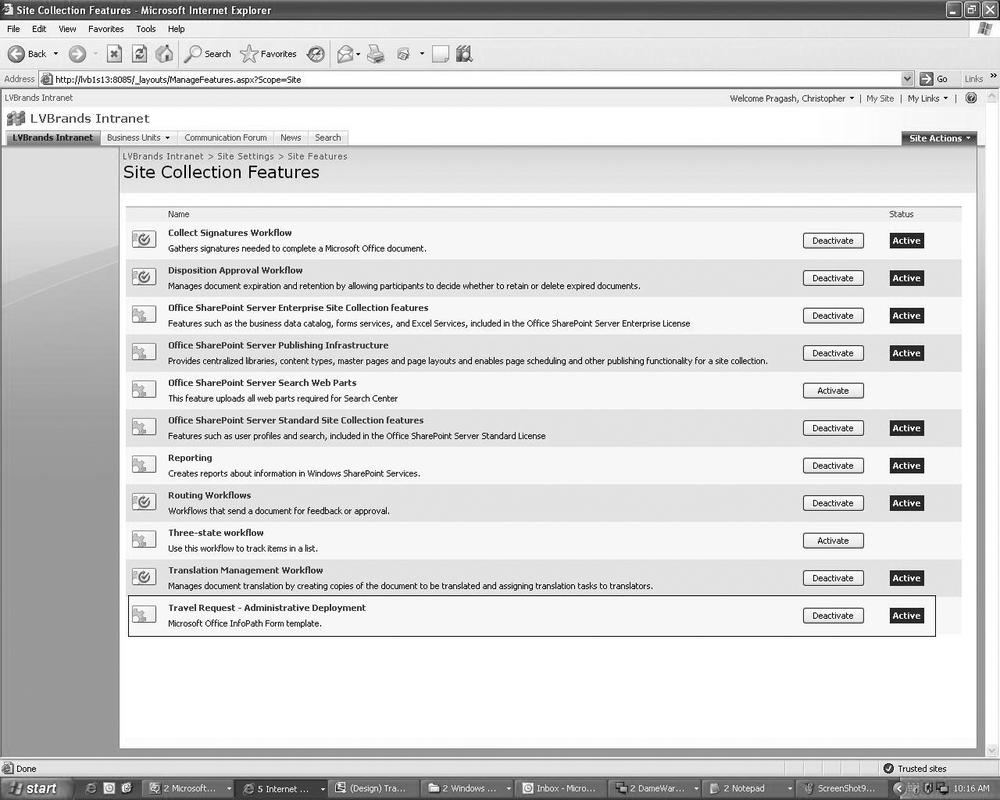
Administrators can use this option to make the form template available to users of a specific site collection. Activating the form template to a site collection activates a site collection feature and creates a form template in the form template library. Figure 20-3 depicts the feature that is activated by this process.
- Deactivate a form template from a site collection
Deactivating a form template terminates existing instances of the form, taking the form template offline immediately. This may result in data loss; therefore, careful consideration should be given before deactivating a form.
- Quiesce a form template
Quiescing is a process that takes the form template offline gradually and prevents new sessions from being created. It allows existing sessions to be completed, thereby preventing data loss. When a form template is quiesced by the administrator, the form templates from all the site collections are taken offline.
- Remove a form template
Removes the form template from the repository.
This page allows the administrator to configure some of the basic settings for the InfoPath Forms Services. There are different sections in this page; some of the more important sections are discussed here:
- User Browser-enabled Form Templates
Administrators can choose to allow end users to browser-enable form templates, and also specify whether rendering the user-enabled form templates browser is allowed.
- Data Connection Timeouts
Allows the administrators to specify a default timeout value and a maximum timeout value. Default timeout values can be overridden in form code but cannot exceed the maximum timeout limit specified by the administrator.
- HTTP data connections
Choosing this setting will require SSL-encrypted connections for data connections that require Basic or Digest authentication types.
- Embedded SQL Authentication
Form code that connects to a database may sometimes have usernames and passwords embedded in the connection string. This usually poses a security risk, as the connection string can be read in clear text in the solution manifest. This setting allows administrators to block forms that use embedded SQL authentication.
- Authentication to data sources (user form templates)
Data connection files may have embedded authentication information in the UDC file or may store the application ID used for Single Sign On. Using this setting, administrators can allow or block forms that use such authentication.
- Cross Domain Access for User Form Templates
Adinistrators can use this setting to control forms that access data from other domains.
- Form Session State
This setting allows the administrator to configure the mode in which InfoPath forms will store session data. InfoPath Forms Services can maintain session data in two modes:
SQL Server database (this approach is termed as using Session State Service)
ASP.NET view state stored in the client side (termed Form view)
Using session state—i.e., storing the state data in the SQL Server database—increases the load on the database server, whereas storing the state in the browser (form view) increases the bandwidth usage between postbacks. One of the important aspects to remember about using Session State Service is that it requires the web application to be associated with a Shared Services Provider (SSP). SSP could be thought off as a layer that provides services such as searching user profiles, site search, Excel services, and audience. (A detailed discussion of SSP is beyond the scope of this chapter.) Session State Service mode is recommended for low-bandwidth users, whereas Form view is recommended in environments with smaller groups of users. Administrators can also enter a value for the session data size allowed for Form view state. InfoPath Forms Services will automatically revert to Session State Service when the session data size exceeds the value associated with the form view mode.
Figure 20-4 depicts the Configure InfoPath Forms Services screen.

In the previous section, we explored the server-side configuration of InfoPath Forms Services. In this and coming sections, we discuss how InfoPath forms can be integrated with SharePoint.
Prior to using InfoPath Forms Services within a site collection, the WSS 3.0 feature called Office SharePoint Server Enterprise Site Collection Features must be activated within the site collection. Depending on the Site Collection Template chosen for the site, this feature may already be active.
To activate the feature, follow the steps listed here:
Open the SharePoint site on which you wish to activate the feature.
Click Site Actions → Site Settings → Modify All Site Settings.
Under the Site Collection Administration column, choose “Site collection features.”
Choose Activate for the “Office SharePoint Server Enterprise Site Collection features” option.
Before we delve into the how-tos of integrating InfoPath and SharePoint, let’s take a minute to discuss the main integration areas and some of their uses.
InfoPath 2007 form templates can be published into a Windows SharePoint Services form library. If InfoPath Forms Services were not active within the site collection, filling up these form templates would require the InfoPath client application. With the help of the Office SharePoint Server Enterprise feature, these forms can be configured as browser-enabled. InfoPath forms that are used for a business processes such as timesheets, expense reports, travel requests, help desk requests, and so on are ideal candidates to be published to a form library.
InfoPath also provides tighter property integration with SharePoint forms libraries using Property Promotion and Property Demotion. Property Promotion allows a field in the InfoPath Form to be exposed as a column in the library, and Property Demotion allows editing of InfoPath form field values inside the Datasheet view or the property pages of the Form Library in SharePoint. Changing the value in the Datasheet view automatically changes the value in the corresponding field in the InfoPath Form. Let’s consider the example of an expense form to better understand these capabilities. Two common fields within an expense form include a start date and an end date. When publishing an InfoPath form to the Form Library, if these fields were Promoted they would show up as columns within the Form Library, presenting a summary grid view with each expense form and its starting date and ending date in a single row within the grid. If these fields were then Demoted, the values of these fields could be changed from within the Form Library without opening the associated InfoPath form. Property Demotion applies only to properties that are Promoted; that is, in order to edit a field without opening the form, the field must first be exposed as a column.
InfoPath 2007 form templates can also be published as a SharePoint site content type, which creates a content type with the form fields as content type columns and allows the form to be used in multiple libraries and sites. Such forms serve the purpose of enriching the metadata collection process. Let’s look at another example to understand the benefits of this capability. Assume that there exists a SharePoint content type for business contract documents and that this content type is used in different libraries and sites across the site collection. While uploading a contract document, users would be required to provide a vendor name and associate this with contract-specific information such as start date, end date, and payment methods. If an InfoPath form is associated with this kind of SharePoint content type, besides providing a rich user interface for the users, it can validate the data the users enter, allowing the user to choose from an existing list of vendors and automatically associating vendor-related information, thereby making the data more accurate. The form can also perform other functions, such as updating other corresponding data sources as required. New features of SharePoint 2007 and their integration with InfoPath 2007 provide better and more flexible approaches to developing simple yet powerful solutions.
Tip
Content types are a new feature in SharePoint 2007. Content types are discussed in more detail in Chapter 1 and Chapter 2.
Another powerful integration point between InfoPath 2007 and SharePoint 2007 is a capability called the Document Information Panel. The objective of a document information panel is to use the rich UI features of InfoPath to capture metadata from within the office 2007 document being uploaded to the SharePoint library. To better understand this capability, let’s look at another example. Assume that a user uploads a document using a SharePoint content type built for the purpose of proposal management. Some standard requests for proposal metadata columns may include project name, project stakeholders, and budget fields. When a document for this content type is being uploaded, the user is required to enter values for the metadata columns described above. InfoPath can be used to create a rich UI for these metadata fields, so the fields for stakeholders and other information can be validated and, if required, automatically populated. Additionally, this form can then be presented within the Office 2007 document that is being uploaded. This provides an easy and powerful way for the users to enter the required metadata.
Now that we have seen some of the uses of InfoPath and SharePoint integration, let’s delve deeper into implementing these integrations. In this section, we will discuss the following main integration points between InfoPath 2007 and SharePoint 2007:
InfoPath forms can be deployed in a number of ways: to a network location, embedded in an email, and published to SharePoint 2007. Within SharePoint 2007, InfoPath forms can be deployed three different ways:
Deploy directly to the Form Library
Deploy the form template as a site content type
Administrator-approved form template deployment
The appropriate deployment option needs to be chosen based on the security restrictions and the data access requirements, among other things. Form templates that contain business logic require full trust. Form templates that do not use data connections managed by administrators or that do not contain business logic code can be deployed directly to a SharePoint site’s form library by a user who has privileges.
A user with appropriate privileges can publish an InfoPath form directly to the Form Library. Ideal candidates for such a deployment would be forms that do not use custom logic or data connections. To publish a form to the Form Library, follow these steps:
Select File → Publish, and click Next.
Specify the URL of the site where the form needs to be published, and click Next.
Ensure that Document Library is selected and that “Enable this form to be filled out by using a browser” is also checked. Click Next.
In the dialog box that appears, select “Create a new document library.” If a document library for this form template already exists, select the “Update the form template in an existing document library” option.
If the “Create a new document library” option is selected, the next dialog box prompts you to enter a name for the form library. Specify a name for the form library and click Next.
In the next dialog box, choose the properties to be promoted and demoted, and click Next. Property promotion and demotion are discussed later in this chapter.
In the final dialog box, click “Publish” to finalize the publishing process.
To use the published form, navigate to the Form Library site and select New → New Document. By default, the form opens up in the InfoPath 2007 client program if the client machine has InfoPath 2007 installed. If the client machine does not have InfoPath 2007 installed, the form is rendered in the browser. Figure 20-5 depicts a form displayed in the browser.
For browser-enabled form templates, Form Library settings can be changed to make the browser the default display mode. To enforce browser-enabled forms to be displayed in the browser, follow these steps:
Navigate to the form library where the InfoPath form is deployed.
Choose Settings → Form Library Settings.
Under Browser-enabled Documents, select “Display as a web page” and then click OK. Figure 20-6 displays this “Advanced Settings” page.

As discussed in the overview section, this mode of publishing creates a site collection specific content type that can be used in different libraries and sites across the site collection. To publish a form as a site content type, follow these steps:
Select File → Publish, and click Next.
Specify the URL of the site where the form needs to be published, and click Next.
Select Site Content Type, and ensure that the “Enable this form to be filled out by using a browser” is also checked.
In the next dialog box, choose “Create a new content type” if you want to create a new content type, or choose “Update an existing site content type” if one already exists, and click Next. The latter option also updates all site content types that inherit from this content type.
In the next dialog box, browse to a location where the form template would be stored. This could be a form library on the site. Specify a name for the form template and click Next.
Specify the properties that need to be promoted or demoted and click Next.
Finally, click “Publish” to complete the process.

The site content type is now available for use throughout the site collection. In order to use the site content type, create a new document library, or modify the settings of an existing library, use these steps:
Click Settings → Document library settings.
In the next screen, choose “Advanced settings.”
Select “Yes” for the “Allow management of content types” option under “Content Types,” and click OK.
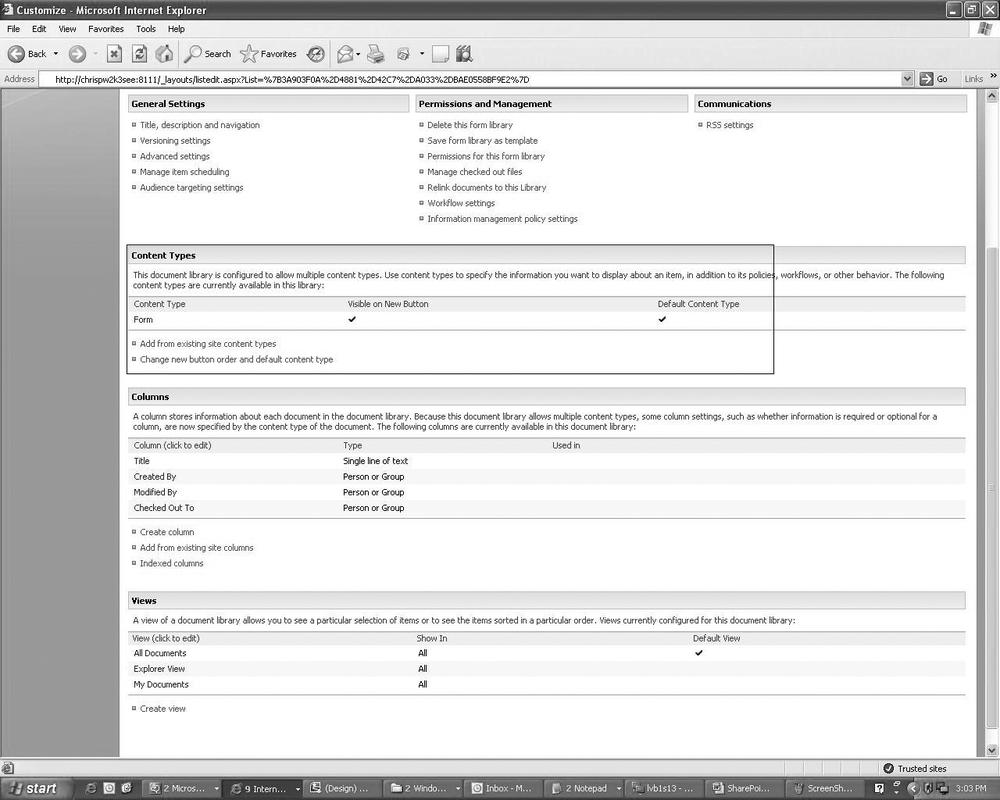
The settings page should now have a section called Content Types, as depicted in Figure 20-7.
To specify the content type published by the InfoPath form, click “Add from existing site content types.”
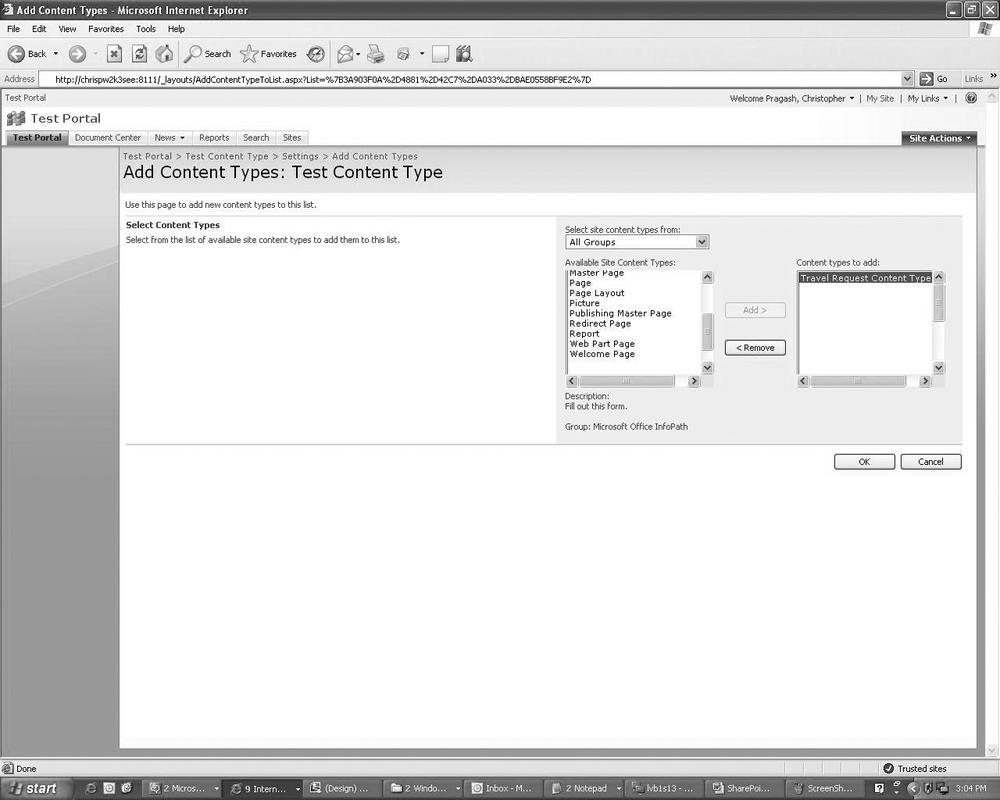
Choose the content type name published by the InfoPath form from the list of available content types and click OK, as depicted in Figure 20-8.
To fill out a form for this content type, navigate to the document library page. The new content type should be available under the New option.
Certain InfoPath forms require administrative approval before they can be hosted by Forms Services. Forms that contain custom code or forms that require “Full Trust” (i.e., the form can access local system resources or use a data connection managed by an administrator) all require a special deployment mode, known as administrative deployment. Administrative deployment allows forms to be uploaded to a central repository. The deployment is broken down into phases:
Before an InfoPath form can be deployed using administrative deployment in InfoPath Forms Services, it needs to be published. To publish a form for administrative deployment, follow these steps:
From the InfoPath 2007 File menu, choose Publish.
The dialog box that opens up specifies the options where the InfoPath Form template can be published. Make sure the option “To a SharePoint server with or without InfoPath Forms Services” is selected, and then click Next.
Specify the URL of the SharePoint site where the form needs to be deployed, and click Next. At this stage, InfoPath validates the SharePoint site.
The dialog box that follows provides different options for form deployment in SharePoint. For administrative deployment purposes, choose “Administrator approved form template (advanced)” and click Next. Figure 20-9 depicts this.
In next dialog box, specify a location and template name for the form; click Next.
In the next dialog screen, specify the fields that need to be displayed as columns in the SharePoint site and click Next.
To add a field, click Add and select the field from the data source displayed. There is an option “Allow users to edit data in this field by using a datasheet or properties page” that appears in the Add dialog box. This option is used for “Property demotion” (discussed in the “Property Promotion and Property Demotion” section, later in this chapter).
In the final dialog box, choose Publish.

This form is now ready to be uploaded into the InfoPath Forms Services. To upload the form to InfoPath Forms Services, follow these steps:
From SharePoint’s Central Administration page, choose Application Management.
Under the InfoPath Forms Services section, choose “Upload form template.” The upload form screen also presents certain other options, such as the ability to upgrade existing form templates and the ability to control whether existing form instances should be allowed to complete or should be terminated. If the form template is being upgraded with significant changes, you can “quiesce” the form template (discussed under the “Manage Form Templates” section earlier in this chapter) before uploading the upgraded template. Figure 20-10 depicts the Upload Form Template screen.
In the page that opens up next, specify the location of the template that was published in the first phase.
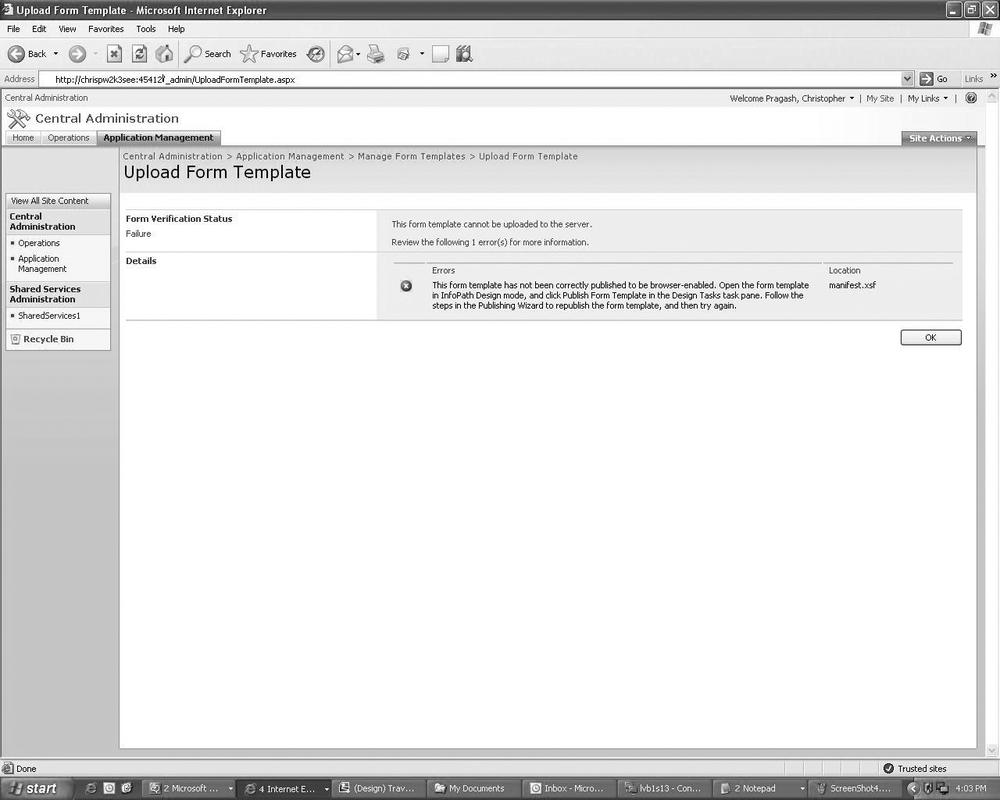
In the upload page, there is a Verify button, which validates the compatibility of the form template with InfoPath Forms Services. If this form template is not compatible with InfoPath Forms Services, an error message is displayed. Figure 20-11 depicts a sample error.
Click OK to complete the upload process.

Sometimes it is useful to view a data source field in InfoPath forms as a column in a SharePoint form library. This gives the user a quick view of certain properties of the specific form. Property Promotion involves promoting a field in the InfoPath form to appear as a column in the form library. Property Demotion, on the other hand, changes a promoted property so it can be edited in the Form Library Datasheet view or the property pages.
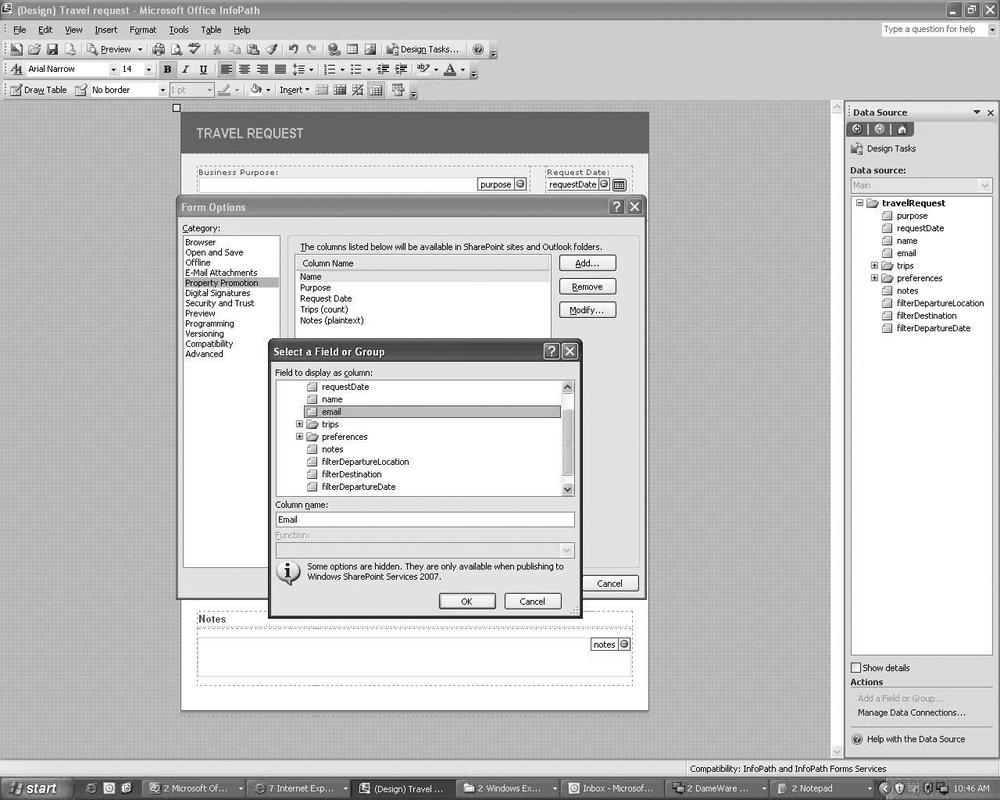
Property promotion can be configured in two different ways: using the Tools menu or using the publishing wizard. There is really no difference between using the Tools menu or the publishing wizard with regard to outcome. To configure Property Promotion using the Tools menu, follow these steps:
Click Form Tools → Form Options.
Select Property Promotion.
Choose the fields that need to be promoted as columns in the Form Library, as shown in Figure 20-12.
Repeat this process for all the fields that need to be promoted.
Tip
Not all fields can be promoted as columns in the Form Library. In particular, certain fields that have recurring data cannot be promoted as columns in a SharePoint form library.
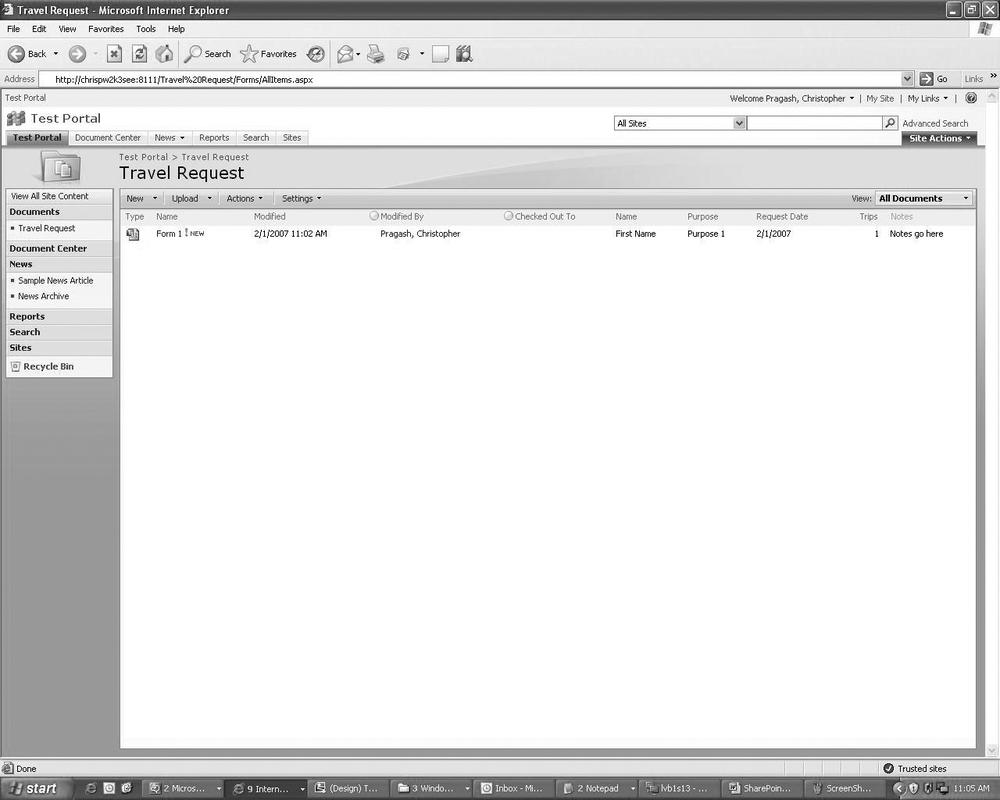
When the form is published to a SharePoint form library, the promoted columns will appear as columns in the form library. When a form is filled, the values of the promoted fields appear in the form library as column values. Figure 20-13 shows promoted properties in the SharePoint form library.
Property Demotion can be configured only on promoted properties. Additionally, it can be configured only while publishing a form template. To configure Property Demotion, follow the steps below:
Click File → Publish.
Select “To a SharePoint server with or without InfoPath Forms Services” and click Next.
Specify the URL of the SharePoint Site where the form needs to be published, and click Next.
Specify the deployment option (in this case, a document library), and select Next.
Choose “Create a new document library,” and click Next.
Type the name of the new document library and click Next.
In the dialog box that appears:
If there no properties available, click Add and select the properties to be promoted.
If there are existing properties, select Modify.
In the dialog box that appears, select “Allow users to edit this field by using a datasheet or properties page” and click OK. One caveat of allowing properties to be edited in the Datasheet view is that the business logic is not executed. InfoPath 2007 displays a dialog box stating this when a property is selected for demotion. Figure 20-14 depicts the Property Demotion option in the publishing wizard.
Finish the publishing process by clicking Publish.

As discussed previously, Property Demotion allows the user to edit the form field value in the Datasheet view of the Form Library. To view the properties in a Datasheet view, navigate to the form library in the SharePoint site, and then select Actions → Edit in Datasheet. Figure 20-15 depicts the Datasheet view for the properties.

The Document Information Panel is a new feature introduced in Office 2007. It provides users with a form that is displayed inside the client application, and it allows the user to enter metadata about the document. It is available in Microsoft Office Word 2007, Microsoft PowerPoint 2007, and Microsoft Office Excel 2007.
InfoPath 2007 can autogenerate the document information panel for a SharePoint content type. The fields in the panel are based on the columns of the associated content type. The panel can be customized with an InfoPath 2007 template for validating and customizing the look and feel of the form presented in the client application.
To demonstrate the development of a document information panel, we will begin with creating a sample content type.
Navigate to the Site collection administration page.
Select “Site content types” under Galleries and click Create.
Enter a name for the content type; for this demo, let’s call it “Demo Content Type.”
Under the “Select parent content type from” category, choose Document Content Types.
Under Parent Content Type, choose Document.
Under “Put this site content type into,” leave the default option selected and click OK.
To add custom columns to the sample content type, select “Demo content type” in the Site Content Type Gallery page.
To add columns to the sample content type, select “Add from existing site columns” under Columns. Figure 20-16 depicts the “Add Columns to Site Content Type” page.
Select the following columns from the Available Columns list, and then click Add:
Address
City
Company
First Name
Zip Code
Fax Number
Click OK to complete creation of the content type.

To design a form for the Demo Content Type, follow these steps:
Open InfoPath 2007 and select File → Design Form Template.
In the dialog box that opens up, choose “XML or Schema.” Also, to make sure that InfoPath allows only browser-compatible controls, check the Enable Browser Compatible Features Only option and click OK. Figure 20-17 depicts this screen.
Enter the URL of the Site collection where the “Demo Content Type” was created and click Next. InfoPath 2007 queries the site collection and displays the list of content types available.
Choose Demo Content Type, and click Next and then Finish.
InfoPath automatically creates the form based on the columns in the site content type. To ensure the panel template is browser compatible, choose “Design checker” and then select Change compatibility settings, which displays the Form Options dialog box with the Compatibility option selected. Figure 20-18 depicts the Form Options dialog box that appears.
Document Information Panels appear inside the client application. Therefore, it is not mandatory to have the panel compatible with the browser, but you can choose to check the “Design a form template that can be opened in a browser or InfoPath” option if the template must be browser-compatible. Click OK.
The Design Checker reports compatibility and other binding problems and issues with the form. For the “Demo Content Type,” the Design Checker should report compatibility issues with the Horizontal Region control. Some controls in InfoPath are not supported in the browser. If a form template needs to be compatible with the browser, the Design Checker is a handy tool that can be used to create a fully functional browser-enabled form. Figure 20-19 depicts the errors reported by the Design Checker.
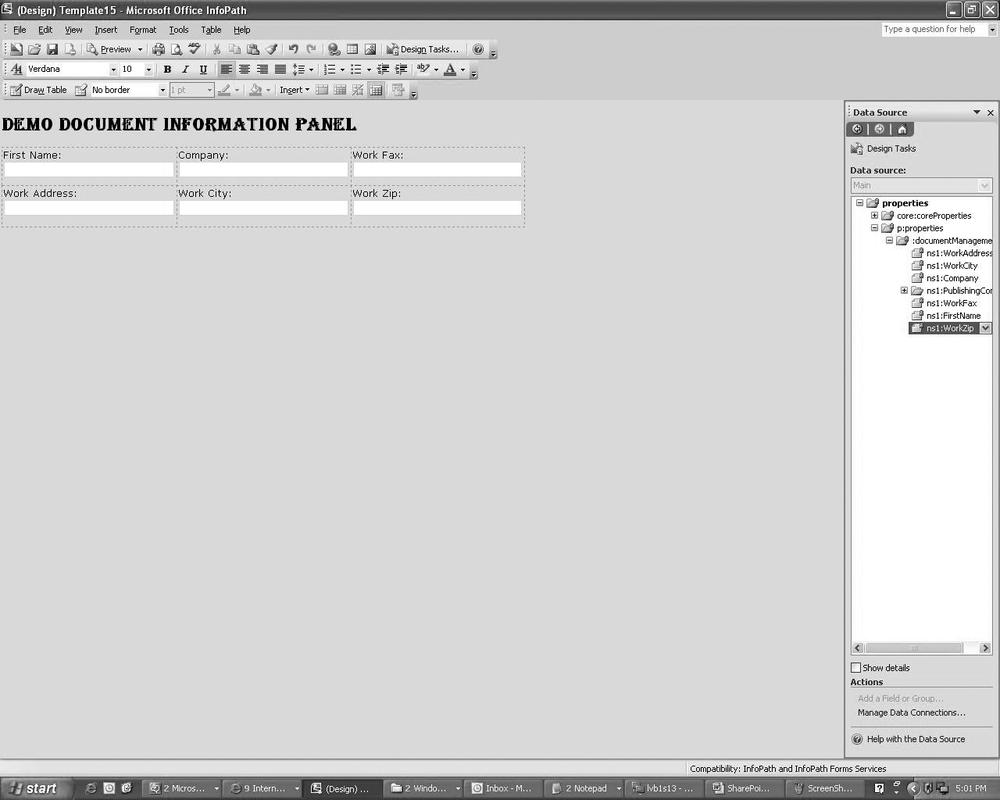
To make the pane browser-compatible, delete existing controls and regions. Drag the “Three-column Table” in the layouts section of the Design Tasks toolbar to the form.
Drag the appropriate fields from the Data Source tab under Design Tasks toolbar into each column of the table. A sample panel is depicted in Figure 20-20.
Custom validations and rules can be added as required. With the finalized design, the template is now ready to be published as the document information panel of the demo content type.
To publish the template, choose Publish from the InfoPath 2007 menu.
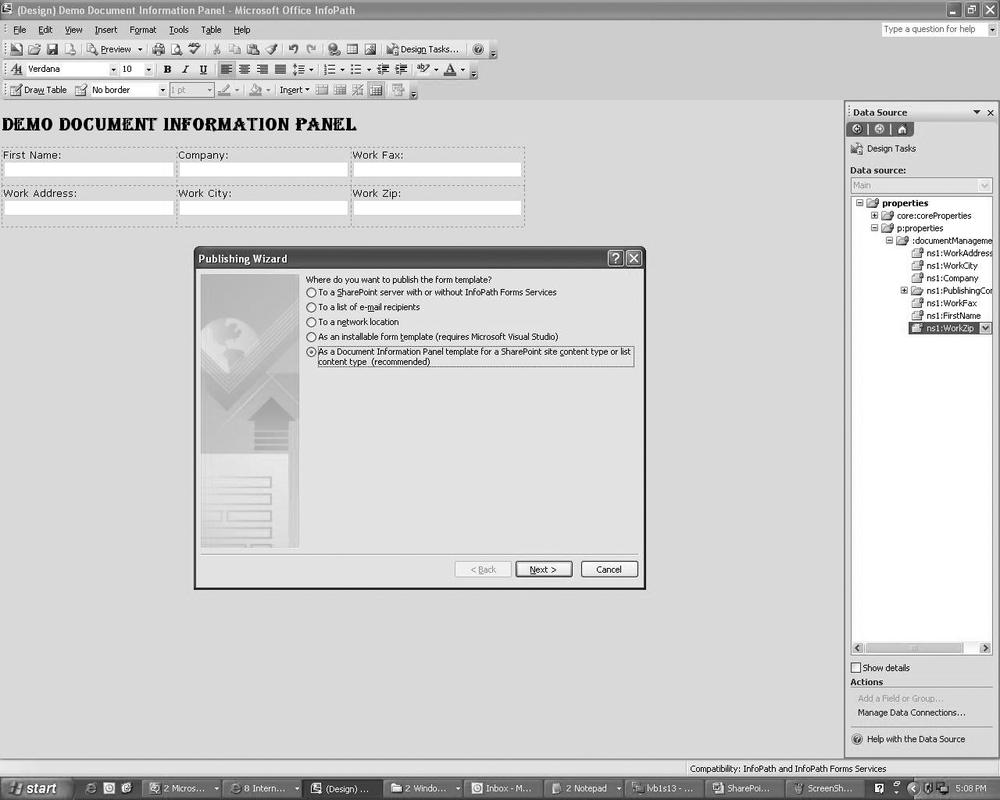
InfoPath forces the template to be saved if this has not already been done. The Publish wizard is launched with the “As a document Information Panel template for a SharePoint site content type or list content type” option preselected. Figure 20-21 depicts the Publish wizard.
Choose Next, and a dialog box with the summary information about the site collection and the content type will appear. Choose Publish.


There is also an alternative approach to create the document information panel for a content type in SharePoint. The following steps describe this approach:
Navigate to the Site Content Type Gallery of the site collection.
Choose “Demo content type,” and then choose Document Information Panel Settings. Figure 20-22 depicts a sample Document Information Panel Settings page.
Click “Create a new custom template,” and InfoPath 2007 will open with the autogenerated form.
To use the document information panel, the content type needs to be associated with a document library. When the user saves a document to the library and selects the content type to save, the document information panel is presented within the application.

In this chapter, we have discussed how the new InfoPath 2007 and InfoPath Forms Services in Office SharePoint Server 2007 can be used to deploy intuitive forms and make them available online. Combined with the power of workflow, security, and all the other list features built into Office SharePoint Server 2007, InfoPath Forms Services makes it easy to build and deploy powerful electronic forms based business process and to create UI-rich forms to capture metadata.