
Lists and document libraries are fundamental building blocks for almost every SharePoint site. Unfortunately, the default view is fairly simple and has limited functionality with regards to adding, updating, deleting, or organizing data. SharePoint provides two views that create an alternate interface for examining your structured data. This chapter demonstrates some of the powerful features associated with each.
If you aren’t familiar with lists, you might want to skip ahead to Chapter 14 to read more about the various types and features of lists.
The Datasheet view (Figure 6-1) displays data from a list or document library in grid format, similar to that of Microsoft Excel. The advantage of a datasheet is that the Excel-like interface provides the same easy methods of inserting, editing, and deleting data but still uses the data validation that is part of a list or document library.
The features of the Datasheet view depend on which version of Microsoft Office is currently installed on the machine accessing the SharePoint site.
A Datasheet view is automatically created with each new list or document library. Additional Datasheet views can be created in compatible lists or document libraries by using the Create View menu option available from the Settings toolbar menu option.
In this chapter, we focus on the following aspects of the Datasheet view:
What’s new for the Datasheet view
System requirements and browser compatibility
How to work with the data
Toolbar
Task Pane

The Datasheet view relies on several client applications, and you must allow the browser to run Microsoft ActiveX controls. If all the requirements are not met, then the option will not be available in the Actions menu from the Standard view. Microsoft Office and Internet Explorer applications are required, as well as Microsoft Office List Datasheet Component or Microsoft Office Access Web Datasheet Component, depending on which version of Microsoft Office is running. The following sections detail the requirements.
Microsoft Office 2007 installed
Microsoft Office Access Web Datasheet Component installed
Internet Explorer 5.01 with Service Pack 2 or higher installed
Browser support for ActiveX controls
The Microsoft Internet Explorer browser 5.01 with Service Pack 2 or higher is the only browser able to support the Datasheet view because it is still an ActiveX control. The “Edit in Datasheet” menu option under the Actions menu will appear only if the browser supports the requirements. This extra feature is very helpful because the user no longer sees the menu option and therefore gets no error message when the system doesn’t meet the requirements.
The Datasheet view is not available in all of Microsoft’s prebuilt list templates. Table 6-1 indicates the list templates that have and don’t have the Datasheet view capability.
Table 6-1. Microsoft’s prebuilt list template
|
Datasheet view capable |
Datasheet view noncapable | |
|---|---|---|
|
Agenda |
Objectives |
Calendar |
|
Announcements |
Project Tasks |
Discussion Board |
|
Contacts |
Report Library |
KPI List |
|
Custom List |
Sites List |
Picture Library |
|
Data Connection Library |
Slide Library |
Survey |
|
Decisions |
Tabs List |
Text Box |
|
Document Library |
Tasks | |
|
Form Library |
Things to Bring | |
|
Issue Tracking |
Translation Management Library | |
|
Languages and Translators |
Wiki Page Library | |
|
Links |
This section covers some of the details on how to work with the data in the datasheet table and the features that it uses to validate and populate new data that has been inserted. The datasheet table is similar to an Excel worksheet. Only the first 100 rows of data are retrieved, and the rest of the data is retrieved asynchronously when first opened. When retrieving for sorting or filtering, then all data is retrieved and displayed in the requested way. The status bar gives visual notification when it is working (the connection box will have a moving green line in it), and there is a status bar located at the bottom of the datasheet table.
A data conflict or error could occur when adding data using the Datasheet view (Figure 6-2 and Figure 6-3).


For example, data conflicts can occur when two people are editing the same column, row, or cell at the same time. When this happens, the data conflict icon appears on the row or rows that contain the conflict and in the first column on the status bar. The third column text also changes to “You have data conflicts with another user. Resolve.” When an error occurs, the error icon appears on the row or rows that have the data conflict and in the second column on the status bar. The third column text also changes to “You have errors. Resolve.”
The word “Resolve” and any of the icons are links to launch the Resolve Conflicts or Resolve Errors pop-up windows. The pop-up windows give details of the conflicts or errors, and contain the Discard My Changes, Retry My Changes, Discard All My Changes, and Retry All My Changes options, along with the help option. When there are multiple conflicts or errors, each item can be seen by using the Previous or Next options in the upper-right corner of the pop-up window. If there is only one conflict or error, then these options are grayed out. You can magnify any cell inside the table that displays the row or rows by hovering over the cell and then clicking it when the magnifying glass appears. The item in question will have a dark black box around it.
The Discard My Changes and Retry My Changes options are for the current conflict or error being displayed in the details section of the pop-up window, and the Discard All My Changes and Retry All My Changes options are for all the conflicts or errors that have been identified. The Help button launches the Access Web Datasheet Help application.
Errors can occur when you:
You can resolve the following errors by retrying your changes:
No response from the server. This could be because of a timeout.
Server is busy or cannot be found.
Server response is not legible.
Any other unexpected error.
You can resolve these errors by discarding your changes:
You do not have the necessary permissions to make the change.
You have been blocked from adding content to the site.
You have exceeded your storage limits for the site.
Additional detailed information on resolving data conflicts or errors can be found by clicking any of the help links.
Another detail worth mentioning is the ability to move columns by left-clicking and dragging them to a different location. This option prevents you from having to go to the View Properties screen to make the changes. To move the columns, navigate to a list or document library Datasheet view. Hover over a column name until the “Move” pointer (a four-prong icon) appears. Click and drag the column to the desired location and then release the mouse button—the column has been moved. Something to keep in mind when moving columns from the Datasheet view is that it changes the properties of the current view permanently. When you switch back to “Show in Standard View,” the column will appear in the new position.
If you fall into a repetitive error cycle when working on a task with the table, column, row, or cell, click to display the task pane, then click the Undo button to back out to the original state. Undo is an option until the change has been successfully committed.
If you highlight the whole table by clicking on the Access icon in the upper-left corner of the table, the following menu options are present:
- Cut
The Cut menu is unavailable when the table is highlighted.
- Copy
The Copy menu acts just like any other Microsoft Office application Copy function. In all the different scenarios I tried, it was available and allowed for the highlighted data to be copied.
- Paste
The Paste menu acts just like any other Microsoft Office application Paste function, but when you’re pasting into any datasheet table, all validation rules will be enforced. For example, if you copy data from a table and paste it into another that uses Check-in and Check-out, the warning message “The selected cells are read-only” will be displayed.
- Add Column
The Add Column menu takes you to the Create Column screen and allows for a new column to be created. Fill in the desired information and click OK to create the column. If the default view is being used, leave the “Add to default view” checkbox checked, and the column will appear in the datasheet table. If the default view is not being used, you will have to manually update the view to make the new column show up.
- Unhide
The Unhide menu is available only when one or more columns are hidden on the datasheet table. If multiple columns are hidden, all of them will appear if you click this option.
- Column Width
Column Width The Column Width menu will adjust all highlighted columns to the specified width. Once this option is used, there is no automatic way to convert the columns back to the original width without doing so manually; even switching back to the Standard view or closing the browser doesn’t reset the columns to the original width.
- Turn Wrap Text Off
The Turn Wrap Text Off menu does exactly what it implies—it doesn’t wrap the text if it is longer than the column width. For example, if you turn wrap text off and the column has been modified to a length of 10, but data in the column is typically longer than 20 characters, nothing after 10 is visible unless the field is in Edit Mode.
- Fill
The Fill menu has two submenu options, AutoFill and Fill Down, neither of which are available when the full datasheet table is highlighted. These options are available only when a column or cell is highlighted.
- Alert Me
The Alert Me menu opens the New Alert page, allowing for configuration. The New Alert page in this instance allows for the Alert Title, Send Alerts To, Change Type, Send Alerts for These Changes, and When to Send Alerts sections to be adjusted. When everything is correct, click OK to create the alert.
- Help
The Help menu launches the Access Web Datasheet Help application.
- About
The About menu launches the About Access Web Datasheet pop-up window. This pop-up window is similar to all the other Microsoft application About pop-up windows.
By hovering over the column title and clicking it when the down arrow pointer appears, the whole column is highlighted and the following menu options are available. A brief description is listed for each:
- Cut
The Cut menu is not available when the full column is highlighted.
- Copy
The Copy menu acts just like any other Microsoft Office application Copy function. In all the different scenarios I tried, it was available and allowed for the highlighted data to be copied.
- Paste
The Paste menu acts just like any other Microsoft Office application Paste function, but when you’re pasting into any datasheet column, all validation rules will be enforced. For example, if pasting a string column into a URL column, you’re given the warning message “Field ‘URL’ contains invalid data. Enter a valid URL.”
- Add Column
The Add Column menu takes you to the Create Column screen and allows for a new column to be created. Fill in the desired information and click OK to create the column. If the default view is being used, leave the “Add to default view” checkbox checked, and the column will appear in the datasheet table. If the default view is not being used, you will have to manually update the view to make the new column show up.
- Edit/Delete Column
The Edit/Delete Column menu opens the Change Column page and allows for editing of column properties. The properties can be different for each data type. At the bottom of this screen, the Delete button will be available if the column can be deleted. Columns required by the list or document library will not have this option.
- Column Width
The Column Width menu will adjust all highlighted columns to the specified width. Once this option is used, there is no automatic way to convert the columns back to the original width without doing so manually; even switching back to the Standard view or closing the browser doesn’t reset the columns to the original width.
- Hide
The Hide menu hides the column from the Datasheet view. The column is still really there, but the width has been set to zero to make it appear hidden. You can restore the column to its original width by hovering over it and clicking the Unhide menu option, by navigating to the Standard view and then back to Datasheet view, or just by refreshing the page by clicking the browser’s refresh button.
- Unhide
The Unhide menu makes the hidden column reappear. This option is only available when a hidden column is highlighted.
- Turn Wrap Text Off
The Turn Wrap Text Off menu option does exactly what it implies—it doesn’t wrap the text if it is longer than the column width. Once this option has been applied, it will not convert back unless it is executed again. This option is useful when a column spans multiple lines but allows only, say, 10 rows to appear on screen. By using this menu for that column, you can turn the multiple lines of text into a single line, allowing for more rows to appear on the screen at once.
- Fill
The Fill menu has two submenu options, AutoFill and Fill Down:
- AutoFill
AutoFill fills in the blank cells after the last populated cell by using all populated cells above the first blank cell. For example, say you have a datasheet view with 10 rows and one column that has values only for the first two cells,
mandn. If you highlight that column and use the option AutoFill, the remaining eight columns will be auto populated with the pattern ofmandnvalues.- Fill Down
Fill Down fills in all cells in the column with the value from the first cell.
- Help
The Help menu launches the Access Web Datasheet Help application.
If you hover over the first (gray) cell in a row and click when the right arrow pointer appears, the whole row is highlighted, and the following menu options are available (some of these menu options are specific to a list or document library and its configuration settings):
- Cut
The Cut menu removes the highlighted row from the datasheet table.
- Copy
The Copy menu copies the highlighted row of data.
- Paste
The Paste menu pastes a row or rows into the current datasheet, unless validation rules are not met.
- Open Folder
The Open Folder menu opens the selected folder.
- Delete Folder
The Delete Folder menu deletes the selected folder. A message is given advising that all subfolders and documents will be deleted and moved to the Recycle Bin before the command is completed.
- Add Row
The Add Row menu adds a new row into the datasheet table. This option is handy when the new blank row is not visible on the screen—using this option will move the screen down to that row.
- Delete Rows
The Delete Rows menu deletes all highlighted rows and moves them into the Recycle Bin. It will ask for a confirmation before deleting the selected rows. The Delete Rows menu option is available only for list types.
- Delete Document
The Delete Document menu deletes the highlighted documents and moves them into the Recycle Bin. It will ask for a confirmation before deleting the selected documents. The Delete Document menu option is available only for document library types.
- Row Height
The Row Height menu resets the row height for all rows in the datasheet table. This option will not work for a single row.
- Fill
The Fill menu has two submenu options, AutoFill and Fill Down:
- AutoFill
The AutoFill option fills in the blank cells after the last populated cell by using all populated cells above the first blank cell. For example, say you have a datasheet view with 10 rows and one column that has values only for the first two cells,
mandn. If you highlight that column and use the option AutoFill, the remaining eight columns will be autopopulated with the pattern ofmandnvalues.- Fill Down
The Fill Down option fills in all cells in the column with the value from the first cell.
- Export Contact
The Export Contact menu is available when working with the Contact List type. The contact is exported out in vCard format.
- Item
The Item menu has a single option, Versions, which appears on the menu only when versioning has been turned on. The Item menu option is specific to list types and will not appear on document library types.
- Document
The Document menu has the following submenu options:
- Open Document (Read-Only)
The Open Document (Read-only) menu allows for the document to be opened in read-only mode and will not allow for editing. If you are using Microsoft Word 2007, the document will open but will not allow you to type any new text into it. If you need to edit the text, you can click the Edit Document button in the message bar.
- Edit Document
The Edit Document menu option opens the document in Edit Mode.
- Check Out Document
The Check Out Document menu checks the document out to you. If the document is opened by someone else, it will be in read-only mode and is not editable by anyone else until it’s checked back in.
- Check In Document
The Check In Document menu checks back in a checked-out document. This option is not available if the document is not checked out.
- Document Versions
The Document Versions menu opens the “Versions saved for” page that displays all the versions for that document. This menu option is not available if the document library does not have versioning turned on.
- Discuss
The Discuss menu uses the browser base discussion feature that is available only from the Datasheet view. This feature may not work depending on how the document type is being opened. This option is available only in document library types.
- Alert Me
The Alert Me menu opens the New Alert page, allowing for configuration. The New Alert page in this instance allows for the Alert Title, Send Alerts To, Change Type, Send Alerts for These Changes, and When to Send Alerts sections to be modified. When everything is correct, click OK to create the alert.
- Help
The Help menu launches the Access Web Datasheet Help application.
When you make a cell active, the following menus are available (some of these menu options are specific to a list or document library and its configuration settings):
- Cut
The Cut menu cuts the content out of a regular cell and makes it available for pasting. There are many field types—for example, Boolean and Calculation fields—that will not allow the content of the cell to be cut but still allow for it to be copied and available for pasting.
- Copy
The Copy menu copies the content of an active cell and makes it available for pasting.
- Paste
The Paste menu pastes a cell’s content into another cell with the same column type if validation rules allow it. If the pasting of the data is not allowed, then a “You cannot perform this operation on a…” warning pop-up box will appear. Almost any field type that is copied or cut can be pasted into a string data type. For example, if you copy a checkbox cell and paste the value into a string cell, then the value will be either 0 or 1.
- Open Folder
The Open Folder menu opens the selected folder.
- Delete Folder
The Delete Folder menu deletes the selected folder. A message is given advising that all subfolders and documents will be deleted and moved to the Recycle Bin before executing the command.
- Add Row
The Add Row menu adds a new row into the datasheet table. The ideal situation to use this option is when the new blank row is not visible on the screen and using this option moves the screen down to that row.
- Delete Rows
The Delete Rows menu deletes all selected rows and moves them into the Recycle Bin. The Delete Rows menu option is available only for list types.
- Delete Document
The Delete Document menu deletes the document associated with the active cell and moves it into the Recycle Bin. The Delete Document menu option is available only for document library types.
- Add Column
The Add Column menu takes you to the Create Column page and allows for a new column to be created. Fill in the desired information and click OK to create the column. Leave the “Add to default view” checkbox checked to add the column to the default view automatically. The new column will be inserted to the right of the active cell.
- Edit/Delete Column
The Edit/Delete Column menu opens the Change Column screen and allows for editing of column properties. The properties can be different for each data type. At the bottom of this screen, the Delete button will be available if the column can be deleted. Required columns can’t be deleted, so the button will not appear.
- Fill
The Fill menu has two submenu options, AutoFill and Fill Down:
- AutoFill
The AutoFill option fills in the blank cells after the last populated cell by using all populated cells above the first blank cell. For example, say you have a datasheet view with 10 rows and one column that has values only for the first two cells,
mandn. If you highlight that column and use the option AutoFill, the remaining eight columns will be autopopulated with the pattern ofmandnvalues.- Fill Down
The Fill Down option fills in all cells in the column with the value from the first cell.
- Pick From List
The Pick From List menu makes available existing values that have been entered into that column. This option is not available for data types.
- Export Contact
The Export Contact menu is available when working with the Contact List type. The contact is exported out in vCard format.
- Item
The Item menu has a single submenu option, Versions, which appears on the menu only when versioning has been turned on for the list. The Item menu option is specific to list types and will not appear on document library types.
- Document
The Document menu has the following submenu options:
- Open Document (Read-Only)
The Open Document (Read-only) menu opens the document in read-only mode and will not allow for editing. If you need to edit, click Edit Document in the message bar.
- Edit Document
The Edit Document menu opens the document for editing.
- Check Out Document
The Check Out Document menu option checks the document out to you. If the document is opened by someone else, it will be in read-only mode and is not editable by anyone else until it’s checked back in.
- Check In Document
The Check In Document menu checks back in a checked-out document. This option is not available if the document is not checked out.
- Document Versions
The Document Versions menu opens the “Versions saved for” page and displays all the versions for that document. This menu option is not available if the document library does not have versioning turned on.
- Discuss
The Discuss menu uses the browser base discussion feature that is available only from the Datasheet view. This feature may not work depending on how the document type is being opened. This option is available only in document library types.
- Alert Me
The Alert Me menu operates the same way as the row Alert Me menu and does not allow for single cell alerts.
- Help
The Help menu launches the Access Web Datasheet Help application.
As mentioned earlier, the Status bar displays:
The status bar will display a calculation formula when either the column or a cell in that column is selected. This feature is very helpful in identifying whether the column is built from a calculation.
All the options are pretty self-explanatory, and determining whether the data is editable or not is pretty simple. If the data can’t be edited, the text “Read-only” will appear next to the connection box on the far righth and side of the status bar. For example, system columns in the datasheet table can’t be edited, so “Read-only” should appear if you click them.
The menu toolbar for SharePoint 2007 has been changed to use a category-style menu that groups all menu options and expands to display the available ones. A drop-down list has been added for displaying the available views. Unlike the previous version, the menu toolbar now filters out menu options that aren’t compatible with a user’s browser or machine.
The menu toolbar now displays three or four different menu categories, depending on the level of security assigned and the type of list or document library being viewed.
- New
The New menu allows you to create a new item. When the Content Types option is used, multiple items will appear under the menu. New Item usually appears as the default item, but there are exceptions—for example, Discussion Board list types use Discussion instead.
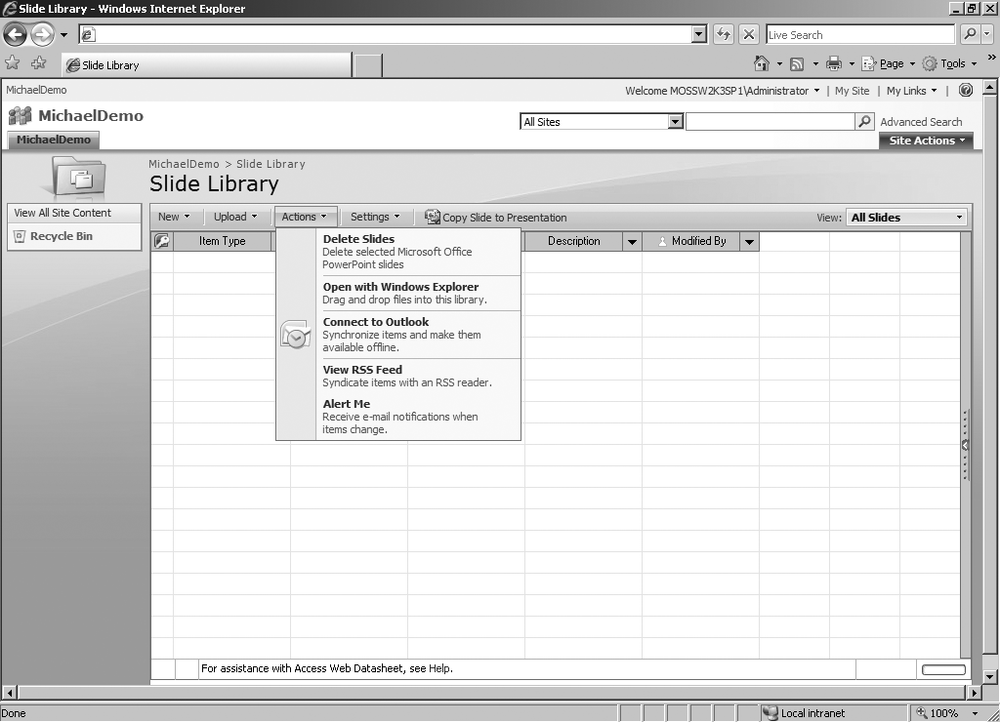
- Actions
The Actions menu lists all the options available for that type of list. For example, when the Announcement template is used to create a list, the Actions menu items from the Datasheet view are: Show in Standard View, New Row, Task Pane, Totals, Refresh Data, Export to Spreadsheet, Open in Access, View RSS Feed, and Alert Me. When you’re using a Contacts list, the Connect to Outlook item is also available.
- Settings
The Settings menu has Create Column, Create View, and List Settings menu items.
- New
The New menu creates a new document or folder. The type of document is determined when the library is created. Additional document types can be added by creating and adding new Content Types to the library.
- Upload
Upload The Upload menu has Upload Document and Upload Multiple Documents menu items.
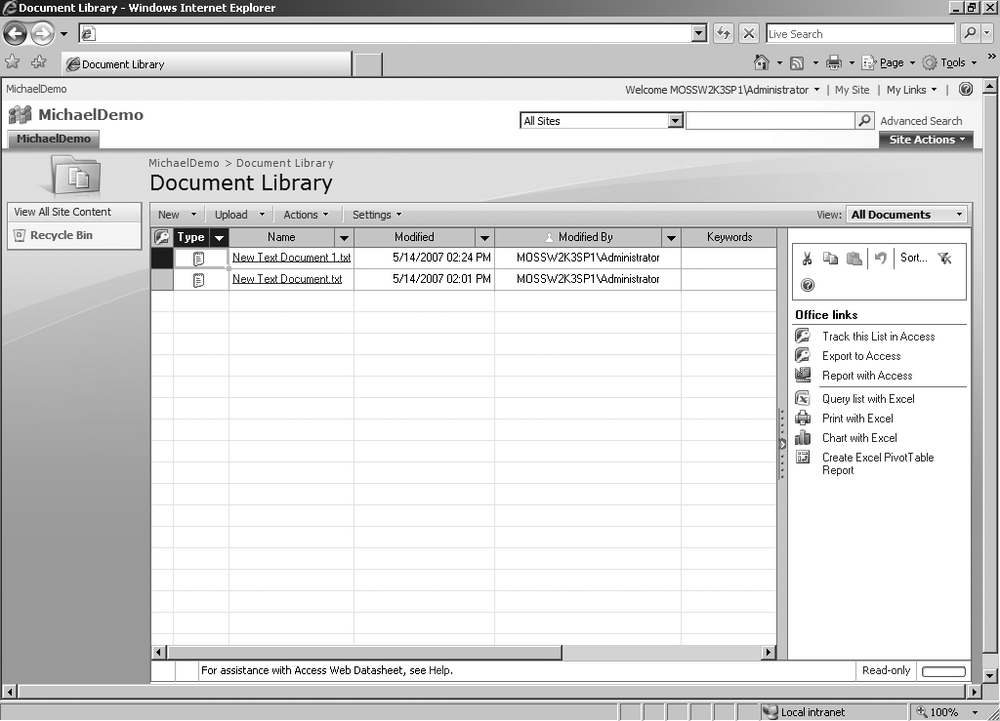
- Actions
The Actions menu lists all the available options for that type of document library. For example, when the Document Library template is used, the Open with Windows Explorer, Show in Standard View, New Row, Task Pane, Totals, Refresh Data, Connect to Outlook, Export to Spreadsheet, View RSS Feed, and Alert Me options are available. If the Wiki Page Library template was used, the Open with Windows Explorer option is not available.
- Settings
The Settings menu has Create Column, Create View, and Document Library Settings menu items.
A couple of options from the menu toolbar worth mentioning are Totals and Connect to Outlook:
- Totals
The Totals menu makes the total row appear, and it will stay visible until the menu option is used again. The total row gives basic totaling functionality to all columns. The available options for each column can be displayed by clicking the “total now” row cell for that column. For most data types, two options will be available: None and Count. For data types of Number and Currency, eight options are available: None, Average, Count, Maximum, Minimum, Sum, Standard Deviation, and Variance.
- Connect to Outlook
The “Connect to Outlook” menu is not available for all list and document library types. When it is available, it gives the capability to synchronize items and make them available offline. Calendar, Contacts, Tasks, and Document Library are a few types that have this capability. This option provides a taste of offline synchronization.
There will be occasions when other menus will appear on the toolbar. An example of this is the Slide Library, which has the Copy Slide to Presentation menu.
A good example of security-sensitive menus is when a user assigned to the reader roll of a list is able to see only the Actions menu and not any other Toolbar menu. The reverse is also true; if you are the site collection administrator, you would be able to see New, Actions, and Settings menus for that list.
In my opinion, the reason for the new style of menus is because the lists and document libraries of SharePoint 2007 now have more menu options available, depending on security level, browser compatibility, and type of list or document library.
The menu option differences in the Actions menu are very evident when looking at a library created from the Document Library template versus a library created from the Slide Library template (see Figure 6-4 and Figure 6-5).

The navigation of the current list or document library links has been moved from the lefth and side of the screen to the righth and side of the menu toolbar in a drop-down list. The drop-down list also gives the capability to modify the current view and create a new view. The Modify and Create options are also available from the Settings menu.
If a user accesses the Datasheet view for a document library and doesn’t have Microsoft Outlook 2007 installed on his machine, he won’t see the menu option Connect to Outlook under the Actions menu. In the previous version of SharePoint, all toolbar menus would be visible but would display a warning message if used without the proper software or browser. This improved feature should make life a lot easier on IT teams because they will no longer have to explain why the menu option is available to click on but doesn’t work.
The Task Pane (Figure 6-6) is one of the most powerful tools of the Datasheet view because of its capacity for doing quick reporting and charting with Microsoft Office Access and Excel. These features are often underutilized by many organizations simply because they are hidden until the Task Pane menu link is clicked from the Actions menu or the Show Task Pane menu bar is expanded.
The Task Pane consists of two categories of options that can be used with the data displayed in the Datasheet view: common options and Office Links.
Cut
Copy
Paste
Undo
Sort
Filter
Help
All these options are also available from a Column menu in Datasheet view, the right-click menu within the Datasheet view, or through keyboard shortcuts.
Tip
For a list of all the keyboard shortcuts, open Help from the Datasheet view and navigate to “Keyboard shortcuts” under Office List Datasheet View 2007, “Startup and settings,” and Accessibility.
The Task Pane grays out the options when they are not available for use. For instance, the Undo option is available only when changing content on the datasheet table and is unavailable once the changes have been committed. If you are changing the formula of a column and you want to convert it back to the original formula before the changes are committed, click the Undo button. Then tab off the cell to have the changes commit.
Office Links consist of:
All the Office Links options are available only from the Task Pane. The options are always available to click even if the corresponding Microsoft Office application is not installed. The messages:
This operation cannot be performed because a compatible version of Microsoft Office Access either is not installed on this computer, or it is not the default version.
and
This operation cannot be performed because a compatible version of Microsoft Office Excel either is not installed on this computer, or it is not the default version.
are displayed if the respective Microsoft application is not installed or compatible.
If you’re a previous user of SharePoint 2003 and Microsoft Office 2003, you’re well aware of integration with Microsoft Excel 2003. When going through the details of each of the following options, you will notice that some of the two-way integration switched to Microsoft Access 2007 and was removed from Microsoft Excel 2007. (When I discovered this during my initial testing last year, I was not too enthused but quickly changed my mind because of all the great improvements in Microsoft Access 2007 and SharePoint 2007.)
The sections that follow give additional information about each option available under Office Links.
“Track this List in Access” provides a richer environment for working with SharePoint list data because of the new and improved features of Microsoft Access 2007, which make it a lot more enjoyable then the previous version.
This feature takes the current SharePoint List and the User Information List and creates or uses an existing Microsoft Access 2007 Database and adds the SharePoint lists as linked tables. Double-clicking one of the linked tables in Navigation Pane brings the datasheet into the righth and side of the window, and the Datasheet menu also appears. If you click the “Datasheet” menu, the menu ribbon appears. More menus can be found by right-clicking the SharePoint list name in the Navigation Pane and choosing SharePoint List Options.
Another big push with this version of SharePoint and Office is offline capabilities. This feature allows users to work offline once the SharePoint list tables have been linked to a Microsoft Access database by clicking the “Online with SharePoint” menu option and then clicking the Work Offline menu option. The “Online with SharePoint” menu option can be found on the righth and corner of the status bar. The Work Offline and Work Online menu buttons can also be found on the External Data menu ribbon on the far right side. There are several other menu options on the ribbon to help with synchronization, caching, and relinking to the SharePoint list.
While working with this capability, the one shortcoming I found was not being able to check out a list item under version control. The new and improved Microsoft Access 2007 could be very helpful to anyone who wants to do a little more with her list data.
For example, say you created an Issue Tracking SharePoint List, and you want to create custom reports to help track metrics. By using this capability, you are able to link the Issue Tracking SharePoint List and create custom reports to be used any time they are needed—e.g., by your boss or for a meeting—and still have the flexibility to add a new SharePoint list. This super tracking capability could become your new best friend when you need results quickly or over a long period of time. Think of it as your personal report center.
By following these steps, you’ll be able to successfully link SharePoint list data to a new or existing Microsoft Access 2007 database. In this example, we will use a new Microsoft Access 2007 database called SPListAccessLinked:
Navigate to the SharePoint list or document library you want to use and click “Edit in Datasheet” under the Actions menu on the toolbar.
Click the Task Pane menu option under the Actions menu located on the toolbar, or by clicking the Show Task Pane bar on the far righth and of the screen.
Click “Track this List in Access” to launch Microsoft Access 2007.
Click New Database and then OK to create the Microsoft Access 2007 database.
From the File New Database pop-up screen, navigate to the location where you want the database to be stored and then change the filename to SPListAccessLinked. Click Create to create the database.
The database should launch and show the linked SharePoint list data.
"Export to Access” is very similar to the “Track this List in Access” feature because it exports the current SharePoint list data to an existing or new Microsoft Access 2007 database and adds it to a new table that is not linked to the SharePoint list data.
This feature gives a lot more flexibility when you want to remove data or add new data to the table without it affecting the SharePoint list structure or data. It could also be used for static reporting.
For example, let’s say that your boss wants a monthly report, but not all the data is in the SharePoint list, so you have to import it from other data sources. The last thing that you want to worry about is the data changing and messing up your reporting numbers. By using this feature, you are able to take a snapshot of the data each month and import it into a Microsoft Access 2007 database table that is static and is updated only from Microsoft Access 2007. This would give you the flexibility to import all the other data sources necessary for creating monthly reports. It would also give you the flexibility to always go back and review the data without wondering whether something had changed.
By following these steps, you’ll be able to successfully export the current SharePoint list data to a new or existing Microsoft Access 2007 database. In this example, we will use a new Microsoft Access 2007 database called SPListAccessExport:
Navigate to the SharePoint list or document library you want to use and click “Edit in Datasheet” under the Actions menu on the toolbar.
Expand the Datasheet View task pane by clicking Task Pane under the Actions menu located on the toolbar or by clicking the Show Task Pane bar on the right-hand side of the screen.
Click “Export to Access” to launch Microsoft Access 2007.
Click New Database and then click OK to create the Microsoft Access 2007 database.
From the File New Database pop-up screen, navigate to the location where you want the database to be stored, and then change the filename to SPListAccessExport. Click Create to create the database.
The database should launch and show the imported SharePoint list data.
"Report with Access” is very useful when you want to create quick reports from SharePoint list data through Microsoft Access 2007. It automatically creates a default report when it is first used.
“Report with Access” is very similar to “Track this List in Access” because it links to the current SharePoint list and the User Information List to allow for easy access to new data that is being entered into the SharePoint lists.
When Microsoft Access 2007 first opens, there will be two tabs. The first tab is the current SharePoint list data in the standard Datasheet view and the second tab (the active tab) is a prebuilt report. When changing between the tabs, the menus above will change.
Once again, Microsoft Access 2007 has an improved reporting model and interface that makes it a lot easier for creating more professional-looking reports quickly.
By following these steps, you’ll be able to successfully link the current SharePoint list data to a new or existing Microsoft Access 2007 database for reporting. In this example, we are going to use a new Microsoft Access 2007 database called SPListAccessReport:
Navigate to the SharePoint list or document library you want to use and click the “Edit in Datasheet” menu option under the Actions menu on the toolbar.
Expand the Datasheet View task pane by clicking the Task Pane menu under the Actions menu located on the toolbar, or by clicking the Show Task Pane bar on the righth and side of the screen.
Click “Report with Access” to start the process.
Click New Database and then click OK to create the Microsoft Access 2007 database.
From the File New Database pop-up screen, navigate to the location where you want the database to be stored and then change the filename to SPListAccessReport. Click Create to create the database.
The database should launch and show the imported SharePoint list data.
"Query list with Excel” exports the data out of the SharePoint list and imports it into a Microsoft Excel 2007 spreadsheet. The connection that was created stays connected unless you terminate it by clicking the Unlink option located in the External Table Data ribbon section. The connection created is a one-way connection; data you add to the spreadsheet will not be synced to the SharePoint list. Many users will be surprised by this limitation because the functionality was there in the previous version of Microsoft Excel 2003 and SharePoint 2003.
Excel may display an error message that says, “Microsoft Office has identified a potential security concern.” Click Enable to allow the data to be imported from your SharePoint list. This new security feature helps users verify that the data being imported is safe.
“Query list with Excel” gives a friendly environment in which to manipulate SharePoint list data with all the trustworthy and new features of Microsoft Excel 2007.
By following these steps, you’ll be able to successfully link the current SharePoint list data to a new Microsoft Excel 2007 workbook:
Navigate to the SharePoint list or document library you want to use and click “Edit in Datasheet” under the Actions menu on the toolbar.
Expand the Datasheet View task pane by clicking the Task Pane menu under the Actions menu located on the toolbar, or by clicking the Show Task Pane bar on the righth and side of the screen.
Click “Query list with Excel” to start the process.
Click Enable when the “Microsoft Office has identified a potential security concern” security message appears.
Microsoft Excel 2007 should launch and show the imported data from the SharePoint list.
"Print with Excel” takes the data from the SharePoint list and imports it into a Microsoft Excel 2007 workbook, then automatically launches the Excel print window.
“Print with Excel” is very similar to “Query list with Excel,” but it also automatically launches the Excel print window. The data that is imported into the Excel Workbook is linked and can be refreshed by selecting the Refresh All menu option on the Data ribbon.
Excel may display an error message that says, “Microsoft Office has identified a potential security concern.” Click Enable to allow the data to be imported from your SharePoint list. This new security feature helps users verify that the data being imported is safe.
By following these steps, you’ll be able to successfully link the current SharePoint list data to a new Microsoft Excel 2007 workbook for printing:
Navigate to the SharePoint list or document library you want to use and click “Edit in Datasheet” under the Actions menu on the toolbar.
Expand the Datasheet View task pane by clicking the Task Pane menu under the Actions menu located on the toolbar or by clicking the Show Task Pane bar on the righth and side of the screen.
Click “Print with Excel” to start the process.
Click Enable when the “Microsoft Office has identified a potential security concern” security message appears.
Microsoft Excel 2007 should launch with the print window being active and show the imported data from the SharePoint list in the background ready to be printed.
Click OK to print the worksheet.
“Chart with Excel” takes the data from the SharePoint list and imports it into a Microsoft Excel 2007 workbook and then automatically launches the Excel Create Chart window to allow the type of chart to be selected before inserting the chart onto the worksheet. Once the chart has been inserted onto the worksheet, the Design menu ribbon becomes active. The Design menu ribbon is part of the Chart Tools section.
“Chart with Excel” is very similar to “Query list with Excel” but it adds the additional feature of automatically launching the “Excel create chart” window. The data that is imported into the Excel Workbook is linked and can be refreshed by selecting the Refresh All menu option on the Data ribbon.
Excel may display an error message that says, “Microsoft Office has identified a potential security concern.” Click Enable to allow the data to be imported from your SharePoint list. This new security feature helps users verify that the data being imported is safe.
By following these steps, you’ll be able to successfully link the current SharePoint list data to a new Microsoft Excel 2007 workbook:
Navigate to the SharePoint list or document library you want to use and click “Edit in Datasheet” under the Actions menu on the toolbar.
Expand the Datasheet View task pane by clicking the Task Pane menu under the Actions menu located on the toolbar or by clicking the Show Task Pane bar on the righth and of the screen.
Click “Chart with Excel” to start the process.
Click Enable when the “Microsoft Office has identified a potential security concern” security message appears.
Microsoft Excel 2007 should launch with the Create Chart window being active and show the imported data from the SharePoint list in the background ready to be charted.
Choose the chart and then click OK to insert it.
“Create Excel Pivot Table Report” takes the data from the SharePoint list and imports it into a Microsoft Excel 2007 workbook. It then automatically launches a worksheet with the pivot table control located on the top left side of the screen, activating both the Pivot Table Field List task pane and the Options menu ribbon from the PivotTable Tools section. A simple way of adding a column or row is by clicking and dragging the field down into either the Column Labels or Row Labels box.
“Create Excel Pivot Table Report” is a little different from the other Excel options because it doesn’t show any of the data until a field has been added to either the Report Filter, Column Labels, Row Labels, or Values box. Data for each field can be seen by hovering over the field and clicking the upside-down triangle on the right end of the bar. The Options menu ribbon gives a lot of additional features. The data is linked and can be refreshed by clicking the Refresh option on the menu ribbon.
Excel may display an error message that says, “Microsoft Office has identified a potential security concern.” Click Enable to allow the data to be imported from your SharePoint list. This new security feature helps users verify that the data being imported is safe.
By following these steps, you’ll be able to successfully link the current SharePoint list data to a new Microsoft Excel 2007 workbook with a Pivot Table already inserted and ready for designing:
Navigate to the SharePoint list or document library that you want to use and click “Edit in Datasheet” under the Actions menu on the toolbar.
Expand the Datasheet View task pane by clicking the Task Pane menu under the Actions menu located on the toolbar, or by clicking the Show Task Pane bar on the righth and of the screen.
Click “Create Excel Pivot Table Report” to start the process.
Click Enable when the “Microsoft Office has identified a potential security concern” security message appears.
Microsoft Excel 2007 should launch a new worksheet with a pivot table inserted in the upper-lefth and corner of the worksheet and the Pivot Table Field List task pane present on the righth and side of the screen.
Left-click and drag any field from the task pane down into the desired box at the bottom of the task pane, and then the pivot table control will display the changes.
Explorer view in general is a quick way to upload large amounts of documents without manually loading the documents one at a time. This view is available both embedded within the browser and as a regular Windows window. The general menu options for the most part are the same as a regular Windows Explorer view and don’t have specific SharePoint menu options. Any SharePoint-specific options will need to be done from the browser or the associated Office application.
This section goes into general detail about the availability and functionality that the view offers, and some of the limitations and possible problem areas that might be encountered in the workplace.
Explorer view is available for the Document Library, Form Library, Picture Library, Report Library, Translation Management Library, Data Connection Library, and Slide Library, but not for the Wiki Page Library.
Microsoft offers support for the “Open with Windows Explorer” option only in Internet Explorer versions 6 and 7. This is not to say that it won’t work in older versions, but there’s no support for it if problems do occur.
When you first open Explorer view for a new library, you will notice that there is a folder called Forms—this is a system folder that contains all the ASPX pages that make up the library. In older versions of SharePoint, this folder could be deleted, which made the library unusable. It is no longer possible to delete the Forms folder, but users may wonder why it’s present. If they do try to delete the folder, they will get an error message.
One of the biggest downsides of using the Explorer view in SharePoint 2003 was the lack of ability to check files in or out. For example, you had the capability to copy and paste large amounts of documents into Explorer view, but each document had to be checked in from the standard Library view. In SharePoint 2007, this is still true, but there has been an improvement. When versioning is turned on and the documents you are copying already exist in the library, a new version will be created for each replaced document.
The new versions of SharePoint and Office are very tightly integrated, and SharePoint relies on Microsoft Office 2007 to perform the tasks that it is unable to handle from Explorer view. For example, the setting requiring documents to be checked out before they can be edited is enforced from the Microsoft Office application, rather than from the Explorer view. If the document is opened from the browser, a pop-up window asks the question before the Microsoft Office application is launched.
If a document is opened from the Explorer view and then checked out from the Microsoft Office application with changes saved, when you check it back in, it returns an error message. If you do not check it back in until you are closing the application and it prompts you to do so, there is no error message, and everything works as expected.
The security behavior is a little different when using the Explorer view versus the Browser view. In the Browser view, if you don’t have access to something, it’s not shown, but that’s not the case in Explorer view.
When I tried to add a document library as a reader, I got this warning message: “An error occurred copying some or all of the selected files.”
When I tried to delete a document from the document library as a reader, I
got this message: “Unable to delete filename. You
do not have the correct permissions. Please contact the server
administrator.”
Because the messages may vary, it might be a good idea to inform other users what messages they might receive when using the Explorer view to help reduce confusion.
Workflow is a new feature for SharePoint 2007. If a library has a workflow assigned to it, and the workflow is set to start when a document is inserted or updated by adding a document through Explorer view, it will trigger the workflow. A workflow can be set up to start manually by a user, but this capability is not available from Explorer view. Any other type of interaction with the workflow needs to be done from the browser.
Any update to metadata will have to be done from the browser or the associated Microsoft Office application. Microsoft Office 2007 has improved the ability of updating the document’s metadata by now displaying the fields in the message bar.
If you are using columns in the library that match the document default properties (Title, Subject, Author, Category, Keywords, and Comments), these values will be automatically populated if the columns are text data types (Single, Multi-Line).
Warning
When working with the Explorer view and Browser view, I noticed that caching issues occurred. For example, if a document was deleted from the standard Library view and then Explorer view was opened, the document was still there until the Explorer view was refreshed.
Another thing to be careful about is the “Move to” and “Copy to” options. When these options are used from Explorer view, Explorer view doesn’t use the new feature Manage Copies but instead uses the regular Windows options. (This should have been assumed but I was hoping for a little more from Explorer view this time around.)