Chapter 15
Performing Fast and Accurate Support
In This Chapter
![]() Understanding service and support processes
Understanding service and support processes
![]() Creating cases
Creating cases
![]() Updating cases
Updating cases
![]() Viewing case lists
Viewing case lists
![]() Researching and resolving cases
Researching and resolving cases
![]() Communicating the outcome
Communicating the outcome
Salesforce provides robust customer service functionality in its Service Cloud product. The module is used to track and resolve cases, using a variety of features that allow agents to respond to cases as efficiently as possible. But it’s more than that as well.
With Service Cloud, you have all the tools at your fingertips to efficiently deliver excellent customer service while managing the costs of operations. In days and weeks, versus months and years, you can start and manage a fully integrated customer service strategy that supports the many channels that customers use to communicate with you. Service Cloud also provides the ability to handle web chats from customers looking for help on your website, for customers to log in to a private portal where they can submit new cases and check up on existing ones, and a console where agents can minimize the number of clicks and additional pages they have to open to see information about a customer.
In this chapter, we introduce you to basic customer support functionality in Salesforce, starting with its core concept, the case. We first discuss fundamental support agent processes for handling new cases, and then we cover how to manage the growing caseload.
Walking through a Day in the Life of a Service Agent
Salesforce follows a general process when it comes to managing cases. Service agents (you may call them support reps) commonly perform these tasks on any given day. The specific tasks may be different in your company, but you probably see some similarities:
- Responding to inbound e-mails and calls
- Taking new cases from assigned queues
- Validating that the inquiry is coming from an authorized contact
- Creating a case to begin tracking efforts to resolve the issue
- Working the case backlog, including researching solutions
- Managing service-level agreements
- Communicating the resolution to the customer
At its core, customer support is all about accepting questions and answering them in a timely and consistent manner, while providing high levels of customer satisfaction. How you handle your responses — and the scale on which you handle them — are more complicated issues.
 High-volume call centers can take advantage of Salesforce’s customer management and reporting capabilities by using Salesforce’s call center capabilities. Salesforce CRM Call Center integrates Salesforce with third-party computer-telephony integration (CTI) systems, allowing your call center agents to do cool stuff, such as dial and receive calls from softphones on their computers and see what contact records or cases are related to the calls.
If your company’s Salesforce users all have full licenses, and just need to capture a fairly manageable influx of basic cases, you can do that without having to purchase full-blown separate Service Cloud licenses.
Understanding the Case Record
A case is a record of a customer service inquiry (you may call them tickets), as shown in Figure 15-1. Just like other common records, such as accounts and contacts, you can track all interactions on a case from a single detail page. And to manage all your cases, Salesforce comes out of the box with all the tools that you need for routing, queuing, and escalating cases, plus complying with service-level agreements (SLAs), if that applies to your company.
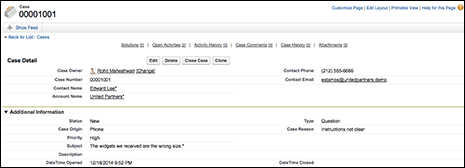
Figure 15-1: Introducing the case record.
A case record comes preconfigured with standard fields and two icons commonly used for case management. Most of the standard fields are self-explanatory, but in the following list, we highlight key fields that are less obvious:
- Status: This field defines the important statuses in your case process. It comes preconfigured with a basic process, but you should modify the values to fit your process. If you’re an Enterprise or Performance Edition user, you can use this field to distinguish multiple support processes appropriate to the different kinds of cases you want to track.
- Case Number: When you create a case, Salesforce automatically assigns a sequential number used for tracking. If you’re an administrator, you can change your starting number and numbering format. See Chapter 16 for more information on customizing this.
- Type: Use this picklist field to define the type of case. Salesforce presets this list with selections that include Problem and Question, but you can modify the picklist to match your categories.
- Case Reason: Use this picklist field to specify the reason the case was opened. Many companies track this field to identify areas of customer service that they can improve. Of course, you can also modify this list to suit your needs.
- Case Origin: Use this field to record from which channel the case originated — for example, by phone, e-mail, or web. Many companies report on this field to understand and improve the methods by which customers interact with service and support agents.
- Internal Comments: Use this field to jot brief comments on this case to communicate internal messages, as needed. Customers or people outside of your company will not see this field by default. However, internal comments that are marked Public may be viewed by clients in the Customer Portal, if you have it enabled.
You may also hear the term case feed. The case feed borrows functionality from Salesforce’s Chatter feature so that users can better collaborate around resolving a particular case. Internal discussions about a case appear chronologically above the case details, as shown in Figure 15-2. Each comment can then appear in other employee’s feeds, and those with information that could help can reply with a comment of their own. You don’t even have to know the coworker who is giving you a response. He just may have seen your comment in his feed, know the answer, or know someone else who knows the answer and can give that other person a heads-up also within the comment.

Figure 15-2: Posting a comment on a case feed.
Creating a Case
One of the main responsibilities of an agent is handling new inbound inquiries. Writing notes on a little sticky square that you attach to your monitor may not be the best way to track information, especially if you have terrible handwriting. In the following sections, we discuss how to begin the case management process in Salesforce so that the right information is tracked for the right customers.
Validating the contact
The first step in creating a case is validating the company and contact information to see whether any special circumstances or SLAs exist. This is less of a technological innovation then a general business best practice. Can’t have just any random person taking up your precious time, can we? This information should reside in custom fields on the account record. For example, to do this in response to an inbound call, log in to Salesforce and follow these steps:
- Type the company name (or account number — whatever your company uses to identify its customers) into the Search field on the sidebar on your Home page and then click the Go button.
The Search Results page appears. Hopefully, you see the account name listed. If it’s not listed, you should have some business processes in place to determine how to verify that the person or business calling in is indeed a customer.
- Click the Account Name field.
The Account record appears. Verify the business’s information on this record that helps you identify that you’re allowed to support this company. You might verify an address or an account number. You should confirm those processes first before using cases.
- Look at the Contact detail list to locate the person with the problem.
Again, depending on your company’s policies, you may or may not have specific customer contacts authorized to call you for support.
- Click the Contact Name field.
The Contact record appears. Verify information on this record that helps you identify that this person is permitted to call for support. If the contact record doesn’t already exist, create a new contact record. For more information, read Chapter 5.
Entering new cases
After you qualify the customer, you have to associate a case to each new issue you receive. Because cases are associated with contacts, the best, most reliable way to create case records is by starting from the relevant Contact detail page. From the Contact detail page, you can add a case by using either the Create New drop-down list on the sidebar or the New button on the Cases related list. The result is the same in both situations, and you automatically prefill the Contact lookup field. By doing this, you can always find your case, and your case activities will be listed on the overall Contact detail page.
To create cases by using the best practice, follow these steps:
- From the Contact detail page, click the New button on the Cases related list.
The Edit mode of a new case appears.
- Fill in the fields as much as you can or as required.
Notice that the Contact field is prefilled with the contact you were working from.
- When you’re done, click one of the following buttons:
- Save: Brings up the Case detail page.
- Save & Close: Saves the current case info and automatically takes you to the Close Case detail page, as shown in Figure 15-3, where you select the appropriate closed case status and add additional details. Use this to quickly resolve an issue.
- Save & New: Saves the current contact info and automatically opens a new, blank contact record.
- Check Spelling: Checks the spelling of the contents of the Description field.

Figure 15-3: Closing a case.
To clone a case, click the Clone button at the top or bottom of the case record. If it’s the day of a new product or feature release, and many customers are reporting the same problem, the Clone button will come in handy for you. This is similar behavior across other records in the Salesforce family.
 You can also set up Salesforce to generate a new case from an e-mail sent to specific addresses (like
 [email protected]), also known as the Email-to-Case feature. You have a few options, depending on your company’s e-mail requirements. For example, if you need to have all e-mail traffic behind your firewall and will be receiving attachments larger than 10MB, check out Email-to-Case at
http://wiki.developerforce.com/index.php/Members:Email_To_Case
Check with your account executive to discuss other options. Of course, you could always have a Web-to-Case form set up (similar to the Web-to-Leads that we discuss in Chapter 13), too.
Managing Cases
As a service or support agent, one of your key goals as a case owner is to address and resolve many customer issues as quickly as possible. Ideally, the need for speed is balanced with some defined processes to ensure a sense of order. Over time, your caseload will build up as different cases take different lengths of time to resolve. You’ll work off the Cases home page, which you access by clicking the Cases tab at the top of the page. There you’ll be able to see the most recent cases and adjust your views so that you can see the cases that are most relevant to you (for example, maybe you handle all the Platinum requests for the West Coast and just want to see those). In the following sections, we describe how to efficiently update a case as you work it, and then we discuss how to manage your growing caseload.
Updating case fields
As you work your cases, you may need to modify case information. To update a case, follow these steps:
- Type the case number in the Search tool and then click Go.
If you don’t have this information (usually from your customer), don’t worry; you can still enter whatever information you have about the customer into the search tool. It may take a few extra hops to get to the case as you return a contact or account record, but the beauty of Salesforce is that these records are all related, via the account record. A Search Results page appears.
- Click the desired Case Number link.
The Case detail page appears.
- Click the Edit button at the top of the case record.
The case record appears in Edit mode.
- Update the fields, as necessary, and then click Save.
The Case detail page reappears. Notice that the fields you edited have been changed.
 Case comments can’t have their own related list on the case detail record and are meant to record any short internal conversations that agents may review at a glance. If you have a Customer Community set up (see Chapter 16 for more information), agents may optionally share certain comments with contacts on a case.
Reassigning case ownership
After you create cases in Salesforce, you might need to transfer them — reassign them — to the right people: folks who become responsible for case resolution after it’s been escalated, for example.
To reassign a case, go to the case record and follow these steps:
- Next to the Case Owner field, click the Change link.
The link is in square brackets. The Change Case Owner page appears.
- Select the user to whom you’re assigning the case.
(Optional) Select the check box to choose to notify the recipient with an e-mail.
- When you’re done, click Save.
The case record reappears. Notice that the Case Owner field has changed to the assigned user.
Getting a clue on views and queues
Case views and case queues are accessed from the same location — the Case View drop-down list on the Cases home page.
A case view is a list of cases that match certain criteria. When you select a view, you’re basically specifying criteria to filter the results that you get back. The advantage of using a view, versus searching, is that you can use the view over and over again.
If your company has several agents resolving cases for a variety of products and services, your administrator may set up case queues to automatically funnel cases to the right pairs of eyeballs. For example, you may use your website to collect both product and billing inquiries. Case queues would allow support agents to grab new cases from the product queue, while accounting operations staff can monitor the billing queue.
To try out a predefined view, do the following:
- On the Cases home page, open the Cases Views drop-down list.
The four default options appear and maybe some other choices that have already been created for you.
- Select the All Open Cases option.
The All Open Cases list opens, as shown in Figure 15-4.
Notice that Salesforce lays the list out with standard columns that correspond to commonly used case fields, plus an Action column so that you can quickly modify a record.

Figure 15-4: Viewing a preset case list.
- Click a column header to re-sort the list page.
- Open the record for any case by clicking a link in the Case Number column.
A Case detail page appears.
- Click the Back button in your browser, and then click the Edit button on the same row as the case you just clicked.
The case record appears in Edit mode, and you can make changes to the data.
- Select the check boxes on certain rows if you’d like to close, change ownership, or change the case status en masse. Then, click the corresponding button to perform the group action.
The case record appears in Edit mode for that action, and you can make changes, as appropriate.
Queues ensure that everyone has an equal chance at the latest cases.
To choose a case from a queue, follow these steps:
- From the Cases home page, select the view that corresponds to a queue that you’re supposed to monitor.
The list page appears.
- In the Action column of the case list, select the check boxes for the case records that you want to accept and begin working on.
- Click the Accept button to take ownership of these cases.
You’ve now claimed these cases from the general pool of new cases.
Creating custom case views
If you want special lists for the way that you track your cases, we recommend building custom views. For most objects with tabs in Salesforce, you can create a custom view. See Chapter 4 to find out how to generally create a custom view.
Knowing More about Salesforce Knowledge
Salesforce Knowledge introduces a more robust knowledge base option for support departments and call centers. It’s smart enough to return relevant answer options to internal support agents or customers, based on its evaluation of your problem description. Multiple filtering options also let you find information based on multiple attributes, for example, based on the type of product and the topic of the issue (GenWatt Engine products and Broken Circuit topics). It’s available for Enterprise and Performance Edition users, and possibly for an additional price, depending on your edition. (Talk to your account executive for more information.)
We discuss Salesforce Knowledge in depth in Chapter 16.
Researching and Resolving Cases
When you have your set of assigned cases, the next milestone is to resolve the customer’s issue. In general, case resolution means responding to the issue and doing it efficiently so that you minimize time spent on repetitive tasks. For example, typing out the same explanation to “Where’s the Any key?” (you know, when the manual says to “press any key”) can tend to get stale after a while.
Understanding solutions
A solution is a basic text boilerplate response to a commonly asked question. As you resolve cases, service reps can both apply existing solutions and create new ones that your teams can use in the future. Using solutions helps new agents ramp up more quickly and makes any agent on your team proficient on a wider range of topics. The following list describes additional terms used when discussing solutions:
- A solution has a related list that indicates all the cases that use the solution. This association is the key to a feature called Suggested Solutions, which substantially reduces the amount of time it takes to get answers to cases. In essence, it finds similar cases and suggests solutions that have answered those cases.
- Solution Categories group similar solutions together. One solution may belong to one or more categories.
- Your collection of solutions is often referred to as the knowledge base and can populate both a Customer Portal and a searchable FAQ for a public website. See the earlier section “Knowing More about Salesforce Knowledge” for more information about the Salesforce knowledge base. (Yes, it can be a bit confusing when the brand name of a salesforce.com feature is also a commonly used noun. In this book, we refer to the add-on product as Salesforce Knowledge.)
So what is the difference between Salesforce Knowledge and solutions? Solutions were an original part of the product and are no longer being enhanced. They are sufficient when working with a manageable volume of cases, and a more basic, straightforward set of products or services to support. If your company is new to the world of customer support, this is a good introduction as you get your feet wet with what support processes work or don’t work for your particular company. This is why we go into a little bit more depth in this chapter about this option. For companies with an extremely varied set of products to support, or for those that need to have very precisely reviewed templates of public-facing information, Salesforce Knowledge may be a better option. Its native functionality lets information get captured in multiple formats. For example, a Salesforce Knowledge article could include an attachment that is an installation manual. When an agent tries to search for an answer to a particular problem, deep searching capabilities allow Salesforce to search for keywords even within that attachment. Also, salesforce.com will continue to enhance Salesforce Knowledge. Discuss your needs with your success manager to better understand which option is the better fit for your company’s needs.
Finding solutions
From the case record, look for solutions by using the method described in this section.
You’ll see a Find Solution button on the Solutions related list, as shown in Figure 15-5. Click the Find Solution button to view relevant solutions. We generally recommend that you associate only reviewed solutions with cases.

Figure 15-5: Viewing suggested solutions.
To look for solutions by using the Search box in the Solutions related list, follow these steps:
- In the Search box of the Solutions related list, enter keywords related to a possible solution.
After you get more familiar with solutions and their unique IDs, you may even look up a solution by part of its solution number.
- If your company uses solution categories, select a category in which to search.
- Click Find Solution.
The Find Solution for Case Number page appears. If Solutions Categories are enabled, search results are first shown by category and subcategory groupings.
Attaching solutions to a case
When you’re viewing the relevant solutions, you want to find the appropriate solution(s) and associate it (or them) to your case. You may do this in two ways:
- From the reviewed list of relevant solutions, click the Select link next to a reviewed solution.
- If you need to confirm the details of the solution first, click the Solution Title link, and then click the Select button on the Solution detail page when you’re sure of the right solution.
After either method, you’re returned to the Case Record page. In the Solutions related list, you see the solution that you just attached. If you add more than one solution to a case, simply repeat the steps for finding solutions and associate them to your case, as appropriate.
Attaching a solution to a case counts as a solution being “used” in Salesforce. This tally can later be analyzed in reports so that support executives and product managers can see which problems or questions are being reported the most (which, in turn, warrant the use of certain solutions). By getting measurable feedback on issues, the support and product teams can work more closely to address the actual issue before cases need to be logged.
Communicating the Outcome
After you research your case and find the right solutions for it, you now must communicate this resolution to your customer before you officially mark the case closed. Make sure that your administrator has created appropriate case resolution e-mails for your support team.
Responding with standard e-mail templates
Standard e-mail templates allow you to merge your attached solutions into the body of an e-mail template, which you then send to your customer. This increases the efficiency with which the support team can answer questions. To provide a response to a customer using an e-mail template, read through Chapter 8 for details.
Closing a case
After you resolve your case and successfully notify your customer, it’s time to close the case and move on to the next one. One of the key advantages of Salesforce is its easy-to-use reporting system (more about that in Chapter 17). Additional information is collected after you close a case, so support executives can use the collective feedback to continuously improve the customer experience.
To close a case, follow these steps:
- From the case record, click the Close Case button.
Alternatively, if you’re on the Edit page for the case record, click Save & Close. The Close Case page appears in Edit mode.
- Select the appropriate closed case status and add any internal comments, if needed.
Other fields are shown based on your company’s customizations. If you’re a Professional, Enterprise, or Performance Edition user, you’ll also see an additional section allowing you to create a solution from this case.
- Edit the solution title as needed so that the solution may be applicable for all customers.
- Select the Submit to Public Solutions check box to submit the solution for review by your team’s designated solution managers.
This will also link the case to your new solution.
- Click Save when finished.
If you want to display common solutions to the public so that customers can look for their own solutions, you have a few options. Both Salesforce Knowledge and the default solutions can be set up for this. Check with your account executive or customer success manager for details.