Chapter 20
Customizing Salesforce with Force.com
In This Chapter
![]() Modifying standard business processes
Modifying standard business processes
![]() Managing multiple business processes
Managing multiple business processes
![]() Customizing page and search layouts
Customizing page and search layouts
![]() Managing record types
Managing record types
![]() Using dependent picklists
Using dependent picklists
![]() Setting workflow processes
Setting workflow processes
If you’re just beginning your implementation, Salesforce comes preconfigured with a number of common fields in simple layouts for each of the tabs. You could buy your licenses, log in, and without any customization, start using it to track your customers. So why is it that as the top cloud-based CRM provider, no two instances of Salesforce are likely to be identical?
The answer is a key ingredient to your success: The more Salesforce is customized to your business, the more likely your company will use it effectively and productively … as long as you lay a strong foundation (using this book will help)!
If you’re an administrator or a user with permission to customize Salesforce, you have a universe of tools to design Salesforce to fit the way you do business. And you don’t need to be a technical wizard to make these changes. With common sense, patience, and a little help from this book, you can customize Salesforce on your own in a way that will allow Salesforce to scale as your business matures.
 You may hear the phrase Force.com used when talking about Salesforce’s customization capabilities. That is the umbrella term used to describe everything under the Setup link, where all the many Salesforce customization features are located. It’s described as the foundational platform that makes Salesforce and its many custom applications possible.
We could write another book if we tried to address each feature. In this chapter, we show you how to perform all the core customization options, including creating fields, building in your standard processes, adding web links, and rearranging layouts. Then, for companies that have Enterprise or Performance Edition and possess complex needs, we show you how to develop custom page layouts, multiple business processes, and record types that link to custom profiles.
Discovering Customization
All your customization tools are conveniently accessible from the Customize menu located under the Build heading of Setup in Salesforce. Navigating the Customize menu is simple when you understand some basics. If you have administrative permissions, log in to Salesforce and do this now:
- Choose Setup⇒Build⇒Customize.
The Customize page of Setup appears, and the sidebar expands to display headings for the various objects that can be customized; see Figure 20-1. Under the Customize heading on the sidebar, you see a few select headings for other areas of Salesforce (such as Call Center and Self-Service), which can also be customized.

Figure 20-1: Expanding the customization sidebar.
- Click the arrow buttons or headings that correspond to the major tabs, such as Accounts, Contacts, and Leads.
The sidebar expands with the different customization features available under each heading. These are all the things you can do when customizing a standard tab. Notice that although certain headings have more features, most of the headings have links to common customization features, such as Fields, Page Layouts, Search Layouts, Buttons and Links, and in certain editions, Record Types and Processes.
- Click the Fields link under a tab-related heading (like Accounts) on the sidebar.
A Fields page appears based on the selected tab heading. This easy and consistent navigation will help you through the customization.
 If you hadn’t noticed, the tab names listed under the Customize header aren’t in alphabetical order. The list used to be much shorter back in Salesforce’s infancy. Over time, more features and tabs (also known as objects) were created. For new users like yourself, you don’t have to keep scrolling to find where a certain object header is listed. Just use the Quick Find search bar in the upper left of the left sidebar (see Figure 20-2). When you type in a tab name or feature setting name, links containing those words will appear.

Figure 20-2: Using the Quick Find search bar to find account-related settings.
Breaking down basic elements
When diving into customization, keep these five basic concepts in mind:
- Records are the high-level data elements (such as accounts, contacts, and opportunities) that are stored in the Salesforce database. Each tab corresponds to a type of record. Records consist of fields. If you think of the Salesforce database as a filing cabinet holding all your company’s information, a record is like a type of form that you house in your filing cabinet.
- Page Layouts allow you to control how a page is displayed to users. Different users (like those in Marketing and Sales) may need to see some common fields on a Contact record, while also focusing on other fields relevant to just their departments. Different page layouts help different teams see fields that are most relevant to them, which helps with adoption and increased usage of your CRM system.
- Search Layouts is the feature that allows you to control how search results are displayed to users. Search layouts correspond to the organization of columns that are displayed on a Search Results page, lookup dialog page, or record home page in Salesforce.
- Processes is an option for some objects, allowing you to build various sales, marketing, and service processes in Salesforce that you want your reps to follow.
- Record Types allow you to offer certain business processes and subsets of drop-down lists to users based on their profiles. Not to be confused with a type of record (such as an account or contact), a record type, when used with page layouts and profiles, can make only some of the drop-down list values available to users within a profile. For example, an enterprise sales rep with a longer sales cycle may need to track more opportunity stages of his sales cycle, compared to a general business rep whose high-volume transactions only require tracking of a few opportunity stages.
Customizing for relevance
Prior to customizing Salesforce, your CRM project team should conduct a series of business process reviews with functional representatives or stakeholders of the teams that will be using Salesforce. In those meetings, not only should you map out current and desired processes, but you should also ask sets of leading questions that will impact the design of fields, records, layouts, and more. Key questions should include
- How do you define your customer?
- What information do you want to collect on a contact?
- Who do you expect to fill out this information? Is that realistic?
- How do you know that you have a qualified lead?
- What do you want to know about an opportunity?
Use the answers to construct a list of standard and custom fields per record that you believe should be in Salesforce. That spreadsheet should include columns for field name, field type, field values, justification, and so on, and you should review it with your project team prior to customization.
When customizing, keep it simple at the beginning. Don’t add or keep a field unless you ultimately believe that you or someone else will use it. You can always build additional fields in the future, especially if you build momentum based on early user adoption success.
When you create custom fields, fill in the Help and Description fields for them, too. This is often overlooked, and results in future generations of employees often scratching their heads as to a field’s usefulness. Custom fields get created over time, names sound familiar (but may be obvious in their differences when you create them), and this tacit knowledge rarely gets passed on. Consider the Help text as your future self, training the next new sales rep, marketing manager, service agent, and so on. Use the Description field to give a little more background to which group requested this field and to what they were trying to report with this data.
Building and Editing Fields
When it comes to customizing Salesforce fields, two words describe the experience: It’s easy. The hard part is confirming why you want it, who will be realistically filling out the information that you want to capture, and whether this will be easily reportable when hundreds or thousands of records have this data. The more relevant you make the record fields to your actual business, the better the user adoption batting average and the higher the likelihood of hitting a home run.
Adding fields
All editions of Salesforce allow you to add fields, but some versions allow you to add significantly more fields than others. For example, if you have Group Edition, you can add 100 custom fields per record; with Enterprise Edition, you can create up to 500 per record.
To add a field, click the Setup link in the upper-right corner of Salesforce and follow these steps:
- Click any tab-related heading under the Customize heading on the sidebar.
The options under the selected heading appear.
- Click the Fields link under the heading.
The Fields page for the tab appears, displaying a list of standard fields at the top and a list of custom fields and relationships at the bottom.
- Click New in the Custom Fields & Relationships related list.
Step 1 of the New Custom Field Wizard appears. Data types with descriptions of each of them appear in a list, as shown in Figure 20-3.
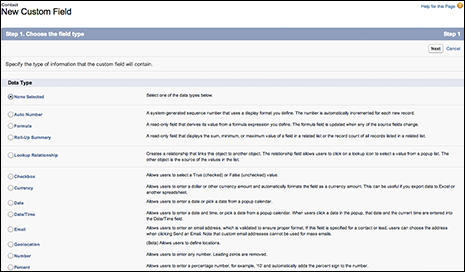
Figure 20-3: Choosing a new contact custom field’s data type.
- Select a radio button matching the type of field that you want to create and then click Next.
Step 2 of the wizard appears, asking you to enter details about the field you want to create. These two fields are required:
- A field label is what’s displayed on page layouts, in reports, and to end users’ eyes, for example, “Reimbursement Date.”
- A field name may be the exact same as a field label but must use an underline (_) as a substitute for a space character. Field names are used as an internal reference by Salesforce and are key for integration, for example, “Reimbursement_Date.”
- Enter the details and click Next.
Step 3 of the wizard appears. The details page varies based on the field type you selected. For example, the settings for a Text Area field are different than for a Currency field.
If your company’s edition is not Enterprise or Performance Edition, click Save and you’re done. Optionally, click Save & New to immediately save this custom field and begin creating another one.
- For Enterprise or Performance Edition, use the check boxes to select the field-level security access and edit rights per profile and then click Next.
Step 4 of the wizard appears.
- For Enterprise or Performance Edition, use the check boxes to select the page layouts that should include this field and then click Save.
The Fields page for the selected record reappears.
Viewing and updating fields
On an ongoing basis, situations come up in which you might need to update the properties of a field. For example, management changes or adds statuses, nomenclature changes so that field labels need to change, and so on.
To view and update your fields, choose Setup⇒Build⇒Customize. Then click the Fields link under a tab heading under the Customize heading on the sidebar. The Fields page for the selected tab appears, displaying lists of standard and custom fields. From this page, you can do the following:
- Update a field: Click the Edit link to the left of whichever field you want to modify.
- Change the field type on a field: Click the Edit link for that field, and then click the Change Field Type button at the top of the Edit page. Step 1 of the wizard appears, and you can follow the steps in the preceding section, starting with Step 4.
 If data already exists in a field and you want to change its data type, you risk losing that data. Also, not all data types can be converted into a different data type. For more details, go to the Help & Training link in the upper-right corner of any Salesforce page and search for “changing custom field types” in the search bar.
 - View the field and its properties: Click a link in the Field Label column.
- Delete a custom field: Click the Del link to the left of the field, next to the Edit link.
- Add values to a drop-down list: Click the Field Name link in the Label column, and then click the New button in the Picklist Values related list, as shown in Figure 20-4.

Figure 20-4: Adding a new picklist value to a drop-down list.
- Replace values in a drop-down list: Click the Replace link next to a field. A Find and Replace Picklist page appears. Make sure to add the new value before trying to replace.
The Replace feature is really helpful when you have existing records with old values that need to be switched to new values. Take the Lead Status field, for example: You could use the Replace feature to update leads formerly marked as Unresponsive and replace them all instantly with a new value called Nurture.
- Reorder values in a drop-down list: Click the field name link in the Label column, and then click the Reorder button in the Picklist Values list.
Replicating your key standard processes
On certain standard records in Salesforce, you use a standard drop-down list to map your business processes.
You’ll probably want to put some careful thought into handling each type of record. To define your standard business processes, do the following:
- Expand the Customize menu until you see the Fields links for various records (under the Activities heading, refer to the Task Fields link).
- Click a Fields link under one of the records mentioned in Step 1.
The Fields page appears with Standard Fields and Custom Fields & Relationships related lists.
- Depending on the record you chose, look in the Standard Fields related list and then click the Status or Stage link to modify the corresponding processes.
In each circumstance, a field page appears with a Picklist Values related list, listing all the values within the process.
- In the Picklist Values related list, adjust your process, as necessary.
See the preceding section for details on updating picklist fields.
Understanding custom formula fields
After you get the hang of adding custom fields, explore some additional cool things you can do with them.
Custom formula fields are a custom field type that automatically calculate their values based on the content of other values or fields. For example, if you charge your customers a shipping and handling fee based on the total quantity of a product listed in an opportunity, create a custom formula field called S&H that multiplies your total quantity amount with a predefined value.
To create a custom formula field, first define the task at hand. What is it you want to calculate? Then follow up to Step 3 of the numbered list in the section “Adding fields,” earlier in this chapter, and choose to add a Formula field. Then continue with these steps:
- At Step 2 of the New Custom Field Wizard, provide a field label and field name.
- Use the radio buttons to select the format that your returned value will take and then click Next.
Depending on your selection, Salesforce may ask you how many decimal places you want your returned value to display.
- Type your formula in Step 3 (as shown in Figure 20-5).
Salesforce displays two subtabs — Simple Formula and Advanced Formula — to help you with creating your formula, and adding your formula for Salesforce to process:
- Simple Formula: Reveals a subset of merge fields to add to your formula, along with standard math operators
- Advanced Formula: Reveals all possible merge fields for your record, provides more operators, and shows you a set of Excel-like function categories that you can use to plug into your formula
To use either, simply move your mouse over the tab that you want to use and click it. The body of that tab appears.
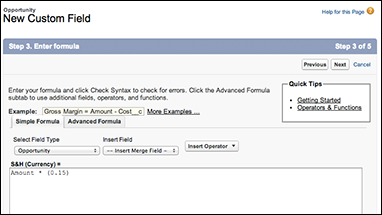
Figure 20-5: Creating a custom formula.
- Click Check Syntax when complete to make sure that your formula is up to snuff. Click Next.
If you get an error message, go back and check your formula. Salesforce’s error messages will tell you if it can’t find the fields you’re referencing, if you used an incorrect parameter, and so on.
- In Step 4, confirm field-level security for your new field and then click Next.
Because it derives its content automatically, the field will be a read-only field. You just have to confirm who can see it.
- In Step 5, confirm which page layout you want to add this new field to. Click Save when finished.
The Fields page for the record reappears.
You don’t have to be a math or Excel whiz to benefit from custom formula fields, although those skills sure can help you master it faster. If you’re like the rest of us and would rather not even figure out the tip on your dinner tab, make sure that you go to the Help & Training section from the upper right of any page in Salesforce and search for “examples of advanced formula fields” for a ton of suggestions on how your organization can benefit from prebuilt formulas grouped by specific topics.
Using Custom Buttons and Links
Many sales, marketing, and support teams rely on websites and secure cloud-based applications to perform their jobs. For example, your company might use a research website for market intelligence. By building powerful custom links that connect to important websites, users can use Salesforce more efficiently without having to manually open another browser window.
The Salesforce Force.com platform allows you to create custom buttons to represent your links or to perform actions that would usually take several mouse clicks to complete, such as escalating a case.
To build a custom button or link, click the Setup link in the upper-right corner and then follow these steps:
- Click any record heading under the Customize heading on the sidebar.
The selected heading expands.
- Click the Buttons & Links link under the record heading.
The Buttons, Links, and Actions page for the selected record appears.
- Click the New Button or Link button in the Buttons, Links, and Actions list.
The New Button or Link page appears in Edit mode. Complete the fields as explained, telling Salesforce whether you’re creating a button or a link, and what action should occur when you click it. If you’re creating a button, you can decide whether it goes on the detail page or within a list. You see links to examples, just to make sure.
- Click Save when finished.
The Custom Button or Link page reappears.
 This book doesn’t go into any technical detail about Visualforce. Here’s what you should know about Visualforce: If your company has specific business processes not addressed by Salesforce, you can use Visualforce to build your own application in Salesforce. Visualforce combines HTML with browser-based styling similar to CSS, so you’ll need to recruit some techie geeks if this sounds foreign. Think, though, how much time your company could save if, for example, your reps could click a custom link on an opportunity page and immediately populate an order form in Salesforce. You could do that. For additional information on Visualforce, go to http://developer.force.com. To display your custom buttons or links to users, you must add the new buttons or links to the appropriate page layout. See the section “Modifying a page layout,” later in this chapter.
Customizing Page and Search Layouts
Wouldn’t it be great if you could take the fields on a record and rearrange them like jigsaw puzzle pieces on a page until they fit just right? Sounds too good to be true, but with Salesforce, you can do just that and more.
Use page layouts to modify the position of fields, custom links, and related lists on Record detail pages and Edit pages. While you’re modifying a page layout, you can also edit field properties to determine which fields should be required or read-only.
And with Enterprise and Performance Editions, you can create multiple page layouts and assign them to profiles, record types, or a combination of both. By doing this, you can ensure that different users are viewing just the right information to do their jobs.
Modifying a page layout
If you have permission to customize Salesforce, you can modify page layouts at any time. We typically recommend that you create some or the majority of your proposed custom fields first before rearranging them on the layout.
To edit a page layout, click the Setup link in the upper-right corner of any Salesforce page and follow these steps:
- Click any tab heading under the Customize heading on the sidebar.
The selected heading expands with links to customization options.
- Click the Page Layouts link under the tab heading.
The Page Layout page for the selected tab appears.
- Click the Edit link next to a page layout that you want to modify.
A Page Layout editor appears, with the editor at the top and a sample layout below it (see Figure 20-6).
- Choose from the following options to edit the layout using the nifty drag-and-drop user interface:
- Arrange fields, buttons, custom links, related lists, and more: By default, you see fields that go into the detail section for that record. Select other options to edit from the left sidebar of the layout editor. If you have a lot of fields to wade through, use the Quick Find search bar in the layout editor to quickly locate a field. If it’s grayed out, it means that its already on the layout — clicking it will take you to it. If the field isn’t grayed out, you can then click and drag it from the main body of the layout editor to desired locations on the sample layout.
- Rearrange existing fields: Hover over them in the sample layout to highlight them, and then click and drag them to the updated destination on the layout. A dark bar shows you where the field will “land” after you drop it.
- Modify field properties: Hover over a field on the sample layout, and then click the wrench icon to the right of the field. In the pop-up window that appears, use the check boxes to modify Read Only and Required settings and then click OK.

Figure 20-6: Viewing the Page Layout editor.
- Organize the record with sections: Hover over a section header and click its wrench icon. Alternatively, click the + Section button in the main body of the layout editor and drag it to where you want it to appear in the sample layout. In the pop-up window that appears, type a name for the section, use the drop-down lists to adjust basic settings (such as columns), and then click OK.
For example, on an account page layout, you might want to build a section named Strategic Account Planning to organize fields for account planning. When you click OK, the window closes.
- To preview the layout, click the Preview As button in the layout editor.
Select which user perspective you want to view. A window appears with sample data displayed in the layout as it’s currently modified. In the preview window that opens, review the layout and click Close.
- When you’re satisfied with your layout changes, click Save in the layout editor.
The Page Layout page for your selected record reappears.
Assigning layouts to profiles
After you create custom page layouts, you can assign your layouts to profiles. By doing this, users will view detail pages based on their profile and associated page layout.
To assign layouts to profiles, click the Setup link in the upper-right corner of any Salesforce page and follow these steps:
- Click any tab heading under the Customize heading on the sidebar.
The selected heading expands with a menu of options.
- Click the Page Layouts link under the tab heading.
The Page Layouts page for the selected tab appears.
- Click the Page Layout Assignment button at the top of the Page Layouts list.
A Page Layout Assignment page appears with a list of current assignments.
- Click the Edit Assignment button.
The page reappears in Edit mode.
- In the Page Layout column, highlight one or multiple cells by clicking the links.
Ctrl-click or Shift-click to select multiple cells.
- From the Page Layout to Use drop-down list, choose the page layout that you want to assign to the selected profiles.
- When you’re done, click Save.
The Page Layout Assignment page reappears, displaying your changes.
Changing search layouts
If you’ve ever seen some search results and wished that they showed a few more column headers, you’re in for a treat. Search layouts allow you to determine which standard or custom fields appear as headers in multiple types of search features for your organization:
- Search results from the sidebar or advanced search
- Lookup dialog boxes that pop up a window when you click the Lookup magnifying glass next to a field
- Lookup phone dialog boxes that pop up a window when you click the magnifying glass icon on a SoftPhone dial pad, which then allows you to make calls from your computer
- Recent Records lists that appear on a tab’s home page
- Search results filter fields for narrowing down searches
Additionally, you can choose to show or hide standard and custom buttons in a list view page.
To change a search layout, follow these steps:
- Click any tab heading under the Customize heading on the sidebar.
The selected heading expands with a menu of options.
- Click the Search Layouts link under the tab heading.
The Search Layouts Page for the selected tab appears.
- Click the Edit link next to any of the search features you’d like to change.
The Edit Search Layout page for the chosen search feature appears.
- Move fields from the Available Fields column to the Selected Fields column using the Add and Remove arrows, as needed. Select or clear any standard or custom buttons that you’d like to have on your list view.
- Click Save when finished.
The Search Layouts page for the selected tab reappears.
Managing Multiple Business Processes
Configuring multiple business processes is particularly helpful if you have several groups of users who use a common tab (such as Leads) but whose processes are different. (And maybe the group leaders don’t want to compromise.) For example, if your company has two sales teams that follow different sales methodologies, you can use multiple business processes and keep everyone happy. Multiple business process features are available only in Enterprise and Performance Editions and pertain only to lead, opportunity, case, and solution records.
To set up multiple business processes, click the Setup link in the upper-right corner of any Salesforce page and follow these steps:
- Click the Lead, Opportunity, Case, or Solution heading under the Customize heading on the sidebar.
The selected tab headings expand.
- Click the Fields link under one of the selected tab headings.
The Fields page for the selected tab appears, displaying a list of standard fields at the top and a list of custom fields at the bottom.
- Under the Standard Fields list, click the Edit link next to the Status or Stage field to modify the drop-down list.
For example, on the Opportunities Fields page, click the Edit link next to the Stage field.
A Picklist Edit page appears for the selected field.
- Review the existing values and then click the New button to add additional values.
An Add Picklist Values page appears.
- Add one or more values and then click Save.
The Picklist Edit page reappears.
- Review the list to verify that you have a complete master list of statuses or stages to support all business processes for that record.
- (Optional) Click the Reorder button to change the order of the values. Click Save.
The Picklist Edit page appears in Edit mode, where you can reorder the list by using the arrow buttons to change the order of the drop-down list. When you click Save, the Picklist Edit page reappears.
- On the sidebar, click the Processes link under the selected record heading.
For example, under the Opportunities heading, click the Sales Processes link.
The Processes page for the selected record appears.
- Click the New button to create a new process.
A Process Edit page appears.
- Choose the Existing Process, name the new process, and then click Save.
A Process page appears, and you can select the values for your new business process.
If you select Master as the Existing Process, you can choose from the master list generated from the Status or Stage field of the record. - Highlight values and use the arrow buttons to modify your Selected Values list.
For example, if your company has a sales team that handles boat orders, you could create a simple sales process, as shown in Figure 20-7.
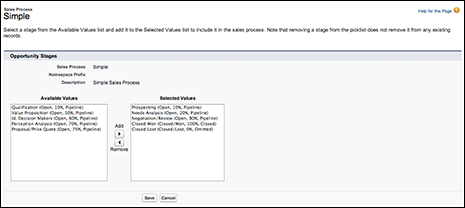
Figure 20-7: Creating a simple sales process.
- Choose a default value from the drop-down list; when you’re done, click Save.
The Default Value drop-down list appears for lead, case, and solution processes but not for sales processes. The Processes page for your selected record reappears.
Managing Record Types
If you’re using Enterprise or Performance Edition, you can use record types to make subsets of drop-down lists and those custom business processes that you just read about, which are available to specific sets of users. For example, if you have two sales teams — say, one that sells into healthcare services and another that sells into retail verticals — both teams might share common picklist fields on an account record but with very different values. With record types, you can customize accounts so that the same Industry field displays retail sectors for one group and healthcare services verticals for the other. When you provide record types to your users, the big benefit is that you make common drop-down lists easier to fill out and more relevant.
You can build record types to support all the major records in Salesforce, including leads, accounts, opportunities, and so on. Before users can take advantage of the record type feature, though, you need to first create the record types and then assign them to profiles. The good news is that with the Salesforce Record Type Wizard, you can perform both actions in a series of guided steps.
Before creating your record types, check that you first added all values to a master picklist field (drop-down list). (See the section “Viewing and updating fields,” earlier in this chapter, for details on editing drop-down lists.)
To create a record type, click the Setup link in the upper-right corner of any Salesforce page and follow these steps:
- Click any tab heading under the Customize heading on the sidebar.
The selected tab heading expands.
- Click the Record Types link under the tab heading.
The Record Type page for the selected tab appears.
- Click the New button.
Step 1 of the New Record Type Wizard appears, as shown in Figure 20-8.
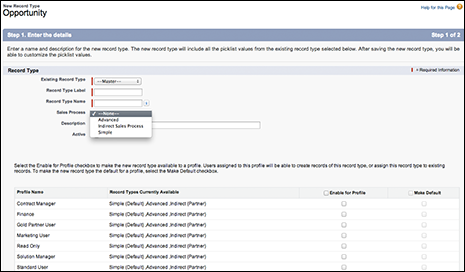
Figure 20-8: Creating a new record type.
- Complete the fields at the top of the page.
Most are obvious, but here are three important pointers:
- Existing Record Type: Choose from this drop-down list to clone from another record type. The new record type will inherit all the drop-down list values from the existing record type. You can then modify it later.
If you choose not to clone, the record type automatically includes the master drop-down list values for both custom and standard fields. That’s okay; you can edit the drop-down lists later.
- Business process: On a lead, opportunity, case, or solution record type, select the business process from the drop-down list. See the preceding section for details.
- Active: Select this check box if you want to make the record type active.
- Existing Record Type: Choose from this drop-down list to clone from another record type. The new record type will inherit all the drop-down list values from the existing record type. You can then modify it later.
- Select the check boxes in the table to make the new record type available to different profiles.
If you ever need to modify the assignment of record types to profiles, you can do this from the Record Type Settings section of a profile page. Simply scroll down the profile page until you see the Record Type Settings section, click the Edit link next to a record type, and follow the easy steps on the page that appears. (See Chapter 19 for details on updating profile settings.)
- When you’re done, click Next.
Step 2 of the wizard appears.
- Use the drop-down lists to select the page layout that different profiles will see for records of this record type.
You can apply one layout to all profiles or assign different layouts to different profiles.
- When you’re done, click Save.
The new Record Type page appears with a section called Picklists Available for Editing, which list the drop-down lists on the record type.
- Click the Edit link next to a picklist to modify the values.
A Record Type Edit page appears.
- Highlight values in the Available Values or Selected Values list box and use the arrow buttons to build the Selected Values list as you want it.
- Select a value from the Default drop-down list, if necessary, and then click Save.
The Record Type page reappears.
If a user will need to make use of multiple record types, remember to add the Record Type field manually to a page layout. For example, if a sales rep sells both generators and engines (and opportunity record types exist for both), providing the Record Type field on a layout allows the rep to switch a generator opportunity to an engine opportunity, if needed. See the section “Customizing Page and Search Layouts,” earlier in this chapter, for details.
Creating Dependent Picklists
If you find your picklist values building up and affecting the user’s experience, you should consider using dependent picklists to show values in one list based on what’s selected in another list. For example, you could create a custom picklist field called Reason for your opportunity record and offer two sets of reasons, depending on whether the opportunity was won or lost.
Creating these lists is a two-step process:
- Your two fields must first exist.
Think about which fields will dictate the drop-down list for what other fields. The field that determines another field’s values is the controlling field and can be a standard or custom picklist, or a check box. The field that’s dependent on the controlling field to determine its displayed values is the dependent field. We cover this step in the “Adding fields” section, earlier in this chapter.
- Tell Salesforce about these two fields and their roles in this relationship.
That’s what we cover in this section.
To define field dependencies, follow these steps:
- Expand the Customize menu until you see the Fields links under the appropriate tab (under the Activities heading, refer to Activity Custom Fields).
The Fields page appears.
- Click Field Dependencies in the Custom Fields & Relationships related list.
The Field Dependencies page for your record appears.
- Click New.
The New Field Dependency page appears in Edit mode.
- Select your controlling and dependent fields. Click Continue to determine what gets filtered.
A field can be dependent to just one controlling field. However, that dependent field may also act as a controlling field to daisy-chain together several dependencies.
- At the Edit Field Dependency page, select which dependent list items are visible for which controlling field values, and then click Include Values.
If your controlling field has several items in its drop-down list, you might have to click the Next link to see additional columns. You can also select multiple values at once by Shift-clicking to select a range of adjacent cells or Ctrl-clicking to select cells that aren’t adjacent.
- (Optional) Click the Preview button to see a pop-up window demo your dependent picklist.
- Click Save.
The Field Dependencies page returns with your new dependent picklist listed.
Record types allow certain people to see the same subset of picklist values every time. Dependent picklists allow a user to see different subsets of picklist values based on what they choose in the controlling field.
Managing Workflow & Approvals
How many times have you lost or delayed business because someone forgot to do something in your sales process? With the workflow feature in Salesforce, you can create a rule and associate it to e-mails, tasks, and alerts that can be assigned to different users. You can also update the value of a field on a record if a certain rule occurs. Enterprise and Performance Edition users can use workflow to automate certain standard processes to make sure that important balls don’t get dropped. For example, if your sales reps create opportunities that sometimes require special pricing paperwork, you can use a workflow rule to automatically send e-mail alerts and tasks to finance and sales managers, and you can set these alerts and tasks to go out a set number of hours later.
Before creating a workflow process, take a moment to understand some basic workflow concepts:
- Workflow rules are the criteria you set that, when triggered, tell Salesforce to assign tasks or send e-mails.
- Workflow field updates specify what field is updated on an object when a workflow rule is triggered.
- Workflow tasks are the tasks that a workflow rule assigns to users when triggered.
- Workflow alerts are the e-mail templates that a workflow rule sends to specific recipients. (Before creating a workflow alert, make sure that you’ve created the e-mail template that you’ll be sending.)
- Workflow tasks and alerts may be reused for different workflow rules.
To create a workflow process, first make sure that you can fill in the blanks in this sentence: When X happens, I want A, B, and C to happen. Your X is your workflow rule, and the A, B, and C actions are the field updates, tasks, and e-mail alerts. Choose Setup⇒Build⇒Create⇒Workflow & Approvals to begin.
Creating workflow rules
To create a workflow rule, follow these steps:
- Click the Workflow Rules link under the Workflow & Approvals heading on the sidebar.
If this is your first time, the Understanding Workflow page appears.
- Click Continue after reading the overview.
The All Workflow Rules page appears.
- Click the New Rule button to create a new rule.
Step 1 of the Workflow Rule Wizard appears for your new rule.
- Select the type of object to which the workflow rule should apply.
- Click Next to continue.
Step 2 of the Workflow Rule Wizard appears. To configure your rule, do the following steps:
- Enter a Rule Name and optional description.
- Decide when the rule will be evaluated by Salesforce. The options are only when a new record is created, when the record is created or it’s been edited and didn’t previously meet the triggering criteria (listed as anytime the field is edited to subsequently meet criteria), or every time the record is created or edited.
- Use the rule criteria to determine what conditions must be met to trigger the rule. Use the Advanced Options for more complex AND/OR scenarios.
- Click Save & Next.
The Specify Workflow Actions screen appears.
- Identify what happens when the workflow criteria is met.
An action can happen immediately, or it can happen a specific number of hours or days before or after certain criteria are met. You can create new actions (see the following section for more information) or use existing ones associated with immediate or time-based workflow triggers.
Assigning workflow tasks
To create a new workflow task, first go to the workflow rule that you want to associate with this task and then follow these steps:
- Choose Setup⇒Build⇒Create⇒Workflow & Approvals⇒Workflow Rules and click the Rule Name of the appropriate rule.
The Workflow Rule page for the rule appears.
- Click Edit from the Workflow Actions related list.
The Specify Workflow Actions step appears.
- In the Immediate Workflow Actions area, click the Add Workflow Action button and select New Task from the resulting drop-down list.
- Configure the task as you would a regular task, but note the Due Date field.
- Complete the Due Date field so that the created task has a due date that’s a number of days relative to a base date you select in the drop-down list.
- Click Save when finished.
The Workflow Task page for this task appears. Note that the Rules Using This Workflow Task related list shows the associated workflow rule.
Choose Setup⇒Build⇒Create⇒Workflow & Approvals⇒Field Updates to select what field on what object changes when a workflow rule is triggered.
Using workflow e-mail alerts
To create a new workflow e-mail alert, first go to the workflow rule that you want to associate with this task and then follow these steps:
- Choose Setup⇒Build⇒Create⇒Workflow & Approvals⇒Workflow Rules and click the Rule Name of the appropriate rule.
The Workflow Rule page for the rule appears.
- Click Edit from the Workflow Actions related list.
The Specify Workflow Actions step appears.
- In the Immediate Workflow Actions area, click the Add Workflow Action button and select New Email Alert from the resulting drop-down list.
- Complete the fields to associate an e-mail template with a set of recipients.
Note that the recipients may or may not be Salesforce users. And remember that the e-mail template must have already been created.
- Click Save when finished.
The Workflow Alert page for this alert appears.
At the Specify Workflow Actions page, you can also click the Add Workflow button to have a new field updated, or an outbound message sent when a certain event occurs.