Chapter 21
Extending Beyond CRM with the Platform
In This Chapter
![]() Understanding the Force.com platform
Understanding the Force.com platform
![]() Creating apps on Force.com
Creating apps on Force.com
![]() Deploying apps for your company
Deploying apps for your company
What if you could modify your business applications in minutes to match the unique ways you manage your customer relationships? How much more productive could you be if you spent less time fighting your technology — and more time with your customers?
Force.com is the Salesforce platform you use to customize and create on-demand applications by simply pointing and clicking your mouse on easy-to-use web pages. In fact, with Force.com, you can not only customize your existing Salesforce applications but also now build entirely new applications to fit the way you do business. If you need a little inspiration, you can also install a preexisting solution from the AppExchange directory.
In this chapter, we demystify the Force.com platform and define some basic terms to give you a glimpse of the awesome power of creating custom apps. Then you see how to share your creation on the AppExchange (www.appexchange.com). Finally, we offer simple and critical tips for preparing your deployment game plan.
Understanding the Force.com Platform
As we mention, Force.com is the salesforce.com on-demand platform: a suite of development tools for customizing, building, integrating, and installing business applications — and you don’t need to build or maintain any infrastructure yourself.
Force.com is both a collection of customization tools as well as the underlying infrastructure that powers the Salesforce app that you use. The cool part is that over time, salesforce.com engineers have exposed parts of their secret sauce so that you can use it, too, and they’ve also used these customization tools to build additional features onto Salesforce.
Briefly, here are some key terms to know:
- Force.com: The engine that makes Salesforce what it is today. It’s the underlying technology that enables you to customize existing applications from the Setup area, create new ones (with or without any programming experience), integrate Salesforce with other company systems, and share these snippets online with others.
- Apex code: Another subset of the Force.com platform. The Salesforce procedural scripting language that allows users to write custom logic and create integrations between Salesforce and other systems. If you’re technical, you now have the ability to build new objects, create triggers and classes, change the user interface to handle custom forms and interactions, use a web services API, and all that techno-speak stuff.
- Visualforce: Another powerful technical capability that Salesforce provides with which you can customize the actual front-end page design and components of your custom application. You’re no longer limited to Salesforce’s default colors, visual design, and tab layouts.
- AppExchange: An online directory where you can quickly browse, try, download, and install apps that can instantly run alongside your existing Salesforce applications.
 Salesforce.com frequently rebrands the names of its various offerings. The preceding terms are the most recent versions as of this book’s publication. The underlying functionality, look, and feel that we discuss is still the same as we describe it.
Unless you’re a developer (or a glutton for punishment), you don’t need to know the technical ins and outs. What you do need to know is that Force.com enables Salesforce administrators to easily customize and extend their existing on-demand applications without extensive involvement from developers. For building applications, which can take months with traditional software, you can point and click to quickly develop new applications in hours or days, completely integrated with your existing Salesforce CRM system.
To see all options available to you with building Custom apps, log in to Salesforce and follow these steps:
- Choose Setup⇒Build.
The Build page appears. This page highlights all the features and functionality available to help you customize, build, share, and integrate your CRM.
- On the sidebar menu, notice the menu items below the Build header.
This chapter focuses on the tools listed under the Create header. We cover the Customize heading in Chapter 20. We don’t discuss Develop because that’s a more technical discussion, and we promised you “no code required.”
Preparing Your Force.com App Strategy
Force.com places so much potential at your fingertips that just like a kid in a candy store, you may have the urge to just jump in and start building custom objects and tabs — a baptism by fire. Although that method is appetizing in theory, it’s a quick way in reality to get a stomachache, especially if your business grows and more people start entering information in Salesforce. Resist that impulse until you review these simple steps for planning your strategy for on-demand applications:
- Define and prioritize objectives.
Your wish list doesn’t need to be very involved, but it should spell out the who, what, when, why, and how.
- Build a plan.
With agreed-upon objectives, take your project down another level and lay out a plan to address the most pressing objectives.
- Determine the most suitable approach.
You have many different ways to tackle a business issue with Force.com — some better than others.
- Use the discussion boards at the Salesforce Success Community website (http://success.salesforce.com) to check existing or upcoming functionality. You may not need to build a unique solution.
- Browse the AppExchange to see whether any available prebuilt applications meet your general requirements.
- Keep it simple.
Don’t sacrifice your objectives at the expense of simplicity — although at the beginning, simple is often better.
- Start with the end in mind.
If a custom app seems like the right strategy, figure out what it is that you want to measure. Understand how well your solution may scale (or not).
 A great way to design your application so that it takes full advantage of relationships is to simply draw it out on a piece of paper or a whiteboard. Your design doesn’t have to be fancy or complicated, but it should define the standard and custom objects you need and how they should be linked.
Creating Custom Apps with Force.com
After you sketch the basic requirements for your new application, you’re ready to begin building. A good place to start is to simply create the custom app, much like a container, before you add your objects and tabs.
To see an example of custom apps that others have created, visit the AppExchange (www.appexchange.com) and browse apps by category. Apps created by Force.com Labs are those that came from within salesforce.com’s own employees!
Choose Setup⇒Build⇒Create to get to a powerful set of customization tools that can empower your business faster than the status quo of traditional software solutions.
Setting up a custom app
Many companies want internal branding for their business applications. Before you can apply branding like this, though, you have to first add the logo to a public folder on the Documents tab. (From any page, click the Documents tab, create a new public folder that’s easily identifiable, like Logos, and click the New Document button from within that folder.) Make sure that the image is a GIF or JPEG file smaller than 20K. Ideally, use a horizontally oriented image. If it’s larger than 300 pixels × 55 pixels, Salesforce will scale the image to fit the space.
To add the custom app, choose Setup⇒Build⇒Create and then follow these steps:
- Click the Apps link from the sidebar.
The Apps page appears. You see a list of your standard Salesforce apps, plus any custom apps you created.
- Click the New button above the Apps list.
The first step of the New Custom App Wizard appears.
- In Step 1 of the wizard, enter a name and description for your app, and then click Next.
The name you type in the label field will appear on the Force.com Apps pull-down menu.
- In Step 2 of the wizard, assuming that you want to apply your branding, insert a logo from your Documents tab. Then click Next.
You have to first add the logo to a public folder on the Documents tab.
The logo will appear as the header whenever a user selects the custom app from the Force.com Apps menu. Of course, if you don’t want to brand the app, you can leave the current Salesforce-provided image.
- In Step 3 of the wizard, select the tabs that will make up your app. Then click Next.
You do this step by simply clicking tabs from the Available Tabs box and using the arrow buttons to create your list of Selected Tabs.
If you haven’t created all your custom tabs yet, don’t worry. As you create custom tabs, you can associate them with your custom or standard apps. (For all the details, see the section “Creating custom tabs,” later in this chapter.)
- In Step 4 of the wizard, select the check boxes to assign the app to different user profiles.
You want to make sure that the right apps are available to the right people in your organization.
- When you’re done, click Save.
The Apps page reappears, and your new custom app now appears in the list.
Building your custom objects
Typically, you create a custom object to house a discrete set of information that’s different from what is contained in other standard objects. For example, an Opportunity object contains opportunity information. A Custom Expense object contains information about expenses that’s unique from the typical purpose of other standard objects.
If you want to build a home, you have to add the basic building blocks first. The same analogy applies to custom apps and objects. For example, if you want to build a recruiting application, you might decide that you could use the Contacts object for applicants and need to build custom objects for Job Postings and Interview Feedback because they’re distinct blocks of data.
To set up a new object, follow these steps:
- Choose Setup⇒Build⇒Create⇒Objects.
The Custom Objects page appears. This page, your starting point for creating an object, is where all your custom objects are displayed.
- Click the New Custom Object button.
The New Custom Object page appears.
- In the Custom Object Information section, type the basic details for your object.
You usually just need to fill out the Label and Plural Label fields. This will then automatically populate the Object Name field. Labels are what your end users see (like “Time Off Request”). The object name is what Force.com sees (like “Time_Off_Req”) in case you need to have another system (or another part of Salesforce) talk to it.
- Complete the Enter Record Name Label and Format fields.
The record name appears on page layouts, related lists, lookups, and search results. This is what you use to differentiate one record of this object from another. Depending on the type of object you’re creating, you may want to switch the data type from Text to Auto Number.
Here’s how to tell when to use text versus auto numbers:
- Text: The name has some intrinsic value.
- Auto numbers: You’re creating an object that will relate to other standard objects in a fundamental way.
Auto Numbers are useful for sequenced business documents, such as invoices (INV-001, INV-002, INV-003, and so on), purchase orders, IT tickets, and timecards.
- Select the custom object’s optional features.
With simple pointing and clicking on your part, Force.com allows you to select your custom object’s features that are identical to many of the features found on standard objects, such as tracking activities, allowing reporting, or allowing notes and attachments to be added.
- Leave the Deployment Status as In Development so that only you can see it, instead of all the other Salesforce users within your company.
We recommend making sure that you can explain the business process around using the new object before deploying it to help guide correct adoption.
Select the Deployed button if you’re ready for your users to begin using it. If you wait to deploy the app, return to this screen by choosing Setup⇒Build⇒Create⇒Objects. Select your object from the list of custom objects, and you return to the custom object detail page.
- Select the Launch New Custom Tab Wizard check box and then click Save.
The New Custom Object Tab Wizard starts. See the section “Adding a tab to a custom object,” later in this chapter, for the how-tos on building a new tab.
If you already mapped the custom objects that will be part of your app, create all the objects first before modifying them. This action is especially helpful if you’re building relationships between them.
Modifying custom objects
Designing your custom object is as simple as modifying a contact record or adding to a contact record’s related lists. If you need to change the basic settings, simply click the Edit button at the top of the Custom Object page for the object, and the New Custom Object Wizard reappears.
If you want to customize your new object, you can point and click through the related lists on the page.
Certain Setup features — including custom profiles, multiple page layouts, record types, workflow, and field-level security — are available only in Enterprise and Performance Editions.
Building relationships
One primary reason for building applications with Force.com is to create a single, integrated, one-stop shopping experience for your users.
The key to those linkages is building custom relationships between objects. For example, if your company wants to manage account planning in Salesforce, you want to create a relationship between the standard Account object and a custom object for the Account Plan.
To build a relationship, follow these steps:
- Choose Setup⇒Build⇒Create⇒Objects.
The All Custom Objects page appears.
- Click the desired custom object under the Label column.
The Custom Object page appears.
- Click the New button in the Custom Fields & Relationships related list (see Figure 21-1).
The New Custom Field Wizard appears.
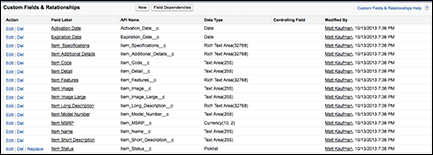
Figure 21-1: Create a new custom field or relationship.
- In Step 1 of the New Custom Field Wizard, choose the type of relationship with another object.
Force.com supports two types of custom relationships: Master-Detail and Lookup. They’re both one-to-many relationships.
A Lookup relationship links one object to another. The representative custom field will have a little magnifying glass icon next to it so that you can “look up” a value from that related object to associate with another object. Master-Detail (also known as parent/child) relationships are a special type of association: The relationship is required for the detail, and the value can’t be changed after the association is made. If you delete the master record, its related children are also deleted.The two relationships look the same in the user interface — as a lookup field with a magnifying glass on the record side and as a related list on the related object.
But here are two big differences:
- Master-Detail relationships cause the cascade deletion of child records to occur when the parent record is deleted. For example, if you delete an account, all related records are also deleted.
- In a Master-Detail relationship, the detail record inherits the Owner and sharing rules of the master record. Detail objects are dependent on their masters. In Lookup relationships, however, they don’t transfer sharing rules — they’re completely independent.
When you’re in doubt, start with the Lookup option. - Click Next to continue. In Step 2 of the wizard, select the other object that you want to relate your object to.
You can create as many as five Lookup relationships with a custom object.
- Click Next to continue. In Step 3 of the wizard, enter the label for the lookup field.
As a default, Force.com prefills the fields with the name of the object you selected, although you can change it.
- Click Next to continue. If you have Enterprise or Performance Edition, set the field-level security in Step 4 of the wizard. (If you don’t, skip to Step 9 because you won’t be able to set field-level security.)
If you chose the Master-Detail option, the security is set for you because it’s locked to the profile. If you chose the Lookup option, select the appropriate check boxes to control visibility and edit rights to the field.
- Click Next to continue. If you have Enterprise or Performance Edition, in Step 5 of the wizard, select the page layouts in which you want to display the field.
Suppose that you’re creating an expense application. You may want the rep’s layout to be different from the manager’s layout.
- Click Next to continue. In Step 6 of the wizard, deselect the check boxes if you don’t want the custom object to appear on the related list of the selected object.
For example, if you’re linking expenses with accounts, you may not want a long list of expenses showing up on an account record.
- When you’re done, click Save.
The Custom Object page reappears, and your custom relationship is displayed in the Custom Fields & Relationships related list.
Build your relationships before loading any actual data.
Remember that between two objects, you can have only one object that allows the Master-Detail relationship, so the other object has to be a Lookup relationship.
Other ways that you can modify custom objects to fit your company’s business processes include
- Creating fields: With Force.com, you can quickly add fields to your custom object, much like you can with a standard object, such as an account or a contact. See Chapter 20 for more information on creating custom fields.
- Adding custom links: Adding custom links to an object can be a powerful way to extend your solution to a business issue. You can build custom links for custom objects, too. See Chapter 20 for more information on creating custom links.
- Changing layouts: After or as you build fields, feel free to start rearranging the page layout for the object record. Often, that’s one of the easiest ways to get a pulse on what’s missing from your record. See Chapter 20 for more information on editing page layouts.
- Customizing related lists: After you add your Lookup relationships and custom fields, you’re ready to start customizing your related lists! Force.com allows you to modify the columns that are displayed in a related list.
Don’t forget this step because without customizing this section, your users don’t see much in a related list. When you add the right columns, though, the related list becomes a powerful tool for your users. By customizing the columns displayed in a related list, users can quickly see a summary of relevant information from a record’s detail page. See Chapter 20 for more information on customizing related lists.
Creating custom tabs
With Force.com, you can create two types of custom tabs: custom object tabs and web tabs. They look just like the standard tabs that your users already use, and you can build the tabs in less than a minute — piece o’ cake.
Adding a tab to a custom object
If you read through the section “Building your custom objects,” earlier in this chapter, you’ve probably already built a custom tab. Sometimes, however, you build a custom object and decide later to add the tab.
Don’t over-tab your application if it’s not necessary. Ask yourself: “Will my users need all the object’s data available from a central area?” If the answer is yes, you may need a custom tab.
To build a custom tab, follow these steps:
- Choose Setup⇒Build⇒Create⇒Tabs.
The Custom Tabs page appears.
- Click New in the Custom Objects Tab related list.
Step 1 of the New Custom Object Tab Wizard appears.
- In Step 1 of the wizard, select the object from the picklist, and then use the Lookup icon to choose a tab style.
The tab style affects both the color of the tab and the icon associated with a custom object record under Recent Items.
- In Step 2 of the wizard, select the desired tab visibility for your user profiles.
With the radio button feature, you can control tab visibility to your profiles.
- In Step 3 of the wizard, select the apps to which the new custom tab will be available.
This step makes it simple to associate custom tabs with just the right apps for your users.
- When you’re done, click Save.
The Custom Tabs page reappears with your new custom tab listed.
Building a web tab
In the normal course of a day, your users frequent other websites as part of their jobs. Here are just a few examples:
- Access an intranet
- Arrange travel plans
- Use an internal web-based application
The list goes on. Why not make it easier for users to get to your business-related sites? With Force.com, you can build web tabs that access web applications and Visualforce.
 We don’t go into the details of Apex code or Visualforce because they require coding, but imagine that you have a particular form to which your teams are emotionally attached (a client profile form with four columns, for example). With Visualforce and the help of an experienced developer, you can display your data in Salesforce in unique formats (and keep everyone happy). To manage these features, choose Setup⇒Build⇒Develop.
To create a simple web tab, follow these steps:
- Choose Setup⇒Build⇒Create⇒Tabs.
The Custom Tabs page appears.
- Click the New button in the Web Tabs related list.
Step 1 of the New Web Tab Wizard appears.
- In Step 1 of the wizard, click a button to select a layout.
- In Step 2, define the content and properties.
In this example, we show you how to create a URL-based web tab for news labeled Company News.
- In Step 3 of the wizard, enter a URL and add any additional merge fields.
Embedding merge fields is easy after you get the hang of it. For example, this URL is the standard search results URL from Yahoo News:
http://search.news.yahoo.com/search/news/?p=salesforce&c=
We copied and pasted the URL in the Button or Link URL box. Then we used the merge field tool for
{!Org_Name}and put that in place ofsalesforcein the URL. - In Step 4, click the drop-down lists to control which user profiles can access the tab, and then click Save.
Sharing Apps on AppExchange
As customers, employees, and partners began building custom applications (or apps), some bright person came up with an idea: Wouldn’t it be great if other customers like you could simply try, download, and install these custom apps without having to build them on their own? iTunes uses the web to distribute music, so why shouldn’t enterprise applications work the same way?
Enter AppExchange, the website owned and operated by salesforce.com where you can try, download, and quickly install apps that can extend the value of Salesforce to meet your unique needs. You can even use the AppExchange to share your custom apps.
Of course, the biggest benefit beyond how much easier your life will be is the impact on your users. The AppExchange marketplace isn’t just about easy sharing — it’s about your employees using integrated business apps with all your information in one place.
Customers, partners, and salesforce.com personnel can all provide AppExchange with applications. Many of them, particularly the ones published by salesforce.com employees (a.k.a. Salesforce Labs), are free to install and use. Others, such as the ones provided by partners, may have a fee associated with them.
Browsing AppExchange
Downloading music and video from the web is something we take for granted nowadays. But downloading enterprise apps? Wow, that seems like a whole ’nother animal.
Yet, when you get down to it, AppExchange is still about the exchange of a package of goods from one party to another. As with many innovations, getting the most out of a new system usually amounts to understanding some basic terms and knowing your limits before jumping in.
Here are six key things you should know before you get started:
- Installation is the process by which you download, install, and deploy a custom app from AppExchange.
- Publishing is the process by which you package a portion of your customizations and make them available, either publicly or privately, on AppExchange.
- Managed package is an AppExchange package created and maintained by a verified third-party vendor. Unlike unmanaged packages whose components you can modify and customize, managed package components have limited customization capabilities. This allows vendors to provide you with an upgrade path that’ll leave you successful, versus stuck in the mud because you changed something that’s not supported by a newer version.
- Although anyone can try out AppExchange, to install and share apps, you must have a Salesforce instance and have administrative rights to that instance. (Did we just hear a sigh of relief?)
- You can publish many types of AppExchange components, not just custom apps, on AppExchange. You can exchange custom links, dashboards, Visualforce code snippets, and more.
- Some apps are self-contained — native — in Salesforce. They were built with Force.com and don’t depend on other external applications. Other custom apps are composite. Such apps may look and feel like Salesforce apps but connect with other services not owned by salesforce.com. Caveat emptor (let the buyer beware).
Familiarize yourself with AppExchange at www.appexchange.com, and then try out some apps before you decide whether you want to use them.
Installing custom apps
If you want to install a custom prebuilt app, you can do it in a matter of simple clicks. This process amounts to first downloading the package, installing the app into your instance of Salesforce, and deploying it to all or a portion of your users.
A package refers to all the components that make up the custom app. A package may include custom tabs and objects, custom links, custom profiles, reports, dashboards, documents, and more.
To install a custom app, follow these steps:
- Click the Get It Now button on the app’s detail page in AppExchange (at www.appexchange.com).
- Choose whether you wish to continue the installation of the app in your production or sandbox.
If you haven’t logged in to the AppExchange yet, you will be prompted to enter your Salesforce username and password. Make sure you enter the information that reflects which org you want to install the app into.
For larger organizations, you may have customizations that need to be tested with this package. A sandbox that is practically an exact copy of what you have in your live system is a good place to kick the tires without the potential of impacting your business if something goes wrong. If you don’t have access to a sandbox, install the app in your production environment, but make sure you make it visible just to system administrators first until they’ve thoroughly tested the installation.
- Review the list that appears, which tells you what you'll be installing and where.
Salesforce makes this as transparent an installation as possible. You can see if this app is free or not, what the subscription model is, and where it is being installed.
- Check the box to confirm that you’ve read the terms and conditions. Then hit the Confirm and Install button to continue.
- Enter your Salesforce login and password again for the org in which you want to install the app.
The Package Installation Details page appears in Salesforce.
If you’re experimenting with the AppExchange for the first time, you may want to consider using the Sandbox Edition or a free Developer Edition instance to install, customize, and test the custom app. - Examine the package components, and then click Continue.
This page summarizes the custom app’s details, including objects, fields, tabs, reports, and dashboards.
Make sure that you examine the contents of a package thoroughly before proceeding. You may see a next page that shows you the package’s API access to various objects, including details of what permissions the package will have on what objects.
- Select a radio button to choose the security settings and then click Next to continue.
This Package Installer Wizard allows you to choose either standard or custom security settings to meet your comfort level. We recommend that you choose the Select Security Settings option to start.
After choosing the Select Security Settings option, a Customize Security page appears.
- Specify the level of access for each profile.
The access levels here determine the layout assignments, field-level security, and other fun stuff such as editing permissions for the custom objects in the package. Access levels set here don’t affect those of any existing objects you have.
Any standard profiles will have full access to custom objects in this package because permissions aren’t editable for them. The only exception is the Read-Only profile, which will still maintain (duh) read-only permissions.
- Click Next to continue. In the last step of the wizard, click the Install button.
A progress page appears as installation begins. An Install Complete page appears after the installation finishes. Bet your traditional software can’t create a whole new app that fast!
- Click OK.
At this point, you can choose to deploy the app immediately to users or further customize it. We suggest that you click OK to confirm the download and begin prepping some dummy data before you deploy this to users.
The Installed Package Details page for your newly downloaded custom app appears. It shows installation details, and from here, you can click the respective buttons to view the package components or view dependencies between this app and anything else you have in your org. If you check out the upper-right corner, you’ll notice that the Force.com Apps menu now contains a listing for your new app.
After you install the app, you can use Force.com to modify its tabs, objects, and other customizations, just as though you had built the custom app yourself. Even though you’ve installed the app, it’s not available to nonadministrators until it’s deployed.