Chapter 16
Managing Your Contact Center with Service Cloud
In This Chapter
![]() Customizing cases
Customizing cases
![]() Using case queues and assignment rules
Using case queues and assignment rules
![]() Building a knowledge base
Building a knowledge base
![]() Automating your support processes
Automating your support processes
![]() Improving team productivity
Improving team productivity
The heart of any successful customer service application is case management, and Salesforce Service Cloud provides a fully integrated solution to track, resolve, and manage all customer interactions, regardless of the point of entry.
Your support team can log in and begin using cases immediately, but they’ll be much more successful if you invest some time up front to customize the program to the team’s exact needs.
In this chapter, we guide the support executive or administrator on setting up case processes and customizing cases. Next, we review how to configure a scalable knowledge base. Then, we cover the different methods for automating customer service processes to improve agent efficiency.
Preparing Your Salesforce Service Cloud Strategy
As a support executive, if you want to get Salesforce Service Cloud working for you, you need to do some careful up-front planning. After you think through your processes, you can customize cases either by yourself or with your Salesforce Service Cloud administrator. Here are some tips to think about before you get started:
- Define and prioritize your service and support objectives.
- Identify and acknowledge your key challenges. Try to identify the biggest ones first.
- Start with the end in mind. The best way to customize your application is to decide what you want to measure first.
- Map out your key processes. If you’re a Visio whiz, use that tool. If not, grab a marker and diagram your key processes on a whiteboard or flip chart. For different types of support issues, think about the similar and different types of information that you want your reps to capture.
- Figure out the best approach for your business. You have many different ways to tackle a business issue with Salesforce Service Cloud — some of these approaches work better than others.
- Assess how much of your support efforts you and your team can share with your customers. If your users would welcome this sort of change, you may want to set up the Community.
- Keep it simple. Don’t sacrifice your objectives just to keep things simple. The more complexity you build, the greater the risk that people won’t use the application.
 For cases, as with other objects, Salesforce Service Cloud provides some common design elements that let you customize the record. As you consider customizing cases, keep in mind that you should strive for ease of use, relevance, and data that can help you manage your support executive job while allowing your agents to efficiently manage theirs. (See Chapter 20 for the how-to details on adding new fields, customizing page layouts, adding record types, and other design tricks.)
Automating Case Management
As a support executive or system administrator with the right permissions, one of your biggest challenges will be managing and administering a growing collection of cases. And because support centers need to maintain customer satisfaction, efficiently opening and resolving cases and keeping customers happy are paramount to your bottom line.
The Salesforce Service Cloud provides built-in tools to help efficiently queue, route, and escalate cases according to your support needs. By distributing and managing case workload more effectively, you ensure that the right agents address the right cases to comply with internal or external service-level agreements (SLAs).
Adding case queues
To set up a case queue, choose Setup⇒Administer⇒Manage Users⇒Queues, and then follow these steps:
- From the Queues page, click the New button.
- Complete the required fields for Label and Queue Name Email and the optional field for Queue Email.
The e-mail address will be used for notifications, such as when a new case has been added to the queue. The e-mail can be for an individual or point to a distribution list (on your e-mail server).
- In the Supported Objects section, move the Case option from the Available Objects into the Selected Objects column.
- In the Queue Members section, move Available Members into the Selected Members column to add them to the queue.
- When you’re finished, click Save.
The Queues page reappears with your new queue displayed.
Using assignment rules for routing
Assignment rules are key to efficient and timely routing of new cases. Your team can apply these assignment rules when adding or editing cases, or when customers submit cases themselves through your website, e-mail, or a Community. (See later sections for more on supporting multiple channels.) These rules allow cases to route directly to users or queues.
 For assignments, escalations, and other support automation tools, don’t forget to set up e-mail templates for notifications — both internal and external. See Chapter 8 for tips on customizing e-mail templates.
To set up assignment rules, choose Setup⇒Build⇒Customize⇒Cases⇒ Assignment Rules, and then follow these steps:
- From the Case Assignment Rule page, click the New button.
A New Case Assignment Rule page appears.
- Select a Default Case Owner or Automated Case User if prompted.
- A default case owner is the person where the buck stops — the person to whom the case routes when the assignment rules can’t seem to find anyone else.
- Automated case users are the owners of cases that are created by Salesforce Service Cloud, as opposed to being manually created by a human being.
- Type a rule name and select the Set This as the Active Case Assignment Rule check box if you want this to be the active rule; then click Save.
Typically, you have one case assignment rule to serve all your case assignment purposes. So, for example, you may have an active assignment rule called US Standard Support and another called US Holiday Support that you activate only when your holiday schedule is running.
The Case Assignment Rules page appears with your rule listed.
- Select the rule name for the assignment rule you just created.
The Case Assignment Rule page for your rule appears.
- Click New under the Rule Entries related list.
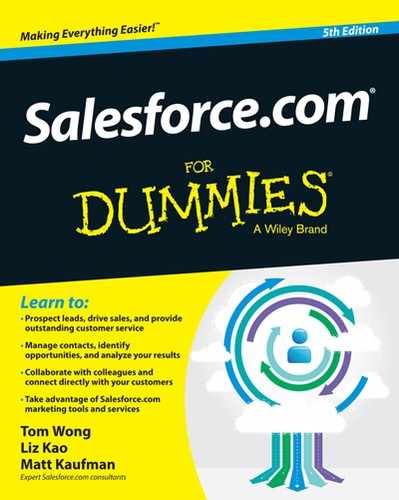
A Rule Entry Edit page appears, as shown in Figure 16-1.
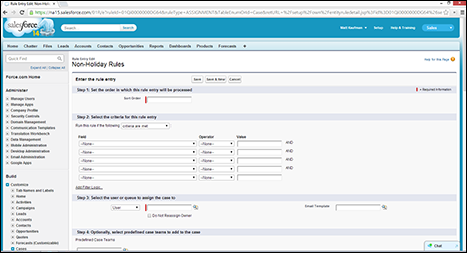
Figure 16-1: Creating a new case assignment rule.
- In Step 1 of the Rule Entry Edit page, enter a number for the order of the entry you’re about to make.
The Salesforce Service Cloud evaluates these rule entries until it finds a match and then stops. The first successful match satisfies the rule, and an assignment is made accordingly.
- In Step 2 of the Rule Entry Edit page, enter criteria for the rule entry.
For example, if your company provides a different support team for partner inquiries, you might enter a criterion of Account: Type Equals Partner to denote cases that relate to partners.
- In Step 3 of the Rule Entry Edit page, select the user or queue to assign the case to and the notification template that goes to the new owner.
- When you’re finished, click Save, or click Save & New to set up another rule entry.
When completed, the Case Assignment Rule page for your assignment rule appears with the related list of rule entries.
Automating case escalation
To make sure that no case is ever overlooked and proper attention is paid to priority cases, you can apply escalation rules. Escalation rules prevent Chicken Little–type overreactions — so that you don’t unnecessarily run around telling your team that the sky is falling … unless it really is. Instead, these rules allow you to create automated actions when cases with certain criteria are still open or untouched after a set duration. When escalating, you set up rule entries (similar to assignment rule entries) to notify users, reassign the case, or both.
To establish escalation rules, choose Setup⇒Build⇒Customize⇒Cases⇒ Escalation Rules, and then follow these steps:
- From the Case Escalation Rules page, click the New button.
- Type a name, select the check box if you want this to be the active rule, and click Save.
As with case assignment rules mentioned in the preceding section, only one case escalation rule may be in effect at one time.
A Case Escalation Rules page appears with your rule listed.
- Click the rule name for the escalation rule you just created.
The Case Escalation Rule page for your rule appears.
- Click New under the Rule Entries related list.
The Rule Entry Edit page appears.
- Complete the rule entry fields, following these guidelines:
- For tips on completing Step 2 of the rule entry fields, see Steps 5–7 in the preceding section.
- In Step 3, select the Ignore Business Hours check box only if you want the escalation rules to be in effect at all times (this means weekends and holidays, folks).
- In Step 4, select a radio button to determine how you want escalation times to be set.
- Click Save, or click Save & New to repeat the process for additional rule entries.
The Rule Entry Edit page reappears with a related list for Escalation Actions.
- Click the New button on the Escalation Actions related list.
An Escalation Action Edit page appears, as shown in Figure 16-2.
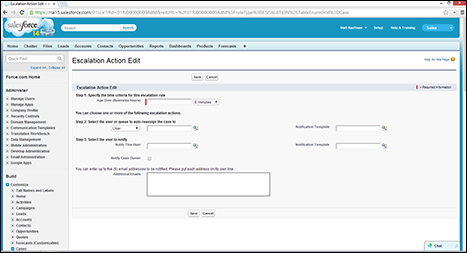
Figure 16-2: Specify actions related to an escalation rule entry.
- In Step 1, specify the time criteria in the Age Over (Business Hours) field to trigger the escalation rule.
You can set escalations to occur after 30-minute intervals.
- In Step 2, select the user or queue that will be reassigned ownership of the escalated case.
You may also select a notification template for the recipient.
- In Step 3, select a user to notify after an escalation occurs.
You must also select a notification template for the recipient.
- Select the Notify Case Owner check box to ensure that the case owner is notified when one of his cases escalates.
- In the Additional Emails field, enter as many as five e-mail addresses that you want to be notified of this escalation.
These addresses don’t have to belong to Salesforce Service Cloud users.
- Click Save.
The Rule Entry Edit page reappears.
Repeat Steps 8–13 as often as needed to add your escalation rule entries, plus corresponding actions.
Another way to automate assigning tasks and sending e-mail alerts within your organization is through workflow rules. Workflow is available to Enterprise and Performance Edition customers only; for details, see Chapter 20.
Capturing and Associating Cases Efficiently
In addition to using the phone, customers want to access support in two other common ways: directly from the web and via e-mail. You can have your customers use a web-based form or let them send an e-mail to your support organization. For either method, the Salesforce Service Cloud can enable these additional channels and make it easy for your agents to follow up. In this section, we describe the various options that you can use to begin collecting this information from your website.
Where do customers go when they have problems? Many customers would be happy if they could simply log the problem and be assured of a prompt response. With Web-to-Case, you can quickly generate an HTML form that captures cases submitted from your website. Then, by using case assignment rules, new cases can route directly to the agents or queues responsible for handling these inquiries. (See the section “Using assignment rules for routing,” earlier in this chapter, for information on automating assignments.)
To automate Web-to-Case, choose Setup⇒Customize⇒Self-Service⇒Web-to-Case and follow these steps:
- From the Capturing Cases from Your Website page, review the general outline, and then click the Generate the HTML link.
The Capture Cases page appears, as shown in Figure 16-3.
Figure 16-3: Generating the HTML to capture cases from your website.
- At this page
- Type a return URL where the users will end up after submitting their cases.
- Choose whether you want the form to be visible in the Self-Service Portal so that customers can submit new cases while monitoring existing ones (more on that later).
- Select the case fields to include on the form.
- Click Generate.
The return URL that you specify usually leads to a thank-you page or your support home page. After you click Generate, a new page appears with the HTML code in a box.
- Copy and paste the HTML code into a page hosted on your web server. Click Finished when done.
You’ll want to review the notes at the top of the HTML, but this step is pretty simple. If such a review seems foreign to you, simply copy and paste the HTML into an e-mail and send it to your webmaster for help with this step. She knows what to do.
You return to the Capturing Cases from Your Website page.
When the web page with your case-capturing form is live, fill out the form, like the unformatted sample in Figure 16-4, and test it to make sure that the case routes to the right resource.
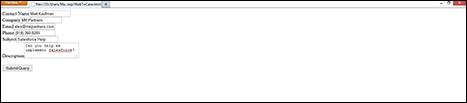
Figure 16-4: Test an unformatted sample Web-to-Case form.
 When customers have issues, they often want to send an e-mail to your support team, expecting a timely response. With Email-to-Case, customers can send e-mail messages to aliases you create, which route new cases directly to the assigned resources and populate relevant case fields. Even attachments stay attached to the original e-mail message. Setting this up is simple and can be done by choosing Setup⇒Build⇒Customize⇒Cases⇒Email-to-Case. Follow the onscreen instructions and coordinate with your mail server administrator.
The Salesforce Service Cloud can also route responses to your customers after they submit a case by using the web or e-mail. This response informs the customer that your company has gotten the submission, and it can explain support policies, too. As long as you have those e-mail templates defined (see Chapter 8), you can assign them to use when responding to cases from Web-to-Case, Email-to-Case, or even the Customer Portal. Choose Setup⇒Build⇒Customize⇒Cases⇒Auto-Response Rules to configure this.
Harvesting Knowledge
Service Cloud from salesforce.com enables you to join the conversations happening on the web about your products and services. Instead of creating an additional channel for your agents to monitor, salesforce.com has already thought about how to capture these conversations and respond efficiently to the topics discussed.
Understanding Salesforce Knowledge
Salesforce Knowledge provides a knowledge base solution for support departments and call centers. It’s available for Enterprise, Performance, and Developer Edition users for an additional price (talk to your account executive for more information).
If you’re using an existing knowledge base solution, you can import those solutions into Salesforce Knowledge. The details are available in the Help & Training section, accessible from the upper-right of your Salesforce page.
Articulating articles
Salesforce Knowledge has its own vocabulary:
- Articles are the pieces of content and knowledge contributed by internal and external experts. Figure 16-5 shows an article that could solve a customer’s problem.
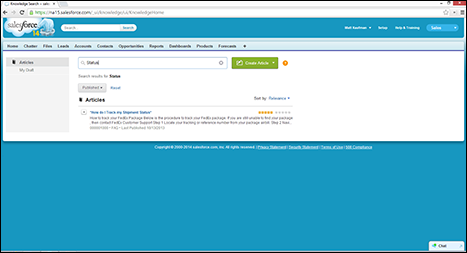
Figure 16-5: Searching for Salesforce Knowledge articles.
- Article Types identify each article and determine which template the article will follow. For example, an article type of FAQ could have the mandatory fields of Question and Answer. When you create a new article, you must define what article type it’s associated with, which then determines the layout of the fields you’ll need to fill out.
- Data categories organize articles in Salesforce Knowledge. They can be nested if you need it — for example, if you organize your products by product line and then part number.
Data categories can be mapped to users’ roles to decide what articles users can and can’t see.
- Category groups are containers for data categories with hierarchies. If you have a Nimbus line of flying broomsticks, that category could be nested below a Products category group.
- Channel describes one of various methods in which an article is available for viewing: the Internal app (where only Service Cloud users can see the article), the Customer Portal (where customers with the right permissions may see it on the portal page), and the Public Knowledge Base for Salesforce Knowledge (available on the AppExchange).
- Synonyms are words or phrases that you associate together so that article searches matching one of those words or phrases will return additional related results associated with the other words. For example, you could associate the words headset and head set so any relevant articles with either keyword would appear in the search results.
- A Synonym Group contains two or more synonyms.
To publish your articles to the Public Knowledge Base channel, you’ll need to download the Public Knowledge app from the salesforce.com AppExchange at www.appexchange.com. Creating a Public Knowledge Base requires Force.com Sites and Force.com pages.
Articles are the content on which your internal product expertise and externally sourced conversations are housed for future reference.
Creating articles
To try your hand at creating an article, do the following:
- On the Article Management tab, click New.
The New Article box appears.
- Choose an article type, enter the article title, and click OK.
The article type determines the page layout of the type of article you’ll be writing.
- Edit the article’s fields as appropriate.
- If categories have already been set up in the Categories area, choose the categories to associate with your article by clicking Edit next to a category group to open the Category Selection dialog box. If categories have not been set up yet, skip to Step 8.
- In the Available Categories list, expand the category hierarchy to select a category.
- Click Add to move a selected category to the Selected Categories list.
As many as eight categories are allowed there.
- Click OK.
- In the Channels area, select where your article will be available after it’s published. You can select one or more channels in which to publish your article.
- Internal App: These articles are available only to users logged in to Salesforce.
- Partner: These articles are available to your partners via your Partner Community.
- Customer: These articles are available to your customers who log in to your Customer Community.
- Public Knowledge Base: These articles are available to anyone via your website.
- Click Save to save your changes, close the article, and go to the Article Management tab.
- (Optional) Create an assignment for a user to edit or review the article.
Publishing articles
After a draft article has been reviewed and has passed your internal quality standards for publishing, do the following to publish an article:
- On the Article Management tab, open the My Draft Articles or All Draft Articles view, select a check box in the list, and click Publish.
Alternatively, click Publish on either the detail page or the edit page of an article.
- Select Publish Article(s) Now.
- If the article has previously been published, select the Flag as New Article(s) check box to make the new article icon display next to your article in the selected channels.
Users from these channels can see that this article has been modified since the last time they read it. This check box is not available when you publish an article for the first time, as the icon displays by default then.
If the draft being published is a working copy of a currently published article, it is published as a new version of the original.
- Click OK.
Articles that you’re publishing now move directly to the Published Articles view.
You can also schedule an article for publication at a later date. And, Service Cloud has you covered in case you change your mind. You can cancel a previously scheduled publication date, too, by clicking the conveniently placed Cancel Publication link for the previously scheduled article.
The Service Cloud Answers feature allows service agents to ask questions to internal and/or external groups and also see various answers from the community. Community members vote on answers they like, and the original asker can deem one response as the best answer. This is similar to how sites like www.StackOverflow.com source responses from their users, and is available in Enterprise and Performance Editions.
Helping Customers Help Themselves
You’d be surprised by how many customers would prefer to get the answers themselves (if they knew where to go), rather than call you. By creating a knowledge base of frequently discussed questions or issues, you can allow your customers to solve their own issues, decreasing call volume to your call centers. You can also improve your agents’ response times so that they don’t have to constantly retype repetitive solutions, and your call center managers can track topic trends to provide feedback to product and marketing teams.
Setting up Communities
When customers have a problem, they can log in to your Community and do things such as
- Log a new case
- Search the knowledge base
- Get help and training
- Interact with other customers in community forums
Before implementing Salesforce Communities, make sure that your public knowledge articles are up to snuff. That is, your knowledge articles must be populated with answers to many common customer inquiries, and the articles must be well written and appropriate for public consumption.
Salesforce Communities is an additional cost. Check with your salesforce.com account executive for details before launching it.
If you want to test Salesforce Communities, sign up for a Developer Edition trial (at www.force.com) or, if your organization has a sandbox, you can enable Communities in your sandbox.
Depending on how new your instance of Salesforce is, you may need to contact salesforce.com to enable Communities for your organization to launch it.
To determine if you already have Salesforce Communities enabled, follow these steps:
- From Setup, click Customize⇒Communities⇒Settings.
The Community Settings page appears.
- Select Enable Communities.
You are asked to acknowledge that enabling Communities is irreversible. If you wish to proceed, check the box to acknowledge that there’s no going back.
- Select a subdomain name to use for your communities, then click Check Availability to make sure it’s not already being used.
The URL defaults to a force.com web address. You get to choose the subdomain. Use something recognizable to your users, such as your company name. The domain name will be the same for all your communities, but you create a unique URL for each community during the creation process.
- Click Save.
Creating a Community
Once your Salesforce Communities is enabled, it’s time to create your first, well, community.
- From Setup, click Customize⇒Communities⇒Manage Communities.
The Manage Communities page appears.
- Click the New Community button.
The Create Community window appears.
- Add the name of the community, a brief description, and a URL.
The URL field will be a subdirectory that lives under the domain name that you selected earlier. This community is only visible by administrators until you share the URL with others, or publish it where others can access it. Until then, you can customize it to your desired look and feel.
- Choose the Create button to create the community.
A confirmation window appears once your community is created. You can click an Edit button to continue to fine-tune this community, or hit Close to return to the Manage Communities page.
- [Optional] From the Manage Communities page, click the Edit link next to a community name to continue with more customizations that we will discuss in the next section.
To quickly access a view of what one of your communities will look like from an end-user’s perspective, click the name of the community from the Manage Communities page. Figure 16-6 shows one sample Community from the customer’s perspective. The colors and tabs of the portal may be customized by you to best match your company branding. When you first get started, it will look something like what’s shown in Figure 16-6.
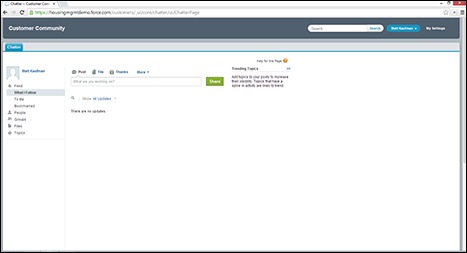
Figure 16-6: A customer’s view of a Salesforce Community.
Adding Community members
After you thoroughly test your Salesforce Community, you want to make it available to customers.
To add members to your Customer Community, take these steps:
- Select which community to target by going to Setup⇒Build⇒Customize⇒Communities⇒Manage Settings.
The Manage Settings page appears.
- Click the Edit link next to the community name that you want to target.
A Community Settings window for that community appears.
- Click the Members button and select which user profiles or permission sets you want to include as members.
Select available profiles or permission sets from their respective left selection windows. Use the Add or Remove buttons to move your selections from the Available windows to the Select windows.
- [Optional] In the Flagging Content section, check the box if you want to allow members of this community to flag content.
This lets community members notify the community moderator to review content. This usually means the flagged content is inappropriate for your community, or at least should be reviewed.
- [Optional] In the Share the Community Before Publishing section, copy the URL and send it to some members whose profile you just added.
This lets stakeholders see what all the fuss has been about.
- Click Save.
The Community Settings window for this community reappears.
Customizing your Salesforce Community
If your business deals with several types of customers, each requiring a customized interface, you can create multiple communities for them. For example, maybe your platinum customers need Salesforce Community access to report on very specific information captured in custom fields that don’t apply to your regular customer base. Or maybe you’re dealing with a large set of customers testing out the newest version of your product, and you need them to provide specific feedback that isn’t normally captured for your current products. Additionally, you can customize the Salesforce Community so that it fits seamlessly with the rest of your corporate website’s branding.
To customize your Community, do the following:
- Choose Setup⇒Build⇒Customize⇒Communities⇒Manage Communities.
- Click the Edit link next to the name of your Community.
- Click Tabs & Pages.
- Move the desired tabs from the Available Tabs into the Selected Tabs column.
- Use the Up and Down buttons to change the order in which the tabs are displayed.
- Click Save to save your changes.
Changes are visible to Community users when they refresh their browsers. Take care to make updates at times when users are least likely to visit your Community.
Sharing Knowledge with your community
Collecting answers to increase your agents’ efficiency is just the tip of the iceberg. Using that information to then efficiently address conversations in the cloud distinguishes your company from the rest. The extent of your customer service efforts will closely follow the pace of conversations so that your brand and its reputation stay current with all messaging. By making your knowledge base available to a customer, you can use the relevant information about a specific customer (like what products of yours they own) to automatically suggest articles relevant to that customer. Salesforce Knowledge can even suggest an article before the customer does a search!
Not only can customers find a quick answer, but they can also find out more about the products they use. The more often that customers can educate themselves, the more often that service agent interactions will start off at a more sophisticated level of dialog.
And if customers have feedback about some of the articles, they can vote on the information and see what others think about it. This closed-loop feedback provides valuable information to other customers and to the internal product folks that put that information there.
Assuming you already have Salesforce Knowledge enabled and want to associate it with Salesforce Communities, do the following to associate a Knowledge-friendly profile with a community:
- Choose Setup⇒Administer⇒Manage Users⇒Profiles.
The User Profiles page appears.
- Click the name of one of your profiles that’s a member of a community where you want Salesforce Knowledge associated.
- Click the Clone button to create a copy of this profile.
The Clone Profile page appears.
- Enter a name for your new profile and click Save.
Your new profile page appears.
- Click the Edit button to update the new profile’s permissions.
The Profile Edit page appears, as shown in Figure 16-7.
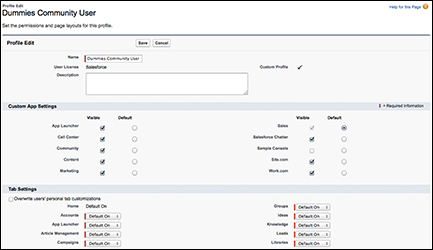
Figure 16-7: Creating a new community profile integrating Salesforce Knowledge.
- Verify that the tab visibility for the Article Management tab is Default On and that the check box for the Read permission for the appropriate Article Type Permissions is selected.
- Click Save to finish updating your new Community Profile.
- Choose Setup⇒Build⇒Customize⇒Communities⇒Manage Communities to return to the Manage Communities page.
- Click the Edit link next to the name of your Community.
The Community detail page appears.
- Click the Members button.
- Select the newly created profile and click Add.
- When finished, click the Save button.
Notify support agents who create articles that they must select Public Knowledge base and Customer as channel options when creating or modifying an article. If the Customer channel isn’t selected, the article will not appear in the community.
Improving Agent Productivity
For those of you who operate a support center in which you handle a high volume of support issues, you probably want to make your agents’ time as productive as possible. What information can you put at their fingertips to help them resolve that case that much faster? In the following sections, we review a timesaving option that may be a good fit for your team.
Using the Salesforce Agent Console
High-volume call center agents need access to a lot of information at once. Typing fewer keystrokes means that resolving a customer’s issue takes less time. From a single web page, the Salesforce Agent Console allows an agent to view all his cases, handle a single case, and see all the records — including accounts, contacts, and opportunities — that relate to a case. The Salesforce Agent Console provides a multifaceted interface, designed to be a one-stop desktop for your agents.
Setting up the Agent Console
We highlight the basic steps that you need to take to get the Salesforce Agent Console up and running in the following sections. Try to walk through a scenario in which an agent handles a new case and sees it to closure from within that Agent Console. Check out the Help & Training section in Salesforce, for more details on the following summaries.
- Create an App for your Salesforce Agent Console.
Choose Setup⇒Build⇒Create⇒Apps to create a new app that defines which tabs your agents will see in the console.
- Assign Users the Service Cloud Feature License.
Choose Setup⇒Administer⇒Manage Users⇒Users to edit each user and select the Service Cloud User in the User License field.
- Create a new Agent Console layout to determine what types of records your agents see in one window.
Choose Setup⇒Build⇒Customize⇒Agent Console⇒Console Layouts⇒New to build a new console layout.
Providing customer service from anywhere
Service Cloud provides two options for managing calls from your customers. The first option is already set up and seems obvious. You define some basic roles and rules for levels of support in your call center. When a person calls in, the agent searches for the contact, validates the caller against information in the Service Cloud, and captures the case in real time. Then, hopefully, the agent resolves the case in the same call.
The second option is to integrate your telephony environment with the Service Cloud to make managing customer calls easier for agents and customers.
Additionally, agents can provide customer service when they’re not in an office. You can distribute your contact center across the world through the wonders of chat-based support. Service professionals constantly on the go can continue to manage multiple customers using Service Cloud mobile solutions and even look up answers to common questions from their favorite mobile device. Field technicians can view their route schedule without going into the office, and they can report issue resolutions without ever turning on a computer.
Using a call center
Service Cloud telephony integration works with more than 80 of the most popular phone systems and may include interactive voice response (IVR), automatic call distribution (ACD), and screen pops that automatically present the caller’s contact record to your agents. With an open CTI integration architecture and the free Force.com Connect CTI Toolkit, available at http://developer.force.com, your technical resources can deliver an even more robust experience, which is especially valuable in higher-volume contact centers.
The integration can work with a bevy of on-demand telephony partners, such as Angel.com, Five9, inContact, and LiveOps, or with on-premise solutions from leading telephony providers including Avaya, Cisco, Genesys, Nortel, and more.
These providers offer prebuilt integrations from their telephony systems to salesforce.com, allowing the agent desktop to be shown right inside the salesforce.com user interface.
If your customers don’t like waiting on hold, you may want to also implement Salesforce Live Agent. Live Agent lets your customer service reps hold chats with multiple visitors to your website. All the information is tracked in Salesforce in real time, and your reps will even be able to leverage your knowledge articles and other customizations.