Ruby is a robust programming language that programmers all over the world use to perform a whole range of tasks. Learning Ruby takes time. You are off to a good start by reading this book. One of the best ways to learn more about Ruby is to experiment with the language using the irb, also referred to as interactive Ruby. Using irb, you can formulate Ruby statements and expressions and execute them to see what happens. In doing so, you will gain insight into the operation of Ruby keywords, operators, commands, and object-oriented programming methodology. This chapter will provide you with an overview of the irb. In addition, you will learn how to access Ruby’s documentation. On top of all this, you will learn how to create a new Ruby script, the Ruby Tall Tale game.
Specifically, you will learn how to:
Start an irb session
Use the irb to execute single and multi-line Ruby statements
Access Ruby documentation
In this chapter, you will learn how to create your second computer game, the Ruby Tall Tale game. This Ruby script demonstrates how to collect and process player input through the development of an interactive mad-lib-style storytelling game. Player input is collected without telling the player in advance the context in which the input will be used. Once collected, the player’s input is then plugged into the story plot. As a result, the story that is ultimately told has unpredictable elements that will result in different variations every time the game is played.
The game begins, as shown in Figure 2.1, by prompting the player for permission to begin the game.

If the player decides not to play, the game displays the window shown in Figure 2.2, encouraging the player to consider returning to play another time.

If, on the other hand, the player decides to play the game, the window shown in Figure 2.3 displays, prompting the player to answer the first of five questions.

Figure 2.3. The player is asked to answer five questions without being told the context in which the answers will be used.
Once all questions have been answered, the game plugs the input provided by the player into the story’s plot and then begins to tell its story, a paragraph at a time. Figure 2.4 shows an example of how the story’s first paragraph might read.

The second paragraph of the story introduces the story’s antagonist, as shown in Figure 2.5.

Figure 2.5. In the second paragraph, the story identifies the villain and establishes the need for its heroes.
In the third paragraph, the story’s heroes arrive on the scene just in time to save the day, as shown in Figure 2.6.

Figure 2.6. The third paragraph draws a picture of desperation and identifies the challenge facing its heroes.
Finally, the fourth paragraph displays, bringing the story to a happy ending, as shown in Figure 2.7.

With the story now told, the game pauses to thank the player for taking the time to play before terminating, as shown in Figure 2.8.
Whether you are trying to learn auto mechanics or a new programming language, sometimes the best way to get started is to look under the hood and just start tinkering. In programming terms, this means formulating and testing the execution of different programming statements to see what happens. While auto mechanics may find it difficult to find a fully operational automobile on which they can tinker at will, Ruby programmers do not have this problem. Every Ruby installation comes with a wonderfully convenient and powerful tool called the irb, which stands for interactive Ruby.
The irb provides Ruby programmers with command line access to a Ruby parser, allowing programmers to write and test different parts of a computer program on the fly. Many programmers use irb to experiment with and get a particular piece of code working like they want it to before adding that code to a Ruby script. New Ruby programmers tend to spend many hours working at the irb command prompt, learning Ruby programming basics.
As you have already seen, the irb is started from the operating system command prompt by simply entering irb and pressing Enter, as demonstrated here:
C:>irb
irb(main):001:0>
Here, a new irb session has been started on a computer running Microsoft Windows. When started this way, the irb displays a command prompt and waits for you to enter commands.
The irb command is actually quite flexible, allowing you to start it by specifying a number of different options using the syntax shown here:
irb [Options] [Script] [Arguments]Options is a placeholder representing any number of optional argument supports by the irb, as outlined in Table 2.1. Script is the complete name and path of a Ruby script that you want the irb to run when it starts. Arguments is a list of one or more arguments that may need to be passed to the script in order for it to execute.
Table 2.1. irb Command Line Options
Option | Description |
|---|---|
| Sets |
| Prevents the processing of |
| Sets the |
| Enables |
| Loads |
| Displays irb version information |
| Displays backtrace data using the last x number of entries |
| Configures the irb to run under Emacs |
| Formats output using |
| Specifies the debug level |
| Disables the default |
| Suppresses the display of the irb command prompt |
| Disables execution of the |
| Configures the irb command prompt to one of the following: classic, null, xmp, simple, default, inf-ruby |
| Loads the readline module |
| Sets the irb command prompt to simple |
| Configures the irb to display trace information |
| Displays irb version information |
You have the option of passing the irb a number of different arguments when starting it, as well as the name of any Ruby script that you might want it to run, along with any argument that may need to be passed to the script.
To start the irb using the options specified in Table 2.1, let’s look at a couple of examples. The first example, shown next, executes the -v option to display irb version information.
C:>irb -v
irb 0.9.5(05/04/13)
Similarly, the following example demonstrates how to start the irb and specify the type of prompt the irb should display.
C:>irb --prompt simple
>>
Each irb session exists within its own context. If you open up two separate irb sessions, each exists completely independently of the other. Each separate irb session maintains its own separate memory space. Therefore any classes, methods, or variables that you define in one irb session will not be visible or accessible in another session.
Additional irb sessions can be started by opening another terminal or command-line session. A new irb session can also be started from within another irb session by typing the irb command. Doing so begins a new irb session, with an entirely new context as demonstrated here:
irb(main):001:0> irb
irb#1(main):001:0> irb
Here, a new irb session has been started as designated by the presence of irb#1 at the beginning of the command prompt. Any objects created within this new context are available only within the context of the new session. Typing in exit will close the new (child) irb session and restore the parent irb session as demonstrated here:
irb#1(main):001:0> exit
=> #<IRB::Irb: @context=#<IRB::Context:0x36c6c60>, @signal_status=:IN_EVAL,
@scanner=#<RubyLex:0x36c6904>>
irb(main):002:0>
When restored, any objects previously defined within the parent session will still be accessible. However, any objects that were defined within the child session are not accessible.
If you do not have immediate access to the irb, perhaps because you are working from a computer where Ruby has not been installed, but you feel a pressing need to try to experiment with Ruby a bit, all is not lost. You can go online to http://tryruby.hobix.com/ and access a special web-enabled version of the irb made available on the Try Ruby! web page. Here you will be greeted by your friendly irb command prompt just waiting to process your commands. For example, if you check out Figure 2.9, you will see an example of the online irb session in action.

As Figure 2.9 demonstrates, you can enter Ruby expressions and statements and the online irb will process them in exactly the same way that they are processed when executed by the irb running on your computer.
Using the irb, you can experiment with Ruby and learn how things work. Each time you start up a new Ruby session, the irb keeps track of any classes, objects, or variables that you define. Therefore, as you execute new script statements, you can create an environment very much like that of scripts in which you can refer to and interact with previously defined objects. Access to previously defined classes, objects, and variables is maintained for as long as the current irb session remains active.
In the sections that follow, you will learn the fundamentals of how to work with the irb.
Let’s begin by executing a print statement, as demonstrated in the following example.
irb(main):002:0> print "Welcome to Ruby"
Welcome to Ruby=> nil
irb(main):003:0>
Here, the print command, which displays a line of text to the screen, has been executed. The test string to be displayed is passed to the print command as an argument wrapped inside matching double quotation marks. The next line shows the result returned by the print command when executed. nil is a value that represents Ruby’s interpretation of nothing. Unlike the print command, most commands that you execute at the irb formulate expressions that return a specific result.
Hint

An expression is a series of language keywords, operators, and variables that, when processed, return a result.
When executed within a Ruby script, the print command displays a text string but does not advance the cursor to the next line. As a result, back-to-back print commands will display the two text strings as if they were a single contiguous string. Most of the time, you are probably going to want to display individual text strings on separate lines. You can do this using the puts command, as demonstrated here:
irb(main):001:0> puts "Welcome to Ruby"
Welcome to Ruby
=> nil
irb(main):002:0>
As you can see, the puts command displays a line of text passed to it as an argument and then returns a nil value after execution. This next example shows an expression that returns a result.
irb(main):002:0> puts 5 + 1
6
   => nil
Here, the puts command passes an expression of 5 + 1. The irb processes the expression, adding the numbers together. The result is then passed to the puts command as an argument. The puts command displays the resulting value, after which a value of nil is displayed.
As you learn to work with different Ruby commands, keywords, and operators, you will have to learn to follow specific syntactical rules. Failure to follow these rules when formulating script statements will result in errors that prevent your scripts from executing. Look at the following.
irb(main):005:0* put "Welcome to Ruby"
NoMethodError: undefined method 'put' for main:Object
        from (irb):5
irb(main):006:0>
Here, an error was made when keying in the puts command. If you look carefully, you will see that the command was misspelled. In response, an error message was generated that reports an undefined method named put. As another example of a syntactical error, look at the following.
irb(main):006:0> print 5 + "5"
TypeError: String can't be coerced into Fixnum
        from (irb):6:in '+'
        from (irb):6
irb(main):007:0>
Here, the print command is passed the results of an expression of 5 + "5". However, there is an error in the expression. Specifically, although strings can be added to strings, and numbers can be added to numbers, a numeric value cannot be added to a string value.
As you work your way through this book, you will see hundreds of examples of Ruby statements that demonstrate the proper way to formulate script statements. When you are not sure about the specific rules required to work with a specific Ruby method, it is best to check Ruby’s documentation as described later in this chapter.
The irb includes a Ruby parser. As a result, it can tell when the statements you enter are complete. If you press the Enter key without keying in a complete statement, the irb displays a modified version of the command prompt that includes an asterisk character. This character serves as a visual indicator that the irb is waiting on you to finish keying in the current statement, as demonstrated here:
irb(main):003:0> 5 - 1 +
irb(main):004:0*
Once a complete statement has been entered, irb processes the statement and redisplays its regular command prompt, as demonstrated here:
irb(main):001:0> 5 - 1 +
irb(main):002:0* 4
=> 8
irb(main):003:0>
Another handy use for the irb is to run and experiment with Ruby scripts or portions of Ruby scripts that you have already written. For example, suppose you had downloaded a Ruby script from the Internet that contained a set of code statements that performed a particular task and you were interested in understanding how they worked. You could quickly do this by copying and pasting the code statements into their own script and then executing them using the load command, as demonstrated here:
load 'c:Ruby_ScriptsRubyJoke.rb'
As you can see, all you have to do is pass a string containing the complete path and filename of the Ruby script that you want to run and the irb will run the script, displaying the value returned by each statement as it executes, allowing you to develop a better understanding of how things work.
If copying and pasting the script statements into a new script file is too much work, you can just copy and paste the script statements that you want executed directly to the irb command prompt and the irb will immediately execute them. For example, suppose you wanted to test the execution of the Screen class that was created as part of the Ruby Joke script back in Chapter 1, “Ruby Basics.” One way of doing so is to copy and paste the following statements to the irb command prompt.
class Screen
  def cls  #Define a method that clears the display area
    puts ("
" * 25)  #Scroll the screen 25 times
  end
end
In response, the irb will load the class definition into the current irb session and return a nil value, as shown here:
irb(main):001:0> class Screen
irb(main):002:1>   def cls  #Define a method that clears the display area
irb(main):003:2>     puts ("
" * 25)  #Scroll the screen 25 times
irb(main):004:2>   end
irb(main):005:1> end
=> nil
irb(main):006:0>
Because a class is just a definition or template, it does not do anything by itself. Its statements only execute when called upon to create a new Screen object. This is accomplished using the syntax outlined here:
variableName = ClassName.newvariableName is a placeholder representing any valid variable name you want to use to refer to the object being instantiated. ClassName represents the name of the class being used as the basis for instantiating the object, and new is the name of the method that, when executed, creates the actual object.
Hint
Instantiation is a term that describes the process used to create a new object. The object that is created is based on a predefined class definition. The object inherits all of the features of the class on which it is based. Therefore, if you were to create two different objects based on the same class definition, those two objects would be identical.
At this point, you can tell the irb to run the cls method defined inside the Screen class, as demonstrated here.
Console_Screen = Screen.new
Hint
A method is a collection of statements defined within a class that can be used to interact with and control the operation of objects created based on that class.
Once instantiated, you can interact with the new object using the syntax demonstrated here:
Console_Screen.cls
Here, the Screen class’s cls method has been called upon to execute. When executed, this method writes 25 blank lines to the console screen, effectively clearing it and readying it for the display of new text.
As you have already seen, Ruby is proficient in working with numbers. As such, you can use the irb to experiment with various calculations to determine how Ruby will handle them. You can also use the irb as a quick command-line calculator. Table 2.2 outlines the various mathematical operators that Ruby provides for performing basic calculations.
Table 2.2. Ruby Math Operators
Operator | Name | Description |
|---|---|---|
+ | Addition | Adds two numbers together |
- | Subtraction | Subtracts one number from another |
* | Multiplication | Multiplies two numbers together |
/ | Division | Divides one number from another number |
** | Exponentiation | Multiplies a number by itself a specified number of times |
% | Modulus | Returns the remainder portion of a division operation |
Hint
Actually, each of the operators listed in Table 2.2 is implemented in Ruby as a method, reflecting Ruby’s dedication to the principles of object-oriented programming.
Using the math operators listed in Table 2.2, you can formulate mathematical expressions of any level of complexity when writing Ruby statements. For example, the following statements demonstrate how to add two numbers.
irb(main):001:0> 1 + 1
=> 5
irb(main):002:0>
Here, the irb has been used to add 1 + 1. After evaluating and executing this expression, the irb displays the result and then redisplays its command prompt. The following set of examples demonstrates how to work with each of the remaining operators shown in Table 2.2.
irb(main):002:0> 10 - 5
=> 5
irb(main):003:0> 3 + 2
=> 5
irb(main):005:0> 3 * 2
=> 6
irb(main):006:0> 8 / 2
=> 4
irb(main):007:0> 2**3
8
irb(main):008:0> 7 % 2
=> 1
irb(main):009:0>
In addition to the rather simple examples shown above, you can create mathematical expressions of great complexity, as demonstrated here:
irb(main):010:0* 7 * 4 / 3 - 4 % 3 + 8
=> 16
irb(main):011:0>
In addition to the standard set of mathematical operator methods previously discussed, Ruby also provides you with access to a collection of mathematical methods stored in its Math module. A module is a structure used to store collections of classes, methods, and constants. The Math module includes a number of methods that support advanced mathematical operations. For example, the Math module includes a sqrt method that you can call upon to determine the square root of any number, as demonstrated here:
irb(main):005:0> Math.sqrt(16)
=> 4.0
Here, the square root of 16 has been calculated.
Trap

Make sure you spell method names correctly; otherwise, you’ll run into errors. For example, in order to call upon Math module methods, you must spell Math with an initial capital. If, instead, you spell the word Math in all lowercase letters (math), you will get the following error.
irb(main):006:0> math.sqrt(16)
NameError: undefined local variable or method 'math' for main:Object
        from (irb):6
Ruby’s Math module provides you with access to numerous mathematical methods. Examples of these methods include acos(), which computes the arc cosine for a specified value, and cos(), which computes the cosine for a specified value. To learn more about the methods contained in Ruby’s Math module, visit http://www.ruby-doc.org/core/classes/Math.html.
Like all programming languages, arithmetic operations are performed in a predetermined order or precedence in Ruby scripts. Specifically, exponentiation is performed first followed by multiplication, division, and modulus division. Finally, addition and subtraction are performed. Operators with the same level or precedence are performed from left to right.
The best way to understand how Ruby’s predefined order of precedence works is to see how it is applied in an example.
10 + 5 * 2 - 8 / 4 + 5**2
First, exponentiation is performed, so the value of 5**2 is calculated, resulting in a value of 25. Next, multiplication and division are performed from left to right, so 5 is multiplied by 2 resulting in a value of 10. Next 8 is divided by 4 resulting in a value of 2. At this point the expression logically could be rewritten as shown here:
10 + 10 - 2 + 25.
Next, addition and division are performed from left to right. Therefore, 10 is added to 10, resulting in a value of 20. Next, 2 is subtracted from 20 yielding a value of 18 to which a value of 25 is added. The end result is 43, as demonstrated here.
irb(main):001:0> 10 + 5 * 2 - 8 / 4 + 5**2
=> 43
irb(main):002:0>
Just like you learned in high school geometry and algebra, parentheses can be used to override Ruby’s default order of precedence. Specifically, Ruby evaluates mathematical expressions by first evaluating anything inside parentheses and then following the order of precedence to process the expression.
First I will show you an example without parentheses and then I will show you the same example using parentheses.
irb(main):001:0> 4 + 7 * 3 - 7 / 2 + 5 ** 2
=> 47
Here, an expression has been processed by the irb that results in a value of 47. This expression is processed as follows. First, exponentiation occurs, so 5 is multiplied times itself, yielding a value of 25. At this point the expression looks like the example shown here:
4 + 7 * 3 - 7 / 2 + 25
Next, multiplication and division are performed from left to right. Therefore, 3 is multiplied by 7, yielding a value of 21, and 7 is divided by 2, yielding a value of 3. At this point the expression looks like the example shown here:
4 + 21 - 3 + 25
Hint
By default, any time two integer numbers are divided in Ruby, the value that is returned is always an integer. As such, any remainder is automatically dropped. You will learn how to instruct Ruby to return a floating-point result in the next section.
All that remains to finish processing the expression is to perform all remaining addition and subtraction operations, which result in a final value of 47. Now, let’s use parentheses to alter the way in which the expression is evaluated, as demonstrated here:
irb(main):002:0> (4 + 7) * 3 - 7 / (2 + 5) ** 2
=> 33
Here, an expression has been processed by the irb that results in a value of 33. This expression is processed as follows. First, anything inside parentheses is processed. At this point, the expression looks like this:
11 * 3 - 7 / 7 ** 2
Next, exponentiation occurs, so 7 is multiplied 2 times resulting in the following logical expression.
11* 3 - 7 / 49
Multiplication and division are then performed, so 11 is multiplied by 3 and 7 is divided by 49, resulting the following logical expression.
33 - 0
Note

Dividing 7 by 49 results in a value of .142857142857143. However, since Ruby always returns an integer value when dividing two integers, a value of 0 is returned.
Finally, 33 is added to 0, resulting in a final result of 33.
33
Any time you work with whole numbers, Ruby treats the numbers in the resulting expression as integers. In Ruby, any operation performed using integers results in an integer value. In the preceding division example, the integers were carefully chosen to ensure that the precision of the results was not an issue. However, the following example provides a good demonstration of the effects of division using integers.
irb(main):001:0> 10 / 4
=> 2
irb(main):002:0>
As you can see, instead of returning a value of 2.5, a value of 2 was returned. The missing .5 is just thrown way. This is just how Ruby deals with integers. If you require a greater level of mathematical precision, you will need to use floating-point numbers (numbers that including a decimal point), as demonstrated here:
irb(main):003:0> 10.0 / 4.0
=> 2.5
irb(main):004:0>
Now that floating-point numbers have been specified, a value of 2.5 has been returned. You do not have to make both numbers floating-point numbers to ensure that Ruby performs floating-point division. All that Ruby requires is that you include a decimal point in one of the numbers being calculated, as demonstrated here:
irb(main):007:0> 10.0 / 4
=> 2.5
irb(main):008:0>
Thousands of methods are supported along with Ruby when Ruby is installed on your computer. There are too many of these methods to consider trying to cover them all in this book or any other book for that matter. Instead, easy access to documentation for most of these methods is provided via a system referred to as RDoc.
You can access the contents of RDoc online from a number of websites, most notably at http://www.ruby-doc.org/, as shown in Figure 2.10.

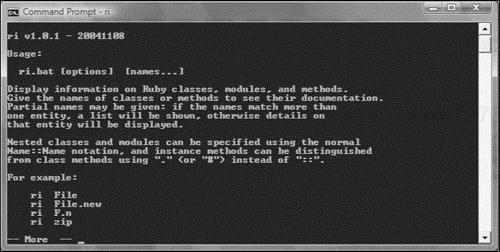
You can also access Ruby documentation locally on your computer using ri. ri is a command line Ruby documentation viewer. For example, to use ri to display information about a Ruby class, all you have to do is access the operating system’s command prompt and type ri followed by the name of the class, as demonstrated in Figure 2.11.

Trap
Watch out for case sensitivity when working with ri. For example, when using ri to look up documentation for a class, you must spell the name of the class with an opening capital letter. Specifying ri Numeric returns documentation for the Numeric class. However, specifying ri numeric returns an error.
As you can see, the documentation presented typically includes a description and a list of other related language components. In the case of Ruby classes, this may include any number of methods. You can also use ri to retrieve documentation for Ruby methods. For example, you might try typing ri Numeric.round to display information about the Numeric class’s round method, as demonstrated in Figure 2.12.

Sometimes you can omit the inclusion of the owning class when displaying a method. As long as the method has only one owning class, you can view its documentation by simply typing ri followed by the name of the method. However, if the method being looked up is associated with more than one class, you will see a message similar to the following.
C:>ri round
More than one method matched your request. You can refine
your search by asking for information on one of:

     Float#round, Integer#round, Numeric#round, REXML::Functions::round,
     Fox::FXGLViewer#getBackgroundColor,
     Fox::FXGLViewer#setBackgroundColor,
     Fox::FXTableItem#drawBackground,
     Windows::Window#GetForegroundWindow
As this example demonstrates, the round method is associated with many classes, including Float, Integer, Numeric, and REXML.
ri is a convenient and powerful tool. To learn more about it, type ri at the operating system command prompt and press Enter, as demonstrated in Figure 2.13.
All right, it is time to turn your attention from the irb and RDoc and refocus on the development of the Ruby Tall Tale game. In this game, the player is prompted to answer a series of questions without being told how the answers that are given will be used. Once the player has answered every question, the game incorporates the player’s input into the plot of the game’s story, which is then displayed a paragraph at a time.
Hint
Don’t worry if you do not yet understand the exact meaning of each of the script statements used to develop the Ruby Tall Tale game. You are still just at the beginning of this book. Much of what you need to know to really understand what is going on is provided in Chapters 3–6. For now, try to limit your focus to the overall big picture.
As was done in the development of Chapter 1’s Ruby Joke game, the development of the Ruby Tall Tale game will be constructed following a series of steps, as outlined next. As you move along from one step to the next, be sure to follow the instructions exactly as they are outlined.
Open your text or script editor and create a new file.
Add comment statements to the beginning of the script file to document the script and its purpose.
Define custom classes required by the game.
Prepare the game for play.
Add the code statements that outline the script’s high-level conditional logic.
Terminate the game when the user decides not to play.
Prompt the player to provide story input for key story elements.
Assemble the game’s story using the player’s input.
Thank the player for playing the game.
Each of these steps is covered in detail in the sections that follow.
The first step in developing the Ruby Tall Tale game is to start up your favorite text or code editor and create a new Ruby script file. Once created, save your script file in whatever location you’ve chosen to store your Ruby script files with a name of TallTale.rb.
The next step in the development of the Ruby Tall Tale game is to add the following statements to the beginning of the script file. These comment statements provide information about the script and its purpose.
#--------------------------------------------------------------------------
#
# Script Name: TallTale.rb
# Version:     1.0
# Author:      Jerry Lee Ford, Jr.
# Date:        October 2007
#
# Description: This Ruby script demonstrates how to collect and process
#              user input through the development of an interactive story
#              telling game.
#
#--------------------------------------------------------------------------
The Ruby Tall Tale game includes two custom classes. The script statements that make up these two statements are shown next and should be added to the end of the script file.
class Screen

  def cls
    puts ("
" * 25)
    puts "a"
  end

end
class Tale
attr_accessor :monster, :villain, :object, :place, :location
attr_accessor :P1, :P2, :P3, :P4
def tell_Story(paragraph)
puts paragraph
end
endThe first class is named Screen and it contains a method named cls that when called will clear the terminal window. In addition, the cls method includes a statement that uses the puts method. This puts method is passed a string that contains the a escape character sequence. The a character sequence does not display any visible text. Instead, it plays an audible beep sound, whose purpose in this method is to notify the player each time the terminal screen is cleared.
Hint
An escape character is a pair of characters that begin with the character followed by a letter. When Ruby comes across the a escape character inside a text string, it plays a beep sound. You will learn more about escape characters in Chapter 3, “Working with Objects, Strings, and Variables.”
The second class is named Tale and it defines properties representing key components of the game’s story plot. The :monster, :villain, :object, :place, and :location properties represent pieces of input that will be collected from the player when the game executes and :P1, :P2, :P3, and :P4 will be used to store the paragraphs that make up the game’s story line. The Tale class also includes a method named tell_Story, which displays any text that is passed to it as an argument.
Hint
Note the use of indentation in the previous class definition as well as throughout the rest of this Ruby script. Indenting programming statements in this manner helps to visually organize script statements and make them easier to read and understand. While indentation is not required, it is considered a good programming practice and I strongly recommend you use it.
The next step in the development of the Ruby Tall Tale game is to clear the screen by instantiating a Screen object and then executing the Screen class’s cls method. This is accomplished by adding the following statements to the end of the script file.
Console_Screen = Screen.new

Console_Screen.cls

print "Would you like to hear an interesting story? (y/n)

: "

answer = STDIN.gets
answer.chop!
Once the cls method has been executed, the player is then prompted to confirm the decision to play the game. As you can see, the player is instructed to reply with a y or n response. The player’s response is retrieved using the STDIN class’s gets method and assigned to a variable named answer. The chop! method is then executed in order to remove the end of line character from the end of the value stored in answer.
With the player’s responses now in hand, the next set of statements to be added to the script file, shown next, are responsible for analyzing the player’s input.
if answer == "n"

else

end
These statements should be added to the end of the script file. The rest of the statements in the script will be embedded within these statements. These statements control the high-level conditional logic for the script. The statements that you embed between the first two statements will execute when the player responds with a reply of n when asked for permission to play the game. The statements that you embed between the last two statements will execute when the player responds with a reply that is anything other than n when prompted for confirmation to play the game.
Hint
As written, the game only recognizes responses of y or n. If the player responds by entering anything other than one of these two letters, the game will treat the response as if a y was entered.
You will learn the ins and outs of applying conditional logic in Ruby later in Chapter 4, “Implementing Conditional Logic.”
The following pair of statements clears the console screen and then displays a text string that encourages the player to return and play the game another time. These statements are to be executed when the player tells the game that she does not want to play. The statements should therefore be placed between the opening if statement and the else statement that you added to the script file in the preceding step.
Console_Screen.cls

puts "Okay, perhaps another time.

"
The rest of the statements that you will add to the script file need to be placed between the else and the end statements that are responsible for outlining the script’s overall controlling logic. For starters, add the following statements.
Story = Tale.new

Console_Screen.cls

print %Q{Type the name of a scary monster. (Press Enter)

: }
monster = STDIN.gets
monster.chomp!

Console_Screen.cls

print %Q{Who is your favorite movie star? (Press Enter)

: }
villain = STDIN.gets
villain.chomp!

Console_Screen.cls

print %Q{Type in the name of a thing. (Press Enter)

: }
object = STDIN.gets
object.chomp!

Console_Screen.cls

print %Q{Enter the name of a good hiding place. (Press Enter)

: }
place = STDIN.gets
place.chomp!

Console_Screen.cls

print %Q{Enter the name of a popular vacation site. (Press Enter)

: }
location = STDIN.gets
location.chomp!
The first statement instantiates an object based on the Tale class. The terminal window is then cleared and a text string displays that presents the player with a question. The player’s input is stored in a variable named monster. Four additional questions display and the player’s responses are recorded in separate variables.
The next set of statements is responsible for assigning each of the game’s four paragraphs to different properties belonging to the Story object. Each paragraph is written as a large text string. Variables have been embedded inside the text string and will be replaced by their assigned values.
Story.P1 = %Q{ Once upon a time in a far away land, just on the
outskirts of #{location}, there lived three very brave young children
named Alexander, William, and Molly. These children were known far and
wide as the heroes who once saved the inhabitants of #{location} from
an evil #{monster}. One day dark clouds descended over #{location}.
For 5 nights and 5 days a great storm raged, flooding all of the land
in #{location}, driving its inhabitants up into the hills. (Press Enter)

}

Story.P2 = %Q{ The good people of #{location} were not the only ones
driven into the hills. An evil monster named #{villain} was also awoken
from a 1,000 year slumber and forced from its lair by the torrential
floods that followed the storm into #{location}. #{villain}, having
been asleep for so long, was now hungry and soon began to prey upon the
helpless people. By the time the water began to recede, over half of
the inhabitants had become meals for #{villain}. (Press Enter)

}

Story.P3 = %Q{ Desperate for help, the remaining inhabitants of
#{location} sent word to Alexander, William, and Molly that their help
was once again needed. The three children soon arrived on the scene
only to find that #{villain} had cornered the last of the inhabitants
inside a #{place} and was preparing to eat one last meal before
returning to his secret lair in #{location}. (Press Enter)

}

Story.P4 = %Q{ Immediately, Alexander, William, and Molly flew into
action. Alexander threw a #{object} and hit #{villain} to get
his attention. At the same time, William and Molly crept up behind him.
William then threw a rope around the feet of #{villain}, momentarily
tying him up and allowing Molly to move in and spray #{villain} with
a full can of bug spray, immediately immobilizing and killing
#{villain}. The remaining inhabitants returned to their homes and soon
life in #{location} was back to normal. Alexander, William, and Molly
returned to their homes, quietly living on the edge of #{location},
waiting until the day they would be needed again. (Press Enter)

}
Hint
The trick to understanding how these code statements work is to understand that in addition to enclosing text strings inside double quotations marks as you have seen done many times already in this book, you can also create string statements by embedding them inside %Q{ and } characters. In addition, variable substitution is performed within the strings by placing the variable name inside #{ and } characters. You will learn the specifics of how this works in Chapter 3, “Working with Objects, Strings, and Variables.”
Now that the story’s plot has been mapped out, it is time to begin telling the story to the player. This is accomplished by adding the following set of statements immediately after the preceding set of statements (inside the else and end statements that are part of the script’s controlling logic).
Console_Screen.cls
Story.tell_Story Story.P1
STDIN.gets

Console_Screen.cls
Story.tell_Story Story.P2
STDIN.gets

Console_Screen.cls
Story.tell_Story Story.P3
STDIN.gets

Console_Screen.cls
Story.tell_Story Story.P4
STDIN.gets
These statements are grouped into five nearly identical sets. Each set begins by calling on the Screen class’s cls method to clear the console window. Next, the Tale class’s tell_Story method is called and passed a paragraph to display. The STDIN class’s gets method is then run in order to pause the execution of the script until the player presses the Enter key.
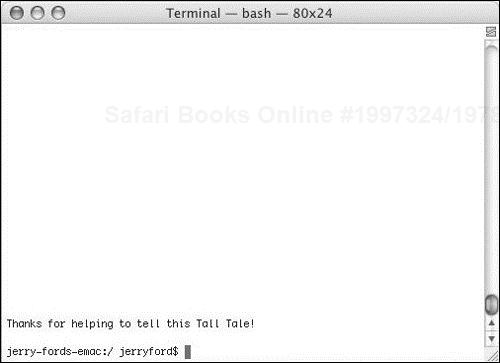
The last statements to be added to the Ruby Tall Tale game are shown next and should be appended to the previous set of statements (placed inside the else and end statements that are part of the script’s controlling logic).
Console_Screen.cls
puts "Thanks for helping to tell this Tall Tale!

"
These two statements clear the console window and display a closing message thanking the player for taking time to play the game.
Well, that’s it. You are ready to save and then execute your Ruby script. To help clarify things a bit and to help ensure that your copy of the Ruby script is properly written, I’ve provided a copy of the fully assembled game next. In addition, I have added a number of comment statements to the script file for the purpose of further documenting everything that is going on at different points within the script file.
#--------------------------------------------------------------------------
#
# Script Name: TallTale.rb
# Version:     1.0
# Author:      Jerry Lee Ford, Jr.
# Date:        October 2007
#
# Description: This Ruby script demonstrates how to collect and process
#              user input through the development of an interactive story
#              telling game.
#
#--------------------------------------------------------------------------


# Define custom classes ---------------------------------------------------

#Define a class representing the console window
class Screen

  def cls  #Define a method that clears the display area
    puts ("
" * 25)  #Scroll the screen 25 times
    puts "a"  #Make a little noise to get the player's attention
  end

end

#Define a class representing the game's story
class Tale

  #Define class properties representing story elements
  attr_accessor :monster, :villain, :object, :place, :location

  #Define class properties representing story paragraphs
  attr_accessor :P1, :P2, :P3, :P4

  #Define a method to be used to display story paragraphs
  def tell_Story(paragraph)
    puts paragraph
  end

end


# Main Script Logic -------------------------------------------------------

Console_Screen = Screen.new  #Initialize a new Screen object

#Execute the Screen object's cls method in order to clear the screen
Console_Screen.cls

#Prompt the player for permission to begin the game
print "Would you like to hear an interesting story? (y/n)

: "

answer = STDIN.gets  #Collect the player's response
answer.chop!  #Remove any extra characters appended to the string


#Analyze the player's response
if answer == "n"  #See if the player elected not to play

  Console_Screen.cls  #Clear the display area

  #Invite the player to return and play again
  puts "Okay, perhaps another time.

"

else

  Story = Tale.new  #Instantiate a new story object

  ###############################################
  # It is time to start collecting player input #
  ###############################################

  Console_Screen.cls  #Clear the display area

  #Prompt the player to provide some input
  print %Q{Type the name of a scary monster. (Press Enter)

: }
  monster = STDIN.gets  #Force the player to press Enter to continue
  monster.chomp!  #Remove any extra characters appended to the string

  Console_Screen.cls  #Clear the display area

  #Prompt the player to provide some input
  print %Q{Who is your favorite movie star? (Press Enter)

: }
  villain = STDIN.gets  #Force the player to press Enter to continue
  villain.chomp!  #Remove any extra characters appended to the string

  Console_Screen.cls  #Clear the display area

  #Prompt the player to provide some input
  print %Q{Type in the name of a thing. (Press Enter)

: }
  object = STDIN.gets  #Force the player to press Enter to continue
  object.chomp!  #Remove any extra characters appended to the string

  Console_Screen.cls  #Clear the display area

  #Prompt the player to provide some input
  print %Q{Enter the name of a good hiding place. (Press Enter)

: }
  place = STDIN.gets  #Force the player to press Enter to continue
  place.chomp!  #Remove any extra characters appended to the string

  Console_Screen.cls  #Clear the display area

  #Prompt the player to provide some input
  print %Q{Enter the name of a popular vacation site. (Press Enter)

: }
  location = STDIN.gets  #Force the player to press Enter to continue
  location.chomp!  #Remove any extra characters appended to the string

  ###############################################
  # It is time to start telling the story       #
  ###############################################

  #Display the first paragraph of the story
  Story.P1 = %Q{ Once upon a time in a far away land, just on the
  outskirts of #{location}, there lived three very brave young children
  named Alexander, William, and Molly. These children were known far and
  wide as the heroes who once saved the inhabitants of #{location} from
  an evil #{monster}. One day dark clouds descended over #{location}.
  For 5 nights and 5 days a great storm raged, flooding all of the land
  in #{location}, driving its inhabitants up into the hills. (Press Enter)

  }

  #Display the second paragraph of the story
  Story.P2 = %Q{ The good people of #{location} were not the only ones
  driven into the hills. An evil monster named #{villain} was also awoken
  from a 1,000 year slumber and forced from its lair by the torrential
  floods that followed the storm into #{location}. #{villain}, having
  been asleep for so long, was now hungry and soon began to prey upon the
  helpless people. By the time the water began to recede, over half of
  the inhabitants had become meals for #{villain}. (Press Enter)

  }

  #Display the third paragraph of the story
  Story.P3 = %Q{ Desperate for help, the remaining inhabitants of
  #{location} sent word to Alexander, William, and Molly that their help
  was once again needed. The three children soon arrived on the scene
  only to find that #{villain} had cornered the last of the inhabitants
  inside a #{place} and was preparing to eat one last meal before
  returning to his secret lair in #{location}. (Press Enter)

  }

  #Display the fourth paragraph of the story
  Story.P4 = %Q{ Immediately, Alexander, William, and Molly flew into
  action. Alexander threw a #{object} and hit #{villain} to get
  his attention. At the same time, William and Molly crept up behind him.
  William then threw a rope around the feet of #{villain}, momentarily
  tying him up and allowing Molly to move in and spray #{villain} with
  a full can of bug spray, immediately immobilizing and killing
  #{villain}. The remaining inhabitants returned to their homes and soon
  life in #{location} was back to normal. Alexander, William, and Molly
  returned to their homes, quietly living on the edge of #{location},
  waiting until the day they would be needed again. (Press Enter)

  }

  Console_Screen.cls  #Clear the display area
  Story.tell_Story Story.P1  #Tell the story's first paragraph
  STDIN.gets  #Force the player to press Enter to continue

  Console_Screen.cls  #Clear the display area
  Story.tell_Story Story.P2  #Tell the story's second paragraph
  STDIN.gets  #Force the player to press Enter to continue

  Console_Screen.cls  #Clear the display area
  Story.tell_Story Story.P3  #Tell the story's third paragraph
  STDIN.gets  #Force the player to press Enter to continue

  Console_Screen.cls  #Clear the display area
  Story.tell_Story Story.P4  #Tell the story's fourth paragraph
  STDIN.gets  #Force the player to press Enter to continue

  Console_Screen.cls  #Clear the display area
  puts "Thanks for helping to tell this Tall Tale!

"

end
Assuming that you followed along exactly as explained and that you did not make any typing mistakes when keying in the script’s code statements, everything should run exactly as expected. When you are ready, start up a new operating system shell session and navigate to the folder where you have stored your Ruby scripts. Next, type RRuby TTallTale.rb and press the Enter key.
At this point your new Ruby script should start running. However, if you made any typos along the way, you will get an error message instead. If this is the case, take a look at the error message and see if it provides any information that you can use to identify what went wrong. If you cannot determine what has happened based on the error message, you will need to review your script file and track down your mistake. Once you think you have located and fixed all your errors, rerun your Ruby script.
In this chapter, you learned how to formulate and execute different Ruby expressions and statements using interactive Ruby, otherwise known as the irb. This chapter showed you how to start up irb sessions and demonstrated how to execute single and multiline Ruby statements. Using the irb, you can tinker around with and learn much about how things work in Ruby. This chapter also showed you how to access Ruby’s documentation via RDoc.
Now, before you move on to Chapter 3, why don’t you set aside a little extra time to work on the Ruby Tall Tale game by implementing the following list of challenges.