Ruby is an object-oriented scripting language originally developed in 1993 to run on UNIX. However, it has since been ported to many other popular operating systems, including Microsoft Windows, Mac OS X, and Linux. Ruby is distributed under an open-source license, allowing anyone to freely install and use it. In this chapter, you will learn background information required to begin working with Ruby and to use it to create and execute Ruby scripts. You will also learn how to use Ruby to create the first of a number of computer games presented in this book.
Specifically, you will learn:
Basic information about Ruby and its capabilities
How to determine if Ruby is already installed on your computer
How to install Ruby on your computer
How to interact with Ruby from the command line
How to save and execute Ruby scripts
In this chapter and in each chapter that follows, you will learn how to create a new computer game. By following along and creating your own copies of these games, you will gain practical, hands-on experience programming with Ruby, and you will develop a foundation upon which you can build and move on to developing larger and more complex Ruby projects, such as system and network administration scripts or the development of website applications.
In this chapter’s game project, the Ruby Joke game, you will learn the basic steps involved in writing a Ruby script. When the game is first started, the screen shown in Figure 1.1 displays, prompting the player for permission to begin telling jokes.
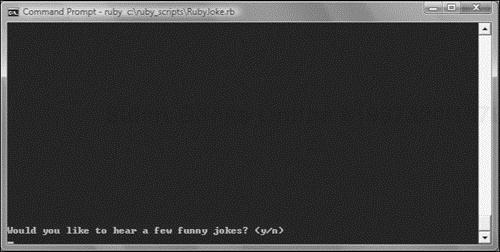
If the player enters a value of n, the game responds by displaying a message that invites the player to return to play another time. However, if the player enters a value of y, the game responds by displaying the first of a series of jokes, as demonstrated in Figure 1.2.

In order to view the first joke’s punch line, the player must press the Enter key, after which the screen shown in Figure 1.3 displays.

To advance to and view successive jokes, the player must continue to press the Enter key. Once the game’s final joke has been told, the screen shown in Figure 1.4 displays, thanking the player for playing the game.

In the previous set of screen prints, you saw what the Ruby Joke game looks like when executed on a computer running Microsoft Windows. Of course, since Ruby is a cross-platform programming language that runs on a number of different operating systems, you can just as easily create and run this game on a different operating system. For example, Figure 1.5 shows an example of how the game would look if it were run on Mac OS X.

Figure 1.5. The Ruby Joke game runs exactly the same regardless of which operating system it is run on.
By the time you have completed the development of the Ruby Joke game, you will have a good understanding of the basic mechanics involved in creating Ruby scripts, and you will be ready to move on and tackle more challenging projects.
Ruby is a modern, object-oriented scripting language created by a Japanese computer scientist named Yukihiro Matsumoto, better known within the Ruby community as Matz. Matz created Ruby to address the shortcomings he found in other programming languages, which he viewed as overly complex and difficult to work with. Instead, as he set out to create what would become Ruby, he did so with the intention of making programming less difficult and fun again.
Matz ultimately named his new programming language Ruby after joking with a friend about the Perl language name. As such, Ruby is the actual name of the scripting language and not just a clever acronym. As a relatively new programming language, Ruby represents lessons learned from many other programming languages. For example, rather than integrating support for object-oriented programming long after the language was originally created, as is being done with Perl, Ruby was created from the ground up with object-oriented programming in mind.
As he worked on creating his new programming language, Matz was heavily influenced by Smalltalk, a pure object-oriented programming language created in the 1970s. Unlike Ruby, Smalltalk programs tended to be cryptic, lacking Ruby’s naturalistic programming style and syntax. Matz also drew heavily on another scripting language, Perl. Unlike Ruby, Perl was not originally designed to support object-oriented programming. In slowly changing to include object-oriented programming and other modern programming features, Perl’s syntax has become cryptic and inconsistent. Other programming languages to which Matz attributed inspiration include Python, C++, Lisp, and ADA.
Hint

Because of their influence on the overall design of Ruby, programmers with previous experience with Perl and Smalltalk, and to a somewhat lesser extent, Python, C++, Lisp, and ADA, should find many similarities between Ruby and these languages, making for a shorter learning curve. Perl programmers in particular will quickly appreciate the many similarities between Perl and Ruby syntax as well as the many Perl-like regular expressions that Ruby provides.
Matz began working on Ruby in February of 1993 and released his first version in December of 1995. It quickly gained notice and popularity in Japan. However, elsewhere few people gave it attention. Ruby 1.0 was released a year later, in December 1996. A big reason for the slow recognition of Ruby in its first few years was the lack of non-Japanese documentation. It was not until the end of 1998 that the ruby-talk mailing list was created that Ruby began to be promoted in English. Later, in 1999, www.ruby-lang.org, shown in Figure 1.6, was set up as the official English-language website for Ruby.

Despite its obvious power and capabilities, Ruby still lacked the notoriety and popularity of other scripting languages like Perl and Python. What Ruby needed, but did not have yet, was a killer application that demonstrated Ruby’s capabilities and got everybody’s attention.
Then, with the introduction of Ruby on Rails, everything changed. Suddenly, programmers all over the world began to take notice of Ruby and recognize its capabilities, both as a general-purpose scripting language and as a web development language.
Hint
Ruby on Rails, sometimes just referred to as Rails, is a web-based application development framework that allows programmers to build website applications using Ruby. It facilitates the development of database-driven applications. Ruby on Rails was first released in 2004 and, like Ruby, it is free. Although coverage of Ruby on Rails is beyond the scope of this book, you will find that the Ruby programming foundation that you build by reading this book will prepare you well, should you decide to later make the jump to Ruby on Rails.
As of the writing of this book, the current stable version of Ruby is version 1.8.6. This version is considered by the Ruby community to be the current general release version of the language. Version 1.9.0 is currently in development and available for download; however, because it is still being developed, it is regarded as an experimental version.
As an interpreted scripting language, Ruby is simple to use. Just open your favorite text or code editor, key in a little Ruby code, and then save your script file and it is ready to execute. If all goes well, your script will do whatever it is supposed to do. If, on the other hand, you made a typo when keying in a script statement or failed to follow Ruby’s syntactical requirements when formulating your script statements, an error will occur when you attempt to run your script.
Ruby can be used to develop complete applications that involve network and database access. Tight integration with the operating systems also provides Ruby with access to a wealth of system resources. Its devotion to object-oriented programming and its extensive set of classes and libraries give it capabilities that rival or surpass most other scripting languages. In this sense, Ruby is quite easy to learn but at the same time difficult to master.
As an interpreted scripting language, Ruby scripts are not converted into executable code until you run them using a Ruby interpreter. An interpreter is an application that converts source code into a format that the operating system can actually execute. This makes Ruby a lot easier to work with than other compiled programming languages, which require you to go through a formal compile process after creating or making a change to your Ruby scripts before you can then run them. Thus if an error occurs in your Ruby script, you can open your script using your editor, find and fix the error, and then save and re-execute your script without a lot of fuss.
As an interpreted scripting language, it is especially easy to create small scripts and get them executing very quickly, perhaps in just a fraction of the time required to create a similar program using a compiled programming language like C++. However, in exchange for this simplicity and ease of use, your Ruby scripts run slower than their compiled counterparts, because each time you run a Ruby script, the script must be reinterpreted before it can execute, whereas a compiled program can begin executing immediately.
Another feature of Ruby that makes it easy to use is its straightforward syntax, which makes learning how to work with the programming language easier to do than is the case with many other programming languages. Ruby is generally regarded as a natural, English-like scripting language. Unlike other programming languages such as Perl and Python, you can often tell exactly what a Ruby statement is doing just by looking at it, even if you are not familiar with the specific commands that make up the statement. For example, consider the following statement.
3.times do print "What's up doc? " end
Without knowing anything yet about programming using Ruby, I’ll bet you can figure out in general terms what this statement will do when executed. Specifically, it will print out the string "What's up doc? " three times in a row.
Another feature of Ruby programming that sets it apart from many other programming languages is its light syntax. Ruby does not force programmers to load up programming statements with brackets and parentheses characters, nor does is require every statement end with a semicolon. Statements tend to be less wordy than other scripting languages. As a result, there is less opportunity for you to make mistakes when writing script code. As an example of Ruby’s simplistic syntax, consider variable declaration. For starters, Ruby does not require you to formally declare a variable prior to its use. This greatly facilitates the development of small one- and two-line scripts.
Despite its simplicities, Ruby is every bit as powerful and complex as any other modern programming language. Many programmers use Ruby to develop scripts that tie together other applications, providing the programmatic glue needed to take disparate applications and get them to work together to be more efficient.
Unlike many other modern scripting languages, which include varying degrees of support for object-oriented programming, Ruby is as close to 100 percent object-oriented as it gets. In Ruby, everything is viewed as an object. Things that describe or characterize an object, such as size or type, are referred to as object properties, which are stored as variables. By accessing the contents of these variables, you can access information about objects. Similarly, by modifying values assigned to object properties, you can make changes that affect the object.
Actions that can be taken against the object or which the object can be directed to perform are stored as part of the object in methods. By creating objects and assigning program code to object methods, you are able to create Ruby scripts whose objects are able to perform any number of actions, such as collecting user input, performing complex mathematical calculations, accessing databases, etc.
Hint
Like many scripting languages, Ruby allows programmers to work with it in a procedural manner, without defining any objects and instead using variables and custom functions to control script execution. However, under the covers, Ruby still enforces an object-oriented programming mode in that all variables and functions are automatically defined as properties and methods belonging to their script’s default main or parent class. As such, Ruby is sometimes referred to as a multi-paradigm programming language.
Unlike many object-oriented programming languages, Ruby implements the principle of object-oriented programming to the nth degree. For example, consider the following statement.
3.times do print "What's up doc? " end
Unlike most object-oriented programming languages, Ruby treats numbers (as well as other primitive data types) as objects. As objects, numbers are associated with specific collections of properties and methods. In the preceding statement, the times method is executed. times is just one of many methods that belong to Ruby’s integer class. To use it you must first specify an integer followed by a dot (.) character and the method name.
Hint
The syntax used to specify the integer class’s times method shown above is referred to as dot notation. Dot notation is also used when specifying object properties.
Hint
A class is a definition or template used to define the properties and methods that represent objects.
Using Ruby, programmers can create scripts that can automate any number of tasks. You can develop Ruby scripts that automate complex processes, thus eliminating the possibility of human error. Alternatively, Ruby scripts can be used to automate repetitive tasks, freeing you up to perform other tasks. In truth, Ruby can be used to perform just about any task you can think of. Today, programmers all around the world are using Ruby to develop scripts to perform tasks that include:
Processing Text Files. Ruby has built-in classes that support file administration and provide the ability to parse file and string contents using regular expressions.
Network Programming. Ruby supports the development of sockets-based applications capable of performing a range of networking tasks.
Application Prototyping. Ruby can be used to quickly develop scripts that demonstrate a proof of concept before creating a final version of an application using a more complicated programming language such as C++.
System Administration. Ruby can be used to automate the execution of complex tasks and repetitive system administration tasks, freeing up system administrators to perform other work.
Web Development. In addition to using the Ruby on Rails framework, programmers can also use Ruby to support traditional CGI programming.
As you know, Ruby can run directly on Microsoft Windows, Mac OS X, and multiple versions of UNIX and Linux, as well as many other types of operating systems. Using the Ruby on Rails framework, Ruby also facilitates the development and execution of web applications. In addition, Ruby also runs within different virtual machine environments.
One such virtual machine environment is JRuby, which is a Java-based Ruby environment developed by Sun Microsystems. Using JRuby, programmers can develop Ruby scripts that can run on any Java-supported platform, including the Internet. Another virtual machine being developed for Ruby is Microsoft’s IronRuby. IronRuby will support the development and execution of Ruby scripts that can interact with the Microsoft .NET Framework. Although not available as of the writing of this book, IronRuby promises to make available to Ruby programmers all of the resources currently available to other .NET-enabled programming languages.
Hint
The .NET Framework is a Microsoft-developed framework that supports the development of desktop, network, and Internet-based applications and scripts.
In addition to JRuby and IronRuby, another Ruby-based virtual machine is currently in the works. This virtual machine evolved out of the YARV project. YARV, which stands for Yet Another Ruby VM, is designed to replace the current Ruby interpreter and has been designed to address one specific area of concern, speed. Compared with other scripting languages like Perl and Python, Ruby scripts generally run slower than Perl and Python scripts. Among other goals, the YARV virtual machine is designed to remedy this situation. It has been reported that under different benchmark tests, Ruby scripts processed by YARV have run between 2 and 10 times faster. YARV is currently being integrated into Ruby and will serve as the Ruby interpreter when version 1.9.1 is released, making it Ruby’s official interpreter.
By default, you will not find Ruby installed on a new computer running any version of Microsoft Windows. However, if you are running Mac OS X, version 10.3 or higher, Ruby should already be installed. If you are running one of the many versions of UNIX or Linux operating systems available today, there is a pretty good chance that Ruby may already be installed on your computer.
If Ruby is not installed on your computer, then you will need to download and install it, as explained in the sections that follow. If you are running a version of Ruby older than Ruby 1.8.2, you’ll need to upgrade to a new version, which you can do by simply installing a new version of the language.
As of the writing of this book, the current version of Ruby is 1.8.6. Any example Ruby scripts that you see in this book were developed and tested using this version of Ruby. However, they should all work just fine on any version of Ruby, from Ruby 1.8.2 on.
Depending on your operating system, there are a number of ways to check and see if Ruby is installed on your computer. The following sections outline a number of these options.
If you are running Microsoft Windows, the easiest way to see if Ruby is installed is to look for the Ruby program group by clicking on Start and then All Programs and looking for a program group named something like Ruby-186-25. If it is there, click on the group to open it and look for an executable file named fxri–interactive Ruby Help & Console. If it’s there, then Ruby is installed on your computer and should be ready for use.
Another way to determine if Ruby is installed on your computer and to ascertain its version number, if it is installed, is to click on Start > All Programs > Accessories > Command Prompt. This will display a Windows Console and provide you with access to the Windows command prompt. Type the following command at the Windows command prompt and press Enter.
ruby –v
If Ruby is installed, you should see output similar to that shown in Figure 1.7.

Unless it has been removed, Ruby should already be installed on any computer running Mac OS X 10.3 or later. To determine if Ruby is installed on a Mac computer, you need to open the Terminal application. To find the Terminal application, open your computer’s startup disk and then find and open the Applications folder. Scroll to the bottom of the Applications folder and find and open the Utilities folder. Inside this folder you will find the Terminal application.
Hint
Ruby programmers who develop scripts for Mac OS X will need to work with the Terminal application a lot. You may want to drag and drop the Terminal application icon onto the dock to have it nearby.
To start the Terminal application, just double-click on its icon. Once started, the terminal application will display a UNIX shell command prompt (Mac OS X is a UNIX-based operating system). To find out if Ruby is installed, type the following command at the command prompt and press Enter.
ruby –v
If Ruby is installed, a message will display indicating the version number. Assuming that the preceding command worked without any issues, type the following command.
irb
Hint
irb stands for interactive Ruby. irb is used to interactively submit Ruby statements for processing and is commonly used by Ruby programmers as a means of tinkering with Ruby and testing different language features to see how they work. You will learn more about the irb later in this chapter.
This command starts a new interactive Ruby session. As a result, you should see the irb command prompt displayed as demonstrated here:
irb
irb(main):001:0>
If everything worked as described, Ruby is installed and ready for use on your computer.
Ruby is often automatically installed as part of many UNIX and Linux operating systems. To determine if Ruby is installed on a UNIX or Linux computer, you need to start a new command shell session using whatever terminal shell program has been supplied with your operating system. Once at the command prompt, type the following command.
irb
This command starts a new interactive Ruby session. As a result, you should see the irb command prompt displayed, as demonstrated here:
irb
irb(main):001:0>
If everything worked as described, Ruby is installed and ready for use on your computer.
When you install Ruby, the Ruby interpreter is installed. You also get a collection of Ruby libraries that support the execution of Ruby on the particular platform on which it has been installed.
Depending on which operating system you are using, there are a number of different options available to you for installing Ruby. When available, the easiest option is to install an already packaged copy of Ruby. In the absence of a pre-built installation package, you can always download the appropriate Ruby source code and perform a manual installation.
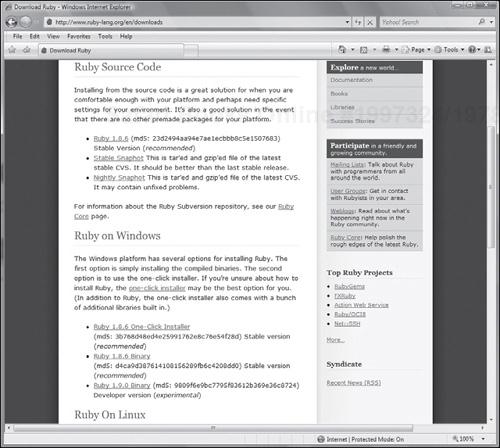
By default, Microsoft Windows does not come with Ruby installed. So, unless someone else has already installed it on the computer you are using, you will need to install it yourself. The easiest way to install a new copy of Ruby is to download the one-click installer package made available at http://www.ruby-lang.org/en/downloads/. To install it, you must first download a copy of the installation package to your desktop, which you can do by clicking on the One-Click Installer link located on the Ruby on Windows section of the web page, as shown in Figure 1.8, and then saving the file to your desktop when prompted.
Once the download is complete, you can install Ruby on your computer by executing the steps outlined in the following procedure.
Double-click on the installer program.
If Microsoft Windows displays a popup window with a security message, click on the Run button to allow the installation process to continue.
When prompted by the install program, click on Next to begin the install process.
Continue to click on Next when prompted to perform a standard installation of Ruby.
Once installation is complete, you will be prompted to click on Next one last time and then on the Finish button. At this point Ruby’s installation is complete.
Hint
You can also use the preceding procedure to install a newer version of Ruby on your Windows computer.
Now that Ruby is installed, click on Start and then on All Programs. You should see a new program group named Ruby-XXX-XX (where XXX-XX identifies the specific version of Ruby that has been installed). Within this group you will find a number of items, including:
fxri - Interactive Ruby Help & Console. An interactive graphical application that provides access to Ruby help files and Ruby’s interactive environment.
SciTE. A general code editor that can be used to create Ruby scripts.
Uninstall Ruby-XXX-XX. An uninstall program for removing Ruby from your computer.
Ruby Documentation. Contains links to online web pages and to Ruby’s help files.
RubyGems. A package manager that provides a standard format for distributing Ruby scripts.
By default, Ruby comes preinstalled on all versions of Mac OS X starting with version 10.3. As such, unless it has been removed or you want to install a more current version of Ruby, you can simply begin working with it. If you visit http://www.ruby-lang.org/en/downloads, you will find several links in the Ruby on OS X section of the web page. Each of these links provides you with a different option for installing Ruby on Mac OS X. The names of these links and their respective URLs are listed here:
Locomotive—. http://locomotive.raaum.org/
MacPorts—. http://www.macports.org/
Fink—. http://www.finkproject.org/
You will find instructions for working with each of these installation options available on their respective websites.
Many UNIX and Linux systems come with Ruby preinstalled. If this is not the case, the best approach is to see if your particular version of UNIX or Linux includes a package management utility that provides you with the ability to install Ruby by selecting it from a list of available applications.
Of course, you can always elect to install Ruby manually. To do so, go to http://www.ruby-lang.org/en/downloads/ and click on the Ruby X.X.X link located in the Ruby Source Code section of the web page and then click on Save when prompted to download the installation files to your computer. This downloads a compressed tar.gz file containing Ruby’s installation files. This file is named ruby-X.X.X.tar.gz, where X.X.X represents the current stable versions of Ruby. For example, as of the wiring of this book the current version of Ruby is 1.8.6; therefore, the tar fail would be named ruby-1.8.6.tar.gz.
Using the contents of the tar.gz file, you can install Ruby on your UNIX or Linux system using the following steps, which you will need to perform while logged on with root access.
Start up a new shell session and navigate to the folder where you saved the tar.gz file.
Uncompress the file by typing tar xzvf ruby-x-x-x.tar.gz and pressing Enter.
From the command line, open the folder created during the decompress process.
Type ./configure and press Enter. This will generate a makefile file and config.h file for Ruby.
Compile Ruby by typing run and pressing Enter.
Type make install and press Enter.
There are a couple different ways of working interactively with Ruby. For starters, you can interact with Ruby from the operating system’s command prompt, starting a temporary Ruby session to which you can submit individual Ruby statements for processing. Alternatively, you can start irb to set up an ongoing interactive Ruby session. The irb is a Ruby shell. The Ruby shell is an interface that facilitates interaction between you and Ruby, allowing you to interact with Ruby and execute as many statements as you want.
One way to interact with Ruby is from the operating system command prompt. This option permits you to enter single line Ruby statements and execute them immediately.
Hint
To access the command prompt on Mac OS X, open the Terminal application. To access the command prompt on UNIX or Linux, you must start a new shell session using whatever command console application has been supplied with your operating system. To access the command prompt on Microsoft Windows, click Start > All Programs > Accessories > Command Prompt.
Working with Ruby from the command prompt is relatively straightforward. For starters, you need to type the command ruby and press Enter. This starts up a new working session with Ruby, allowing you to enter any valid Ruby statement that you would like for Ruby to execute. Once you have finished typing in your statement, you need to inform Ruby that you are done. This is accomplished by pressing Control+D and subsequently pressing Enter. Once this is done, Ruby will execute the statement that you entered.
To see how all this works, consider the pair of examples shown next. In the example on the left, a Ruby session is started at the Microsoft Windows command prompt and then the statement puts "Hello World!" is keyed in after which the end of file character (Control+D) is executed. In response, Ruby displays the text string Hello World! on the console window. At this point the Ruby session is closed and the Windows command prompt is redisplayed.
Microsoft Windows        UnixLinux
C:> ruby                 $ ruby
puts "Hello World!"      puts "Hello World!"
^d                       ^d
Hello World!             Hello World!
C:>                      $
Similarly, the example on the right shows the execution of the exact same process of this example on a computer running UNIX or Linux.
To start the irb, type irb at the operating system command prompt and press Enter. The irb is available on Windows, Mac OS X, UNIX, and Linux. When you start the irb, an irb shell is opened. This shell provides a number of helpful features. For starters, the shell maintains a history of all commands that are entered during the current working session. This allows you to use the up and down arrows to move backward and forward in this history, retrieving and re-executing previous commands without having to type them again.
Hint
You can also access the irb on Microsoft Windows through the fxri application, which is discussed in the next section.
Using the irb you can type in small code snippets, press the Enter key, and get immediate feedback on the results. When started, the irb command prompt displays, as shown here:
irb(main):001:0>
As you can see, the irb command prompt consists of several parts, each of which is separated by a colon, as outlined here:
(main). The word listed inside the parentheses identifies the current class object (in this case it’s the main object).
001. This three-digit number represents a history showing the number of commands that have been entered for the current working session. A value of 001 indicates that that irb is waiting for the first command to be entered.
0. The last number that makes up the irb command prompt represents the current queue depth when working with a class. (You’ll learn what this means in Chapter 2, “Interacting with Ruby.”)
>. Identifies the end of the command prompt.
To see an example of how to start and interact with the irb, look at the following example.
C:>irb
irb(main):001:0> "Hello World!"
=> "Hello World!"
irb(main):002:0>
Here, a new irb session has been started by entering irb at the command prompt. Next, a text string of "Hello World!" has been entered and then the Enter key pressed. In response, Ruby displays a line that reports on the result of the last expression that was executed. Finally, another irb command prompt is displayed, indicating that Ruby is now ready for another command.
Hint
You can stop the current irb session at any time and return to the operating system’s command prompt by typing the word exit at the irb command prompt and pressing the Enter key.
Before moving on, let’s look at another example of how to work with the irb.
irb(main):002:0> puts "Hello World!"
Hello World!
=> nil
irb(main):003:0>
This time the puts command, which displays a line of text on the console, is used. The line of text to be displayed is passed to the puts command as an argument. The irb responds by displaying Hello World!. Next, the irb displays a value of nil, indicating the result of the last expression that it processed.
Hint
nil is a Ruby value that indicates a value of nothing. Unlike most Ruby commands, the puts command always returns a value of nil.
As a new Ruby programmer, you are going to want to spend a lot of time working with the irb prompt to experiment with various language elements. You’ll learn more about how to work with the irb in Chapter 2.
Although you can use irb when working on a computer using Microsoft Windows, a second option known as fxri - Interactive Ruby Help and Console is also available to Windows users. fxri is a graphical interface that consists of three parts, as shown in Figure 1.9. On the left-hand side of the window is a list of language elements from which you can select to learn about them. The top-right portion of the window displays syntactical information about the selected item.

Figure 1.9. In addition to providing access to help information, fxri also provides access to the irb.
The lower-right side of the window provides access to the irb command prompt, which you can work with exactly as if you have accessed the irb via the Windows command prompt.
While working with Ruby, using the command prompt or irb has certain advantages; to really take advantage of the programming language, you must of course learn how to create and execute Ruby scripts. By creating Ruby script files, you can develop programs that can be executed over and over again. Ruby script files have the suffix .rb.
To create and save Ruby script files, you need access to a good text or script editor. If you are working on Microsoft Windows, you can use the Notepad text editor to create your scripts files. Alternatively, you can use the SciTE editor that is installed along with Ruby on Windows. SciTE is a generic code editor, designed to facilitate the development of scripts for a number of different programming languages.
Mac OS X users can use the TextEdit application to create and save Ruby scripts. Alternatively, Mac users can download and install any of a number of third-party editors like TextMate (http://www.macromates.com) or Komodo IDE (http://www.activestate.com). Komondo IDE also runs on Windows and Linux.
Trap

In order to work correctly, Ruby scripts must be saved as plain text files. However, the Mac OS X TextEdit application is much more than a simple text editor, providing a number of advanced word processing features. To use it to save a Ruby script, you can enable the Make Plain Text option located under TextEdit’s Format menu before saving your script file. Alternatively, you can change TextEdit’s default file settings so that it automatically saves all files as plain text files by clicking on the TextEdit menu, selecting Preferences, and then selecting the Plain text radio button on the Preferences window.
Linux and UNIX programmers can always use the vi editor to create and save Ruby scripts. However, unless you already have experience with vi and have a personal affinity for it, odds are you are going to want to look for an alternative. One alternative is KATE (KDE Advanced Text Editor). KATE is a free text editor available at http://kate-editor.org/.
If you are going to be developing Ruby scripts for execution on more than one type of operating system, then you might want to look into FreeRIDE, which you can download at http://rubyforge.org/projects/freeride/. FreeRIDE, shown in Figure 1.10, is a Ruby-specific code editor that you can download for free. FreeRIDE supports a number of advanced features, including statement color-coding and the ability to execute Ruby scripts without having to leave the editor and switch over to the command prompt. To learn more about FreeRIDE, check out http://freeride.rubyforge.org/wiki/wiki.pl.

The process involved in creating a Ruby script is really not very different from that of creating a text file or spreadsheet. For starters, you must open your preferred text or code editor and create a new file. You are then ready to enter the code statements that will make up your Ruby script. Ruby scripts may be many hundreds of lines long or they may consist of a single statement.
For now, let’s keep things simple by creating a Ruby script comprised of the following individual code statement.
puts "Hello World!"
This statement uses the puts command to display a text string. Now, save this file with a filename of HelloWorld.rb.
That’s all there is to it. Your new Ruby script is ready for execution as explained in the next section.
Once your new Ruby script has been saved, you can run it from the command prompt. So, to run it on Microsoft Windows, click on Start > All Programs > Accessories > Command Prompt. This will open a Windows console, providing access to the command prompt. Once at the command prompt, navigate to the folder where you stored your new Ruby script file and type in the following command.
ruby HelloWorld.rb
As you can see, the command that you are executing passes the name of the script to be run as an argument to the ruby command. Alternatively, you could execute the Ruby script by specifying its complete name and path. For example, the following command could be used to run the HelloWorld.rb script if it were stored in a folder named Ruby_Scripts located off of the root of the startup drive on a Windows computer.
ruby c:Ruby_ScriptsHelloWorld.rb
Note that on Microsoft Windows, the .rb file extension is automatically registered with the operating system when Ruby is installed. As such, you can run your Ruby scripts from the Windows desktop by double-clicking on them and Windows will recognize the file as a Ruby script and run it automatically.
Ruby scripts on Mac OS X, UNIX, and Linux are run from the command prompt. As with Microsoft Windows, you can run them by specifying the ruby command followed by the name and path of the script, as demonstrated here:
ruby/Ruby_Scripts/HelloWorld.rb
Here a script named HelloWorld.rb, which is stored in the Ruby_Scripts folder, is executed. As an alternative to running your Ruby scripts this way on UNIX or Linux, you can include the following command as the first statement in your Ruby scripts.
#!/usr/local/bin/ruby –w
On Mac OS X, you’d rewrite this statement as shown here:
#!/usr/bin/ruby –w
These commands tell the operating system where to look to find Ruby and to use it to execute the contents of the script file. Note that if the default location of Ruby was changed during its installation, you will need to alter these commands accordingly. In addition to adding one of the above commands to your Ruby scripts, you must also mark your Ruby script file as being an executable file. This is accomplished using the chmod command, as demonstrated here:
chmod +x HelloWorld.rb
Once you have completed both of the preceding steps, you can then execute your Ruby script by navigating to the directory where it is stored and then entering the following command at the command prompt.
% ./HelloWorld.rb
Hint
In the preceding statement, the . character was used to instruct the operating system to look in the current working directory for a file named HelloWorld.rb.
Trick
If you elect to use FreeRIDE as your code editor when creating your Ruby scripts, you can configure the editor to initiate the execution of your scripts from directly within the editor by clicking on the Edit menu and then selecting Preferences. This opens the FreeRIDE Configuration window. Next, select the Debugger/Run item located in the navigation pane. This displays a list of Debugger/Run Settings. Enable the Run Process in Terminal option located at the bottom of the window and click on the OK button. Once you have completed the above steps, all you have to do to run your script while still within FreeRIDE is click on the Run button located on the FreeRIDE toolbar.
All right, that’s enough background information on Ruby programming for now. It is time to turn your attention back to this chapter’s game project, the Ruby Joke game. As you follow the steps required to create and execute this game, try not to get too hung up on the program code that you’ll be asked to enter. For now, you should focus on the overall steps involved in creating and executing Ruby scripts and wait to learn the ins and outs of Ruby programming in later chapters.
The development of the Ruby Joke game will follow a specific series of steps as outlined next. As you advance from step to step, be sure to follow along carefully. Do not skip any steps and make sure that you precisely follow the instructions provided in each step. This applies doubly when keying in the script’s code statements. This will help you to avoid errors and will make things go a lot smoother.
Open your text or script editor and create a new file.
Add comment statements to the beginning of the script file to document the script and its purpose.
Define classes used in the script to instantiate objects.
Instantiate new objects used in the script.
Add the code statements that prompt the player for permission to continue.
Add the code statements that outline the script’s high-level conditional logic.
Call upon the code statements that clear the display area.
Add the code statements that tell the game’s first joke.
Add the code statements that tell the rest of the game’s jokes.
Add the code statements that thank the player for playing.
Each of these steps is covered in detail in the sections that follow.
The first step in creating the Ruby Joke game is to open your text or code editor and create a new file. Once created, save your file with a name of RubyJoke.rb. If you have created a folder to store all of your Ruby scripts, make sure that you store your new game script there.
Okay, now you are ready to begin adding the code statements that will make up your script file. Let’s begin by adding the following statements to the beginning of the script file. These statements are comments, which provide a little information about the script and its purpose.
#--------------------------------------------------------------------------
#
# Script Name: RubyJoke.rb
# Version: 1.0
# Author: Jerry Lee Ford, Jr.
# Date: October 2007
#
# Description: This Ruby script tells a series of 5 humorous jokes
#
#--------------------------------------------------------------------------
Hint
A comment is a line of text that is preceded by the # character. Comments are ignored by the Ruby interpreter and have no effect on the execution of the script. Adding comments to Ruby scripts helps to make them easier to understand and maintain and is considered a good programming practice. As such, you can expect to find comments included in all of this book’s game scripts.
Now that your script file’s opening documentation has been added, it’s time to get busy writing the code statements that will make your new script do something. Begin by adding the following statements to the end of the script file.
class Screen
  def cls  #Define a method that clears the display area
    puts ("
" * 25)  #Scroll the screen 25 times
  end
end
Without getting into things too deeply at this point in the book, what these statements do is define a class named Screen that represents the console window in which the game will execute. Within the class definition, a method name cls is defined that when executed will write 25 blank links to the console window, thus clearing the display to make it ready to display new text.
The Screen class defined in the preceding step is only a template. Using it, the first statement shown next creates or instantiates a new object based on that class. The new object is assigned a name of Console_Screen. The second statement shown next executes the Screen class’s cls method to clear out the display area.
Console_Screen = Screen.new
Console_Screen.cls
Add these two statements to the end of your script file.
Hint
Remember, you have not learned anything about Ruby syntax or how to formulate Ruby statements yet, so do not be discouraged if the programming statements you are typing seem a little confusing. This understanding will be developed in later chapters. For now, focus your attention on the overall process you are going through to create your first Ruby script game.
Before telling the game’s first joke, the game prompts the player for permission to continue. This is accomplished by adding the following statements to the end of the script file.
puts "Would you like to hear a few funny jokes? (y/n) "
answer = STDIN.gets
answer.chop!
The first statement displays a text message asking for permission to tell some jokes, instructing the player to respond by typing either a y or n, representing answers of yes or no. The next two statements collect and format the input provided by the player.
Once the player’s input has been collected, it must be analyzed. If the player entered a value of n, the game should invite the player to return and play again later. If, on the other hand, the player enters a value of y, the game should start telling its jokes. In order to set up a high-level structure for managing this overall process, add the following statements to the end of your script file.
if answer == "n"

else

end
In the next several steps, you will be asked to return and key in script statements into this block of code.
The next two statements are responsible for inviting the player to return and play the game again another time. They should be executed in the event the player entered a value of n when prompted to play the game. Therefore, you will need to embed these statements into the preceding code block, between the first and second statements.
Console_Screen.cls
puts "Sorry to hear that. Please return and play again soon."
When executed, these two statements will call on the Screen class’s cls method to clear the screen and then display a text message, encouraging the player to return and play again another time.
Now it is time to tell the game’s first joke. This is accomplished by embedding the following statements between the second and third statements in the previously defined code block (e.g., after the else keyword and before the end keyword).
Console_Screen.cls

puts "What is black and white and red all over? (Press Enter) "
pause = STDIN.gets

puts "A messy penguin eating cherry pie! (Press Enter) "
pause = STDIN.gets
These statements are responsible for clearing the display area, and then displaying the first joke’s opening line. The script is then paused to give the player the chance to read the setup line. The script resumes execution as soon as the player presses the Enter key, at which time the joke’s punch line is displayed, and the script is halted again to give the player the chance to read it. Game play resumes again when the player presses the Enter key.
Now it is time to tell the rest of the script’s jokes. This is accomplished by embedding the following statement between the second and third statements in the previously defined code block, just after the statements that are responsible for telling the game’s first joke.
Console_Screen.cls

puts "What is black and white and red all over? (Press Enter) "
pause = STDIN.gets

puts "A sunburned penguin! (Press Enter) "
pause = STDIN.gets

Console_Screen.cls

puts "What is black and white and red all over? (Press Enter) "
pause = STDIN.gets

puts "An embarrassed Dalmatian puppy!! (Press Enter) "
pause = STDIN.gets

Console_Screen.cls

puts "What is black and white and red all over? (Press Enter) "
pause = STDIN.gets
puts "A zebra with a scratched knee! (Press Enter) "
pause = STDIN.gets

Console_Screen.cls

puts "What is black and white and red all over? (Press Enter) "
pause = STDIN.gets

puts "A skunk with diaper rash! (Press Enter) "
pause = STDIN.gets
In total, there are four additional jokes included in this group of code statements. If you look closely, you will see that the statements that tell each joke are nearly identical to the statements that tell the game’s first joke, the only difference being that the text strings representing each joke’s text have been rewritten to tell a different joke.
You are almost done. All that remains at this point is to clear the screen one last time and thank the player for taking the time to play the game. This is accomplished by adding the following statement to the very end of the script file.
Console_Screen.cls

puts "Thanks for playing the Ruby Joke game!"
Well, that’s it. Go ahead and save your Ruby script. At this point you have everything you need to build the Ruby Joke game. Because the development of this game involved numerous steps, there is plenty of opportunity to get confused and make mistakes when typing in the required script statements. To help clarify things a bit and to help ensure that your copy of the Ruby script is properly written, I’ve provided a copy of the fully assembled game below. In addition, I have also added a number of additional comment statements to the script file for the purpose of further documenting everything that is going on at different points within the script file.
#--------------------------------------------------------------------------
#
# Script Name: RubyJoke.rb
# Version: 1.0
# Author: Jerry Lee Ford, Jr.
# Date: October 2007
#
# Description: This Ruby script tells a series of 5 humorous jokes
#
#--------------------------------------------------------------------------


# Define custom classes ---------------------------------------------------


class Screen
  def cls
    puts ("
" * 25)
  end
end


# Main Script Logic -------------------------------------------------------

Console_Screen = Screen.new  #Initialize a new Screen object

#Execute the Screen object's cls method to clear the screen
Console_Screen.cls

#Prompt the player for permission to begin the game
puts "Would you like to hear a few funny jokes? (y/n) "

#Collect the player's response
answer = STDIN.gets

#Remove any extra characters appended to the string
answer.chop!

#Analyze the player's response
if answer == "n"  #See if the player elected not to play

  Console_Screen.cls  #Clear the display area

  #Invite the player to return and play again
  puts "Sorry to hear that. Please return and play again soon."

else

  Console_Screen.cls  #Clear the display area

  #Display the beginning of the first joke
  puts "What is black and white and red all over? (Press Enter) "
  pause = STDIN.gets  #Force the player to press Enter to continue

  #Display the punch line
  puts "A messy penguin eating cherry pie! (Press Enter) "


  pause = STDIN.gets  #Force the player to press Enter to continue


  Console_Screen.cls  #Clear the display area

  #Display the beginning of the second joke
  puts "What is black and white and red all over? (Press Enter) "

  pause = STDIN.gets  #Force the player to press Enter to continue

  #Display the punch line
  puts "A sunburned penguin! (Press Enter) "


  pause = STDIN.gets  #Force the player to press Enter to continue


  Console_Screen.cls  #Clear the display area

  #Display the beginning of the third joke
  puts "What is black and white and red all over? (Press Enter) "

  pause = STDIN.gets  #Force the player to press Enter to continue

  #Display the punch line
  puts "An embarrassed Dalmatian puppy! (Press Enter) "


  pause = STDIN.gets  #Force the player to press Enter to continue


  Console_Screen.cls  #Clear the display area

  #Display the beginning of the fourth joke
  puts "What is black and white and red all over? (Press Enter) "

  pause = STDIN.gets  #Force the player to press Enter to continue

  #Display the punch line
  puts "A zebra with a scratched knee! (Press Enter) "


  pause = STDIN.gets  #Force the player to press Enter to continue


  Console_Screen.cls  #Clear the display area

  #Display the beginning of the fifth joke
  puts "What is black and white and red all over? (Press Enter) "

  pause = STDIN.gets  #Force the player to press Enter to continue

  #Display the punch line
  puts "A skunk with diaper rash! (Press Enter) "


  pause = STDIN.gets  #Force the player to press Enter to continue


  Console_Screen.cls  #Clear the display area

  puts "Thanks for playing the Ruby Joke game!"


end
Assuming that you have finished keying in and saving your copy of the Ruby Joke game, all that remains is to run it and see what happens. To do so, access the operating system command prompt and navigate to the folder where you saved your Ruby script. Now, enter the following command and press the Enter key.
ruby RubyJoke.rb
Assuming that you followed along carefully and did not make any typing mistakes, the game should run exactly as described at the beginning of the chapter. If, however, you made a typo somewhere along the way, you’ll get an error message when you try to run your script. If this happens, review the error message carefully and see if it provides you with any clue as to what when wrong. If you are unable to figure out what went wrong based on the text of the error message, go back and review your script file and look for mistyped or missing scripts statements. Once you think that you have identified and corrected all your typing errors, try running your Ruby script again.
In this chapter, you learned a little about Ruby’s history and its influences. You also learned about many of the things that make Ruby a popular scripting language, including its object-oriented designed and support for cross-platform development on operating systems like Microsoft Windows, Mac OS X, UNIX, and Linux. This chapter provided you with instruction for installing Ruby on different operating systems and explained how to verify Ruby’s operation. In addition, you learned how to create and execute Ruby scripts and created your first Ruby script, the Ruby Joke game.
Now, before you move on to Chapter 2, I suggest you take a few extra minutes to see if you can improve the Ruby Joke game by implementing the following list of challenges.