As has already been demonstrated in each of the game scripts that you have worked on in this book, it is virtually impossible to create Ruby scripts of any level of complexity without performing some degree of conditional analysis. This analysis might involve examining things like player input or the value of a randomly generated number. To perform this analysis, Ruby provides you with access to a number of conditional expressions, modifiers, and logical operators that you can use to compare different values and control the logical execution of different script statements. This will allow you to create Ruby scripts that are capable of altering their execution based on the data that they are presented with and will result in scripts that are adaptive and handle many different types of situations. In addition to showing you how to apply conditional logic within your Ruby scripts, this chapter will show you how to create your next computer game, the Ruby Typing Challenge game.
Specifically, you will learn how to:
Work with
ifexpressions and modifiersWork with
unlessexpressions and modifiersUse the
caseblock to compare one condition against a range of valuesUse different logical operators to perform different types of comparisons
Use the ternary operator to perform conditional analysis
In this chapter, you will learn how to create a new computer game called the Ruby Typing Challenge game. This Ruby script will demonstrate how to apply conditional logic to analyze user input through the development of a computer typing test that evaluates the player’s typing skills.
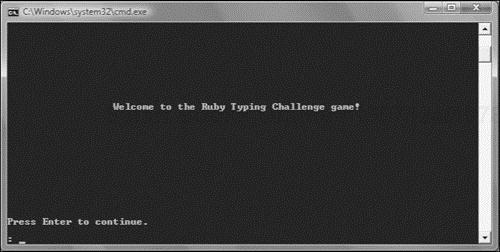
The Ruby Typing Challenge game begins displaying a welcome screen as shown in Figure 4.1.
Next, the game prompts the player for permission to begin the test as demonstrated in Figure 4.2. The player is instructed to respond with a y/n answer.

If the player decides not to take the typing test, the screen shown in Figure 4.3 displays and the game will end once the player presses the Enter key.

If, on the other hand, the player elects to take the typing test, the instructions shown in Figure 4.4 display.

Figure 4.4. Instructions provide the player with information needed to understand how to take the test.
Next, the first of a series of five sentences is presented as demonstrated in Figure 4.5. In response, the player must type the sentence exactly as shown and then press the Enter key.

As soon as the player presses the Enter key, the game analyzes the player’s input to determine whether it exactly matches the game’s sentence. If the player’s input is identical to the game’s sentence, the screen shown in Figure 4.6 displays. If the player makes one or more typing mistakes, a different message displays notifying the player that she has failed to correctly type the sentence.

The game’s sentences grow longer as the test progresses. Once the player has typed in all five sentences, the game analyzes the player’s score and displays a message indicating whether or not the player has passed the test as demonstrated in Figure 4.7.

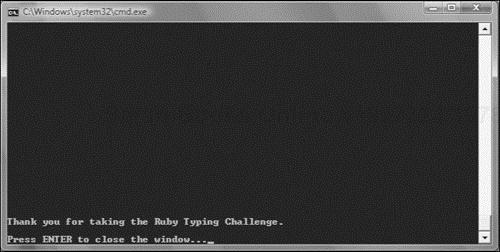
Once the player presses the Enter key, the screen showing the score is dismissed. Finally, a message displays thanking the player for taking the time to take the typing test as shown in Figure 4.8.
Using Ruby, you can create scripts that consist of a series of statements that are executed in sequential order, one after the other, without any alteration in the logical flow of the scripts. However, while this approach may work well with small scripts that perform simple tasks, scripts that process sequentially are not well suited to tasks that involve any level of complexity. For example, as you have already seen in all the game scripts that you have worked on in this book, some level of conditional execution is almost always required. This execution might involve prompting the player for permission to play a game and then either ending or continuing the game based on an analysis of the player’s response.
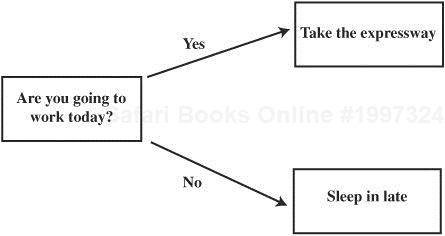
People use conditional logic all the time. Therefore, from a programming standpoint, it is a relatively easy concept to understand. For example, every morning people around the globe awake and must make a decision as to whether or not to go to work. Based on that decision, different courses of action must be taken. For example, take a look at Figure 4.9, which visually outlines the conditional logic involved in selecting from two alternatives.
This same basic logic can easily be applied to the development of a computer program or script. For example, take a look at Figure 4.10.
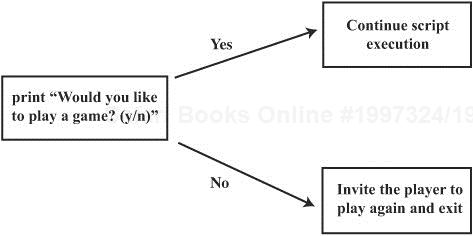
Figure 4.10. A graphical representation of the conditional logic used to determine whether or not to start game play.
Hint

Figures 4.9 and 4.10 are both examples of simple flowcharts. A flowchart is a tool used to graphically represent some or all of a script’s logical flow. Flowcharts are often created by programmers to outline the overall design of the logic involved in designing a computer program or script prior to beginning work on it. By first creating a flowchart, programmers provide themselves with a high-level outline of the overall logic involved. This gives programmers the ability to focus on the overall process required to create the program and helps to identify logical errors in the program’s design before investing time in program development and testing.
Flowcharts are often used in large projects involving the combined efforts of many programmers. Once created, flowcharts can be used to identify different parts of a program or project, making the division of work easier while also helping to ensure that each programmer has a good understanding of how the part of the program or project he is assigned fits into the overall scheme of things.
As you can see, Figure 4.10 outlines two separate and distinct courses of action, of which only one will be followed, based on the user’s response as to whether or not to begin game play. The logic outlined in the flowchart can be directly translated into script statements, as demonstrated here:
puts "Would you like to play a game? (y/n) "
answer = STDIN.gets
answer.chop!

if answer == "n"
  puts "Sorry to hear that. Please return and play again soon."
else
  puts "OK, let's play!"
  .
  .
  .
end
Here, the puts method is executed and passed a text string that is used to display a message that prompts the player to respond with a value of y or n to indicate whether to continue game play. The player indicates her decision by keying in the appropriate response and pressing the Enter key.
The key point to understand regarding the application of conditional programming logic is that when it comes right down to it, all that is happening is an evaluation of whether a tested condition is true or false. Based on the result of the analysis, the appropriate set of program statements is then executed.
Ruby provides programmers with access to several ways of applying conditional logic, each of which is designed to address a specific type of situation. A list of available options for applying conditional logic is outlined here.
The
ifmodifier. A conditional evaluation appended to the end of Ruby statements to conditionally control the execution of the statement.The
unlessmodifier. A conditional evaluation appended to the end of Ruby statements that performs the opposite type of evaluation as theifmodifier.The
ifexpression. Used to create complex conditional evaluations spread out over multiple lines.The
unlessexpression. Used to create complex conditional evaluations spread out over multiple lines that perform the opposite type of evaluation as anifexpression.Case. A conditional evaluation that performs a series of conditional tests, each of which is compared to a single value.The Ternary Operator. An operator that facilitates the inclusion of a conditional expression within another statement.
Up to this point in the book, all the comparison operations that have been demonstrated have used the == comparison operator. Like other modern programming languages, Ruby provides programmers with access to a range of comparison operators. For example, instead of setting up a comparison test that evaluates whether one value is equal to another, you might want to know whether one value is greater than or less than another value. This type of analysis uses comparison operators. Table 4.1 provides a list of the comparison operators supported by Ruby.
Table 4.1. Ruby Comparison Operators
Operator | Description |
|---|---|
| Equal |
| Not equal |
| Less than |
| Less than or equal to |
| Greater than |
| Greater than or equal to |
The rest of this chapter will provide you with examples of how to work with the comparison operators shown in Table 4.1.
One quick and easy way that Ruby allows you to integrate conditional logic into your Ruby scripts is through the use of conditional logic modifiers. Using Ruby’s modifiers, you can append a conditional check onto the end of other Ruby statements to control the conditional execution of the statement.
Using the if modifier, you can attach a conditional test to the end of a Ruby statement to control the execution of that statement. This conditional test consists of the if keyword followed by an expression formulated using a comparison operator as demonstrated in the following example.
print "Enter your age and press Enter:  "
answer = STDIN.gets
answer.chop!

puts "You must be 18 or older to play this game!" if answer.to_i < 18
Here, the user is prompted to specify her age. The value of the number that is supplied by the user is then analyzed to determine whether it is less than 18. If it is, the puts statement to which the modifier has been appended is executed. However, if the number entered by the user is 18 or greater, the execution of the puts statement is skipped.
An advantage of appending conditional modifiers to the end of script statements is that it helps you to write compact script statements and thus to reduce the overall size of your script files. A disadvantage of this approach is that modifiers only work with individual statements. If you need to control the execution of multiple lines of code, you will be better off using conditional expressions as demonstrated later in this chapter.
As an alternative to the if modifier, you might want to use the unless modifier. The unless modifier is the logical opposite of the if modifier. As such, there is nothing that you can accomplish using the unless modifier that you cannot accomplish with the if modifier. Therefore, its use is really just a matter of preference.
To see the unless modifier in action, take a look at the following example.
print "Enter your age and press Enter:  "
answer = STDIN.gets
answer.chop!

puts "You must be 18 or older to play this game!" unless answer.to_i > 17
As you can see, this example is nearly identical to the previous example, except instead of using the if modifier, the unless modifier has been substituted. In addition, the less than comparison operator was replaced with the greater than operator and the number 18 has been replaced with the number 17. Both this and the preceding example produce the same result.
Using if and unless expressions, you can spread out conditional statements over multiple lines, making these forms of conditional tests even more powerful than their modifier equivalents. As such, you can use conditional expressions to group together and control the execution of large numbers of statements, making your scripts easier to read and maintain.
Unlike if modifiers, if expressions are capable of controlling the execution of more than one statement, making them even more powerful and useful. The if expression supports a very flexible syntax that provides the ability to use the expression in a number of different ways. A high-level outline of the if expression’s syntax is provided here:
if condition then
  statements
elsif condition then
  statements
.
.
.
else
  statements
end if
condition represents an expression that is to be tested. statements represents one or more script statements that are to be conditionally executed. elsif represents an option keyword that when used allows additional conditional tests to be performed. else is another optional keyword that when specified allows you to identify an alternate set of programming statements that are to be executed when none of the preceding conditions that have been tested evaluates as being true.
To better understand how to work with this powerful and extremely useful expression, you need to see examples of it in action. Earlier in this chapter, the following example was presented to demonstrate the use of the if modifier.
print "Enter your age and press Enter:  "
answer = STDIN.gets
answer.chop!

puts "You must be 18 or older to play this game!" if answer.to_i < 18
Using the if expression, this example could be rewritten as shown here.
print "Enter your age and press Enter:  "
answer = STDIN.gets
answer.chop!

if answer.to_i < 18 then
  puts "You must be 18 or older to play this game!"
end
As you can see, this version of the example is more longwinded than the if modifier example. However, as demonstrated in the next code block, you can use the if expression to include any number of statements inside the opening if and closing end statements, allowing the conditional execution of any number of statements.
if answer.to_i < 18
  puts "You must be 18 or older to play this game!"
  puts "Goodbye."
  exit
end
Hint
Note the use of the exit method in the previous example. The exit method is provided by the kernel class. This method forces the immediate termination of a Ruby script.
As has been stated, the syntax support of the if expression is very flexible, allowing for many formats. For example, the following example demonstrates how to format an if expression that fits on a single line.
x = 10
if x == 10 then puts "x is equal to 10" end
When used in this format, the if expression is very similar to the if modifier, except that in the case of the if modifier, the conditional logic that is executed is appended to the end of the statement instead of being defined at the beginning of the statement as demonstrated here.
x = 10
puts "x is equal to 10" if x == 10
In addition to executing one or more script statements when a test condition evaluates as being true, you can modify an if expression to execute one or more statements in the event the test condition evaluates as being false. To accomplish this, you need to add the optional else keyword to the expression as demonstrated here.
x = 10
if x == 10 then
  puts " x is equal to 10"
else
  puts " x does not equal 10"
end
Here, either of two puts statements executes depending on whether or not the value assigned to x is equal to 10.
There will be times when you will need to examine a series of conditions to find out which one of them evaluates as being true. One way of accomplishing this is to define a series of statements as demonstrated here.
if x == 10 then puts "x is 10"  end
if x == 15 then puts "x is 15"  end
if x == 20 then puts "x is 20"  end
if x == 25 then puts "x is 25"  end
The objective of these statements is to find out which of four possible values has been assigned to x. If you prefer, you could use the if expression’s optional elsif keyword to rewrite this example as shown here.
if x == 10 then puts "x is 10"
elsif x == 15 then puts "x is 15"
elsif x == 20 then puts "x is 20"
elsif x == 25 then puts "x is 25"
end
Hint
If you need to execute more than one statement when a matching condition is found, you would need to reformat the previous example as shown here.
if x == 10 then
  puts "x is 10"
elsif x == 15 then
  puts "x is 15"
elsif x == 20 then
  puts "x is 20"
elsif x == 25 then
  puts "x is 25"
end
You could also include the optional else keyword to provide an alternative course of action should none of the preceding tests evaluate as being true.
if x == 10 then puts "x is 10"
elsif x == 15 then puts "x is 15"
elsif x == 20 then puts "x is 20"
elsif x == 25 then puts "x is 25"
else puts "The value of x is unknown"
end
Just like the if modifier and the unless modifier, the unless expression is the polar opposite of the if expression. As such, there is nothing that you can accomplish with an if expression that you cannot accomplish with an unless expression. For example, take a look at the following if expression.
print "Enter your age and press Enter:  "
answer = STDIN.gets
answer.chop!

if answer.to_i < 18
  puts "You must be 18 or older to play this game!"
end
To convert it to an unless expression, all you need to do is replace the if keyword with the unless keyword and then replace the < operator with the > operator as shown here. Also note that the number 18 has been replaced with the number 17.
print "Enter your age and press Enter:  "
answer = STDIN.gets
answer.chop!

unless answer.to_i > 17
  puts "You must be 18 or older to play this game!"
end
Obviously, when it comes right down to it, the decision whether to use an if expression or an unless expression is really just a matter of personal preference.
In addition to the if and unless modifiers and expressions, Ruby also provides you with access to the case block as a means of comparing a series of expressions against a single expression to see whether any of the expressions being evaluated result in equivalent value. Although you can accomplish the same thing using an if expression that includes a series of elsif statements, the case block is better suited for situations where you need to compare a single condition to a whole range of possible matches. The syntax for the case block is outlined here:
case expression
  when value
    statements
       .
       .
       .
  when value
    statements
  else
    statements
end
As you can see, the case block includes one or more when statements. The expression that is evaluated is compared to the value associated with one or more when statements. If a match occurs with one of the with statements, any statements associated with that when statement are executed. If none of the when statements matches the value of the expression being evaluated, the statements belonging to the optional else statement (if present) are executed.
As a quick example of how to set up a case block, take a look at the following statements.
x = 10

case x

  when 1
    puts "*"
  when 5
    puts "*****"
  when 10
    puts "**********"
  else
    puts "No stars"

end
Here, the value assigned to x is compared to a series of values specified in a case block. Since the value of x is 10, the puts "**********" will be executed. Had none of the when statements contained a matching value, the puts statement associated with the else keyword would have executed. In most cases, you will find that it takes fewer lines of code to set up a case block than an equivalent if expression using multiple elsif keywords.
If you want, you can omit the specification of an expression on the open case statement when setting up a case block as demonstrated here.
puts "
Welcome to the vacation calculator!

"

print "How many years have you worked for the company?

: "
answer = STDIN.gets
answer.chop!
answer = answer.to_i

case
  when (answer.between?(1, 5))
    puts "You are entitled to 1 week of vacation per year."
  when (answer.between?(6, 10))
    puts "You are entitled to 2 weeks of vacation per year."
  when (answer.between?(11, 15))
    puts "You are entitled to 3 weeks of vacation per year."
  when (answer.between?(16, 20))
    puts "You are entitled to 4 weeks of vacation per year."
  else
    puts "You are entitled to 5 weeks of vacation per year."
End
Here, a series of unique expressions has been specified for each when statement. The statements belonging to the first expression that evaluates as true will be executed and the rest of the statements are skipped.
Ruby provides you with an additional option, known as the ternary operator (?:), available for setting up conditional logic. Using the ternary operator, you can evaluate the value of two different expressions and make variable assignments as a result of that comparison. The syntax required to work with the ternary operator is
variable = expression ? true_result : false_result
Here, variable is assigned the value returned by the statement. expression represents the expression that is evaluated. true_result is the value that is assigned if the expression evaluates as true and false_result is the value returned if the expression evaluates as being false. To get a better understanding of how to work with the ternary operator, take a look at the following example.
print "

Enter your age and press Enter:  "
answer = STDIN.gets
answer.chop!
answer = answer.to_i

result = answer < 18 ? "denied!" : "approved!"

puts "

Your access has been " + result + "

"
Here, the user is prompted to enter her age. The statement that contains the ternary operator evaluates the expression answer < 18. If the user enters a value of 17 or less, the expression evaluates as true, and a value of "denied!" is assigned to a variable named result. On the other hand, if the user enters a value that is 18 or higher, the expression evaluates as being false and a value of "approved!" is assigned to result.
Some situations require more complicated analysis than can be accomplished using an individual conditional modifier expression. In these situations, you may need to perform one conditional evaluation based on the result of another evaluation. One way of addressing this type of challenge is to embed one conditional statement inside another through a process called nesting. To get a better understanding of how nesting works, take a look at the following example.
redStatus = "Go"
blueStatus = "Go"
greenStatus = "Go"

if redStatus == "Go" then
  if blueStatus == "Go" then
    if greenStatus == "Go" then
      puts "All systems are go. Prepare for launch!"
    end
  end
end
Here, a series of three if expressions has been set up. If the first expression evaluates as false, the remaining if expressions are skipped. Otherwise, the second if expression is executed. If the second if expression proves false, the third if expression is skipped. Otherwise, it is executed. Nesting also works just as effectively for unless expressions.

Like most modern programming languages, Ruby also supports the use of a number of logical, or Boolean, operators. These operators are listed in Table 4.2.
Table 4.2. Ruby Boolean Operators
Operator | Type | Example |
|---|---|---|
| Evaluates as true if both comparisons evaluate as true | x > 1 and x < 10 |
| Evaluates as true if both comparisons evaluate as true | x > 1 && x < 10 |
| Evaluates as true if either comparison evaluates as true | x = 1 or x = 10 |
| Evaluates as true if either comparison evaluates as true | x = 1 || x = 10 |
| Reverses the value of a comparison | not (x > 5) |
| Reverses the value of a comparison | ! (x > 5) |
As you can see, the and and && operators are essentially identical. The only difference between the two is that the and operator has a higher level of precedence than the && operator. Likewise, the or and || operators work identically, the only difference being precedence, with or having higher precedence than ||. The and and && operators evaluate the second operand only if the first operand is true. The or and || operators evaluate the second operand only if the first operand is false.
To get a better understanding of how to work with these operators, let’s look at a few examples. For starters, take a look at the following statements.
print "Enter your age and press Enter:  "
reply = STDIN.gets
reply.chop!
reply = reply.to_i

puts "You are eligible to play this game!" if reply >= 18 && reply <= 65
Here, the if modifier at the end of the last statement uses the && operator to determine whether the value assigned to reply is both greater than or equal to 18 and less than or equal to 65. If both expressions evaluate as true, the puts statement executes. Otherwise, the puts statement is skipped.
Hint
If you want, you can enclose expressions within parentheses to make things easier to understand as demonstrated here:
puts "You are eligible to play this game" if (reply >= 18) && (reply <= 65)
Next, let’s look at an example that uses the || operators.
print "What is your rank?: "
rank = STDIN.gets
rank.chop!
rank = rank.to_i

puts "Access is permitted." if rank == 1 || rank == 3
Here, the last statement shown above uses the || operator to determine if the value assigned to rank is equal to 1 or to 3. If either (or both) or these expressions proves true, the associated puts statement executes. If neither expression proves true, the puts statement is skipped.
This final example demonstrates how to work with the ! operator, which negates or reverses the value returned from a conditional expression.
randomNo = 1 + rand(10)

print "What number am I thinking of?

:  "
answer = STDIN.gets
answer.chop!

puts "Wrong! My number was " + randomNo.to_s if ! (answer.to_i == randomNo)
Here, a random number between 1 and 10 is generated using the rand method and assigned to a variable named randomNo. The user is then prompted to try and guess the randomly generated number. The player’s answer is then converted to an integer and compared to the value or randomNo. If these two values are not equal, the associated puts statement executes. Otherwise, it does not execute.
Okay, now it is time to turn your attention back to the development of this chapter’s game project, the Ruby Typing Challenge game. As you work on creating this script, focus on the conditional expression to control the script’s overall controlling logic and its use in evaluating the accuracy of the player’s typing.
The development of the Ruby Typing Challenge game will be completed in 13 steps as outlined here.
Open your text or script editor and create a new file.
Add comment statements to the beginning of the script file to document the script and its purpose.
Define a
Screenclass representing the console window.Define a
Testclass representing the typing test.Develop a method in the
Testclass that displays a greeting message.Develop a method in the
Testclass that displays test instructions.Develop a method in the
Testclass that presents typing challenge sentences.Develop a method in the
Testclass that displays test results.Prompt the player for permission to start the typing test.
Develop the overall programming logic responsible for analyzing the player response.
Manage early game termination.
Execute methods required to deliver the typing test.
Remember to follow along carefully and not to skip any steps or parts of steps as you work your way through.
The first step in creating the Ruby Typing Challenge game is to open your text or code editor and create a new Ruby script file. Assign the script a filename of TypingChallenge.rb and save it in the folder where you have decided to store all your Ruby script files.
Now that you have created a new script file, the next step is to add the following comment statements to it. These statements document the name of the script and its purpose.
#--------------------------------------------------------------------------
#
# Script Name: TypingChallenge.rb
# Version:     1.0
# Author:      Jerry Lee Ford, Jr.
# Date:        October 2007
#
# Description: This Ruby script demonstrates how to apply conditional logic
#              in order to analyze user input and control script execution
#              through the development of a computer typing test that
#              evaluates the player's typing skills.
#
#--------------------------------------------------------------------------
Now it is time to define the first of two new classes. The first class is named Screen. This is accomplished by adding the following statements to the end of the script file.
# Define custom classes ---------------------------------------------------

#Define a class representing the console window
class Screen
  def cls  #Define a method that clears the display area
    puts ("
" * 25)  #Scroll the screen 25 times
    puts "a"  #Make a little noise to get the player's attention
  end

  def pause    #Define a method that pauses the display area
    STDIN.gets  #Execute the STDIN class's gets method to pause script
                #execution until the player presses the Enter key
  end

end
The first method defined in the class is the cls method. The method contains two statements. The first statement writes 25 blank lines to the console window to clear the screen. The second statement processes a string that contains the a escape character, in order to play an audible beep sound, notifying the player each time the terminal screen is cleared.
The next step in the development of the Ruby Typing Challenge game is to begin the definition of a new class that will represent the game’s typing test. This is accomplished by adding the following statements to the end of the script file. This class will be named Test and will eventually be populated with four methods.
#Define a class representing the typing test
class Test

end
Now it is time to begin developing the methods belonging to the Test class. The script statements that make up this class’s first method are shown here and should be inserted in between the class’s opening and closing statements.
#This method displays the 8-ball greeting message
def display_greeting

  Console_Screen.cls  #Clear the display area

  #Display a welcome screen
  print "		 Welcome to the Ruby Typing Challenge game!" +
  "


Press Enter to " +
             "continue.

: "

Console_Screen.pause       #Pause the game

end
This method, named display_greeting, is responsible for displaying the game’s welcome screen.
The script statements for the Test class’s next method are shown here and should be added to the end of the class definition, immediately following the previously defined method.
#Define a method to be used to present test instructions
def display_instructions

  Console_Screen.cls       #Clear the display area
  puts "			Instructions:

"  #Display a heading

  #Display the game's instructions
  puts %Q{    This test consists of a series of 5 typing challenges.
  Each challenge sentence is presented one at a time. To respond
  correctly, you must retype each sentence exactly as shown and press
  the Enter key. Your grade will be displayed at the end of the test.


  Press Enter to continue.

}

  Console_Screen.pause       #Pause the game

End
This method, named display_instructions, is responsible for displaying a text string containing instructions for playing the game.
The script statements for the Test class’s third method are shown here and should be added to the end of the class definition.
#Define a method to be used to present typing challenges
def present_test(challenge)

  Console_Screen.cls       #Clear the display area
  print challenge + "

: "  #Display the challenge sentence
  result = STDIN.gets  #Collect the player's input
  result.chop!         #Remove the end of line marker

  #Analyze the player input and see if it is correct
  if challenge == result then

    #Keep track of the number of correctly retyped challenge sentences
    $noRight += 1
    Console_Screen.cls       #Clear the display area
    #Keep the player informed
    print "Correct!

Press Enter to continue."
    Console_Screen.pause       #Pause the game

  else

    Console_Screen.cls       #Clear the display area
    #Keep the player informed
    print "Incorrect!

Press Enter to continue."
    Console_Screen.pause       #Clear the game

  end

end
This method, named present_test, is responsible for displaying sentences passed to it as string arguments and for collecting and storing player input. Next, an if expression has been set up to analyze the player’s input to see whether it matches the original sentence. If the player input matches the original sentence, the value of $noRight is incremented by one to keep track of the number of correctly typed sentences. In addition, a text string is displayed that notifies the player of the match.
If, on the other hand, the player makes a typing mistake when keying in the sentence, the value of $noRight is not incremented and a different text string is displayed, notifying the player of her mistake.
The script statements for the Test class’s final method are shown here and should be added to the end of the class definition.
#Define a method to be used to display test results
def determine_grade

  Console_Screen.cls       #Clear the display area

  #To pass the test the player must correctly retype 3 sentences
  if $noRight >= 3 then

    #Inform the player of the good news
    print "You retyped " + $noRight.to_s + " sentence(s) correctly. "
    puts "You have passed the typing test!

Press Enter to continue."

  else  #The player has failed the test

    #Inform the player of the bad news
    print "You retyped " + $noRight.to_s + " sentence(s) correctly. "
    puts "You have failed the typing test!

Press Enter to continue."

  end

end
This method, named determine_grade, is responsible for determining whether the player has passed the typing test. To pass, the player must correctly type in at least three sentences. To determine the player’s score, an if expression has been set up to evaluate the value assigned to $noRight to see if it is greater than or equal to three. If it is, a text string is displayed notifying the player that she has passed.
If, on the other hand, the value of $noRight is not greater than or equal to three, the else portion of the if expression is executed, informing the player that she has failed the test.
Now it is time to initialize instances of both the Screen and the Test classes. This is accomplished by adding the following statements to the end of the script file.
# Main Script Logic -------------------------------------------------------

# Initialize global variable that will be used to keep track of the number
#of correctly retyped sentences
$noRight = 0

Console_Screen = Screen.new  #Instantiate a new Screen object
Typing_Test = Test.new        #Instantiate a new Test object

#Execute the Test object's display_greeting method
Typing_Test.display_greeting
In addition to instantiating the Console_Screen and Typing_Test objects, these statements initialize a global variable named $noRight, which will be used to keep track of the number of correctly typed sentences and also execute the Test class’s display_greeting method.
The next step in the development of the Ruby Typing test game is to add programming logic that prompts the player for permission to start the test. This is accomplished by adding the following statements to the end of the script file.
#Execute the Screen object's cls method in order to clear the screen
 Console_Screen.cls

#Prompt the player for permission to begin the test
print "Would you like to test your typing skills? (y/n)

: "

answer = STDIN.gets  #Collect the player's response
answer.chop!  #Remove any extra characters appended to the string

#Loop until the player enters y or n and do not accept any other input.
until answer == "y" || answer == "n"

  Console_Screen.cls  #Clear the display area

  #Prompt the player for permission to begin the test
  print "Would you like to test your typing skills? (y/n)

: "

  answer = STDIN.gets  #Collect the player's response
  answer.chop!  #Remove any extra characters appended to the string

end
At this point, all that remains to be done is to develop the controlling logic responsible for analyzing the player’s response when prompted for permission to begin the test. This is accomplished by adding the following statements to the end of the script file.
#Analyze the player's response
if answer == "n"  #See if the player elected not to play

else  #The player wants to take the test

end
The code statements from the next step will need to be embedded into the first part of the above if expression and the statements from the last step will need to be embedded at the end of the if expression (between the else and end statements).
This next set of script statements is executed in the event the player responds with a value of n when prompted for permission to start the typing test and therefore should be placed in between the opening if statement and the else statement that you added to the script in the previous step.
Console_Screen.cls  #Clear the display area

#Invite the player to return and play again
puts "Okay, perhaps another time.

"
These statements clear the screen and then display a text message encouraging the player to return and take the test at another time.
This final set of script statements is responsible for administering the typing test and should be embedded into the bottom half of the if expression that you added to the script file in step 11.
#Execute the Test object's display_instructions method
Typing_Test.display_instructions
#Display typing challenges and grade each answer by calling on the
#Test object's present_test method
Typing_Test.present_test "In the end there can be only one."
Typing_Test.present_test "Once a great plague swept across the land."
Typing_Test.present_test "Welcome to Ruby Programming for the Absolute" +
" Beginner."
Typing_Test.present_test "There are very few problems in the world " +
"that enough M&Ms cannot fix."
Typing_Test.present_test "Perhaps today is a good day to die. Fight " +
"beside me and let us die together."

#Notify the player of the results by executing the Test object's
# determine_grade method
Typing_Test.determine_grade

Console_Screen.pause       #Pause the game

Console_Screen.cls  #Clear the display area
#Thank the player for taking the typing test
puts "Thank you for taking the Ruby Typing Challenge.

"
As you can see, these statements consist of a series of calls to methods belonging to the Typing_Test and Console_Screen objects. The first method that is called is the display_instructions method. This is followed by five separate calls to the present_test method. Each of these calls passes a different text string to the method, which displays the sentence and then prompts the player to retype it. Next, the determine_grade method is called. This method determines whether the player passed or failed the test. Finally, the screen is cleared and a message is displayed thanking the player for taking time to play the Ruby Typing Challenge game.
All right! You now have everything that you need to build and execute the Ruby Typing Challenge game. Go ahead and save and then run your new Ruby script. As long as you have followed along carefully and have not mistyped anything or accidentally skipped the keying in of any statements, everything should work as advertised. In the event you run into any errors, carefully review them and look for clues regarding where things may have gone awry. If necessary, go back and review the entire script and look for mistyped or missing script statements.
In this chapter you learned different ways of implementing conditional logic in your Ruby scripts. This included learning how to work with if and unless modifiers and expressions. This chapter showed you how to use the ternary operator to perform conditional analysis. You also learned how to use the case statement to match one value up against a range of possible options and to use different types of logical operations to perform different types of comparisons. Last, you learned how to combine and negate logical comparison operations using Ruby Boolean operators.
Now, before you move on to Chapter 5, “Working with Loops,” I suggest you set aside a little extra time to make a few improvements to the Ruby Typing Challenge game by implementing the following list of challenges.