Loops are an essential part of most Ruby scripts. Loops provide you with the ability to repeat a set of statements over and over again as many times as necessary to perform a particular task. Using a minimum amount of code, loops facilitate the development of scripts that can process huge amounts of data. Loops can also be used when interacting with users to create scripts capable of collecting any amount of input the user wants to supply. Ruby provides support for loops in a number of different ways, including built-in language constructs, statement modifiers, and object methods. Ruby also provides you with commands that you can use to alter and control the execution of loops. In addition to showing you how to develop programming logic, this chapter will also show you how to develop your next computer game, the Superman Movie Trivia Quiz.
Specifically, you will learn how to:
Set up
while, until, andfor...inloopsWork with
whileanduntilmodifiersWork with
times, upto, downto, andsteploop methodsUse the
break, redo, next, andretrycommands to alter loop execution
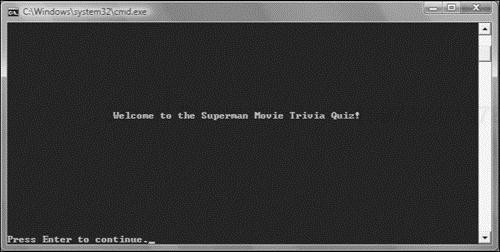
In this chapter, you will learn how to create a new computer game called the Superman Movie Trivia Quiz. This Ruby script demonstrates how to work with loops when collecting player input through the creation of an interactive quiz that evaluates the player’s knowledge of the Superman movies series. The game begins by displaying a welcome screen, as shown in Figure 5.1.
After pressing the Enter key to dismiss the welcome screen, the player is prompted for permission to begin the quiz, as shown in Figure 5.2.

If the player decides not to play and responds by entering a value of n, the message shown in Figure 5.3 displays, encouraging the player to return and take the quiz another day.

If the player elects to take the quiz, the instructions shown in Figure 5.4 are displayed, providing the player with an understanding of how the quiz will be administered.

Next, the first of five questions is displayed and the player is prompted to specify a letter representing one of four possible answers, as demonstrated in Figure 5.5.
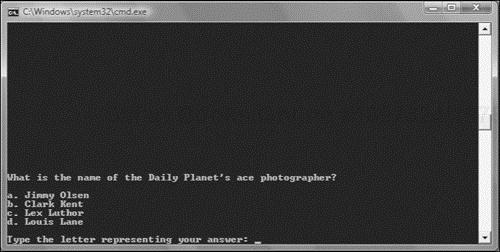
To advance to the next quiz question, the player must enter an a, b, c, or d and press the Enter key. Any other input is rejected. Once a valid answer has been provided, the game evaluates the player’s input and then displays the next quiz question. Once all questions have been answered, the game displays a message indicating whether the player has passed or failed the quiz. If the player has passed, ranking is assigned as demonstrated in Figure 5.6.

Finally, once the player presses the Enter key to dismiss the previous screen, the screen shown in Figure 5.7 displays.

In order to effectively process large amounts of data, you need to learn how to work with loops. A loop is a collection of statements that execute repeatedly as a unit. Loops facilitate the processing of large text files or the collection of unlimited amounts of user input. Loops also provide you with the ability to develop scripts that can repeat the execution of any number of commands.
Using loops, you can develop computer games that can be replayed over and over again. Loops also provide the basis for developing program logic that helps to process and validate user input, allowing the script to continue only once valid data has been input. Loops let you develop powerful programming logic using a minimum number of lines of code that can be executed as many times as necessary to accomplish a particular task. This helps reduce the size of your Ruby scripts, making them easier to develop and maintain.
Ruby provides you with access to many different types of loops, which can be organized broadly using the following three categories.
Language constructs. Language commands that are part of the core Ruby scripting language.
Modifiers. A modifier appended to the end of a Ruby statement to repeat the statement until a specified condition is met.
Methods. Loops provided as methods associated with specific objects.
Each of these three categories of loops will be examined in detail throughout the rest of this chapter.
As has been stated, loops provide you with the ability to identify a collection of statements that need to be repeatedly executed. One way of adding loops to your Ruby script files is to work with the while, until, and for loops. These three loops are supported by Ruby as a part of the core programming language. These loops are sometimes thought to be a little “old school” by many Ruby programmers who prefer instead to work with loop methods provided by various object classes. Still, while, until, and for loops are still widely used and an understanding of how to work with them is fundamental to becoming a good Ruby programmer.
The while loop is a loop that executes as long as a tested condition is true. The syntax for this loop is outlined here:
while Expression [ do | : ]
  Statements
end
Expression is any valid Ruby expression that is tested at the beginning of each iteration of the loop. do or : are mutually exclusive and can be left off if you decide to spread the loop out over more than one line. Statements represents any number of statements that you want to execute each time the loop repeats.
To get a good feel for how to work with the while loop, take a look at the following example.
x = 1

while x <= 10 do
  puts x
 x += 1
end
Here, a variable named x has been defined and assigned a value of 1. Next, a while loop has been set up to run as long as the value of x is less than or equal to 10. The first statement in the loop prints the current value assigned to x and the second statement increments the value of x by 1. As a result, when executed, this loop will display a list of numbers from one to ten as shown here:
1
2
3
4
5
6
7
8
9
10
Trap

One thing to be on the lookout for whenever you work with any type of loop is an endless loop. An endless loop is a loop that is set up in such as way that it never stops executing, unnecessarily using computer resources.
The until loop is pretty much the opposite of the while loop. Instead of looping while a tested expression remains true, the until loop executes until the tested condition becomes true. The syntax for the until loop is outlined here:
until Expression [ do | : ]
  Statements
end
Expression is any valid Ruby expression that is tested at the beginning of each iteration of the loop. Do or : are mutually exclusive and can be left off if you decide to spread the loop out over more than one line. Statements represents any number of statements that you want to execute each time the loop repeats.
As the following example demonstrates, the until loop works very much like the while loop.
x = 1

until x >= 10 do
  puts x
  x += 1
end
Here, a variable named x has been defined and assigned a value of 1. Next, an until loop has been set up to run until the value of x becomes greater than or equal to 10. The first statement in the loop prints the current value assigned to x and the second statement increments the value of x by 1. When executed, this example displays a list of numbers from one to nine, as shown here:
1
2
3
4
5
6
7
8
9
The for...in loop is provided as part of Ruby’s core programming language. This loop is designed to process collections of data. The syntax of the for...in loop is outlined here:
for Variable in Expression [ do | : ]
  Statements
End
Variable represents a variable used by the loop to store the value of the current item in the collection that is being processed. Expression is any valid Ruby expression that specifies the collection to be processed. Do or : are mutually exclusive and should be left off if you decide to spread the loop out over more than one line. Statements represents any number of statements that you want to execute each time the loop repeats.
To get a good feel for how to work with the for...in loop, take a look at the following example.
MyList = ["Molly", "William", "Alexander", "Jerry", "Mary"]

for x in MyList
 print "Hi ", x, "!
"
end
Here, an array named MyList has been created and assigned a list of five names. Next, a for...in loop has been set up that will repeat once for each element stored in the array. Each time the loop repeats, or iterates, it prints a text string that displays the value of the array item currently being processed.
Hint

An array is an indexed collection of items stored as a list. You will learn how to create and work with arrays in Chapter 6, “Working with Collections of Data.”
When executed, the preceding example displays the following output.
Hi Molly!
Hi William!
Hi Alexander!
Hi Jerry!
Hi Mary!
The for...in loop can also be used to process a range of items, as demonstrated here:
for i in 1..5
  puts i
end
When executed, this example displays the following output.
1
2
3
4
5
Hint
Ruby range operator (..) provides you with the ability to display a range of consecutive letters or numbers. For example, (1..5) would create the following set of numbers: 1 2 3 4 5. Likewise, (a..z) would produce a set of all lowercase letters starting with the letter a going consecutively all the way to the letter z.
A loop modifier is an expression added to the end of another Ruby statement that executes that statement as a loop. Ruby supports both while and until loop modifiers. Loop modifiers are perfect for situations where you only need to repeat the execution of a single statement.
The while modifier evaluates a Boolean expression and then conditionally executes the statement to which is has been appended as long as that condition remains true. The while modifier supports the following syntax.
Expression while Condition
Expression is any Ruby statement that you want to be conditionally executed. Condition is a Boolean expression that, once evaluated, determines whether the opening expression is executed. To better understand how to work with the while modifier, take a look at the following example.
counter = 1
counter += 1 while counter < 10
puts counter
Here, a variable named counter has been assigned a value of 1. Next, the value of counter is incremented by 1 if and only if the value assigned to counter is less than 10. The while modifier, attached to the second statement, repeats the statement over and over again, incrementing the value of counter repeatedly until counter becomes equal to 10, at which time the loop stops executing and the last statement executes, displaying the value of counter, which of course is 10.
The until modifier is pretty much the opposite of the while modifier, executing the statement to which it has been appended repeatedly until a specified condition is evaluated as being true. The syntax used by the until modifier is shown here:
Expression while Condition
Expression is any Ruby expression that you want to be conditionally executed. Condition is a Boolean expression that, once evaluated, determines whether the opening expression is executed. To better understand how to work with the until modifier, take a look at the following example.
counter = 1
counter += 1 until counter >= 10
puts counter
Here, a variable named counter has been assigned a value of 1. Next, the value of counter is increment by 1 over and over again until the value of counter becomes equal to or greater than 10.
Ruby provides you with access to a number of different looping methods belonging to various classes. These methods simplify loop construction and help to eliminate the chance of errors that can otherwise sometimes occur if you work instead with Ruby’s built-in language looping constructions (while, until, and for...in).
One very commonly used looping method is the each method. This method is supported by a number of different Ruby classes, including the Array, Dir, Hash, and Range classes.
The each method supports the following syntax.
Object.each { |i| Statement }
Object represents the object upon which the each loop will operate. i represents a variable used by the each loop to represent the current item being processed by the loop, and Statement represents a Ruby statement that you want to be repeatedly executed.
The previous syntax outlines the use of the each method when processing a single Ruby statement. If you want, you may use the following syntax when working with the each method to repeat the execution of one or more statements.
Object.each do |i|
  Statements
end
To better understand how to work with the each method, take a look at the following example.
MyList = ["Molly", "William", "Alexander", "Jerry", "Mary"]

MyList.each do |x|
 print "Hi ", x, "!
"
end
Here, a loop made up of five items has been defined. Next, the Array class’s each method is used to process and display each of the items stored in the array. The first time the loop executes, the value of the first array element ("Molly") is assigned to the x variable, which is then used inside the loop to display the element. The each method automatically iterates once for each item stored in the array, resulting in the display of the following output.
Hi Molly!
Hi William!
Hi Alexander!
Hi Jerry!
Hi Mary!
Hint
When compared to built-in language-based loop constructs like while and until, the elegance and sophistication of Ruby’s method-based loops become quickly apparent. For example, you could use one of these types of loops to process the contents of an array as demonstrated here.
MyList = ["Molly", "William", "Alexander", "Jerry", "Mary"]
x = 0

while (x < MyList.length)
 print "Hi ", MyList[x], "!
"
 x += 1
end
When executed, this example produces results that are identical to those produced by the previous example, which used the each method. However, unlike the each method, which automatically takes care of the processing of every element in the array for you, when you use the while or until loops, it is up to you to specify a variable that will be used to control how many times the loop iterates. In addition, it is also up to you to determine how many times the loop repeats. You must also provide an expression for tracking the last element processed in the array and also remember to increment the value of the controlling variable at the end of each execution of the loop.
Clearly, using the each method, and the other class methods outlined in the following sections, is not only easier and more straightforward, but it also removes the many opportunities for error that occur when you try working with more traditional loop constructs.
The times method is used to execute a code block a specific number of times. The times method is provided by the Integer class. The times method supports the following syntax.
Integer.times { |i| Statement }
Here, Integer represents a numeric integer value. i represents an iterator used by the times method to represent the current item being processed by the loop, and Statement represents a Ruby statement that you want to be repeatedly executed.
The previous syntax outlined the use of the times method when processing a single Ruby statement. If you want, you may use the following syntax when working with the times method to repeat the execution of one or more statements.
Integer.times do |i|
  Statements
end
To better understand how to work with the times method, take a look at the following example.
puts "Watch me count!"
10.times {|x| puts x}
Here, the times method has been used to set up an example that will iterate 10 times. Upon each iteration of the loop, the value x is assigned an integer value representing the number of iterations of the loop, which is then displayed on the screen using the puts method. The end result is the display of the following output.
Watch me count!
0
1
2
3
4
5
6
7
8
9
Another time-saving looping method that merits discussion is the upto method, which is provided by the Integer class. This method results in a loop that iterates a predetermined number of times. The syntax for a single-line version of the upto method is outlined here:
Integer.upto(EndValue) { |i| Statement }
Integer represents a numeric integer value. EndValue is an integer that is passed to the upto method as an argument and which is used to tell the method how many times to iterate. i represents a variable used by the upto method to represent the current item being processed by the loop, and Statement represents a Ruby statement that you want to be repeatedly executed.
The multiline version of this method’s syntax is shown here:
Integer.upto(endValue) do |i|
  Statements
end
To better understand how to work with the upto method, take a look at the following example.
1.upto(10) do |x|
 print x, ") Hello!
"
end
Here, a loop has been set up that executes 10 times (starting at 1 and ending at 10) as specified by the value the integer and the argument (10) passed to the upto method. When executed, this example displays the following output.
1) Hello!
2) Hello!
3) Hello!
4) Hello!
5) Hello!
6) Hello!
7) Hello!
8) Hello!
9) Hello!
10) Hello!
Another time-saving looping method that merits discussion is the downto method, which is provided by the Integer class. As its name implies, it allows you to set up a loop that iterates a predetermined number of times, starting at a specified integer value and counting down to whatever integer value that is passed to it.
The syntax for the single-line version of the downto method is outlined here:
Integer.downto(EndValue) { |i| Statement }
Integer represents a numeric integer value. EndValue is an integer that is passed to the downto method as an argument and is used to tell the method how many times to iterate. i represents a variable used by the downto loop to represent the current item being processed by the loop and Statement represents a Ruby statement that you want to be repeatedly executed.
The multiline version of this method’s syntax is shown here:
Integer.downto(endValue) do |i|
  Statements
end
To better understand how to work with the downto method, take a look at the following example.
5.downto(1) do |x|
 print x, ") Hello!
"
end

puts "That's all folks!"
Here, a loop has been set up that iterates five times. The first time that loop iterates, x is assigned a value of 5. Upon each subsequent iteration, the value of x is decremented. The loop repeats over and over again (from 5 down to 1). When executed, this example generates the output shown here:
5) Hello!
4) Hello!
3) Hello!
2) Hello!
1) Hello!
That's all folks!
The step method is used to set up loops that execute a predefined number of times. The step method works with the Float and Integer classes. The syntax for a single-line version of the step method is outlined here:
Number.step(EndNumber, Increment) { |i| Statement }
Number represents an integer or floating point number. EndNumber specifies a value that when reached will terminate the loop’s execution. Increment specifies the value used to increment the loop each time it iterates. i represents a variable used by the step method to represent the current item being processed by the loop and Statement represents a Ruby statement that you want to be repeatedly executed.
The multiline version of this method’s syntax is shown here:
Number.step(EndNumber, Increment) do |i|
  Statements
end
To better understand how to work with the step method, take a look at the following example.
1.step(10,2) do |x|
 print x, ". Counting by 2
"
end
Here, a loop has been set up that will execute five times. The first time the loop executes, the value of i is set to 1. The value of i is then incremented by two upon each subsequent iteration, resulting in the following output.
1. Counting by 2
3. Counting by 2
5. Counting by 2
7. Counting by 2
9. Counting by 2
The step method is quite flexible. You can set it up to decrement instead of increment, as demonstrated here:
50.step(10,-5) do |x|
 print x, ". I'm getting smaller!
"
end
Here, the loop has been set up to start at 50, decrementing by 5 upon each iteration until a value of 10 is reached. As a result, the following output is displayed.
50. I'm getting smaller!
45. I'm getting smaller!
40. I'm getting smaller!
35. I'm getting smaller!
30. I'm getting smaller!
25. I'm getting smaller!
20. I'm getting smaller!
15. I'm getting smaller!
10. I'm getting smaller!
Another useful loop method is the aptly named loop method. This method belongs to the Kernel module. Like all of the other looping methods, the loop method supports two forms of syntax. The single-line version of its syntax is outlined here:
loop { Statement }Here, Statement represents a statement that is executed each time the loop iterates. The multiline version of its syntax is outlined here:
loop do
  Statements
end
Loops created using the loop method run forever unless you provide a way to terminate them. To better understand how to work with the loop method, take a look at the following example:
counter = 1

loop do

  print counter.to_s + " "
  counter += 1
  break if counter == 10

end
Here, a variable named counter is assigned a value of 1. Next, a loop has been set up using the loop method. Upon each iteration, the print method is used to display the current value assigned to counter. In addition, the value of counter is incremented by 1. At the end of each iteration of the loop, the last statement ensures that the loop has a way of terminating, executing the break command if the value of counter is equal to 10. When executed, this example generates the following output.
1 2 3 4 5 6 7 8 9
There may be times in which certain events occur that will make you want to prematurely halt the execution of a loop. For example, you might set up a loop that processes the elements stored in an array, looking for a particular item. Once found, you might want to stop executing the loop, rather than wasting unnecessary resources processing the rest of the elements in the array when you have no use for them. You could accomplish this by executing the break command, which is just one of a number of commands supplied by Ruby as a means of altering a loop’s default execution. A list of these commands, as well as brief descriptions of each, is provided here:
break. Terminates the execution of a loop.redo. Repeats the current execution of the loop without evaluating its condition and without iterating.next. Stops the current iteration of the loop and immediately begins a new iteration.retry. Restarts the loop from the beginning, resetting the value of the iterator.
The break command provides the ability to terminate the execution of a loop at any time. To see an example of how you might use this command, take a look at the following example.
loop do

 print "Type q to quit this script. "

  answer = STDIN.gets
  answer.chop!

 break if answer == "q"

end
Here, a loop has been set up that by default will repeat forever. Each time the loop executes, a message is displayed that prompts the user to type q to quit the script. The user’s response is captured and stored in a variable named answer. The last statement in the loop has been set up to conditionally execute the break command based on whether the user provides the proper input.
The redo command forces a loop to repeat without evaluating its condition and without iterating. As such, it might be used to force a loop to execute again should something occur that you do not like. To see how this command works, take a look at the following example.
i = 1

loop do
  puts i
  redo if i == 3
  i += 1
end
Here, a loop has been set up that will execute forever. Each time the loop repeats, the value of a variable named i is incremented by 1. The second statement within the loop conditionally executes the redo command when the value of i becomes 3. As such, after the third iteration of the loop, once the value of i has become 3, the redo command is executed, preventing the last statement in the loop from executing again, as demonstrated here:
1
2
3
3
3
.
.
.
The next command stops the current iteration of the loop and immediately begins a new iteration. However, before the new iteration occurs, the loop condition is evaluated. Thus the loop only executes again if the analysis of the loop condition permits it. To see an example of how you might use the redo command, look at the following example.
for i in 1..5
  next if i == 3
  puts i
end
Here a for...in loop has been set up to execute over a range of numbers, starting at 1 and going through 5. Upon the third execution of the loop, when the value of i is equal to 3, the next command is executed. However, the loop continues executing two more times, ultimately resulting in the following output.
1
2
4
5
The retry command restarts a loop from the beginning. As such, the value of the loop’s iterator is reset, starting the loop over from the beginning, as demonstrated here:
for i in 1..5
  puts i
  retry if i == 3
end
Here, a for...in loop has been set up that repeats for a range of numbers from 1 to 5. Each time the loop runs, the value of i is displayed. When the value of i becomes equal to 3, the retry command is executed, starting the loop over again. As such, an endless loop has been created that repeatedly counts from 1 to 3 forever, as demonstrated here:
1
2
3
1
2
3
.
.
.
Okay, now it is time to turn your attention back to the development of this chapter’s game project, the Superman Movie Trivia Quiz. As you follow along with the development of this script, focus on the use of loops to manage the process of prompting the player for permission to start the quiz to ensure that only valid input is accepted.
The development of the Superman Movie Trivia Quiz will be completed in 12 steps, as outlined here:
Open your text or script editor and create a new file.
Add comment statements to the beginning of the script file to document the script and its purpose.
Define a class representing the terminal window.
Define a class representing the game’s quiz.
Add a
display_greetingmethod to theQuizclass.Add a
display_instructionsmethod to theQuizclass.Add a
disp_qmethod to theQuizclass.Add a
determine_grademethod to theQuizclass.Add a
display_creditsmethod to theQuizclass.Instantiate script objects.
Prompt the player for permission to begin the quiz.
Administer the quiz.
As you work your way through each of the steps in the development of the Superman Trivia Quiz, remember to follow along carefully, not skip any steps, and to be on the lookout for typos.
The first step in developing the Superman Movie Trivia Quiz is to start up your text or script editor and then create a new Ruby script file. Once created, save this file with a file name of SupermanQuiz.rb.
The next step in the creation of the Superman Movie Trivia Quiz is to add the following statements to the script file. These statements provide a high-level description of the game and its purpose.
#--------------------------------------------------------------------------
#
# Script Name: SupermanQuiz.rb
# Version:     1.0
# Author:      Jerry Lee Ford, Jr.
# Date:        October 2007
#
# Description: This Ruby script demonstrates how to work with loops when
#              collecting user input through the creation of an
#              interactive quiz that evaluates the player's knowledge of
#              the Superman movie series.
#
#--------------------------------------------------------------------------
The Superman Movie Trivia Quiz makes use of two custom classes, each of which contains numerous methods that control the overall interaction with the user and the execution of the game. The first of these classes is named screen. The script statements that make up this class are provided next and should be added to the end of the script file.
# Define custom classes ---------------------------------------------------

#Define a class representing the console window
class Screen

  def cls  #Define a method that clears the display area
    puts ("
" * 25)  #Scroll the screen 25 times
    puts "a"  #Make a little noise to get the player's attention
  end

  def pause    #Define a method that pauses the display area
    STDIN.gets  #Execute the STDIN class's gets method to pause script
                #execution until the player presses the Enter key
  end

end
The first method defined within this class is the cls method. The method consists of two statements. The first statement writes 25 blank lines to the console window to clear the screen. The second statement contains a string that is made up of the a escape character that when executed results in an audible beep, whose purpose is to notify the player that the terminal screen has been cleared.
The second class definition that you need to add to your new Ruby script is the Quiz class. This class will be used to represent the game’s quiz and will contain methods used to administer and control the delivery of the quiz. Let’s begin the creation of the Quiz class by adding the following statements to the end of the script file.
#Define a class representing the Superman Movie Trivia Quiz
class Quiz

end
The Quiz class consists of five methods. The first of these methods is named display_greeting and is comprised of the statements outlined next and should be inserted between the class’s opening and closing statements.
#This method displays the quiz's opening screen
def display_greeting

  Console_Screen.cls  #Clear the display area

  #Display welcome message
  print "		 Welcome to the Superman Movie Trivia Quiz!" +
  "


Press Enter to " +
             "continue."

  Console_Screen.pause       #Pause the game

end
This method is responsible for displaying the quiz’s welcome screen and should be placed inside the Quiz class.
The second method to be added to the Quiz class is the display_instructions method. The statements that make up this class are shown next and should be added to the end of the class definition, immediately following the previously defined method.
#Define a method to be used to present quiz instructions
def display_instructions

  Console_Screen.cls       #Clear the display area
  puts "INSTRUCTIONS:

"  #Display a heading

  #Display the game's instructions
  puts "You will be presented with a series of multiple choice"
  puts "questions. To answer a question, type in the letter of"
  puts "the corresponding answer and press the Enter key. Your"
  puts "grade will be displayed at the end of the test.


"
  puts "Good luck!


"
  print "Press Enter to continue."

  Console_Screen.pause       #Pause the game

end
This method is responsible for displaying a text string containing instructions for taking the Superman Movie Trivia quiz.
The script statements for the Quiz class’s third method are provided next and should be added to the end of the class. This method is responsible for presenting the player with quiz questions and processing the player’s answers.
#Define a method to be used to present and process quiz questions
def disp_q(question, q_A, q_B, q_C, q_D, answer)

 #Loop until the player inputs a valid answer
  loop do

    Console_Screen.cls       #Clear the display area

    #Format the display of the quiz question
    puts question + "

"
    puts q_A
    puts q_B
    puts q_C
    puts q_D
    print "
Type the letter representing your answer: "

    reply = STDIN.gets  #Collect the player's answer
    reply.chop!         #Remove the end of line marker

    #Analyze the player's input to determine if it is correct
    if answer == reply then

     #Keep track of the number of correctly answered questions
     $noRight += 1

    end

    #Analyze the answer to determine if it was valid
    if reply == "a" or reply == "b" or reply == "c" or reply == "d" then

     break  #Terminate the execution of the loop

    end

  end

end
This method consists of a loop that repeatedly executes until the player provides a valid answer to the currently presented quiz question. Quiz questions pass to the method a series of arguments. The first argument that is passed is a text string representing the quiz question. The next four arguments that are passed are mapped to variables named q_A, q_B, q_C, and q_D, which represent four different multiple-choice answers that will be presented along with the question. The last argument passed to the method is assigned to a variable named answer, which is assigned the letter representing the correct answer to the quiz question.
Once parameter assignments have been made, the loop begins to execute, clearing the screen and then displaying the quiz question. The player’s answer is then captured and stored in a variable named reply. Next, an if statement has been set up to analyze the value of reply to see if it is equal to the value assigned to answer, in which case the player has correctly answered the quiz question. If this is the case, the value of $noRight is incremented by one to keep track of the number of correctly answered quiz questions.
The last set of statements to be executed conditionally examines the player’s input to ensure that it is valid (i.e. that the player entered either a, b, c, or d and nothing else). In the event this is not the case, the break command is executed, terminating the execution of the loop.
The script statements for the Quiz class’s fourth method are shown next and should be added to the end of the class. This method determines whether the player has passed the quiz.
#Define a method to be used to grade and display quiz results
def determine_grade

  Console_Screen.cls       #Clear the display area

  #To pass the test, the player must correctly answer 3 questions
  if $noRight >= 3 then

    #Inform the player of the good news and assign a ranking
    print "You correctly answered " + $noRight.to_s + " question(s). "
    puts "You have passed the Superman Movie Trivia Quiz!

"
    puts "You have earned a rank of: Good Citizen" if $noRight == 3
    puts "You have earned a rank of: Side Kick" if $noRight == 4
    puts "You have earned a rank of: Superhero" if $noRight == 5
    print "

Press Enter to continue."

  else  #The player has failed the quiz

    #Inform the player of the bad news
    print "You missed " + (5 - $noRight).to_s + " questions. "
    puts "You have failed the Superman Movie Trivia Quiz."
    puts "Perhaps you should watch the movies again before returning to"
    puts "retake the quiz"
    print "

Press Enter to continue."

  end

  Console_Screen.pause       #Pause the game

end
To pass the quiz, the player must correctly answer at least three questions. To determine the player’s grade, an if expression has been set up to evaluate the value assigned to $noRight. If it is greater than or equal to three, the player has passed and a series of puts statements are executed that notify the player that he has passed. The puts statements also assign the player a ranking based on that grade. A ranking of Good Citizen is assigned when three questions have been correctly answered. A ranking of Side Kick is assigned when four questions are correctly answered, and a ranking of Superhero is assigned if the player answers every question correctly.
If, however, the value of $noRight is less than three, the player is informed of the failing score and told how many questions were missed.
The final method to be added to the Quiz class is the display_credits method. This method is responsible for displaying information about the quiz and its developer, including the developer’s ULR. The statements that make up this method are provided next and should be added to the end of the Quiz class.
#This method displays the information about the Superman Movie Trivia Quiz
def display_credits

  Console_Screen.cls  #Clear the display area

  #Thank the player and display game information
  puts "		Thank you for taking the SUPERMAN MOVIE TRIVIA QUIZ.


"
  puts "
			 Developed by Jerry Lee Ford, Jr.

"
  puts "				 Copyright 2008

"
  puts "			URL: http://www.tech-publishing.com


"

end
Now it is time to initialize an instance of the Screen and Quiz classes. This is accomplished by adding the following statements to the end of the script file.
# Main Script Logic -------------------------------------------------------

#Initialize global variable that will be used to keep track of the number
#of correctly answered quiz questions
$noRight = 0

Console_Screen = Screen.new  #Instantiate a new Screen object
SQ = Quiz.new     #Instantiate a new Quiz object

#Execute the Quiz class's display_greeting method
SQ.display_greeting
In addition to instantiating the Console_Screen and SQ objects, these statements define a global variable named $noRight, which will be used to keep track of the number of correctly answered quiz questions and execute the Quiz class’s display_greeting method.
The next step in the development of the Superman Movie Trivia Quiz is to add the programming logic responsible for prompting the player for permission to begin the quiz. This is accomplished by adding the following statements to the end of the script file.
answer = ""

#Loop until the player enters y or n and do not accept any other input.
loop do

  Console_Screen.cls  #Clear the display area

  #Prompt the player for permission to start the quiz
  print "Are you ready to take the quiz? (y/n): "

 answer = STDIN.gets  #Collect the player's response
 answer.chop!  #Remove any extra characters appended to the string

  break if answer == "y" || answer == "n"

end
As you can see, a loop has been set up that executes until the player provides a valid response (y or n), at which time the break command is executed to terminate the loop.
At this point, all that remains is to add the programming logic that is responsible for either starting the quiz or for terminating it in the event the player decides not to take it. This is accomplished by adding the following statements to the end of the script file.
#Analyze the player's input
if answer == "n"  #See if the player elected not to take the quiz

  Console_Screen.cls  #Clear the display area

  #Invite the player to return and take the quiz some other time
  puts "Okay, perhaps another time.

"

else  #The player wants to take the quiz

  #Execute the Quiz class's display_instructions method
  SQ.display_instructions

  #Execute the Quiz class's disp_q method and pass it
  #arguments representing a question, possible answers and the letter
  #of the correct answer
  SQ.disp_q("What is the name of the Daily Planet's ace photographer?",
  "a. Jimmy Olsen", "b. Clark Kent", "c. Lex Luthor", "d. Louis Lane",
  "a")

  #Call upon the disp_q method and pass it the second question
  SQ.disp_q("What is the name of Clark Kent's home town?",
  "a. Metropolis", "b. Gotham City", "c. Smallville", "d. New York",
  "c")

  #Call upon the disp_q method and pass it the third question
  SQ.disp_q("In which movie did Superman battle General Zod?",
  "a. Superman", "b. Superman II", "c. Superman III", "d. Superman IV",
  "b")

  #Call upon the disp_q method and pass it the fourth question
  SQ.disp_q("What is the name of Superman's father?",
  "a. Nimo", "b. Jarrell", "c. Lex Luthor", "d. Krypton",
  "b")

  #Call upon the disp_q method and pass it the fifth question
  SQ.disp_q("Where had Superman been at the start of 'Superman Returns'?",
  "a. Moon", "b. Fortress of Solitude", "c. Earth's Core", "d. Krypton",
  "d")

  #Call upon the Quiz class's determine grade method to display
  #the player's grade and assigned rank
  SQ.determine_grade

  #Call upon the Quiz class's determine grade method to thank
  #the player for taking the quiz and to display game information
  SQ.display_credits

end
As you can see, these statements are controlled by a large if statement. The first part of the if statement checks to see if the player responds with a value of n when prompted for permission to begin the quiz. These statements clear the screen and then display a message intended to encourage the player to return and take the quiz at another time.
In the event the player decides to take the quiz, the statements in the else portion of the if statement block are executed. As you can see, these statements consist of a series of calls to methods belonging to the SQ and Console_Screen objects. The first method that is called is the display_instructions method, which is then followed by five separate calls to the disp_q method. Each of these five calls passes a different set of arguments, representing a quiz question, four multiple choice answers, and the correct answer. Once all five quiz questions have been processed by the disp_q method, the Quiz class’s determine_grade method is called. This method is responsible for determining whether the player passed the quiz. Finally, the display_credits method is called, which clears the screen and displays a message thanking the player for taking time to take the quiz.
That’s everything! At this point you should be ready to take your new Ruby script for a test drive. If you have not done so yet, save your script file and then execute it. As long as you followed along carefully and did not make any typing mistakes along the way, everything should work as expected. If you run into any errors, make sure that you carefully read the resulting error messages to figure out where things went wrong. If necessary, you may have to review the entire script looking for mistyped or missing scripts statements. Once you’ve found and fixed any errors, put the script through its paces and then share a copy of it with your friends and see what they think of it.
In this chapter you learned how to incorporate looping logic into your Ruby scripts to set up the repeated execution of statements and code blocks. You learned how to work with many different types of loops, including loops that are provided as Ruby language constructs, loop modifiers, and loops provided as methods belonging to various Ruby classes. Using what you have learned in this chapter, you will be able to develop Ruby scripts that are capable of processing large amounts of data. You will also be able to develop scripts that can perform specific actions over and over again with a minimal amount of code and effort.
Now, before you move on to Chapter 6, “Working with Collections of Data,” I suggest you set aside a little extra time to make a few improvements to the Superman Movie Trivia Quiz by implementing the following list of challenges.