So far, every time you have worked with data in this book, it has been using variables to store and manage individual pieces of information. While this is certainly an excellent way to manage small amounts of information, things become very difficult when you start creating scripts that need to work with dozens, hundreds, or even thousands of pieces of data at one time. This chapter will show you how to manage groups of related data, like you might find in a personal address book or a small database, using arrays and hashes. Using the information presented in this chapter, you will learn how to develop Ruby scripts capable of storing, retrieving, and manipulating huge amounts of data with a minimum of programming statements. In addition, you will learn how to create a new Ruby script, the Ruby Number Guessing game.
Specifically, you will learn how to:
Organize related data using lists
Use lists as a means of assigning data to arrays
Create arrays and use them to store, retrieve, and process array items
Create hashes and use them to store, retrieve, and process key-value pairs
Create loops that process the items stored in arrays and hashes
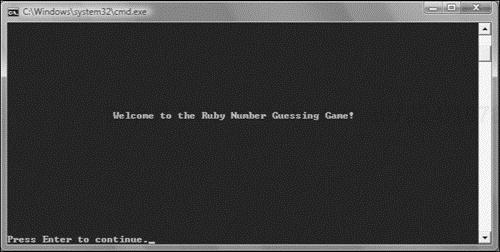
In this chapter, you will learn how to create a new computer script called the Ruby Number Guessing game. This game challenges the player to guess a randomly generated number from 1 to 100 in as few guesses as possible. The game begins by displaying the welcome message shown in Figure 6.1.
Before starting a new round of play, the game requires that the player provide it with permission to begin, as demonstrated in Figure 6.2.

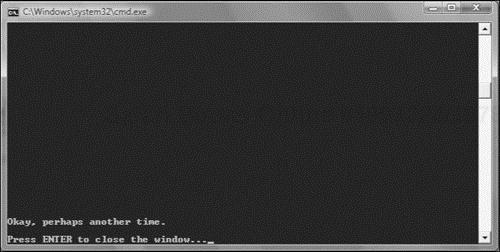
To begin playing, the player must respond by typing a y and pressing the Enter key. Alternatively, the player can enter a value of n to instruct the game to terminate, as shown in Figure 6.3. Any player input other than y or n is ignored.
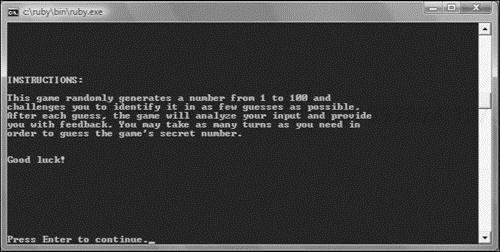
Assuming the player has elected to play the game, the instructions shown in Figure 6.4 display.
Once the player has read and dismissed the instructions by pressing the Enter key, game play begins and the player is prompted to make an initial guess, as shown in Figure 6.5.

After each guess, the game provides the player with a hint that will help him hone in on the game’s secret number. Figure 6.6 shows the message that displays when the player’s guess is too high.
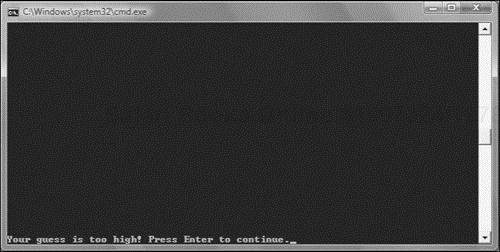
Figure 6.7 shows the message that displays when the player’s guess is too low.

The player may make as many guesses as are necessary to finally guess the game’s secret number. Once the player guesses the secret number, the message shown in Figure 6.8 displays.

Once the player presses the Enter key, the game prompts the player for permission to play a new game, allowing the player to play as many games as she wants.
All of the examples that you have seen up to this point in the book have involved the storage, manipulation, and retrieval of small amounts of data. As such, variables have been used as the primary means of managing this data. However, as your scripts grow larger and more complex, there will be situations where the number of different pieces of data being managed becomes too large to be effectively managed using variables. Since most of the data managed by a given script is usually related, you can often manage this data in the form of a list.
For example, rather than manipulating the names of 100 individual people using variables, you could add the names to a list and then process the list as a unit. This is a lot easier to manage than trying to process 100 different variables. In Ruby lists can be managed and stored using one of the following structures.
Arrays
Hashes
A list is a collection of data. Lists are created as comma-separated items. In Ruby, lists can be used as the basis for populating arrays. An array is an indexed list of items. In Ruby, array indexes begin at 0 and are incremented by 1 each time a new item is added. Index numbers can only be whole numbers (integers). In Ruby, arrays are simply viewed as another type of object.
Ruby arrays have an initial element, a final element, and any number of elements in between. Once added to an array, an array element can be referred to by specifying its index position within the array. The following syntax can be used when creating a new array.
VariableName = [Elements]
Here, VariableName is the name of a variable to which the array is assigned and Elements represents the contents of the array, which are stored as a comma-separated list enclosed within matching square brackets. For example, the following statement creates an array named x and stores five numbers in it.
x = [2, 4, 6, 8, 10]
If you want to experiment with arrays a bit, you can do so using the irb. For example, start up a new irb session and execute the preceding statement. At this point, the x array has been created and is ready and waiting for you to do something with it. You can then use the inspect method to view the array’s contents, as demonstrated here:
irb(main):002:0> puts x.inspect
[2, 4, 6, 8, 10]
Trick
inspect is a method associated with most of Ruby’s object classes. Its purpose is to provide a text view of an object. In the case of an array, the inspect method will display a list of the elements stored in the array.
Arrays can be used to store any type of object supported by Ruby. For example, the following statement creates a new array called children and stores three text strings in it.
children = ["Alexander", "William", "Molly"]
Unlike many programming languages, Ruby does not require that you formally declare an array prior to using it. All that you have to do to begin working with a new array is to reference it. In response, Ruby will create a new array. Unlike many programming languages, Ruby does not require that you tell it in advance how big an array will be. Instead, Ruby lets you create and grow an array on the fly, accepting as many or as few items as you want to add to them.
As you have already seen, one way to create an array is to assign a list to it, as shown here:
children = ["Alexander", "William", "Molly"]
A quick way to create an array made up of strings is to use the %w(and) characters, as shown here:
children = %w(Alexander William Molly)
Here, an array named children has been declared and assigned three string items. The array is created by extracting space-separated string elements. The advantage of using this option when creating string arrays is that you do not have to worry about remembering to provide quotes and commas that are otherwise required when creating an array.
Trick
You can also use the %W(and) characters to create an array by extracting space-separated string elements while also performing string substitutions for individual words, as shown here:
me = "Jerry"

Names = %W(Molly William Alexander #{me} Mary)
puts Names.inspect
When executed, this example generates a new array called Names that contains the following items.
["Molly", "William", "Alexander", "Jerry", "Mary"]
Yet another way to create an array is to use an object-oriented approach using the Array object’s New method.
x = Array.new
Here, an empty array named x has been created. Using operators and methods shown later in this chapter, you can populate this array.
New arrays can also be created by assigning the contents of one array to another array, as demonstrated here:
x = [1, 2, 3]
y = x
Here an array named x, which contains three numbers, is assigned to a variable named y. As a result of this assignment, y is set up as an array containing a list of three numbers. To prove that the y array was created as described, you can use the inspect method as shown here:
puts y.inspect
Once executed, this statement will display the following result.
[1, 2, 3]
Ruby also lets you create a new array by adding two existing arrays together, as demonstrated here:
x = [1, 2, 3]
y = [4, 5, 6]
z = x + y
puts z.inspect
When executed, this example displays the following output.
[1, 2, 3, 4, 5, 6]
Trick
In an interesting twist on the idea of subtraction, you can use array subtraction to create a new array. Array subtraction takes two arrays, removes any duplicate items, and creates a new array, as demonstrated here:
family = %w(Alexander William Molly Daddy Mommy)
parents = %w(Daddy Mommy)
children = family - parents
puts children.inspect
Here, two arrays have been defined, one named family with five items and another named parents with two items. A new array named children is then created by subtracting parents from family. When executed, this example displays the following output.
["Alexander", "William", "Molly"]
As you can see, the duplicate items found in the family and parents array were not added to the new children array.
In addition to populating an array with items when you initially declare it, Ruby lets you add new items to any array. Ruby also lets you modify existing array items any time you want. One way of doing so is to specify the index number of the item to be replaced or added using the syntax outlined here.
arrayname[indexNo]
Here, arrayname is the name of the array and indexNo is the index position within the array where the new assignment is to be made.
To get a feel for how to modify an existing array item, look at the following example, which replaces one of the elements stored in an array.
children = ["Alexander", "William", "Molly"]
children[2] = "Mighty One"
puts children.inspect
In this example an array named children is declared and assigned three initial items. Next, the item stored at index position 2 ("Molly") is replaced with a value of "Mighty One". When executed, this example displays the following output.
["Alexander", "William", "Mighty One"]
To add a new item to an existing array, all you have to do is add it using an index number that is one greater than the index number of the last item stored in the array, as demonstrated here.
children = ["Alexander", "William", "Molly"]
children[3] = "Dolly"
puts children.inspect
When executed, the following output is displayed, showing that the array has been increased by one item.
["Alexander", "William", "Molly", "Dolly"]
Trap

Be careful when adding elements to the end of an array. If you accidentally specify an index number that goes too far beyond the last used index number, you will end up with a range of undefined items, as demonstrated here:
children = %w(Alexander William)
children[4] = "Molly"
puts children.inspect
When executed, the following output is displayed, showing that the array now contains two nil items.
["Alexander", "William", nil, nil, "Molly"]
As has already been stated, in Ruby an array is an object. As such, whenever you work with an array, you can call upon any of the methods associated with Ruby’s Array class. Once such method is <<. Using this method you can add elements to an array by pushing them onto the end of the array, as demonstrated here:
Names = []
Names << "Alexander"
Names << "William"
Names << "Molly"
puts Names.inspect
Once these statements have been executed, the Names array will contain the following list of items.
["Alexander", "William", "Molly"]
If you prefer, you can use the push method in place of the << method to add elements to an array by pushing them onto the end of the array, as demonstrated here:
Names = []
Names.push("Alexander")
Names.push("William")
Names.push("Molly")
puts Names.inspect
Once these statements have been executed, the Names array will contain the following list of items.
["Alexander", "William", "Molly"]
Before you begin working with an array, you might first want to check to see if anything is in it. One way of accomplishing this is to use the Array class’s length or size methods to see if the value that they return is equal to zero. An easier way to accomplish the same thing would be to use the empty? method. This method returns a value of true if the specified array is empty and false if it contains at least one element.
Take a look at the following statements to see an example of how to work with the empty? method:
if children.empty? == false then
  children.each {|child| puts child}
else
  puts "The children array is empty"
end
Here an array has been created that contains three strings. An if statement is then set up that uses the empty? method to determine if the children array has any items in it. If it does, the each method is used to display the names of every item in the list. If, on the other hand, the array is empty, a text message is displayed instead.
Ruby provides you with a host of different ways to access data stored in an array. This includes the ability to specify particular items as well as ranges of items. Items can also be retrieved based on their locations within arrays.
You can retrieve any item located in an array by specifying the name of the array followed by the index number where the item is stored, as demonstrated here:
children = ["Alexander", "William", "Molly"]
middleChild = children[1]
Here, the first statement declares an array named children and assigns three items to it. The second statement assigns the value of the second item located in the array ("William") to a variable named middleChild.
There is often more than one way to do things in Ruby. For example, when it comes to retrieving items from an array, you can also use the Array class’s at method to retrieve an array item based on its index position. This method retrieves an array element using an integer value passed to it as an argument, as demonstrated here:
children = %w(Alexander William Molly)
puts children.at(1)
Here, the at method retrieves a value of "William" from the children array, which is then displayed.
You can use the Array class’s slice method to retrieve a series of elements, referred to as a slice, from an array by enclosing a list or range of index numbers within a pair of parentheses, as demonstrated here:
children = %w(Alexander William Molly)
boys = children.slice(0..1)
When executed, the slice method retrieves the first and second items stored in the children array and assigns them as items in the boys array.
Other ways of retrieving items from an array are provided by the Array class’s first and last methods. The first method retrieves the first element from the specified array, as demonstrated here:
children = %w(Alexander William Molly)
puts children.first
When executed, these statements display the following output.
Alexander
As you may have already guessed, the Array class’s last method can be used to retrieve the last element from the specified array, as shown here:
children = %w(Alexander William Molly)
puts children.last
When executed, these statements display the following output.
Molly
As was demonstrated in Chapter 5, you can use a loop to efficiently process the contents of an array using a minimum number of script statements. While you can certainly use the while and until loop for processing the contents of a loop, the Array class’s each method is tailor-made for processing loops.
For example, the following statements demonstrate how to set up a loop that displays each element in an array named children.
children = %w(Alexander William Molly)
children.each do |child|
  puts child
end
This each method automatically repeats once for each item stored in the specified array. In this example, each time the loop iterates, the value of the current array item is assigned to the child variable, which is then displayed, resulting in the following output.
Alexander
William
Molly
Ruby provides you with a number of different methods that you can use to delete items stored in arrays. This includes the ability to delete all of the items stored in an array and to delete items based on their position within the array. You can also delete items based on their value as well as specify items to be deleted using their index position.
If at some point in a Ruby script you decide that you need to remove all the items stored in an array to begin adding items to the array from scratch, you can use the Array class’s clear method as demonstrated here:
children = %w(Alexander William Molly)
children.clear
Here, the clear method is used to remove all items currently stored in an array named children, resulting in an empty array.
Another way to delete items from an array is with the Array class’s shift method. This method deletes the first element stored in an array, shifting the index number of all remaining items elements down by one index position as demonstrated here:
children = %w(Alexander William Molly)
x = children.shift
puts children.inspect
Here, the shift method is used to retrieve the value of the first element stored in the array, which is assigned to the x variable. At the same time, the shift method also removes the first element from the array, which, in the case of the previous example, results in an array named children that contains the following list of items.
["William", "Molly"]
If you need to, you can delete an item from the end of an array using the Array class’s pop method, as demonstrated here:
family = %w(Alexander William Molly Daddy Mommy)
family.pop
family.pop
puts family.inspect
Here, an array named family has been assigned five items. Next the pop method is used twice, removing the last two items from the array. As a result, the family array is left with the following list of items.
["Alexander", "William", "Molly"]
Rather than deleting array items based on their location within an array, you may instead want to delete them based on their value, which you can do using the Array class’s delete method. To use this method, you must pass the delete method an argument that identifies which items should be deleted, as demonstrated here:
fruit = %w(Apples Oranges Bananas Oranges Grapes)
fruit.delete("Oranges")
Here, an array named fruit has been created and assigned five items. Next, the Array class’s delete method is executed and passed a value of "Oranges". Based on this input, the delete method removes two items from the fruit array, leaving the array with the following list of items.
["Apples", "Bananas", "Grapes"]
Another option for deleting items from an array is to use the Array class’s delete_at method. This method lets you delete any item from an array based on its index position, as demonstrated here:
fruit = %w(Apples Oranges Bananas Oranges Grapes)
fruit.delete_at(3)
Here an array named fruit has been created and assigned five items. Next, the Array class’s delete_at method is executed and passed an argument of 3. In response, the method removes the item from the array stored in index position 3 (e.g., its fourth item). As a result, the fruit array ends up containing the following list of items.
["Apples", "Oranges", "Bananas", "Grapes"]
When an item is deleted using the delete_at method, all items that follow it in the array are automatically shifted to the left one position.
Hint

The Array class’s insert_at method is the opposite of the delete_at method. The insert_at method adds a new item to an array at the specified index number. To make room for the new item, all items already in the array at the specified index location and beyond are automatically shifted one position to the right to make room.
In Ruby, elements are stored by default in an array based on the order in which they are added to the array. As a result, you may end up with a list of items that are not in the order you want them to be. As such, you may want to use the Array class’s sort method to sort the contents of the array, as demonstrated here:
fruit = %w(Apples Oranges Bananas Grapes)
puts fruit.sort.inspect
Hint
In the last statement, the output of the sort method was used as input for the inspect method. When used in this manner, the methods are said to be chained together.
In this example, an array named fruit is created and assigned five items. The contents of the array are then displayed using the puts method. Note that in this example the items are first sorted and then the resulting list is displayed using the inspect method resulting in the following output.
["Apples", "Bananas", "Grapes", "Oranges"]
Trick
Ruby’s Array class also provides you with access to a method named reverse. This method reverses the order of items stored in a list. So, using this method, you could reverse the order of array items after they have been sorted, as demonstrated here:
fruit = %w(Apples Oranges Bananas Grapes)
puts fruit.sort.reverse.inspect
Here, the items stored in the fruit array are first sorted. Next, the order of the now-sorted items is reversed. Finally, the inspect method is used to display the resulting list.
["Oranges", "Grapes", "Bananas", "Apples"]
One way of finding something stored in an array is to set up a loop to iterate through the array to look for a specific item. In the case where you have a large array that might contain thousands of items, processing the contents of the array takes time. Before you perform such a resource-intensive operation, it is a good idea to first use the Array class’s include? method to check and see if the array contains any instances of the item you are looking for, as demonstrated here:
children = %w(Alexander William Molly)
puts "I found him!" if children.include?("William")
Here, the include? method is used to search the children array to see if it contains a value of "William". Once you determine whether an array contains any instances of the item you are looking for, you can then decide whether you need to loop through the array and process the items in some way.
As arrays grow in size, it becomes difficult trying to keep up with the index positions where individual items are stored. Because of this, you will usually need to set up a loop to process all of the contents of an array just to find the specific items you need to work with. As an alternative to arrays, Ruby also supports the storage and retrieval of data using hashes.
A hash, sometimes referred to as an associative array or dictionary in other programming languages, is a list of data stored in key-value pairs. Each piece of data stored in a hash is stored as a value and assigned a key, which uniquely identifies the data. Instead of referencing data stored using an index position as with arrays, hashes allow you to reference a value by specifying its key.
Like arrays, hashes are objects and therefore provide you with access to large numbers of methods that you can use to create and interact with hashes. Like arrays, hashes can store any type of object that Ruby supports, including numbers and strings. To access a particular value, you need its associated key. Hashes can be used to store virtually any amount of data, limited only by the computer’s available memory. Access to data stored in a hash is relatively fast and does not significantly diminish as additional key-value pairs are added. Hash keys and values can be of any length. Unlike arrays, which store items in the order they are added, hashes do not store their contents in any particular order.
As with arrays, Ruby provides you with a number of different ways of creating hash files. You can create and populate hash files at the same time. You can spread hash file definitions out over multiple lines and you can even use the Hash class’s new method to create new empty hash files.
The syntax that you need to follow when creating a hash and populating it with an initial set of key-value pairs is outlined here:
variableName = { key => value, key => value, ... key => value}
Here, variableName represents the name of a variable to which the hash is assigned. key represents a unique key name associated with a particular value and value is a piece of data stored in the hash.
As the following example demonstrates, creating a new hash is pretty straightforward.
kids = {"first" => "Alexander", "second" => "William", "third" => "Molly"}In this example a new hash named kids has been created and populated with three key-value pairs. The first key assigned to the hash is named "first" and its associated value is "Alexander". As you can see, keys and their associated values are separated by the => characters and commas are used to separate key-value pairs.
Hint
If you prefer, you can replace the => characters with the, character when defining a hash, as shown here:
kids = {"first", "Alexander", "second", "William", "third", "Molly"}Once created, you can view the hash using the following statement.
puts kids.inspect
When executed, this statement displays the following output, showing the structure of the hash that has been created.
{"third"=>"Molly", "second"=>"William", "first"=>"Alexander"}If you prefer, you can rewrite the previous example and spread it across multiple lines to make is easier to understand and expand, as demonstrated here:
kids = {"first" => "Alexander",
  "second" => "William",
  "third" => "Molly"
}You can add as many key-value pairs as you want to a hash using the following syntax.
hashVariable[key] = value
hashVariable is the name of the variable to which the hash has been assigned. key is the name of the key to be assigned to the new key-value pair, and hash represents the data that is stored. For example, the following statement creates a new hash file and assigns three initial key-value pairs to it.
kids = {"first" => "Alexander", "second" => "William", "third" => "Molly"}You can add additional key-value pairs to the hash as shown here:
kids["fourth"] = "Dolly"
kids["fifth"] = "Regis"
Here, two new key-value pairs have been added to the kids hash. At this point the hash now contains five key-value pairs as shown here:
{"third"=>"Molly", "fifth"=>"Regis", "second"=>"William", "first"=>"Alexander",
"fourth"=>"Dolly"}Another way to create a hash is to copy the contents of one hash into a new hash, as demonstrated here:
kids = {"first" => "Alexander", "second" => "William", "third" => "Molly"}
family = kids
Now the hash named family contains an exact copy of the key-value pairs stored in the kids hash.
Another way to create a new hash is to take the contents of two existing hashes and use them as the basis for creating a new hash. To accomplish this you will need to work with the Hash class’s merge method, as demonstrated here:
kids = {"first" => "Alexander", "second" => "William", "third" => "Molly"}
parents = {"daddy" => "Jerry", "mommy" => "Mary"}
family = kids.merge(parents)
Here, a new hash named family has been created by using the merge method on the kids hash and passing the method the name of the parents hash as an argument. The result is a new hash that contains all of the key-value pairs from both hashes.
As with arrays, you can use the Hash class’s clear method to remove all key-value pairs from a hash, as demonstrated here:
kids = {"first" => "Alexander", "second" => "William", "third" => "Molly"}
kids.clear
When executed, the first statement creates a new hash and populates it with three key-value pairs. However, the second statement then executes the Hash class’s clear method, deleting all of the key-value pairs from the hash, leaving it empty.
Hint
You can also delete the contents of a hash by assigning an empty list to a hash, as demonstrated here:
kids = {"first" => "Alexander", "second" => "William", "third" => "Molly"}
kids = {}You can also use the Hash class’s delete method to remove a key-value pair from a hash by passing the method the name of a key, as demonstrated here:
kids = {"first" => "Alexander", "second" => "William", "third" => "Molly"}
kids.delete("second")
When executed, the first statement creates a new hash and populates it with three key-value pairs. The second statement then deletes the key-value pair whose key is "second".
You can also delete key-value pairs from a hash using the Hash class’s delete_if method, as demonstrated here:
kids = {"first" => "Alexander", "second" => "William", "third" => "Molly"}
kids.delete_if {|key, value| key >= "third"}
The delete_if method takes as an argument an expression. If the expression evaluates as being true for any key-value pair, the key-value pair is deleted from the hash.
There is no point in trying to retrieve data from a hash or trying to use a loop to process a hash if there are no key-value pairs stored in it. As with arrays, you can use the empty? method to determine if a hash contains any key-value pairs. The empty? method returns a value of true if the specified hash contains no key-value pairs.
To get a better understanding of how the empty? method works, take a look at the following example.
kids = {"first" => "Alexander", "second" => "William", "third" => "Molly"}

if kids.empty? == false then
  puts kids.inspect
else
  puts "The kids hash is empty"
end
Here, a hash named kids has been created and assigned three key-value pairs. Next the Hash class’s empty? method is used to determine if the hash is empty. Since the hash is not empty, the inspect method is executed, showing the hash’s contents. However, had the hash in fact been empty, the statement that followed the else keyword would have been executed.
Data is extracted from a hash in very much the same way that it is extracted from an array, only you specify a key instead of an index number. For example, take a look at the following statement.
kids = {"first" => "Alexander", "second" => "William", "third" => "Molly"}Here, a hash named kids has been created and assigned three key-value pairs. The following statement demonstrates how to access the value associated with the "third" key.
x = kids["third"]
Here, a variable named x is assigned a value of "Molly".
Unlike arrays, hashes are not indexed. Therefore, you cannot set up a loop to process their contents from beginning to end. Hashes have no starting or ending positions. However, Ruby gives you a way around this hash limitation by providing you with access to the keys method.
The keys method creates a list of all the keys stored within a specified hash. Using this list, you can set up a loop to iterate through and process the hash’s keys, as demonstrated here:
kids = {"first" => "Alexander", "second" => "William", "third" => "Molly"}

puts "

Keys belonging to the kids hash:

"
kids.keys.each do |child|
  puts child
end
Here, a hash named kids has been created and assigned three key-value pairs. Next the puts method is used to display a string, and then, using chaining, the output of the keys method is passed to the each method, which displays each key name as it iterates through the list. The output displayed when these statements are executed is shown here:
Keys belonging to the kids hash:

third
second
first
Now that you know how to iterate through a list of all the keys stored within a hash, you are just a step away from being able to reach out and grab and then process each key’s associated value. As the following example demonstrates, all you have to do to get your hands on the values stored in the hash is precede the reference to the keys with the name of the hash (e.g., hash [key], or kids[child] in the following example).
kids = {"first" => "Alexander", "second" => "William", "third" => "Molly"}
puts "

Values belonging to the kids hash:

"
kids.keys.each do |child|
  puts kids[child]
end
The output displayed when these statements are executed is shown here:
Values belonging to the kids hash:

Molly
William
Alexander
Trick
You can also use the Hash values method to generate a list of all the values stored in a hash.
kids = {"first" => "Alexander", "second" => "William", "third" =>
"Molly"}
x = kids.values
puts x.inspect
When executed, this example assigns the following list to the x array.
["Molly", "William", "Alexander"]
Because hashes do not store their key-value pairs in any particular order, the order in which keys are retrieved when working with the keys method may not always be optimal. If you want, you can pass the keys method’s output to the sort method prior to looking through a hash’s keys, as demonstrated here:
kids = {"first" => "Alexander", "second" => "William", "third" => "Molly"}
kids.keys.sort.each do |child|
  puts child
end
When executed, this example generates the following output, sorted by key name.
first
second
third
Okay, now it is time to turn your attention back to the development of this chapter’s game project, the Ruby Number Guessing game. As with the previous chapter game projects, it is important that you follow along carefully with each step that is outlined in the following sections to avoid making any time-consuming mistakes.
The development of the Ruby Number Guessing game will be completed in 12 steps, as outlined here:
Open your text or script editor and create a new file.
Add comment statements to the beginning of the script file to document the script and its purpose.
Define a class representing the terminal window.
Define a class representing the Ruby Number Guessing game.
Add a
display_greetingmethod to theGameclass.Add a
display_instructionsmethod to theGameclass.Add a
generate_numbermethod to theGameclass.Add a
play_gamemethod to theGameclass.Add a
display_creditsmethod to theGameclass.Instantiate script objects.
Prompt the player for permission to begin the game.
Set up the game’s controlling logic.
The first step in developing the Ruby Number Guessing game is to open up your favorite text or code editor and create a new Ruby script file. Save the script file with a name of NumberGuess.rb.
Next, add the following comment statements to the script file. These statements provide a high-level overview of the game and its purpose and provide you with a place to record updates to the script should you decide to return and modify it at some point in the future.
#--------------------------------------------------------------------------
#
# Script Name: NumberGuess.rb
# Version:     1.0
# Author:      Jerry Lee Ford, Jr.
# Date:        October 2007
#
# Description: This Ruby script is a number guessing game that challenges
#              the player to guess a randomly generated number in as few
#              guesses as possible.
#
#--------------------------------------------------------------------------
The Ruby Number Guessing game will rely on two custom classes to provide it with a collection of methods that will be used to control interaction with the user and the execution of the game. The code statements belonging to the Screen class are shown next and should be added to the end of the script file.
# Define custom classes ---------------------------------------------------

#Define a class representing the console window
class Screen

  def cls  #Define a method that clears the display area
    puts ("
" * 25)  #Scroll the screen 25 times
    puts "a"  #Make a little noise to get the player's attention
  end

  def pause    #Define a method that pauses the display area
    STDIN.gets  #Execute the STDIN class's gets method to pause script
                #execution until the player presses the Enter key
  end

end
The Screen class contains two methods. The first method is the cls method. It is made up of two statements. The first statement writes 25 blank lines to the console window to clear the screen and the second statement contains a string that is made up of the a escape character that when executed results in the play of an audible beep.
The Screen class’s second method is named pause and is used to execute the STDIN class’s gets method to pause script execution until the player presses the Enter key.
The script’s second custom class is named Game. It provides access to five methods that are needed to control the overall execution of the game. To begin the creation of this class, add the statements shown next to the end of the script file.
#Define a class representing the Ruby Number Guessing Game
class Game

end
The Game class consists of five methods. The first of these methods is named display_greeting. This method is made up of the script statements shown next, which should be inserted between the Game class’s opening and closing statements.
#This method displays the game's opening screen
def display_greeting

  Console_Screen.cls  #Clear the display area

  #Display welcome message
  print "		  Welcome to the Ruby Number Guessing Game!" +
  "


Press Enter to " +
             "continue."

  Console_Screen.pause       #Pause the game

end
When called, this method calls upon the Screen class’s cls method to clear the screen, displays the game’s welcome message, and then pauses the execution of the script using the Screen class’s pause method.
The next method to be added to the Game class is the display_instructions method. The script statements for this method are shown next and should be added to the end of the class definition, immediately after the previously defined method.
#Define a method to be used to present game instructions
def display_instructions

  Console_Screen.cls       #Clear the display area
  puts "INSTRUCTIONS:

"  #Display a heading

  #Display the game's instructions
  puts "This game randomly generates a number from 1 to 100 and"
  puts "challenges you to identify it in as few guesses as possible."
  puts "After each guess, the game will analyze your input and provide"
  puts "you with feedback. You may take as many turns as you need in"
  puts "order to guess the game's secret number.


"
  puts "Good luck!


"
  print "Press Enter to continue."

  Console_Screen.pause       #Pause the game

end
This method uses the Kernel class’s puts method to display a series of text strings representing the game’s instructions.
The next method to be added to the Game class is the generate_number method. The script statements for this method are shown next and should be added to the end of the class definition, immediately after the previously defined method.
#Define a method that generates the game's secret number
def generate_number

  #Generate and return a random number from 1 to 100
  return randomNo = 1 + rand(100)

end
This method is responsible for generating a random number from 1 to 100. To accomplish this, the rand method is executed and passed a value of 100. This results in an integer value between 0 and 99. As such, a value of one is added to the value returned by the rand method to end up with a number in the target range. This integer value is then returned back to the statement that calls upon the generate_number method using the return command.
The next method to be added to the Game class is the play_game method. The script statements for this method are shown next and should be added to the end of the class definition, immediately after the previously defined method.
#Define a method to be used to control game play
def play_game

  #Call on the generate_number method to get a random number
  number = generate_number

  #Loop until the player inputs a valid answer
  loop do

    Console_Screen.cls       #Clear the display area

    #Prompt the player to make a guess
    print "
Enter your guess and press the Enter key: "

    reply = STDIN.gets  #Collect the player's answer
    reply.chop!         #Remove the end of line marker
    reply = reply.to_i  #Convert the player's guess to an integer

    #Validate the player's input only allowing guesses from 1 to 100
    if reply < 1 or reply > 100 then
      redo  #Redo the current iteration of the loop
    end

    #Analyze the player's guess to determine if it is correct
    if reply == number then    #The player's guess was correct
      Console_Screen.cls        #Clear the display area
      print "You have guessed the number! Press Enter to continue."
      Console_Screen.pause      #Pause the game
      break
    elsif reply < number then  #The player's guess was too low
      Console_Screen.cls        #Clear the display area
      print "Your guess is too low! Press Enter to continue."
      Console_Screen.pause      #Pause the game
    elsif reply > number then  #The player's guess was too high
      Console_Screen.cls        #Clear the display area
      print "Your guess is too high! Press Enter to continue."
      Console_Screen.pause      #Pause the game
    end

  end

end
This method begins by calling upon the Game class’s generate_number method, which generates a random number from 1 to 100. This value is then assigned to a variable named number. The rest of the statements that make up the method are enclosed inside a loop that has been set up to execute forever.
Within the loop, the screen is cleared and then the player is prompted to try and guess the game’s secret number. The player’s guess is captured and stored in a variable named reply. The value stored in reply is then converted to an integer using the to_i method. This way, if the player entered something other than an integer, an error will not occur when the script begins to analyze the player’s input using the statements that follow.
Next, the value assigned to reply is analyzed to see if it is less than 1 or greater than 100. If this is the case, the redo command is executed, restarting the current iteration of the loop to prompt the player to guess again.
If a valid guess was provided by the player, the value of reply is then analyzed to see if it is equal to the game’s secret number, lower than the secret number, or higher than the secret number. If the player has guessed the game’s secret number, a message is displayed notifying the player that the number has been guessed and then the break command is executed, terminating the execution of the play_game method’s loop. If, however, the player’s guess is too low or too high, the player is given a hint to help guide her next guess and the play_game method’s loop is repeated, giving the player the chance to make another guess.
The last method to be added to the Game class is the display_credits method. This method will display information about the game and its author, including the author’s URL. The statements that make up this method are shown next and should be appended to the end of the Game class.
#This method displays the information about the Ruby Number Guessing game
def display_credits

  Console_Screen.cls  #Clear the display area

  #Thank the player and display game information
  puts "		Thank you for playing the Ruby Number Guessing Game.


"
  puts "
			 Developed by Jerry Lee Ford, Jr.

"
  puts "				 Copyright 2008

"
  puts "			URL: http://www.tech-publishing.com


"

end
The next step in the development of the Ruby Number Guessing game is to initialize instances of the Screen and the Game classes. This is done by appending the following statements to the end of the script file.
# Main Script Logic -------------------------------------------------------

#Initialize a global variable that will be used to keep track of the
#number of correctly answered quiz questions
$noRight = 0

Console_Screen = Screen.new  #Instantiate a new Screen object
SQ = Game.new                #Instantiate a new Quiz object

#Execute the Quiz class's display_greeting method
SQ.display_greeting

answer = ""
In addition to instantiating the Console_Screen and SQ objects, these statements define a variable named answer, which will be used in the next section to control the execution of the loop that will be used to prompt the player for permission to begin a new round of play.
The programming logic that is responsible for prompting the player for permission to begin a new round of play is outlined here:
#Loop until the player enters y or n and do not accept any other input
loop do

  Console_Screen.cls  #Clear the display area

  #Prompt the player for permission to start the quiz
  print "Are you ready to play the Ruby Number Guessing Game? (y/n): "
  answer = STDIN.gets  #Collect the player's response
  answer.chop!  #Remove any extra characters appended to the string

  #Terminate the loop if valid input was provided
  break if answer == "y" || answer == "n"

end
These statements, which should be added to the end of the script file, are controlled by a loop that has been set up to run forever. Upon each iteration of the loop, the player is prompted to enter a value of y or n, to indicate whether a new round of play should be initiated or the game should be terminated. Any input other than a y or n is ignored. Once a valid response has been collected from the user, the break command is executed, terminating the loop and allowing the rest of the script to continue running.
The remainder of the script file is controlled by a larger if code block. The script statements that it executes depend on whether the player decided to terminate the game or play another round.
#Analyze the player's input
if answer == "n"  #See if the player elected not to take the quiz

  Console_Screen.cls  #Clear the display area

  #Invite the player to return and take the quiz some other time
  puts "Okay, perhaps another time.

"

else  #The player wants to take the quiz

    #Execute the Quiz class's display_instructions method
    SQ.display_instructions

  loop do

    #Execute the Quiz class's disp_q method and pass it
    #arguments representing a question, four possible answers, and the
    #letter representing the correct answer
    SQ.play_game
    Console_Screen.cls  #Clear the display area

    #Prompt the player for permission to start the quiz
    print "Would you like to play again? (y/n): "

    playAgain = STDIN.gets  #Collect the player's response
    playAgain.chop!  #Remove any extra characters appended to the string

    break if playAgain == "n"

  end

  #Call upon the Quiz class's determine_credits method to thank
  #the player for taking the quiz and to display game information
  SQ.display_credits

end
If the player decides to stop playing the game, the script statement located at the top of the if code block is executed, clearing the screen and inviting the player to return and play another time. If, however, the player decides to play a new round, the statements that follow the else keyword are processed, in which case the Game class’s display_instructions method is called. Next a loop is set up to facilitate the execution of as many rounds of play as the player wants. Each time the loop repeats, it calls on the play_game method, which is responsible for managing the actual playing of the game. Once the play_game method has finished executing, the screen is cleared and the player is asked if she would like to play another game. If the player responds by entering an n and pressing the Enter key, the break command is executed, terminating the loop and allowing the display_credits method to be called, after which the script terminates. If the player responds by entering a value of y and then pressing the Enter key, the loop iterates and a new round of play is initiated.
Okay, that’s everything you need to create and execute the Ruby Number Guessing game. As long as you followed along carefully and did not make any typos when keying in the script statements, everything should work as advertised. In the event that you do run into errors, make sure that you carefully read the resulting error messages to ascertain where you made your mistakes. If necessary, go back and review the script and look for typos and missing scripts statements.
In this chapter, you learned how to store related items in arrays and hashes. You learned how to use methods belonging to arrays and hashes to manipulate and process their contents. In doing so, you learned how to add, delete, and sort array and hash data. You also learned how to tell when arrays and hashes are empty and to use loops to iterate through them and display their contents. Now, before you move on to Chapter 7, “Working with Regular Expressions,” I suggest you set aside a little extra time to make a few improvement to the Ruby Number Guessing game by implementing the following list of challenges.