
Chapter 16
Managing Rentals
In This Chapter
![]() Describing rental properties and tenants
Describing rental properties and tenants
![]() Recording rent payments
Recording rent payments
![]() Keeping track of rental expenses
Keeping track of rental expenses
![]() Tracking rental profits
Tracking rental profits
The Quicken Rental Property Manager version of Quicken — the focus of this short chapter — provides everything available in the other versions of Quicken. The Rental Property Manager version also includes tools for tracking both your rental properties and your rental income and expense.
If you own rental properties — and I say this as a CPA who breaks down and cries several times each year when I see the messy financial records that most real estate investors keep — you definitely want to make the investment and buy Quicken Rental Property Manager. You’ll have a much better handle on your rental property investments, the rental income the properties earn, and the rental deductions the properties produce.
Describing a Rental Property
To track rental properties with Quicken, you need to describe each property. To describe a property, follow these steps:
- Display the Rental Property tab.
If you purchased the Rental Manager version of Quicken, you should also have a Rental Property tab available in the Quicken window. If the tab doesn’t show, choose View⇒Tabs to Show and click Rental Property. If you want to manage rental properties but didn’t buy the Rental Manager version of Quicken, you may be able to buy and immediately turn on the Rental Manager functionality by choosing Help⇒Add Rental Property Tools.
- Click the Properties & Tenants button and choose Add Property.
Quicken displays the Add Rental Property dialog box, shown in Figure 16-1.
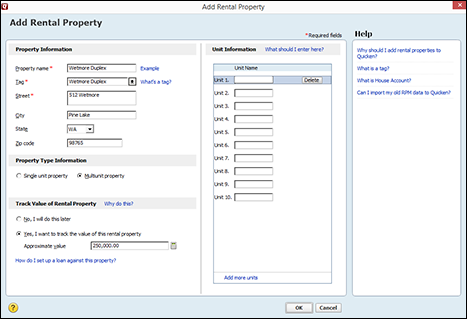
Figure 16-1: The Add Rental Property dialog box.
The Properties & Tenants button also gives you access to another command, Show Property List, which you can choose to display a window that lists the previously added rental properties. You can edit a rental property that appears in this property list by selecting the property and then clicking the Edit button. You can remove a rental property that appears in this property list by selecting the property and then clicking the Delete button.
- Describe the property.
Describe the rental property you’re going to track in Quicken. You’ll want to name the property, using the Property Name text box. You can then create a tag for the property’s income and expense transactions using the Tag text box. Optionally, you can enter the street, city, state, and ZIP code information in the appropriately labeled text boxes.
Note: You use the tag to mark, or tag, each income or expense transaction for a specific property. By tagging the transactions in this way, Quicken easily produces a profit-and-loss statement by rental property. You want a profit-and-loss statement by property to manage your real estate investments, of course. But you also need a profit-and-loss statement by property for your year-end income tax returns.
- Indicate whether the property is a single or multiple unit.
Use the Property Type Information option buttons — Single Unit Property and Multiunit Property — to specify whether the property is a single-unit property (such as a single-family rental house) or a multiunit property (such as a fourplex or a strip mall).
- (Optional) Identify the multiple units.
If you indicate in Step 4 that a rental property is multiunit, Quicken adds the Unit Information text boxes to the Add Rental Property dialog box. Use these boxes to name each of the rental units — using, for example, apartment letters, suite numbers, or similar identifying labels.
- (Optional) Track the net worth of the property.
If you want to track the fair market value or your estimate of the fair market value of the rental property, select the Yes, I Want to Track the Value of This Rental Property button. Then, without laughing, enter the fair market value of the property in the Approximate Value text box.
Note: If you decide to track the net worth of the property, Quicken adds an asset account to the Quicken account list.
- Click OK.
Quicken displays the Rental Property tab, or window, with the rental property you just created. (See Figure 16-2.)
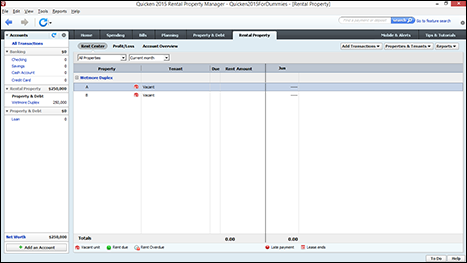
Figure 16-2: The Rental Property window.
Describing Tenants
After you describe your rental property or properties, you need to describe the tenants that occupy the property or properties. To describe the tenants, follow these steps:
- Display the Rental Property tab.
- Click the Properties & Tenants button and choose Add Tenant.
Quicken displays the Add Rental Property Tenant dialog box. (See Figure 16-3.)

Figure 16-3: The Add Rental Property Tenant dialog box.
The Property & Tenants button also displays another tenant-related command, Show Tenants List. Choose the Show Tenants List command to display a window that lists the previously added tenants. You can edit and delete tenants that appear in the list by clicking the tenant and clicking either the Edit or Delete button.
- Describe the tenant.
Describe the tenant by clicking the Rent Details tab and then entering the renter’s name in the Tenant Name text box and the monthly rent in the Rent Amount text box.
Choose the name of the bank account into which you’ll deposit rent from the Account Name drop-down list box, and choose the property (or property and unit) the tenant occupies from the Property drop-down list box.
You can specify the rent due date — and I’m sure this is a big surprise — by using the Rent Due On drop-down list box.
Optionally, you can use the Contact tab of the Add Rental Property Tenant dialog box to collect and store the tenant’s contact information, including work phone number, home phone number, email, and so on.
- (Optional) Document the lease agreement.
You can use the Terms and Agreement tab to document the rental agreement, recording items such as the lease term, lease start date, late fee, and so forth.
You can use the Security Deposit tab to record the security deposit you collect at the start of the lease and any security deposit you return at the end of the lease.
- Click OK.
Quicken displays the Rental Property tab or window. The names of any tenants you’ve added appear indented below the rental property they occupy.
Recording Tenant Rent Payments
After you describe your properties and your tenants, you can begin recording tenant rent payments as tenants pay you, the lord of the manor. Simply follow these steps:
- Display the Rental Property tab.
No problem here, right? You just click the tab.
- Click the Add Transactions button.
Quicken opens the a menu of commands related to working with your rental property record-keeping.
- Choose the Enter Rent command from the Add Transactions menu.
Quicken displays the Enter Rent dialog box. (See Figure 16-4.)
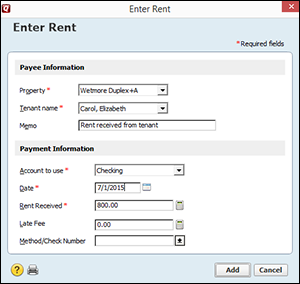
Figure 16-4: The Enter Rent dialog box.
- Choose the tenant from the Tenant Name drop-down list box.
Quicken enters most of what else it needs to know to record the rent payment: the property, the rent amount, and so on. But confirm that this information is correct. You may want to edit the contents of the Memo text box, for example, or you may need to assess a late fee if the tenant has paid late.
- Click Add to record the transaction.
Quicken adds the rent payment to your records, recording the rent check as a deposit in the specified bank account. Behind the scenes, Quicken tags the transaction as income related to a specific property — just as you want it to do.
Recording Rental Expenses
You record rent expenses in a fashion similar to that used to record rent income. Follow these steps:
- Display the Rental Property tab.
- Click the Add Transactions button.
- Choose the Enter Expense command from the Add Transactions menu.
Quicken displays the Enter Expense dialog box. (See Figure 16-5.)

Figure 16-5: The Enter Expense dialog box.
- Choose the rental property from the Property drop-down list box.
- Use the other fields in the dialog box to record the rent expense: the payee, category, and so on.
Quicken guesses at the bank account, so confirm this bit of information. You may want to edit the contents of the Memo text box, for example, and you may want to record a check number or payment method.
One other point: You don’t have to use the Enter Expense dialog box to record expenses for a rental. Alternatively, you can record the expense directly in the register. If you use the “direct into the register” approach, however, you need to tag the transaction with the property’s tag. If you have questions about how to record checks in a Quicken bank account, refer to Chapter 4.
Note: Tax laws now require you to send Form 1099s to your unincorporated vendors if, as part of your rental property business, you pay these people $600 or more in a year by check. Therefore, you probably want to collect completed W-9 forms (available from the www.irs.gov website) from any such vendors you use.
Tracking Rental Property Profits
I don’t want to talk too long about the Rental Property Manager features. If I do that, you’ll think that the tools are complicated to learn and use. The tools aren’t complicated. They’re really, really easy.
Before I quit, however, I do want to share one quick reminder: In Chapter 7, I talk about how to produce reports in Quicken, including how to produce reports specifically designed to track your rental properties. Peek back there.
Another thing to point out — and this is sort of redundant, but it’s so darn important — is that the Rental Property Manager features let you track rental income and rental expenses by properties, using those tags that you create for each property. This tagging means you can produce reports that show profit by property. This “profit by property” measurement is really important. You use the segmented profit data to manage your properties — and to report what’s happening with your rental properties on your tax return.