
Chapter 9
Housekeeping for Quicken
In This Chapter
![]() Backing up your Quicken data
Backing up your Quicken data
![]() Knowing when and how often to back up your data
Knowing when and how often to back up your data
![]() Knowing what to do if you lose your Quicken data
Knowing what to do if you lose your Quicken data
![]() Creating and working with more than one set of Quicken data
Creating and working with more than one set of Quicken data
![]() Setting up a new file password
Setting up a new file password
![]() Changing a file password
Changing a file password
Okay, you don’t have to worry about chasing dust bunnies in Quicken, but you do have to take care of little housekeeping tasks. This chapter describes these chores and how to do them right, with minimal hassle.
Backing Up Is Hard to Do
You should back up the files that Quicken uses to store your financial records. But you need to know how to back up before you can back up.
Backing up the quick-and-dirty way
You’re busy. You don’t have time to fool around. You just want to do a passable job backing up files. Sound like your situation? Then follow these steps:
- Insert a writable CD into the appropriate drive or a flash drive into a USB port.
You can back up to any disc or storage device you can write to, such as a writable CD or flash drive. You need to know only which letters your computer uses to label its drives. If you don’t, consult the documentation that came with your computer.
- Verify that the file you want to back up is active.
Expand the Accounts bar (if necessary) and then make sure that it displays one of the accounts in the file you want to back up. (If you don’t remember setting up multiple files, don’t worry. You probably have only one file — the usual case.)
- Start the backup operation by choosing File⇒Backup and Restore⇒Backup Quicken File.
Quicken displays the Quicken Backup dialog box, shown in Figure 9-1.

Figure 9-1: The Quicken Backup dialog box.
- Identify the backup drive.
Select the Back Up on My Computer option button. Then verify that the disk letter shown in the text box is the one you want to use for backing up. If it isn’t, click the Change button. When Quicken displays the Enter Backup File Name dialog box, shown in Figure 9-2, select the correct disk.
 You can use any removable media, including a flash drive, a recordable CD, or even an external hard disk.
 - Click OK.
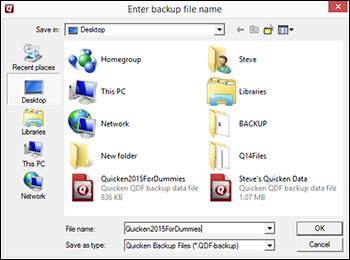
Figure 9-2: The Enter Backup File Name dialog box.
You see a message onscreen that says, “Aye, Cap’n, I’m working just as fast as I can” (or something to that effect). Then you see a message that says the backup is complete. Don’t worry. You’ll never see a message that says, “She’s starting to break up, Cap’n. She can’t take warp 9 much longer.” You see a warning message if the file you want to back up is too large. In this case, you need to shrink the file, use a different disk, or use multiple disks.
As Figure 9-1 indicates, you can also back up Quicken online. When you select the Use Quicken Online Backup option button and click Back Up Now, Quicken explains the service and gets you started. Just so you know, an online backup gets stored on Intuit’s computers — Intuit makes Quicken — rather than on your computer’s disks. Online backup works the same basic way as local backup, except you need an Internet connection, and the online backup service costs money. The service costs $9.99 to $149.99 a year at the time I’m writing this book, depending on the level of service you choose. I’m as cheap as the next guy, but I think the online backup option is truly something to consider. The prices seem cheap relative to the value of your data, especially if you’re using Quicken for a small business. And one other thing: Often, you can sign up for a free 30-day trial to verify that the service works the way you want.
Deciding when to back up
Sure, I can give you some tricky, technical examples of fancy backup strategies, but they have no point here. You want to know the basics, right? So here’s what I do to back up my files. I back up every month after I reconcile. Then I stick the flash drive in my briefcase, so if something terrible happens at home, I don’t lose both my computer and the backup with the data.
I admit that my strategy has a few problems, however. Because I’m backing up only once per month, for example, I may have to re-enter as much as a month’s worth of data if the computer crashes toward the end of the month. In my case, I wouldn’t lose all that much work. But if you have really heavy transaction volumes — if you write hundreds of checks per month, for example — you may want to back up more frequently than monthly, such as once weekly. If you use the same disk or set of disks to back up your Quicken file, Quicken warns you before it replaces the old file with the new one. You can go ahead and let Quicken do this as long as you’re sure that you won’t want to access the old file anymore.
A second problem with my strategy is only remotely possible but still worth mentioning. If something bad does happen to the Quicken files stored on my computer’s hard drive and the files stored on the backup disc, I’m up the proverbial creek without a paddle. I should also note that a removable disc may be more likely to fail or get lost than a hard drive is. If this worst-case scenario actually occurs, I need to start over from scratch from the beginning of the year. To prevent this scenario from happening, some people — those who are religiously careful — make more than one backup copy of their Quicken files.
By the way, Quicken periodically prompts you to back up when you try to exit. (You see a message that basically says, “Friend, backing up is a darn good idea.”) You can, of course, choose to ignore this message. Or you can take Quicken’s advice and do the backup thing as describe earlier in this chapter, in the section “Backing up the quick-and-dirty way.”
You know what else? Here’s a secret feature of Quicken: Quicken adds a folder called Backup to the Documents directory, and it sticks a backup copy of your files in this folder every few days. You can find out more on this feature later in this chapter, in the section “Losing your Quicken data when you haven’t backed up.”
Losing your Quicken data after you’ve backed up
What happens if you lose all your Quicken data? First of all, I encourage you to feel smug. Get a cup of coffee. Lean back in your chair. Gloat for a couple of minutes. You, my friend, will have no problem.
After you’ve gloated sufficiently, carefully do the following to reinstate your Quicken data on the computer:
- Get your backup disk.
Find the backup disk you created, and carefully insert it or plug it in. (If you can’t find the backup disk, forget what I said about feeling smug; stop gloating and skip to the next section.)
- Start Quicken.
You already know how to do this, right? By the way, if the disaster that caused you to lose your data also trashed other parts of your computer, you may need to reinstall Quicken. Shoot. I suppose it’s possible that you may even need to reinstall Windows.
- Choose File⇒Backup and Restore⇒Restore from Backup File.
Quicken displays the Restore from Backup File dialog box (not shown), which lets you restore from one of Quicken’s automatic backup copies, from a backup copy you made by choosing the File⇒Backup and Restore⇒Backup Quicken File command, or from an online backup. To restore by using one of the automatic backup copies of the Quicken data file that Quicken secretly (and previously) made, simply select the automatic backup copy you want to use. Quicken automatically restores the file for you — and you get to skip to Step 6.
Alternatively, you can click the Restore from your Backup button and then click the Browse button. Quicken looks at the selected folder or disk and displays a list of the files stored there, as shown in Figure 9-3. If your computer has another disk in it, and this other disk has the backup copy of the file, use the Look In drop-down list box to select the other drive.
If you want to restore from an online backup copy of the Quicken data file, select the Restore from Online Backup button.

Figure 9-3: The Restore Quicken File dialog box.
- Select the file you want to restore and then click OK.
Use the arrow keys or the mouse to select the file that you want to restore.
If the file you select is the one Quicken used last, the program displays a message asking whether it’s okay to overwrite, or replace, the file with the one stored on the disk.
 When you restore a file, you replace the current, in-memory version of the file with the backup version stored on the disk. Don’t restore a file for fun. Don’t restore a file for entertainment. Restore a file only if the current version is trashed and you want to start over by using the version stored on the backup disk.
 - Click Restore Backup.
Quicken replaces the file it’s currently using with the one from the backup disk. When it finishes, Quicken displays a message telling you that it has restored the file. You’re almost done.
- Update the account registers as necessary.
Using the register windows for each of the accounts in a file, re-enter each of the transactions you recorded since you created the backup. Be sure that you update your accounts because you’ve almost certainly entered transactions since the last time you backed up.
Just to be on the safe side, you should back up the file after you complete this process. Using a new flash drive is probably a good idea, too. I’ve heard that lightning never strikes the same place twice, but I’m not sure that the old saying is true. If you have hard-drive problems or another recurring problem, whatever fouled up your file this time may rear its ugly head again — and soon.
Losing your Quicken data when you haven’t backed up
What do you do if you haven’t backed up your files in a while and you lose all the data in your Quicken files? Okay. Stay calm. All may not be lost.
First, you can try restoring the files from the semisecret Quicken backup directory. To do so, you follow the file-restoration steps I cover in the preceding section, with one minor exception: After you choose the Restore from Backup command, look at the list of automatic (semisecret) backup files that Quicken has squirreled away on your computer.
Select the newest automatic backup file and then click OK. Quicken uses that file to restore the current file. As I allude to earlier in this chapter, grabbing one of these secret backup copies of the Quicken data file may just work. And if it does, you should feel very lucky. Very lucky indeed.
Okay. Suppose that you’ve tried the approach described in the preceding paragraph, and it didn’t work. What next? You have to re-enter all the transactions for the entire year. Yeah, I know. It’s a bummer. This method isn’t quick, and it isn’t pretty, but it works.
If you have copies of the registers, of course, you can use these copies as your information sources to re-enter the information in your files. If you don’t have copies of the registers, you need to use your bank statements and any other paper financial records you have.
If, for some unfortunate reason, the only copy you have of your Quicken data seems to have become corrupted, you can have Quicken try to rebuild the file. To do so, choose File⇒File Operations⇒Validate and Repair, and enter the name of the file you want rebuilt in the File Name text box. You typically do this, however, only when so instructed by Quicken or Intuit technical support people.
Working with Files, Files, and More Files
As part of setting up Quicken, you create what Quicken calls a file: a place where Quicken stores all your accounts (bank accounts, credit card accounts, investment accounts, and so on).
You can have more than one Quicken file at any time. Most people won’t want to do this. But you can (for example) use different files to keep your personal financial records separate from business financial records.
Using multiple files does have two drawbacks, however. First, you can’t easily record, in one fell swoop, account transfer transactions between accounts in different files. You need to record the transaction twice — once in the source account, the file where the transaction originates, and again in the destination account, the file to which you’re transferring the transaction.
A second drawback with using multiple files is that Quicken only syncs the data from a single Quicken file with a mobile device like your smartphone.
Setting up a new file
To set up a new file so that you can create accounts in it, follow these steps:
- Choose File⇒New.
Quicken displays the Create New File: Dude, Are You Sure? dialog box, shown in Figure 9-4.

Figure 9-4: The Create New File dialog box.
- Select the New Quicken File option button and then click OK or press Enter.
Quicken displays the Create Quicken File dialog box, shown in Figure 9-5.

Figure 9-5: The Create Quicken File dialog box.
- Enter a name for the Quicken file.
Position the cursor in the File Name text box and type some meaningful combination of letters and numbers. You don’t need to enter a file extension because Quicken supplies the correct file extension — .qdf — for you.
- Choose an appropriate file location.
Tell Quicken where you want to store the Quicken data files, using the Save In drop-down list box at the top of the dialog box.
- (Optional) Sync the new file with the Quicken Cloud.
If prompted, provide your Intuit ID so Quicken can sync the new file with any mobile device you’ve indicated that you want to use. (Refer to Chapter 1 for more information about the Intuit ID and the Quicken Cloud.)
- Add an account.
When Quicken displays the Add Account dialog box (shown in Figure 9-6) so you can add at least one starter account to the new file, click the hyperlink that references the type of account you want, and then follow the by-now-familiar onscreen prompts to add the account.

Figure 9-6: The Add Account dialog box lets you add that first account to a new file.
- Run Setup.
After you complete adding a new account (or possibly two), you see the Home tab. Click its Get Started button to finish setting up the new account.
Flip-flopping between files
You can work with only one file at a time. So after you create a second file, you need to know how to flip-flop between your files. If you’re recording business stuff, for example, you want to be using the business file. What do you do, though, if a transaction comes in that’s clearly meant for your personal file and you want to enter it there immediately? Flip-flopping allows you to get from one file to another in no time.
Flip-flopping is easy. Follow these steps:
- Choose File⇒Open.
Quicken displays the Open Quicken File dialog box (see Figure 9-7).
- Select the folder that contains the Quicken file, pick the file you want from the File Name drop-down list box, and then click OK.
Bingo. You’re in the new file.

Figure 9-7: The Open Quicken File dialog box.
If you really want to switch to another file with lightning speed, you can choose the name of the other file directly from the bottom of the File menu, where Quicken lists the last four files you used.
When files get too big for their own good
You can enter a large number of transactions in a Quicken file; in fact, you can record tens of thousands of transactions in a single account or file. Wowsers!
In spite of these huge numbers, I can think of some good reasons to work with smaller files if you can. For one, working with files of a manageable size means that you can back them up more easily and more quickly. Also, fewer transactions mean that Quicken runs faster because more memory is available for Windows. (Windows likes lots of memory — the same way that some people like lots of ice cream.)
Note: Oh, jeepers. My technical editor wants me to remind you that there are good reasons to work with large files when you can. And, of course, he’s right. Having several years’ worth of data at your fingertips, for example, is handy. With several years’ worth of data, you can easily get answers to all sorts of questions: how much money wealthy relatives have given you over the years, how much cable television has gone up in price, and so on.
If your files have gotten too big for their own good, you can knock them down to size by creating a new file that contains only the current year’s transactions. You end up with a copy of the big file that you won’t use anymore and a smaller, shrunken file with just the current year’s transactions. Working with a smaller file probably means that Quicken will run faster. (The memory thing comes into play again.) And smaller files should make backing up easier because you can probably keep your files small enough to fit on just about any storage device.
Call me a Nervous Nellie — or a Nervous Nelson — but because shrinking a file involves wholesale change, I’d really feel more comfortable helping you through this process if you first backed up the file you’re about to shrink. I don’t think that you need to be anxious about anything, but just in case something does go wrong during the shrinking process, I know that you want to have a backup copy of the file to fall back on.
To shrink a Quicken file, follow these steps:
- Choose File⇒File Operations⇒Year-End Copy.
Quicken displays a portrait of Barry Nelson, the first actor to portray James Bond.
No, not really — I just wanted to see whether you were awake. Actually, Quicken displays the Create a Year End Copy dialog box, shown in Figure 9-8.

Figure 9-8: The Create a Year End Copy dialog box.
- Describe what you want in the current data file.
Your next step in creating a year-end copy is describing what information you want in the current data file, which is the Quicken file that you’ll continue to work with. As the Create a Year End Copy dialog box suggests, you have two choices. The Do Nothing choice leaves the Quicken data file alone. The I Only Want Transctions In My Current Data Starting With This Date choice creates a copy of the Quicken data file by using only balances and transactions after a specified date. To shrink the current Quicken file, you predictably use the Do Something (please!) option by selecting the appropriate option button and then specifying the cutoff date.
When you archive, you make a copy of the Quicken data file, but (typically) just through the end of the preceding year. You continue to work with the big, everything-is-still-there data file. Why archive? So that you can have a copy of the Quicken data file as it existed at a particular point in time. You might archive the Quicken data file on CD and store the archive file with your tax return, for example. By doing this, you’ll be sure of always being able to take a later look at the Quicken data file that explained your tax deductions. - Confirm the name in the Give the Archive File a Name and Location text box.
You can actually ignore the filename and folder location information that Quicken enters in the Give the Archive File a Name and Location text box. If you really must have it your way, however, you do have the option of replacing what Quicken suggests with another name. You can also click the Browse button and choose another folder location by using the dialog box that Quicken displays.
- Specify a starting date.
Using the Specify Starting Date text box, type a cutoff date. (Nowadays, the folks at Quicken are calling this text box This Archive Data File Will Contain Transactions Up to and Including, but you guessed that, didn’t you?) Quicken deletes from the current file all cleared transactions with dates that fall before the cutoff date.
 This file is the one you work with and want to shrink.
I chose 1/1/2015 as the cutoff date in Figure 9-8 so that I could create a new file for all 2015 and later transactions. (Note: Quicken doesn’t delete uncleared transactions, and it doesn’t delete investment transactions.)
- Click OK.
Quicken creates an old-transactions “Old File” with the filename discussed in Step 3. If you told it to, Quicken also deletes all the old transactions from the current file so that your current file contains only the transactions that are dated after the cutoff date.
Then Quicken displays the dialog box shown in Figure 9-9, which tells you that the file was successfully copied.
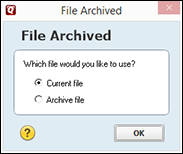
Figure 9-9: The File Archived dialog box.
- Do one of the following and then click OK:
- Select the Current File option button if you want to use the current file you’ve just shrunk.
- Select the Archive File option button if you want to use the old-transactions file.
If you want to see the old-transactions, or archive, file again, you can select it in the Open dialog box (accessed by choosing File⇒Open). You should not enter any new transactions in the old-transactions file, however, because these new transactions will change the old file’s ending account balance without changing the current file’s beginning account balance.
Using and Abusing Passwords
I have mixed feelings about Quicken passwords. Theoretically, they let you lock up your Quicken data so that your rebellious teenagers (if you’re using Quicken at home) or the night janitors (if you’re using Quicken in a business) can’t come in and print checks, process automatic payments, and just generally mess things up.
Using passwords sounds pretty good, of course. But before you set up a password and then start relying on it to protect your information, let me remind you that a Quicken password only prevents someone from accessing your data with Quicken. Using a password doesn’t prevent someone from fooling around with your computer itself. If the night janitors — or, heaven forbid, your teenagers — are nefarious types, they can erase your files with Windows or scramble them with another program, such as a spreadsheet or word-processing program. And they may even be able to get in and manipulate the data with another checkbook or accounting program.
Passwords come with one other little annoying problem, too: Darn it, you have to remember them.
For these reasons, I think that passwords are best left to computer systems that use them on a global basis to control access to all programs and to computer systems that can track all users (you, your teenagers, the night janitors, and anyone else) by name. Your PC doesn’t fall into this category.
Setting up a file password
You still want a password? Okay. With much trepidation, I give you the following steps for setting up a password for a Quicken file:
- Select the file you want to protect with a password.
If the file you want to password-protect is not the active file, choose File⇒Open, double-click the file you want or select it in the Open dialog box, and click OK.
- Choose File⇒Set Password for This Data File.
Quicken displays the Quicken File Password dialog box, shown in Figure 9-10.

Figure 9-10: The Quicken File Password dialog box.
- Enter the password in the New Password text box.
You can use up to 16 characters. Quicken differentiates between lowercase and uppercase characters, by the way, so Washington, wASHINGTON, and WASHINGTON are all different from its point of view. Also, Quicken doesn’t display the actual characters you type; it displays asterisks instead. If you type Dog, for example, it displays ***. (Passwords require strict secrecy, you see.)
- Enter the password you want to use again — this time, in the Confirm Password text box — and then click OK.
Congratulations! You’re done.
Assigning a password to a file doesn’t prevent you from doing anything with the file that you’d normally do. But the next time you try to use this file — after you start Quicken or when you try to select the file by choosing the File⇒Open command — Quicken will ask you for the file’s password. You need to supply the password to gain access to the file.
Changing a file password
After you set up a file password, you’re not stuck with it forever. You can change the password or remove it by choosing File⇒Set Password for This Data File.
If you’ve already set up a password, however, Quicken doesn’t display the Quicken File Password dialog box (refer to Figure 9-10 earlier in this chapter). Instead, Quicken displays a mutated Quicken File Password dialog box that asks for the password you’re now using and the new password you want to use in the future (as shown in Figure 9-11). Type the current password in the Old Password text box and the new password in both the New Password and the Confirm Password text boxes. Then press Enter or click OK. From now on, you need to use the new password to gain access to the file. If you don’t want to use a password anymore, just leave the New Password and Confirm Password text boxes blank.
And a final tip for you concerning Quicken passwords: If you lose your password, the Quicken technical support ninjas provide a tool you can use to retrieve your password-protected file. (To locate this tool, visit http://quicken.intuit.com/support. Select your version of Quicken and then search on the keywords Quicken Password Removal Tool.)

Figure 9-11: Change your password here.
Sanitizing a File
One other File menu command deserves quick mention; the File⇒Sanitize command.
When you choose this command, Quicken displays a dialog box you use to start a process during which you create a copy of your Quicken file — but a copy that’s had quite a bit of your personal information removed from it: file passwords, financial institution log in credentials, obviously personal information from accounts and transactions. (You might use such a file, for example, to share financial information from your accountant during tax time.)