
Chapter 4
Checkbook on a Computer
In This Chapter
![]() Recording checks, deposits, and transfers
Recording checks, deposits, and transfers
![]() Splitting categories
Splitting categories
![]() Deleting and voiding your transactions
Deleting and voiding your transactions
![]() Understanding the register phenomenon
Understanding the register phenomenon
![]() Discovering Quicken’s calculators and calendars
Discovering Quicken’s calculators and calendars
![]() Attaching an image, a flag, or a note to a transaction
Attaching an image, a flag, or a note to a transaction
This is it. The big time. You’re finally going to do those everyday Quicken things: entering checks, deposits, and transfers. Along the way, you also use some of the neat tools that Quicken provides for making these tasks easier, more precise, and faster.
Getting Started
Okay. I’m going to start at the very beginning.
As you start working with Quicken, you probably want to work from the Spending tab (shown in Figure 4-1). Basically, it looks and works (sort of) like a web page that provides clickable hyperlinks to some of the most popular banking and bookkeeping features of Quicken, and also supplies interesting tidbits of financial trivia. But initially, before you start entering data, the tab looks pretty sparse. (This is how Figure 4-1 looks.)

Figure 4-1: The Spending tab, or window.
Finding Your Checkbook
To enter checkbook transactions, look for the bank account you want to work with listed in the Accounts bar. When you see the bank account, you can click it to display that account’s transactions in a register (shown in Figure 4-2).

Figure 4-2: The account transactions showing in a register window.
Figure 4-2 shows the account name — Checking — highlighted in the Accounts bar and in the Quicken window’s title bar.
The starting balance you specified as part of setting up the account is the first amount that Quicken lists. In Figure 4-2, for example, the starting balance is $4.16. Bummer.
Recording Checks
First things first: You can enter checks by using the Spending tab and its register window (refer to Figure 4-2) or the Write Checks window, which I describe in Chapter 5.
You use the Spending tab’s register window for the checks that you don’t want to print or pay electronically with Quicken; you use the Write and Print Checks command and the Write Checks window the command displays to enter the checks that you do want to print or pay electronically with Quicken. (This rule isn’t etched in stone, but it does make things easier, so it’s the rule that I follow.)
Entering a check in the register
Entering a check in the register is a simple matter of describing to whom you wrote the check and how much you paid. Suppose that you paid $85.95 to the cable television company for your monthly cable service. Here’s how you enter this check:
- Enter the check date.
Move the cursor to the Date field in the next empty row of the register (if it isn’t already there) and type the date by using MM/DD format. To enter August 31, 2015, for example, type 8/31. You usually don’t have to type the year because Quicken retrieves the current year number from the little clock inside your computer.
You can adjust the date in a Date field by using the + and – keys on your keyboard. The + key adds one day to the current date; the – key subtracts one day from the current date.
- Enter the check number.
Move the cursor (or tab) to the Check # field and type the check number. Alternatively, move the cursor to the Check Number field and then, when Quicken displays a list box of entries (such as ATM, Deposit, EFT, Next Check Num, Print Check, Send Online Payment, and Transfer), select Next Check Num if you want. Quicken then fills in the number with its guess as to the new check number — one more than the preceding check number you entered. If this guess is right, you can just leave it in place. If it isn’t right, type over what Quicken guessed with the correct number or use the + or – key to increase or decrease the check number.
- Enter the payee.
Move the cursor to the Payee field. Type the name of the person or business you’re paying. If the cable company’s name is Movies Galore, for example, type Movies Galore. (In the future, you can probably select payee names in the Payee list box.)
- (Optional) Enter a memo description.
Move the cursor to the Memo field, and describe the specific reason that you’re paying the check. You may identify the cable payment as the June payment, for example. If you’re using Quicken for a business, use this field to identify the paid invoice — usually by entering the invoice number you’re paying. You don’t have to enter anything in this field, by the way.
- Enter the category.
Move the cursor to the Category field. Quicken displays a drop-down list box of category names from your category list. You can select one of these categories by using the arrow keys or the mouse. Or, if you’re the independent type, just type the name yourself. For example, if you use the standard Quicken categories list, you may categorize a payment to your cable company as Bills & Utilities:Television. The first part of this entry, Bills & Utilities, is the category. The second part, Television, is the subcategory.
If you go with the typing approach and you’re not a super-fast typist, Quicken can probably guess which category you’re entering before you enter it. When you start typing Bi, for example, Quicken fills in the rest of the category name — lls & Utilities for you (Bi + lls & Utilities = Bills & Utilities). This feature is called QuickFill, and I talk about it in more detail in the section “Working with a kooky (and clever) little thing named QuickFill,” later in this chapter.
- (Optional) Tag that transaction.
If, after reading about tags in Chapter 2, you decided to use tags and have turned this feature on, you can also enter a tag in the Tag field. Just to make this a bit clearer, suppose that you’re using tags to segregate expenses by house because you actually own two homes: your principal residence and a cabin in the mountains. If you’ve set up two tags — principal and cabin — you record utilities expenses for your principal residence by entering utilities in the Category field and principal in the Tag field. You record utilities expenses for your cabin by entering utilities in the Category field and cabin in the Tag field.
- Enter the check amount.
Move the cursor to the Payment field, and type the check amount — 85.95 for this example. You don’t have to type the dollar sign, but you do need to type the period to indicate the decimal place and cents.
- Click the Save button.
Click the Save button that appears in the transaction’s row of the register. This option tells Quicken that you want to record the transaction in your register. Quicken beeps in acknowledgment, calculates the new account balance, and moves the cursor to the next slot (or row) in the register.
Figure 4-3 shows the cable television check recorded in the register. You can’t see it in this black-and-white figure, but the $81.79 in the Balance field is in red after the $85.95 check is recorded. This red number indicates that you’ve overdrawn your account. I don’t need to tell you what that means: overdraft charges.

Figure 4-3: The Quicken register after recording the check to Movies Galore.
Changing a check you’ve entered
What if you need to change a check that you’ve already entered? Suppose that you make a terrible mistake, such as recording a $85.95 check as $89.55. Can you fix it? Sure. Just use the arrow keys or click the mouse to highlight the check transaction that you want to change. Use the Tab and Shift+Tab keys to move the cursor to the field you want to change. (You can also select the field by clicking in it with the mouse.) Then make your fix. Click the Enter button when you finish or press Enter on the keyboard.
Packing more checks into the register
Normally, Quicken displays a single row of information about each check that you enter. It also displays a single row of information about each of the other types of transactions you enter. The single-row approach is often pretty illegible, unfortunately. If you want to show more transaction information, click the Actions button (which shows a picture of a little gear and appears near the top-right corner of the register) and then choose the Two-Line Display command from the menu that Quicken displays. After you do, Quicken displays all the same register information (though arranged in slightly different order) in a double-line format (shown in Figure 4-4). To return to the single-line format, click the Actions button and choose the Two-Line Display command again.

Figure 4-4: How the register looks with the Two-Line Display format.
Sorting transactions
If you click the Actions button, you notice that it also displays a bunch of commands in addition to the Two-Line Display command that I talk about in the preceding section. I talk about most of these commands elsewhere in this book, but let me mention one set of the commands here. If you choose the Sorting Options command, Quicken displays a submenu of commands that begin with By. These commands all work the same basic way. They let you reorganize the transactions shown in the register in some new way: by date, amount, check number, and so on.
Don’t worry. I’m not going to waste your precious time by telling you (say) that the By Date command sorts transactions by their dates or that the By Category command sorts transactions by category. You knew that.
 If you point to the column heading for the Payee field, the Payment field, or the Cleared Status field (labeled Clr), Quicken displays a pop-up command that you can use to re-sort the transactions in the register. These options are self-explanatory. The one that appears when you point to the Payee field is Sort by Payee, and the one that appears when you point to the Cleared Status field is Sort by Cleared. You get the picture.
Working with a kooky (and clever) little thing named QuickFill
Here’s kind of a funny quirk about Quicken: If Quicken can guess what you’re typing in a field, it fills in the rest of the field for you. Earlier in this chapter, I mention how this QuickFill feature works when you type category names. But it gets even better than that.
The second time you use a payee name, for example, Quicken knows that it’s the second time. Quicken also figures, “Hey, some stuff from the last Movies Galore transaction will probably be the same for this transaction.” When you type the first few letters of the payee name, Quicken supplies a payee name for you. After you press the Tab key to accept the name, Quicken uses the last transaction’s information to fill in all the current transaction’s fields.
This feature is a real time saver. Suppose that you did write a $85.95 check to Movies Galore for your August cable television bill. When you type Movies Galore to record September’s cable television check, the amount will probably be the same. The complete payee name will certainly be the same, and the category will also be the same. So Quicken fills in all these fields, too.
QuickFill doesn’t do everything for you, however. You still need to make sure that the date and check number are correct. If Quicken QuickFills a field with the wrong information, just replace the wrong information with the right information.
Recording Deposits
Recording a deposit works almost the same way as recording a check. The only difference is that you enter the deposit amount in the Deposit field rather than enter the check amount in the Payment field.
Entering a deposit into the register
Suppose that you receive $100 as a birthday gift from your elderly Aunt Enid and deposit it into your checking account. Here’s how you record this deposit in the register:
- Enter the deposit date.
Move the cursor to the Date field of the next empty row of the register (if it isn’t already there) and type the date. Use MM/DD format. You enter August 31, 2015, for example, as 8/31. As with check dates, you have to enter the year only if the current year number, which Quicken retrieves from the little clock inside your computer, is wrong.
You can adjust the date in a Date field in Quicken by using the + and – keys. The + key adds one day to the current date; the – key subtracts one day from the current date.
- Type the code DEP (for deposit) in the Check Number field.
Are you the meticulous type? Then go ahead and move the cursor to the Check Number field. Open the Num drop-down list box and select Deposit.
- Type the name of the person from whom you received the deposit.
In this case, move the cursor to the Payee field and type Aunt Enid. (I don’t mean to sound presumptuous, but the next time Aunt Enid sends you birthday money, you can select her name in the Payee drop-down list box.)
- Enter the deposit amount.
Move the cursor to the Deposit field and type 100. Don’t type the dollar sign — or any other punctuation. (If Aunt Enid sweats money and sometimes passes out $1,000 gifts, for example, you record the deposit as 1000 — not 1,000 or $1,000.)
- (Optional) Enter a memo description.
Move the cursor to the Memo field and describe something, such as the reason for the deposit. Aunt Enid’s money may be described as birthday gift. If you’re a business depositing a customer’s check, use this entry to identify the invoice the customer is paying.
- Enter the category.
You know how this works by now. Move the cursor to the Category field. Open the Category drop-down list box, if necessary, and select the appropriate category. Alternatively, if you like living on the edge, try typing the category name. You might describe Aunt Enid’s check as Gift Received.
To add a category, type a name in the Category field and move to another field. When Quicken doesn’t recognize the category name, it asks you whether you want to add the category. Click Yes, and Quicken displays the Set Up Category dialog box. See Chapter 2 if you have questions about how this works.
- (Optional) Enter a tag.
If you’re tagging transactions because categories don’t provide you enough detail about transactions, enter a tag in the Tag box. If you don’t know what tags are and want to find out more, refer to the Chapter 2 discussion on using tags.
- Click the Save button.
This command tells Quicken that you want to record the transaction in your register. Quicken beeps in protest but then adds the transaction.
Figure 4-5 shows the Checking register (in the Two-Line Display format) after you enter Aunt Enid’s thoughtful gift. Your account is no longer overdrawn, so you have that going for you. Maybe before you go any further, you should call Aunt Enid to thank her.

Figure 4-5: A Checking register as you record your first deposit.
See the ending balance given at the bottom in the register window? The Ending Balance shows the account balance after every register transaction. If you enter future-dated transactions, the register window shows both a current balance — the balance as of the current date — and an ending balance, which is the balance after all the transactions.
 Quicken also includes a Paycheck Setup Wizard that you can use to describe the taxes withheld from your paycheck and categorize the deductions from your paycheck. That much said, you probably don’t need to keep track of these amounts unless, for some reason, you want precise estimates of the income taxes you pay. Remember that your employer already does this accounting. Also remember that you must use the employer’s data, which appears on your W-2 form — and not your Quicken data — when you prepare your U.S. taxes. If you do decide to use the Paycheck Wizard, click the Planning tab, the Tax Center button, and then the Add Paycheck button. When Quicken displays the Paycheck Setup dialog box, use its buttons and boxes to describe your payroll check and any deductions. Note that you may need to scroll down the Tax Center tab to see the Add Paycheck button. The button appears at the bottom of the tab.
Changing a deposit you’ve already entered
Big surprise here — changing a deposit works just like changing a check. First, use the arrow keys or click the mouse to select the deposit. Use the Tab and Shift+Tab keys to move the cursor to the field you want to change. Tab moves the cursor to the next field. Shift+Tab moves the cursor to the preceding field. (You can also select the field by clicking in it.) Then make your fix and click the Save button.
Recording Account Transfers
Account transfers occur when you move money from one account, such as your savings account, to another account, such as your checking account. But jeepers, why am I telling you this? If you have one of those combined savings and checking accounts, you probably do this sort of thing all the time.
Oh, now I remember why I brought this up: Quicken makes quick work of account transfers as long as you already have both accounts set up.
If you don’t have the second account set up, you need to do that first. If you don’t know how, flip to Chapter 2.
Entering an account transfer
Buckle up. I speed through the steps for recording an account transfer. For the most part, you record an account transfer the same way you record a check or deposit.
Suppose that you want to record the transfer of $10 from your checking account to your savings account. Maybe you want to set aside a little money to purchase a gift for your generous Aunt Enid — perhaps a Macklemore CD.
Say that you’re working with your checking account and want to record a transfer to your account. Here’s what you need to do:
- Enter the transfer date.
Move the cursor to the Date field. Then type the date that you move the money from one account to another.
- Flag the transaction as a transfer.
Move the cursor to the Check Number field. Open the drop-down list box and select the Transfer entry. Quicken abbreviates transfer as TXFR.
- (Optional) Enter a description of the transaction.
You don’t have to do this, but you may want to use the Payee field to describe the transfer — for example, Birthday. You know how this works by now, don’t you? You just move the cursor to the field. Then you pound away at the keyboard. Bang. Bang. Bang.
- Enter the transfer amount.
You enter amounts that you transfer out of an account in the Payment field, and you enter amounts that you transfer into an account in the Deposit field. So move the cursor to the right field (right as in right and wrong, not right and left) and then enter the transfer amount.
- (Optional) Enter a memo description.
Enter more information about the transaction (if you need to) in the Memo field. Perhaps a gift idea for Aunt Enid?
- Indicate the other account.
Move the cursor to the Category field, which has a modified name of Xfer Acct (standing for Transfer Account). When Quicken drops down a list box of accounts, select the other account. In Figure 4-6, I show the transfer as going to an account named Savings. I set up this account secretly, while you weren’t watching. But note that the steps for setting up a second bank account parallel those for setting up a checking account. (See Chapter 2 for more information.)
- Click the Save button.
This command tells Quicken that you want to record the transfer transaction in your register.
Figure 4-6 shows the Checking register after you transfer money from your checking account to your savings account so that you’ll have money to purchase something nice for Aunt Enid’s next birthday. (Seriously, think about the Macklemore CD idea. I’m sure your aunt will love rap.)

Figure 4-6: The Checking register after you enter the transfer transaction.
Take a look at the Category field. Notice that Quicken uses brackets — [ ] — to identify the Category field entry as an account, not as an income or expense category.
Working with the other half of the transfer
Here’s the cool thing about transfer transactions: Quicken automatically records the other half of the transfer for you. Figure 4-6 shows the $10 reduction in the checking account because of the transfer. Quicken uses this information to record a $10 increase in the savings account. Automatically. Biddabam. Biddaboom.
To see the other half of a transfer transaction, right-click the transfer transaction and choose the Go To Matching Transfer command on the More Actions menu. Quicken displays the other account in a new register window, shown in Figure 4-7.

Figure 4-7: The other half of the transfer transaction.
Changing a transfer you’ve already entered
Predictably, this activity works just like changing a check or a deposit:
- Select the transfer by using the arrow keys or by clicking the mouse.
- Use the Tab and Shift+Tab keys to move the cursor to the field that you want to change.
- Make your fix, click the Save button, and then go to lunch.
Splitting Transactions
Here’s a sort of Quicken riddle for you: Suppose that you have a check that pays more than one kind of expense. You trot down to the grocery store, for example, and pick up $10 worth of junk food and junk beverages (which you should categorize as a Groceries expense) and $10 worth of 10W-40 motor oil (which you should categorize as an Auto expense). How do you categorize a transaction like this? Well, I’ll tell you. You use a split category.
Here’s how a split category works: When you’re ready to categorize the check, you click the Split button, and Quicken displays the Split Transaction window, shown in Figure 4-8. The Split button shows two arrows that look like a warning sign for a fork in the road.
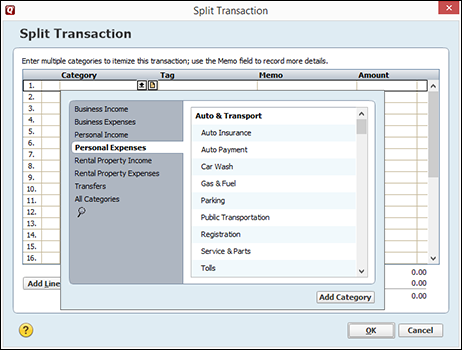
Figure 4-8: The Split Transaction window.
Steps for splitting a check
Being a clever sort, you probably already know how the Split Transaction window works. I go through the steps anyway. Suppose that you want to categorize a $20 check that includes $10 for groceries and $10 for motor oil.
To categorize a check in the Split Transaction window, do the following:
- Enter the first category name in the first Category field.
Move the cursor to the Category field (if it isn’t already there). Activate the drop-down list box by pressing Alt+↓ arrow or by clicking the down arrow and then selecting the category name.
(Despite what a dietitian may say, you can call the soda and candy Groceries.)
- (Optional) Tag the first categorized portion of the check.
If you’re using tags to further classify your spending, move the cursor to the first Tag field and then type the tag. If you have no idea what I’m talking about here, either just forget I said anything or see the final paragraphs of Chapter 2.
- Enter a memo description for the first categorized portion of the check.
Move the cursor to the first Memo field and then type whatever you want. (Maybe a description of the food you bought. Er, then again, maybe if you’re buying real junk, you should just leave this blank.)
- Enter the amount spent for the first category.
Move the cursor to the first Amount field and then type…well, the amount. If the first category is what you’re calling Groceries, and you spent $10 on this, you type 10.
- Repeat Steps 1–4 for each spending category.
If you spent another $10 on motor oil, for example, move the cursor to the second Category field and enter the category and, optionally, the subcategory you use to summarize auto maintenance expenses. In Figure 4-9, for example, I use the category–subcategory combination Auto & Transport:Service & Parts. Optionally, tag the transaction. Optionally (again), move the cursor to the second Memo field and enter a memo description of the expenditure, such as motor oil. Move the cursor to the second Amount field and enter the amount of the expenditure, such as 10.
Figure 4-9 shows a Split Transaction window that’s complete. A split transaction can have up to 30 pieces. Use the scroll bar or PgUp and PgDn keys to scroll through the list of split amounts.

Figure 4-9: The completed Split Transaction window.
- Verify that the Split Transaction window shows no uncategorized spending.
If you find extra spending — this shows up as the Remainder amount — either add the category you need or delete the split transaction line that’s uncategorized. To delete a split transaction line, move the cursor to one of the fields in the line and choose Edit⇒Delete. You can also click the Adjust button to get rid of the Remainder amount — but in this case, Quicken adjusts the amount originally entered into the register so that it agrees with the details you’ve supplied in the Split Transaction window.
If you want to insert a new line, move the selection cursor to the line above where you want to make your insertion and choose Edit⇒Insert. If you’re fed up and want to start over from scratch, choose Edit⇒Clear All (which causes Quicken to erase all the split transaction lines).
- Click OK.
After you complete the Split Transaction window — that is, after you completely and correctly categorize all the little pieces of the transaction — click OK. Quicken closes the Split Transaction window. If you didn’t enter an amount in the Payment column of the register before opening the Split Transaction window, Quicken displays a dialog box that asks whether the transaction is a payment or a deposit. You select an option button to make your choice known.
To let you know that the transaction is one that you’ve split, the Category field shows --Split-- when you select the split transaction to show that you’ve split a transaction among categories or tags. Take a peek at Figure 4-10 to see for yourself.
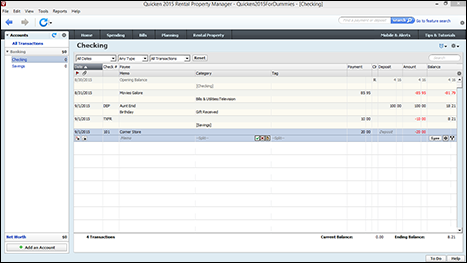
Figure 4-10: The Checking register. Can you find the boxes labeled Split?
- Click the Save button.
This command tells Quicken that you want to record the transaction in your register.
Editing and deleting split categories
You can delete or change any individual line of a split category. To do so, first select the transaction (to display the Split Transaction window) and then click the check-mark button, which appears in the register’s Category field after you record the transaction. After Quicken dutifully displays the Split Transaction window, you can edit a field by selecting it and then typing over its contents. You can delete any line of the split transaction by choosing Edit⇒Delete. (If you want to delete all the lines of the split transaction so that you can start over, choose Clear All instead.)
If you want to unsplit the transaction so that you can assign it to a single category, you need to use a little trick: Click the X button that appears in the register’s Category field after you record the transaction.
Steps for splitting deposits and transfers
Wondering whether you can split deposits and transfers? Well, you can. The steps for doing so work just like the steps for splitting categories for a check transaction. The basic trick — if you can call it a trick — is to use the Split Transaction window to list all the category names and amounts.
One other point I should make here is that you can mix and match categories and transfers in the Split Transaction window. Some of the splits, for example, can be categories, and some can be transfer accounts. This type of transaction is common in a business setting. (See Chapter 15 for more information.)
Deleting and Voiding Transactions
You can delete and void register transactions by using the More Actions button’s Delete and Void Transaction(s) commands. If you’ve looked at the More Actions button — it appears just below the selected transaction when you’re entering data — you’ve probably already guessed as much. The More Actions button looks like a compass. Or something.
Using either command is a snap: Just highlight the transaction you want to delete or void by using the arrow keys or by clicking the mouse. Then click the More Actions button and choose the command. And that’s that.
Use the Void Transaction(s) command any time you void a check. Quicken leaves voided transactions in the register but marks them as void and erases the Payment or Deposit amount. So by using the Void Transaction(s) command, you keep a record of voided, or canceled, transactions.
Use the Delete command if you want to remove the transaction from your register.
The Big Register Phenomenon
If you start entering a bunch of checks, deposits, and transfers into your registers, you’ll soon find yourself with registers that contain hundreds — even thousands — of transactions. You can still work with one of these big registers by using the tools and techniques I talk about in the preceding paragraphs. Nevertheless, let me give you some more help for dealing with … (drumroll, please) … the big register phenomenon.
Moving through a big register
You can use the PgUp and PgDn keys to page up and down through your register a screenful of transactions at a time. Some people call this scrolling. You can call it whatever you want.
You can press Ctrl+Home to move to the first transaction in a register and Ctrl+End to move to the last transaction in a register.
You can also use the vertical scroll bar along the right edge of the Transactions tab. Click either above or below the square scroll-bar marker to page back and forth through the register. Or, if you have no qualms about dragging the mouse around, you can drag the scroll-bar marker up and down the scroll bar. If you drag the scroll-bar marker to scroll through the register, Quicken displays a pop-up box that shows the transaction date you’ve scrolled to.
Finding that darn transaction
Want to find a specific check, deposit, or transfer? No problem. The Find command provides a handy way for doing just that. Here’s what you do:
- Choose Edit⇒Find or press Ctrl+F.
Quicken, with restrained but obvious enthusiasm, displays the Quicken Find dialog box (shown in Figure 4-11). You use this dialog box to describe, in as much detail as possible, the transaction you want to find.

Figure 4-11: The Quicken Find dialog box.
- Specify which pieces, or fields, of the register transaction you want Quicken to search.
Click the down arrow to the right of the first Find box; then, in the drop-down list, select the field that Quicken should look at during the search: Amount, Cleared Status (the Clr field), Memo, Date, Check Number Category, Tag, or Payee. Or get truly crazy and pick the Any Fields list entry so that Quicken looks both high and low.
- Tell Quicken whether you’re using a shotgun or a rifle.
(Metaphorically speaking, of course.) Specify how closely the text or value you’re searching for must match the data stored in the register. To do so, open the second Find box and select the appropriate matching rule:
- Contains: Select this rule if the field or fields you’re searching just need to use a piece of text. If you enter Aunt in the Find text box and use this matching rule to search Payee fields, Quicken finds transactions that use the payee names Aunt Enid, Aunt Enid and Uncle Joob, Uncle Harry and Aunt Edna, and…well, you get the idea.
- Exact: Select this rule if the field you’re searching needs to exactly match your Find text-box entry. If you enter the Find text-box entry as Aunt, for example, and you’re searching Payee fields, Quicken looks for transactions where the Payee field shows Aunt — nothing more and nothing less.
- Starts With: Select this rule if the field you’re searching for just needs to start with what you entered in the Find text box. For example, if you enter Aunt in the Find text box, and you’re searching the Payee fields, Quicken looks for transactions where the Payee field starts with the word Aunt — such as Aunt Enid or Aunt Enid and Uncle Joob. (Uncle Joob and Aunt Enid wouldn’t cut the mustard in this case, though.)
- Ends With: Select this rule if the field you’re searching for just needs to end with what you entered in the Find text box.
- Greater: Select this rule if the field you’re searching for needs to hold a value that exceeds the number you entered in the Find text box. This makes sense, right? Like you’re looking for checks you wrote for more than $100?
- Greater or Equal: Select this rule if the field you’re searching for needs to hold a value that either exceeds or equals the number you entered in the Find text box.
- Less: Select this rule if the field you’re searching for needs to hold a value that is less than the number you entered in the Find text box.
- Less or Equal: Select this rule if the field you’re searching for needs to hold a value that is less than or equal to the number you entered in the Find text box.
- Enter the piece of text or number that identifies the transaction you want to locate.
Move the cursor to the third Find text box. Then type the text or number you want to find. By the way, the case of the text doesn’t matter. If you type aunt, for example, Quicken finds AUNT or Aunt.
- Tell Quicken whether you want it to search forward or backward from the selected transaction.
Select the Search Backwards check box if you want to look backward starting from the selected transaction.
- Let the search begin.
You click either the Find or the Find All button to begin the search. If you click Find, Quicken looks through the register, and if it can find a transaction like you describe, it highlights the transaction.
If you click Find All, Quicken looks through the register and builds a list of all the transactions that are like the one you describe. Then it displays the list in an expanded version of the Search Results window (shown in Figure 4-12). To edit a found transaction, select the transaction and click the Edit Transaction(s) button.
Quicken supplies another command that is similar to Find. The Edit menu’s Find/Replace command lets you both locate and modify transactions that look like the one you describe. (To use the Find/Replace command, choose Edit⇒Find/Replace.) For example, you may want to locate transactions showing Aunt Enid as the payee so that you can replace Aunt with Great Aunt. The Find/Replace command works in a similar fashion to the Find command except that you need to describe what you want to modify in the found transactions. After you complete the initial dialog box that Quicken displays when you choose the command, Quicken displays a window listing the transactions it has found. (This window looks like the one shown in Figure 4-13.) You mark — by clicking — the transactions you want to modify, describe the replacement information, and then click the Replace button.

Figure 4-12: The Search Results window with a transaction that matches the search criteria.
You can use the Find/Replace command to find and replace categories, which is kind of a handy trick. For example, you may want to recategorize all your cable television payments as the Entertainment category (where earlier, you placed them in the Utilities category). To recategorize, use the Find/Replace command to search the Quicken register for the transactions you want to recategorize. Mark the transactions you’re sure you want to recategorize. Then click the arrow button next to the With box so that Quicken displays a list of categories (see Figure 4-14) , select the category and click Replace All.

Figure 4-13: The Find and Replace dialog box.
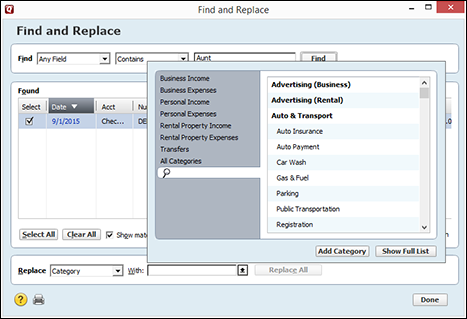
Figure 4-14: The pop-up categories box you can use to recategorize.
Pop-Up Calendars and Calculators
Can I tell you just a couple more things? (If not, skip this section. If so, read on.) Quicken provides a pop-up calendar any time you move the selection cursor to a Date field. To get to the calendar, click the button that appears at the right end of the Date field. Quicken displays a calendar for the current month (shown in Figure 4-15). All you have to do is select the day you want as the date. (If you want to see a calendar for a different month, click the << and >> buttons.)

Figure 4-15: The pop-up calendar.
Quicken also provides a pop-up calculator any time you move the selection cursor to an Amount field. (See Figure 4-16.) To get to the calculator, click the button that appears at the right end of the Amount field.
Quicken displays a calculator like the one shown in Figure 4-16 when you choose the Tools⇒Calculator command. This baby works like a regular handheld calculator. You just type the math you want to perform. Quicken displays the calculation result in the Amount field.

Figure 4-16: The pop-up calculator.
Do the calculator keys make sense? Table 4-1 shows how they work.
Table 4-1 A Handyman’s Guide to the Quicken Calculator Keys
|
Key Name |
Operation |
|
/ (slash) |
Division |
|
X |
Multiplication |
|
– (minus) |
Subtraction |
|
+ (plus) |
Addition |
|
. (period) |
Indicates the decimal point |
|
% |
Indicates that the number you just typed is a percentage and should be converted to a decimal value |
|
= (equal sign) |
Calculates the amount and removes the pop-up calculator |
|
<- |
Removes, or clears, the last digit you entered |
|
CE |
Clears the last number entered into the calculator |
|
C |
Clears the Amount field |
|
MC |
Clears the calculator’s memory |
|
MR |
Enters the number stored in the calculator’s memory |
|
MS |
Stores the displayed value in the calculator’s memory |
If you type a number in the Amount field and then type any one of the math operand keys (+, –, /, *), Quicken pops open the calculator to continue the calculation. You don’t have to click the calculator button first.
Attaching Flags, Notes, and Images
Quicken provides a couple of handy though easy-to-miss buttons inside the register window just below the Date field: a Flag button and an Attach button. If you wouldn’t mind, take a minute to see whether you can find these babies. The Flag button shows a little flag. The Attach button shows a picture of a paper clip.
The Flag button, if clicked, displays the Transaction Notes and Flags dialog box, which lets you append a note to a transaction; tell Quicken you want to flag the transaction in your register (by making the flag appear in a different color); and, just possibly, command Quicken to display an alert message about the transaction on some specified future date.
When you click the Attach button, Quicken displays the Transaction Attachments dialog box, which you can use to attach an image of the check or some document to the transaction. You can attach images from a variety of sources, including files, scanned images, or the Clipboard.