
Chapter 5
Printing 101
In This Chapter
![]() Printing a check
Printing a check
![]() Recovering from a mistake after you’ve printed the check
Recovering from a mistake after you’ve printed the check
![]() Printing a register
Printing a register
I bet you can’t guess what this chapter describes. Gee, you guessed it — how to print checks and reports.
Printing Checks
Printing checks in Quicken is…well, quick. All you basically need to do is enter the information you want to print on the check form and the number you want Quicken to use to identify the check. Sounds simple enough, doesn’t it? It is, as you can read in the steps that follow.
To enter the information on a check form, follow these steps:
- Display the Write Checks window.
You can display the Write Checks window in a bunch of ways. For example, you can choose the Tools⇒Write and Print Checks command. And when the Spending tab displays an account register, you can also click the Actions button (the button in the top-right corner of the tab that shows a gear) and choose the Write Checks command. You can also use the command shortcut Ctrl+W. Figure 5-1 shows the Write Checks: Checking window.
- Select the account on which you want to write the check.
 This step is very important! To select the account you want to use, open the Write Checks From drop-down list at the top of the window. (You can do this by clicking the arrow button that’s just to the right of the box.) When Quicken displays the list of accounts, choose the one you want to use.
Figure 5-1: The Write Checks: Checking window.
- Enter the check date.
First, use the mouse or Tab key to move the cursor to the Date field. Then type the date that you’re going to print the check (probably today’s date). Remember to type the date in MM/DD/YYYY format; enter September 1, 2015, as 9/1/2015. You don’t need to enter the year if the year number that Quicken retrieves from your computer’s internal system clock is correct. You can adjust the date by a day by using + and – on the numeric keypad. You can also click the button at the end of the Date field to display your friend the pop-up calendar.
- Enter the name of the person or business you’re paying.
Move the cursor to the Pay to the Order Of field and type away. For example, to write a check to me, type Steve Nelson. (Feel free to do so, by the way. If you send me a check, I’ll even cash it as a sort of public service.) If you’ve written a check to the payee before, when you start to type the name, Quicken recognizes it and fills in the rest for you.
- Enter the amount of the check.
Move the cursor to the $ text box and type the amount. (If you’re sending a check to me, be sure to make the amount nominal — for sure, not more than $10 or $20… . ) When you press the Tab key, the cursor moves down to the next field, and Quicken writes the amount in words on the line under the payee name and before the word Dollars.
- Enter the payee’s address.
If you plan to mail the check in a window envelope, move the cursor to the Bill Pay Address field. (You can do this by clicking in the field.) Then enter the name and address of the person or business you’re paying.
 Here’s a little address entry trick: You can copy the payee name from the Pay to the Order Of text box to the first line of the Bill Pay Address field. Select the payee name and press Ctrl+C. Then click the mouse in or select the first line of the address field and press Ctrl+V. Now fill in the rest of the address block, including the street number and name, city, state, and ZIP code. After you enter this, Quicken memorizes these address details for the next time you use this payee.
 - (Optional) Enter a memo description of the check.
Move the cursor to the Memo field and enter a description (such as an account number or an invoice number) of why you’re sending your money to this person or business. Or if you’re sending someone a check because you didn’t have time to go out and buy a real gift, type Happy Birthday in the Memo field. It’s the little things that make a difference.
- Enter the category.
Move the cursor to the Category field and type the category name for the expense you’re paying with the check. If you don’t remember the category name, scroll down the category list to find the category. Figure 5-2 shows the completed window for a check payable to Movies Galore, the local cable TV company.

Figure 5-2: A completed check.
You can assign a check to more than a single category by using the Split Transaction window. Using the Split Transaction window with the Write Checks window works the same way as using the Split Transaction window with the Transactions tab. (I describe using the Split Transaction window with the Transactions tab in Chapter 4.) Okay. So why do I bring this up? You use the Split Transaction window when a check pays more than one type of expense or is transferred to more than one account.
For example, if you’re writing a check to pay your mortgage, with part of the check paying the actual mortgage and part of the check going into an escrow account for property taxes, you can use the Split Transaction window to describe the transaction’s individual components. To split a check amount so that the amount is assigned to multiple spending categories, click the Split button (which looks like a sign for a fork in the road) or press Ctrl+S. Either way, Quicken displays the Split Transaction window for you to indicate the categories and categorized amounts that make up the check total. If you have questions about how split transactions work, see Chapter 4.
- Click the Record Check button.
Quicken records the check. It displays the current account balance and the ending account balance, and it even adds a Checks to Print total in the bottom of the window. If you’re working with a monitor that supports a high screen resolution, you’ll also see a Checks to Print window that lists all the nitty-gritty about the checks you have to print. Shoot, when you’re finished with one check, Quicken even scrolls the completed check off the screen and replaces it with a new, blank check that you can use to pay your next bill. It doesn’t get much better than this, does it?
What if you make a mistake entering a check?
Don’t worry. If you haven’t yet printed the check, fixing mistakes is easy. If you press the PgUp and PgDn keys with the Write Checks window displayed, Quicken pages you through the check transactions. That way, you can display any check that you wrote — but have not yet printed — in the Write Checks window. An even easier way, if you have a lot of checks, is to double-click the check in the list that appears below the check form. (Quicken adds a check to this list when you click the Record Check button.)
With the check redisplayed, you can fix the mistake in two ways:
- If you incorrectly entered some bit of check information, move the cursor to the field with the incorrect data and just type over the data.
- If you’re really mad or frustrated, you can delete the entire check by clicking the Delete button. (I should ’fess up here and suggest that you delete the check if you accidentally entered a check to me, for example.) Then you can re-enter the check — only this time, correctly.
Don’t use this method to delete a check that you’ve already printed. Instead, void it. To void a check that you’ve already printed, follow these steps:
- Go into the Spending tab.
- To display the register, click the Accounts-bar hyperlink for the account.
The Accounts bar appears along the left edge of the Quicken program window.
- Find the check in the register, select the check, and void it by clicking the More Actions button and then choosing the drop-down list’s Void Transaction(s) command.
- Write something, such as VOID, in large letters across the face of the printed check.
Printing a check you’ve entered
Printing checks is easy. Here’s what you need to do:
- Load the checks into your printer.
You do so the same way you load any other paper into your printer. If you have questions about it, refer to your printer documentation. (Sorry I can’t help more on this process, but with a million printers on the market, I can’t guess which one you have.)
- Click the Print button at the bottom of the Write Checks window and then choose the Checks command on the menu Quicken displays (or choose File⇒Print Checks).
If you haven’t yet saved the check, Quicken asks whether you want to save the check. Then Quicken displays the Select Checks to Print: Checking dialog box shown in Figure 5-3. At the top of the dialog box, Quicken shows how many checks you have to print and the total dollar amount for those checks.

Figure 5-3: The Select Checks to Print: Checking dialog box.
- Enter the first check number.
Move the cursor to the First Check Number text box and type the number printed on the first check form you’ll print. Figure 5-3 shows 1001, for example, so the first check form is numbered 1001. To quickly increase or decrease the check numbers, use + or – on the numeric keypad.
- Indicate which checks Quicken should print by selecting one of these options:
- All Checks: Select this option button if you want Quicken to print all the checks you’ve entered by using the Write Checks window, which is the usual case. (If you select this option, skip to Step 6.)
- Checks Dated Through: Select this option button if you want to print all the checks through a certain date; then type that date in the text box. (If you select this option, skip to Step 6.)
- Selected Checks: Select this option button if you want to pick and choose which checks to print.
- If you want to select which checks to print, click the Choose button.
Quicken, with some annoyance, displays the Select Checks to Print window, shown in Figure 5-4. Initially, Quicken marks all the checks dated on or earlier than the current date by placing a check mark in the Print column. If you don’t want to print a check, either leave the Print field for that check clear (deselected) or click in the field to remove the check mark. When only the checks you want to print are marked to be printed, click Done to continue with this crazy little thing called check printing. Quicken, happy with your progress, redisplays the Select Checks to Print: Checking dialog box (refer to Figure 5-3).

Figure 5-4: The Select Checks to Print window.
- Indicate which Quicken check form you’re using.
Move the cursor to the Check Style drop-down list box; click the arrow so that the list drops down; and then select the check form you purchased: standard, voucher, or wallet checks.
- Tell Quicken if you’re printing a partial page.
If you’re printing a partial page, use the Checks on First Page option buttons to indicate the number of check forms on the partial page. Select the Three option button if you have three checks, the Two option button if you have two checks, or the One option button if you have one check.
- Indicate whether you want extra copies of the check form.
Type the number of copies you want in the Additional Copies text box. (This text box appears only if you’re set up for the voucher check style.)
If you use Quicken for business to keep accounts payable files, make copies of checks to attach to the invoices that the checks pay. Then, if a vendor calls later, starts hassling you, and asks which check paid an invoice, you can easily check your accounts payable files, quickly answer that question, and basically cover your derrière.
- Click OK and let the games begin.
A couple of quick tips: First, if you’re unsure about how your checks feed through your printer, you can click the Print First Check button (see Figure 5-3) to tell Quicken to print only a single check. (This will let you confirm in another way that you’ve got things lined up correctly.) Second, if you’re using a partial starting page of forms, your printer may prompt you to feed the first page of forms manually. When it finishes, Quicken asks whether it printed your checks correctly, as shown in Figure 5-5.
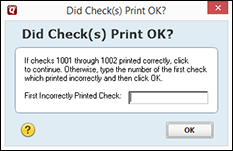
Figure 5-5: The Did Check(s) Print OK? dialog box.
- Do one of the following:
- If the checks printed correctly, click OK. You’re done.
- If the checks didn’t print correctly, enter the number of the first check that printed incorrectly and click OK; then repeat Steps 3–9.
- Sign the printed checks.
Then — and I guess you probably don’t need my help here — put the checks in the mail.
What if you discover a mistake after you print the check?
This problem isn’t as big as you may think.
If you’ve already mailed the check, you can’t do a whole lot. You can try to get the check back (if the person you paid hasn’t cashed it) and replace it with the correct check. (Good luck on this one.)
If the person has cashed the check, you can’t get the check back. If you overpaid the person by writing the check for too much, you need to get the person to pay you the overpayment amount. If you underpaid the person, you need to write another check for the amount of the underpayment.
If you printed the check but haven’t mailed it, void the printed check. First, write VOID in large letters — in ink — across the face of the check form. (Use a ballpoint pen if you’re using multipart forms so that the second and third parts also show as VOID.) Second, click the Register tab, highlight the check, click the More Actions button, and then choose the Void Transaction command. (This option marks the check as one that has been voided in the system so that Quicken doesn’t use the voided check in calculating your account balance.)
A few words about check printing
Check printing is kind of complicated at first, isn’t it?
For the record, I’m with you on this one. But you’ll find that printing checks does get easier after the first few times.
Pretty soon, you’ll be running instead of walking through the steps. Pretty soon, you’ll just skate around things like check-form alignment problems. Pretty soon, you’ll know all this stuff and never have to read pretty soon again.
Printing a Check Register
You can print a check register or a register for any other account. To print a register, follow these magic steps:
- Display the register by clicking the Accounts-bar hyperlink for the account.
- Choose the File⇒Print [account name] command.
The File menu command you choose, by the way, names your account. If the account you displayed in Step 1 is named Checking, for example, the File menu command is Print Checking. After you choose the File menu command, of course, Quicken displays the Print Register dialog box, shown in Figure 5-6.

Figure 5-6: The Print Register dialog box.
- (Optional) Customize the printed register.
You can use the Print Register dialog box to give the printed register a title (just enter something in the Printed Title box) and to specify the range of transactions. If you select the Print Split Transactions check box, Quicken prints the details of split transaction data.
- Print the register.
Click the Print Register dialog box’s Print button. Quicken displays the Print dialog box, shown in Figure 5-7. You don’t have to fool around with this dialog box. If you want to print a register pronto, just click OK. Then again, if you’re the sort of person who likes to fool around with this kind of stuff, carry on with the rest of these steps.
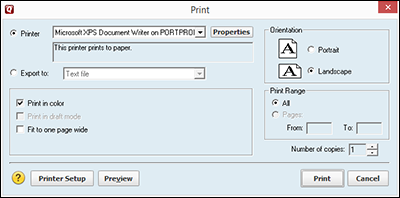
Figure 5-7: The Print dialog box.
 (Optional) Export the report to disk if you want.
To print the report to disk as a text file, choose one of the following options from the Export To drop-down list:
- Text File if you want to create a text file, such as when you want to import the register into a word-processing program.
- Tab-Delimited (Excel Compatible) Disk File, such as when you want to import the register into a spreadsheet or database program. (Oooh … fancy… . )
- PRN (123-compatible) Disk File, such as when you want to import the register into any spreadsheet program that will open 1-2-3 files (which, basically, means any spreadsheet program, including Microsoft Excel). Lotus 123, by the way, was basically the first, super-popular spreadsheet program and widely used two decades ago.
If you indicate that you want a disk file, after you click the Export To button to start the ol’ exporting process, Quicken displays the Create Disk File dialog box (not shown). This dialog box asks for the filename that Quicken should create as part of printing the file to disk and asks where you want to store the file. Just enter the filename you want in — you guessed it — the File Name text box. (Use a valid filename, of course.) Use the Save In text box to indicate where you want to store the file. And what do you do with the disk file? You’re on your own here… .
- (Optional) Tell Quicken which pages to print.
Use the Print Range option buttons and text boxes to limit the pages Quicken prints (refer to Figure 5-7). How? Select the Pages option button and then type the range of page numbers you want to print. That’s simple enough, right?
- (Optional) Color your world.
If you have a color printer and want to print your register in color, select the Print in Color check box in the Print dialog box (refer to Figure 5-7).
- (Optional) Trade speed for quality.
You can select the Print in Draft Mode check box to tell Quicken it should print faster and spend less time worrying about the quality of the printing job (refer to Figure 5-7). In other words, you can use this check box to trade print quality for print speed. Life is full of trade-offs, isn’t it?
- (Optional) Tell Quicken to scrunch the information so that it fits across the page.
Click the Fit to One Page Wide check box to tell Quicken that you want its register information to fit across the width of the page (refer to Figure 5-7).
- Click OK.
Quicken finally prints the register. I’m not going to show a printed copy of the register here. All it is, really, is just a printed copy of the same account detail information you see on the Transactions tab.