
Chapter 12
Other People’s Money
In This Chapter
![]() Tracking loans, mortgages, and other debts
Tracking loans, mortgages, and other debts
![]() Setting up liability accounts
Setting up liability accounts
![]() Calculating the principal and interest portions of a payment
Calculating the principal and interest portions of a payment
![]() Recording loan payments
Recording loan payments
![]() Handling mortgage escrow accounts
Handling mortgage escrow accounts
![]() Adjusting principal and interest breakdowns
Adjusting principal and interest breakdowns
![]() Scheduling automatic loan payments
Scheduling automatic loan payments
A while back, a popular financial self-help writer used to argue that one of the secrets to financial success is using other people’s money: the bank’s, the mortgage company’s, the credit people’s, your brother-in-law’s… . You get the idea.
Me? I’m not so sure that using other people’s money is the key to financial success. Borrowing other people’s money can turn into a nightmare.
Quicken can help you here. No, the folks at Intuit won’t make your loan payments for you. But in a way, they do something even better: They provide you a tool to monitor the money you owe other people and the costs of your debts.
Should You Bother to Track Your Debts?
I think that tracking your debts — car loans, mortgages, student loans, and so on — is a good idea when lenders fail to tell you the amount that you’re paying in annual interest or the amount you owe after each and every payment.
If your lenders are doing a good job of keeping you informed, I don’t think that using Quicken for this purpose makes much sense. Heck, it’s their money. They can do the work, right?
Let me make one more observation. If lenders have half a clue, they send you a United States 1098 tax form at the end of every year. The number shown on that form equals your tax deduction if the interest stems from a mortgage, business, or investment loan. Note that personal interest expenses aren’t deductible anymore, so you shouldn’t track them unless you really want to be mean to yourself.
How Do You Get Started?
To track other people’s money with Quicken, you must set up a liability account. Setting up one of these babies is easy. Just remember that you must set up a liability account for every loan or debt you want to track: one account for your mortgage, another for your car loan, still another for your student loan, and so on.
Setting up a liability account for an amortized loan
An amortized loan is one on which you make regular, equal payments. Over time, the principal portion of each payment pays off, or amortizes, the loan principal. If you borrowed money to purchase a house, a car, a Winnebago, or anything else that’s really expensive and that you pay off over several years, chances are good that your loan is of the amortizing variety.
Setting up a loan account requires a few dozen steps, but none of the steps is difficult, and none takes that much time to complete. As long as you have your loan information handy — the loan amount, interest rate, balance, and so on — setting up this type of account is a snap.
Here’s the recipe for setting up a liability account:
- Click the Add an Account button.
The Add an Account button appears in the lower-left corner of the Accounts bar.
- Tell Quicken you want to set up a loan account.
When Quicken displays the Add Account dialog box, choose Loan⇒Manual Account Setup. Quicken displays the Loan Details dialog box (see Figure 12-1).
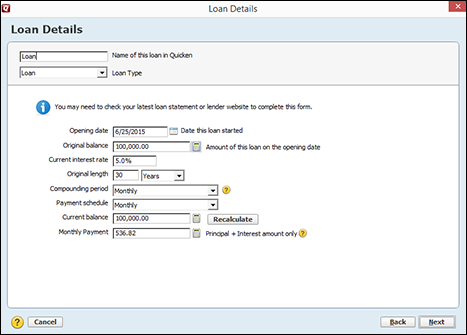
Figure 12-1: The Loan Details dialog box.
- Name and (optionally) classify the loan account.
Use the Name of This Loan in Quicken text box to give the loan a name. And please be clever here. Then consider using the Loan Type drop-down list box to classify the loan by selecting a loan type (such as auto loan, consumer loan, or commercial loan) from the list.
- Enter the date that you borrowed the money in the Opening Date text box; or, if your loan has a grace period (like the one for a student loan), enter the date when your loan enters the repayment period.
Quicken needs to know this date so it can calculate the interest that the loan started to accrue when you borrowed the money. The program suggests the current system date as the Opening Date, but this is probably wrong.
- Enter the original loan balance.
Enter the original loan amount in the Original Balance text box. You can get this amount, if you’re unsure, from the original loan documents.
- Specify the interest rate.
Enter the loan’s interest rate in the Current Interest Rate text box. The loan interest rate, by the way, isn’t the same thing as the APR, or annual percentage rate. You want to enter the actual interest rate used to calculate your payments. Enter the interest rate as a decimal amount. Don’t type 75⁄8, for example; instead, type 7.625. You should be able to get this rate from the lender or the prospective lender.
- Enter the loan term (in years) in the Original Length text box.
If you set up a 30-year mortgage, for example, type 30. You may have to perform one tiny trick when entering this figure. If you set up a loan that includes a balloon payment, enter the number of years over which the loan will be fully paid — not the number of years used for calculating the loan payment. Loan payments may be calculated based on a 30-year term, but the loan may require a balloon payment at the end of 7 years. In that case, type 7 in the Original Length text box.
- Indicate how often the bank calculates loan interest.
Use the Compounding Period text box to specify how often the bank calculates interest on the loan. The interest-compounding period usually equals the payment period.
- Describe how often you make a loan payment by using the Payment Schedule drop-down list box.
If you make regular monthly payments, for example, select Monthly from the Payment Schedule drop-down list box. If you can’t find an entry in the Payment Schedule drop-down list box that describes how often you make payments, select the Other Period list entry and then type the number of payments you make each year in the Payments Per Year text box. (Note that the Payments Per Year text box doesn’t appear unless you select Other Period.)
- Enter the current balance if you’ve made any payments.
If you’ve already made payments on the loan, specify how much you still owe on the loan after making the last payment by using the Current Balance text box. If you don’t know the current balance, call the lender and ask for it. If you haven’t made any payments yet, skip to Step 11.
- Correct the calculated payment amount (if necessary).
After you enter the loan information discussed in the preceding steps, Quicken calculates the loan payment, using the loan balance, term, and interest rate you entered. In most cases, the calculated payment Quicken gives you should be correct. But if the calculated payment is wrong — say, because of a rounding error or because your loan includes a balloon payment — enter the correct loan principal and interest amount in the Monthly Payment text box.
 You can tell Quicken to recalculate the payment or current balance amount by using some new bit of loan information you enter. Just click the field you want to update and then click the Recalculate button.
 - Click Next.
Confirm that the Quicken calculations make sense and then click Next. Quicken displays the second Loan Details dialog box (shown in Figure 12-2).
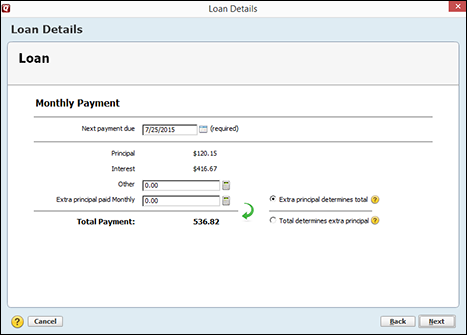
Figure 12-2: The second Loan Details dialog box.
- Verify the principal and interest payment calculated by the program.
If it’s wrong, you can keep going, but let me point out a minor (yet annoying) problem. You probably entered one of the loan calculation inputs incorrectly, such as the loan balance, loan term, or the interest rate. Fortunately, these errors are only minor bummers. Later in this chapter (in the “Fixing loan stuff” section), I describe how to start over.
- (Optional) Indicate any amounts you pay besides principal and interest.
If your lender requires you to add a little extra to the payment — such as for insurance, say, or for property taxes — enter that amount in the Other text box. If you want, you can also enter an extra principal payment in the Extra Principal Paid Monthly text box.
If you want to set up a loan payment so that it includes an extra chunk of principal payment, you can enter either the extra amount in the Extra Principal Paid Monthly text box. Or you can select the Total Determines Extra Principal option button. When you select the option button, Quicken turns the Total Payment field into a text box. In that text box, enter the total payment you can afford to make, including any extra principal. - Set up a loan reminder.
To help you remember your loan payments — hey, nobody likes late payment fees — Quicken at this point displays a message box (not shown here) that informs you that it added a loan reminder message to the account so you don’t forget. You can also use this message box to tell Quicken that it can actually enter the loan payment transaction for you; just select the check box labeled “Automatically Enter The Transaction Into The Register” and specify how many days before the due date the transaction should be entered. You can also fine-tune the way the reminder and data entry work by using the Loan Payment Reminder dialog box (see Figure 12-3) which automatically appears. To tweak your reminder and transaction data entry, enter the lender name in the Pay To text box and the next payment date in the Due Next On text box, and then select the bank account you’ll use to make the payment from the From Account drop-down list box.

Figure 12-3: The Loan Payment Reminder dialog box.
- Describe the transaction splits.
If you’ve read Chapter 4, you may remember (from the section on splitting transactions) that Quicken allows you to split transactions into multiple categories. Good. That trick works for loan payments, too, as you may not be surprised to hear. If you want to split a loan payment, click the Split link in the Loan Payment Reminder dialog box and then click the Split button in the little message box that Quicken displays. Quicken displays the Split Transaction dialog box (see Figure 12-4), which you can use to describe any additional amounts the lender requires you to pay. In the case of a mortgage, for example, you may be required to pay property taxes or private mortgage insurance. After you enter the information, click Adjust and then click OK twice. Quicken calculates the full payment and redisplays the Loan Payment Reminder dialog box (refer to Figure 12-3).
- Tag or add a memo description to the loan payment transaction.
If you click the Tag or Memo link on the Loan Payment Reminder dialog box, Quicken displays a little message box you can use to add a tag or memo. I talk a little bit about how tags and memo descriptions work in Chapter 4. (See, for example, the section on recording checks.) But let me also point out here that if you’re using Quicken to track rental property, you want to tag the loan transaction by using the tag specific to a particular rental property. (See Chapter 16 for more information about using Quicken for rentals.)
- (Optional) Fine-tune the way the reminder works.
If you want, you can click the Optional Settings link to get to other links that let you specify things like how many days in advance you want to be reminded. How these optional reminder settings work requires no lengthy explanation from me. If you’re interested, just click around a bit and do a little experimenting.
- Click Done twice.
Quicken adds the new loan payment to your financial records, along with the payment details and any reminder message settings you set up.

Figure 12-4: The Split Transaction dialog box.
Fixing loan stuff
Nobody’s perfect, right? You may have made a tiny little mistake in setting up either the loan or the loan payment. This mistake doesn’t need to be a major financial or personal crisis, however. Just display the loan account window’s Loan Details tab by clicking the account name in the Accounts bar and then clicking the Loan Details tab (see Figure 12-5).
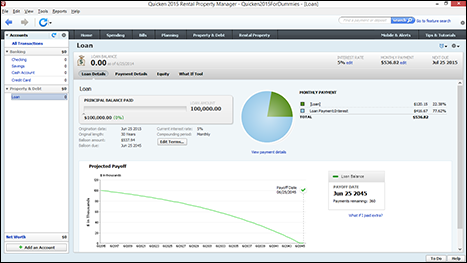
Figure 12-5: The Loan Details tab.
The Loan Details tab provides lots of interesting loan-related information, so take a couple of minutes to look it over. At the top of the tab, for example, Quicken tells you about the loan’s terms, including the original balance, the origination date, the term, any balloon payment, the interest rate, and the compounding period. In the bottom part of the tab, Quicken displays a line chart that plots the paydown of the loan principal.
Changing loan terms
To edit most bits of the loan information, click the Edit Terms button. Quicken displays the Loan Details dialog box, as shown in Figure 12-6. This version of the Loan Details dialog box works just like the nearly identical Loan Details dialog box you used to originally describe the loan. (See Figure 12-1.) You can change any loan term by editing the contents of its text box. (If you have questions about what the different loan terms mean or their effect, refer to the preceding section.)

Figure 12-6: The Loans Details dialog box, which you use to edit an existing loan.
Hey, can I mention one other thing about the loan account window shown in Figure 12-5? See that tab labeled Payment Details? If you click the Payment Details tab, Quicken displays a pie chart that shows how loan payments break down into principal, interest, and (if applicable) other components. (Figure 12-7 shows the dialog box.) If you click the Edit Payment Details button, which appears just under the pie chart, Quicken displays another version of the “second” Loan Details dialog box originally shown in Figure 12-2. The second Loan Details dialog box lets you make changes in the loan payment breakdown. The Payment Details tab also shows a little register-style list of recent payments. You may want to take a minute to experiment with this tab, too. The information provided is pretty neat.
Working with interest rate changes
If you need to change the loan interest rate regularly, say because you’ve borrowed money on an adjustable- or variable-rate loan, you can click the loan account window’s Interest Rate edit link. (This link appears in the upper-right corner of the loan account window.) When you click this link, Quicken displays the Loan Interest Rate dialog box (shown in Figure 12-8). This dialog box has a very simple purpose: It lists the interest rates you entered for a loan and the dates when these interest rates were used in loan calculations. For an adjustable-rate loan, click the arrowhead button next to the Adjustable-Rate Loans label to expand the dialog box so that it looks like the one shown in Figure 12-8.

Figure 12-7: The Payment Details dialog box.
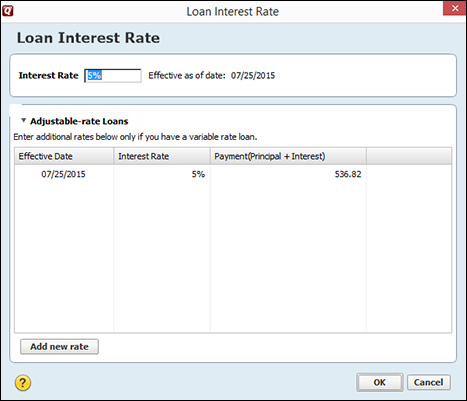
Figure 12-8: The Loan Interest Rate dialog box.
If you want to record new interest rates — because you have a variable-rate loan and the interest rate changes, for example — display the Loan Interest Rate dialog box and then follow these steps:
- Indicate that you want to record a new interest rate.
Click the Add New Rate button in the Loan Interest Rate dialog box. Quicken displays the Variable Interest Rate dialog box, shown in Figure 12-9.

Figure 12-9: Changing a loan’s interest rate.
- Provide the effective date of the interest rate change.
Use the Effective Date text box to indicate when the new interest rate becomes effective. You can either type a date or open the drop-down list box and select a date from the calendar.
- Give the new interest rate.
Type the new interest rate in the Interest Rate text box. When you move the selection cursor to a new box, Quicken refigures the loan payment and sticks the new loan payment figure in the Regular Payment text box.
- Click OK.
Removing loans
You can delete (remove) loans you no longer need or shouldn’t have added in the first place. Here are the steps:
- Display the loan account window by clicking the loan name on the Accounts bar.
Quicken displays the loan account window and either the Loan Details or Payment Details tab.
- Choose the Actions menu’s Edit Account command.
Quicken displays the Account Details dialog box (see Figure 12-10).

Figure 12-10: You can use the Account Details dialog box to remove a loan account.
- Delete the loan account by clicking the Delete Account button.
- When Quicken asks you to confirm your deletion, type the word “Yes” into the Type Yes To Confirm text box
You’d probably remove only a loan account that you previously added as an experiment or a loan account that you added incorrectly and need to restart from scratch. You probably wouldn’t want to remove a loan account you’ve paid off, because you may want information about the loan later on.
Delivering a Pound of Flesh (Also Known as Making a Payment)
After you set up a liability account, you’re ready to hand over a pound of your flesh — that is, make a payment. Before you say that this phrase is just some sort of populist bull-dweeble, I want to remind you that this metaphor comes from Shakespeare’s The Merchant of Venice, in which a loan is guaranteed by a pound of human flesh. Furthermore, I want to point out that with this allusion, I’ve been able to incorporate both violence and high culture into a computer how-to book. Sweet.
Recording the payment
After you set up the loan and the loan payment, you’re ready to record the payment.
To record the payment, follow these steps:
- Display the loan account.
Click the loan account on the Accounts bar and then click the Payment Details tab.
- Choose the Enter Loan Payment command.
Click the Actions button (the button in the upper-right corner of the screen that shows that little gear) and then choose the Enter Loan Payment command from the menu that Quicken displays. Quicken displays the Enter Expense Transaction dialog box (see Figure 12-11).
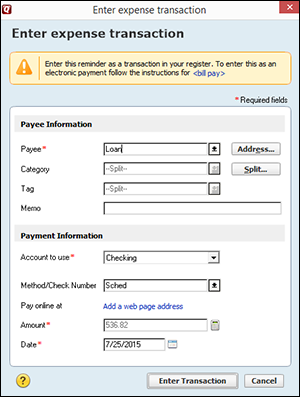
Figure 12-11: The Enter Expense Transaction dialog box.
- Verify the loan payment details.
Quicken should have filled out the Enter Expense Transaction dialog box correctly. But this is your money, after all, so be careful. Make sure that the right information appears.
- Click Enter Transaction.
Quicken enters the loan payment in the liability register and bank account register. If you want to print and mail a paper check, you can do that in the way I describe in Chapter 5.
Handling mortgage escrow accounts
I should talk about one minor, mortgage recordkeeping annoyance: mortgage escrow accounts.
If you have a mortgage, you know the basic procedure. Although your mortgage payment may be $536.82 per month, your friendly mortgage company (while insisting that it trusts you completely) makes you pay an extra $125 per month for property taxes and other such things. In other words, even though you’re paying only $536.82 per month in principal and interest, your monthly payment to the mortgage company is, according to this example, $661.82 ($536.82 + $125).
The mortgage company, as you probably know, saves this money for you in an escrow account or a set of escrow accounts. A couple of times yearly, the mortgage company pays your property taxes; a time or two per year, it pays your homeowner’s insurance. If you have private mortgage insurance, it may pay this fee every month as well. And so it goes.
The question, then, is how do you treat this stuff? As with most things, you can take the easy way (which is rough, dirty, and unshaven) or the hard way (which is precise, sophisticated, and cumbersome).
You can choose whichever method you want. It’s your life.
The rough, dirty, and unshaven method
Suppose that you do pay an extra $125 per month. You can treat this extra $125 as another expense category, such as Tax:Property or Other Housing or Property Expenses. (I’m just making up these categories. If you can think of better ones, use your own.)
Nice. Easy. No fuss. These words and phrases pop into my head when I think about the rough, dirty, and unshaven method of mortgage escrow recordkeeping. Figure 12-12 shows a sample Split Transaction window filled out this way. If the Split Transaction window seems like too much fuss, mosey on over to Chapter 4, where I give you the rundown on using it.
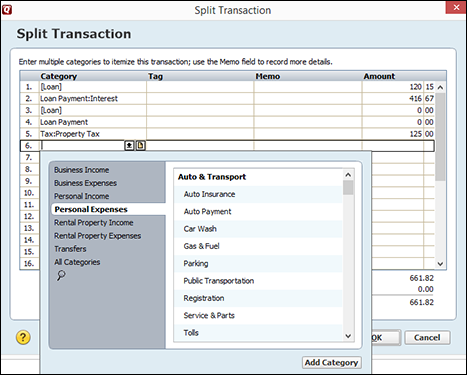
Figure 12-12: A mortgage payment with an escrow account treated as an expense.
I use the rough, dirty, and unshaven method. Let me make a confession, though. This approach doesn’t tell you how much moolah you have stashed away in your escrow accounts. It also doesn’t tell you how much you really spend in the way of homeowner’s insurance, what you’re entitled to claim as a property tax deduction, or how much the bank is bleeding you for private mortgage insurance.
To get these figures, you have to peruse the monthly and annual mortgage account statements — that is, if you get them. Or you have to call the mortgage lender and rattle a cage or two.
Still, with all its shortcomings, I like the easy-to-use, rough, dirty, unshaven method.
The precise, sophisticated, and cumbersome approach
You say you can’t live with the uncertainty, the stress, the not knowing? Then I have another approach just for you.
You can set up an asset account for each escrow account for which the mortgage company collects money.
You set up an asset account the way you set up a checking account. And, in fact, you should think of escrow accounts essentially as special checking accounts in which your lender deposits money collected from you so that it can pay your property taxes and insurance.
Because I explain this “setting up a checking account” process in Chapter 1, I cover it quickly here. You set up an asset account with its starting balance equal to the current escrow account balance. To do so, follow these steps:
- Display the Quicken home page or some other Quicken tab that shows the Accounts bar along the left edge of the window.
- Click the Add an Account button to indicate that you want to create a new account.
- As you step through the seemingly interminable account setup process, identify the account as an asset account and give it a name.
- Tell Quicken how much money is in the account as of a specific date.
If you’ve set up an account or two in your time, this process should take you about 40 seconds.
After you set up your asset account and record its current balance, you’re ready to cruise. Record payments in the escrow as account transfers whenever you record the actual loan payment.
You need to do one other thing: When you set up an escrow account, you must record the payments that the bank makes from your escrow account to the county assessor (for property taxes) and to the insurance company (for things such as homeowner’s and private mortgage insurance). You don’t know when these payments are really made, so watch your monthly mortgage account statements.
When the mortgage company disburses money from the escrow account to pay your first property tax assessment, for example, you need to record a decrease equal to the payment for property taxes and then categorize the transaction as a property tax expense. This process isn’t tricky in terms of mechanics. The account increases after every loan payment and decreases after a disbursement.
Basically, the Asset Account register mirrors the Checking Account register. The only difference is that the Checking Account register’s Payment and Deposit fields are relabeled as the Decrease and Increase fields in an Asset Account register. To get to this account’s register, click its name on the Accounts bar.
This second approach doesn’t seem like all that much work, does it? And if you use this approach, you can track escrow balances and escrow spending precisely. You can, for example, pull your property tax deduction right from Quicken. (Jeepers, maybe I should try the sophisticated approach next year.)
Your Principal-Interest Breakdown Won’t Be Right
Not to bum you out, but your principal-interest breakdown is often wrong. You may calculate interest expense as $416.67 when your bank calculates it as $416.69. A few pennies here, a few pennies there, and pretty soon your account balance and interest expense tallies are a few pennies off.
So you can’t change the world
You can try calling the bank, telling whomever you talk to what a bozo he (or she) is, and then demanding that someone there correct your balance. (If this approach works for you, let me know.)
Or (and this method is really more practical) you can adjust your records to agree with the bank’s records. Here’s how:
- Display the register for the liability.
To get to this account’s register, you just click the account name on the Accounts bar and then click the Payment tab.
- Click the Account Actions button and choose the Update Balance command from the resulting menu.
(Go ahead. Tap your keys very hard if you’re angry that the bank won’t adjust its records.) Quicken displays the Update Balance dialog box, shown in Figure 12-13.

Figure 12-13: The Update Balance dialog box.
- Enter the correct account balance (that is, the one that the bank says is correct).
Type the correct figure in the New Balance text box. (The amount probably comes from the year-end or month-end loan statement.)
- Enter the last day of the month or year for which you’re making the adjustment.
Enter a transaction date in the Adjustment Date text box. (You must use a transaction date that sticks the adjustment transaction — which fixes the principal-interest split — in the right month or year.)
- Record the adjustment.
When the Update Balance dialog box correctly describes the needed adjustment, click OK.
Slightly smarter adjustments
The Update Balance dialog box (shown in Figure 12-13) adjusts the loan balance to whatever value you indicate, but then it forgets to categorize this adjustment, instead calling the change a balance adjustment. That’s okay, I guess. But if you want to be slightly smarter about this adjustment, you should adjust the interest expense category. Let me explain.
 When you record loan payments, you split the loan payment between the interest expense category and a principal account transfer that reduces the liability. When the liability gets reduced either too much or not enough — as would be the case if you need to adjust the liability balance — you must fix the liability balance and the principal-interest split.
Suppose that over the course of a year, you record $0.17 too little interest expense — and, therefore, record $0.17 too much principal reduction, despite your best efforts to be accurate. You need to increase the liability account balance by $0.17 in this case, but you also need to increase the interest expense figure by $0.17.
If you want to be just a little bit more obsessive-compulsive than Quicken is, you can do so. Simply display the loan account register, select the adjustment transaction, and then use the appropriate interest expense category for Adjustment.
Automatic Payments
Quicken has a couple of nifty features — Scheduled Transactions and the Calendar — that can help you with automatic loan payments.
The Calendar and Scheduled Transactions features may be useful in other instances as well. A business, for example, may use the Scheduled Transactions and Calendar features to schedule and plan employee payroll checks, tax returns, and deposits. But I think that these features are most useful in the case of a loan, so I talk about them here.
Scheduling a bill reminder
If a payment occurs regularly — for a loan or some other regular bill, such as your cable TV service — you can tell Quicken to remind you about the payment, or you can set it up as a scheduled payment. When you do so, Quicken either reminds you or automatically records the payment for you, based on a schedule.
Follow these steps to set up such a reminder or scheduled transaction:
- Display the Calendar window.
To display the Quicken Calendar window, press Ctrl+K or choose the Tools⇒Calendar command. Either way, Quicken displays the Calendar window, shown in Figure 12-14. The figure shows a calendar for the current month and, optionally, a list of memorized payees.
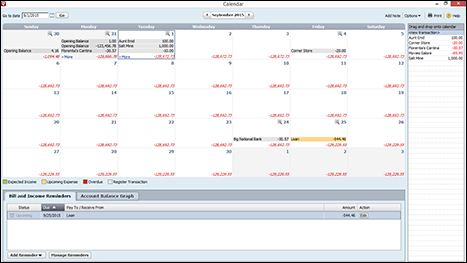
Figure 12-14: The Calendar window.
Note: If you can’t see the list of transactions along the right edge of the Calendar window, click the Options button and then choose the Show Memorized Payees List command from the menu Quicken displays. By dragging payees’ names from the list to the Calendar, you add transactions to the calendar one at a time, using previously recorded transactions.
- Display the first month for which you want to schedule the transaction.
Using the left- and right-arrow buttons, select the starting month for the reminder or scheduled transaction. You can also enter a date in the Go to Date box and click the Go button. Quicken displays the month you want to schedule a payment for inside the Calendar window.
- Click the Add Reminder button and choose Bill Reminder from the menu.
Quicken displays the first Add Bill Reminder dialog box (not shown), which you use to enter the payee name. You can also click the button at the right end of the Pay To box to drop down a list of previous payees and then select one.
- Click Next, and use the second Add Bill Reminder dialog box to describe the recurring payment.
You use the second Add a Bill Reminder dialog box (see Figure 12-15) to describe the recurring payment.
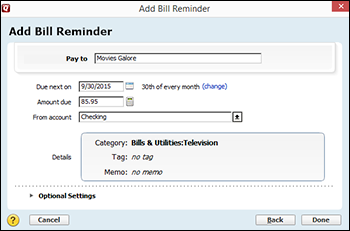
Figure 12-15: The second Add Bill Reminder dialog box.
- Verify that the Pay To and Amount Due fields are correct.
They probably are. But I have kind of a compulsive personality. Because I’ve been telling you to check all this other stuff, I thought I’d also suggest that you check these fields. Quicken uses the last payment amount to the payee as the suggested amount due, by the way.
- Check the payment-scheduling stuff.
Verify that the Due Next On text box and labeling show the correct date for the first payment. If Quicken doesn’t show the current due date, click the button that shows a picture of a stubby little pencil to display a pop-up box with boxes that let you specify how often the payment should be made; which day of, say, the month the payment is due; and the date when payments should stop.
- Identify how the payment should be made.
Open the From Account drop-down list box and then select the appropriate account.
- Categorize, tag, and bag.
If you’re scheduling a reminder for a transaction that you’ve already correctly recorded once, the Category, Tag, and Memo fields should show the correct information. You should still check them, however. You don’t want to have Quicken copy some old error you made. (Note that the Tag field appears only if you’ve enabled the Show Tag Field option in the Register section of the Quicken Preferences window.) Quicken opens text boxes that let you make changes in the Category, Tag, and Memo fields when you click the Add Category, tag, or memo link in the Details field.
- Click Done.
Quicken adds the payee’s transaction to the Calendar.
Note: When you schedule payments, you may implicitly break your budget. If you’ve set up a budget and scheduling a payment does “break” the budget, Quicken alerts you. Quicken also asks (in the nicest way possible) whether you want to update your budget. For more information about budgeting, refer to Chapter 3.
Scheduling income and transfer reminders
If you click the Add Reminder button, shown in the lower-left corner of the Calendar window (refer to Figure 12-14 earlier in this chapter), Quicken displays a menu of three commands: Bill Reminder, Income Reminder, and Transfer Reminder.
Although I describe in step-by-step detail only the Bill Reminder command (see the preceding paragraphs), you can use the Income Reminder and Transfer Reminder commands in the same basic way that you use the Bill Reminder command. The Income Reminder command lets you schedule reminders to record recurring income or deposit transactions such as from a regular payroll check. The Transfer Reminder command lets you schedule reminders to record recurring transfers such as mortgage payments from your checking account.
Another way to schedule transactions
Quicken allows you to automatically schedule the adding of transactions. To create these scheduled transactions, click the Manage Reminders button at the bottom of the Calendar window or choose Tools⇒Manage Bill & Income Reminders. Quicken displays the Bill and Income Reminders window (see Figure 12-16).

Figure 12-16: The Bill and Income Reminders window.
To create a scheduled transaction, click the Create New button and select the Bill Reminder, Income Reminder, or Transfer Reminder command from the resulting menu. After you choose the transaction you want to schedule, Quicken displays a dialog box (not shown here) that you use to describe an automatically scheduled transaction. you can automatically schedule any kind of transaction — loan payments, insurance premiums, child support, or whatever. (I’m describing automatically scheduled transactions in this chapter, though, because loan payments are among the most common ways to use this Quicken feature.) If you have questions about how bill, income, or transfer reminders work, refer to “Scheduling a bill reminder” earlier in this chapter. But know that income and transfer reminders work very, very similarly to bill reminders.
The Create New menu’s Scheduled Transaction Group command deserves a bit more discussion, though, so let me briefly touch on that subject. If you choose Scheduled Transaction Group from the menu Quicken displays when you click the Create New button, Quicken displays the Create Transaction Group dialog box (see Figure 12-17).
A scheduled transaction group is a collection of transactions that you schedule together — such as all the bills you need to pay on the first of the month or out of your second paycheck.

Figure 12-17: The Create Transaction Group dialog box.
To create a scheduled transaction group, use the Create Transaction Group dialog box to name the group, pick the account from which you’ll use funds, and then provide payment date and frequency information.
The Create Transaction Group dialog box provides a list of memorized transactions that you can use to indicate which transactions belong in the group. Check the box for each transaction you want to add.
Checking out the Calendar
The bar along the top of the Calendar (refer to Figure 12-14) provides some other tools that you may want to use. I’m not going to spend much time on them; you’ll have more fun trying them out yourself than you would reading about them. Nevertheless, let me give you a bird’s-eye view:
- The Add Note button lets you post a note on a calendar day. You use this feature to create reminder notes that will also appear in the Alerts area of the Cash Flow Center. You may want to post a note saying Remember Wedding Anniversary on the big day, for example. After you click this button, Quicken displays a dialog box in which you type the message. Then you click (in effect) Save My Butt. The program also marks the calendar day with a little yellow square — a miniature stick-on note. Click the square to read the message.
- The Options button displays a menu of commands that let you specify which transactions should appear in the Calendar, add an account balance graph in the Calendar window, and fiddle with the memorized transactions list. The transactions shown in that list box along the right edge of the Calendar window, by the way, are memorized transactions. (Chapter 4 briefly discusses memorized transactions.)