
Chapter 11
Credit Cards, Petty Cash, and PayPal
In This Chapter
![]() Tracking credit cards with Quicken
Tracking credit cards with Quicken
![]() Setting up and selecting a credit card account
Setting up and selecting a credit card account
![]() Recording a credit card charge
Recording a credit card charge
![]() Changing charges you’ve already entered
Changing charges you’ve already entered
![]() Paying a credit card bill
Paying a credit card bill
![]() Reconciling a credit card balance
Reconciling a credit card balance
![]() Deciding whether to use Online Account Access
Deciding whether to use Online Account Access
![]() Tracking cash with Quicken
Tracking cash with Quicken
![]() Tracking PayPal with Quicken
Tracking PayPal with Quicken
You can use Quicken to track your credit cards and even the cash in your pocket in much the same way that you use Quicken to keep a checkbook. Tracking these items uses a nearly identical process — with a few wrinkles.
First, however, I need to discuss whether you should even bother.
Tracking a Credit Card
If you do carry a credit card balance — and about 50 percent of people do — you can set up a credit card account and use it for tracking credit card purchases. If you just need to keep track of how much you charge during the month (even if you’re going to pay the balance in full), you must also set up a credit card account and use it. I should make one other point: To track not just what you charge (by using spending categories), but also where you charge it (by using the Payee field), you must set up a credit card account and use it.
Note: If you use a credit card account in a small-business or rental-property situation, you should set up a credit card account and use it because credit card charges should be deducted on your tax return in the same year as the charge occurs.
I don’t use Quicken to track my credit card purchases because I pay my credit card balance in full every month. (Don’t feel bad if you don’t; it’s like a natural law that CPAs like me must do this.) Therefore, I don’t have an open credit card balance to track. What’s more, when I pay the monthly credit card bill, I can easily use the Split Transaction window to describe my spending categories: $3.53 on food for lunch, $52.64 for car repair, and $217.54 for books (my personal weakness). If you’re in the same boat — meaning that you use a credit card but you don’t carry a balance — you don’t need anything special to track your credit card purchases. And of course, you don’t need to use Quicken to tell you your account balance because it’s always zeroed-out at the end of the month.
Setting Up a Credit Card Account
If you want to track credit card spending and balances with Quicken, you must set up a special credit card account. (By comparison, you use bank accounts to track other things, such as the money that flows into and out of a checking account.)
Adding a credit card account
To set up a credit card account, you follow roughly the same steps as you do to set up a bank account. Here’s what you do:
- Display the Quicken home page.
You can do this by clicking the Home tab. Figure 11-1 shows the Quicken home page.
- Click the Add an Account button.
The Add an Account button appears in the lower-left corner, by the way. (I mention this because the button is a little hard to spot.) Quicken displays the Add Account dialog box (see Figure 11-2).
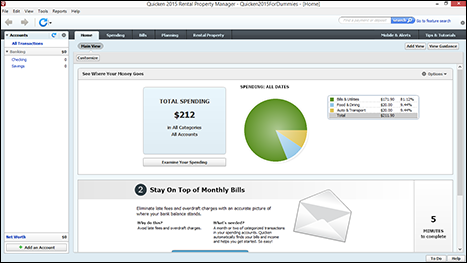
Figure 11-1: The Quicken home page.
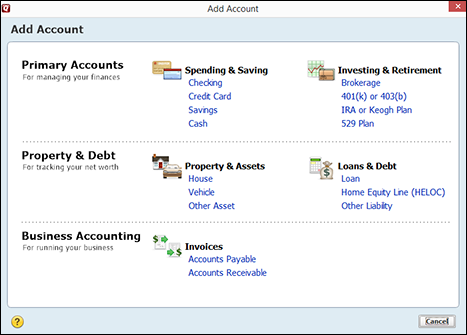
Figure 11-2: The Add Account window allows you to select the type of account you want to set up.
- Click the Credit Card option link to tell Quicken you’re setting up a credit card account.
- Identify the financial institution.
Quicken displays a dialog box that asks for the name of the credit card issuer. The first “identify your financial institution” dialog box, shown in Figure 11-3, lets you enter the issuer name or part of the name in a text box or lets you select your bank from Quicken’s list of popular banks. After you identify the bank issuing the credit card, Quicken prompts you to provide your online username and password. If you don’t want Quicken to make online connections to your bank, you can click the Advanced Setup link (at the bottom of the dialog box) to indicate that you don’t want to identify your credit card issuer. When Quicken displays the dialog box that asks whether you want to download transactions or manually enter them, select the I Want to Enter My Transactions Manually option button and click Next.
- Name the account and then click Next.
When Quicken displays the dialog box that asks you to give a name to the credit card account (not shown here), move the cursor to the Account Name/Nickname text box and type a name. In some flavors of Quicken, this dialog box also supplies option buttons you can use to indicate what you use the credit card for: Personal Transactions, Business Transactions, and Rental Property Transactions. After you click Next, Quicken displays the Add Credit Card Account dialog box that lets you provide the account balance on a specific date, as shown in Figure 11-4.
- Enter the date on which you’ll start keeping records for the credit card account.
You probably should choose the date of your last statement, as Quicken suggests. Move the cursor to the Statement Ending Date text box and type the date in MM/DD/YYYY format. August 31, 2015, for example, should be entered as 8/31/2015.
- Enter the balance you owed at the end of the last credit card billing period after making your payment; then click Next.
Move the cursor to the Statement Ending Balance text box and type the balance value by using the number keys. After you click Next, Quicken displays a message stating that account setup is complete.
- Click Finish.
Quicken finally gets the message and redisplays the Quicken home page (refer to Figure 11-1 earlier in this chapter).

Figure 11-3: This Add Credit Card Account dialog box asks for your financial institution.
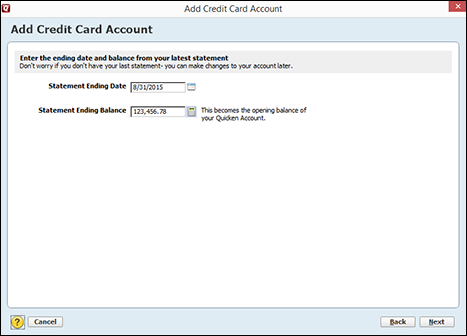
Figure 11-4: This dialog box lets you provide the account balance on a specific date.
Note: As you complete credit card account setup, Quicken may also display a message that urges you to sign up for your credit card company’s online banking services. For now, ignore this message. If you want to sign up later, just tell your bank, and it’ll help you get set up.
Selecting a credit card account so that you can use it
To tell Quicken that you want to work with an account, you use the Accounts bar. Just click the credit card account’s name.
 You can also use the Accounts List window to get to the new credit card account — or to any other account, too. To get to the Accounts List window again, choose Tools⇒Accounts List and then select the account you want to work with.
After you select the account you want, Quicken displays the register for that account so that you can begin recording transactions (which I describe in the next section).
Entering Credit Card Transactions
After you select a credit card account, Quicken displays a special version of the register, as shown in Figure 11-5.
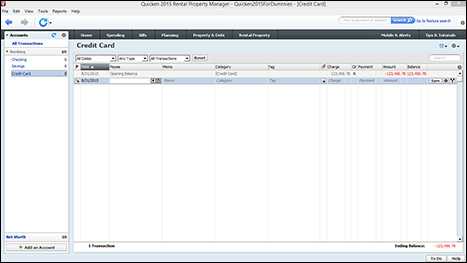
Figure 11-5: The credit card version of the Quicken register.
Touring the credit card register
The credit card register works like the regular register that you use for a bank account. You enter transactions in the rows of the register. After you record a charge, Quicken updates the credit card balance and the remaining credit limit (if you entered the optional credit limit information when you set up the account).
You can use the same techniques and commands as you do for your regular ol’ bank account register. I talk about these in earlier chapters, so I won’t regurgitate those discussions here.
Recording a credit card charge
Recording a credit card charge is similar to recording a check or bank account withdrawal. For the sake of illustration, suppose that you charge $30.57 for dinner at your favorite Mexican restaurant. Here’s how you record this charge:
- Enter the charge date.
Move the cursor to the Date field (if it isn’t already there) and type the date, using MM/DD format. You’d enter August 1, 2015, as 8/1, for example. You usually don’t have to type the year because Quicken retrieves the current year number from the little clock inside your computer. Or, if you want, get crazy: Click the box at the end of the field that remotely resembles a calendar, and Quicken displays a pop-up calendar from which you can select the appropriate month and day (see Chapter 4 for more information).
Don’t bother with the Ref field (if you see it). Quicken optionally supplies this field so that you can record the credit card reference number — a bit of data that’s usually about 20 characters long. You, my friend, have better things to do with your time. Just skip the field. - Record the name of the business you paid with a credit card.
Move the cursor to the Payee field and type the name of the person or business you paid. If the restaurant is Florentia’s Cantina, for example, type Florentia’s Cantina in the Payee field.
- (Optional) Enter a memo description.
Move the cursor to the Memo field and type the specific reason you’re charging the item, such as a special date with your spouse or an important business meeting. The Memo field — just so you know — appears only when the register display is set to Two-Line Display mode.
- Enter the category.
Move the cursor to the Category field, open the drop-down list box, and select the appropriate category. You may categorize a restaurant charge as Food & Dining:Restaurants, for example, if you’re using Quicken’s suggested categories and subcategories.
- (Optional) Tag the description.
If you’re using tags to classify the data even more granularly, move the cursor to the Tag field and select the tag you want to use for the transaction. If you’re like “Tags, what the heck?!”, turn back to the very end of Chapter 2 and look through the last few paragraphs.
- Enter the charge amount.
Move the cursor to the Charge field and type the total charge amount — 30.57 in this example. Don’t type a dollar sign, but do type the period to indicate the decimal place and cents.
- Record the charge, and click the Save button.
Quicken beeps, calculates both the new credit card balance and the remaining credit limit, and then moves the cursor to the next slot in the register.
Figure 11-6 shows the charge at Florentia’s. Good food and reasonable prices — you can’t ask for much more than that.
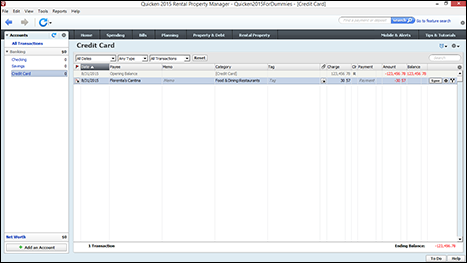
Figure 11-6: The charge at Florentia’s Cantina.
Changing charges you’ve already entered
Press the arrow keys or click the mouse to highlight the charge that you want to change. Press Tab and Shift+Tab or the mouse to move the cursor to the field that contains the misinformation you want to fix. Then you can fix the entry and record the transaction by clicking the Save button. That’s easy enough, isn’t it?
Paying credit card bills
If you’re tracking the credit card account balance with a credit card account like the one I’m describing here, Quicken provides two ways for you to pay a credit card bill.
Note: If you’re not using a credit card account in Quicken, you record the check you send to pay a credit card bill in the same way you record any other check. And that means you don’t have to read anything I’m about to say.
A most bodacious way to pay a credit card bill
This method is pretty simple, so don’t blink.
Look at your credit card statement. Decide how much you want to pay. Select the bank account on which you’ll write the check. Then write the check and record it in the bank account register — but as a transfer to the credit card account.
You’re done. If you have questions, take a peek at the selected check transaction shown in Figure 11-7. It pays $30.57 of the credit card balance. The only trick — if you want to call it that — is that the credit card account is specified as the account to which the money is transferred. (You can see the other account by right-clicking the transaction and choosing Go to Transfer from the contextual menu, or you can click the other account’s QuickTab, of course.)
If you could look at the credit card account register now — of course, you can’t because you’re not sitting in front of my computer — you would see that this check reduces the credit card balance by $30.57.
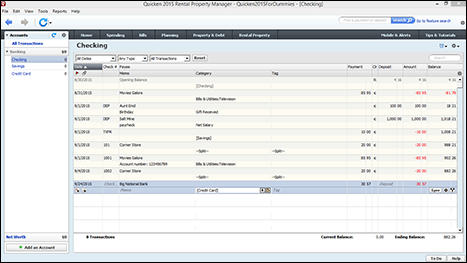
Figure 11-7: A check transaction that pays a credit card balance.
A less bodacious way to pay a credit card bill
You can also tell Quicken that you want to pay some portion of the credit card bill as part of reconciling the credit card’s account balance. What happens is that after you reconcile the credit card account, Quicken asks (or may ask) whether you want to make a payment. If you say you do, Quicken prompts you to describe the payment.
I think that this method is slightly more difficult. But if you want to reconcile your credit card account, think about using this second method. If you’re reconciling a credit card statement and paying some portion of the credit card balance at the same time, you may find this method more convenient. Who knows?
I describe how to reconcile a credit card account in the very next section.
Reconciling That Crazy Account
You know that trick in which you compare your checking account records with your bank’s records of your checking account? The one in which you calculate the difference between what you think is your account balance and what the bank thinks is your balance? And this difference is supposed to equal the total of the transactions floating around out there in the system? You can use this same trick on your credit card account.
To reconcile a credit card account, first get your credit card statement. Next, display the credit card account in a transaction list window.
What the nasty credit card company says
To tell Quicken what that nasty credit card company says, follow these steps and put on some music if you can’t seem to get the rhythm thing right:
- Click the Account Actions button in the transaction list window and choose the Reconcile command.
Quicken displays the Reconcile: Credit Card dialog box, as shown in Figure 11-8.
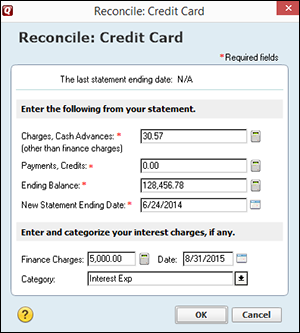
Figure 11-8: The Reconcile: Credit Card dialog box.
- Enter the charges and cash advances that your statement shows.
Move the cursor to the Charges, Cash Advances text box and then type the number.
- Enter the payment and credits that your statement shows.
You know the drill: Move the cursor to the Payments, Credits text box and type the number.
- Enter the new balance shown on the credit card statement.
Now, I bet this is a surprise. Go ahead and type the figure in the Ending Balance text box — even if you just can’t believe you charged that much.
- Enter the ending statement date.
I don’t know why Quicken is now collecting this piece of information. For more than ten years, Quicken has been able to reconcile your credit card account (and any other account) without this snidbit of data.
- Enter the monthly interest charge by using the Finance Charges text box.
Pause for a moment of silence here if this topic makes you sad, sad, sad.
- Assign the monthly interest to the appropriate spending category, such as Interest Exp.
Move the cursor to the Category text box and type the category name. (Are you getting bored yet? I know: Move and type … move and type … all I ever seem to say is “Move and type.”)
 You can click the little down arrow at the end of the text box to see a list of categories.
 - Click OK.
Quicken displays the Reconcile: Credit Card window (see Figure 11-9). Use this window to tell Quicken which credit card charges and payments appear on your statement. (This step is akin to looking at a bank statement and noting which checks and deposits have cleared the bank.)
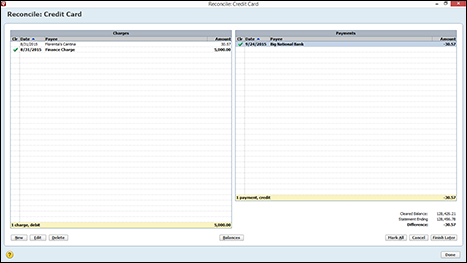
Figure 11-9: The Reconcile: Credit Card window.
Ouch! Did I really spend that much?
After you give Quicken an overview of your credit card situation, you can note which charges have cleared and which charges haven’t.
If you’re comfortable whipping through a bank reconciliation, you can probably do this reconciliation with your eyes closed. If you need some help, leave your eyes open so that you can read these steps:
- Find the first charge listed on the credit card statement.
- Mark the charge as cleared.
Charges are listed in the left list box. If you charged a bunch of stuff, scroll through the transactions listed in the Charges window until you find the charge. After you see a charge that appears on your credit card statement, click it. Or select the charge by using the arrow keys and then press the spacebar. Quicken adds the check-mark symbol in front of the list entry in the Clr column to mark this charge as cleared and then updates the cleared statement balance.
- Enter any missing charges.
If you can’t find a charge, you probably didn’t enter it in the Quicken register yet. Open the credit card account register by clicking its tab and then enter the charge in the register in the usual way — except enter c (the letter c) in the Clr column by clicking the Clr field. By doing so, you identify the charge as one that’s already cleared. When you finish, click the Return to Reconcile button to return to the Reconcile: Credit Card window.
- Repeat Steps 1–3 for charges listed on the credit card statement.
Or until you’re blue in the face.
- Find the first payment or credit listed on the credit card statement.
Any payments and credits appear in the right list box.
- Mark the payment or credit as cleared.
Scroll through the transactions listed in the Payments window until you find the first payment or credit and then select it. Or select the credit and then press the spacebar. Quicken adds the check-mark symbol in front of the list entry to mark the payment or credit as cleared and then updates the cleared statement balance.
- Enter any missing payments or credits.
If you can’t find the payment or credit — you probably know what I’m going to say — you haven’t entered it in the Quicken register yet. Open the credit card account register by clicking its tab and then enter the payment or credit in the register in the usual way, but put ac in the Clr column. When you finish, click the Return to Reconcile button to return to the Reconcile: Credit Card window.
- Repeat Steps 5–7 for payments or credits listed on the credit card statement.
If you record a transaction wrong, do this
As you’re looking through the credit card statement, you may discover that you incorrectly recorded a transaction. If this happens, display the credit card register so that you can make the necessary fixes.
Oh, that explains the difference
After you mark all the cleared charges and payments, the difference between the cleared balance for the credit card and the statement’s ending balance should be zero.
Figure 11-10 shows how this looks. By the way, reconciling with fictitious data is darned easy.

Figure 11-10: When the difference between the cleared balance and the statement is zero, the reconciliation is complete.
If you’re ready to finish
If the difference does equal zero, you’re cool. You’re golden. You’re done. (Sort of makes you sound like fried chicken, doesn’t it?)
All you need to do is click Done to tell Quicken that you’re done. Quicken asks you whether you want to make a credit card payment. Jump ahead to the “Paying the bill as part of the reconciliation” section for help doing just that.
If the difference doesn’t equal zero, you have a problem. If you clicked Done in spite of the problem, Quicken displays a message that has some cursory explanation of why your account doesn’t balance. This message also tells you that you can force the two amounts to agree by pressing Enter.
Forcing the two amounts to agree isn’t a very good idea, though. To make the balances agree, Quicken adds a cleared transaction equal to the difference. (Quicken asks for a category if you choose the adjustment route.)
Despite the ease of making adjustments, you should still correct the error responsible for the difference.
Chapter 8 provides some ideas for trying to figure out why a bank account that should balance doesn’t. You can apply the same list of tips to credit card reconciliations if you’re in a bad way.
If you want to postpone the inevitable
You can postpone reconciling the account by clicking the Finish Later button. When you click this button, you abandon your reconciliation work. Transactions that you mark as cleared still show c in the Clr text box. You still have an inexplicable difference between the credit card statement and your register. Even so, postponing a reconciliation is usually better than forcing the cleared balance to equal the credit card statement balance. By postponing a reconciliation, you can (ideally) find the problem or problems and fix them. Then you can restart the reconciliation and finish your work. (You restart a credit card reconciliation in the same way that you originally started one.)
When you finish, Quicken redisplays the Transactions tab. You may notice that when you mark credit card transactions as cleared, Quicken puts c in the Clr column of the credit card register. When you finish reconciling the credit card account, Quicken changes all these cs to Rs. None of what Quicken does here is magical. Quicken just makes this change to identify the transactions that have already been through the reconciliation process. (The c shows that a transaction has been marked as cleared. The R shows that a transaction has been reconciled.)
Paying the bill as part of the reconciliation
After you finish reconciling the credit card account, Quicken does two things:
- If some of the stuff in the credit card register doesn’t agree with the credit card statement, Quicken displays a message box to alert you to these, er, discrepancies. Then it suggests that you let it bring your records into agreement with the statement (see Figure 11-11). To synchronize your records with the credit card statement, verify that Quicken is using a reasonable expense category to categorize the discrepancy and then click Adjust.
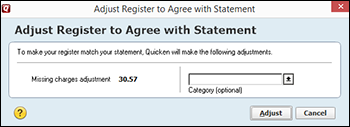
Figure 11-11: The Adjust Register to Agree with Statement dialog box.
- Quicken does a second thing after you finish reconciling a credit card account: It asks whether you want to pay the bill. Figure 11-12 shows the Make Credit Card Payment dialog box, which is the tool that Quicken uses to collect the necessary data. You simply identify the bank account on which you want to write the check and indicate whether you’ll use a printed check or a handwritten check. Then Quicken records a check that pays the credit card balance into the register. You can edit, print, and do whatever else you want to do with this check in the usual way.
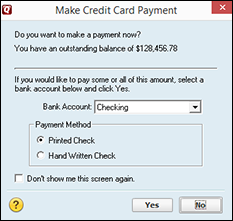
Figure 11-12: The Make Credit Card Payment dialog box.
The Online Banking Hoopla
As I briefly mention in Chapter 6, Quicken supports online banking. If you have your credit card with a credit card company — probably a bank — that’s set up to handle Quicken online banking, you can grab your credit card statement directly from the company. If you have a checking account at the bank that issued the credit card, you can also pay your credit card bill simply by transferring money from your checking account to your credit card. (This feature is actually pretty slick, I have to say.)
The big hoopla concerning this feature — at least as it relates to credit cards — is that you don’t have to enter the credit card transactions in a register. Rather, you retrieve them by using an Internet connection.
Should you even bother?
Is the online-banking-with-a-credit-card-thing a feature that you should look into? Does it really save you time? Is it a good deal? Inquiring minds want to know, so I’ll tell you what I think. (I should point out that what I’m about to say next is just my humble opinion.)
I think that when you consider the time savings, online banking in general is well worth the fee you probably have to pay for the service. You’ll probably pay only a few dollars a month. (What you pay depends on the bank issuing the credit card.)
Something bothers me about the whole deal, however: You really just receive an electronic version of your statement, which means (at least from my perspective) that you’re more likely not to see erroneous transactions. And reconciling your bank statement against…well, your bank statement isn’t going to make a whole heck of a lot of sense. (Golly, gee, Batman — the charge to Edna’s Pet School appears on both statements, too!)
How to use Online Account Access with your credit card
Okay, so you’ve listened to my side of the story, but you still want to use the Quicken Online Account Access feature with your credit card — and your bank is one that provides this service. “What next?” you’re wondering.
Here’s the answer: You set up online credit card accounts the same way you set up online bank accounts. Note: For more information about the Quicken Online Account Access feature, see Chapter 6.
Petty Cash and Mad Money
You can track petty cash in your business as well as the petty cash in your wallet by using a special Quicken cash account. To track the cash, you must set up a cash account and then enter the increases and decreases in the cash account’s register. Sure, this stuff isn’t exactly rocket science, but shoot, I thought I’d just go over it quickly to show you how easy it really is. Okay?
Adding a cash account
To set up a cash account — an account for “pocket money”-- you follow roughly the same steps as you do for setting up a bank account. Because you’ve probably already set up a bank account, you can move quickly through the following steps to set up a cash account:
- Display the Quicken home page.
Click the Home tab, and Quicken displays the Quicken home page (refer to Figure 11-1). You remember this puppy.
- Click the Add an Account button to set up a new account.
The Add an Account button appears in the lower-left corner of the window. Quicken, of course, is no fool, so it displays the Add Account dialog box.
- Set up a cash account.
You can guess how to do this, can’t you? You indicate that you want to set up a cash account and then simply step through Quicken’s questions about the account you want to set up. You need to give the account a name, such as cash or pocket money. And you need to provide a starting balance value using the faithful, familiar Add Account dialog box, as shown in Figure 11-13.
- Click Next and then click Done.
When you finish describing the cash account, click Done. Quicken displays the new cash account in a register window.
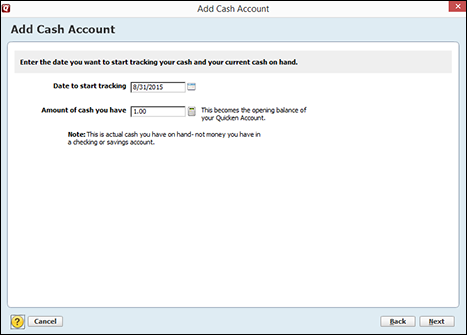
Figure 11-13: The final Quicken Add Cash Account dialog box used for cash accounts.
Tracking cash inflows and outflows
After you set up a cash account, you can use it to track the cash you receive and spend in the same way that you track the deposits and checks for a bank account.
To record your cash inflows and outflows, use the QuickTab for the account, which should appear on the Accounts bar. Figure 11-14 shows the cash-account version of the register. Until you start entering transactions, only the first opening balance transaction shows.
To record the amount of money you spend, fill in the Date, Payee, and Spend fields. To record the amount of money you receive, fill in the Date, Payee, and Receive fields. To track the reasons that you’re receiving and spending the cash, use the Memo and Category fields.

Figure 11-14: The cash-account version of the register.
Recording checks you cash instead of deposit
By the way, you don’t necessarily need to set up a cash account if you like to spend cash (rather than, say, write checks or charge on a credit card). If you just cash a check and you do have a bank account set up, you can record the transaction in another way that may be simpler: Just use the Split Transaction window to show both the income category (Salary, for example, for an individual) and how you’re going to use the money.
If you cash a $1,000 check, for example, and plan to use the $1,000 for spending money, you may show a positive $1,000 in the Net Salary category and a negative $1,000 in the Entertainment:Amusement spending category. Figure 11-15 shows this trick.
Note that the transaction shown in Figure 11-15 produces a transaction that equals zero. This is correct. Cashing a check that you never deposited doesn’t affect your checking account balance. But by filling out the Split Transaction window, as shown in Figure 11-15, you do end up recording both the $1,000 of income and the $1,000 of expense.
Don’t worry. I won’t ask why you’re carrying around $1,000 in cash.
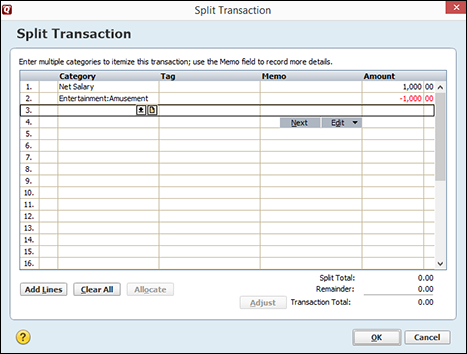
Figure 11-15: A zero-amount transaction is one handy trick.
Updating cash balances
You can update a register’s cash balance to reflect what you actually have in petty cash, your wallet, under the mattress, in the cookie jar, or wherever else you keep your cash by following these steps:
- Display the cash account register.
- Click the Actions button and choose Update Balance.
Quicken displays the Update Balance dialog box, as shown in Figure 11-16.

Figure 11-16: The Update Balance dialog box.
- Enter the actual cash balance in the New Balance text box.
- Enter a date in the Adjustment Date text box.
- Choose the category that you want to update from the Category for Adjustment drop-down list box.
After you click the arrow to the right of the drop-down list box, you get a list of all the categories you’ve set up.
- When you finish, click OK.
Quicken updates the cash account’s balance.
And that, my friend, is that.
PayPal Can Be Quicken’s Friend
One final point before I end this discussion.
If you use PayPal, you can and should use Quicken to track the money flowing into and out of your PayPal account. Fortunately, tracking a PayPal account with Quicken is pretty dang easy.
To track PayPal using Quicken, you just want to remember these three points:
- A PayPal account is really just another bank account, albeit a special sort of bank account. Accordingly, you want to set up a Quicken PayPal account in the same way that you set up any other Quicken bank account. (Refer to Chapter 2 for additional information about setting up a bank account.)
- If you use your credit card to pay money into the PayPal account, you’re actually transferring money from your credit card account to your PayPal account. To record this transfer, you record a credit card charge in your credit card register (similar to the charge made to Florentia’s Cantina shown in Figure 11-6 earlier in this chapter). Rather than use a Quicken category, however, you specify the PayPal account.
- You should reconcile your PayPal account just like you do any other bank account or credit card account. During this reconciliation, be sure to record any PayPal charges.
And one final snidbit for people who really want to push the envelope: PayPal allows you to download your transaction history into a QIF file, which you can then import into Quicken by choosing the File⇒File Import⇒QIF File command. You may want to refer to both Quicken’s and PayPal’s online Help for more information.