
Now that you’ve built a business and gained some tips and techniques to working with clients and writing a pitch—hopefully leading to a signed contract—you’ll want to think about what kind of gear you may need to shoot and edit your projects. You don’t need to break the bank to get professional results. A basic gear package with a Canon DSLR can yield strong cinematic results.1 You can get professional results with minimum gear if your production house is on a tight budget.
For some people, throwing a lot of money at a problem is the only way to find a solution—but this isn’t usually the best option. Being challenged with limited gear can result in creative solutions that may actually lead to better work. The challenge arrives from the fact that when you’re on a tight budget you must still put together a great-looking film.
But the gear is only part of it. A person with a $1,000 Canon 70D can get better results than with a $20,000 RED—if the person on the RED doesn’t know as much about cinematic storytelling—the professional skills—as the person on the 70D. Andrew Hutcheson of Zandrak feels that the most important element of your business revolves around your skills and professionalism. “The client’s impression of you is all that matters, it doesn’t matter how you do it. It doesn’t matter where you are so much, but it’s really how they see you as being valuable. Did they see the work they get from you as being professional? Is it giving them what they need? Which is why it’s so important to find a client that’s right for you.”
In the end, those facets are more important than what camera you own, for example. “Most people aren’t going to be impressed by what camera you have,” Andrew adds. “Like most dates aren’t going to be impressed by what car you drive, because they’re dating who you are.” So, yes, you need to shoot high definition and if you can’t afford the camera you want, then rent it. Andrew says, “The industry at a certain point is a renter’s market.”
But renting can have its limitations, such as lack of versatility in being able to have the gear on hand when you might need it. “If you’re going to get your own gear,” Andrew says, “you should get a piece of tech that you think is going to not just be the best thing right now, but it’s going to hold up for some time.” DSLRs are perfect examples of how they have come a long way. “There’s a lot you can do to upgrade them. Shane Hurlbut, ASC is a perfect example as to how you can really professionalize these cameras. Escape from Tomorrow was a feature film recently shot at Disney World all on DSLRs, and it was a Sundance film that got distribution.”
“The point,” Andrew adds, “is to show that it’s not the tools that define the job—it’s you.” What skills, vision, and passion do you bring to the project? “Anyone can buy the tools,” Andrew explains. He heard a story from Vincent Laforet—who helped instigate the DSLR cinema revolution by using a Canon 5D Mark II as a cinema camera. An executive for a potential job asked him, “Why should I hire you to shoot my project when my daughter has a 5D?” Andrew says it goes back to the vision statement: “What you need to sell people on is your style, the same thing that you’ve always had as an artist”:
- What’s your style?
- What’s your story?
- What differentiates you from someone else?
“And that’s the most important thing to establish in the beginning, before you go into business.” (You should have explored this vision in Chapter 2.)
“In addition to that,” Andrew explains, “you should get business cards printed. Accessorize your camera package, more lenses, more media cards, more batteries. Maybe a tripod, or maybe a shoulder rig if you’re more about handheld. Monopods are the most common tools we use. And I’d make sure within all of that, find out how much it will cost you to get a website and factor that in. That’s almost more important than anything else. It’s your baseline for your business.”
Furthermore, when you invest money (or credit) in your gear, you should calculate your return on the investment. Will spending money on a RED Epic give you a return on your investment over a few years? Or does it make more sense to spend $1,000 for a Canon DSLR and accessorize it for a couple thousand more, knowing that once you’ve gotten a couple of jobs your gear is paid for? And if you need to shoot a project with a RED Epic, you could rent one.
Rather than recommending one piece of gear over another, below I describe what features you need to consider when getting a computer, editing software, camera, and audio gear. Getting the cheapest PC or Apple’s MacBook Air, for example, is not the way to go when faced with gigabytes of video data that needs processing and editing, but I’m also making an assumption that someone starting a business isn’t going to invest $50,000 or $100,000 in getting gear. A startup should be wise with their funds (unless you happen to have that kind of money laying around). Andrew at Zandrak recommends that if you have an equipment budget of around $5,000, then the first thing he would do is buy a DSLR camera, whichever is the best for you at the time. “You get a DSLR, you get a laptop, and you get a copy of Adobe Creative Cloud (monthly subscription), since you have access to multiple apps, from color grading to Photoshop or retouching, as well as After Effects, Audition for music, and there’s a storyboard visualization software you’d want to get.”
Even though I do list a few items of lower-budget gear (such as cameras under $5,000), I’m not going to provide an exhaustive list. Rather, I delve into the details, explaining what some of the equipment does and what features you may want to consider when purchasing or renting certain gear. Too many shooters, for example, don’t know what 8-bit compression means and how that limits postproduction work when compared to a camera that shoots Apple ProRes or a camera that shoots 12-bit raw. Therefore, the heart of this chapter is really about what features and specs you should be looking for, so when you look at a camera, you can see if it has what it takes with regard to image and audio quality, and if it doesn’t, what you need to compensate for it.
What Computer Should I Get?
The merits of a laptop and a full desktop system cannot be understated. If you’re starting out and need the portability to edit or at the very least back up files in the field, you’ll want a laptop. It’s your choice whether you should get an Apple or PC—and that will depend on what software you want to use for editing. If you want to use Final Cut Pro, then you must get an Apple computer. If you choose Avid or Premiere you could buy an Apple or PC. If you want to use Sony Vegas, then it’s PC only. To keep the budget reasonable, I’m not going to get into the Mac Pro description, but when your budget increases you may want to go for the top-of-the-range model if you really want serious computing power (it’ll cost upwards of $10,000, but you’ll have 12 core processors, 64GB of memory, dual AMD graphics card with 6GB of video memory for each)—this kind of setup will be good for 4K and raw video assets, so that’s something to consider.
Whatever you end up choosing, these are the kinds of specs you’ll want:
- Processor: This is what will render your projects, including special effects and graphics. The more processors you have, the faster the render times. Quad core processors are a minimum. Apple’s MacBook Pro has a 2.5GHz speed with turbo speeds up to 3.4GHz in the high-end mid-2015 model, but there are high-end PCs clocking in at 4GHz, and you can choose more than four cores (6, 8, 12, or even more). (The Mac Pro tower will allow you to go up to 12 cores.)
- Memory: 16GB RAM (minimum). This allows you to run more apps at once, or for video purposes, less refresh of your timeline.
- Graphics card with dedicated video memory: Make sure you have a dedicated graphics card with at least 1GB of dedicated video RAM (2GB is better, but the higher this number the better off you are—especially if you’re running 4K and/or raw video files). Some models I describe below, such as the PC laptop, offer up to 8GB of video memory.
- Display: You want this to be high, preferably 4K (not what’s called full HD 1920×1080). Apple’s Retina display on a MacBook Pro is 2880×1800 (in the 2015 model). I would say this is the minimum you would want since you need to have good real-estate area on your screen when editing.
- Storage drive: This is where all of your software goes. Hard drives spin and you want at least 7200RPM. You can also get more expensive SSD (solid state drive), which contains no moving parts and is faster than hard drives in general. I use Apple’s MacBook Pro with a 500GB SSD, which makes the bootup times fast and increases performance. All of my software goes on this main drive. However, I don’t store any video or audio here; use dedicated drives instead (see below).
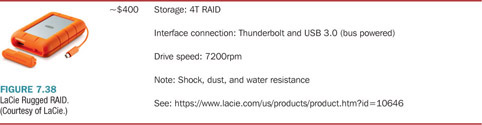
- External storage drives: Get dedicated hard drives to store your footage. We’re talking terabytes, not gigabytes. The onboard base drive for your computer should be 500GB—this is for your software. Don’t store your footage on your main drive. Use additional drives. You can get large array drives or stand-alone portable drives. If you’re getting a hard drive, you’ll want a minimum of 7200RPM spin speed with a USB 3.0, eSATA, or Thunderbolt (Apple only) for high-speed connectivity. For field drives, look at LaCie’s 4T RAID drive with USB 3.0 and Thunderbolt cables and G Drive mini (1T USB 3.0). For large storage bays, look at CalDigit and G-Drive.
Here are some example computers you should use as a representative baseline when choosing a later model (prices will stay relatively the same, but the specs will just get better):
-
MacBook Pro (laptop) ~$2,500 (~$120/month for 24 months through Apple financing)
Get the highest-end model with a Retina display. Anything less, and you’re not getting the full power you need for editing. The lower-end models and 13-inch models are really not worth it. See http://store.apple.com/us/buy-mac/macbook-pro. Here’s the specs as of mid-2015:
- – Processor: 2.5GHz Quad-core Intel Core i7, Turbo Boost up to 3.7GHz
- – RAM: 16GB 1600MHz DDR3L SDRAM
- – Graphics card: Intel Iris Pro Graphics and AMD Radeon R9 M370X with 2GB of GDDR5 memory. The AMD Radeon (or NVIDIA) graphics cards with the 2GB of memory is the key component you want here.
- – Storage drive: 512GB PCIe-based Flash Storage
- – Display: Retina (2880×1800 resolution)
- – Storage drive: SSD (500GB)
- – AppleCare Protection Plan for MacBook Pro (recommended so you can get your computer repaired or replaced if you run into issues with it).
-
iMac with Retina 5K display (desktop) ~$3,400 ($163 for 24 months through Apple financing)
This is the top of the line iMac. The lower models aren’t really worth it. With the 5K display, this is one of the best computers for video editing you can get from Apple. For the price point, you’re getting a lot of computer power without having to spend over $9,000 for a full-spec Mac Pro tower. See: http://store.apple.com/us/buy-mac/imac-retina. Specs as of mid-2015:
- – Display: 5K (27”, 5120×2880 resolution)
- – 4.0GHz Quad-core Intel Core i7, Turbo Boost up to 4.4GHz (don’t do the standard i5 core—pay more for the i7)
- – 32GB 1600MHz DDR3 SDRAM—4 x 8GB
- – 1TB Fusion Drive (SSD for bootable software fused with a regular hard drive)
- – AMD Radeon R9 M295X 4GB GDDR5 (pay the extra money for this card with 4GB of dedicated video/graphics memory).
-
PC (Windows) laptop ~$2,800
Priced about the same as the MacBook Pro, there’s more bang for your buck in this work horse from Titan Computers. Do not get an $800 laptop for video editing. This is where you do not want to skimp on your budget. The fact that this model has a 4K display, with high memory and a strong video card makes this a great workstation for editing. As you shop around for PC laptops, take note of how the specs outperform Apple’s MacBook Pro. But also note that by putting this kind of power in a laptop, the weight of the computer comes in at 7.5 pounds (as opposed to the less than 3.5 pounds of the MacBook Pro):
- – Display: 4K, 15.6” Samsung (3840×2160)
- – Processor: Quad core Intel i7-4790K 4.0 GHz (4.4GHz turbo) with 8MB L3 Cache
- – Hard drive: Seagate 500GB 7200 RPM
- – Memory: 32GB (4 x 8G) DDR3 1600 (PC3 12800)
- – Video card: NVIDIA GeForce GTX 980M with 8GB GDDR5
You can tailor this model with several options, including going up to 12 cores, for example (see: http://www.titancomputers.com/Titan-X4K-Intel-Xeon-E3-1200-V3-Series-Mobile-Wo-p/x4k.htm).
-
PC (Windows) tower ~$3,000 ($4,200 with recommended display)
This computer is comparable to Apple’s 5K iMac (the iMac is somewhat better and contains the 5K display). See Titan Computers for an example of how you can map out a top-of-the-range PC. See: http://www.titancomputers.com/Titan-X180-Intel-Xeon-E5-2600-V2-Series-Video-p/x180.htm. Specs as of mid-2015:
- – Processor: Six core Intel i7-4960X Ivy Bridge-E 3.6Ghz (4.0GHz turbo)
- – Hard drive: Seagate 500GB 7200 RPM
- – Memory: 32GB (4 x 8G) DDR3 1866 quad channel
- – Video card: NVIDIA GeForce GTX 970 with 4GB GDDR5
- – Display (not included), but a recommend 4K display would be LG’s 31-inch 4K monitor (31MU97-B) for around $1,200 (see this link from Amazon: http://www.amazon.com/LG-Electronics-Digital-31MU97-B-31-0-Inch/dp/B00OKSEVTY/)
Again, these specs are 2015. The secret to computer prices—high-end machines will stay about the same price; what changes are increased specs.
What Editing Software Should I Get?
Table 7.1 Software Comparison Chart
| Software | Avid | Final Cut | Premiere |
|
|
|||
| Cost | $50/month ($600 per year) | $299 (additional costs for Motion and Compressor of $49 each) | $49/month (~$600 per year; includes all of Adobe’s software, such as Photoshop and After Effects; student price $19/month) |
|
|
|||
| Platform | Apple and PC | Apple | Apple and PC |
|
|
|||
| Cloud or standalone | Cloud and standalone | Stand-alone | Cloud |
|
|
|||
| Learning curve | High | Low | Medium |
|
|
|||
| Penetration rate | Hollywood and some news outlets; some independent productions | Independent films, production houses, some news outlets | Independent films, production houses |
There are professionals who spend too much time debating the merits and demerits of particular editing software (and cameras, for that matter). The debate tends to revolve around the big three of Avid Media Composer, Apple’s Final Cut Pro, and Adobe’s Premiere Pro. Avid was the first and in many ways is the most stable when locking in a picture for film out, so it tends to be the most popular among feature film editors. Apple purchased Macromedia’s software and rendered it into their version throughout the 2000s, making it popular among those in the indie film movement who were attracted to the graphics and Windows-based Macs. But when Apple finally created their own software from scratch with the release of Final Cut X, some were so used to the old interface, they couldn’t adjust and jumped over to Adobe’s Premiere, which engages a similar interface to previous versions of the now defunct Final Cut 7. Fundamentally, they all do they same thing—allowing you to put together a digital film comprised of digital images, audio, and graphics. If you want the most flexibility as a professional editor, you should learn how to use them all. Each one has a different interface and that’s the point of issue for most users, which comes down to personal taste. Table 7.1 summarizes the price points, platform, ease of learning, and so forth.
What you Really Need to Know About Dslrs and Cinema Cameras
There have been more innovative and competitively priced cameras released over the past two to three years than probably at any time in the history of the industry. Canon, Panasonic, and Sony have released DSLRs and mirrorless cameras that can shoot cinematic quality for low costs, from full HD to 4K resolutions. Blackmagic and Digital Bolex have released cinematic cameras that shoot raw (little to no compression), providing cinematic-quality postproduction capabilities for under $5,000.
No matter what camera you decide to shoot on, what you need to look at is the sensor size, resolution, frame rate, type of shutter, compression codec, and audio quality—I’ll describe what these mean below. Some cameras come with different lens mounts (such as Canon EF, micro 4/3, PL cinema, C-mounts, and so forth). Whatever the lens mount, this is clear: cameras will evolve every year with new releases, but lenses and audio gear don’t change often—if you invest in lenses and audio, that will be more important than buying a new camera ever year. In some ways, you could invest in a set of good lenses and audio gear and rent new and different cameras for different projects—maybe invest in one cheaper camera to have it for small projects, personal use, and as a backup or second camera on a shoot. I’ll also provide a chart describing the key features of several different lower budget cameras in relation to these elements after laying out these definitions.
-
Lens mount: Different brands contain different mounts. Sony cameras are different than Canon cameras, and then different sensor-sized cameras might have their own types of lenses. Some companies will use other companies’ standards as well. And then older cameras will have different mounts than newer ones (such as older Canon cameras with different mounts than their EF lines). Some of the Canon lenses (EF-S) won’t work on their full-frame sensor cameras, since they’re designed for their cropped-sensor cameras.
In either case, you’re looking for focal lengths, speed, and whether it’s a zoom (adjustable focal length) or prime (fixed focal length) lens. The speed of the lens refers to how open you can set the aperture (given as an f-stop number), which lets in more light (the wider the opening, the less light you need). The smaller the f-stop number the more open, or faster, the lens is. For example, f/2.8 is considered a fast lens, while an f/4 or f/5.6 is considered slow. Inexpensive zoom lenses will have changing speeds on their lenses, so getting a fixed aperture zoom lens is important, but they are more expensive. Also, cinema lenses are rated with T-stops, which are the same as f-stops, but take into effect the loss of light going through the glass, so the T-stop is accurate, while the f-stop is a mathematical rating that doesn’t take the transmission quality of the glass into effect.
- Sensor (CCD and CMOS):
- – CCD (charged coupled device) with a global shutter. High-end cameras, scientific instruments, and even older model video cameras used CCDs, but they’re more expensive to make. Joe Rubinstein, who designed the Digital Bolex camera, says that, “The pixels that are next to each other on CCD sensors affect each other. When one pixel overflows with energy, it affects the pixels around it. The pixels work together as a unit, much the way chemicals on a film plane do. We believe this gives the sensor a more organic look.” There is less light sensitivity with CCDs and, due to the expense, most camera manufacturers use CMOS sensors. (The sensor for the Digital Bolex, for example, costs about $1,000.) Does this mean you should not shoot with a rolling shutter camera? No. Thousands of professional projects have been shot with cameras containing rolling shutters. But you need to be aware of the conditions so you know their limitations.
- – CMOS (Complementary Metal Oxide Semiconductor) with rolling shutter. (Blackmagic has put a global shutter feature on low frame rates in some of their new cameras, such as the URSA Mini.) These are active pixel sensors. Rubinstein says that, “Active Pixel Sensors read all of their pixels linearly from top left to bottom right while the shutter is open. The pixels don’t store any charge, they simply read how much light is hitting that pixel at the exact moment and convert that into an electrical signal. A rolling shutter (as opposed to a global shutter) is always active and ‘rolling’ through pixels from top to bottom. This can result in the now-familiar motion artifacts often referred to as ‘jello.’” These sensors are more light sensitive, are fairly inexpensive, and can engage in high frame rates. (See http://www.digitalbolex.com/global-shutter/.)
- Sensor size and resolution: The sensor size is measured in millimeters, while the resolution of the sensor represents how many pixels are being used in a particular shot (in some cameras, such as Blackmagic’s URSA Mini you can choose the resolution on their 35mm sensor to be 4.6K, 4K, 2K, full HD, or even less, while the Digital Bolex shoots 2K and full HD on a 16mm-size sensor). The sensor size impacts how the focal length of lenses effects how the field of view gets resolved. Photographers set the standard of the focal length against the full frame sensor, so they refer to the APS-C sensor on a 70D, for example, as a cropped sensor. Thus a 50mm focal length lens will be equivalent to an 80mm on a full frame camera (it has a crop factor of 1.6). (See http://www.abelcine.com/fov/ for a visual reference guide where you can input different camera’s field of view based on the focal length of the lens.)
- – Full frame: Photographers love the full frame sensor. The frame is the size of old-school 35mm film (but not 35mm cinema film!). Due to the larger sensor, filmmakers can get really shallow depth of field when shooting wide open apertures. You don’t need a full frame sensor camera and if you’re going for a 35mm cinema look, this is really not the camera to get, unless you’re going for its unique look—some argue that it actually provides a 65mm film look. The Canon 5D Mark III (and Mark IV), 6D, and Sony’s A7s contain this large sensor.
- – Cropped frame (1.6): This is the APS-C sensor, which is close to the size of the S35mm sensor. Most DSLRs are this size, including the Canon 60D, 70D, and so forth. If you’re shooting with a DSLR, this is the standard for getting a 35mm film look.
- – S35mm: This is the cinema standard, found in the Canon C100, C300, URSA Mini, among others. Cinematographers will not consider this a cropped frame, but if you want the comparison to the full frame, then it’s 1.39.
- – Micro 4/3: A smaller format found on many mirrorless cameras (such as Panasonic’s GH4). Crop factor is 2.
- – Super 16mm: The sensor size found on the Digital Bolex D16 and the Blackmagic Pocket Cinema Camera. Crop factor is 3 (when shooting full HD) and 2.88 when shooting 2K on the Bolex and 2.88 on the Blackmagic.
- Dynamic range: The ability of a sensor to record in a range of dark to bright without losing information in the extreme ranges—the contrast ratio. If a camera says that it has a dynamic range of 12 stops, it means that it can capture a range of detail from dark to light within this 12-stop range. If the scene is beyond a 12-stop range, then the values beyond these 12 stops will not be recorded—the darks will either go black (crushed) or the light will go all white (blown out or clipped). Typically in the digital cinema field, you’ll want to expose for the highlights, since data can be recovered in the dark regions, while it is impossible with clipped shots. Some cameras can record images in a “flat” mode. These include Sony’s S-curve, Canon C-log, and Blackmagic Film setting, a mathematical process that spreads the image data along the full dynamic range making the image appear flat onscreen (see “Raw is Not Magic” at http://prolost.com/blog/rawvslog). It’s designed for postproduction work, by which you pull this data out in the highlights and the shadows, recovering a larger dynamic range and allowing for greater color grading. In addition, you can read general exposure data if you use a histogram, which shows the intensity of darks to lights on a scale on a camera’s monitor, so you can adjust the exposure if you’re clipping values in the whites or crushing the blacks. (Again, you can crush blacks and recover the data, but if you clip the highlights, it’s gone forever.)
- Frame rate: The film standard is 24fps (frames per second); NTSC Television is 30fps and PAL television is 25fps (these are based on the electrical current rates of 60Hz and 50Hz cycles, depending on which country you live in). High frame rates allow you to create slow-motion shots (since you’re getting more data and conforming it to 24fps, slowing down the images and vice versa—shooting at 16 fps, will cause a faster rate). The higher the frame rate, the slower the playback of motion. A 60fps rate will give you a pleasant smooth slow down. For certain scenes and shots, this is an important tool for filmmakers. Frame rates that show 23.97 or 29.97 refer to the space needed for a broadcast signal to carry an audio signal.
- Shutter angle/speed: A standard look to your footage will be a shutter angle of 180 degrees or 1/48th per second shutter speed (on a 24fps frame rate). This is half of a circle standard in a film camera as the shutter rotates, letting in half the light in a single rotation. The smaller the angle, such as 90 or 45 degrees (or high shutter speed, like 1/500th), the more staccato the look with minimum motion blur; the larger the angle, such as 270 degrees (or low shutter speed, such as 1/24th), the smoothness or motion blur of the look increases). (See Figure 7.1.) Shane Hurlbut, ASC, describes the shutter angle this way:
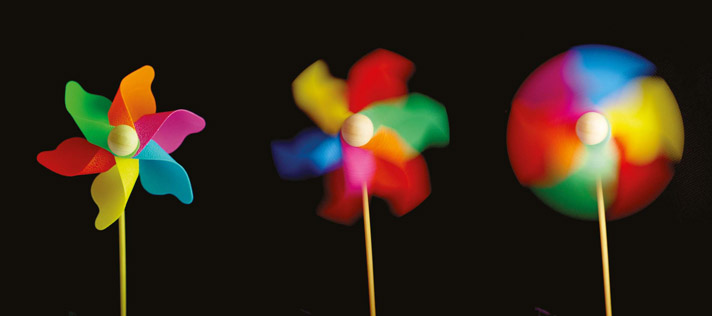
Figure 7.1 Shutter angle/shutter speed. As the angle increases, you increase motion blur (or when setting the shutter speed slower), and as it decreases you get sharper edges (or when setting the shutter speed faster). (Image licensed under Creative Commons Attribution-Share Alike 3.0.)
What is shutter speed? Imagine a pie, and that pie has 24 pieces. If the film plane or digital sensor in your camera were to always see the lens, this would be shutterless. Nothing is obstructing its view with a 360-degree shutter. To the best of my knowledge, this can only be done on digital cameras, unless you pull the shutter physically out of a film camera. At 360 degrees, you will have a lot of motion blur in your action because as an actor moves his arm or his drumstick you are seeing it on all 24 pieces of the pie. If you were to use a 180-degree shutter, which has become the industry standard at 24fps, you would see motion blur that we have all come accustomed to in the theater. At 180 degrees, the film plane or digital sensor at 1/50 or more exacting 1/48 of a second would be seeing the drumstick on 12 out of the 24 pieces. (See https://www.hurlbutvisuals.com/blog/2013/08/intensity-with-internal-camera-settings/.)
-
Compression: Every consumer camera, DSLR in video mode, and most prosumer cameras record in 8-bit H.264 codec (compression/decompression algorithm). Eight bits means there are 256 points of data per pixel and the H.264 is a compression standard that engineers created to make the image look great with the smallest file size—which means the image is compressed. It looks good in a small file size, because it is a finishing codec designed to look good as a finished product online or with Blu-ray discs. Manufacturers use these in consumer-type cameras, so a lot more recording can be placed on memory cards. But they’re not good for editing, since data is being shared across images. When you import these compressed files into your video editing software, the files are typically decompressed for editing, increasing the file size into Apple’s ProRes2 or equivalent codec (4:2:2—a note about this below). This isn’t really a big issue if you get the look of the shot in-camera accurate (proper color balance and exposure, for example). If your color and exposure is inaccurate, you can tweak the image just a little bit in post to correct issues, but the images quickly fall apart if you push it too far, because there’s not enough data in the compressed image to recover any details. Treat 8-bit like negative reversal film stock (if you’re old school).
High-end professional cameras, and some of the cheaper cameras, such as Blackmagic Design’s cameras, can shoot in ProRes at different compression rates. An 8-bit compression contains 256 points of info (4:2:0 and 4:2:2), 10-bits is 1,024 (4:2:2), and 12-bits (4:4:4:4) is uncompressed with 4,096 pieces of data per pixel. The less the compression, the more data you get and more headroom you’ll have in post to make corrections and adjust the look and feel of your project during color grading. Other cameras use uncompressed and compressed forms of raw, providing the best quality image, but requiring a lot of recording and storage space (2K recording at uncompressed raw will click in at about 500GB for about 90 minutes of recording).
- Chroma subsampling: The eye perceives the nuance of brightness more than color. To take advantage of this, chroma (or color) subsampling compresses color information to save space. In this type of compression, there’s one piece of information for luminance (brightness) and two for color (chrominance). The numbers represent the one brightness sample rate (given as a 4) and two color sample rates among a group of pixels (given as a 0—no sample; 2—half sample; or 4—full sample, no compression). The first number (luma) shows how many pixels across are in the group (usually four in each of two rows), while the second number shows how many of these are receiving the color data (chroma) in the top row; the third number shows how many pixels in the second row are getting color data. All pixels get full brightness or luma values, thus these sequences always begin as 4. (When there’s a fourth 4, that represents the chroma channel for green screen work.)
- – 4:4:4: All light and colors are sampled at the same rate. There is no subsampling, so this provides the strongest image for postproduction work. Each pixel contains luma (brightness) and chroma (color) data. Provides for the most headroom in post, especially when doing green screen work, which is called the alpha channel and is represented by the fourth digit. Greatest ability to alter color and exposure values in post color correction and color grading work. This is the 12-bit raw standard.
When you’re shooting an 8-bit compression format, the look is baked in—not much can be done in post. When working with raw or even somewhat in 10-bit workflow, you can shape the look of the film in post. You can either design or apply existing Look Up Tables (LUTs) to a project—which provide color grading to the work, giving it a specific style of film look. This is why raw is so attractive to some filmmakers—you can shape nearly any look you want without destroying the original, so in many ways it’s a throwback to shooting on original film stock. - – 4:2:2: In a four-pixel sample, all the luma values are used (4), but only two on top and two on bottom are utilized—the pixels share the same color data—resulting in half the sample of 4:4:4 (saving recording space). The image is considered very good and nearly indistinguishable from 4:4:4—except when you need to do heavy post work, when the image will fall apart into blocky, noisy artifacts, and banding across colors. This is the standard ProRes codec, providing a clean image with some ability to change color and exposure values in post. Circumventing the 8-bit compression scheme of many cameras, Atomos and Video Devices make video recorders that allow such cameras as the 8-bit compression found in the C100 and DSLRs to record in 10-bit 4:2:2 with a feed from the HDMI out (the Video Devices PIX-E5 records up to 4:4:4XQ). On the other hand, Blackmagic Design created their cameras to allow for ProRes recording in-camera.
- – 4:2:0: Same as 4:2:2, except the bottom row of pixels in the sample don’t get any data—they share it with the top row, therefore they’re given a zero. This is the sampling rate found in AVCHD and MPG-4, both of which are a type of package for H.264 compression. The image will fall apart quickly in post if you have to make changes to the image—hence the importance of getting the image right in-camera.3 Overleaf Table 7.2 summarizes these different types of codecs.
- – 4:4:4: All light and colors are sampled at the same rate. There is no subsampling, so this provides the strongest image for postproduction work. Each pixel contains luma (brightness) and chroma (color) data. Provides for the most headroom in post, especially when doing green screen work, which is called the alpha channel and is represented by the fourth digit. Greatest ability to alter color and exposure values in post color correction and color grading work. This is the 12-bit raw standard.
- Resolution: Full HD, 2K, 4K: The amount of pixels recorded. The higher the number the higher the resolution. Full HD is 1920×1080 and is the current standard for Blu-ray DVDs and broadcast television; 2K is cinema quality for projection; 4K is the future.4 Those who are shooting 4K now will not have a large audience see their work in 4K, since most of cinema is still 2K and most television sets are Full HD—although more and more televisions are being released with 4K capability. It will likely become more of a standard by 2020 or a few years later. However, there are increasingly more cameras being released that shoot 4K. There are several benefits to shooting in 4K now:
- – Future proof: Store your film or project in 4K so it’s ready when there’s a market for it.
- – Cropping a shot: The editor may want to crop an image and if you have a large area of resolution (such as 4K), then the image can be cropped or recomposed for an HD or 2K project without losing any data.
- – Fixing unwanted motion in a shot: There might be a wobbly shot that allows software to fix that motion. If you’re shooting in full HD or 2K, that software will share and grab data around the wobbly shots in order to fix it. If there’s no space around the shot, then the image will lose some resolution, but if there’s a lot of space around it, then it can pull data above full HD and 2K without losing any resolution.
- Audio quality: Don’t skimp on audio. Poorly recorded audio is the number one killer of a project. For this reason, you must be able to see levels on a meter and listen to the audio being recorded on headphones. Either you’re doing this or you’re hiring a sound recordist to do this. There are no shortcuts to good audio. Some settings to keep in mind:
- – 24-bit audio should be the standard (as opposed to many cameras still using 16-bit recordings)—more data gives you more headroom in post. It doesn’t matter if it’s 48kHz or 96kHz, just as long as you have headroom (space to adjust your audio) in post.
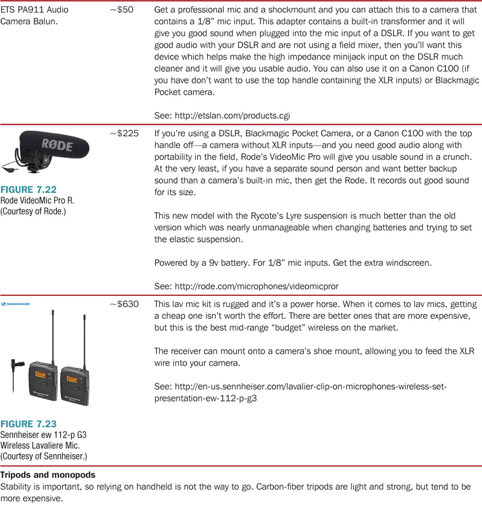
- – XLR inputs are a must, which results in low interference, low impedance. It’s the professional standard. If your camera doesn’t have it, then you’ll want a field mixer and/or recorder with XLR connections, resulting
Table 7.2 A Comparison of Several Different Types of Codecs
| CODEC | Data bit | Data throughput at 1920×1080 24p | Storage space at 1920×1080 | Uses |
|
|
||||
| 4:2:0 (H.264, AVCHD, MPG-4 | 8-bit | 18Mb/s | 20GB/hr | Finishing for web streaming and Blu-ray DVDs; most lower-end cameras and DSLRs record in this format; files need to be decompressed before editing. Very little postproduction (around 10%) can be applied before the image falls apart. |
|
|
||||
| ProRes 4:2:2 (LT)23 | 10-bit | 82 Mb/s | 37GB/hr | Shots must be accurate in-camera (proper exposure and color balance); use for extra recording space. Not recommended for professional work. |
|
|
||||
| ProRes 4:2:2 | 10-bit | 117 Mb/s | 53GB/hr | A professional codec, but the look should be accurate incamera; some post correction may be applied. |
|
|
||||
| ProRes 4:2:2 (HQ) | 10-bit | 176 Mb/s | 79GB/hr | A professional codec, but the look should be accurate incamera as much as possible; some post correction may be applied. |
|
|
||||
| ProRes 4:4:4 | 12-bit | 264 Mb/s | 119GB/hr | A professional codec with plenty of headroom for postproduction work. |
|
|
||||
| ProRes 4:4:4HQ | 12-bit | 396Mb/s | 178GB/hr | A professional codec with a lot of headroom for postproduction work. |
|
|
||||
| Avid DNxHD 4:2:2 80 | 10-bit | 80Mb/s | 33.6GB/hr | Equivalent to ProRes LT. Shots must be accurate in-camera (proper exposure and color balance); use for extra recording space. Not recommended for professional work. |
|
|
||||
| Avid DNxHD 4:2:2 115 | 10-bit | 116 Mb/s | 73.71GB/hr | A professional codec, but the look should be accurate in-camera; some post correction may be applied. |
|
|
||||
| Avid DNxHD 4:2:2 175 | 10-bit | 176 Mb/s | 48.7GB/hr | A professional codec, but the look should be accurate in-camera as much as possible; some post correction may be applied. |
|
|
||||
| Avid DNxHD 4:4:4 | 12-bit | 352 Mb/s | 147.8GB/hr | A professional codec, but the look should be accurate in-camera; some post correction may be applied. |
|
|
||||
| CinemaDNG (compressed) | 12-bit | Varies based on compression level | Varies based on compression level | A professional codec for cinema work; a lot of post correction may be used. Saves space compared to uncompressed raw. |
|
|
||||
| CinemaDNG (raw, uncompressed) | 12-bit | 357 Mb/s | 500GB for just under 2 hours in full HD or under 90 minutes in 2K | Cinema; allows for excellent headroom to adjust when doing color correction and grading in post. Uses a lot of recording and storage space. |
-
- in the recording of audio separate from audio on-camera. One-eighth inch inputs found on many DSLRs, the C100 with the top handle removed, and the Blackmagic Pocket Cinema Camera are high impedance, which results in picking up more noise, and are not used by professionals (it’s okay to use such mics for reference audio).
- – If your camera doesn’t have good audio recording, use an external audio recorder to get strong and clean audio. It’s best to have a dedicated sound recordist, but when you can’t, dedicated audio recorders will give you better audio than the camera provides.
- Metabones: DSLRs and the lower-end Blackmagic cameras (such as the Cinema Camera or Pocket Cinema Camera), as well as the Digital Bolex (with the micro 4/3 mount) can greatly benefit from the Metabones Speedbooster. It’s a lens adapter that increases the field of view and the aperture speed of lenses. The Digital Bolex, for example, is a difficult camera to get a zoom lens that starts wide. With the EF to BMPCC model, you can place a Canon 17–55mm zoom lens (with a simple modification)5 and get the equivalent of a 10–32mm lens with a 1 2/3 increased aperture stop. In addition, some of the adapters accept a 5v battery from a mini-USB on the side of the adapter. This allows you to change the f-stop of the lenses that use automatic controls (good for cameras with passive Micro Four Thirds mounts (such as the Digital Bolex and Blackmagic Cinema Cameras). See http://metabones.com for more information. See Figure 7.2 for a comparison of field of view and aperture stop adjustments.

Figure 7.2 Metabones Speedbooster chart comparing the differences to the Canon EF to Micro Four-Thirds adapters.
Take note of the crop factor multiplication and aperture stop increase (making your base lenses faster).
- Ergonomics: How does the camera handle in your hands? Is it light (too light), too heavy, awkward to hold, designed more for a tripod, and so forth? These questions can only be answered if you go to a store or trade show and handle the camera you’re thinking about getting.
- Magic Lantern: A necessary tool for those using DSLRs—it provides software on a memory card that the camera can access (you’ll need to place it on all of your memory cards to activate this feature). The features of this software comes standard in most professional cameras, but is missing in most DSLRs. Therefore it is one of the most important things you can do to your DSLR to get it to a professional status—providing you with focus peaking, histogram, waveform monitor, spot meter, audio meters, among other features. For installation instructions and updates on what Canon DSLRs are available for the firmware, see: http://www.magiclantern.fm/. The installation guide can be found at: http://wiki.magiclantern.fm/install.
Below Table 7.3 outlines some features in a variety of cameras—from DSLRs to raw capable cameras. All prices are from early 2016.
Additional Gear
Microphones
Without good sound, you do not have a viable project. Your work will never be perceived as professional. While viewers may forgive a compromised image, they will never forgive poor sound. Most cameras with XLR inputs can record clean audio, as long as you record a clean and strong signal—which usually means someone monitors the audio with headphones and observe the meters for a −12dB to −6dB range to make sure the signal doesn’t clip, and to allow plenty of headroom in post.
A note about foam windscreens—these come with nearly every mic and they’re designed to help reduce pops for people who pop their Ps and Ts. They’re not windscreens. You’ll want a dedicated windscreen, and if you’re really fighting wind, then get a blimp-style windscreen.
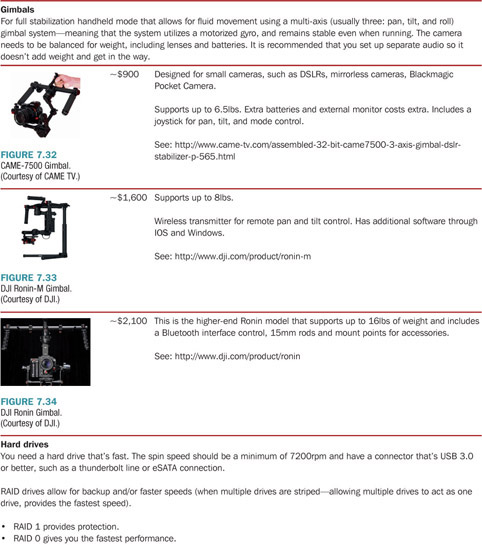
- Shotgun: These types of mics can sit on the camera with a shockmount (to absorb handling vibration sound), pistol grip, or boom pole. These directional mics may be utilized to pick up dialogue from the direction they are pointed (and always point them at the subject’s mouth for the strongest signal) and ambient sound that they are pointed at.
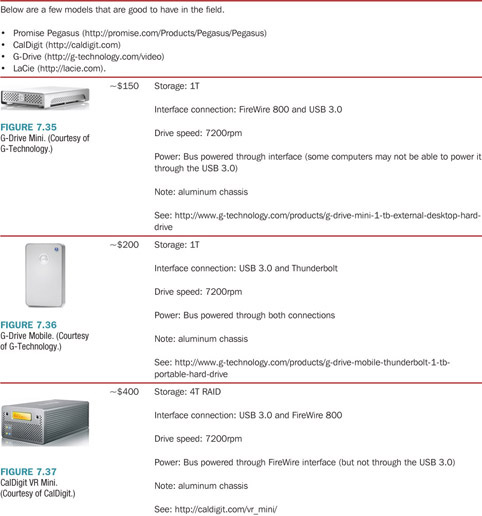
- Lavaliere: A clip-on mic designed to pick up dialogue from the person the mic is clipped to.
- Built-in camera mic: Never use as primary audio (use only as reference audio that you will replace with an external audio recorder and micro phone).
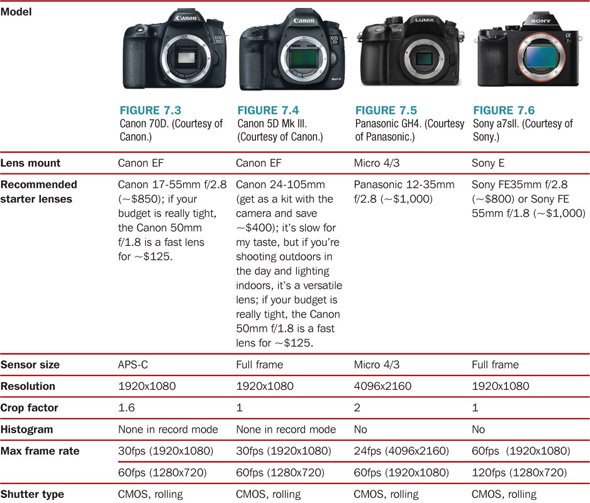
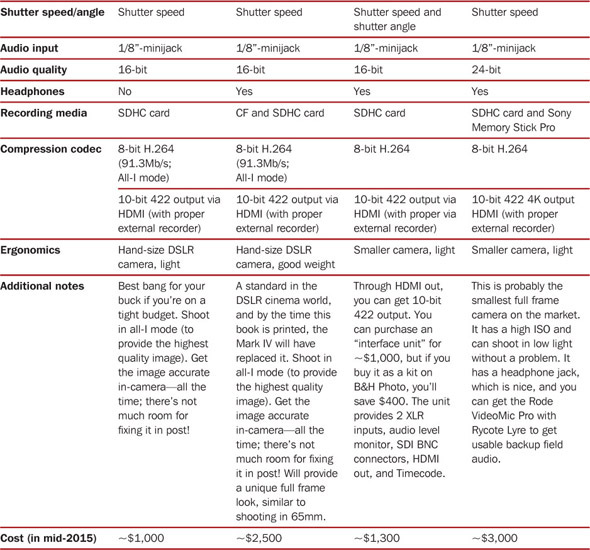
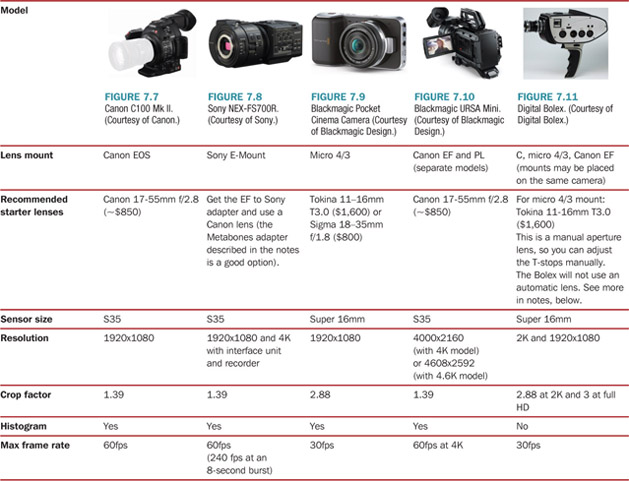
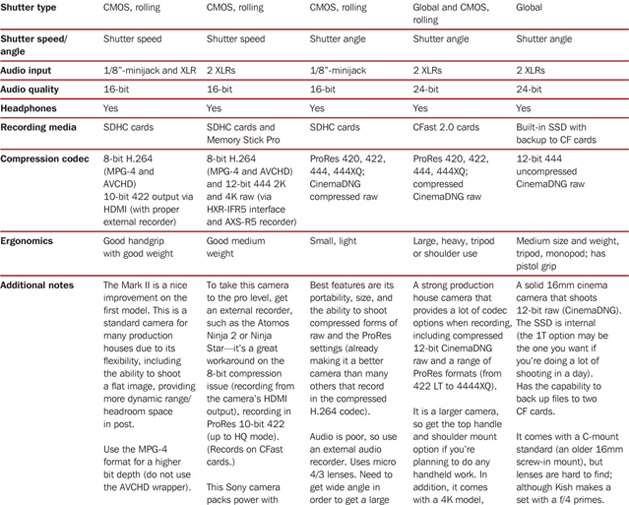
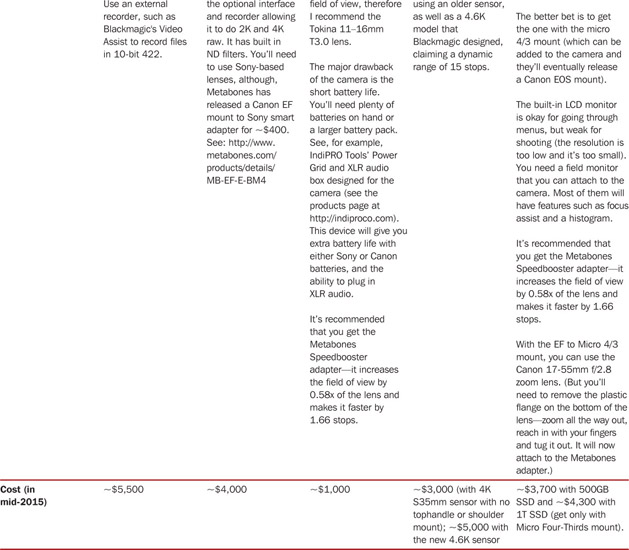
Table 7.4 A Comparison of Cinema-quality Budget Cameras
Furthermore, different microphones use different pickup patterns (what sounds they primarily pick up). Keep the mic less than two feet from the subject’s mouth.
- Omnidirectional: Audio is picked up from all directions like a sphere. Many lavaliere mics (clip-on mics for interviews) are omnidirectional.
- Cardioid: A heart-shaped pattern where audio is recorded mainly from the front, but also some from the side. It’ll pick up ambient sound from the sides, while utilizing the strongest signal from the front. Use for dialogue.
- Hypercardioid: The audio signal is picked up mostly from the front with very little from the sides and rear. Directional mic used to pick up audio/dialogue from the direction it is pointed.
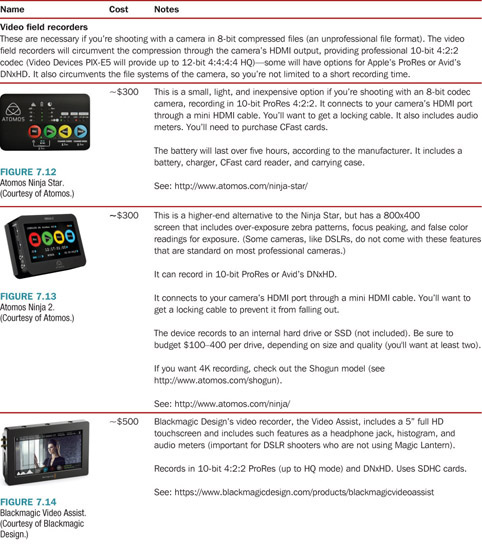
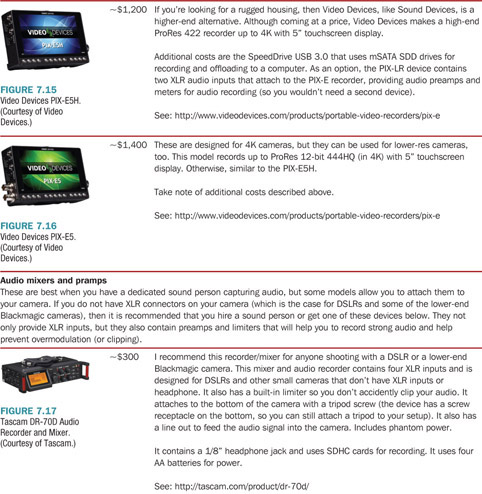
Video Recorders
You’ll want a video recorder if your camera doesn’t record in a 10-bit (or 12-bit raw) codec. Nearly every lower budget camera (except for the Blackmagic)6 records in a compressed 8-bit codec that could lead to unprofessional results. A video recorder takes a camera’s HDMI output (or SDI on higher-end models) and feeds it into a specially designed recorder that makes the footage 10-bit, preventing the need to decompress footage in editing.
Preamp Field Mixers
While many people record audio with a microphone attached to their camera— and if they’re shooting solo this may be their only option—there are field mixers with dedicated preamps that will provide the best sound in the field. Most of them will have at least two XLR inputs, so professional microphones can be attached. Some of these preamp mixers can be attached directly to a DSLR, the Blackmagic Cinema Camera, and the Blackmagic Pocket Cinema Camera, which do not contain XLR inputs. Because these devices are dedicated to audio, they’ll also contain better and cleaner amps than those found in most cameras—the preamps in the Digital Bolex are strong. With the multiple input XLRs, shooters can connect a lav and shotgun mic on two separate channels—the lav dedicated to an interview, for example, and the shotgun mic dedicated to recording ambient audio and acting as a backup to the lav. It will also include phantom power, which will power microphones that do not have batteries (but will also shorten the device’s battery).
Audio Recorder
Most professional shoots utilize a sound recordist who will have both a field mixer and an external audio recorder. They may also plug an XLR line into the main camera so it receives the field mixer’s feed. There are many field recorders on the market. Be sure to set the recording to 24-bits at 48k (or 96k), so that there’s more headroom in post. Make sure the levels hit between −12dB to −6dB. A dedicated sound person is best, because they can monitor the audio and adjust it if the levels get too low or too high. Most devices also contain limiters preventing you from accidently clipping audio. Audio recorders include the Tascam DR-40, Zoom H5, Zoom H6, and the Marantz PMD661. (I don’t cover these in this book due to a lack of space, but these are standard recorders for the budget-conscious filmmaker.)
Tripod
You need stable shots. A lot of beginners and amateurs think that they can handhold their camera and get good-looking shots. Very few people can pull off a strong handheld shot, so a locked-off tripod shot is best, because it shows control. Be sure to get a tripod that contains a fluid head and a half-ball leveler, so you’re not adjusting tripod legs to get your tripod level. The half-ball leveler will allow you to loosen a bottom handle to the half-ball, adjust it quickly, then lock it off when it’s level.
Slider
Provides for cinematically smooth tracking shots without needing to set up a track on the ground. Get a slider that attaches to a tripod. Be sure to make sure the movement reveals something in the shot—that it helps tell the story, rather than providing movement for the sake of movement. Change the way the camera faces, rotating it along the axis to get parallel tracking shots and perpendicular push in and pullout shots.
Cranes/Jibs
Small cranes or jibs will attach to your tripod and allow you to do vertical up and down movements as well as pushing in and pulling out from a shot.
Below, in Table 7.5, I list several lower-budget models of some of the types of gear described above—it is not close to being complete, but reflects a certain budget requirement balanced with a level of quality.


With the gear chosen, we’ll now look at a couple of case studies of client-based work by Stillmotion and Zandrak in Chapters 8 and 9.