![]()
Data Pump
Data Pump is often described as an upgraded version of the old exp/imp utilities. That depiction is inaccurate; it’s a bit like calling a modern smartphone a replacement for an old rotary-dial landline. Although the old utilities are dependable and work well, Data Pump encompasses that functionality and while adding completely new dimensions to how data can be lifted and moved between environments. This chapter will help explain how Data Pump makes your current data transfer tasks easier and will also show how to move information and solve problems in ways that you didn’t think were possible.
Data Pump enables you to efficiently back up, replicate, secure, and transform large amounts data and metadata. You can use Data Pump in a variety of ways:
- Perform point-in-time logical backups of the entire database or subsets of data
- Replicate entire databases or subsets of data for testing or development
- Quickly generate DDL required to recreate objects
- Upgrade a database by exporting from the old version and importing into the new version
Sometimes, DBAs exert a Luddite-like attachment to the exp/imp utilities because the DBAs are familiar with the syntax of these utilities, and they get the job done quickly. Even if those legacy utilities are easy to use, you should consider using Data Pump going forward. Data Pump contains substantial functionality over the old exp/imp utilities:
- Performance with large data sets, allowing efficient export and import gigabytes of data
- Interactive command line utility, which lets you disconnect and then later attach to active Data Pump jobs
- Ability to export large amounts of data from a remote database and import them directly into a local database without creating a dump file
- Ability to make on-the-fly changes to schemas, tablespaces, data files, and storage settings from export to import
- Sophisticated filtering of objects and data
- Security-controlled (via database) directory objects
- Advanced features, such as compression and encryption
This chapter begins with a discussion on the Data Pump architecture. Subsequent topics include basic export and import tasks, moving data across networks, filtering data, and running Data Pump in legacy mode.
Data Pump Architecture
Data Pump consists of the following components:
- expdp (Data Pump export utility)
- impdp (Data Pump import utility)
- DBMS_DATAPUMP PL/SQL package (Data Pump application programming interface [API])
- DBMS_METADATA PL/SQL package (Data Pump Metadata API)
The expdp and impdp utilities use the DBMS_DATAPUMP and DBMS_METADATA built-in PL/SQL packages when exporting and importing data and metadata. The DBMS_DATAPUMP package moves entire databases or subsets of data between database environments. The DBMS_METADATA package exports and imports information about database objects.
![]() Note You can call the DBMS_DATAPUMP and DBMS_METADATA packages independently (outside expdp and impdp) from SQL*Plus. I rarely call these packages directly from SQL*Plus, but you may have a specific scenario in which it’s desirable to interact directly with them. See the Oracle Database PL/SQL Packages and Types Reference Guide, which is available for download from the Technology Network area of the Oracle Web site (http://otn.oracle.com), for more details.
Note You can call the DBMS_DATAPUMP and DBMS_METADATA packages independently (outside expdp and impdp) from SQL*Plus. I rarely call these packages directly from SQL*Plus, but you may have a specific scenario in which it’s desirable to interact directly with them. See the Oracle Database PL/SQL Packages and Types Reference Guide, which is available for download from the Technology Network area of the Oracle Web site (http://otn.oracle.com), for more details.
When you start a Data Pump export or import job, a master OS process is initiated on the database server. This master process name has the format ora_dmNN_<SID>. On Linux/Unix systems, you can view this process from the OS, prompt using the ps command:
$ ps -ef | grep -v grep | grep ora_dm
oracle   14602     1  4 08:59 ?        00:00:03 ora_dm00_o12c
Depending on the degree of parallelism and the work specified, a number of worker processes are also started. If no parallelism is specified, then only one worker process is started. The master process coordinates the work between master and worker processes. The worker process names have the format ora_dwNN_<SID>.
Also, when a user starts an export or import job, a database status table is created (owned by the user that starts the job). This table exists only for the duration of the Data Pump job. The name of the status table is dependent on what type of job you’re running. The table is named with the format SYS_<OPERATION>_<JOB_MODE>_NN, where OPERATION is either EXPORT or IMPORT. JOB_MODE can be one of the following types:
- FULL
- SCHEMA
- TABLE
- TABLESPACE
- TRANSPORTABLE
For example, if you’re exporting a schema, a table is created in your account with the name SYS_EXPORT_SCHEMA_NN, where NN is a number that makes the table name unique in the user’s schema. This status table contains information such as the objects exported/imported, start time, elapsed time, rows, and error count. The status table has more than 80 columns.
![]() Tip The Data Pump status table is created in the default permanent tablespace of the user performing the export/import. Therefore, if the user has no privileges to create a table in the default tablespace, the Data Pump job will fail, with an ORA-31633 error.
Tip The Data Pump status table is created in the default permanent tablespace of the user performing the export/import. Therefore, if the user has no privileges to create a table in the default tablespace, the Data Pump job will fail, with an ORA-31633 error.
The status table is dropped by Data Pump upon successful completion of an export or import job. If you use the KILL_JOB interactive command, the master table is also dropped. If you stop a job with the STOP_JOB interactive command, the table isn’t removed and is used in the event you restart the job.
If your job terminates abnormally, the master table is retained. You can delete the status table if you don’t plan to restart the job.
When Data Pump runs, it uses a database directory object to determine where to write and read dump files and log files. Usually, you specify which directory object you want Data Pump to use. If you don’t specify a directory object, a default directory is used. The default directory path is defined by a data directory object named DATA_PUMP_DIR. This directory object is automatically created when the database is first created. On Linux/Unix systems this directory object maps to the ORACLE_HOME/rdbms/log directory.
A Data Pump export creates an export file and a log file. The export file contains the objects being exported. The log file contains a record of the job activities. Figure 13-1 shows the architectural components related to a Data Pump export job.
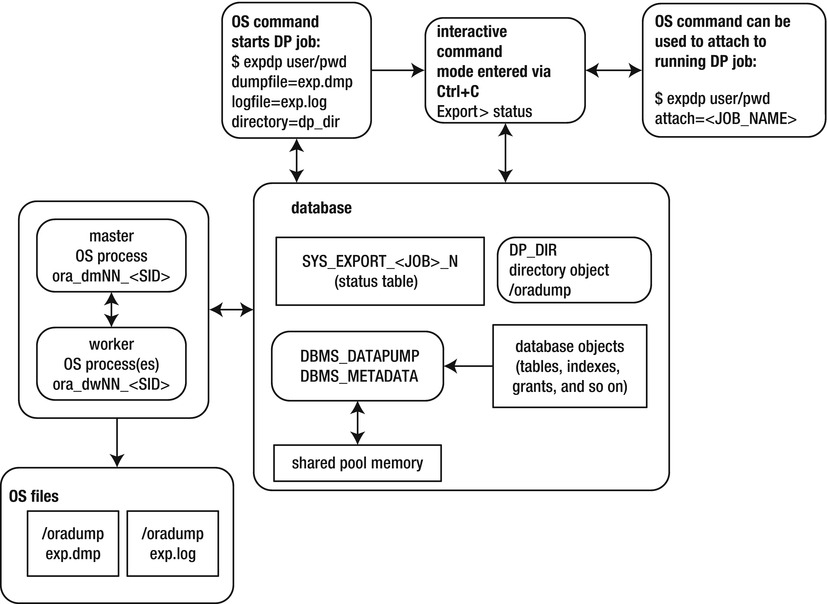
Figure 13-1. Data Pump export job components
Similarly, Figure 13-2 displays the architectural components of a Data Pump import job. The main difference between export and import is the direction in which the data flow. Export writes data out of the database, and import brings information into the database. Refer back to these diagrams as you work through Data Pump examples and concepts throughout this chapter.
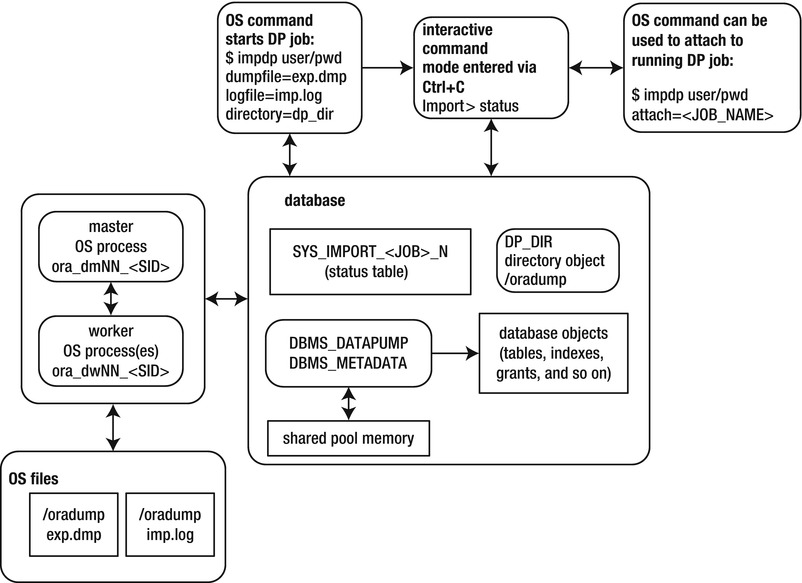
Figure 13-2. Data Pump import job components
For each Data Pump job, you must ensure that you have access to a directory object. The basics of exporting and importing are described in the next few sections.
![]() Tip Because Data Pump internally uses PL/SQL to perform its work, there needs to be some memory available in the shared pool to hold the PL/SQL packages. If there is not enough room in the shared pool, Data Pump will throw an ORA-04031: unable to allocate bytes of shared memory... error and abort. If you receive this error, set the database parameter SHARED_POOL_SIZE to at least 50M. See MOS note 396940.1 for further details.
Tip Because Data Pump internally uses PL/SQL to perform its work, there needs to be some memory available in the shared pool to hold the PL/SQL packages. If there is not enough room in the shared pool, Data Pump will throw an ORA-04031: unable to allocate bytes of shared memory... error and abort. If you receive this error, set the database parameter SHARED_POOL_SIZE to at least 50M. See MOS note 396940.1 for further details.
Getting Started
Now that you have an understanding of the Data Pump architecture, next is a simple example showing the required export setup steps for exporting a table, dropping the table, and then reimporting the table back into the database. This will lay the foundation for all other Data Pump tasks covered in this chapter.
A small amount of setup is required when you run a Data Pump export job. Here are the steps:
- Create a database directory object that points to an OS directory that you want to write/read Data Pump files to/from.
- Grant read and write privileges on the directory object to the database user running the export.
- From the OS prompt, run the expdp utility.
Step 1. Creating a Database Directory Object
Before you run a Data Pump job, first create a database directory object that corresponds to a physical location on disk. This location will be used to hold the export and log files and should be a location where you know you have plenty of disk space to accommodate the amount of data being exported.
Use the CREATE DIRECTORY command to accomplish this task. This example creates a directory named dp_dir and specifies that it is to map to the /oradump physical location on disk:
SQL> create directory dp_dir as '/oradump';
To view the details of the newly created directory, issue this query:
SQL> select owner, directory_name, directory_path from dba_directories;
Here is some sample output:
OWNER      DIRECTORY_NAME  DIRECTORY_PATH
---------- --------------- --------------------
SYS        DP_DIR          /oradump
Keep in mind that the directory path specified has to physically exist on the database server. Furthermore, the directory has to be one that the oracle OS user has read/write access to. Finally, the user performing the Data Pump operations needs to be granted read/write access to the directory object (see step 2).
If you don’t specify the DIRECTORY parameter when exporting or importing, Data Pump will attempt to use the default database directory object (as previously discussed, this maps to ORACLE_HOME/rdbms/log). I don’t recommend using the default directory for two reasons:
- If you’re exporting large amounts of data, it’s better to have on disk the preferred location, where you know you have enough room to accommodate your disk space requirements. If you use the default directory, you run the risk of inadvertently filling up the mount point associated with ORACLE_HOME and then potentially hanging your database.
- If you grant privileges to non-DBA users to take exports, you don’t want them creating large dump files in a location associated with ORACLE_HOME. Again, you don’t want the mount point associated with ORACLE_HOME to become full to the detriment of your database.
Step 2. Granting Access to the Directory
You need to grant permissions on the database directory object to a user that wants to use Data Pump. Use the GRANT statement to allocate the appropriate privileges. If you want a user to be able to read from and write to the directory, you must grant security access. This example grants access to the directory object to a user named MV_MAINT:
SQL> grant read, write on directory dp_dir to mv_maint;
All directory objects are owned by the SYS user. If you’re using a user account that has the DBA role granted to it, then you have the requisite read/write privileges on any directory objects. I usually perform Data Pump jobs with a user that has the DBA granted to it (so that I don’t need to bother with granting access).
SECURITY ISSUES WITH THE OLD EXP UTILITY
The idea behind creating directory objects and then granting specific I/O access to the physical storage location is that you can more securely administer which users have the capability to generate read and write activities when normally they wouldn’t have permissions. With the legacy exp utility, any user that has access to the tool by default has access to write or read a file to which the owner (usually oracle) of the Oracle binaries has access. It’s conceivable that a malicious non-oracle OS user can attempt to run the exp utility to purposely overwrite a critical database file. For example, the following command can be run by any non-oracle OS user with execute access to the exp utility:
$ exp heera/foo file=/oradata04/SCRKDV12/users01.dbf
The exp process runs as the oracle OS user and therefore has read and write OS privileges on any oracle-owned data files. In this exp example, if the users01.dbf file is a live database data file, it’s overwritten and rendered worthless. This can cause catastrophic damage to your database.
To prevent such issues, with Oracle Data Pump you first have to create a database object directory that maps to a specific directory and then additionally assign read and write privileges to that directory per user. Thus, Data Pump doesn’t have the security problems that exist with the old exp utility.
Step 3. Taking an Export
When the directory object and grants are in place, you can use Data Pump to export information from a database. The simple example in this section shows how to export a table. Later sections in this chapter describe in detail the various ways in which you can export data. The point here is to work through an example that will provide a foundation for understanding more complex topics that follow.
As a non-SYS user, create a table, and populate it with some data:
SQL> create table inv(inv_id number);
SQL> insert into inv values (123);
Next, as a non-SYS user, export the table. This example uses the previously created directory, named DP_DIR. Data Pump uses the directory path specified by the directory object as the location on disk to which to write the dump file and log file:
$ expdp mv_maint/foo directory=dp_dir tables=inv dumpfile=exp.dmp logfile=exp.log
The expdp utility creates a file named exp.dmp in the /oradump directory, containing the information required to recreate the INV table and populate it with data as it was at the time the export was taken. Additionally, a log file named exp.log is created in the /oradump directory, containing logging information associated with this export job.
If you don’t specify a dump file name, Data Pump creates a file named expdat.dmp. If a file named expdat.dmp already exists in the directory, then Data Pump throws an error. If you don’t specify a log file name, then Data Pump creates one named export.log. If a log file named export.log already exists, then Data Pump overwrites it.
![]() Tip Although it’s possible to execute Data Pump as the SYS user, I don’t recommend it for couple of reasons. First, SYS is required to connect to the database with the AS SYSDBA clause. This requires a Data Pump parameter file with the USERID parameter and quotes around the associated connect string. This is unwieldy. Second, most tables owned by SYS cannot be exported (there are a few exceptions, such as AUD$). If you attempt to export a table owned by SYS, Data Pump will throw an ORA-39166 error and indicate that the table doesn’t exist. This is confusing.
Tip Although it’s possible to execute Data Pump as the SYS user, I don’t recommend it for couple of reasons. First, SYS is required to connect to the database with the AS SYSDBA clause. This requires a Data Pump parameter file with the USERID parameter and quotes around the associated connect string. This is unwieldy. Second, most tables owned by SYS cannot be exported (there are a few exceptions, such as AUD$). If you attempt to export a table owned by SYS, Data Pump will throw an ORA-39166 error and indicate that the table doesn’t exist. This is confusing.
One of the key reasons to export data is so that you can recreate database objects. You may want to do this as part of a backup strategy or to replicate data to a different database. Data Pump import uses an export dump file as its input and recreates database objects contained in the export file. The procedure for importing is similar to exporting:
- Create a database directory object that points to an OS directory that you want to read/write Data Pump files from.
- Grant read and write privileges on the directory object to the database user running the export or import.
- From the OS prompt, run the impdp command.
Steps 1 and 2 were covered in the prior section, “Taking an Export,” and therefore will not be repeated here.
Before running the import job, drop the INV table that was created previously.
SQL> drop table inv purge;
Next, recreate the INV table from the export taken:
$ impdp mv_maint/foo directory=dp_dir dumpfile=exp.dmp logfile=imp.log
You should now have the INV table recreated and populated with data as it was at the time of the export. Now is a good time to inspect again Figures 13-1 and 13-2. Make sure you understand which files were created by expdb and which files were used by impdp.
Instead of typing commands on the command line, in many situations it’s better to store the commands in a file and then reference the file when executing Data Pump export or import. Using parameter files makes tasks more repeatable and less prone to error. You can place the commands in a file once and then reference that file multiple times.
Additionally, some Data Pump commands (such as FLASHBACK_TIME) require the use of quotation marks; in these situations, it’s sometimes hard to predict how the OS will interpret these. Whenever a command requires quotation marks, it’s highly preferable to use a parameter file.
To use a parameter file, first create an OS text file that contains the commands you want to use to control the behavior of your job. This example uses the Linux/Unix vi command to create a text file named exp.par:
$ vi exp.par
Now, place the following commands in the exp.par file:
userid=mv_maint/foo
directory=dp_dir
dumpfile=exp.dmp
logfile=exp.log
tables=inv
reuse_dumpfiles=y
Next, the export operation references the parameter file via the PARFILE command line option:
$ expdp parfile=exp.par
Data Pump processes the parameters in the file as if they were typed on the command line. If you find yourself repeatedly typing the same commands or using commands that require quotation marks, or both, then consider using a parameter file to increase your efficiency.
![]() Tip Don’t confuse a Data Pump parameter file with the database initialization parameter file. A Data Pump parameter file instructs Data Pump as to which user to connect to the database as, which directory locations to read/write files to and from, what objects to include in the operation, and so on. In contrast, a database parameter file establishes characteristics of the instance upon database startup.
Tip Don’t confuse a Data Pump parameter file with the database initialization parameter file. A Data Pump parameter file instructs Data Pump as to which user to connect to the database as, which directory locations to read/write files to and from, what objects to include in the operation, and so on. In contrast, a database parameter file establishes characteristics of the instance upon database startup.
Exporting and Importing with Granularity
Recall from the section “Data Pump Architecture,” earlier in this chapter, that there are several different modes in which you can invoke the export/import utilities. For instance, you can instruct Data Pump to export/import in the following modes:
- Entire database
- Schema level
- Table level
- Tablespace level
- Transportable tablespace level
Before diving into the many features of Data Pump, it’s useful to discuss these modes and ensure you’re aware of how each operates. This will further lay the foundation for understanding concepts introduced later in the chapter.
Exporting and Importing an Entire Database
When you export an entire database, this is sometimes referred to as a full export. In this mode the resultant export file contains everything required to make a copy of your database. Unless restricted by filtering parameters (see the section “Filtering Data and Objects,” later in this chapter), a full export consists of
- all DDL required to recreate tablespaces, users, user tables, indexes, constraints, triggers, sequences, stored PL/SQL, and so on.
- all table data (except the SYS user’s tables)
A full export is initiated with the FULL parameter set to Y and must be done with a user that has DBA privileges or that has the DATAPUMP_EXP_FULL_DATABASE role granted to it. Here is an example of taking a full export of a database:
$ expdp mv_maint/foo directory=dp_dir dumpfile=full.dmp logfile=full.log full=y
As the export is executing, you should see this text in the output, indicating that a full-level export is taking place:
Starting "MV_MAINT"."SYS_EXPORT_FULL_01":
Be aware that a full export doesn’t export everything in the database:
- The contents of the SYS schema are not exported (there are a few exceptions to this, such as the AUD$ table). Consider what would happen if you could export the contents of the SYS schema from one database and import them into another. The SYS schema contents would overwrite internal data dictionary tables/views and thus corrupt the database. Therefore, Data Pump never exports objects owned by SYS.
- Index data are not exported, but rather, the index DDL that contains the SQL required to recreate the indexes during a subsequent import.
Once you have a full export, you can use its contents to either recreate objects in the original database (e.g., in the event a table is accidentally dropped) or replicate the entire database or subsets of users/tables to a different database. This next example assumes that the dump file has been copied to a different database server and is now used to import all objects into the destination database:
$ impdp mv_maint/foo directory=dp_dir dumpfile=full.dmp logfile=fullimp.log full=y
![]() Tip To initiate a full database import, you must have DBA privileges or be assigned the DATAPUMP_IMP_FULL_DATABASE role.
Tip To initiate a full database import, you must have DBA privileges or be assigned the DATAPUMP_IMP_FULL_DATABASE role.
In the output displayed on your screen, you should see an indication that a full import is transpiring:
Starting "MV_MAINT"."SYS_IMPORT_FULL_01":
Running a full-import database job has some implications to be aware of:
- The import job will first attempt to recreate any tablespaces. If a tablespace already exists, or if the directory path a tablespace depends on doesn’t exist, then the tablespace creation statements will fail, and the import job will move on to the next task.
- Next, the import job will alter the SYS and SYSTEM user accounts to contain the same password that was exported. Therefore, after you import from a production system, it’s prudent to change the passwords for SYS and SYSTEM, to reflect the new environment.
- Additionally, the import job will then attempt to create any users in the export file. If a user already exists, an error is thrown, and the import job moves on to the next task.
- Users will be imported with the same passwords that were taken from the original database. Depending on your security standards, you may want to change the passwords.
- Tables will be recreated. If a table already exists and contains data, you must specify how you want the import job to handle this. You can have the import job either skip, append, replace, or truncate the table (see the section “Importing When Objects Already Exist,” later in this chapter).
- After each table is created and populated, associated indexes are created.
- The import job will also try to import statistics if available. Furthermore, object grants are instantiated.
If everything runs well, the end result will be a database that is logically identical to the source database in terms of tablespaces, users, objects, and so on.
When you initiate an export, unless otherwise specified, Data Pump starts a schema-level export for the user running the export job. User-level exports are frequently used to copy a schema or set of schemas from one environment to another. The following command starts a schema-level export for the MV_MAINT user:
$ expdp mv_maint/foo directory=dp_dir dumpfile=mv_maint.dmp logfile=mv_maint.log
In the output displayed on the screen, you should see some text indicating that a schema-level export has been initiated:
Starting "MV_MAINT"."SYS_EXPORT_SCHEMA_01"...
You can also initiate a schema-level export for users other than the one running the export job with the SCHEMAS parameter. The following command shows a schema-level export for multiple users:
$ expdp mv_maint/foo directory=dp_dir dumpfile=user.dmp schemas=heera,chaya
You can initiate a schema-level import by referencing a dump file that was taken with a schema-level export:
$ impdp mv_maint/foo directory=dp_dir dumpfile=user.dmp
When you initiate a schema-level import, there are some details to be aware of:
- No tablespaces are included in a schema-level export.
- The import job attempts to recreate any users in the dump file. If a user already exists, an error is thrown, and the import job continues.
- The import job will reset the users’ passwords, based on the password that was exported.
- Tables owned by the users will be imported and populated. If a table already exists, you must instruct Data Pump on how to handle this with the TABLE_EXISTS_ACTION parameter.
You can also initiate a schema-level import when using a full-export dump file. To do this, specify which schemas you want extracted from the full export:
$ impdp mv_maint/foo directory=dp_dir dumpfile=full.dmp schemas=heera,chaya
You can instruct Data Pump to operate on specific tables via the TABLES parameter. For example, say you want to export
$ expdp mv_maint/foo directory=dp_dir dumpfile=tab.dmp
tables=heera.inv,heera.inv_items
You should see some text in the output indicating that a table-level export is transpiring:
Starting "MV_MAINT"."SYS_EXPORT_TABLE_01...
Similarly, you can initiate a table-level import by specifying a table-level-created dump file:
$ impdp mv_maint/foo directory=dp_dir dumpfile=tab.dmp
A table-level import only attempts to import the tables and specified data. If a table already exists, an error is thrown, and the import job continues. If a table already exists and contains data, you must specify how you want the export job to handle this. You can have the import job either skip, append, replace, or truncate the table with the TABLE_EXISTS_ACTION parameter.
You can also initiate a table-level import when using a full-export dump file or a schema-level export. To do this, specify which tables you want extracted from the full- or schema-level export:
$ impdp mv_maint/foo directory=dp_dir dumpfile=full.dmp tables=heera.inv
A tablespace-level export/import operates on objects contained within specific tablespaces. This example exports all objects contained in the USERS tablespace:
$ expdp mv_maint/foo directory=dp_dir dumpfile=tbsp.dmp tablespaces=users
The text displayed in the output should indicate that a tablespace-level export is occurring:
Starting "MV_MAINT"."SYS_EXPORT_TABLESPACE_01"...
You can initiate a tablespace-level import by specifying an export file that was created with a tablespace-level export:
$ impdp mv_maint/foo directory=dp_dir dumpfile=tbsp.dmp
You can also initiate a tablespace-level import by using a full export, but specifying the TABLESPACES parameter:
$ impdp mv_maint/foo directory=dp_dir dumpfile=full.dmp tablespaces=users
A tablespace-level import will attempt to create any tables and indexes within the tablespace. The import doesn’t try to recreate the tablespaces themselves.
![]() Note There is also a transportable tablespace mode export. See the section “Copying Data Files”, later in this chapter.
Note There is also a transportable tablespace mode export. See the section “Copying Data Files”, later in this chapter.
One of the main uses of Data Pump is the copying of data from one database to another. Often, source and destination databases are located in data centers thousands of miles apart. Data Pump offers several powerful features for efficiently copying data:
- Network link
- Copying data files (transportable tablespaces)
- External tables (see Chapter 14)
Using a network link allows you to take an export and import it into the destination database without having to create a dump file. This is a very efficient way of moving data.
Oracle also provides the transportable tablespace feature, which lets you copy the data files from a source database to the destination and then use Data Pump to transfer the associated metadata. These two techniques are described in the following sections.
![]() Note See Chapter 14 for a discussion of using external tables to transfer data.
Note See Chapter 14 for a discussion of using external tables to transfer data.
Exporting and Importing Directly Across the Network
Suppose you have two database environments—a production database running on a Solaris box and a test database running on a Linux server. Your boss comes to you with these requirements:
- Make a copy of the production database on the Solaris box.
- Import the copy into the testing database on the Linux server.
- Change the names of the schemas when importing so as to meet the testing database standards for names.
First, consider the steps required to transfer data from one database to another, using the old exp/imp utilities. The steps would look something like this:
- Export the production database (which creates a dump file on the database server).
- Copy the dump file to the testing database server.
- Import the dump file into the testing database.
You can perform those same steps using Data Pump. However, Data Pump provides a much more efficient and transparent method for executing those steps. If you have direct network connectivity between the production and testing database servers, you can take an export and directly import it into your target database without having to create or copy any dump files. Furthermore, you can rename schemas on the fly as you perform the import. Additionally, it doesn’t matter if the source database is running on an OS different from that of the target database.
An example will help illustrate how this works. For this example, the production database users are STAR2, CIA_APP, and CIA_SEL. You want to move these users into a testing database and rename them STAR_JUL, CIA_APP_JUL, and CIA_SEL_JUL. This task requires the following steps:
- Create users in the test database to be imported into. Here is a sample script that creates the users in the testing database:
define star_user=star_jul
define star_user_pwd=star_jul_pwd
define cia_app_user=cia_app_jul
define cia_app_user_pwd=cia_app_jul_pwd
define cia_sel_user=cia_sel_jul
define cia_sel_user_pwd=cia_sel_jul_pwd
--
create user &&star_user identified by &&star_user_pwd;
grant connect,resource to &&star_user;
alter user &&star_user default tablespace dim_data;
--
create user &&cia_app_user identified by &&cia_app_user_pwd;
grant connect,resource to &&cia_app_user;
alter user &&cia_app_user default tablespace cia_data;
--
create user &&cia_sel_user identified by &&cia_app_user_pwd;
grant connect,resource to &&cia_app_user;
alter user &&cia_sel_user default tablespace cia_data; - In your testing database, create a database link that points to your production database. The remote user referenced in the CREATE DATABASE LINK statement must have the DBA role granted to it in the production database. Here is a sample CREATE DATABASE LINK script:
create database link dk
connect to darl identified by foobar
using 'dwdb1:1522/dwrep1'; - In your testing database, create a directory object that points to the location where you want your log file to go:
SQL> create or replace directory engdev as '/orahome/oracle/ddl/engdev'; - Run the import command on the testing box. This command references the remote database via the NETWORK_LINK parameter. The command also instructs Data Pump to map the production database user names to the newly created users in the testing database.
$ impdp darl/engdev directory=engdev network_link=dk
schemas='STAR2,CIA_APP,CIA_SEL'
remap_schema=STAR2:STAR_JUL,CIA_APP:CIA_APP_JUL,CIA_SEL:CIA_SEL_JUL
This technique allows you to move large amounts of data between disparate databases without having to create or copy any dump files or data files. You can also rename schemas on the fly via the REMAP_SCHEMA parameter. This is a very powerful Data Pump feature that lets you transfer data quickly and efficiently.
![]() Tip When replicating entire databases, also consider using the RMAN duplicate database functionality.
Tip When replicating entire databases, also consider using the RMAN duplicate database functionality.
Oracle Net VS. NETWORK_LINK
Don’t confuse exporting while connected to a remote database via Oracle Net with exporting using the NETWORK_LINK parameter. When exporting while connected to a remote database via Oracle Net, the objects being exported exist in the remote database, and the dump file and log file are created on the remote server in the directory specified by the DIRECTORY parameter. For instance, the following command exports objects in the remote database and creates files on the remote server:
$ expdp mv_maint/foo@shrek2 directory=dp_dir dumpfile=sales.dmp
In contrast, when you export using the NETWORK_LINK parameter, you are creating dump files and log files locally, and the database objects being exported exist in a remote database; for example,
$ expdp mv_maint/foo network_link=shrek2 directory=dp_dir dumpfile=sales.dmp
Oracle provides a mechanism for copying data files from one database to another, in conjunction with using Data Pump to transport the associated metadata. This is known as the transportable tablespace feature. The amount of time this task requires depends on how long it takes you to copy the data files to the destination server. This technique is appropriate for moving data in DSS and data warehouse environments.
![]() Tip Transporting tablespaces can also be used (in conjunction with the RMAN CONVERT TABLESPACE command) to move tablespaces to a destination server that has a platform different from that of the host.
Tip Transporting tablespaces can also be used (in conjunction with the RMAN CONVERT TABLESPACE command) to move tablespaces to a destination server that has a platform different from that of the host.
Follow these steps to transport tablespaces:
- Ensure that the tablespace is self-contained. These are some common violations of the self-contained rule:
- An index in one tablespace can’t point to a table in another tablespace that isn’t in the set of tablespaces being transported.
- A foreign key constraint is defined on a table in a tablespace that references a primary key constraint on a table in a tablespace that isn’t in the set of tablespaces being transported.
Run the following check to see if the set of tablespaces being transported violates any of the self-contained rules:
SQL> exec dbms_tts.transport_set_check('INV_DATA,INV_INDEX', TRUE);Now, see if Oracle detected any violations:
SQL> select * from transport_set_violations;If you don’t have any violations, you should see this:
no rows selectedIf you do have violations, such as an index that is built on a table that exists in a tablespace not being transported, then you’ll have to rebuild the index in a tablespace that is being transported.
- Make the tablespaces being transported read-only:
SQL> alter tablespace inv_data read only;
SQL> alter tablespace inv_index read only; - Use Data Pump to export the metadata for the tablespaces being transported:
$ expdp mv_maint/foo directory=dp_dir dumpfile=trans.dmp
transport_tablespaces=INV_DATA,INV_INDEX - Copy the Data Pump export dump file to the destination server.
- Copy the data file(s) to the destination database. Place the files in the directory where you want them in the destination database server. The file name and directory path must match the import command used in the next step.
- Import the metadata into the destination database. Use the following parameter file to import the metadata for the data files being transported:
userid=mv_maint/foo
directory=dp_dir
dumpfile=trans.dmp
transport_datafiles=/ora01/dbfile/rcat/inv_data01.dbf,
/ora01/dbfile/rcat/inv_index01.dbf
If everything goes well, you should see some output indicating success:
Job "MV_MAINT"."SYS_IMPORT_TRANSPORTABLE_01" successfully completed...
If the data files that are being transported have a block size different from that of the destination database, then you must modify your initialization file (or use an ALTER SYSTEM command) and add a buffer pool that contains the block size of the source data file. For example, to add a 16KB buffer cache, place this in the initialization file:
db_16k_cache_size=200M
You can check a tablespace’s block size via this query:
SQL> select tablespace_name, block_size from dba_tablespaces;
The transportable tablespace mechanism allows you to quickly move data files between databases, even if the databases use different block sizes or have different endian formats. This section doesn’t discuss all the details involved with transportable tablespaces; the focus of this chapter is to show how to use Data Pump to transport data. See the Oracle Database Administrator’s Guide, which can be freely downloaded from the Technology Network area of the Oracle Web site (http://otn.oracle.com ), for complete details on transportable tablespaces.
![]() Note To generate transportable tablespaces, you must use the Oracle Enterprise Edition. You can use other editions of Oracle to import transportable tablespaces.
Note To generate transportable tablespaces, you must use the Oracle Enterprise Edition. You can use other editions of Oracle to import transportable tablespaces.
Features for Manipulating Storage
Data Pump contains many flexible features for manipulating tablespaces and data files when exporting and importing. The following sections show useful Data Pump techniques when working with these important database objects.
Sometimes, you may be required to replicate an environment—say, replicating a production environment into a testing environment. One of the first tasks is to replicate the tablespaces. To this end, you can use Data Pump to pull out just the DDL required to recreate the tablespaces for an environment:
$ expdp mv_maint/foo directory=dp_dir dumpfile=inv.dmp
full=y include=tablespace
The FULL parameter instructs Data Pump to export everything in the database. However, when used with INCLUDE, Data Pump exports only the objects specified with that command. In this combination only metadata regarding tablespaces are exported; no data within the data files are included with the export. You could add the parameter and value of CONTENT=METADATA_ONLY to the INCLUDE command, but this would be redundant.
Now, you can use the SQLFILE parameter to view the DDL associated with the tablespaces that were exported:
$ impdp mv_maint/foo directory=dp_dir dumpfile=inv.dmp sqlfile=tbsp.sql
When you use the SQLFILE parameter, nothing is imported. In this example the prior command only creates a file named tbsp.sql, containing SQL statements pertaining to tablespaces. You can modify the DDL and run it in the destination database environment; or, if nothing needs to change, you can directly use the dump file by importing tablespaces into the destination database.
Specifying Different Data File Paths and Names
As previously discussed, you can use the combination of the FULL and INCLUDE parameters to export only tablespace metadata information:
$ expdp mv_maint/foo directory=dp_dir dumpfile=inv.dmp
full=y include=tablespace
What happens if you want to use the dump file to create tablespaces on a separate database server that has different directory structures? Data Pump allows you to change the data file directory paths and file names in the import step with the REMAP_DATAFILE parameter.
For example, say the source data files existed on a mount point named /ora03, but on the database being imported to, the mount points are named with /ora01. Here is a parameter file that specifies that only tablespaces beginning with the string INV should be imported and that their corresponding data files names be changed to reflect the new environment:
userid=mv_maint/foo
directory=dp_dir
dumpfile=inv.dmp
full=y
include=tablespace:"like 'INV%'"
remap_datafile="'/ora03/dbfile/O12C/inv_data01.dbf':'/ora01/dbfile/O12C/tb1.dbf'"
remap_datafile="'/ora03/dbfile/O12C/inv_index01.dbf':'/ora01/dbfile/O12C/tb2.dbf'"
When Data Pump creates the tablespaces, for any paths that match the first part of the string (to the left of the colon [:]), the string is replaced with the text in the next part of the string (to the right of the colon).
![]() Tip When working with parameters that require both single and double quotation marks, you’ll get predictable behavior when using a parameter file. In contrast, if you were to try to enter in the various required quotation marks on the command line, the OS may interpret and pass to Data Pump something other than what you were expecting.
Tip When working with parameters that require both single and double quotation marks, you’ll get predictable behavior when using a parameter file. In contrast, if you were to try to enter in the various required quotation marks on the command line, the OS may interpret and pass to Data Pump something other than what you were expecting.
Importing into a Tablespace Different from the Original
You may occasionally be required to export a table and then import it into a different user and a different tablespace. The source database could be different from the destination database, or you could simply be trying to move data between two users within the same database. You can easily handle this requirement with the REMAP_SCHEMA and REMAP_TABLESPACE parameters.
This example remaps the user as well as the tablespace. The original user and tablespaces are HEERA and INV_DATA. This command imports the INV table into the CHAYA user and the DIM_DATA tablespace:
$ impdp mv_maint/foo directory=dp_dir dumpfile=inv.dmp remap_schema=HEERA:CHAYA
remap_tablespace=INV_DATA:DIM_DATA tables=heera.inv
The REMAP_TABLESPACE feature doesn’t recreate tablespaces. It only instructs Data Pump to place objects in tablespaces different from those they were exported from. When importing, if the tablespace that you’re placing the object in doesn’t exist, Data Pump throws an error.
Changing the Size of Data Files
You can change the size of the data files when importing by using the TRANSFORM parameter with the PCTSPACE option. Say you’ve created an export of just the tablespace metadata:
$ expdp mv_maint/foo directory=dp_dir dumpfile=inv.dmp full=y include=tablespace
Now, you want to create the tablespaces that contain the string DATA in the tablespace name in a development database, but you don’t have enough disk space to create the tablespaces as they were in the source database. In this scenario, you can use the TRANSFORM parameter to specify that the tablespaces be created as a percentage of the original size.
For instance, if you want the tablespaces to be created at 20 percent of the original size, issue the following command:
userid=mv_maint/foo
directory=dp_dir
dumpfile=inv.dmp
full=y
include=tablespace:"like '%DATA%'"
transform=pctspace:20
The tablespaces are created with data files 20 percent of their original size. The extent allocation sizes are also 20 percent of their original definition. This is important because Data Pump doesn’t check to see if the storage attributes meet the minimum size restrictions for data files. This means that if the calculated smaller size violates an Oracle minimum size (e.g., five blocks for the uniform extent size), an error will be thrown during the import.
This feature is useful when used to export production data and then import it into a smaller database. In these scenarios, you may be filtering out some of the production data via the SAMPLE parameter or QUERY parameters (see the section “Filtering Data and Objects,” later in this chapter).
Changing Segment and Storage Attributes
When importing, you can alter the storage attributes of a table by using the TRANSFORM parameter. The general syntax for this parameter is
TRANSFORM=transform_name:value[:object_type]
When you use SEGMENT_ATTRIBUTES:N for the transformation name, you can remove the following segment attributes during an import:
- Physical attributes
- Storage attributes
- Tablespaces
- Logging
You may require this feature when you’re importing into a development environment and don’t want the tables to come in with all the storage attributes as they were in the production database. For example, in development you may just have one tablespace in which you store all your tables and indexes, whereas in production, you spread the tables and indexes out in multiple tablespaces.
Here is an example that removes the segment attributes:
$ impdp mv_maint/foo directory=dp_dir  dumpfile=inv.dmp
transform=segment_attributes:n
You can remove just the storage clause by using STORAGE:N:
$ impdp mv_maint/foo directory=dp_dir dumpfile=inv.dmp
transform=storage:n
Data Pump has a vast array of mechanisms for filtering data and metadata. You can influence what is excluded or included in a Data Pump export or import in the following ways:
- Use the QUERY parameter to export or import subsets of data.
- Use the SAMPLE parameter to export a percentage of the rows in a table.
- Use the CONTENT parameter to exclude or include data and metadata.
- Use the EXCLUDE parameter to specifically name items to be excluded.
- Use the INCLUDE parameter to name the items to be included (thereby excluding other nondependent items not included in the list).
- Use parameters such as SCHEMAS to specify that you only want a subset of the database’s objects (those that belong to the specified user or users).
Examples of each of these techniques are described in the following sections.
![]() Note You can’t use EXCLUDE and INCLUDE at the same time. These parameters are mutually exclusive.
Note You can’t use EXCLUDE and INCLUDE at the same time. These parameters are mutually exclusive.
You can use the QUERY parameter to instruct Data Pump to write to a dump file only rows that meet a certain criterion. You may want to do this if you’re recreating a test environment and only need subsets of the data. Keep in mind that this technique is unaware of any foreign key constraints that may be in place, so you can’t blindly restrict the data sets without considering parent–child relationships.
The QUERY parameter has this general syntax for including a query:
QUERY = [schema.][table_name:] query_clause
The query clause can be any valid SQL clause. The query must be enclosed by either double or single quotation marks. I recommend using double quotation marks because you may need to have single quotation marks embedded in the query to handle VARCHAR2 data. Also, you should use a parameter file so that there is no confusion about how the OS interprets the quotation marks.
This example uses a parameter file and limits the rows exported for two tables. Here is the parameter file used when exporting:
userid=mv_maint/foo
directory=dp_dir
dumpfile=inv.dmp
tables=inv,reg
query=inv:"WHERE inv_desc='Book'"
query=reg:"WHERE reg_id <=20"
Say you place the previous lines of code in a file named inv.par. The export job references the parameter file as shown:
$ expdp parfile=inv.par
The resulting dump file only contains rows filtered by the QUERY parameters. Again, be mindful of any parent–child relationships, and ensure that what gets exported won’t violate any constraints on the import.
You can also specify a query when importing data. Here is a parameter file that limits the rows imported into the INV table, based on the INV_ID column:
userid=mv_maint/foo
directory=dp_dir
dumpfile=inv.dmp
tables=inv,reg
query=inv:"WHERE inv_id > 10"
This text is placed in a file named inv2.par and is referenced during the import as follows:
$ impdp parfile=inv2.par
All the rows from the REG table are imported. Only the rows in the INV table that have an INV_ID greater than 10 are imported.
Exporting a Percentage of the Data
When exporting, the SAMPLE parameter instructs Data Pump to retrieve a certain percentage of rows, based on a number you provide. Data Pump doesn’t keep track of parent–child relationships when exporting. Therefore, this approach doesn’t work well when you have tables linked via foreign key constraints and you’re trying to select a percentage of rows randomly.
Here is the general syntax for this parameter:
SAMPLE=[[schema_name.]table_name:]sample_percent
For example, if you want to export 10 percent of the data in a table, do so as follows:
$ expdp mv_maint/foo directory=dp_dir tables=inv sample=10 dumpfile=inv.dmp
This next example exports two tables, but only 30 percent of the REG table’s data:
$ expdp mv_maint/foo directory=dp_dir tables=inv,reg sample=reg:30 dumpfile=inv.dmp
![]() Note The SAMPLE parameter is only valid for exports.
Note The SAMPLE parameter is only valid for exports.
Excluding Objects from the Export File
For export the EXCLUDE parameter instructs Data Pump not to export specified objects (whereas the INCLUDE parameter instructs Data Pump to include only specific objects in the export file). The EXCLUDE parameter has this general syntax:
EXCLUDE=object_type[:name_clause] [, ...]
The OBJECT_TYPE is a database object, such as TABLE or INDEX. To see which object types can be filtered, view the OBJECT_PATH column of DATABASE_EXPORT_OBJECTS, SCHEMA_EXPORT_OBJECTS, or TABLE_EXPORT_OBJECTS. For example, if you want to view what schema-level objects can be filtered, run this query:
SELECT
 object_path
FROM schema_export_objects
WHERE object_path NOT LIKE '%/%';
Here is a snippet of the output:
OBJECT_PATH
------------------
STATISTICS
SYNONYM
SYSTEM_GRANT
TABLE
TABLESPACE_QUOTA
TRIGGER
The EXCLUDE parameter instructs Data Pump export to filter out specific objects from the export. For instance, say you’re exporting a table but want to exclude the indexes and grants:
$ expdp mv_maint/foo directory=dp_dir dumpfile=inv.dmp tables=inv exclude=index,grant
You can filter at a more granular level by using NAME_CLAUSE. The NAME_CLAUSE option of EXCLUDE allows you to specify an SQL filter. To exclude indexes that have names that start with the string “INV,” you use the following command:
exclude=index:"LIKE 'INV%'"
The previous line requires that you use quotation marks; in these scenarios, I recommend that you use a parameter file. Here is a parameter file that contains an EXCLUDE clause:
userid=mv_maint/foo
directory=dp_dir
dumpfile=inv.dmp
tables=inv
exclude=index:"LIKE 'INV%'"
A few aspects of the EXCLUDE clause may seem counterintuitive. For example, consider the following export parameter file:
userid=mv_maint/foo
directory=dp_dir
dumpfile=sch.dmp
exclude=schema:"='HEERA'"
If you attempt to exclude a user in this manner, an error is thrown. This is because the default mode of export is SCHEMA level, and Data Pump can’t exclude and include a schema at the same time. If you want to exclude a user from an export file, specify the FULL mode, and exclude the user:
userid=mv_maint/foo
directory=dp_dir
dumpfile=sch.dmp
exclude=schema:"='HEERA'"
full=y
By default, when you export a table object, any statistics are also exported. You can prevent statistics from being imported via the EXCLUDE parameter. Here is an example:
$ expdp mv_maint/foo directory=dp_dir dumpfile=inv.dmp
tables=inv exclude=statistics
When importing, if you attempt to exclude statistics from a dump file that didn’t originally include the statistics, then you receive this error:
ORA-39168: Object path STATISTICS was not found.
You also receive this error if the objects in the exported dump file never had statistics generated for them.
Including Only Specific Objects in an Export File
Use the INCLUDE parameter to include only certain database objects in the export file. The following example exports only the procedures and functions that a user owns:
$ expdp mv_maint/foo dumpfile=proc.dmp directory=dp_dir include=procedure,function
The proc.dmp file that is created contains only the DDL required to recreate any procedures and functions the user owns.
When using INCLUDE, you can also specify that only specific PL/SQL objects should be exported:
$ expdp mv_maint/foo directory=dp_dir dumpfile=ss.dmp
include=function:"='IS_DATE'"
When you’re exporting only specific PL/SQL objects, because of the issue of having to escape quotation marks on the OS command line, I recommend using a parameter file. When you use a parameter file, this is not a concern. The following example shows the contents of a parameter file that exports specific objects:
directory=dp_dir
dumpfile=ss.dmp
include=function:"='ISDATE'",procedure:"='DEPTREE_FILL'"
If you specify an object that doesn’t exist, Data Pump throws an error but continues with the export operation:
ORA-39168: Object path FUNCTION was not found.
Exporting Table, Index, Constraint, and Trigger DDL
Suppose you want to export the DDL associated with tables, indexes, constraints, and triggers in your database. To do this, use the FULL export mode, specify CONTENT=METADATA_ONLY, and only include tables:
$ expdp mv_maint/foo directory=dp_dir dumpfile=ddl.dmp
content=metadata_only full=y include=table
When you export an object, Data Pump also exports any dependent objects. So, when you export a table, you also get indexes, constraints, and triggers associated with the table.
Excluding Objects from Import
In general, you can use the same techniques used to filter objects in exports to exclude objects from being imported. Use the EXCLUDE parameter to exclude objects from being imported. For example, to exclude triggers and procedures from being imported, use this command:
$ impdp mv_maint/foo dumpfile=inv.dmp directory=dp_dir exclude=TRIGGER,PROCEDURE
You can further refine what is excluded by adding an SQL clause. For example, say you want not to import triggers that begin with the letter B. Here is what the parameter file looks like:
userid=mv_maint/foo
directory=dp_dir
dumpfile=inv.dmp
schemas=HEERA
exclude=trigger:"like 'B%'"
You can use the INCLUDE parameter to reduce what is imported. Suppose you have a schema from which you want to import tables that begin with the letter A. Here is the parameter file:
userid=mv_maint/foo
directory=dp_dir
dumpfile=inv.dmp
schemas=HEERA
include=table:"like 'A%'"
If you place the previous text in a file named h.par, then the parameter file can be invoked as follows:
$ impdp parfile=h.par
In this example the HEERA schema must already exist. Only tables that start with the letter A are imported.
Common Data Pump Tasks
The following sections describe common features you can use with Data Pump. Many of these features are standard with Data Pump, such as creating a consistent export and taking action when imported objects already exist in the database. Other features, such as compression and encryption, require the Enterprise Edition of Oracle or an extra license, or both. I’ll point out these requirements (if relevant) for the Data Pump element being covered.
Estimating the Size of Export Jobs
If you’re about to export a large amount of data, you can estimate the size of the file that Data Pump creates before you run the export. You may want to do this because you’re concerned about the amount of space an export job needs.
To estimate the size, use the ESTIMATE_ONLY parameter. This example estimates the size of the export file for an entire database:
$ expdp mv_maint/foo estimate_only=y full=y logfile=n
Here is a snippet of the output:
Estimate in progress using BLOCKS method...
Total estimation using BLOCKS method: 6.75 GB
Similarly, you can specify a schema name to get an estimate of the size required to export a user:
$ expdp mv_maint/foo estimate_only=y schemas=star2 logfile=n
Here is an example of estimating the size required for two tables:
$ expdp mv_maint/foo estimate_only=y tables=star2.f_configs,star2.f_installations
logfile=n
Listing the Contents of Dump Files
Data Pump has a very robust method of creating a file that contains all the SQL that’s executed when an import job runs. Data Pump uses the DBMS_METADATA package to create the DDL that you can use to recreate objects in the Data Pump dump file.
Use the SQLFILE option of Data Pump import to list the contents of a Data Pump export file. This example creates a file named expfull.sql, containing the SQL statements that the import process calls (the file is placed in the directory defined by the DPUMP_DIR2 directory object):
$ impdp hr/hr DIRECTORY=dpump_dir1 DUMPFILE=expfull.dmp
SQLFILE=dpump_dir2:expfull.sql
If you don’t specify a separate directory (such as dpump_dir2, in the previous example), then the SQL file is written to the location specified in the DIRECTORY option.
![]() Tip You must run the previous command as a user with DBA privileges or the schema that performed the Data Pump export. Otherwise, you get an empty SQL file without the expected SQL statements in it.
Tip You must run the previous command as a user with DBA privileges or the schema that performed the Data Pump export. Otherwise, you get an empty SQL file without the expected SQL statements in it.
When you use the SQLFILE option with an import, the impdp process doesn’t import any data; it only creates a file that contains the SQL commands that would be run by the import process. It’s sometimes handy to generate an SQL file for the following reasons:
- Preview and verify the SQL statements before running the import
- Run the SQL manually to precreate database objects
- Capture the SQL that would be required to recreate database objects (users, tables, index, and so on)
In regard to the last bulleted item, sometimes what’s checked into the source code control repository doesn’t match what’s really been applied to the production database. This procedure can be handy for troubleshooting or documenting the state of the database at a point in time.
Suppose you need to move a user’s objects and data to a new database. As part of the migration, you want to rename the user. First, create a schema-level export file that contains the user you want to clone. In this example the user name is INV:
$ expdp mv_maint/foo directory=dp_dir schemas=inv dumpfile=inv.dmp
Now, you can use Data Pump import to clone the user. If you want to move the user to a different database, copy the dump file to the remote database, and use the REMAP_SCHEMA parameter to create a copy of a user. In this example the INV user is cloned to the INV_DW user:
$ impdp mv_maint/foo directory=dp_dir remap_schema=inv:inv_dw dumpfile=inv.dmp
This command copies all structures and data in the INV user to the INV_DW user. The resulting INV_DW user is identical, in terms of objects, to the INV user. The duplicated schema also contains the same password as the schema from which it was copied.
If you just want to duplicate the metadata from one schema to another, use the CONTENT parameter with the METADATA_ONLY option:
$ impdp mv_maint/foo directory=dp_dir remap_schema=inv:inv_dw
content=metadata_only dumpfile=inv.dmp
The REMAP_SCHEMA parameter provides an efficient way to duplicate a schema, with or without the data. During a schema duplication operation, if you want to change the tablespace in which the objects reside, also use the REMAP_TABLESPACE parameter. This allows you to duplicate a schema and also place the objects in a tablespace different from that of the source objects.
You can also duplicate a user from one database to another without first creating a dump file. To do this, use the NETWORK_LINK parameter. See the section “Exporting and Importing Directly Across the Network,” earlier in this chapter, for details on copying data directly from one database to another.
A consistent export means that all data in the export file are consistent as of a time or an SCN. When you’re exporting an active database with many parent-child tables, you should ensure that you get a consistent snapshot of the data.
![]() Tip If you’re using Oracle Database 11g Release 2 or higher, you can take a consistent export by invoking the legacy mode parameter of CONSISTENT=Y. See the section“Data Pump Legacy Mode,” later in this chapter, for details.
Tip If you’re using Oracle Database 11g Release 2 or higher, you can take a consistent export by invoking the legacy mode parameter of CONSISTENT=Y. See the section“Data Pump Legacy Mode,” later in this chapter, for details.
You create a consistent export by using either the FLASHBACK_SCN or FLASHBACK_TIME parameter. This example uses the FLASHBACK_SCN parameter to take an export. To determine the current value of the SCN of your data set, issue this query:
SQL> select current_scn from v$database;
Here is some typical output:
 CURRENT_SCN
-----------
    5715397
The following command takes a consistent full export of the database, using the FLASHBACK_SCN parameter:
$ expdp mv_maint/foo directory=dp_dir full=y flashback_scn=5715397
dumpfile=full.dmp
The previous export command ensures that all data exported are consistent with any transactions committed in the database as of the specified SCN.
When you use the FLASHBACK_SCN parameter, Data Pump ensures that the data in the export file are consistent as of the specified SCN. This means that any transactions committed after the specified SCN aren’t included in the export file.
![]() Note If you use the NETWORK_LINK parameter in conjunction with FLASHBACK_SCN, then the export is taken with the SCN consistent with the database referenced in the database link.
Note If you use the NETWORK_LINK parameter in conjunction with FLASHBACK_SCN, then the export is taken with the SCN consistent with the database referenced in the database link.
You can also use FLASHBACK_TIME to specify that the export file should be created with consistent committed transactions as of a specified time. When using FLASHBACK_TIME, Oracle determines the SCN that most closely matches the time specified and uses that to produce an export consistent with that SCN. The syntax for using FLASHBACK_TIME is as follows:
FLASHBACK_TIME="TO_TIMESTAMP{<value>}"
For some OSs, double quotation marks appearing directly on the command line must be escaped by a backslash (), because the OS treats them as special characters. For this reason, it’s much more straightforward to use a parameter file. Here are the contents of a parameter file that uses FLASHBACK_TIME:
directory=dp_dir
content=metadata_only
dumpfile=inv.dmp
flashback_time="to_timestamp('24-jan-2013 07:03:00','dd-mon-yyyy hh24:mi:ss')"
Depending on your OS, the command line version of the previous example must be specified as follows:
flashback_time="to_timestamp('24-jan-2013 07:03:00',
'dd-mon-yyyy hh24:mi:ss')"
This line of code should be specified on one line. Here, the code has been placed on two lines in order to fit on the page.
You can’t specify both FLASHBACK_SCN and FLASHBACK_TIME when taking an export; these two parameters are mutually exclusive. If you attempt to use both parameters at the same time, Data Pump throws the following error message and halts the export job:
ORA-39050: parameter FLASHBACK_TIME is incompatible with parameter FLASHBACK_SCN
Importing When Objects Already Exist
When exporting and importing data, you often import into schemas in which the objects have been created (tables, indexes, and so on). In this situation, you should import the data but instruct Data Pump to try not to create already existing objects.
You can achieve this with the TABLE_EXISTS_ACTION and CONTENT parameters. The next example instructs Data Pump to append data in any tables that already exist via the TABLE_EXISTS_ACTION=APPEND option. Also used is the CONTENT=DATA_ONLY option, which instructs Data Pump not to run any DDL to create objects (only to load data):
$ impdp mv_maint/foo directory=dp_dir dumpfile=inv.dmp
table_exists_action=append content=data_only
Existing objects aren’t modified in any way, and any new data that exist in the dump file are inserted into any tables.
You may wonder what happens if you just use the TABLE_EXISTS_ACTION option and don’t combine it with the CONTENT option:
$ impdp mv_maint/foo directory=dp_dir dumpfile=inv.dmp
table_exists_action=append
The only difference is that Data Pump attempts to run DDL commands to create objects if they exist. This doesn’t stop the job from running, but you see an error message in the output, indicating that the object already exists. Here is a snippet of the output for the previous command:
Table "MV_MAINT"."INV" exists. Data will be appended ...
The default for the TABLE_EXISTS_ACTION parameter is SKIP, unless you also specify the parameter CONTENT=DATA_ONLY. If you use CONTENT=DATA_ONLY, then the default for TABLE_EXISTS_ACTION is APPEND.
The TABLE_EXISTS_ACTION parameter takes the following options:
- SKIP (default if not combined with CONTENT=DATA_ONLY)
- APPEND (default if combined with CONTENT=DATA_ONLY)
- REPLACE
- TRUNCATE
The SKIP option tells Data Pump not to process the object if it exists. The APPEND option instructs Data Pump not to delete existing data, but rather, to add data to the table without modifying any existing data. The REPLACE option instructs Data Pump to drop and recreate objects; this parameter isn’t valid when the CONTENT parameter is used with the DATA_ONLY option. The TRUNCATE parameter tells Data Pump to delete rows from tables via a TRUNCATE statement.
The CONTENT parameter takes the following options:
- ALL (default)
- DATA_ONLY
- METADATA_ONLY
The ALL option instructs Data Pump to load both data and metadata contained in the dump file; this is the default behavior. The DATA_ONLY option tells Data Pump to load only table data into existing tables; no database objects are created. The METADATA_ONLY option only creates objects; no data are loaded.
Starting with Oracle Database 11g, you have the option of renaming a table during import operations. There are many reasons you may want to rename a table when importing it. For instance, you may have a table in the target schema that has the same name as the table you want to import. You can rename a table when importing by using the REMAP_TABLE parameter. This example imports the table from the HEERA user INV table to the HEERA user INVEN table:
$ impdp mv_maint/foo directory=dp_dir dumpfile=inv.dmp tables=heera.inv
remap_table=heera.inv:inven
Here is the general syntax for renaming a table:
REMAP_TABLE=[schema.]old_tablename[.partition]:new_tablename
Note that this syntax doesn’t allow you to rename a table into a different schema. If you’re not careful, you may attempt to do the following (thinking that you’re moving a table and renaming it in one operation):
$ impdp mv_maint/foo directory=dp_dir dumpfile=inv.dmp tables=heera.inv
remap_table=heera.inv:scott.inven
In the prior example, you end up with a table in the HEERA schema named SCOTT. That can be confusing.
![]() Note The process of renaming a table wasn’t entirely bug free in Oracle Database 11g Release 1 but has been corrected in Oracle Database 11g Release 2. See MOS Note 886762.1 for more details.
Note The process of renaming a table wasn’t entirely bug free in Oracle Database 11g Release 1 but has been corrected in Oracle Database 11g Release 2. See MOS Note 886762.1 for more details.
Starting with Oracle Database 11g, when either exporting or importing, you can apply a PL/SQL function to alter a column value. For example, you may have an auditor who needs to look at the data, and one requirement is that you apply a simple obfuscation function to sensitive columns. The data don’t need to be encrypted; they just need to be changed enough that the auditor can’t readily determine the value of the LAST_NAME column in the CUSTOMERS table.
This example first creates a simple package that is used to obfuscate the data:
create or replace package obfus is
  function obf(clear_string varchar2) return varchar2;
  function unobf(obs_string varchar2) return varchar2;
end obfus;
/
--
create or replace package body obfus is
  fromstr varchar2(62) := '0123456789ABCDEFGHIJKLMNOPQRSTUVWXYZ' ||
             'abcdefghijklmnopqrstuvwxyz';
  tostr varchar2(62)   := 'defghijklmnopqrstuvwxyzabc3456789012' ||
             'KLMNOPQRSTUVWXYZABCDEFGHIJ';
--
function obf(clear_string varchar2) return varchar2 is
begin
  return translate(clear_string, fromstr, tostr);
end obf;
--
function unobf(obs_string varchar2) return varchar2 is
begin
  return translate(obs_string, tostr, fromstr);
end unobf;
end obfus;
/
Now, when you import the data into the database, you apply the obfuscation function to the LAST_NAME column of the CUSTOMERS table:
$ impdp mv_maint/foo directory=dp_dir dumpfile=cust.dmp tables=customers
remap_data=customers.last_name:obfus.obf
Selecting LAST_NAME from CUSTOMERS shows that it has been imported in an obfuscated manner:
SQL> select last_name from customers;
LAST_NAME
------------------
yYZEJ
tOXXSMU
xERX
You can manually apply the package’s UNOBF function to see the real values of the column:
SQL> select obfus.unobf(last_name) from customers;
OBFUS.UNOBF(LAST_NAME)
-------------------------
Lopuz
Gennick
Kuhn
By default, Data Pump creates a log file when generating an export or an import. If you know that you don’t want a log file generated, you can suppress it by specifying the NOLOGFILE parameter. Here is an example:
$ expdp mv_maint/foo directory=dp_dir tables=inv nologfile=y
If you choose not to create a log file, Data Pump still displays status messages on the output device. In general, I recommend that you create a log file with every Data Pump operation. This gives you an audit trail of your actions.
Use the PARALLEL parameter to parallelize a Data Pump job. For instance, if you know you have four CPUs on a box, and you want to set the degree of parallelism to 4, use PARALLEL as follows:
$ expdp mv_maint/foo parallel=4 dumpfile=exp.dmp directory=dp_dir full=y
To take full advantage of the parallel feature, ensure that you specify multiple files when exporting. The following example creates one file for each thread of parallelism:
$ expdp mv_maint/foo parallel=4 dumpfile=exp1.dmp,exp2.dmp,exp3.dmp,exp4.dmp
You can also use the %U substitution variable to instruct Data Pump to create dump files automatically to match the degree of parallelism. The %U variable starts at the value 01 and increments as additional dump files are allocated. This example uses the %U variable:
$ expdp mv_maint/foo parallel=4 dumpfile=exp%U.dmp
Now, say you need to import from the dump files created from an export. You can either individually specify the dump files or, if the dump files were created with the %U variable, use that on import:
$ impdp mv_maint/foo parallel=4 dumpfile=exp%U.dmp
In the prior example the import process starts by looking for a file with the name exp01.dmp, then exp02.dmp, and so on.
![]() Tip Oracle recommends that the degree of parallelism not be set to more than two times the number of CPUs available on the server.
Tip Oracle recommends that the degree of parallelism not be set to more than two times the number of CPUs available on the server.
You can also modify the degree of parallelism while the job is running. First, attach in the interactive command mode to the job (see the section “Interactive Command Mode,” later in this chapter) for which you want to modify the degree of parallelism. Then, use the PARALLEL option. In this example the job attached to is SYS_IMPORT_TABLE_01:
$ impdp mv_maint/foo attach=sys_import_table_01
Import> parallel=6
You can check the degree of parallelism via the STATUS command:
Import> status
Here is some sample output:
Job: SYS_IMPORT_TABLE_01
Operation: IMPORT
Mode: TABLE
State: EXECUTING
Bytes Processed: 0
Current Parallelism: 6
![]() Note The PARALLEL feature is only available in the Enterprise Edition of Oracle.
Note The PARALLEL feature is only available in the Enterprise Edition of Oracle.
Specifying Additional Dump Files
If you run out of space in the primary data pump location, then you can specify additional data pump locations on the fly. Use the ADD_FILE command from the interactive command prompt. Here is the basic syntax for adding additional files:
ADD_FILE=[directory_object:]file_name [,...]
This example adds another output file to an already existing Data Pump export job:
Export> add_file=alt2.dmp
You can also specify a separate database directory object:
Export> add_file=alt_dir:alt3.dmp
Reusing Output File Names
By default, Data Pump doesn’t overwrite an existing dump file. For example, the first time you run this job, it will run fine because there is no dump file named inv.dmp in the directory being used:
$ expdp mv_maint/foo directory=dp_dir dumpfile=inv.dmp
If you attempt to run the previous command again with the same directory and the same data pump name, this error is thrown:
ORA-31641: unable to create dump file "/oradump/inv.dmp"
You can either specify a new data pump name for the export job or use the REUSE_DUMPFILES parameter to direct Data Pump to overwrite an existing dump file; for example,
$ expdp mv_maint/foo directory=dp_dir dumpfile=inv.dmp reuse_dumpfiles=y
You should now be able to run the Data Pump export regardless of an existing dump file with the same name in the output directory. When you set REUSE_DUMPFILES to a value of y, if Data Pump finds a dump file with the same name, it overwrites the file.
![]() Note The default value for REUSE_DUMPFILES is n. The REUSE_DUMPFILES parameter is available only in Oracle Database 11g and higher.
Note The default value for REUSE_DUMPFILES is n. The REUSE_DUMPFILES parameter is available only in Oracle Database 11g and higher.
Sometimes, in database environments, changes occur to database objects in unexpected ways. You may have a developer who somehow obtains the production user passwords and decides to make a change on the fly, without telling anybody. Or a DBA may decide not to follow the standard release process and make a change to an object while troubleshooting an issue. These scenarios can be frustrating for production-support DBAs. Whenever there is an issue, the first question raised is, “What changed?”
When you use Data Pump, it’s fairly simple to create a file that contains all the DDL to recreate every object in your database. You can instruct Data Pump to export or import just the metadata via the CONTENT=METADATA_ONLY option.
For instance, in a production environment, you can set up a daily job to capture this DDL. If there is ever a question about what changed and when, you can go back and compare the DDL in the daily dump files.
Listed next is a simple shell script that first exports the metadata content from the database and then uses Data Pump import to create a DDL file from that export:
#!/bin/bash
# source OS variables, see Chapter 2 for details
. /etc/oraset o12c
#
DAY=$(date +%Y_%m_%d)
SID=DWREP
#---------------------------------------------------
# First create export dump file with metadata only
expdp mv_maint/foo dumpfile=${SID}.${DAY}.dmp content=metadata_only
directory=dp_dir full=y logfile=${SID}.${DAY}.log
#---------------------------------------------------
# Now create DDL file from the export dump file.
impdp mv_maint/foo directory=dp_dir dumpfile=${SID}.${DAY}.dmp
SQLFILE=${SID}.${DAY}.sql logfile=${SID}.${DAY}.sql.log
#
exit 0
This code listing depends on a database directory object’s being created that points to where you want the daily dump file to be written. You may also want to set up another job that periodically deletes any files older than a certain amount of time.
When you use Data Pump to create large files, you should consider compressing the output. As of Oracle Database 11g, the COMPRESSION parameter can be one of the following values: ALL, DATA_ONLY, METADATA_ONLY, or NONE. If you specify ALL, then both data and metadata are compressed in the output. This example exports one table and compresses both the data and metadata in the output file:
$ expdp dbauser/foo tables=locations directory=datapump
dumpfile=compress.dmp compression=all
If you’re using Oracle Database 10g, then the COMPRESSION parameter only has the METADATA_ONLY and NONE values.
![]() Note The ALL and DATA_ONLY options of the COMPRESS parameter require a license for the Oracle Advanced Compression option.
Note The ALL and DATA_ONLY options of the COMPRESS parameter require a license for the Oracle Advanced Compression option.
New with Oracle Database 12c, you can specify a compression algorithm. The choices are BASIC, LOW, MEDIUM, and HIGH. Here is an example of using MEDIUM compression:
$ expdp mv_maint/foo dumpfile=full.dmp directory=dp_dir full=y
compression=all compression_algorithm=MEDIUM
Using the COMPRESSION_ALGORITHM parameter can be especially useful if you’re running low on disk space or exporting over a network connection (as it reduces the number of bytes that need to be transferred).
![]() Note The COMPRESSION_ALGORITHM parameter requires a license for the Oracle Advanced Compression option.
Note The COMPRESSION_ALGORITHM parameter requires a license for the Oracle Advanced Compression option.
Changing Table Compression Characteristics on Import
Starting with Oracle Database 12c, you can change a table’s compression characteristics when importing the table. This example changes the compression characteristics for all tables imported in the job to ROW STORE COMPRESS ADVANCED. Because the command in this example requires quotation marks, it’s placed in a parameter file, as shown:
userid=mv_maint/foo
dumpfile=inv.dmp
directory=dp_dir
transform=table_compression_clause:"ROW STORE COMPRESS ADVANCED"
Assume that the parameter file is named imp.par. It can now be invoked as follows:
$ impdp parfile=imp.par
All tables included in the import job are created as ROW STORE COMPRESS ADVANCED, and the data are compressed as they’re loaded.
One potential security issue with Data Pump dump files is that anybody with OS access to the output file can search for strings in the file. On Linux/Unix systems, you can do this with the strings command:
$ strings inv.dmp | grep -i secret
Here is the output for this particular dump file:
Secret Data<
top secret data<
corporate secret data<
This command allows you to view the contents of the dump file because the data are in regular text and not encrypted. If you require that the data be secured, you can use Data Pump’s encryption features.
This example uses the ENCRYPTION parameter to secure all data and metadata in the output:
$ expdp mv_maint/foo encryption=all directory=dp_dir dumpfile=inv.dmp
For this command to work, your database must have an encryption wallet in place and open. See the Oracle Advanced Security Administrator’s Guide, available for download from the Technology Network area of the Oracle web site (http://otn.oracle.com), for more details on how to create and open a wallet.
![]() Note The Data Pump ENCRYPTION parameter requires that you use the Enterprise Edition of Oracle Database 11g or higher and also requires a license for the Oracle Advanced Security option.
Note The Data Pump ENCRYPTION parameter requires that you use the Enterprise Edition of Oracle Database 11g or higher and also requires a license for the Oracle Advanced Security option.
The ENCRYPTION parameter takes the following options:
- ALL
- DATA_ONLY
- ENCRYPTED_COLUMNS_ONLY
- METADATA_ONLY
- NONE
The ALL option enables encryption for both data and metadata. The DATA_ONLY option encrypts just the data. The ENCRYPTED_COLUMNS_ONLY option specifies that only columns encrypted in the database are written to the dump file in an encrypted format. The METADATA_ONLY option encrypts just metadata in the export file.
Starting with Oracle Database 12c, you can export a view and later import it as a table. You may want to do this if you need to replicate the data contained in a view to a historical reporting database.
Use the VIEWS_AS_TABLES parameter to export a view into a table structure. This parameter has the following syntax:
VIEWS_AS_TABLES=[schema_name.]view_name[:template_table_name]
Here is an example:
$ expdp mv_maint/foo directory=dp_dir dumpfile=v.dmp
views_as_tables=sales_rockies
The dump file can now be used to import a table named SALES_ROCKIES into a different schema or database.
$ impdp mv_maint/foo directory=dp_dir dumpfile=v.dmp
If you just want to import the table (which was created from a view during the export), you can do so as follows:
$ impdp mv_maint/foo directory=dp_dir dumpfile=v.dmp tables=sales_rockies
The table will have the same columns and data types as per the view definition. The table will additionally contain rows of data that match what would have been selected from the view at the time of the export.
Disabling Logging of Redo on Import
Starting with Oracle Database 12c, you can specify that objects be loaded with nologging of redo. This is achieved via the DISABLE_ARCHIVE_LOGGING parameter:
$ impdp mv_maint/foo directory=dp_dir dumpfile=inv.dmp
transform=disable_archive_logging:Y
While performing the import, the logging attributes for objects are set to NO; after the import the logging attributes are set back to their original values. For operations that Data Pump can perform with direct path (such as inserting into a table), this can reduce the amount of redo generated during an import.
Interactive Command Mode
Data Pump provides an interactive command mode that allows you to monitor the status of a Data Pump job and modify on the fly a number of job characteristics. The interactive command mode is most useful for long-running Data Pump operations. In this mode, you can also stop, restart, or terminate a currently running job. Each of these activities is discussed in the following sections.
Entering Interactive Command Mode
There are two ways to access the interactive command mode prompt:
- Press Ctrl+C in a Data Pump job that you started via expdp or impdp.
- Use the ATTACH parameter to attach to a currently running job.
When you run a Data Pump job from the command line, you’re placed in the command-line mode. You should see output displayed to your terminal as a job progresses. If you want to exit command-line mode, press Ctrl+C. This places you in the interactive command-interface mode. For an export job, the prompt is
Export>
Type in the HELP command to view the export interactive commands available (see Table 13-1):
Table 13-1. Export Interactive Commands
| Command | Description |
|---|---|
| ADD_FILE | Adds files to the export dump set |
| CONTINUE_CLIENT | Continues with interactive client mode |
| EXIT_CLIENT | Exits the client session and returns to the OS prompt; leaves the current job running |
| FILESIZE | Defines file size for any subsequently created dump files |
| HELP | Displays interactive export commands |
| KILL_JOB | Terminates the current job |
| PARALLEL | Increases or decreases the degree of parallelism |
| REUSE_DUMPFILES | Overwrites the dump file if it exists (default is N) |
| START_JOB | Restarts the attached job |
| STATUS | Displays the status of the currently attached job |
| STOP_JOB [=IMMEDIATE] | Stops a job from processing (you can later restart it). Using the IMMEDIATE parameter quickly stops the job, but there may be some incomplete tasks. |
Export> help
Type EXIT to leave interactive command mode:
Export> exit
You should now be at the OS prompt.
You can press Ctrl+C for either an export or an import job. For an import job the interactive command mode prompt is
Import>
To view all commands available, type HELP:
Import> help
The interactive command mode import commands are summarized in Table 13-2.
Table 13-2. Import Interactive Commands
| Command | Description |
|---|---|
| CONTINUE_CLIENT | Continues with interactive logging mode |
| EXIT_CLIENT | Exits the client session and returns to the OS prompt. Leaves the current job running |
| HELP | Displays the available interactive commands |
| KILL_JOB | Terminates the job currently connected to in the client |
| PARALLEL | Increases or decreases the degree of parallelism |
| START_JOB | Restarts a previously stopped job. START_JOB=SKIP_CURRENT restarts the job and skips any operations that were active when the job was stopped |
| STATUS | Specifies the frequency at which the job status is monitored. Default mode is 0; the client reports job status changes whenever available in this mode. |
| STOP_JOB [=IMMEDIATE] | Stops a job from processing (you can later restart it). Using the IMMEDIATE parameter quickly stops the job, but there may be some incomplete tasks. |
Type EXIT to leave the Data Pump status utility:
Import> exit
You should now be at the OS prompt.
One powerful feature of Data Pump is that you can attach to a currently running job and view its progress and status. If you have DBA privileges, you can even attach to a job if you aren’t the owner. You can attach to either an import or an export job via the ATTACH parameter.
Before you attach to a job, you must first determine the Data Pump job name (and owner name, if you’re not the owner of the job). Run the following SQL query to display currently running jobs:
SQL> select owner_name, operation, job_name, state from dba_datapump_jobs;
Here is some sample output:
OWNER_NAME OPERATION       JOB_NAME              STATE
---------- --------------- --------------------  --------------------
MV_MAINT   EXPORT          SYS_EXPORT_SCHEMA_01  EXECUTING
In this example the MV_MAINT user can directly attach to the export job, as shown:
$ expdp mv_maint/foo attach=sys_export_schema_01
If you aren’t the owner of the job, you attach to the job by specifying the owner name and the job name:
$ expdp system/foobar attach=mv_maint.sys_export_schema_01
You should now see the Data Pump command-line prompt:
Export>
Type STATUS to view the status of the currently attached job:
Export> status
Stopping and Restarting a Job
If you have a currently running Data Pump job that you want to temporarily stop, you can do so by first attaching to the interactive command mode. You may want to stop a job to resolve space issues or performance issues and then, after resolving the issues, restart the job. This example attaches to an import job:
$ impdp mv_maint/foo attach=sys_import_table_01
Now, stop the job, using the STOP_JOB parameter:
Import> stop_job
You should see this output:
Are you sure you wish to stop this job ([yes]/no):
Type YES to proceed with stopping the job. You can also specify that the job be stopped immediately:
Import> stop_job=immediate
When you stop a job with the IMMEDIATE option, there may be some incomplete tasks associated with the job. To restart a job, attach to interactive command mode, and issue the START_JOB command:
Import> start_job
If you want to resume logging job output to your terminal, issue the CONTINUE_CLIENT command:
Import> continue_client
Terminating a Data Pump Job
You can instruct Data Pump to permanently kill an export or import job. First, attach to the job in interactive command mode, and then issue the KILL_JOB command:
Import> kill_job
You should be prompted with the following output:
Are you sure you wish to stop this job ([yes]/no):
Type YES to permanently kill the job. Data Pump unceremoniously kills the job and drops the associated status table from the user running the export or import.
When you have long-running Data Pump jobs, you should occasionally check the status of the job to ensure it hasn’t failed become suspended, and so on. There are several ways to monitor the status of Data Pump jobs:
- Screen output
- Data Pump log file
- Querying data dictionary views
- Database alert log
- Querying the status table
- Interactive command mode status
- Using the process status (ps) OS utility
The most obvious way to monitor a job is to view the status that Data Pump displays on the screen as the job is running. If you’ve disconnected from the command mode, then the status is no longer displayed on your screen. In this situation, you must use another technique to monitor a Data Pump job.
By default, Data Pump generates a log file for every job. When you start a Data Pump job, it’s good practice to name a log file that is specific to that job:
$ impdp mv_maint/foo directory=dp_dir dumpfile=archive.dmp logfile=archive.log
This job creates a file, named archive.log, that is placed in the directory referenced in the database object DP_DIR. If you don’t explicitly name a log file, Data Pump import creates one named import.log, and Data Pump export creates one named export.log.
![]() Note The log file contains the same information you see displayed interactively on your screen when running a Data Pump job.
Note The log file contains the same information you see displayed interactively on your screen when running a Data Pump job.
A quick way to determine whether a Data Pump job is running is to check the DBA_DATAPUMP_JOBS view for anything running with a STATE that has an EXECUTING status:
select job_name, operation, job_mode, state
from dba_datapump_jobs;
Here is some sample output:
JOB_NAME                  OPERATION            JOB_MODE   STATE
------------------------- -------------------- ---------- ---------------
SYS_IMPORT_TABLE_04       IMPORT               TABLE      EXECUTING
SYS_IMPORT_FULL_02        IMPORT               FULL       NOT RUNNING
You can also query the DBA_DATAPUMP_SESSIONS view for session information via the following query:
select sid, serial#, username, process, program
from v$session s,
     dba_datapump_sessions d
where s.saddr = d.saddr;
Here is some sample output, showing that several Data Pump sessions are in use:
      SID    SERIAL#  USERNAME             PROCESS         PROGRAM
---------- ---------- -------------------- --------------- ----------------------
      1049       6451 STAGING              11306           oracle@xengdb (DM00)
      1058      33126 STAGING              11338           oracle@xengdb (DW01)
      1048      50508 STAGING              11396           oracle@xengdb (DW02)
If a job is taking much longer than you expected, look in the database alert log for any messages similar to this:
statement in resumable session 'SYS_IMPORT_SCHEMA_02.1' was suspended due to
ORA-01652: unable to extend temp segment by 64 in tablespace REG_TBSP_3
This message indicates that a Data Pump import job is suspended and is waiting for space to be added to the REG_TBSP_3 tablespace. After you add space to the tablespace, the Data Pump job automatically resumes processing. By default a Data Pump job waits 2 hours for space to be added.
![]() Note In addition to writing to the alert log, for each Data Pump job, Oracle creates a trace file in the ADR_HOME/trace directory. This file contains information such as the session ID and when the job started. The trace file is named with the following format: <SID>_dm00_<process_ID>.trc.
Note In addition to writing to the alert log, for each Data Pump job, Oracle creates a trace file in the ADR_HOME/trace directory. This file contains information such as the session ID and when the job started. The trace file is named with the following format: <SID>_dm00_<process_ID>.trc.
Every time you start a Data Pump job, a status table is automatically created in the account of the user running the job. For export jobs the table name depends on what type of export job you’re running. The table is named with the format SYS_<OPERATION>_<JOB_MODE>_NN, where OPERATION is either EXPORT or IMPORT. JOB_MODE can be FULL, SCHEMA, TABLE, TABLESPACE, and so on.
Here is an example of querying the status table for particulars about a currently running job:
select name, object_name, total_bytes/1024/1024 t_m_bytes
,job_mode
,state ,to_char(last_update, 'dd-mon-yy hh24:mi')
from SYS_EXPORT_TABLE_01
where state='EXECUTING';
Interactive Command Mode Status
A quick way to verify that Data Pump is running a job is to attach in interactive command mode and issue a STATUS command; for example,
$ impdp mv_maint/foo attach=SYS_IMPORT_TABLE_04
Import> status
Here is some sample output:
Job: SYS_IMPORT_TABLE_04
Operation: IMPORT
Mode: TABLE
State: EXECUTING
Bytes Processed: 0
Current Parallelism: 4
You should see a state of EXECUTING, which indicates that the job is actively running. Other items to inspect in the output are the number of objects and bytes processed. Those numbers should increase as the job progresses.
You can use the ps OS utility to display jobs running on the server. For example, you can search for master and worker processes, as follows:
$ ps -ef | egrep 'ora_dm|ora_dw' | grep -v egrep
Here is some sample output:
oracle 29871   717   5 08:26:39 ?          11:42 ora_dw01_STAGE
oracle 29848   717   0 08:26:33 ?           0:08 ora_dm00_STAGE
oracle 29979   717   0 08:27:09 ?           0:04 ora_dw02_STAGE
If you run this command multiple times, you should see the processing time (seventh column) increase for one or more of the current jobs. This is a good indicator that Data Pump is still executing and doing work.
This feature is covered last in this chapter, but it’s quite useful, especially if you’re an old-school DBA. As of Oracle Database 11g Release 2, Data Pump allows you to use the old exp and imp utility parameters when invoking a Data Pump job. This is known as legacy mode, and it’s a great feature.
You don’t have to do anything special to use legacy mode Data Pump. As soon as Data Pump detects a legacy parameter, it attempts to process the parameter as if it were from the old exp/imp utilities. You can even mix and match old legacy parameters with newer parameters; for example,
$ expdp mv_maint/foo consistent=y tables=inv directory=dp_dir
In the output, Data Pump indicates that it has encountered legacy parameters and gives you the syntax for what it translated the legacy parameter to in Data Pump syntax. For the previous command, here is the output from the Data Pump session that shows what the consistent=y parameter was translated into:
Legacy Mode Parameter: "consistent=TRUE" Location: Command Line,
Replaced with:
"flashback_time=TO_TIMESTAMP('2013-01-25 19:31:54', 'YYYY-MM-DD HH24:MI:SS')"
This feature can be extremely handy, particularly if you’re really familiar with the old legacy syntax and wonder how it’s implemented in Data Pump.
I recommend that you try to use the newer Data Pump syntax whenever possible. However, you may run into situations in which you have legacy exp/imp jobs and want to continue running the scripts as they are, without modification.
![]() Note When Data Pump runs in legacy mode, it doesn’t create an old exp-/imp-formatted file. Data Pump always creates a Data Pump file and can only read Data Pump files.
Note When Data Pump runs in legacy mode, it doesn’t create an old exp-/imp-formatted file. Data Pump always creates a Data Pump file and can only read Data Pump files.
Data Pump Mapping to the exp Utility
If you’re used to the old exp/imp parameters, you may initially be confused by some of the syntax semantics. However, after you use Data Pump, you’ll find the newer syntax fairly easy to remember and use. Table 13-3 describes how the legacy export parameters map to Data Pump export.
In many instances, there isn’t a one-to-one mapping. Often, Data Pump automatically provides features that used to require a parameter in the legacy utilities. For example, whereas you used to have to specify DIRECT=Y to get a direct path export, Data Pump automatically uses direct path whenever possible.
Table 13-3. Mapping of Old Export Parameters to Data Pump
| Original exp Parameter | Similar Data Pump expdp Parameter |
|---|---|
| BUFFER | N/A |
| COMPRESS | TRANSFORM |
| CONSISTENT | FLASHBACK_SCN or FLASHBACK_TIME |
| CONSTRAINTS | EXCLUDE=CONSTRAINTS |
| DIRECT | N/A; Data Pump automatically uses direct path whenever possible. |
| FEEDBACK | STATUS in client output |
| FILE | Database directory object and DUMPFILE |
| GRANTS | EXCLUDE=GRANT |
| INDEXES | INCLUDE=INDEXES, INCLUDE=INDEXES |
| LOG | Database directory object and LOGFILE |
| OBJECT_CONSISTENT | N/A |
| OWNER | SCHEMAS |
| RECORDLENGTH | N/A |
| RESUMABLE | N/A; Data Pump automatically provides functionality. |
| RESUMABLE_NAME | N/A |
| RESUMABLE_TIMEOUT | N/A |
| ROWS | CONTENT=ALL |
| STATISTICS | N/A; Data Pump export always exports statistics for tables. |
| TABLESPACES | TRANSPORT_TABLESPACES |
| TRANSPORT_TABLESPACE | TRANSPORT_TABLESPACES |
| TRIGGERS | EXCLUDE=TRIGGER |
| TTS_FULL_CHECK | TRANSPORT_FULL_CHECK |
| VOLSIZE | N/A; Data Pump doesn’t support tape devices. |
Data Pump Mapping to the imp Utility
As with Data Pump export, Data Pump import often doesn’t have a one-to-one mapping of the legacy utility parameter. Data Pump import automatically provides many features of the old imp utility. For example, COMMIT=Y isn’t required because Data Pump import automatically commits after each table is imported. Table 13-4 describes how the legacy import parameters map to Data Pump import.
Table 13-4. Mapping of Old Import Parameters to Data Pump
| Original imp Parameter | Similar Data Pump impdp Parameter |
|---|---|
| BUFFER | N/A |
| CHARSET | N/A |
| COMMIT | N/A; Data Pump import automatically commits after each table is exported. |
| COMPILE | N/A; Data Pump import compiles procedures after they’re created. |
| CONSTRAINTS | EXCLUDE=CONSTRAINT |
| DATAFILES | TRANSPORT_DATAFILES |
| DESTROY | REUSE_DATAFILES=y |
| FEEDBACK | STATUS in client output |
| FILE | Database directory object and DUMPFILE |
| FILESIZE | N/A |
| FROMUSER | REMAP_SCHEMA |
| GRANTS | EXCLUDE=OBJECT_GRANT |
| IGNORE | TABLE_EXISTS_ACTION, with APPEND, REPLACE, SKIP, or TRUNCATE |
| INDEXES | EXCLUDE=INDEXES |
| INDEXFILE | SQLFILE |
| LOG | Database directory object and LOGFILE |
| RECORDLENGTH | N/A |
| RESUMABLE | N/A; this functionality is automatically provided. |
| RESUMABLE_NAME | N/A |
| RESUMABLE_TIMEOUT | N/A |
| ROWS=N | CONTENT, with METADATA_ONLY or ALL |
| SHOW | SQLFILE |
| STATISTICS | N/A |
| STREAMS_CONFIGURATION | N/A |
| STREAMS_INSTANTIATION | N/A |
| TABLESPACES | TRANSPORT_TABLESPACES |
| TOID_NOVALIDATE | N/A |
| TOUSER | REMAP_SCHEMA |
| TRANSPORT_TABLESPACE | TRANSPORT_TABLESPACES |
| TTS_OWNERS | N/A |
| VOLSIZE | N/A; Data Pump doesn’t support tape devices. |
Summary
Data Pump is an extremely powerful and feature-rich tool. If you haven’t used Data Pump much, then I recommend that you take some time to reread this chapter and work through the examples. This tool greatly simplifies tasks such as moving users and data from one environment to another. You can export and import subsets of users, filter and remap data via SQL and PL/SQL, rename users and tablespaces, compress, encrypt, and parallelize, all with one command. It really is that powerful.
DBAs sometimes stick with the old exp/imp utilities because that’s what they’re familiar with (I’m occasionally guilty of this). If you’re running Oracle Database 11g Release 2, you can use the old exp/imp parameters and options directly from the command line. Data Pump translates these parameters on the fly to Data Pump–specific syntax. This feature nicely facilitates the migration from the old to the new. For reference, I’ve also provided a mapping of the old exp/imp syntax and how it relates to Data Pump commands.
Although Data Pump is an excellent tool for moving database objects and data from one environment to another, sometimes you need to transfer large quantities of data to and from OS flat files. You use external tables to achieve this task. This is the topic of the next chapter in this book.