![]()
Materialized Views
Materialized view (MV) technology was introduced in Oracle Database version 7. This feature was originally called snapshots, and you can still see this nomenclature reflected in some data dictionary structures. An MV allows you to execute an SQL query at a point in time and store the result set in a table (either locally or in a remote database). After the MV is initially populated, you can later rerun the MV query and store the fresh results in the underlying table. There are two main uses for MVs:
- Replicating of data to offload query workloads to separate reporting databases
- Improving performance of queries by periodically computing and storing the results of complex aggregations of data, which lets users query point-in-time results (of the complex aggregations)
The MV can be a query based on tables, views, and other MVs. The base tables are often referred to as master tables. When you create an MV, Oracle internally creates a table (with the same name as the MV) as well as an MV object (visible in DBA/ALL/USER_OBJECTS).
Understanding MVs
A good way of introducing MVs is to walk through how you’d manually perform a task if the MV feature weren’t available. Suppose you have a table that stores sales data:
create table sales(
 sales_id  number
,sales_amt number
,region_id number
,sales_dtt date
,constraint sales_pk primary key(sales_id));
--
insert into sales values(1,101,10,sysdate-10);
insert into sales values(2,511,20,sysdate-20);
insert into sales values(3,11,30,sysdate-30);
commit;
And, you have a query that reports on historical daily sales:
select
sum(sales_amt) sales_amt
,sales_dtt
from sales
group by sales_dtt;
You observe from a database performance report that this query is executed thousands of times a day and is consuming a large amount of database resources. The business users use the report to display historical sales information and therefore don’t need the query to be reexecuted each time they run a report. To reduce the amount of resources the query is consuming, you decide to create a table and populate it as follows:
create table sales_daily as
select
 sum(sales_amt) sales_amt
,sales_dtt
from sales
group by sales_dtt;
After the table is created, you put in a daily process to delete from it and completely refresh it:
-- Step 1 delete from daily aggregated sales data:
delete from sales_daily;
--
-- Step 2 repopulate table with a snapshot of aggregated sales table:
insert into sales_daily
select
 sum(sales_amt) sales_amt
,sales_dtt
from sales
group by sales_dtt;
You inform the users that they can have subsecond query results by selecting from SALES_DAILY (instead of running the query that directly selects and aggregates from the master SALES table):
SQL> select * from sales_daily;
The prior procedure roughly describes an MV complete refresh process. Oracle’s MV technology automates and greatly enhances this process. This chapter covers the procedures for implementing both basic and complex MV features. After reading this chapter and working through the examples, you should be able to create MVs to replicate and aggregate data in a wide variety of situations.
Before delving into the details of creating MVs, it’s useful to cover basic terminology and helpful data dictionary views related to MVs. The next two sections briefly describe the various MV features and the many data dictionary views that contain MV metadata.
![]() Note This chapter doesn’t cover topics such as multimaster replication and updatable MVs. See the Oracle Advanced Replication Guide, which is available for download from the Technology Network area of the Oracle web site (http://otn.oracle.com), for more details on those topics.
Note This chapter doesn’t cover topics such as multimaster replication and updatable MVs. See the Oracle Advanced Replication Guide, which is available for download from the Technology Network area of the Oracle web site (http://otn.oracle.com), for more details on those topics.
A great many terms relate to refreshing MVs. You should be familiar with these terms before delving into how to implement the features. Table 15-1 defines the various terms relevant to MVs.
Table 15-1. MV Terminology
| Term | Meaning |
|---|---|
| Materialized view (MV) | Database object used for replicating data and improving query performance |
| MV SQL statement | SQL query that defines what data are stored in the underlying MV base table |
| MV underlying table | Database table that has the same name as the MV and that stores the result of the MV SQL query |
| Master (base) table | Table that an MV references in its FROM clause of the MV SQL statement |
| Complete refresh | Process in which an MV is deleted from and completely refreshed with an MV SQL statement |
| Fast refresh | Process during which only DML changes (against base table) that have occurred since the last refresh are applied to an MV |
| MV log | Database object that tracks DML changes to the MV base table. An MV log is required for fast refreshes. It can be based on the primary key, ROWID, or object ID. |
| Simple MV | MV based on a simple query that can be fast refreshed |
| Complex MV | MV based on a complex query that isn’t eligible for fast refresh |
| Build mode | Mode that specifies whether the MV should be immediately populated or deferred |
| Refresh mode | Mode that specifies whether the MV should be refreshed on demand, on commit, or never |
| Refresh method | Option that specifies whether the MV refresh should be complete or fast |
| Query rewrite | Feature that allows the optimizer to choose to use MVs (instead of base tables) to fulfill the requirements of a query (even though the query doesn’t directly reference the MVs) |
| Local MV | MV that resides in the same database as the base table(s) |
| Remote MV | MV that resides in a database separate from that of the base table(s) |
| Refresh group | Set of MVs refreshed at the same consistent transactional point |
Refer back to Table 15-1 as you read the rest of this chapter. These terms and concepts are explained and expounded on in subsequent sections.
Referencing Useful Views
When you’re working with MVs, sometimes it’s hard to remember which data dictionary view to query under a particular circumstance. A wide variety of data dictionary views are available. Table 15-2 contains a description of the MV-related data dictionary views. Examples of using these views are shown throughout this chapter where appropriate. These views are invaluable for troubleshooting, diagnosing issues, and understanding your MV environment.
Table 15-2. MV Data Dictionary View Definitions
| Data Dictionary View | Meaning |
|---|---|
| DBA/ALL/USER_MVIEWS | Information about MVs, such as owner, base query, last refresh time, and so on |
| DBA/ALL/USER_MVIEW_REFRESH_TIMES | MV last refresh times, MV names, master table, and master owner |
| DBA/ALL/USER_REGISTERED_MVIEWS | All registered MVs; helps identify which MVs are using which MV logs |
| DBA/ALL/USER_MVIEW_LOGS | MV log information |
| DBA/ALL/USER_BASE_TABLE_MVIEWS | Base table names and last refresh dates for tables that have MV logs |
| DBA/ALL/USER_MVIEW_AGGREGATES | Aggregate functions that appear in SELECT clauses for MVs |
| DBA/ALL/USER_MVIEW_ANALYSIS | Information about MVs. Oracle recommends that you use DBA/ALL/USER_MVIEWS instead of these views. |
| DBA/ALL/USER_MVIEW_COMMENTS | Any comments associated with MVs |
| DBA/ALL/USER_MVIEW_DETAIL_PARTITION | Partition and freshness information |
| DBA/ALL/USER_MVIEW_DETAIL_SUBPARTITION | Subpartition and freshness information |
| DBA/ALL/USER_MVIEW_DETAIL_RELATIONS | Local tables and MVs that an MV is dependent on |
| DBA/ALL/USER_MVIEW_JOINS | Joins between two columns in the WHERE clause of an MV definition |
| DBA/ALL/USER_MVIEW_KEYS | Columns or expressions in the SELECT clause of an MV definition |
| DBA/ALL/USER_TUNE_MVIEW | Result of executing the DBMS_ADVISOR.TUNE_MVIEW procedure |
| V$MVREFRESH | Information about MVs currently being refreshed |
| DBA/ALL/USER_REFRESH | Details about MV refresh groups |
| DBA_RGROUP | Information about MV refresh groups |
| DBA_RCHILD | Children in an MV refresh group |
Creating Basic Materialized Views
This section covers how to create an MV. The two most common configurations used are as follows:
- Creating complete refresh MVs that are refreshed on demand
- Creating fast refresh MVs that are refreshed on demand
It’s important to understand these basic configurations. They lay the foundation for everything else you do with the MV feature. Therefore, this section starts with these basic configurations. Later, the section covers more advanced configurations.
Creating a Complete Refreshable MV
This section explains how to set up an MV that is periodically completely refreshed, which is about the simplest example possible. Complete refreshes are appropriate for MVs that have base tables in which significant portions of the rows change from one refresh interval to the next. Complete refreshes are also required in situations in which a fast refresh isn’t possible because of restrictions imposed by Oracle (more on this later in this section; see also the section “Manually Refreshing MVs from SQL *Plus,” later in this chapter).
![]() Note To create an MV, you need both the CREATE MATERIALIZED VIEW system privilege and the CREATE TABLE system privilege. If a user creating MVs doesn’t own the base table, then SELECT access on the base table is also required.
Note To create an MV, you need both the CREATE MATERIALIZED VIEW system privilege and the CREATE TABLE system privilege. If a user creating MVs doesn’t own the base table, then SELECT access on the base table is also required.
The MV example is this section is based on the previously created SALES table. Suppose you wanted to create an MV that reports on daily sales. Use the CREATE MATERIALIZED VIEW...AS SELECT statement to do this. The following statement names the MV, specifies its attributes, and defines the SQL query on which the MV is based:
create materialized view sales_daily_mv
segment creation immediate
refresh
complete
on demand
as
select
 sum(sales_amt) sales_amt
,trunc(sales_dtt) sales_dtt
from sales
group by trunc(sales_dtt);
The SEGMENT CREATION IMMEDIATE clause is available with Oracle 11g Release 2 and higher. This clause instructs Oracle to create the segment and allocate an extent when you create the MV. This was the behavior in previous versions of Oracle. If you don’t want immediate segment creation, use the SEGMENT CREATION DEFERRED clause. If the newly created MV contains any rows, then segments are created, and extents are allocated, regardless of whether you use SEGMENT CREATION DEFERRED.
Let’s look at the USER_MVIEWS data dictionary to verify that the MV was created as expected. Run this query:
select mview_name, refresh_method, refresh_mode
,build_mode, fast_refreshable
from user_mviews
where mview_name = 'SALES_DAILY_MV';
Here is the output for this MV:
MVIEW_NAME      REFRESH_ REFRES BUILD_MOD FAST_REFRESHABLE
--------------- -------- ------ --------- ------------------
SALES_DAILY_MV  COMPLETE DEMAND IMMEDIATE DIRLOAD_LIMITEDDML
It’s also informative to inspect the USER_OBJECTS and USER_SEGMENTS views to see what has been created. When you query USER_OBJECTS, note that an MV and table object have been created:
select object_name, object_type
from user_objects
where object_name like 'SALES_DAILY_MV'
order by object_name;
Here is the corresponding output:
OBJECT_NAME          OBJECT_TYPE
-------------------- -----------------------
SALES_DAILY_MV       MATERIALIZED VIEW
SALES_DAILY_MV       TABLE
The MV is a logical container that stores data in a regular database table. Querying the USER_SEGMENTS view shows the base table, its primary key index, and the table that stores data returned by the MV query:
select segment_name, segment_type
from user_segments
where segment_name like '%SALES%'
order by segment_name;
Here is the output for this example:
SEGMENT_NAME              SEGMENT_TYPE
------------------------- ------------------
I_SNAP$_SALES_DAILY_MV    INDEX
SALES                     TABLE
SALES_DAILY_MV            TABLE
SALES_PK                  INDEX
In the prior output the I_SNAP$_SALES_DAILY_MV is a unique index associated with the MV that Oracle automatically creates to help improve refresh performance. Recall that the MV feature was originally called snapshots, and so sometimes you’ll find objects with names derived from the early days of the feature.
Finally, let’s look at how to refresh the MV. Here are data contained in the MV:
SQL> select sales_amt, to_char(sales_dtt,'dd-mon-yyyy') from sales_daily_mv;
Here is the output:
SALES_AMT TO_CHAR(SALES_DTT,'D
---------- --------------------
       101 20-jan-2013
       511 10-jan-2013
        11 31-dec-2012
Next, insert some additional data into the base SALES table:
insert into sales values(4,99,200,sysdate);
insert into sales values(5,127,300,sysdate);
commit;
Now, you attempt to initiate a fast refresh of the MV, using the REFRESH procedure of the DBMS_MVIEW package. This example passes two parameters to the REFRESH procedure: the name and the refresh method. The name is SALES_DAILY_MV, and the parameter is F (for fast):
SQL> exec dbms_mview.refresh('SALES_DAILY_MV','F'),
Because this MV wasn’t created in conjunction with an MV log, a fast refresh isn’t possible. The following error is thrown:
ORA-23413: table "MV_MAINT"."SALES" does not have a materialized view log
Instead, a complete refresh is initiated. The parameter passed in is C (for complete):
SQL> exec dbms_mview.refresh('SALES_DAILY_MV','C'),
The output indicates success:
PL/SQL procedure successfully completed.
Now, when you select from the MV, it returns data showing that more information has been added:
SQL> select sales_amt, to_char(sales_dtt,'dd-mon-yyyy') from sales_daily_mv;
Here is the output:
 SALES_AMT TO_CHAR(SALES_DTT,'D
---------- --------------------
       101 20-jan-2013
       226 30-jan-2013
       511 10-jan-2013
        11 31-dec-2012
Figure 15-1 illustrates the architectural components involved with a complete refresh. If you’re new to MVs, pause for a few minutes here, and make sure you understand all the components.
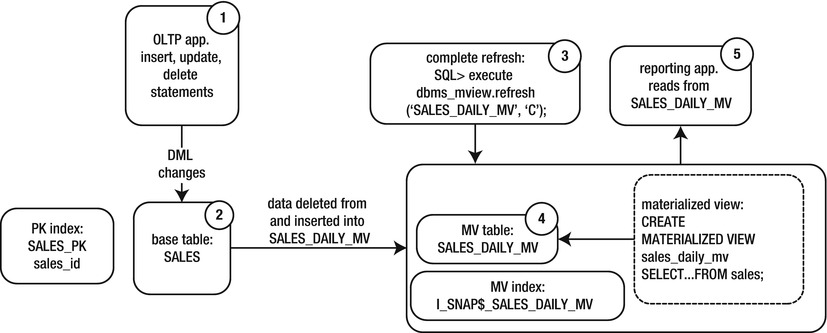
Figure 15-1. Architectural components of a complete refresh MV
This diagram illustrates that a complete refresh isn’t difficult to understand. The numbers show the flow of data in the complete refresh process:
- Users/applications create transactions.
- Data are committed in the base table.
- A complete refresh is manually initiated with the DBMS_MVIEW package.
- Data in the underlying MV are deleted and completely refreshed with the contents of the base table.
- Users can query data from the MV, which contains a point-in-time snapshot of the base table’s data.
In the next section, a more complicated example shows you how to set up a fast refreshable MV.
Creating a Fast Refreshable MV
When you create a fast refreshable MV, it first populates the MV table with the entire result set of the MV query. After the initial result set is in place, only data modified (in the base table) since the last refresh need to be applied to the MV. In other words, any updates, inserts, or deletes from the master table that have occurred since the last refresh are copied over. This feature is appropriate when you have a small number of changes to a base table over a period of time compared with the total number of rows in the table.
Here are the steps for implementing a fast refreshable MV:
- Create a base table (if it hasn’t already been created).
- Create an MV log on the base table.
- Create an MV as fast refreshable.
This example uses the previously created SALES table. A fast refreshable MV requires an MV log on the base table. When a fast refresh occurs, the MV log must have a unique way to identify which records have been modified and thus need to be refreshed. You can do this with two different approaches. One method is to specify the PRIMARY KEY clause when you create the MV log; the other is to specify the ROWID clause. If the underlying base table has a primary key, then use the primary key–based MV log. If the underlying base table has no primary key, then you have to create the MV log, using ROWID. In most cases, you’ll probably have a primary key defined for every base table. However, the reality is that some systems are poorly designed or have some rare reason for a table not to have a primary key.
In this example, a primary key is defined on the base table, so you create the MV log with the PRIMARY KEY clause:
SQL> create materialized view log on sales with primary key;
If there was no primary key defined on the base table, this error is thrown when attempting to create the MV log:
ORA-12014: table does not contain a primary key constraint
If the base table has no primary key, and you don’t have the option of adding one, you must specify ROWID when you create the MV log:
SQL> create materialized view log on sales with rowid;
When you use a primary key–based fast refreshable MV, the primary key column(s) of the base table must be part of the fast refreshable MV SELECT statement. Also, when creating a fast refreshable MV, there are certain restrictions on what can be aggregated (see the section “Creating a Fast Refreshable MV Based on a Complex Query,” later in the chapter). For this example there will be no aggregated columns in the MV. This type of MV would typically be used to replicate data from one environment to another:
create materialized view sales_rep_mv
segment creation immediate
refresh
  with primary key
  fast
  on demand
as
select
 sales_id
,sales_amt
,trunc(sales_dtt) sales_dtt
from sales;
At this point, it’s useful to inspect the objects that are associated with the MV. The following query selects from USER_OBJECTS:
select object_name, object_type
from user_objects
where object_name like '%SALES%'
order by object_name;
Here are the objects that have been created:
OBJECT_NAME          OBJECT_TYPE
-------------------- -----------------------
MLOG$_SALES          TABLE
RUPD$_SALES          TABLE
SALES                TABLE
SALES_PK             INDEX
SALES_PK1            INDEX
SALES_REP_MV         TABLE
SALES_REP_MV         MATERIALIZED VIEW
A few objects in the previous output require some explanation:
- MLOG$_SALES
- RUPD$_SALES
- SALES_PK1
First, when an MV log is created, a corresponding table is also created that stores the rows in the base table that changed and how they changed (insert, update, or delete). The MV log table name follows the format MLOG$_<base table name>.
A table is also created with the format RUPD$_<base table name>. Oracle automatically creates this RUPD$ table when you create a fast refreshable MV, using a primary key. The table is there to support the updatable MV feature. You don’t have to worry about this table unless you’re dealing with updatable MVs (see the Oracle Advanced Replication Guide for more details on updatable MVs). If you’re not using the updatable MV feature, then you can ignore the RUPD$ table.
Furthermore, Oracle creates an index with the format <base table name>_PK1. This index is automatically created for primary key–based MVs and is based on the primary key column(s) of the base table. If this is a ROWID instead of a primary key, then the index name has the format I_SNAP$_<table_name> and is based on the ROWID. If you don’t explicitly name the primary key index on the base table, then Oracle gives the MV table primary key index a system-generated name, such as SYS_C008780.
Now that you understand the underlying architectural components, let’s look at the data in the MV:
select sales_amt, to_char(sales_dtt,'dd-mon-yyyy')
from sales_rep_mv
order by 2;
Here is the output:
SALES_AMT TO_CHAR(SALES_DTT,'D
---------- --------------------
       511 10-jan-2013
       101 20-jan-2013
       127 30-jan-2013
        99 30-jan-2013
        11 31-dec-2012
Let’s add two records to the base SALES table:
insert into sales values(6,99,20,sysdate-6);
insert into sales values(7,127,30,sysdate-7);
commit;
At this point, it’s instructional to inspect the M$LOG table. You should see two records that identify how the data in the SALES table have changed:
SQL> select count(*) from mlog$_sales;
There are two records:
  COUNT(*)
----------
         2
Next, let’s refresh the MV. This MV is fast refreshable, so you call the REFRESH procedure of the DBMS_MVIEW package with the F (for fast) parameter:
SQL> exec dbms_mview.refresh('SALES_REP_MV','F'),
A quick inspection of the MV shows two new records:
select sales_amt, to_char(sales_dtt,'dd-mon-yyyy')
from sales_rep_mv
order by 2;
Here is some sample output:
SALES_AMT TO_CHAR(SALES_DTT,'D
---------- --------------------
       511 10-jan-2013
       101 20-jan-2013
       127 23-jan-2013
        99 24-jan-2013
       127 30-jan-2013
        99 30-jan-2013
        11 31-dec-2012
Additionally, the count of the MLOG$ has dropped to zero. After the MV refresh is complete, those records are no longer required:
SQL> select count(*) from mlog$_sales;
Here is the output:
  COUNT(*)
----------
         0
You can verify the last method whereby an MV was refreshed by querying the USER_MVIEWS view:
select mview_name, last_refresh_type, last_refresh_date
from user_mviews
order by 1,3;
Here is some sample output:
MVIEW_NAME                LAST_REF LAST_REFR
------------------------- -------- ---------
SALES_REP_MV              FAST     30-JAN-13
Figure 15-2 illustrates the architectural components involved with a fast refresh. The numbers in the boxes represent the sequential flow of the fast refresh process. If you’re new to MVs, pause for a few minutes here, and make sure you understand all the components.
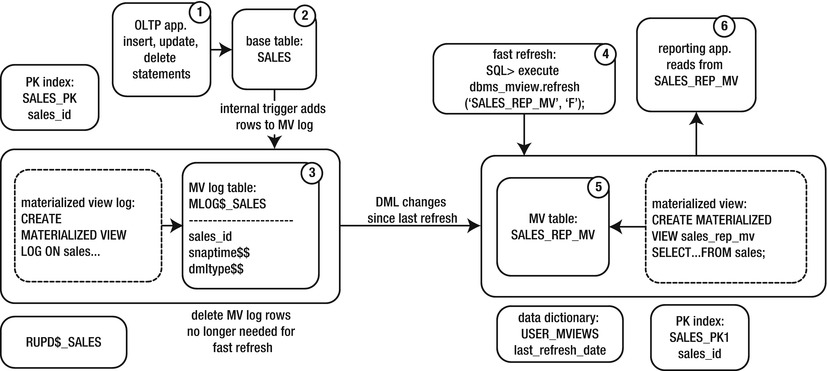
Figure 15-2. Architectural components of a fast refreshable MV
The numbers in the diagram describe the flow of data for a fast refreshable MV:
- Users create transactions.
- Data are committed in the base table.
- An internal trigger on the base table populates the MV log table.
- A fast refresh is initiated via the DBMS_MVIEW package.
- DML changes that have been created since the last refresh are applied to the MV. Rows no longer needed by the MV are deleted from the MV log.
- Users can query data from the MV, which contains a point-in-time snapshot of the base table’s data.
When you have a good understanding of the architecture of a fast refresh, you won’t have difficulty learning advanced MV concepts. If you’re new to MVs, it’s important to realize that an MV’s data are stored in a regular database table. This will help you understand architecturally what is and is not possible. For the most part, because the MV and MV log are based on tables, most features available with a regular database table can also be applied to the MV table and MV log table. For instance, the following Oracle features are readily applied to MVs:
- Storage and tablespace placement
- Indexing
- Partitioning
- Compression
- Encryption
- Logging
- Parallelism
The next section shows examples of how to create MVs with various features.
Going Beyond the Basics
Numerous MV features are available. Many are related to attributes that you can apply to any table, such as storage, indexing, compression, and encryption. Other features are related to the type of MV created and how it’s refreshed. These features are described in the next several sections.
Creating MVs and Specifying Tablespace for MVs and Indexes
Every MV has an underlying table associated with it. Additionally, depending on the type of MV, an index may be automatically created. When you create an MV, you can specify the tablespace and storage characteristics for both the underlying table and index. The next example shows how to specify the tablespace to be used for the MV table and the index:
create materialized view sales_mv
tablespace users
using index tablespace users
refresh with primary key
  fast on demand
as
select sales_id ,sales_amt, sales_dtt
from sales;
You can also specify storage characteristics. For example, if you know that you’re loading data into MVs that are based on tables that are rarely updated (and thus, the MV is rarely updated), it’s appropriate to set PCTUSED to a high value, such as 95; for example,
create materialized view sales_mv
pctused 95
pctfree 5
tablespace users
using index tablespace users
refresh with primary key
  fast on demand
as
select sales_id ,sales_amt, sales_dtt
from sales;
An MV stores its data in a regular database table. Therefore, you can create indexes on the underlying table (just as you can for any other table). In general, follow the same guidelines for creating an index on an MV table as you would a regular table (see Chapter 8 for more details on creating indexes). Keep in mind that although indexes can significantly improve query performance, overhead is associated with maintaining the index for any inserts, updates, and deletes. Indexes also consume disk space.
Listed next is an example of creating an index based on a column in an MV. The syntax is the same as for creating an index on a regular table:
SQL> create index sales_mv_idx1 on sales_mv(sales_dtt) tablespace users;
You can display the indexes created for an MV by querying the USER_INDEXES view:
select a.table_name, a.index_name
from user_indexes a
    ,user_mviews  b
where a.table_name = b.mview_name;
![]() Note If you create, using the WITH PRIMARY KEY clause, a simple MV that selects from a base table that has a primary key, Oracle automatically creates an index on the corresponding primary key columns in the MV. If you create, using the WITH ROWID clause, a simple MV that selects from a base table that has a primary key, Oracle automatically creates an index named I_SNAP$_<table_name> on a hidden column named M_ROW$$.
Note If you create, using the WITH PRIMARY KEY clause, a simple MV that selects from a base table that has a primary key, Oracle automatically creates an index on the corresponding primary key columns in the MV. If you create, using the WITH ROWID clause, a simple MV that selects from a base table that has a primary key, Oracle automatically creates an index named I_SNAP$_<table_name> on a hidden column named M_ROW$$.
You can partition an MV table like any other table in the database. If you work with large MVs, you may want to consider partitioning to better manage and maintain a large table. Use the PARTITION clause when you create the MV. This example builds an MV that is partitioned by hash on SALES_ID:
create materialized view sales_mv
partition by hash (sales_id)
partitions 4
refresh on demand complete with rowid
as
select sales_id, sales_amt, region_id, sales_dtt
from sales;
The result set from the query is stored in a partitioned table. You can view the partition details for this table in USER_TAB_PARTITIONS and USER_PART_TABLES (just like any other partitioned table in your database). See Chapter 12 for more details on partitioning strategies and maintenance.
As mentioned earlier, when you create an MV, an underlying table is created to store the data. Because this table is a regular database table, you can implement features such as compression; for example,
create materialized view sales_mv
compress
as
select sales_id, sales_amt
from sales;
You can confirm the compression details with the following query:
select table_name, compression, compress_for
from user_tables
where table_name='SALES_MV';
Here is the output:
TABLE_NAME                     COMPRESS COMPRESS_FOR
------------------------------ -------- ------------
SALES_MV                         ENABLED  BASIC
![]() Note Basic table compression doesn’t require an extra license from Oracle, whereas ROW STORE COMPRESS ADVANCED compression (prior to 12c this was enabled via COMPRESS FOR OLTP) calls for the Advanced Compression option, which does require an extra license from Oracle. See Oracle Database Licensing Information, available from the Technology Network area of the Oracle Web site (http://otn.oracle.com), for details.
Note Basic table compression doesn’t require an extra license from Oracle, whereas ROW STORE COMPRESS ADVANCED compression (prior to 12c this was enabled via COMPRESS FOR OLTP) calls for the Advanced Compression option, which does require an extra license from Oracle. See Oracle Database Licensing Information, available from the Technology Network area of the Oracle Web site (http://otn.oracle.com), for details.
As mentioned earlier, when you create an MV, an underlying table is created to store the data. Because this table is a regular database table, you can implement features such as encryption of columns; for example,
create materialized view sales_mv
(sales_id   encrypt no salt
,sales_amt  encrypt)
as
select
 sales_id
,sales_amt
from sales;
For the previous statement to work, you must create and open a security wallet for your database. This feature requires the Advanced Security option from Oracle.
You can verify that encryption is in place by describing the MV:
SQL> desc sales_mv
Name                        Null?    Type
 ----------------------------------- ----------------------------
 SALES_ID                   NOT NULL NUMBER ENCRYPT
 SALES_AMT                           NUMBER ENCRYPT
ENABLING AN ORACLE WALLET
An Oracle Wallet is the mechanism Oracle uses to enable encryption. The wallet is an OS file that contains encryption keys. The wallet is enabled via the following steps:
- Modify the SQLNET.ORA file to contain the location of the wallet:
ENCRYPTION_WALLET_LOCATION=
(SOURCE=(METHOD=FILE) (METHOD_DATA=
(DIRECTORY=/ora01/app/oracle/product/12.1.0.1/db_1/network/admin)))
- Create the wallet file (ewallet.p12) with the ALTER SYSTEM command:
SQL> alter system set encryption key identified by foo;
- Enable encryption:
SQL> alter system set encryption wallet open identified by foo;
See the Oracle Advanced Security Administrator’s Guide, which can be freely downloaded from the Technology Network area of the Oracle web site (http://otn.oracle.com), for full details on implementing encryption.
Building an MV on a Prebuilt Table
In data warehouse environments, sometimes you need to create a table, populate it with large quantities of data, and then transform it into an MV. Or, you may be replicating a large table and find that it’s more efficient to initially populate the remote MV by prebuilding the table with data, using Data Pump. Listed next are the steps for building an MV on a prebuilt table:
- Create a table.
- Populate it with data.
- Create an MV on the table created in step 1.
Here is a simple example to illustrate the process. First, you create a table:
create table sales_mv
(sales_id    number
,sales_amt number);
Now, populate the table with data. For instance, in a data warehouse environment, a table can be loaded using Data Pump, SQL*Loader, or external tables.
Finally, run the CREATE MATERIALIZED VIEW...ON PREBUILT TABLE statement to turn the table into an MV. The MV name and the table name must be identical. Additionally, each column in the query must correspond to a column in the table; for example,
create materialized view sales_mv
on prebuilt table
using index tablespace users
as
select sales_id, sales_amt
from sales;
Now, the SALES_MV object is an MV. If you attempt to drop the SALES_MV table, the following error is thrown, indicating that SALES_MV is now an MV:
SQL> drop table sales_mv;
ORA-12083: must use DROP MATERIALIZED VIEW to drop "MV_MAINT"."SALES_MV"
The prebuilt-table feature is useful in data warehouse environments, in which typically there are long periods when a base table isn’t being actively updated. This gives you time to load a prebuilt table and ensure that its contents are identical to those of the base table. After you create the MV on the prebuilt table, you can fast refresh the MV and keep it in sync with the base table.
If your base table (specified in the SELECT clause of the MV) is continuously being updated, then creating an MV on a prebuilt table may not be a viable option. This is because there is no way to ensure that the prebuilt table will stay in sync with the base table.
![]() Note For MVs created on prebuilt tables, if you subsequently issue a DROP MATERIALIZED VIEW statement, the underlying table isn’t dropped. This has some interesting implications when you need to modify a base table (such as adding a column). See the section “Modifying Base Table DDL and Propagating to MVs,” later in this chapter, for details.
Note For MVs created on prebuilt tables, if you subsequently issue a DROP MATERIALIZED VIEW statement, the underlying table isn’t dropped. This has some interesting implications when you need to modify a base table (such as adding a column). See the section “Modifying Base Table DDL and Propagating to MVs,” later in this chapter, for details.
When you create an MV, you have the option of instructing Oracle whether or not to initially populate the MV with data. For example, if it takes several hours to initially build an MV, you may want to first define the MV and then populate it as a separate job.
This example uses the BUILD DEFERRED clause to instruct Oracle not to initially populate the MV with the results of the query:
create materialized view sales_mv
tablespace users
build deferred
refresh complete on demand
as
select sales_id, sales_amt
from sales;
At this point, querying the MV results in zero rows returned. At some later point, you can initiate a complete refresh to populate the MV with data.
Creating an MV Refreshed on Commit
You may be required, when data are modified in the master table, to have them immediately copied to an MV. In this scenario, use the ON COMMIT clause when you create the MV. The master table must have an MV log created on it for this technique to work:
SQL> create materialized view log on sales with primary key;
Next, an MV is created that refreshes on commit:
create materialized view sales_mv
refresh
on commit
as
select sales_id, sales_amt from sales;
As data are inserted and committed in the master table, any changes are also available in the MV that would be selected by the MV query.
The ON COMMIT refreshable MV has a few restrictions you need to be aware of:
- The master table and MV must be in the same database.
- You can’t execute distributed transaction on the base table.
- This approach isn’t supported with MVs that contain object types or Oracle-supplied types.
Also consider the overhead associated with committing data simultaneously in two places; this can affect the performance of a high-transaction OLTP system. Additionally, if there is any problem with updating the MV, then the base table can’t commit a transaction. For example, if the tablespace in which the MV is created becomes full (and can’t allocate another extent), you see an error such as this when trying to insert into the base table:
ORA-12008: error in materialized view refresh path
ORA-01653: unable to extend table MV_MAINT.SALES_MV by 16 in tablespace...
For these reasons, you should use this feature only when you’re sure it won’t affect performance or availability.
![]() Note You can’t specify that an MV be refreshed with both ON COMMIT and ON DEMAND. In addition, ON COMMIT isn’t compatible with the START WITH and NEXT clauses of the CREATE MATERIALIZED VIEW statement.
Note You can’t specify that an MV be refreshed with both ON COMMIT and ON DEMAND. In addition, ON COMMIT isn’t compatible with the START WITH and NEXT clauses of the CREATE MATERIALIZED VIEW statement.
Creating a Never Refreshable MV
You may never want an MV to be refreshed. For example, you may want to guarantee that you have a snapshot of a table at a point in time for auditing purposes. Specify the NEVER REFRESH clause when you create the MV to achieve this:
create materialized view sales_mv
never refresh
as
select sales_id, sales_amt
from sales;
If you attempt to refresh a nonrefreshable MV, you receive this error:
ORA-23538: cannot explicitly refresh a NEVER REFRESH materialized view
You can alter a never refreshable view to be refreshable. Use the ALTER MATERIALIZED VIEW statement to do this:
SQL> alter materialized view sales_mv refresh on demand complete;
You can verify the refresh mode and method with the following query:
SQL> select mview_name, refresh_mode, refresh_method from user_mviews;
Creating MVs for Query Rewrite
Query rewrite allows the optimizer to recognize that an MV can be used to fulfill the requirements of a query instead of using the underlying master (base) tables. If you have an environment in which users frequently write their own queries and are unaware of the available MVs, this feature can greatly help with performance. There are three prerequisites for enabling query rewrite:
- Oracle Enterprise Edition
- Setting database initialization parameter QUERY_REWRITE_ENABLED to TRUE (the default value in 10g and higher)
- MV either created or altered with the ENABLE QUERY REWRITE clause
This example creates an MV with query rewrite enabled:
create materialized view sales_daily_mv
segment creation immediate
refresh
complete
on demand
enable query rewrite
as
select
 sum(sales_amt) sales_amt
,trunc(sales_dtt) sales_dtt
from sales
group by trunc(sales_dtt);
You can verify that query rewrite is in use by examining a query’s explain plan via the autotrace utility:
SQL> set autotrace trace explain
Now, suppose a user runs the following query, unaware that an MV exists that already aggregates the required data:
select
 sum(sales_amt) sales_amt
,trunc(sales_dtt) sales_dtt
from sales
group by trunc(sales_dtt);
Here is a partial listing of autotrace output that verifies that query rewrite is in use:
-------------------------------------------------------------------------------
| Id  | Operation                    | Name           | Cost (%CPU)| Time     |
-------------------------------------------------------------------------------
|   0 | SELECT STATEMENT             |                |     3   (0)| 00:00:01 |
|   1 |  MAT_VIEW REWRITE ACCESS FULL| SALES_DAILY_MV |     3   (0)| 00:00:01 |
-------------------------------------------------------------------------------
As you can see from the prior output, even though the user selected directly from the SALES table, the optimizer determined that it could more efficiently satisfy the results of the query by accessing the MV.
You can tell if query rewrite is enabled for an MV by selecting the REWRITE_ENABLED column from USER_MVIEWS:
select mview_name, rewrite_enabled, rewrite_capability
from user_mviews
where mview_name = 'SALES_DAILY_MV';
If for any reason a query isn’t using the query rewrite functionality, and you think it should be, use the EXPLAIN_REWRITE procedure of the DBMS_MVIEW package to diagnose issues.
Creating a Fast Refreshable MV Based on a Complex Query
In many situations, when you base an MV on a query that joins multiple tables, it’s deemed complex and therefore is available only for a complete refresh. However, in some scenarios, you can create a fast refreshable MV when you reference two tables that are joined together in the MV query.
This section describes how to use the EXPLAIN_MVIEW procedure of the DBMS_MVIEW to determine whether it’s possible to fast refresh a complex query. To help you completely understand the example, this section shows the SQL used to create the base tables. Say you have two base tables, defined as follows:
create table region(
 region_id number
,reg_desc varchar2(30)
,constraint region_pk primary key(region_id));
--
create table sales(
 sales_id  number
,sales_amt number
,region_id number
,sales_dtt date
,constraint sales_pk primary key(sales_id)
,constraint sales_fk1 foreign key (region_id) references region(region_id));
Additionally, REGION and SALES have MV logs created on them, as shown:
create materialized view log on region with primary key;
create materialized view log on sales with primary key;
Also, for this example, the base tables have these data inserted into them:
insert into region values(10,'East'),
insert into region values(20,'West'),
insert into region values(30,'South'),
insert into region values(40,'North'),
--
insert into sales values(1,100,10,sysdate);
insert into sales values(2,200,20,sysdate-20);
insert into sales values(3,300,30,sysdate-30);
Suppose you want to create an MV that joins the REGION and SALES base tables as follows:
create materialized view sales_mv
as
select
 a.sales_id
,b.reg_desc
from sales  a
    ,region b
where a.region_id = b.region_id;
Next, let’s attempt to fast refresh the MV:
SQL> exec dbms_mview.refresh('SALES_MV','F'),
This error is thrown:
ORA-12032: cannot use rowid column from materialized view log...
The error indicates that the MV has issues and can’t be fast refreshed. To determine whether this MV can become fast refreshable, use the output of the EXPLAIN_MVIEW procedure of the DBMS_MVIEW package. This procedure requires that you first create an MV_CAPABILITIES_TABLE. Oracle provides a script to do this. Run this script as the owner of the MV:
SQL> @?/rdbms/admin/utlxmv.sql
After you create the table, run the EXPLAIN_MVIEW procedure to populate it:
SQL> exec dbms_mview.explain_mview(mv=>'SALES_MV',stmt_id=>'100'),
Now, query MV_CAPABILITIES_TABLE to see what potential issues this MV may have:
select capability_name, possible, msgtxt, related_text
from mv_capabilities_table
where capability_name like 'REFRESH_FAST_AFTER%'
and statement_id = '100'
order by 1;
Next is a partial listing of the output. The P (for possible) column contains an N (for no) for every fast refresh possibility:
CAPABILITY_NAME                P MSGTXT                              RELATED_TEXT
------------------------------ - ----------------------------------- ---------------
REFRESH_FAST_AFTER_INSERT      N the SELECT list does not have the   B
                                 rowids of all the detail tables
REFRESH_FAST_AFTER_INSERT      N mv log must have ROWID              MV_MAINT.REGION
REFRESH_FAST_AFTER_INSERT      N mv log must have ROWID              MV_MAINT.SALES
MSGTXT indicates the issues: The MV logs need to be ROWID based, and the ROWID of the tables must appear in the SELECT clause. So, first drop and recreate the MV logs with ROWID (instead of a primary key):
drop materialized view log on region;
drop materialized view log on sales;
--
create materialized view log on region with rowid;
create materialized view log on sales with rowid;
--
drop materialized view sales_mv;
--
create materialized view sales_mv
as
select
 a.rowid sales_rowid
,b.rowid region_rowid
,a.sales_id
,b.reg_desc
from sales  a
    ,region b
where a.region_id = b.region_id;
Next, reset the MV_CAPABILITIES_TABLE, and repopulate it via the EXPLAIN_MVIEW procedure:
SQL> delete from mv_capabilities_table where statement_id=100;
SQL> exec dbms_mview.explain_mview(mv=>'SALES_MV',stmt_id=>'100'),
The output shows that it’s now possible to fast refresh the MV:
CAPABILITY_NAME                P MSGTXT                              RELATED_TEXT
------------------------------ - ----------------------------------- ------------
REFRESH_FAST_AFTER_ANY_DML     Y
REFRESH_FAST_AFTER_INSERT      Y
REFRESH_FAST_AFTER_ONETAB_DML  Y
Execute the following statement to see if the fast refresh works:
SQL> exec dbms_mview.refresh('SALES_MV','F'),
PL/SQL procedure successfully completed.
The EXPLAIN_MVIEW procedure is a powerful tool that allows you to determine whether a refresh capability is possible and, if it isn’t possible, why it isn’t and how to potentially resolve the issue.
To quickly view the SQL query on which an MV is based, select from the QUERY column of DBA/ALL/USER_MVIEWS. If you’re using SQL*Plus, first set the LONG variable to a value large enough to display the entire contents of a LONG column:
SQL> set long 5000
SQL> select query from dba_mviews where mview_name=UPPER('&&mview_name'),
To view the entire DDL required to recreate an MV, use the DBMS_METADATA package (you also need to set the LONG variable to a large value if using SQL*Plus):
SQL> select dbms_metadata.get_ddl('MATERIALIZED_VIEW','SALES_MV') from dual;
Here is a partial listing of the output for this example:
DBMS_METADATA.GET_DDL('MATERIALIZED_VIEW','SALES_MV')
--------------------------------------------------------------------------------

  CREATE MATERIALIZED VIEW "MV_MAINT"."SALES_MV" ("SALES_ROWID", "REGION_ROWID",
 "SALES_ID", "REG_DESC")
  ORGANIZATION HEAP PCTFREE 10 PCTUSED 40 INITRANS 1 MAXTRANS 255
This output shows the DDL that Oracle thinks is required to recreate the MV. This is usually the most reliable way to generate the DDL associated with an MV.
You may occasionally need to drop an MV. Perhaps a view is no longer being used, or you may need to drop and recreate an MV to change the underlying query on which the MV is based (such as adding a column). Use the DROP MATERIALIZED VIEW command to drop an MV; for example,
SQL> drop materialized view sales_mv;
When you drop an MV, the MV object, the table object, and any corresponding indexes are also dropped. Dropping an MV doesn’t affect any MV logs—an MV log is dependent only on the master table.
You can also specify that the underlying table be preserved. You may want to do this if you’re troubleshooting and need to drop the MV definition but keep the MV table and data; for example,
SQL> drop materialized view sales_mv preserve table;
In this scenario, you can also use the underlying table later as the basis for an MV by building the MV, using the ON PREBUILT TABLE clause.
If the MV was originally built using the ON PREBUILT TABLE clause, then when you drop the MV, the underlying table isn’t dropped. If you want the underlying table dropped, you must use a DROP TABLE statement:
SQL> drop materialized view sales_mv;
SQL> drop table sales_mv;
Modifying MVs
The following sections describe common maintenance tasks associated with MVs. Topics covered include how to modify an MV to reflect column changes that have been applied to the base table sometime after the MV was initially created and modifying attributes such as logging and parallelism.
Modifying Base Table DDL and Propagating to MVs
A common task involves adding a column to or dropping a column from a base table (because business requirements have changed). After the column is added to or dropped from the base table, you want those DDL changes to be reflected in any dependent MVs. You have a few options for propagating base table column changes to dependent MVs:
- Drop and recreate the MV with the new column definitions.
- Drop the MV, but preserve the underlying table, modify the MV table, and then recreate the MV (with the new column changes), using the ON PREBUILT TABLE clause.
- If the MV was originally created using the ON PREBUILT TABLE clause, drop the MV object, modify the MV table, and then recreate the MV (with the new column changes), using the ON PREBUILT TABLE clause.
With any of the prior options, you have to drop and recreate the MV so that it’s aware of the column changes in the base table. These approaches are described next.
Recreating an MV to Reflect Base Table Modifications
Using the previously created SALES table, suppose you have an MV log and an MV, created as shown:
create materialized view log on sales with primary key;
--
create materialized view sales_mv
refresh with primary key
  fast on demand as
select sales_id ,sales_amt, sales_dtt
from sales;
Then, sometime later, a column is added to the base table:
SQL> alter table sales add(sales_loc varchar2(30));
You want the base table modification to be reflected in the MV. How do you accomplish this task? You know the MV contains an underlying table that stores the results. You decide to modify the underlying MV table directly:
SQL> alter table sales_mv add(sales_loc varchar2(30));
The alteration is successful. You next refresh the MV but realize that the additional column isn’t being refreshed. To understand why, recall that an MV is an SQL query that stores its results in an underlying table. Therefore, to modify an MV, you have to change the SQL query that the MV is based on. Because there is no ALTER MATERIALIZED VIEW ADD/DROP/MODIFY <column> statement, you must do the following to add/delete columns in an MV:
- Alter the base table.
- Drop and recreate the MV to reflect the changes in the base table.
drop materialized view sales_mv;
--
create materialized view sales_mv
refresh with primary key
  complete on demand as
select sales_id, sales_amt, sales_dtt, sales_loc
from sales;
This approach may take a long time if large quantities of data are involved. You have downtime for any application that accesses the MV while it’s being rebuilt. If you work in a data warehouse environment, then because of the amount of time it takes to refresh the MV completely, you may want to consider not dropping the underlying table. This option is discussed in the next section.
Altering an MV but Preserving the Underlying Table
When you drop an MV, you have the option of preserving the underlying table and its data. You may find this approach advantageous when you’re working with large MVs in data warehouse environments. Here are the steps:
- Alter the base table.
- Drop the MV, but preserve the underlying table.
- Modify the underlying table.
- Recreate the MV, using the ON PREBUILT TABLE clause.
Here is a simple example to illustrate this procedure:
SQL> alter table sales add(sales_loc varchar2(30));
Drop the MV, but specify that you want to preserve the underlying table:
SQL> drop materialized view sales_mv preserve table;
Now, modify the underlying table:
SQL> alter table sales_mv add(sales_loc varchar2(30));
Next, create the MV, using the ON PREBUILT TABLE clause:
create materialized view sales_mv
on prebuilt table
refresh with primary key
  complete on demand as
select sales_id, sales_amt, sales_dtt, sales_loc
from sales;
This allows you to redefine the MV without dropping and completely refreshing the data. Be aware that if there is any DML activity against the base table during the MV rebuild operation, those transactions aren’t reflected in the MV when you attempt to refresh it. In data warehouse environments, you typically have a known schedule for loading base tables and therefore should be able to perform the MV alteration during a maintenance window in which no transactions are occurring in the base table.
Altering an MV Created on a Prebuilt Table
If you originally created an MV using the ON PREBUILT TABLE clause, then you can perform a procedure similar to the one shown in the previous section when preserving the underlying table. Here are the steps for modifying an MV that was created using the ON PREBUILT TABLE clause:
- Alter the base table.
- Drop the MV. For MVs built on prebuilt tables, this doesn’t drop the underlying table.
- Alter the prebuilt table.
- Recreate the MV on the prebuilt table.
Here is a simple example to illustrate this process. First, the base table is altered:
SQL> alter table sales add(sales_loc varchar2(30));
Then, drop the MV:
SQL> drop materialized view sales_mv;
For MVs created on prebuilt tables, this doesn’t drop the underlying table—only the MV object. Next, add a column to the prebuilt table:
SQL> alter table sales_mv add(sales_loc varchar2(30));
Now, you can rebuild the MV, using the prebuilt table with the new column added:
create materialized view sales_mv
on prebuilt table
refresh with primary key
  complete on demand as
select sales_id, sales_amt, sales_dtt, sales_loc
from sales;
This process has the advantage of allowing you to modify an MV definition without dropping the underlying table. You have to drop the MV, alter the underlying table, and then recreate the MV with the new definition. If the underlying table contains a large amount of data, this method can prevent unwanted downtime.
As mentioned in the previous section, you need to be aware that if there is any DML activity against the base table during the MV rebuild operation, those transactions aren’t reflected in the MV when you attempt to refresh it.
Toggling Redo Logging on an MV
Recall that an MV has an underlying database table. When you refresh an MV, this initiates transactions in the underlying table that result in the generation of redo (just as with a regular database table). In the event of a database failure, you can restore and recover all the transactions associated with an MV.
By default, redo logging is enabled when you create an MV. You have the option of specifying that redo not be logged when an MV is refreshed. To enable nologging, create the MV with the NOLOGGING option:
create materialized view sales_mv
nologging
refresh with primary key
  fast on demand as
select sales_id ,sales_amt, sales_dtt
from sales;
You can also alter an existing MV into nologging mode:
SQL> alter materialized view sales_mv nologging;
If you want to reenable logging, then do as follows:
SQL> alter materialized view sales_mv logging;
To verify that the MV has been switched to NOLOGGING, query the USER_TABLES view:
select a.table_name, a.logging
from user_tables a
    ,user_mviews b
where a.table_name = b.mview_name;
The advantage of enabling nologging is that refreshes take place more quickly. The refresh mechanism uses a direct path insert, which, when combined with NOLOGGING, eliminates most of the redo generation. The big downside is that if a media failure occurs soon after an MV has been refreshed, you can’t recover the data in the MV. In this scenario the first time you attempt to access the MV, you receive an error such as
ORA-01578: ORACLE data block corrupted (file # 5, block # 899)
ORA-01110: data file 5: '/u01/dbfile/o12c/users02.dbf'
ORA-26040: Data block was loaded using the NOLOGGING option
If you get the previous error, then you’ll most likely have to rebuild the MV to make the data accessible again. In many environments this may be acceptable. You save on database resources by not generating redo for the MV, but the downside is a longer restore process (in the event of a failure) that requires you to rebuild the MV.
![]() Note If your database is in force logging mode, then the NOLOGGING clause has no effect. The force logging mode is required in environments using Data Guard.
Note If your database is in force logging mode, then the NOLOGGING clause has no effect. The force logging mode is required in environments using Data Guard.
Sometimes, an MV is created with a high degree of parallelism to improve the performance of the creation process:
create materialized view sales_mv
parallel 4
refresh with primary key
  fast on demand as
select sales_id ,sales_amt, sales_dtt
from sales;
After you create the MV, you may not need the same degree of parallelism associated with the underlying table. This is important because queries against the MV will start parallel threads of execution. In other words, you may require parallelism for building the MV quickly but do not want parallelism used when subsequently querying the MV. You can alter an MV’s parallelism as follows:
SQL> alter materialized view sales_mv parallel 1;
You can check on the degree of parallelism by querying USER_TABLES:
SQL> select table_name, degree from user_tables where table_name= upper('&mv_name'),
Moving an MV
As the operating environment’s conditions change, you may need to move an MV from one tablespace to another. In these scenarios, use the ALTER MATERIALIZED VIEW...MOVE TABLESPACE statement. This example moves the table associated with an MV to a different tablespace:
SQL> alter materialized view sales_mv move tablespace users;
If any indexes are associated with the MV table, the move operation renders them unusable. You can check the status of the indexes as follows:
select a.table_name, a.index_name, a.status
from user_indexes a
    ,user_mviews  b
where a.table_name = b.mview_name;
You must rebuild any associated indexes after moving the table; for example,
SQL> alter index sales_pk2 rebuild;
Managing MV Logs
MV logs are required for fast refreshable MVs. The MV log is a table that stores DML information for a master (base) table. The MV log is created in the same database as the master table with the same user that owns the master table. You need the CREATE TABLE privilege to create an MV log.
The MV log is populated by an Oracle internal trigger (that you have no control over). This internal trigger inserts a row into the MV log after an INSERT, UPDATE, or DELETE on the master table. You can view the internal triggers in use by querying DBA/ALL/USER_INTERNAL_TRIGGERS.
An MV log is associated with only one table, and each master table can have only one MV log defined for it. You can create an MV log on a table or on another MV. Multiple fast refreshable MVs can use one MV log.
After an MV performs a fast refresh, any records in the MV log that are no longer needed are deleted. In the event that multiple MVs are using one MV log, then records are purged from the MV log only once they aren’t required by any of the fast refreshable MVs.
Table 15-3 defines the terms used with MV logs. These terms are referred to in the following sections in this chapter that relate to MV logs.
Table 15-3. MV Log Terminology and Features
| Term | Meaning |
|---|---|
| Materialized view (MV) log | Database object that tracks DML changes to MV base table; required for fast refreshes |
| Primary key MV log | MV log that uses the base table primary key to track DML changes |
| ROWID MV log | MV log that uses the base table ROWID to track DML changes |
| Commit SCN MV log | MV log based on the commit SCN instead of a timestamp; available in Oracle Database 11g Release 2 and higher |
| Object ID | Object identifier used to track DML changes |
| Filter column | Nonprimary key column referenced by an MV subquery; required for some fast refresh scenarios |
| Join column | Nonprimary key column that defines a join in the subquery WHERE clause; required for some fast refresh scenarios |
| Sequence | Sequence value required for some fast refresh scenarios |
| New values | Specifies that old and new values be recorded in the MV log; required for single-table aggregate views to be eligible for fast refresh |
Fast refreshable views require an MV log to be created on the master (base) table. Use the CREATE MATERIALIZED VIEW LOG command to create an MV log. This example creates an MV log on the SALES table, specifying that the primary key should be used to identify rows in the MV log:
SQL> create materialized view log on sales with primary key;
You can also specify storage information, such as the tablespace name:
create materialized view log on sales
pctfree 5
tablespace users
with primary key;
When you create an MV log on a table, Oracle creates a table to store the changes since the last refresh to a base table. The name of the MV log table follows this format: MLOG$_<master_table_name>. You can use the SQL*Plus DESCRIBE statement to view the columns of the MV log:
SQL> desc mlog$_sales;
Name                              Null?    Type
-------------------------------- -------- ----------------------------
SALES_ID                                  NUMBER
SNAPTIME$$                                DATE
DMLTYPE$$                                 VARCHAR2(1)
OLD_NEW$$                                 VARCHAR2(1)
CHANGE_VECTOR$$                           RAW(255)
XID$$                                     NUMBER
You can query this underlying MLOG$ table to determine the number of transactions since the last refresh. After each refresh the MV log table is purged. If multiple MVs use the MV log, the log table isn’t purged until all dependent MVs are refreshed.
If you create the MV log on a table with a primary key, then a RUPD$_<master_table_name> table is also created. This table is used for updatable MVs. If you’re not using the updatable MV feature, then this table is never used, and you can ignore it.
When you create an MV log, you can specify that it use one of the following clauses to uniquely identify rows in the MV log table:
- WITH PRIMARY KEY
- WITH ROWID
- WITH OBJECT ID
If the master table has a primary key, use WITH PRIMARY KEY when you create the MV log. If the master table doesn’t have a primary key, you have to use WITH ROWID to specify that a ROWID value be used to uniquely identify MV log records. You can use WITH OBJECT ID when you create an MV log on an object table.
Oracle uses the SNAPTIME$$ column to determine which records need to be refreshed or purged, or both. As of Oracle Database 11g Release 2, you have the option of creating a COMMIT SCN–based MV log (not based on a timestamp). This type of MV log uses the SCN of a transaction to determine which records need to be applied to any dependent MVs. COMMIT SCN–based MV logs are more efficient than timestamp-based MV logs. If you’re using Oracle Database 11g Release 2 or higher, then you should consider using COMMIT SCN–based MV logs. Use the WITH COMMIT SCN clause to do this:
SQL> create materialized view log on sales with commit scn;
You can view whether an MV log is SCN based by querying USER_MVIEW_LOGS:
SQL> select log_table, commit_scn_based from user_mview_logs;
![]() Note MV logs created with COMMIT SCN do not have a SNAPTIME$$ column.
Note MV logs created with COMMIT SCN do not have a SNAPTIME$$ column.
Sometimes, you may need better performance from your fast refreshing MVs. One way to do this is through indexes on columns of the MV log table. In particular, Oracle uses the SNAPTIME$$ column or the primary key column, or both, when refreshing or purging. Therefore, indexes on these columns can improve performance:
SQL> create index mlog$_sales_idx1 on mlog$_sales(snaptime$$);
SQL> create index mlog$_sales_idx2 on mlog$_sales(sales_id);
You shouldn’t add indexes just because you think it may be a good idea. Only add indexes on the MV log tables when you have known performance issues with fast refreshes. Keep in mind that adding indexes consumes resources in the database. Oracle has to maintain the index for DML operations on the table, and an index uses disk space.
Viewing Space Used by an MV Log
You should consider periodically checking the space consumed by an MV log. If the space consumed is growing (and never shrinking), you may have an issue with an MV’s not successfully refreshing and hence causing the MV log never to be purged. Here is a query to check the space of MV logs:
select segment_name, tablespace_name
,bytes/1024/1024 meg_bytes, extents
from dba_segments
where segment_name like 'MLOG$%'
order by meg_bytes;
Here is some sample output:
SEGMENT_NAME         TABLESPACE_NAME                 MEG_BYTES    EXTENTS
-------------------- ------------------------------ ---------- ----------
MLOG$_USERS          MV_DATA                              1609       3218
MLOG$_ASSET_ATTRS    MV_DATA                            3675.5       7351
This output indicates that a couple of MV logs most likely have purging issues. In this situation there are probably multiple MVs that are using the MV log, and one of them isn’t refreshing on a daily basis, thus preventing the log from being purged.
You may run into a situation in which an MV log hasn’t been purged for quite some time. This can happen because you have multiple MVs using the same MV log, and one of those MVs isn’t successfully refreshing anymore. This can happen when a DBA builds a development environment and connects development MVs to the production environment (it shouldn’t happen, but it does). At some later point in time, the DBA drops the development database. The production environment still has information regarding the remote development MV and won’t purge MV log records because it thinks a fast refreshable MV needs the log data to refresh.
In these scenarios, you should determine which MVs are using the log (see the section “Determining How Many MVs Reference a Central MV Log,” later in this chapter), and resolve any issues. After the problem is solved, check the space being used by the log, and see if it can be shrunk (see the next section, “Shrinking the Space in an MV Log”).
Shrinking the Space in an MV Log
If an MV log doesn’t successfully delete records, it grows large. After you resolve the issue, and the records are deleted from the MV log, you can set the high-water mark for the MV log table to a high value. But, doing so may cause performance issues and also unnecessarily consumes disk space. In this situation, consider shrinking the space used by the MV log.
In this example, MLOG$_SALES had a problem with purging records because of an associated MV’s not successfully refreshing. This MV log subsequently grew large. The issue was identified and resolved, and now the log’s space needs to be reduced. To shrink the space in an MV log, first enable row movement on the appropriate MV log MLOG$ table:
SQL> alter table mlog$_sales enable row movement;
Next, issue the ALTER MATERIALIZED VIEW LOG ON...SHRINK statement. Note that the table name (after the keyword ON) is that of the master table:
SQL> alter materialized view log on sales shrink space;
This statement may take a long time, depending on the amount of space it shrinks. After the statement finishes, you can disable row movement:
SQL> alter table mlog$_sales disable row movement;
You can verify that the space has been reduced by running the query from the prior section, which selects from DBA_SEGMENTS.
Checking the Row Count of an MV Log
As mentioned earlier, sometimes there are problems with an MV’s refreshing, and this results in the building up of a large number of rows in the corresponding MV log table. This can happen when multiple MVs are using one MV log, and one of the MVs can’t perform a fast refresh. In this situation the MV log continues to grow until the issue is resolved.
One way of detecting whether an MV log isn’t being purged is to check the row counts of the MV log tables periodically. The following query uses SQL to generate SQL that creates a script that checks row counts for MV log tables owned by the currently connected user:
set head off pages 0 lines 132 trimspool on
spo mvcount_dyn.sql
select 'select count(*) || ' || '''' || ': ' || table_name || ''''
|| ' from ' || table_name || ';'
from user_tables
where table_name like 'MLOG%';
spo off;
This script generates a script named mvcount_dyn.sql, containing the SQL statements to select row counts from the MLOG$ tables. When you’re inspecting row counts, you must be somewhat familiar with your application and have an idea of what a normal row count is. Here is some sample code generated by the previous script:
select count(*) || ': MLOG$_SALES' from MLOG$_SALES;
select count(*) || ': MLOG$_REGION' from MLOG$_REGION;
You may need to move an MV log because the initial creation script didn’t specify the correct tablespace. A common scenario is that the tablespace isn’t specified, and the MV log is placed by default in a tablespace such as USERS. You can verify the tablespace information with this query:
select table_name, tablespace_name
from user_tables
where table_name like 'MLOG%';
If any MV log tables need to be relocated, use the ALTER MATERIALIZED VIEW LOG ON <table_name> MOVE statement. Note that you specify the name of the master table (and not the underlying MLOG$ table) on which the MV is created:
SQL> alter materialized view log on sales move tablespace users;
Also keep in mind that when you move a table, any associated indexes are rendered unusable (because the ROWID of every record in the table has just changed). You can check the status of the indexes as shown:
select a.table_name, a.index_name, a.status
from user_indexes a
    ,user_mview_logs b
where a.table_name = b.log_table;
Any unusable indexes must be rebuilt. Here is an example of rebuilding an index:
SQL> alter index mlog$_sales_idx2 rebuild;
There are a couple of reasons why you may want to drop an MV log:
- You initially created an MV log, but requirements have changed and you no longer need it.
- The MV log has grown large and is causing performance issues, and you want to drop it to reset the size.
Before you drop an MV log, you can verify the owner, master table, and MV log table with the following query:
select
 log_owner
,master     -- master table
,log_table
from user_mview_logs;
Use the DROP MATERIALIZED VIEW LOG ON statement to drop an MV log. You don’t need to know the name of the MV log, but you do need to know the name of the master table on which the log was created. This example drops the MV log on the SALES table:
SQL> drop materialized view log on sales;
You should see the following message if successful:
Materialized view log dropped.
If you have permissions, and you don’t own the table on which the MV log is created, you can specify the schema name when dropping the MV log:
SQL> drop materialized view log on <schema>.<table>;
If you’re cleaning up an environment and want to drop all MV logs associated with a user, then use SQL to generate SQL to accomplish this. The following script creates the SQL required to drop all MV logs owned by the currently connected user:
set lines 132 pages 0 head off trimspool on
spo drop_dyn.sql
select 'drop materialized view log on ' || master || ';'
from user_mview_logs;
spo off;
The previous SQL*Plus code creates a script named drop_dyn.sql, containing the SQL statements that can be used to drop all MV logs for a user.
Refreshing MVs
Typically, you refresh MVs at periodic intervals. You can either refresh the MVs manually or automate this task. The following sections cover these related topics:
- Manually refreshing MVs from SQL*Plus
- Automating refreshes, using a shell script and scheduling utility
- Automating refreshes, using the built-in Oracle job scheduler
![]() Note If you require that a group of MV be refreshed as a set, see the section “Managing MVs in Groups,” later in this chapter.
Note If you require that a group of MV be refreshed as a set, see the section “Managing MVs in Groups,” later in this chapter.
Manually Refreshing MVs from SQL*Plus
You’ll need to refresh an MV periodically so as to synchronize it with the base table. To do this, use SQL*Plus to call the REFRESH procedure of the DBMS_MVIEW package. The procedure takes two parameters: the MV name and the refresh method. This example uses the EXEC[UTE] statement to call the procedure. The MV being refreshed is SALES_MV, and the refresh method is F (for fast):
SQL> exec dbms_mview.refresh('SALES_MV','F'),
You can also manually run a refresh from SQL*Plus, using an anonymous block of PL/SQL. This example performs a fast refresh:
SQL> begin
     dbms_mview.refresh('SALES_MV','F'),
     end;
     /
Additionally, you can use a question mark (?) to invoke the force refresh method. This instructs Oracle to perform a fast refresh if possible. If a fast refresh isn’t possible, then Oracle performs a complete refresh:
SQL> exec dbms_mview.refresh('SALES_MV','?'),
You can also use a C (for complete) to specifically execute the complete refresh method:
SQL> exec dbms_mview.refresh('SALES_MV','C'),
MVS VS. RESULT CACHE
Starting with Oracle Database 11g, Oracle has a result cache feature that stores the result of a query in memory and makes that result set available to any subsequent identical queries that are issued. If a subsequent identical query is issued, and none of the underlying table data have changed since the original query was issued, Oracle makes the result available to the subsequent query. For databases with relatively static data and many identical queries being issued, using the result cache can significantly improve performance.
How do MVs compare with the result cache? Recall that an MV stores the result of a query in a table and makes that result available to reporting applications. The two features sound similar but differ in a couple of significant ways:
- The result cache stores results in memory. An MV stores results in a table.
- The result cache needs to be refreshed any time the underlying data in the tables change. MVs are refreshed on commit or at a periodic interval (such as on a daily basis).
The result cache can significantly improve performance if you have long-running queries that operate on relatively static data. MVs are better suited for replicating data and storing the results of complex queries that only require new results on a periodic basis (such as daily, weekly, or monthly).
Automating Refreshes, Using a Shell Script and Scheduling Utility
Many MVs must be refreshed on a daily basis. To achieve this, you can use a Linux/Unix utility (such as cron) that calls a shell script to refresh the MVs. This approach
- is easy to implement and maintain
- makes it easy to create a daily log file for auditing
- sends e-mail when the job has problems or when the database isn’t available
Here is an example of a shell script that contains the logic to refresh an MV:
#!/bin/bash
if [ $# -ne 1 ]; then
  echo "Usage: $0 SID"
  exit 1
fi
#
HOSTNAME='uname -a | awk '{print$2}''
MAILX='/bin/mailx'
MAIL_LIST='[email protected]'
ORACLE_SID=$1
jobname=SALES_MV
# Source oracle OS variables, see Chapter 2 for details.
. /etc/oraset $ORACLE_SID
#
sqlplus -s <<EOF
mv_maint/foo
WHENEVER SQLERROR EXIT FAILURE
exec dbms_mview.refresh('SALES_MV','C'),
EOF
#
if [ $? -ne 0 ]; then
echo "not okay"
$MAILX -s "Problem with MV refresh on $HOSTNAME $jobname" $MAIL_LIST <<EOF
$HOSTNAME $jobname MVs not okay.
EOF
else
echo "okay"
$MAILX -s "MV refresh OK on $HOSTNAME $jobname" $MAIL_LIST <<EOF
$HOSTNAME $jobname MVs okay.
EOF
fi
#
exit 0
For this MV refresh job, here is the corresponding cron entry that invokes it:
25 16 * * * /orahome/oracle/bin/mvref_sales.bsh DWREP
1>/orahome/oracle/bin/log/mvref_sales.log 2>&1
This job runs on a daily basis, at 4:25 pm. For details on using cron to schedule jobs, see Chapter 21.
Creating an MV with a Refresh Interval
When you initially create an MV, you have the option of specifying START WITH and NEXT clauses, which instruct Oracle to set up an internal database job (via the DBMS_JOB package) to initiate the refresh of an MV on a periodic basis. If you omit START WITH and NEXT, then no job is set up, and you have to use another technique (e.g., a scheduling utility such as cron).
I almost never specify START WITH and NEXT as a refresh mechanism. I strongly prefer to use another scheduling utility, such as cron. When using cron, it’s easy to create a log file that details how the job ran and whether there were any issues. Also, when using cron, it’s easy to have the log file e-mailed to a distribution list so that the support DBAs are aware of any issues.
Regardless, it’s important to understand how START WITH and NEXT work, because sooner or later you’ll find yourself in an environment in which DBAs or developers prefer to use the DBMS_JOB package for refreshes. When you’re troubleshooting refresh issues, you must understand how this refresh mechanism works.
The START WITH parameter specifies the date you want the first refresh of an MV to occur. The NEXT parameter specifies a date expression that Oracle uses to calculate the interval between refreshes. For instance, this MV initially refreshes 1 minute in the future (sysdate+1/1440) and subsequently refreshes on a daily basis (sysdate+1):
create materialized view sales_mv
refresh
with primary key
fast on demand
start with sysdate+1/1440
next sysdate+1
as
select sales_id, sales_amt, sales_dtt
from sales;
You can view details of the scheduled job by querying USER_JOBS:
select job, schema_user
,to_char(last_date,'dd-mon-yyyy hh24:mi:ss') last_date
,to_char(next_date,'dd-mon-yyyy hh24:mi:ss') next_date
,interval, broken
from user_jobs;
Here is some sample output:
JOB  SCHEMA_USE LAST_DATE            NEXT_DATE            INTERVAL     B
---- ---------- -------------------- -------------------- ------------ -
   1 MV_MAINT   28-jan-2013 14:55:33 29-jan-2013 14:55:33 sysdate+1    N
You can also view job information in the USER_REFRESH view:
select rowner, rname, job
,to_char(next_date,'dd-mon-yyyy hh24:mi:ss')
,interval, broken
from user_refresh;
Here is some sample output:
ROWNER     RNAME       JOB TO_CHAR(NEXT_DATE,'DD-MON-YYY INTERVAL     B
---------- ---------- ---- ----------------------------- ------------ -
MV_MAINT   SALES_MV      1 29-jan-2013 14:55:33          sysdate+1    N
When you drop an MV, the associated job is also removed. If you want to remove a job manually, use the REMOVE procedure DBMS_JOB. This example removes job number 1, which was identified from the previous queries:
SQL> exec dbms_job.remove(1);
![]() Note You can’t use START WITH or NEXT in conjunction with an MV that refreshes ON COMMIT.
Note You can’t use START WITH or NEXT in conjunction with an MV that refreshes ON COMMIT.
Efficiently Performing a Complete Refresh
When an MV does a complete refresh, the default behavior is to use a DELETE statement to remove all records from the MV table. After the delete is finished, records are selected from the master table and inserted into the MV table. The delete and insert are done as one transaction; this means that anybody selecting from the MV during the complete refresh process sees the data as they existed before the DELETE statement. Anybody accessing the MV immediately after the INSERT commits sees a fresh view of the data.
In some scenarios, you may want to modify this behavior. If a large amount of data are being refreshed, the DELETE statement can take a long time. You have the option of instructing Oracle to perform the removal of data as efficiently as possible via the ATOMIC_REFRESH parameter. When this parameter is set to FALSE, it allows Oracle to use a TRUNCATE statement instead of a DELETE when performing a complete refresh:
SQL> exec dbms_mview.refresh('SALES_MV',method=>'C',atomic_refresh=>false);
TRUNCATE works faster than DELETE for large data sets because TRUNCATE doesn’t have the overhead of generating redo. The disadvantage of using the TRUNCATE statement is that a user selecting from the MV may see zero rows while the refresh is taking place.
When you attempt to perform a fast refresh of an MV, you may sometimes get the ORA-12034 error; for example,
SQL> exec dbms_mview.refresh('SALES_MV','F'),
The statement subsequently throws this error message:
ORA-12034: materialized view log on "MV_MAINT"."SALES" younger than last refresh
To resolve this error, try to refresh the MV completely:
SQL> exec dbms_mview.refresh('SALES_MV','C'),
After the complete refresh has finished, you should be able to perform a fast refresh without receiving an error:
SQL> exec dbms_mview.refresh('SALES_MV','F'),
The ORA-12034 error is thrown when Oracle determines that the MV log was created after the last refresh took place in the associated MV. In other words, the MV log is younger than the last refresh of MV. There are several possible causes:
- The MV log was dropped and recreated.
- The MV log was purged.
- The master table was reorganized.
- The master table was truncated.
- The previous refresh failed.
In this situation, Oracle knows that transactions may have been created between the last refresh time of the MV and when the MV log was created. In this scenario, you have to first perform a complete refresh before you can start using the fast refresh mechanism.
Monitoring MV Refreshes
The following sections contain some very handy examples of how to monitor MV refresh jobs. Examples include how to view the last refresh time, determine whether a job is currently executing, establish the progress of a refresh job, and check to see whether MVs haven’t refreshed within the last day. Scripts such as these are invaluable for troubleshooting and diagnosing refresh problems.
Viewing MVs’ Last Refresh Times
When you’re troubleshooting issues with MVs, usually the first item to check is the LAST_REFRESH_DATE in DBA/ALL/USER_MVIEWS. Viewing this information allows you to see whether the MVs are refreshing on schedule. Run this query as the owner of the MV to display the last refresh date:
select mview_name
,to_char(last_refresh_date,'dd-mon-yy hh24:mi:ss')
,refresh_mode, refresh_method
from user_mviews
The LAST_REFRESH_DATE column of DBA/ALL/USER_MVIEWS shows the last date and time that an MV successfully finished refreshing. The LAST_REFRESH_DATE is NULL if the MV has never successfully refreshed.
Determining Whether a Refresh Is in Progress
If you need to know what MVs are running, use this query:
SQL> select sid, serial#, currmvowner, currmvname from v$mvrefresh;
Here is some sample output:
      SID    SERIAL#  CURRMVOWNER             CURRMVNAME
---------- ---------- ----------------------- --------------------
       108       3037 MV_MAINT                SALES_MV
Monitoring Real-Time Refresh Progress
If you deal with large MVs, the next query shows you the real-time progress of the refresh operation. When you’re troubleshooting issues, this query can be very useful. Run the following script as the user, with privileges on the internal SYS tables:
column "MVIEW BEING REFRESHED" format a25
column inserts format 9999999
column updates format 9999999
column deletes format 9999999
--
select
  currmvowner_knstmvr || '.' || currmvname_knstmvr "MVIEW BEING REFRESHED",
  decode(reftype_knstmvr, 1, 'FAST', 2, 'COMPLETE', 'UNKNOWN') reftype,
  decode(groupstate_knstmvr, 1, 'SETUP', 2, 'INSTANTIATE',
     3, 'WRAPUP', 'UNKNOWN' ) STATE,
  total_inserts_knstmvr inserts,
  total_updates_knstmvr updates,
  total_deletes_knstmvr deletes
from x$knstmvr x
where type_knst = 6
and exists (select 1
            from v$session s
            where s.sid=x.sid_knst
            and s.serial#=x.serial_knst);
When an MV first starts refreshing, you see this output:
MVIEW BEING REFRESHED     REFTYPE  STATE        INSERTS  UPDATES  DELETES
------------------------- -------- ----------- -------- -------- --------
MV_MAINT.SALES_MV         UNKNOWN  SETUP              0        0        0
After a few seconds the MV reaches the INSTANTIATE state:
MV_MAINT.SALES_MV FAST INSTANTIATE 0 0 0
As the MV refreshes, the INSERTS, UPDATES, and DELETES columns are updated appropriately:
MV_MAINT.SALES_MV FAST INSTANTIATE 860 274 0
When the MV is almost finished refreshing, it reaches the WRAPUP state:
MV_MAINT.SALES_MV FAST WRAPUP 5284 1518 0
After the MV has completed refreshing, the query returns no rows:
no rows selected
As you can imagine, this query can be quite useful for troubleshooting and diagnosing MV refresh issues.
Checking Whether MVs Are Refreshing Within a Time Period
When you’re dealing with MVs, it’s nice to have an automated way of determining whether refreshes are occurring. Use the following shell script to detect which MVs haven’t refreshed within the last day and then send an e-mail if any are detected:
#!/bin/bash
# Source oracle OS variables, see Chapter 2 for details
. /etc/oraset $1
#
crit_var=$(sqlplus -s <<EOF
mv_maint/foo
SET HEAD OFF FEED OFF
SELECT count(*) FROM user_mviews
WHERE sysdate-last_refresh_date > 1;
EOF)
#
if [ $crit_var -ne 0 ]; then
  echo $crit_var
  echo "mv_ref refresh problem with $1" | mailx -s "mv_ref problem"
[email protected]
else
  echo $crit_var
  echo "MVs ok"
fi
#
exit 0
This script takes the output of the SQL*Plus statement and returns it to the shell crit_var variable. If any MVs for the REP_MV user haven’t refreshed within the last day, then the crit_var variable has a nonzero value. If crit_var isn’t equal to zero, then an e-mail is sent, indicating that there is an issue.
You can create MVs that select from remote tables, MVs, or views, or a combination of these. Doing so allows you to quickly and efficiently replicate data. The setup for basing MVs on remote objects is as follows:
- Ensure that Oracle Net connectivity exists from the replicated database environment to the database with the master tables. If you don’t have this connectivity, you can’t replicate using MVs.
- Obtain access to a user account in the remote database that has access to the remote tables, MVs, or views that you want to replicate.
- For fast refreshes, create an MV log on the master (base) table. You only need to do this if you intend to perform fast refreshes.
- Create a database link in the replicated database environment that points to the master database.
- Create MVs in the replicated database environment that access remote master objects via the database link created in step 4.
Here is a simple example. First, ensure that you can establish Oracle Net connectivity from the replicated environment to the master database. You can verify connectivity and ensure that you can log in to the master database by connecting via SQL*Plus from the replicated database environment to the remote master. From the command prompt on the database that will contain the MVs, attempt to connect to the user REP_MV in the master database named ENGDEV on the XENGDB server:
$ sqlplus rep_mv/foo@'xengdb:1522/engdev'
When you’re connected to the remote master database, also be sure you have access to the tables that you base the MV on. In this example the name of the remote master table is SALES:
SQL> select count(*) from sales;
Next, create a database link in the database that will contain the MVs. The database link points to the user in the remote master database:
create database link engdev
connect to rep_mv identified by foo
using 'xengdb:1522/engdev';
Now, create an MV that accesses the master SALES table:
create materialized view sales_mv
refresh complete on demand
as
select
 sales_id
,sales_amt
from sales@engdev;
You access the remote database by appending the @<database_link_name> to the table name. This instructs Oracle to select from the remote table. The remote table’s location is defined in the CREATE DATABASE LINK statement.
Understanding Remote-Refresh Architectures
You can use numerous configurations with remotely refreshed MVs. This section details three common scenarios; you can build on them to meet most remote-replication needs.
Figure 15-3 shows a common configuration using MV logs on the master OLTP database. The remote database uses MV logs to enable fast refreshes. This configuration is typically used when you can’t report directly from an OLTP database because of concern that the reporting activity will greatly hamper production performance. This architecture is also useful when you have users on the other side of the planet, and you want to replicate data to a database that is physically closer to them so that they have acceptable reporting performance.
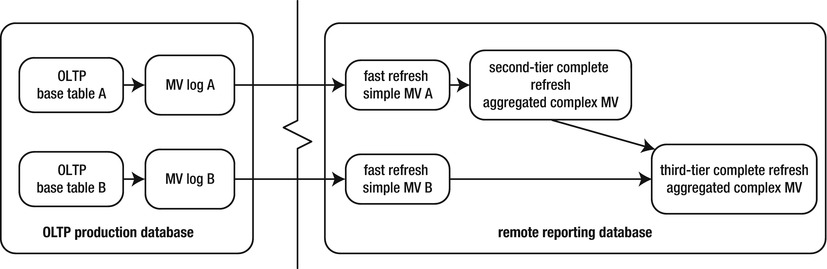
Figure 15-3. Remote refresh, using MV logs at a master site
Figure 15-4 illustrates a scenario in which you aren’t allowed to create MV logs on the master base tables. This may happen because another team or organization owns the master (base) database, and the owners are unwilling to let you create MV logs in the master environment. In this case, you have to use complete MV refreshes to the remote reporting database. This architecture is also appropriate when a large percentage of the base table records are modified each day. In this situation a complete refresh may be more efficient than a fast refresh (because you’re replicating most of the data, not just a small subset).
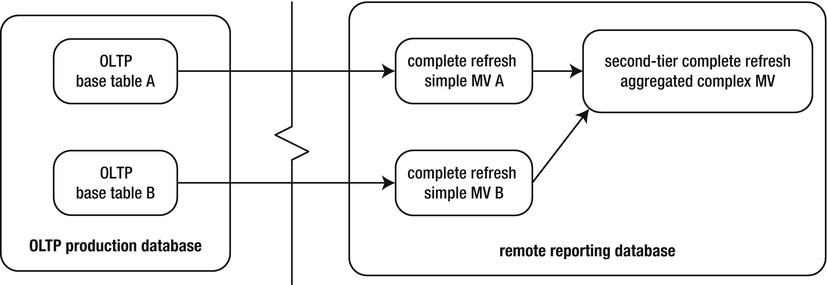
Figure 15-4. Remote refresh, using complete MV refreshes
Figure 15-5 shows a scenario in which you replicate the base tables to a staging database and then replicate from the staging database to a reporting database. This situation is common when the network architecture is configured such that the reporting database is placed on a network segment that can’t be directly connected to a hardened production environment. In this case, you can build an intermediate database that resides in a network that can connect to both the OLTP database and the reporting database. Note that MV logs built are on the MVs in the secure staging database. When refreshing in this configuration, you must coordinate the refresh times of the staging and reporting databases so that there is no overlap during the refresh.
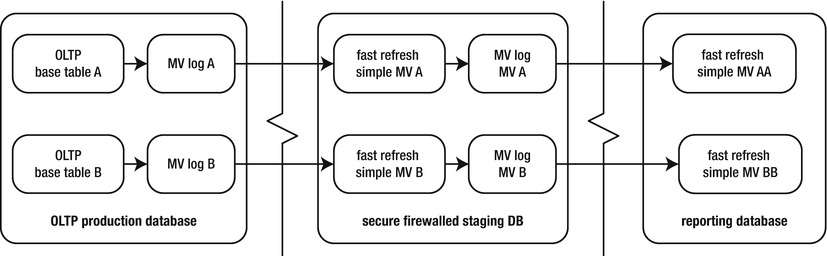
Figure 15-5. Two-hop remote fast MV refresh
![]() Note Sometimes, an MV built on another MV is called a nested MV.
Note Sometimes, an MV built on another MV is called a nested MV.
Viewing MV Base Table Information
When you’re diagnosing issues with MVs, it’s useful to view the MV and its associated remote master table. Run the following query on the database that contains the MV to extract master owner and table information:
select
 owner        mv_owner
,name         mv_name
,master_owner mast_owner
,master       mast_table
from dba_mview_refresh_times
order by 1,2;
The previous query reports on each MV and the master table it’s based on. The base table can be local or remote.
Determining How Many MVs Reference a Central MV Log
Say you have one master table with an MV log. Additionally, more than one remote MV uses the central master MV log. Figure 15-6 illustrates this configuration.
Figure 15-6. Multiple remote MVs using the same centralized MV log
In this situation, Oracle keeps records in the MV log until all MVs have refreshed. For example, suppose MV A has a LAST_REFRESH_DATE of July 1, 2013, and MV B has a LAST_REFRESH_DATE of September 1, 2013. Then, MV A refreshes on October 1, 2013. The master log only purges records older than September 1, 2013 (because the more recent log records are still needed by MV B).
If an MV was dropped and unable to unregister itself from a master MV log table, then records grow indefinitely in the master MV log table. To resolve this issue, you need information regarding which MVs are tied to which MV logs. This query displays the master table owner information and the SNAPID (MV ID) of all dependent MVs:
select mowner
,master base_table
,snapid, snaptime
from sys.slog$;
Here is some sample output that shows two MVs connected to one MV log:
MOWNER          BASE_TABLE               SNAPID SNAPTIME
--------------- -------------------- ---------- ---------
INV_MGMT        PRODUCT_TAXONOMY            653 28-JAN-13
INV_MGMT        COMPANY_ACCOUNTS            650 28-JAN-13
INV_MGMT        CMP_GRP_ASSOC               651 28-JAN-13
The next query displays information regarding all MVs that have been created that tie into an MV log. Run this query on the master site:
select a.log_table, a.log_owner
,b.master mast_tab
,c.owner  mv_owner
,c.name   mview_name
,c.mview_site, c.mview_id
from dba_mview_logs a
    ,dba_base_table_mviews b
    ,dba_registered_mviews c
where b.mview_id = c.mview_id
and   b.owner    = a.log_owner
and   b.master   = a.master
order by a.log_table;
Here is some sample output:
LOG_TABLE           LOG_OWNE MAST_TAB      MV_OWN MVIEW_NAME       MVIEW_S MVIEW_ID
------------------- -------- ------------- ------ ---------------- ------- --------
MLOG$_CMP_GRP_ASSOC INV_MGMT CMP_GRP_ASSOC REP_MV CMP_GRP_ASSOC_MV DWREP        651
MLOG$_CMP_GRP_ASSOC INV_MGMT CMP_GRP_ASSOC TSTDEV CMP_GRP_ASSOC_MV ENGDEV       541
When you drop a remote MV, it should unregister from the master database. However, this doesn’t always happen. A remote database may get wiped out (e.g., a short-term development database), and the MV doesn’t get a chance to unregister itself (via the DROP MATERIALIZED VIEW statement). In this situation the MV log is unaware that a dependent MV is no longer available and therefore keeps records indefinitely.
To purge unwanted MV information from the database that contains the MV log, execute the PURGE_MVIEW_FROM_LOG procedure of DBMS_MVIEW. This example passes in the ID of the MV to be purged:
SQL> exec dbms_mview.purge_mview_from_log(541);
This statement should update the data dictionary and remove information from the internal table SLOG$ and DBA_REGISTERED_MVIEWS. If the MV being purged is the oldest MV associated with the MV log table, the associated old records are also deleted from the MV log.
If a remote MV is no longer available but is still registered with the MV log table, you can manually unregister it at the master site. Use the UNREGISTER_MVIEW procedure of the DBMS_MVIEW package to unregister a remote MV. To do this, you need to know the remote MV owner, MV name, and MV site (available from the output of the previous query in this section):
SQL> exec dbms_mview.unregister_mview('TSTDEV','CMP_GRP_ASSOC_MV','ENGDEV'),
If successful, the prior operation removes a record from DBA_REGISTERED_MVIEWS.
Managing MVs in Groups
An MV group is a useful feature that enables you to refresh a set of MVs at a consistent transactional point in time. If you refresh MVs based on master tables that have parent–child relationships, then you should most likely use a refresh group. This method guarantees that you won’t have any orphaned child records in your set of refreshed MVs. The following sections describe how to create and maintain MV refresh groups.
![]() Note You use the DBMS_REFRESH package to accomplish most of the tasks involved in managing MV refresh groups. This package is fully documented in the Oracle Advanced Replication Management API Reference Guide, which is available for download from the Technology Network area of the Oracle Web site (http://otn.oracle.com).
Note You use the DBMS_REFRESH package to accomplish most of the tasks involved in managing MV refresh groups. This package is fully documented in the Oracle Advanced Replication Management API Reference Guide, which is available for download from the Technology Network area of the Oracle Web site (http://otn.oracle.com).
You use the MAKE procedure of the DBMS_REFRESH package to create an MV group. When you create an MV group, you must specify a name, a comma-separated list of MVs in the group, the next date to refresh, and the interval used to calculate the next refresh time. Here is an example of a group that consists of two MVs:
begin
  dbms_refresh.make(
    name      => 'SALES_GROUP'
   ,list      => 'SALES_MV, SALES_DAILY_MV'
   ,next_date => sysdate-100
   ,interval  => 'sysdate+1'
);
end;
/
When you create an MV group, Oracle automatically creates a database job to manage the refresh of the group. You can view the details of an MV group by querying from DBA/ALL/USER_REFRESH:
SQL> select rname, job, next_date, interval from user_refresh;
Here is some sample output:
RNAME       JOB NEXT_DATE                 INTERVAL
--------------- ---- -------------------- ---------------
SALES_GROUP        3 20-OCT-12            sysdate+1
I hardly ever use the internal database job as a refresh mechanism. Note that the NEXT_DATE value specified in the previous SQL is sysdate-100, meaning that the only way the database job will kick off the job is if the date somehow gets set to 100 days in the past. In this way, the job scheduler never initiates the refresh.
In most environments the refresh needs to start at a specific time. In these scenarios, you use a cron job or some similar utility that has job-scheduling capabilities.
Altering an MV Refresh Group
You can alter characteristics of a refresh group, such as the refresh date or interval. If you rely on a database job for your refresh mechanism, then you may occasionally need to tweak your refresh characteristics. Use the CHANGE function of the DBMS_REFRESH package to achieve this. The following example changes the INTERVAL calculation:
SQL> exec dbms_refresh.change(name=>'SALES_GROUP',interval=>'SYSDATE+2'),
Again, you need to change refresh intervals only if you’re using the internal database job to initiate the materialized group refresh. You can verify the details of a refresh group’s interval and job information with this query:
select a.job, a.broken, b.rowner, b.rname, b.interval
from dba_jobs    a
    ,dba_refresh b
where a.job = b.job
order by a.job;
Here is the output for this example:
JOB  B ROWNER     RNAME           INTERVAL
---- - ---------- --------------- ---------------
   3 N MV_MAINT   SALES_GROUP     SYSDATE+2
After you’ve created a group, you can manually refresh it, using the REFRESH function of the DBMS_REFRESH package. This example refreshes the group that you previously created:
SQL> exec dbms_refresh.refresh('SALES_GROUP'),
If you inspect the LAST_REFRESH_DATE column of USER_MVIEWS, you’ll note that all MVs in the group have the same refresh time. This is the expected behavior because the MVs in the group are all refreshed at a consistent transactional point in time.
You may have noted that you can use the DBMS_MVIEW package to refresh a group of MVs. For instance, you can refresh a set of MVs in a list as follows, using DBMS_MVIEW:
SQL> exec dbms_mview.refresh(list=>'SALES_MV,SALES_DAILY_MV'),
This method refreshes each MV in the list in a single transaction. It’s the equivalent of using an MV group. However, when you use DBMS_MVIEW, you have the option of setting the ATOMIC_REFRESH parameter to TRUE (default) or FALSE. For example, here the ATOMIC_REFRESH parameter is set to FALSE:
SQL> exec dbms_mview.refresh(list=>'SALES_MV,SALES_DAILY_MV',atomic_refresh=>false);
This setting instructs DBMS_MVIEW to refresh each MV in the list as a separate transaction. The setting also instructs complete refreshes of the MV to consider using the TRUNCATE statement. The previous line of code is equivalent to the following two lines:
SQL> exec dbms_mview.refresh(list=>'SALES_MV', atomic_refresh=>false);
SQL> exec dbms_mview.refresh(list=>'SALES_DAILY_MV', atomic_refresh=>false);
Compare that with the behavior of DBMS_REFRESH, which is the package you should use to set up and maintain an MV group. The DBMS_REFRESH package always refreshes a group of MVs as a consistent transaction.
If you always need a set of MVs to be refreshed as a transactionally consistent group, use DBMS_REFRESH. If you need some flexibility as to whether a list of MVs is refreshed as a consistent transaction (or not), use DBMS_MVIEW.
Determining MVs in a Group
When you’re investigating issues with an MV refresh group, a good starting point is to display which MVs the group contains. Query the data dictionary views DBA_RGROUP and DBA_RCHILD to see the MVs in a refresh group:
select a.owner
 ,a.name mv_group
 ,b.name mv_name
from dba_rgroup a
    ,dba_rchild b
where a.refgroup = b.refgroup
and   a.owner    = b.owner
order by a.owner, a.name, b.name;
Here is a snippet of the output:
OWNER      MV_GROUP             MV_NAME
---------- -------------------- --------------------
MV_MAINT   SALES_GROUP          SALES_DAILY_MV
MV_MAINT   SALES_GROUP          SALES_MV
In the DBA_RGROUP view, the NAME column represents the name of the refresh group. The DBA_RCHILD view contains the name of each MV in the refresh group.
Adding an MV to a Refresh Group
As your business requirements change, you occasionally need to add an MV to a group. Use the ADD procedure of the DBMS_REFRESH package to accomplish this task:
SQL> exec dbms_refresh.add(name=>'SALES_GROUP',list=>'PRODUCTS_MV,USERS_MV'),
You must specify a name and provide a comma-separated list of the MV names to add. The newly added MVs are refreshed the next time the group is refreshed.
The other way to add an MV to a group is to drop the group and recreate it with the new MV. However, it’s usually preferable to add an MV.
Removing MVs from a Refresh Group
Sometimes, you need to remove an MV from a group. To do this, use the SUBTRACT function of the DBMS_REFRESH package. This example removes one MV from a group:
SQL> exec dbms_refresh.subtract(name=>'SALES_GROUP',list=>'SALES_MV'),
You have to specify the name of the MV group and provide a comma-separated list containing the names of the MVs you want to remove.
The other way to remove an MV from a group is to drop the group and recreate it without the unwanted MV(s). However, it’s usually preferable to remove an MV.
If you need to drop an MV refresh group, use the DESTROY procedure of the DBMS_REFRESH package. This example drops the MV group named SALES_GROUP:
SQL> exec dbms_refresh.destroy('SALES_GROUP'),
This method only drops the MV refresh-group object—it doesn’t drop any of the actual MVs. If you need to also drop the MVs, use the DROP MATERIALIZED VIEW statement.
Summary
Sometimes, the term materialized view confuses people who are new to the technology. Perhaps Oracle should have named this feature “periodically purge and repopulate a table that contains the results of a query,” but that’s probably too long a phrase. Regardless, when you understand the power of this tool, you can use it to replicate and aggregate large amounts of data. You can greatly improve the performance of queries by periodically computing and storing the results of complex aggregations of data.
MVs can be fast refreshable, which means that they copy over only changes from the master table that have occurred since the last refresh. To use this type of MV, you must create an MV log on the master table. It’s not always possible to create an MV log; in these scenarios the MV must be completely refreshed.
If need be, you can also compress and encrypt the data with an MV. This allows for better space management and security. Additionally, you can partition the underlying table used by an MV, to allow for greater scalability, performance, and availability.
The last several chapters have focused on specialized database features that DBAs often use. These include large objects, partitioning, Data Pump, external tables, and MVs. The book now shifts focus to one of the most important topics a DBA must be familiar with: backup and recovery. User managed backups and RMAN are covered in the next several chapters.