![]()
User-Managed Backup and Recovery
All DBAs should know how to back up a database. Even more critical, a DBA must be able to restore and recover a database. When media failures occur, everybody looks to the DBA to get the database up and running. There are two common, yet very different, Oracle approaches for backup and recovery:
User-managed backups are aptly named because you manually perform all steps associated with the backup or recovery, or both. There are two types of user-managed backups: cold backups and hot backups. Cold backups are sometimes called offline backups because the database is shut down during the backup process. Hot backups are also referred to as online backups because the database is available during the backup procedure.
RMAN is Oracle’s flagship backup and recovery tool. It automates and manages most aspects of backup and recovery. For Oracle backup and recovery, you should use RMAN. So, why have a chapter about user-managed backups when this approach has been gathering dust for more than a decade? Consider the following reasons for understanding user-managed backup and recovery:
- You still find shops using user-managed backup and recovery techniques. Therefore, you’re required to be knowledgeable about this technology.
- Manually executing a user-managed backup, restore, and recovery solidifies your understanding of the Oracle backup and recovery architecture. This helps immensely when you’re troubleshooting issues with any backup and recovery tool and lays the foundation of core knowledge for key Oracle tools, such as RMAN and Data Guard.
- You’ll more fully appreciate RMAN and the value of its features.
- Nightmarish database recovery stories recounted by the old DBAs will now make sense.
For these reasons, you should be familiar with user-managed backup and recovery techniques. Manually working through the scenarios in this chapter will greatly increase your understanding of which files are backed up and how they’re used in a recovery. You’ll be much better prepared to use RMAN. RMAN makes much of backup and recovery automated and push-button. However, knowledge of how to back up and recover a database manually helps you think through and troubleshoot issues with any type of backup technology.
This chapter begins with cold backups. These types of backups are viewed as the simplest form of user-managed backup because even a system administrator can implement them. Next, the chapter discusses hot backups. You also investigate several common restore-and-recovery scenarios. These examples build your base knowledge of Oracle backup and recovery internals.
![]() Tip In Oracle Database 12c, you can perform user-managed hot backups and cold backups on pluggable databases; the user-managed backup and recovery technology works fine. However, I would strongly recommend that you use RMAN to manage backup and recovery in a pluggable environment. When connected to either the root container or a pluggable container, RMAN automatically determines which data files need to be backed up, their locations, and how to restore and recover. This task quickly becomes unwieldy for user-managed backups, in which the DBA has to manage this information for the root container and, potentially, numerous pluggable databases.
Tip In Oracle Database 12c, you can perform user-managed hot backups and cold backups on pluggable databases; the user-managed backup and recovery technology works fine. However, I would strongly recommend that you use RMAN to manage backup and recovery in a pluggable environment. When connected to either the root container or a pluggable container, RMAN automatically determines which data files need to be backed up, their locations, and how to restore and recover. This task quickly becomes unwieldy for user-managed backups, in which the DBA has to manage this information for the root container and, potentially, numerous pluggable databases.
Implementing a Cold-Backup Strategy for a Noarchivelog Mode Database
You perform a user-managed cold backup by copying files after the database has been shut down. This type of backup is also known as an offline backup. Your database can be in either noarchivelog mode or archivelog mode when you make a cold backup.
DBAs tend to think of a cold backup as being synonymous with a backup of a database in noarchivelog mode. That isn’t correct. You can make a cold backup of a database in archivelog mode, and that’s a backup strategy that many shops employ. The differences between a cold backup with the database in noarchivelog mode and in archivelog mode are detailed in the following sections.
Making a Cold Backup of a Noarchivelog Mode Database
One main reason for making a cold backup of a database in noarchivelog mode is to give you a way to restore a database back to a point in time in the past. You should use this type of backup only if you don’t need to recover transactions that occurred after the backup. This type of backup and recovery strategy is acceptable only if your business requirements allow for the loss of data and downtime. Rarely would you ever implement this type of backup and recovery solution for a production business database.
Having said that, there are some good reasons to implement this type of backup. One common use is to make a cold backup of a development/test/training database and periodically reset the database back to the baseline. This gives you a way to restart a performance test or a training session with the same point-in-time snapshot of the database.
![]() Tip Consider using the Flashback Database feature to set your database back to a point in time in the past (see Chapter 19 for more details).
Tip Consider using the Flashback Database feature to set your database back to a point in time in the past (see Chapter 19 for more details).
The example in this section shows you how to make a backup of every critical file in your database: all control files, data files, temporary data files, and online redo log files. With this type of backup, you can easily restore your database back to the point in time when the backup was made. The main advantages of this approach are that it’s conceptually simple and easy to implement. Here are the steps required for a cold backup of a database in noarchivelog mode:
- Determine where to copy the backup files and how much space is required.
- Identify the locations and names of the database files to copy.
- Shut down the database with the IMMEDIATE, TRANSACTIONAL, or NORMAL clause.
- Copy the files (identified in step 2) to the backup location (determined in step 1).
- Restart your database.
The following sections elaborate on these steps.
Step 1. Determine Where to Copy the Backup Files and How Much Space Is Required
Ideally, the backup location should be on a set of disks separate from your live data files location. However, in many shops, you may not have a choice and may be told which mount points are to be used by the database. For this example the backup location is the directory /u01/cbackup/o12c. To get a rough idea of how much space you need to store one copy of the backups, you can run this query:
select sum(sum_bytes)/1024/1024 m_bytes
from(
select sum(bytes) sum_bytes from v$datafile
union
select sum(bytes) sum_bytes from v$tempfile
union
select (sum(bytes) * members) sum_bytes from v$log
group by members);
You can verify how much operating disk space is available with the Linux/Unix df (disk free) command. Make sure that the amount of disk space available at the OS is greater than the sum returned from the prior query:
$ df -h
Step 2. Identify the Locations and Names of the Database Files to Copy
Run this query to list the names (and paths) of the files that are included in a cold backup of a noarchivelog mode database:
select name from v$datafile
union
select name from v$controlfile
union
select name from v$tempfile
union
select member from v$logfile;
BACKING UP ONLINE REDO LOGS (OR NOT)
Do you need to back up the online redo logs? No; you never need to back up the online redo logs as part of any type of backup. Then, why do DBAs back up the online redo logs as part of a cold backup? One reason is that it makes the restore process for the noarchivelog mode scenario slightly easier. The online redo logs are required to open the database in a normal manner.
If you back up all files (including the online redo logs), then to get your database back to the state it was in at the time of the backup, you restore all files (including the online redo logs) and start up your database.
Step 3. Shut Down the Database
Connect to your database as the SYS (or as a SYSDBA-privileged user), and shut down your database, using IMMEDIATE, TRANSACTIONAL, or NORMAL. In almost every situation, using IMMEDIATE is the preferred method. This mode disconnects users, rolls back incomplete transactions, and shuts down the database:
$ sqlplus / as sysdba
SQL> shutdown immediate;
Step 4. Create Backup Copies of the Files
For every file identified in step 2, use an OS utility to copy the files to a backup directory (identified in step 1). In this simple example all the data files, control files, temporary database files, and online redo logs are in the same directory. In production environments, you’ll most likely have files spread out in several different directories. This example uses the Linux/Unix cp command to copy the database files from /u01/dbfile/o12c to the /u01/cbackup/o12c directory:
$ cp /u01/dbfile/o12c/*.* /u01/cbackup/o12c
Restoring a Cold Backup in Noarchivelog Mode with Online Redo Logs
The next example explains how to restore from a cold backup of a database in noarchivelog mode. If you included the online redo logs as part of the cold backup, you can include them when you restore the files. Here are the steps involved in this procedure:
- Shut down the instance.
- Copy the data files, online redo logs, temporary files, and control files back from the backup to the live database data file locations.
- Start up your database.
These steps are detailed in the following sections.
Step 1. Shut Down the Instance
Shut down the instance, if it’s running. In this scenario it doesn’t matter how you shut down the database, because you’re restoring back to a point in time (with no recovery of transactions). Any files in the live database directory locations are overwritten when the backup files are copied back. If your instance is running, you can abruptly abort it. As a SYSDBA-privileged user, do the following:
$ sqlplus / as sysdba
SQL> shutdown abort;
Step 2. Copy the Files Back from the Backup
This step does the reverse of the backup: you’re copying files from the backup location to the live database file locations. In this example all the backup files are located in the /u01/cbackup/o12c directory, and all files are being copied to the /u01/dbfile/o12c directory:
$ cp /u01/cbackup/o12c/*.* /u01/dbfile/o12c
Step 3. Start Up the database
Connect to your database as SYS (or a user that has SYSDBA privileges), and start up your database:
$ sqlplus / as sysdba
SQL> startup;
After you finish these steps, you should have an exact copy of your database as it was when you made the cold backup. It’s as if you set your database back to the point in time when you made the backup.
Restoring a Cold Backup in Noarchivelog Mode Without Online Redo Logs
As mentioned earlier, you don’t ever need the online redo logs when restoring from a cold backup. If you made a cold backup of your database in noarchivelog mode and didn’t include the online redo logs as part of the backup, the steps to restore are nearly identical to the steps in the previous section. The main difference is that the last step requires you to open your database, using the OPEN RESETLOGS clause. Here are the steps:
- Shut down the instance.
- Copy the control files and data files back from the backup.
- Start up the database in mount mode.
- Open the database with the OPEN RESETLOGS clause.
Step 1. Shut Down the Instance
Shut down the instance, if it’s running. In this scenario it doesn’t matter how you shut down the database, because you’re restoring back to a point in time. Any files in the live database directory locations are overwritten when the backups are copied. If your instance is running, you can abruptly abort it. As a SYSDBA-privileged user, do the following:
$ sqlplus / as sysdba
SQL> shutdown abort;
Step 2. Copy the Files Back from the Backup
Copy the control files and data files from the backup location to the live data file locations:
$ cp <backup directory>/*.* <live database file directory>
Step 3. Start Up the Database in Mount Mode
Connect to your database as SYS or a user with SYSDBA privileges, and start the database in mount mode:
$ sqlplus / as sysdba
SQL> startup mount
Step 4. Open the Database with the OPEN RESETLOGS Clause
Open your database for use with the OPEN RESETLOGS clause:
SQL> alter database open resetlogs;
If you see the Database altered message, the command was successful. However, you may see this error:
ORA-01139: RESETLOGS option only valid after an incomplete database recovery
In this case, issue the following command:
SQL> recover database until cancel;
You should see this message:
Media recovery complete.
Now, attempt to open your database with the OPEN RESETLOGS clause:
SQL> alter database open resetlogs;
This statement instructs Oracle to recreate the online redo logs. Oracle uses information in the control file for the placement, name, and size of the redo logs. If there are old online redo log files in those locations, they’re overwritten.
If you’re monitoring your alert.log throughout this process, you may see ORA-00312 and ORA-00313. This means that Oracle can’t find the online redo log files; this is okay, because these files aren’t physically available until they’re recreated by the OPEN RESETLOGS command.
Scripting a Cold Backup and Restore
It’s instructional to view how to script a cold backup. The basic idea is to dynamically query the data dictionary to determine the locations and names of the files to be backed up. This is preferable to hard-coding the directory locations and file names in a script. The dynamic generation of a script is less prone to errors and surprises (e.g., the addition of new data files to a database but not to an old, hard-coded backup script).
![]() Note The scripts in this section aren’t meant to be production-strength backup and recovery scripts. Rather, they illustrate the basic concepts of scripting a cold backup and subsequent restore.
Note The scripts in this section aren’t meant to be production-strength backup and recovery scripts. Rather, they illustrate the basic concepts of scripting a cold backup and subsequent restore.
The first script in this section makes a cold backup of a database. Before you use the cold backup script, you need to modify these variables in the script to match your database environment:
- ORACLE_SID
- ORACLE_HOME
- cbdir
The cbdir variable specifies the name of the backup-directory location. The script creates a file named coldback.sql, which is executed from SQL*Plus to initiate a cold backup of the database:
#!/bin/bash
ORACLE_SID=o12c
ORACLE_HOME=/u01/app/oracle/product/12.1.0.1/db_1
PATH=$PATH:$ORACLE_HOME/bin
#
sqlplus -s <<EOF
/ as sysdba
set head off pages0 lines 132 verify off feed off trimsp on
define cbdir=/u01/cbackup/o12c
spo coldback.sql
select 'shutdown immediate;' from dual;
select '!cp ' || name || ' ' || '&&cbdir' from v$datafile;
select '!cp ' || name || ' ' || '&&cbdir' from v$tempfile;
select '!cp ' || member || ' ' || '&&cbdir' from v$logfile;
select '!cp ' || name || ' ' || '&&cbdir' from v$controlfile;
select 'startup;' from dual;
spo off;
@@coldback.sql
EOF
exit 0
This file generates commands that are to be executed from an SQL*Plus script to make a cold backup of a database. You place an exclamation mark (!) in front of the Unix cp command to instruct SQL*Plus to host out to the OS to run the cp command. You also place a backward slash () in front of each dollar sign ($) when referencing v$ data dictionary views; this is required in a Linux/Unix shell script. The escapes the $ and tells the shell script not to treat the $ as a special character (the $ normally signifies a shell variable).
After you run this script, here is a sample of the copy commands written to the coldback.sql script:
shutdown immediate;
!cp /u01/dbfile/o12c/system01.dbf /u01/cbackup/o12c
!cp /u01/dbfile/o12c/sysaux01.dbf /u01/cbackup/o12c
!cp /u01/dbfile/o12c/undotbs01.dbf /u01/cbackup/o12c
!cp /u01/dbfile/o12c/users01.dbf /u01/cbackup/o12c
!cp /u01/dbfile/o12c/tools01.dbf /u01/cbackup/o12c
!cp /u01/dbfile/o12c/temp01.dbf /u01/cbackup/o12c
!cp /u01/oraredo/o12c/redo02a.rdo /u01/cbackup/o12c
!cp /u02/oraredo/o12c/redo02b.rdo /u01/cbackup/o12c
!cp /u01/oraredo/o12c/redo01a.rdo /u01/cbackup/o12c
!cp /u02/oraredo/o12c/redo01b.rdo /u01/cbackup/o12c
!cp /u01/oraredo/o12c/redo03a.rdo /u01/cbackup/o12c
!cp /u02/oraredo/o12c/redo03b.rdo /u01/cbackup/o12c
!cp /u01/dbfile/o12c/control01.ctl /u01/cbackup/o12c
!cp /u01/dbfile/o12c/control02.ctl /u01/cbackup/o12c
startup;
While you make a cold backup, you should also generate a script that provides the commands to copy data files, temp files, log files, and control files back to their original locations. You can use this script to restore from the cold backup. The next script in this section dynamically creates a coldrest.sql script that copies files from the backup location to the original data file locations. You need to modify this script in the same manner that you modified the cold backup script (i.e., change the ORACLE_SID, ORACLE_HOME, and cbdir variables to match your environment):
#!/bin/bash
ORACLE_SID=o12c
ORACLE_HOME=/u01/app/oracle/product/12.1.0.1/db_1
PATH=$PATH:$ORACLE_HOME/bin
#
sqlplus -s <<EOF
/ as sysdba
set head off pages0 lines 132 verify off feed off trimsp on
define cbdir=/u01/cbackup/o12c
define dbname=$ORACLE_SID
spo coldrest.sql
select 'shutdown abort;' from dual;
select '!cp ' || '&&cbdir/' || substr(name, instr(name,'/',-1,1)+1) ||
' ' || name from v$datafile;
select '!cp ' || '&&cbdir/' || substr(name, instr(name,'/',-1,1)+1) ||
' ' || name from v$tempfile;
select '!cp ' || '&&cbdir/' || substr(member, instr(member,'/',-1,1)+1) ||
' ' || member from v$logfile;
select '!cp ' || '&&cbdir/' || substr(name, instr(name,'/',-1,1)+1) ||
' ' || name from v$controlfile;
select 'startup;' from dual;
spo off;
EOF
exit 0
This script creates a script, named coldrest.sql, that generates the copy commands to restore your data files, temp files, log files, and control files back to their original locations. After you run this shell script, here is a snippet of the code in the coldrest.sql file:
shutdown abort;
!cp /u01/cbackup/o12c/system01.dbf /u01/dbfile/o12c/system01.dbf
!cp /u01/cbackup/o12c/sysaux01.dbf /u01/dbfile/o12c/sysaux01.dbf
!cp /u01/cbackup/o12c/undotbs01.dbf /u01/dbfile/o12c/undotbs01.dbf
!cp /u01/cbackup/o12c/users01.dbf /u01/dbfile/o12c/users01.dbf
!cp /u01/cbackup/o12c/tools01.dbf /u01/dbfile/o12c/tools01.dbf
...
!cp /u01/cbackup/o12c/redo03b.rdo /u02/oraredo/o12c/redo03b.rdo
!cp /u01/cbackup/o12c/control01.ctl /u01/dbfile/o12c/control01.ctl
!cp /u01/cbackup/o12c/control02.ctl /u01/dbfile/o12c/control02.ctl
startup;
If you need to restore from a cold backup using this script, log in to SQL*Plus as SYS, and execute the script:
$ sqlplus / as sysdba
SQL> @coldrest.sql
Making a Cold Backup of an Archivelog Mode Database
You can use a backup of a database in archivelog mode to restore and recover up to the last committed transaction prior to a failure. Therefore, unlike a backup of a noarchivelog mode database, this type of backup is not necessarily intended to be used to reset the database back to a point in time in the past from which no recovery can be applied. The purpose of a backup of an archivelog mode database is usually to restore the database and roll forward and apply transactions to fully recover the database.
This has significant implications for the backups. Recall that for a noarchivelog mode database, DBAs sometimes include the online redo logs as part of the backup. For a backup of an archivelog mode database, you should never include the online redo logs in the backup. The online redo logs contain the most currently generated redo transaction information for the database. Any transactions in the current online redo logs that haven’t been archived are required for a complete recovery. In the event of a failure, you don’t want to overwrite the online redo logs with backups of online redo logs taken from a point in time in the past; this would result in the inability to perform a complete recovery.
The high-level steps for a cold backup of a database in archivelog mode are identical to those for a noarchivelog mode database:
- Determine where to copy the backup files and how much space is required.
- Identify the locations and names of the database files to copy.
- Shut down the database with the IMMEDIATE, TRANSACTIONAL, or NORMAL clause.
- Copy the files (identified in step 2) to the backup location (determined in step 1).
- Restart your database.
The main difference between the cold archivelog mode backup and noarchivelog mode backup is that in step 2, you run this query to identify the files to be backed up:
select name from v$datafile
union
select name from v$controlfile;
Also, you don’t need to back up the data files associated with the TEMP tablespace. As of Oracle Database 10g, Oracle automatically attempts to create missing data files associated with the TEMP tablespace (for locally managed temp tablespaces) when the database is started.
Restoring and recovering with a cold backup of a database in archivelog mode is nearly identical to the restore and recovery from a hot backup. See the sections “Performing a Complete Recovery of an Archivelog Mode Database” and “Performing an Incomplete Recovery of an Archivelog Mode Database,” later in this chapter, for discussion of how to restore and recover from a database in archivelog mode.
UNDERSTANDING THE MECHANICS DOES MATTER
Knowing how a hot backup works also helps in untangling and surviving difficult RMAN scenarios. RMAN is a sophisticated and highly automated tool. With just a few commands, you can back up, restore, and recover your database. However, if there is a failure with any RMAN command or step, an understanding of Oracle’s underlying internal restore-and-recovery architecture pays huge dividends. A detailed knowledge of how to restore and recover from a hot backup helps you logically think your way through any RMAN scenario.
When you ride a bike, understanding how the derailleurs and gears and shifting work helps a great deal. You can usually tell when a rider knows only to push one button to go slower and another button to go faster. Riders who understand in more detail how the chain moves between gears will always be smoother at shifting gears. My editor, Jonathan Gennick, recounted the following anecdote while reading an early draft of this chapter:
I loaned my bike to a guy the other week and went on a ride with him. You should have heard the horrible noises he conjured out of my derailleurs and drivetrain. I thought he was going to damage the bike. After a few minutes, he rode up to me and told me that my front derailleur wasn’t working right.
“The derailleur was fine. He was just one of those guys who knows only how to push the button, without any understanding of what goes on underneath that action.”
Similarly, effort you put into understanding how backup and recovery is implemented pays off in the long run. You actually have less to remember—because your understanding of the underlying operation enables you to think through problems and solve them in ways that checklists don’t.
Implementing a Hot Backup Strategy
As discussed previously, RMAN should be your tool of choice for any type of Oracle database backup (either online or offline). RMAN is more efficient than user-managed backups and automates most tasks. Having said that, one of the best ways to gain an understanding of Oracle backup and recovery internals is to make a hot backup and then use that backup to restore and recover your database. Manually issuing the commands involved in a hot backup, followed by a restore and recovery, helps you understand the role of each type of file (control files, data files, archive redo logs, online redo logs) in a restore-and-recovery scenario.
The following sections begin by showing you how to implement a hot backup. They also provide basic scripts that you can use to automate the hot backup process. Later sections explain some of the internal mechanics of a hot backup and clarify why you must put tablespaces in backup mode before the hot backup takes place.
Making a Hot Backup
Here are the steps required for a hot backup:
- Ensure that the database is in archivelog mode.
- Determine where to copy the backup files.
- Identify which files need to be backed up.
- Note the maximum sequence number of the online redo logs.
- Alter the database/tablespace into backup mode.
- Copy the data files with an OS utility to the location determined in step 2.
- Alter the database/tablespace out of backup mode.
- Archive the current online redo log, and note the maximum sequence number of the online redo logs.
- Back up the control file.
- Back up any archive redo logs generated during the backup.
These steps are covered in detail in the following sections.
Step 1. Ensure That the Database Is in Archivelog Mode
Run the following command to check the archivelog mode status of your database:
SQL> archive log list;
The output shows that this database is in archivelog mode:
Database log mode Archive Mode
Automatic archival Enabled
Archive destination /u01/oraarch/o12c
If you’re not sure how to enable archiving, see Chapter 5 for details.
Step 2. Determine Where to Copy the Backup Files
Now, determine the backup location. For this example the backup location is the directory /u01/hbackup/o12c. To get a rough idea of how much space you need, you can run this query:
SQL> select sum(bytes) from dba_data_files;
Ideally, the backup location should be on a set of disks separate from your live data files. But, in practice, many times you’re given a slice of space on a SAN and have no idea about the underlying disk layout. In these situations, you rely on redundancy’s being built into the SAN hardware (RAID disks, multiple controllers, and so on) to ensure high availability and recoverability.
Step 3. Identify Which Files Need to Be Backed Up
For this step, you only need to know the locations of the data files:
SQL> select name from v$datafile;
When you get to step 5, you may want to consider altering tablespaces one at a time into backup mode. If you take that approach, you need to know which data files are associated with which tablespace:
select tablespace_name, file_name
from dba_data_files
order by 1,2;
Step 4. Note the Maximum Sequence Number of the Online Redo Logs
To successfully recover using a hot backup, you require, at minimum, all the archive redo logs that were generated during the backup. For this reason, you need to note the archivelog sequence before starting the hot backup:
select thread#, max(sequence#)
from v$log
group by thread#
order by thread#;
Step 5. Alter the Database/Tablespaces into Backup Mode
You can put all your tablespaces into backup mode at the same time, using the ALTER DATABASE BEGIN BACKUP statement:
SQL> alter database begin backup;
If it’s an active OLTP database, doing this can greatly degrade performance. This is because when a tablespace is in backup mode, Oracle copies a full image of any block (when it’s first modified) to the redo stream (see the section “Understanding the Split-Block Issue,” later in this chapter, for more details).
The alternative is to alter only one tablespace at a time into backup mode. After the tablespace has been altered into backup mode, you can copy the associated data files (step 6) and then alter the tablespace out of backup mode (step 7). You have to do this for each tablespace:
SQL> alter tablespace <tablespace_name> begin backup;
Step 6. Copy the Data Files with an OS Utility
Use an OS utility (Linux/Unix cp command) to copy the data files to the backup location. In this example all the data files are in one directory, and they’re all copied to the same backup directory:
$ cp /u01/dbfile/o12c/*.dbf /u01/hbackup/o12c
Step 7. Alter the Database/Tablespaces out of Backup Mode
After you’re finished copying all your data files to the backup directory, you need to alter the tablespaces out of backup mode. This example alters all tablespaces out of backup mode at the same time:
SQL> alter database end backup;
If you’re altering your tablespaces into backup mode one at a time, you need to alter each tablespace out of backup mode after its data files have been copied:
SQL> alter tablespace <tablespace_name> end backup;
If you don’t take the tablespaces out of backup mode, you can seriously degrade performance and compromise the ability to recover your database. You can verify that no data files have an ACTIVE status with the following query:
SQL> alter session set nls_date_format = 'DD-MON-RRRR HH24:MI:SS';
SQL> select * from v$backup where status='ACTIVE';
Step 8. Archive the Current Online Redo Log, and Note the Maximum Sequence Number of the Online Redo Logs
The following statement instructs Oracle to archive any unarchived online redo logs and to initiate a log switch. This ensures that an end-of-backup marker is written to the archive redo logs:
SQL> alter system archive log current;
Also, note the maximum online redo log sequence number. If a failure occurs immediately after the hot backup, you need any archive redo logs generated during the hot backup to fully recover your database:
select thread#, max(sequence#)
from v$log
group by thread#
order by thread#;
Step 9. Back Up the Control File
For a hot backup, you can’t use an OS copy command to make a backup of the control file. Oracle’s hot backup procedure specifies that you must use the ALTER DATABASE BACKUP CONTROLFILE statement. This example makes a backup of the control file and places it in the same location as the database backup files:
SQL> alter database backup controlfile
to '/u01/hbackup/o12c/controlbk.ctl' reuse;
The REUSE clause instructs Oracle to overwrite the file if it already exists in the backup location.
Step 10. Back Up Any Archive Redo Logs Generated During the Backup
Back up the archive redo logs that were generated during the hot backup. You can do this with an OS copy command:
$ cp <archive redo logs generated during backup> <backup directory>
This procedure guarantees that you have the logs, even if a failure should occur soon after the hot backup finishes. Be sure you don’t back up an archive redo log that is currently being written to by the archiver process—doing so results in an incomplete copy of that file. Sometimes, DBAs script this process by checking the maximum SEQUENCE# with the maximum RESETLOGS_ID in the V$ARCHIVED_LOG view. Oracle updates that view when it’s finished copying the archive redo log to disk. Therefore, any archive redo log file that appears in the V$ARCHIVED_LOG view should be safe to copy.
Scripting Hot Backups
The script in this section covers the minimal tasks associated with a hot backup. For a production environment a hot backup script can be quite complex. The script given here provides you with a baseline of what you should include in a hot backup script. You need to modify these variables in the script for it to work in your environment:
- ORACLE_SID
- ORACLE_HOME
- hbdir
The ORACLE_SID OS variable defines your database name. The ORACLE_HOME OS variable defines where you installed the Oracle software. The SQL*Plus hbdir variable points to the directory for the hot backups.
#!/bin/bash
ORACLE_SID=o12c
ORACLE_HOME=/u01/app/oracle/product/12.1.0.1/db_1
PATH=$PATH:$ORACLE_HOME/bin
#
sqlplus -s <<EOF
/ as sysdba
set head off pages0 lines 132 verify off feed off trimsp on
define hbdir=/u01/hbackup/o12c
spo hotback.sql
select 'spo &&hbdir/hotlog.txt' from dual;
select 'select max(sequence#) from v$log;' from dual;
select 'alter database begin backup;' from dual;
select '!cp ' || name || ' ' || '&&hbdir' from v$datafile;
select 'alter database end backup;' from dual;
select 'alter database backup controlfile to ' || '''' || '&&hbdir'
|| '/controlbk.ctl' || '''' || ' reuse;' from dual;
select 'alter system archive log current;' from dual;
select 'select max(sequence#) from v$log;' from dual;
select 'select member from v$logfile;' from dual;
select 'spo off;' from dual;
spo off;
@@hotback.sql
EOF
The script generates a hotback.sql script. This script contains the commands for performing the hot backup. Here is a listing of the hotback.sql script for a test database:
spo /u01/hbackup/o12c/hotlog.txt
select max(sequence#) from v$log;
alter database begin backup;
!cp /u01/dbfile/o12c/system01.dbf /u01/hbackup/o12c
!cp /u01/dbfile/o12c/sysaux01.dbf /u01/hbackup/o12c
!cp /u01/dbfile/o12c/undotbs01.dbf /u01/hbackup/o12c
!cp /u01/dbfile/o12c/users01.dbf /u01/hbackup/o12c
!cp /u01/dbfile/o12c/tools01.dbf /u01/hbackup/o12c
alter database end backup;
alter database backup controlfile to '/u01/hbackup/o12c/controlbk.ctl' reuse;
alter system archive log current;
select max(sequence#) from v$log;
select member from v$logfile;
spo off;
You can run this script manually from SQL*Plus, like this:
SQL> @hotback.sql
![]() Caution If the previous script fails on a statement before ALTER DATABASE END BACKUP is executed, you must take your database (tablespaces) out of backup mode by manually running ALTER DATABASE END BACKUP from SQL*Plus (as the SYS user).
Caution If the previous script fails on a statement before ALTER DATABASE END BACKUP is executed, you must take your database (tablespaces) out of backup mode by manually running ALTER DATABASE END BACKUP from SQL*Plus (as the SYS user).
While you generate the hot backup script, it’s prudent to generate a script that you can use to copy the data files from a backup directory. You have to modify the hbdir variable in this script to match the location of the hot backups for your environment. Here is a script that generates the copy commands:
#!/bin/bash
ORACLE_SID=o12c
ORACLE_HOME=/u01/app/oracle/product/12.1.0.1/db_1
PATH=$PATH:$ORACLE_HOME/bin
#
sqlplus -s <<EOF
/ as sysdba
set head off pages0 lines 132 verify off feed off trimsp on
define hbdir=/u01/hbackup/o12c/
define dbname=$ORACLE_SID
spo hotrest.sql
select '!cp ' || '&&hbdir' || substr(name,instr(name,'/',-1,1)+1)
|| ' ' || name from v$datafile;
spo off;
EOF
#
exit 0
For my environment here is the code generated that can be executed from SQL*Plus to copy the data files back from the backup directory, if a failure should occur:
!cp /u01/hbackup/o12c/system01.dbf /u01/dbfile/o12c/system01.dbf
!cp /u01/hbackup/o12c/sysaux01.dbf /u01/dbfile/o12c/sysaux01.dbf
!cp /u01/hbackup/o12c/undotbs01.dbf /u01/dbfile/o12c/undotbs01.dbf
!cp /u01/hbackup/o12c/users01.dbf /u01/dbfile/o12c/users01.dbf
!cp /u01/hbackup/o12c/tools01.dbf /u01/dbfile/o12c/tools01.dbf
In this output, you can remove the exclamation point (!) from each line if you prefer to run the commands from the OS prompt. The main idea is that these commands are available in the event of a failure, so you know which files have been backed up to which location and how to copy them back.
![]() Tip Don’t use user-managed hot backup technology for online backups; use RMAN. RMAN doesn’t need to place tablespaces in backup mode and automates nearly everything related to backup and recovery.
Tip Don’t use user-managed hot backup technology for online backups; use RMAN. RMAN doesn’t need to place tablespaces in backup mode and automates nearly everything related to backup and recovery.
Understanding the Split-Block Issue
To perform a hot backup, one critical step is to alter a tablespace into backup mode before you copy any of the data files associated with the tablespace, using an OS utility. To understand why you have to alter a tablespace into backup mode, you must be familiar with what is sometimes called the split- (or fractured-) block issue.
Recall that the size of a database block is often different from that of an OS block. For instance, a database block may be sized at 8KB, whereas the OS block size is 4KB. As part of the hot backup, you use an OS utility to copy the live data files. While the OS utility is copying the data files, the possibility exists that database writers are writing to a block simultaneously. Because the Oracle block and the OS block are different sizes, the following may happen:
- The OS utility copies part of the Oracle block.
- A moment later, a database writer updates the entire block.
- A split second later, the OS utility copies the latter half of the Oracle block.
This can result in the OS copy of the block’s being inconsistent with what Oracle wrote to the OS. Figure 16-1 illustrates this concept.

Figure 16-1. Hot backup split- (or fractured-) block issue
Looking at Figure 16-1, the block copied to disk at time 3 is corrupt, as far as Oracle is concerned. The first half of the block is from time 1, and the latter half is copied at time 3. When you make a hot backup, you’re guaranteeing block-level corruption in the backups of the data files.
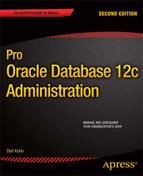
To understand how Oracle resolves the split-block issue, first consider a database operating in its normal mode (not in backup mode). The redo information that is written to the online redo logs is only what Oracle needs, to reapply transactions. The redo stream doesn’t contain entire blocks of data. Oracle only records a change vector in the redo stream that specifies which block changed and how it was changed. Figure 16-2 shows Oracle operating under normal conditions.
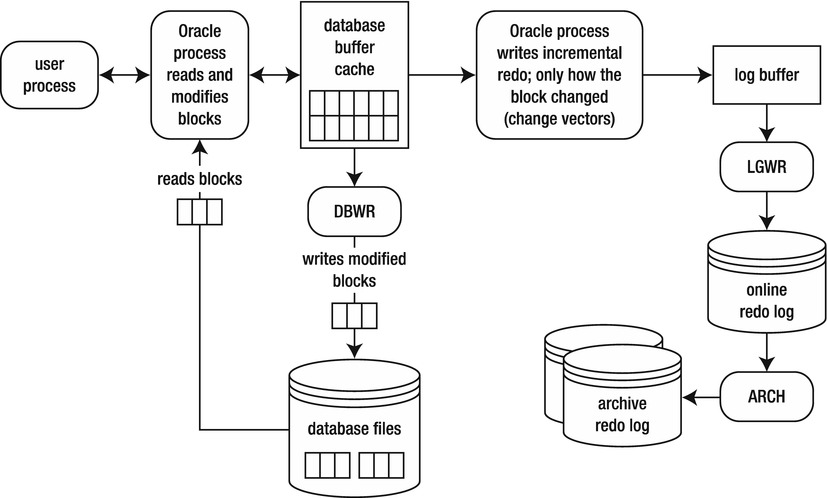
Figure 16-2. Oracle normally only writes change vectors to the redo stream
Now, consider what happens during a hot backup. For a hot backup, before you copy the data files associated with a tablespace, you must first alter the tablespace into backup mode. While in this mode, before Oracle modifies a block, the entire block is copied to the redo stream. Any subsequent changes to the block only require that the normal redo-change vectors be written to the redo stream. This is illustrated in Figure 16-3.
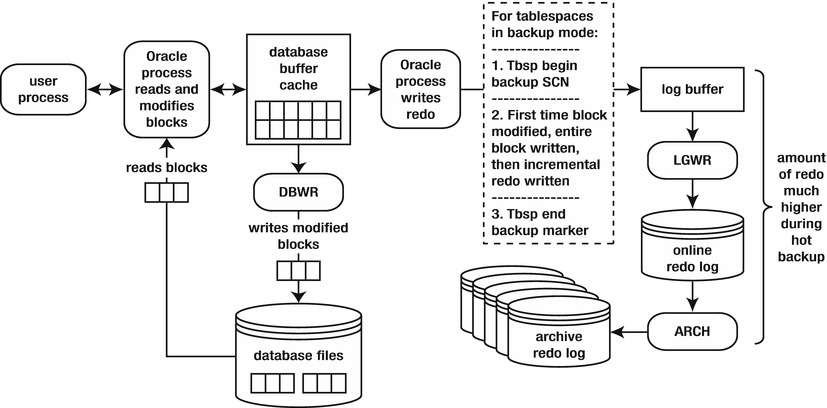
Figure 16-3. Entire blocks are written to the redo stream
To understand why Oracle logs the entire block to the redo stream, consider what happens during a restore and recovery. First, the backup files from the hot backup are restored. As explained earlier, these backup files contain corrupt blocks, owing to the split-block issue. But, it doesn’t matter, because once Oracle recovers the data files, for any block that was modified during the hot backup, Oracle has an image copy of the block as it was before it was modified. Oracle uses the copy of the block it has in the redo stream as a starting point for the recovery (of that block). This process is illustrated in Figure 16-4.
Figure 16-4. Restore and recovery of a split block
In this way, it doesn’t matter if there are corrupt blocks in the hot backup files. Oracle always starts the recovery process for a block from a copy of the block (as it was before it was modified) in the redo stream.
Understanding the Need for Redo Generated During Backup
What happens if you experience a failure soon after you make a hot backup? Oracle knows when a tablespace was put in backup mode (begin backup system SCN written to the redo stream), and Oracle knows when the tablespace was taken out of backup mode (end-of-backup marker written to the redo stream). Oracle requires every archive redo log generated during that time frame to successfully recover the data files.
Figure 16-5 shows that, at minimum, the archive redo logs from sequence numbers 100 to 102 are required to recover the tablespace. These archive redo logs were generated during the hot backup.
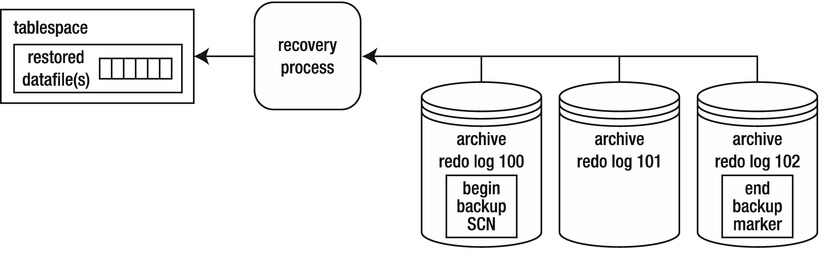
Figure 16-5. Recovery applied
If you attempt to stop the recovery process before all redo between the begin and end markers has been applied to the data file, Oracle throws this error:
ORA-01195: online backup of file 1 needs more recovery to be consistent
All redo generated during the hot backup of a tablespace must be applied to the data files before they can be opened. Oracle, at a minimum, needs to apply everything between the begin-backup SCN marker and the end-backup marker, to account for every block modified while the tablespace was in backup mode. This redo is in the archive redo log files; or, if the failure happened right after the backup ended, some of the redo may not have been archived and may be in the online redo logs. Therefore, you have to instruct Oracle to apply what’s in the online redo logs.
Understanding that Data Files are Updated
Note that, in Figures 16-2 and 16-3, the behavior of the database writer is, for the most part, unchanged throughout the backup procedure. The database writer continues to write blocks to data files, regardless of the backup mode of the database. The database writer doesn’t care if a hot backup is taking place; its job is to write blocks from the buffer cache to the data files.
Every once in a while, you run into a DBA who states that the database writer doesn’t write to data files during user-managed hot backups. This is a widespread misconception. Use some common sense: if the database writer isn’t writing to the data files during a hot backup, then where are the changes being written? If the transactions are being written to somewhere other than the data files, how would those data files be resynchronized after the backup? It doesn’t make any sense.
Some DBAs say, “The data file header is frozen, which means no changes to the data file.” Oracle does freeze the SCN to indicate the start of the hot backup in the data file header and doesn’t update that SCN until the tablespace is taken out of backup mode. This “frozen SCN” doesn’t mean that blocks aren’t being written to data files during the backup. You can easily demonstrate that a data file is written to during backup mode by doing this:
- Put a tablespace in backup mode:
SQL> alter tablespace users begin backup; - Create a table that has a character field:
SQL> create table cc(cc varchar2(20)) tablespace users; - Insert a string into that table:
SQL> insert into cc values('DBWR does write'), - Force a checkpoint (which ensures that all modified buffers are written to disk):
SQL> alter system checkpoint; - From the OS, use the strings and grep commands to search for the string in the data file:
$ strings /u01/dbfile/o12c/users01.dbf | grep "DBWR does write" - Here is the output, proving that the database writer did write the data to disk:
DBWR does write - Don’t forget to take the tablespace out of backup mode:
SQL> alter tablespace users end backup;
Performing a Complete Recovery of an Archivelog Mode Database
The term complete recovery means that you can recover all transactions that were committed before a failure occurred. Complete recovery doesn’t mean you that completely restore and recover the entire database. For instance, if only one data file has experienced media failure, you need to restore and recover only the damaged data file to perform a complete recovery.
![]() Tip If you have access to a test or development database, take the time to walk through every step in each of the examples that follow. Going through these steps can teach you more about backup and recovery than any documentation.
Tip If you have access to a test or development database, take the time to walk through every step in each of the examples that follow. Going through these steps can teach you more about backup and recovery than any documentation.
The steps outlined here apply to any database backed up while in archivelog mode. It doesn’t matter if you made a cold backup or hot backup. The steps to restore and recover data files are the same, as long as the database was in archivelog mode during the backup. For a complete recovery, you need
- to be able to restore the data files that have experienced media failure
- access to all archive redo logs generated since the last backup was started
- intact online redo logs
Here is the basic procedure for a complete recovery:
- Place the database in mount mode; this prevents normal user transaction processing from reading/writing to data files being restored. (If you’re not restoring the SYSTEM or UNDO tablespace, you have the option of opening the database and manually taking the data files offline before restoring them. If you do this, make sure you place the data files online after the recovery is complete.)
- Restore the damaged data files with an OS copy utility.
- Issue the appropriate SQL*Plus RECOVER command to apply any information required in the archive redo logs and online redo logs.
- Alter the database open.
The next several sections demonstrate some common complete restore-and-recovery scenarios. You should be able to apply these basic scenarios to diagnose and recover from any complex situation you find yourself in.
Restoring and Recovering with the Database Offline
This section details a simple restore-and-recovery scenario. Described next are the steps to simulate a failure and then perform a complete restore and recovery. Try this scenario in a development database. Ensure that you have a good backup and that you aren’t trying this experiment in a database that contains critical business data.
Before you start this example, create a table, and insert some data. This table and data are selected from the end of the complete recovery process to demonstrate a successful recovery:
SQL> create table foo(foo number) tablespace users;
SQL> insert into foo values(1);
SQL> commit;
Now, switch the online logs several times. Doing so ensures that you have to apply archive redo logs as part of the recovery:
SQL> alter system switch logfile;
The forward slash (/) reruns the most recently executed SQL statement:
SQL> /
SQL> /
SQL> /
Next, simulate a media failure by renaming the data file associated with the USERS tablespace. You can identify the name of this file with this query:
SQL> select file_name from dba_data_files where tablespace_name='USERS';
FILE_NAME
----------------------------------
/u01/dbfile/o12c/users01.dbf
From the OS, rename the file:
$ mv /u01/dbfile/o12c/users01.dbf /u01/dbfile/o12c/users01.dbf.old
And, attempt to stop your database:
$ sqlplus / as sysdba
SQL> shutdown immediate;
You should see an error such as this:
ORA-01116: error in opening database file ...
If this were a real disaster, it would be prudent to navigate to the data file directory, list the files, and see if the file in question was in its correct location. You should also inspect the alert.log file to see if any relevant information is logged there by Oracle.
Now that you’ve simulated a media failure, the next several steps walk you through a restore and complete recovery.
Step 1. Place Your Database in Mount Mode
Before you place your database in mount mode, you may need to first shut it down, using ABORT:
$ sqlplus / as sysdba
SQL> shutdown abort;
SQL> startup mount;
Step 2. Restore the Data File from the Backup
The next step is to copy from the backup the data file that corresponds to the one that has had a failure:
$ cp /u01/hbackup/o12c/users01.dbf /u01/dbfile/o12c/users01.dbf
At this point, it’s instructional to ponder what Oracle would do if you attempted to start your database. When you issue the ALTER DATABASE OPEN statement, Oracle inspects the SCN in the control file for each data file. You can examine this SCN by querying V$DATAFILE:
SQL> select checkpoint_change# from v$datafile where file#=4;
CHECKPOINT_CHANGE#
------------------
3543963
Oracle compares the SCN in the control file with the SCN in the data file header. You can check the SCN in the data file header by querying V$DATAFILE_HEADER; for example,
select file#, fuzzy, checkpoint_change#
from v$datafile_header
where file#=4;
FILE# FUZ CHECKPOINT_CHANGE#
---------- --- ------------------
4 YES 3502285
Note that the SCN recorded in V$DATAFILE_HEADER is less than the SCN in V$DATAFILE for the same data file. If you attempt to open your database, Oracle throws an error stating that media recovery is required (meaning that you need to apply redo) to synchronize the SCN in the data file with the SCN in the control file. The FUZZY column is set to YES. This indicates that redo must be applied to the data file before it can be opened for use. Here is what happens when you try to open the database at this point:
SQL> alter database open;
alter database open;
alter database open
*
ERROR at line 1:
ORA-01113: file 4 needs media recovery...
Oracle doesn’t let you open the database until the SCN in all data file headers matches the corresponding SCN in the control file.
Step 3. Issue the Appropriate RECOVER Statement
The archive redo logs and online redo logs have the information required to catch up the data file SCN to the control file SCN. You can apply redo to the data file that needs media recovery by issuing one of the following SQL*Plus statements:
- RECOVER DATAFILE
- RECOVER TABLESPACE
- RECOVER DATABASE
Because only one data file in this example needs to be recovered, the RECOVER DATAFILE statement is appropriate. However, keep in mind that you can run any of the previously listed RECOVER statements, and Oracle will figure out what needs to be recovered. In this particular scenario, you may find it easier to remember the name of the tablespace that contains the restored data file(s) than to remember the data file name(s). Next, any data files that need recovery in the USERS tablespace are recovered:
SQL> recover tablespace users;
At this point, Oracle uses the SCN in the data file header to determine which archive redo log or online redo log to use to begin applying redo. You can view the starting log sequence number that RMAN will use to begin the recovery process via the following query:
select
HXFNM file_name
,HXFIL file_num
,FHTNM tablespace_name
,FHTHR thread
,FHRBA_SEQ sequence
from X$KCVFH
where FHTNM = 'USERS';
If all the redo required is in the online redo logs, Oracle applies that redo and displays this message:
Media recovery complete.
If Oracle needs to apply redo that is only contained in archived redo logs (meaning that the online redo log that contained the appropriate redo has already been overwritten), you’re prompted with a recommendation from Oracle as to which archive redo log to apply first:
ORA-00279: change 3502285 generated at 11/02/2012 10:49:39 needed for thread 1
ORA-00289: suggestion : /u01/oraarch/o12c/1_1_798283209.dbf
ORA-00280: change 3502285 for thread 1 is in sequence #1
Specify log: {<RET>=suggested | filename | AUTO | CANCEL}
You can press Enter or Return (<RET>) to have Oracle apply the suggested archive redo log file, specify a file name, specify AUTO to instruct Oracle to apply any suggested files automatically, or type CANCEL to cancel out of the recovery operation.
In this example, specify AUTO. Oracle applies all redo in all archive redo log files and online redo log files to perform a complete recovery:
AUTO
The last message displayed after all required archive redo and online redo have been applied is this:
Log applied.
Media recovery complete.
Restoring and Recovering with a Database Online
If you lose a data file associated with a tablespace other than SYSTEM and UNDO, you can restore and recover the damaged data file while leaving the database online. For this to work, any data files being restored and recovered must be taken offline first. You may be alerted to an issue with a data file in which a user is attempting to update a table and sees an error such as this:
SQL> insert into foo values(2);
ORA-01116: error in opening database file ...
You navigate to the OS directory that contains the data file and determine that it has been erroneously removed by a system administrator.
In this example the data file associated with the USERS tablespace is taken offline and subsequently restored and recovered while the rest of the database remains online. First, place take the data file offline:
SQL> alter database datafile '/u01/dbfile/o12c/users01.dbf' offline;
Now, restore the appropriate data file from the backup location:
$ cp /u01/hbackup/o12c/users01.dbf /u01/dbfile/o12c/users01.dbf
In this situation, you can’t use RECOVER DATABASE. The RECOVER DATABASE statement attempts to recover all data files in the database, of which the SYSTEM tablespace is part. The SYSTEM tablespace can’t be recovered while the database is online. If you use the RECOVER TABLESPACE, all data files associated with the tablespace must be offline. In this case, it’s more appropriate to recover at the data file level of granularity:
SQL> recover datafile '/u01/dbfile/o12c/users01.dbf';
Oracle inspects the SCN in the data file header and determines which archive redo log or online redo log to use to start applying redo. If all redo required is in the online redo logs, you see this message:
Media recovery complete.
If the starting point for redo is contained only in an archive redo log file, Oracle suggests which file to start with:
ORA-00279: change 3502285 generated at 11/02/2012 10:49:39 needed for thread 1
ORA-00289: suggestion : /u01/oraarch/o12c/1_1_798283209.dbf
ORA-00280: change 3502285 for thread 1 is in sequence #1
Specify log: {<RET>=suggested | filename | AUTO | CANCEL}
You can type AUTO to have Oracle apply all required redo in archive redo log files and online redo log files:
AUTO
If successful, you should see this message:
Log applied.
Media recovery complete.
You can now bring the data file back online:
SQL> alter database datafile '/u01/dbfile/o12c/users01.dbf' online;
If successful, you should see this:
Database altered.
When you’re dealing with user-managed backups, you usually restore the control file in one of these situations:
- A control file is damaged, and the file is multiplexed.
- All control files are damaged.
These two situations are covered in the following sections.
Restoring a Damaged Control File When Multiplexed
If you configure your database with more than one control file, you can shut down the database and use an OS command to copy an existing control file to the location of the missing control file. For example, from the initialization file, you know that two control files are used for this database:
SQL> show parameter control_files
NAME TYPE VALUE
---------------------------- ----------- ------------------------------
control_files string /u01/dbfile/o12c/control01.ctl
,/u02/dbfile/o12c/control02.ctl
Suppose the control02.ctl file has become damaged. Oracle throws this error when querying the data dictionary:
ORA-00210: cannot open the specified control file...
When a good control file is available, you can shut down the database, move the old/bad control file (this preserves it, in the event that it is later needed for root cause analysis), and copy the existing good control file to the name and location of the bad control file:
SQL> shutdown abort;
$ mv /u02/dbfile/o12c/control02.ctl /u02/dbfile/o12c/control02.ctl.old
$ cp /u01/dbfile/o12c/control01.ctl /u02/dbfile/o12c/control02.ctl
Now, restart the database:
SQL> startup;
In this manner, you can restore a control file from an existing control file.
Restoring When All Control Files Are Damaged
If you lose all of your control files, you can restore one from a backup, or you can recreate the control file. As long as you have all your data files and any required redo (archive redo and online redo), you should be able to recover your database completely. The steps for this scenario are as follows:
- Shut down the database.
- Restore a control file from the backup.
- Start the database in mount mode, and initiate database recovery, using the RECOVER DATABASE USING BACKUP CONTROLFILE clause.
- For a complete recovery, manually apply the redo contained in the online redo logs.
- Open the database with the OPEN RESETLOGS clause.
In this example all control files for the database were accidentally deleted, and Oracle subsequently reports this error:
ORA-00210: cannot open the specified control file...
Step 1. Shut Down the Database
First, shut down the database:
SQL> shutdown abort;
Step 2. Restore the Control File from the Backup
This database was configured with just one control file, which you copy back from the backup location, as shown:
$ cp /u01/hbackup/o12c/controlbk.ctl /u01/dbfile/o12c/control01.ctl
If more than one control file is being used, you have to copy the backup control file to each control file and location name listed in the CONTROL_FILES initialization parameter.
Step 3. Start the Database in Mount Mode, and Initiate Database Recovery
Next, start the database in mount mode:
SQL> startup mount;
After the control file(s) and data files have been copied back, you can perform a recovery. Oracle knows that the control file was from a backup (because it was created with the ALTER DATABASE BACKUP CONTROLFILE statement), so the recovery must be performed with the USING BACKUP CONTROLFILE clause:
SQL> recover database using backup controlfile;
At this point, you’re prompted for the application of archive redo log files:
ORA-00279: change 3584431 generated at 11/02/2012 11:48:46 needed for thread 1
ORA-00289: suggestion : /u01/oraarch/o12c/1_8_798283209.dbf
ORA-00280: change 3584431 for thread 1 is in sequence #8
Specify log: {<RET>=suggested | filename | AUTO | CANCEL}
Type AUTO to instruct the recovery process to apply all archive redo logs automatically:
AUTO
The recovery process applies all available archive redo logs. The recovery process has no one way of determining where the archive redo stream ends and therefore tries to apply an archive redo log that doesn’t exist, resulting in a message such as this:
ORA-00308: cannot open archived log '/u01/oraarch/o12c/1_10_798283209.dbf'
ORA-27037: unable to obtain file status
The prior message is to be expected. Now, attempt to open the database:
SQL> alter database open resetlogs;
Oracle throws the following error in this situation:
ORA-01113: file 1 needs media recovery
ORA-01110: data file 1: '/u01/dbfile/o12c/system01.dbf'
Step 4. Apply Redo Contained in the Online Redo Logs
Oracle needs to apply more redo to synchronize the SCN in the control file with the SCN in the data file header. In this scenario the online redo logs are still intact and contain the required redo. To apply redo contained in the online redo logs, first identify the locations and names of the online redo log files:
select a.sequence#, a.status, a.first_change#, b.member
from v$log a, v$logfile b
where a.group# = b.group#
order by a.sequence#;
Here is the partial output for this example:
SEQUENCE# STATUS FIRST_CHANGE# MEMBER
---------- ---------------- ------------- ------------------------------
6 INACTIVE 3543960 /u01/oraredo/o12c/redo03a.rdo
6 INACTIVE 3543960 /u02/oraredo/o12c/redo03b.rdo
7 INACTIVE 3543963 /u02/oraredo/o12c/redo01b.rdo
7 INACTIVE 3543963 /u01/oraredo/o12c/redo01a.rdo
8 CURRENT 3583986 /u02/oraredo/o12c/redo02b.rdo
8 CURRENT 3583986 /u01/oraredo/o12c/redo02a.rdo
Now, reinitiate the recovery process:
SQL> recover database using backup controlfile;
The recovery process prompts for an archive redo log that doesn’t exist:
ORA-00279: change 3584513 generated at 11/02/2012 11:50:50 needed for thread 1
ORA-00289: suggestion : /u01/oraarch/o12c/1_10_798283209.dbf
ORA-00280: change 3584513 for thread 1 is in sequence #10
Specify log: {<RET>=suggested | filename | AUTO | CANCEL}
Instead of supplying the recovery process with an archive redo log file, type in the name of a current online redo log file (you may have to attempt each online redo log until you find the one that Oracle needs). This instructs the recovery process to apply any redo in the online redo log:
/u01/oraredo/o12c/redo01a.rdo
You should see this message when the correct online redo log is applied:
Log applied.
Media recovery complete.
Step 5. Open the Database with RESETLOGS
The database is completely recovered at this point. However, because a backup control file was used for the recovery process, the database must be opened with the RESETLOGS clause:
SQL> alter database open resetlogs;
Upon success, you should see this:
Database altered.
Performing an Incomplete Recovery of an Archivelog Mode Database
Incomplete recovery means that you don’t restore all transactions that were committed before the failure. With this type of recovery, you’re recovering to a point in time in the past, and transactions are lost. This is why incomplete recovery is also known as database point-in-time recovery (DBPITR).
Incomplete recovery doesn’t mean that you’re restoring and recovering only a subset of data files. In fact, with most incomplete scenarios, you have to restore all data files from the backup as part of the procedure. If you don’t want to recover all data files, you first need to take offline any data files you don’t intend to participate in the incomplete recovery process. When you initiate the recovery, Oracle will only recover data files that have an ONLINE value in the STATUS column of V$DATAFILE_HEADER.
You may want to perform an incomplete recovery for many different reasons:
- You attempt to perform a complete recovery but are missing the required archive redo logs or unarchived online redo log information.
- You want to restore the database back to a point in time in the past just prior to an erroneous user error (deleted data, dropped table, and so on).
- You have a testing environment in which you have a baseline copy of the database. After the testing is finished, you want to reset the database back to baseline for another round of testing.
You can perform user-managed incomplete recovery three ways:
Cancel based allows you to apply archive redo and halt the process at the boundary, based on an archive redo log file. For instance, say you’re attempting to restore and recover your database, and you realize that you’re missing an archive redo log. You have to stop the recover process at the point of your last good archive redo log. You initiate cancel-based incomplete recovery with the CANCEL clause of the RECOVER DATABASE statement:
SQL> recover database until cancel;
If you want to recover up to and including a certain SCN number, use SCN-based incomplete recovery. You may know from the alert log or from the output of LogMiner the point to which you want to restore to a certain SCN. Use the UNTIL CHANGE clause to perform this type of incomplete recovery:
SQL> recover database until change 12345;
If you know the time at which you want to stop the recovery process, use time-based incomplete recovery. For example, you may know that a table was dropped at a certain time and want to restore and recover the database up to the specified time. The format for a time-based recovery is always as follows: YYYY-MM-DD:HH24:MI:SS. Here is an example:
SQL> recover database until time '2012-10-21:02:00:00';
When you perform an incomplete recovery, you have to restore all data files that you plan to have online when the incomplete restoration is finished. Here are the steps for an incomplete recovery:
- Shut down the database.
- Restore all the data files from the backup.
- Start the database in mount mode.
- Apply redo (roll forward) to the desired point, and halt the recovery process (use cancel-, SCN-, or time-based recovery).
- Open the database with the OPEN RESETLOGS clause.
The following example performs a cancel-based incomplete recovery. If the database is open, shut it down:
$ sqlplus / as sysdba
SQL> shutdown abort;
Next, copy all data files from the backup (either a cold or hot backup). This example restores all data files from a hot backup. For this example the current control file is intact and doesn’t need to be restored. Here is a snippet of the OS copy commands for the database being restored:
cp /u01/hbackup/o12c/system01.dbf /u01/dbfile/o12c/system01.dbf
cp /u01/hbackup/o12c/sysaux01.dbf /u01/dbfile/o12c/sysaux01.dbf
cp /u01/hbackup/o12c/undotbs01.dbf /u01/dbfile/o12c/undotbs01.dbf
cp /u01/hbackup/o12c/users01.dbf /u01/dbfile/o12c/users01.dbf
cp /u01/hbackup/o12c/tools01.dbf /u01/dbfile/o12c/tools01.dbf
After the data files have been copied back, you can initiate the recovery process. This example performs a cancel-based incomplete recovery:
$ sqlplus / as sysdba
SQL> startup mount;
SQL> recover database until cancel;
At this point, the Oracle recovery process suggests an archive redo log to apply:
ORA-00279: change 3584872 generated at 11/02/2012 12:02:32 needed for thread 1
ORA-00289: suggestion : /u01/oraarch/o12c/1_1_798292887.dbf
ORA-00280: change 3584872 for thread 1 is in sequence #1

Specify log: {<RET>=suggested | filename | AUTO | CANCEL}
Apply the logs up to the point you where want to stop, and then type CANCEL:
CANCEL
This stops the recovery process. Now, you can open the database with the RESETLOGS clause:
SQL> alter database open resetlogs;
The database has been opened to a point in time in the past. The recovery is deemed incomplete because not all redo was applied.
![]() Tip Now would be a good time to get a good backup of your database. This will give you a clean point from which to initiate a restore and recovery should a failure happen soon after you’ve opened your database.
Tip Now would be a good time to get a good backup of your database. This will give you a clean point from which to initiate a restore and recovery should a failure happen soon after you’ve opened your database.
PURPOSE OF OPEN RESETLOGS
Sometimes, you’re required to open your database with the OPEN RESETLOGS clause. You may do this when recreating a control file, performing a restore and recovery with a backup control file, or performing an incomplete recovery. When you open your database with the OPEN RESETLOGS clause, it either wipes out any existing online redo log files or, if the files don’t exist, recreates them. You can query the MEMBER column of V$LOGFILE to see which files are involved in an OPEN RESETLOGS operation.
Why would you want to wipe out what’s in the online redo logs? Take the example of an incomplete recovery, in which the database is deliberately opened to a point in time in the past. In this situation the SCN information in the online redo logs contains transaction data that will never be recovered. Oracle forces you to open the database with OPEN RESETLOGS to purposely wipe out that information.
When you open your database with OPEN RESETLOGS, you create a new incarnation of your database and reset the log sequence number back to 1. Oracle requires a new incarnation so as to avoid accidentally using any old archive redo logs (associated with a separate incarnation of the database), in the event that another restore and recovery is required.
Summary
Some studies have indicated that airplane pilots who are over dependent on autopilot technology are less able to cope with catastrophic in-flight problems than the pilots who have spent considerable time flying without autopilot assistance. The overautodependent pilots tend to forget key procedures when serious problems arise, whereas pilots who aren’t as dependent on autopilot are more adept at diagnosing and resolving stressful in-flight failures.
Similarly, DBAs who understand how to backup, restore, and recover a database manually, using user-managed techniques, are more proficient at troubleshooting and resolving serious backup and recovery problems than DBAs who only navigate backup and recovery technology via screens. This is why I included this chapter in the book. Understanding what happens at each step and why the step is required is vital for complete knowledge of the Oracle backup and recovery architecture. This awareness translates into key troubleshooting skills when you’re using Oracle tools such as RMAN (backup and recovery), Enterprise Manager, and Data Guard (disaster recovery, high availability, and replication).
The user-managed backup and recovery techniques covered in this chapter aren’t taught or used much anymore. Most DBAs are (and should be) using RMAN for their Oracle backup and recovery requirements. However, it’s critical for you to understand how cold backups and hot backups work. You may find yourself employed in a shop in which old technology has been implemented and needing to restore and recover the database, troubleshoot, or assist in migrating to RMAN. In these scenarios, you must fully understand the old backup technologies.
Now that you have an in-depth understanding of Oracle backup and recovery mechanics, you’re ready to investigate RMAN. The next several chapters examine how to configure and use RMAN for production-strength backup and recovery.