All the tools discussed in this chapter can be used in concert to maximize the amount of information gleaned during dynamic analysis. In this section, we’ll look at all the tools discussed in the chapter as we present a sample setup for malware analysis. Your setup might include the following:
Running procmon and setting a filter on the malware executable name and clearing out all events just before running.
Starting Process Explorer.
Gathering a first snapshot of the registry using Regshot.
Setting up your virtual network to your liking using INetSim and ApateDNS.
Setting up network traffic logging using Wireshark.
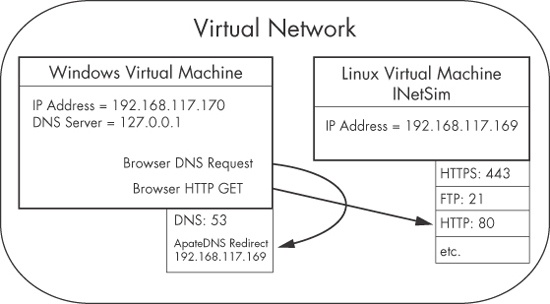
Figure 3-12 shows a diagram of a virtual network that can be set up for malware analysis. This virtual network contains two hosts: the malware analysis Windows virtual machine and the Linux virtual machine running INetSim. The Linux virtual machine is listening on many ports, including HTTPS, FTP, and HTTP, through the use of INetSim. The Windows virtual machine is listening on port 53 for DNS requests through the use of ApateDNS. The DNS server for the Windows virtual machine has been configured to localhost (127.0.0.1). ApateDNS is configured to redirect you to the Linux virtual machine (192.168.117.169).
If you attempt to browse to a website using the Windows virtual machine, the DNS request will
be resolved by ApateDNS redirecting you to the Linux virtual machine. The browser will then perform
a GET request over port 80 to the INetSim server listening on
that port on the Linux virtual machine.
Let’s see how this setup would work in practice by examining the malware msts.exe. We complete our initial setup and then run msts.exe on our malware analysis virtual machine. After some time, we stop event capture with procmon and run a second snapshot with Regshot. At this point we begin analysis as follows:
Examine ApateDNS to see if DNS requests were performed. As shown in Figure 3-13, we notice that the malware performed a DNS request for www.malwareanalysisbook.com.
Review the procmon results for file system modifications. In the procmon results shown in Figure 3-14, we see
CreateFileandWriteFile(sequence numbers 141 and 142) operations for C:WINDOWSsystem32winhlp2.exe. Upon further investigation, we compare winhlp2.exe to msts.exe and see that they are identical. We conclude that the malware copies itself to that location.Compare the two snapshots taken with Regshot to identify changes. Reviewing the Regshot results, shown next, we see that the malware installed the autorun registry value
winhlpatHKLMSOFTWAREMicrosoftWindowsCurrentVersionRunlocation. The data written to that value is where the malware copied itself (C:WINDOWSsystem32winhlp2.exe), and that newly copied binary will execute upon system reboot.Values added:3 ---------------------------------- HKLMSOFTWAREMicrosoftWindowsCurrentVersionRunwinhlp: C:WINDOWSsystem32winhlp2.exe
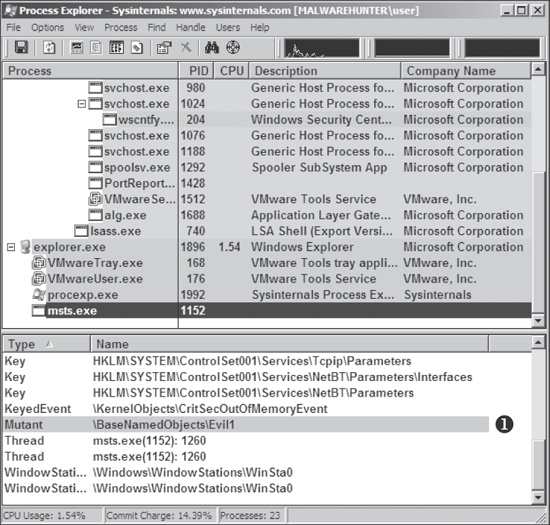
Use Process Explorer to examine the process to determine whether it creates mutexes or listens for incoming connections. The Process Explorer output in Figure 3-15 shows that msts.exe creates a mutex (also known as a mutant) named
Evil1❶. We discuss mutexes in depth in Chapter 7, but you should know that msts.exe likely created the mutex to ensure that only one version of the malware is running at a time. Mutexes can provide an excellent fingerprint for malware if they are unique enough.Review the INetSim logs for requests and attempted connections on standard services. The first line in the INetSim logs (shown next) tells us that the malware communicates over port 443, though not with standard Secure Sockets Layer (SSL), as shown next in the reported errors at ❶.
[2010-X] [15013] [https 443/tcp 15199] [192.168.117.128:1043] connect [2010-X] [15013] [https 443/tcp 15199] [192.168.117.128:1043] ❶ Error setting up SSL: SSL accept attempt failed with unknown error Error:140760FC:SSL routines:SSL23_GET_CLIENT_HELLO:unknown protocol [2010-X] [15013] [https 443/tcp 15199] [192.168.117.128:1043] disconnectReview the Wireshark capture for network traffic generated by the malware. By using INetSim while capturing with Wireshark, we can capture the TCP handshake and the initial data packets sent by the malware. The contents of the TCP stream sent over port 443, as shown in Figure 3-16, shows random ACSII data, which is often indicative of a custom protocol. When this happens, your best bet is to run the malware several more times to look for any consistency in the initial packets of the connection. (The resulting information could be used to draft a network-based signature, skills that we explore in Chapter 14.)