Basic Lighting Setups
Where Do They Go?
Perhaps the most important aspect in selecting the lighting setup for any scene is consistency–consistency on several fronts. First, the choice of setup must be consistent with the mood of the script. It must be consistent with scenic elements and take cues from such things as window placement, placement of practical lighting fixtures on the set, established conventions, and unnatural effects that are to occur. This is not meant to imply that setups should emulate nature 100%. One of the joys of lighting is the fact that you can improve on nature and still maintain the illusion that it is responsible for the final look. The purpose of lighting is to further an illusion. When some element of the setup is not consistent with all the other elements, the illusion is destroyed. Good lighting is invisible. Bad lighting is obvious.
There must be consistency from a long shot to a close-up, and there must be consistency within a series of shots. The placement of the key light is critical, and once that has been decided, the degree of fill, the establishment of ratios, the placement of lights to achieve separation of scenic elements, and other factors concerning the color and quality of light must be carefully worked out. Good lighting takes time, so do not feel you are doing your job poorly if satisfactory results are not achieved instantly. Naturally, time must be weighed against budget and the shooting schedule, but there is always a reasonable compromise.
I suggest that you light your widest shot for any given scene first. From this setup you can determine your exposure ratios for various areas and follow through with more critical lighting control as your shots narrow. Aside from establishing the various exposure ratios for the scene, you will eliminate the possibility of creating continuity problems between the close-up and the long shot.
If you start by lighting a close-up and project a pattern on the background for visual interest, you may create extremely satisfying results and an appealing set of exposure ratios between the subject and various background items. Problems occur when you try to set up the wide shot and find that you cannot duplicate the basic exposure ratios and shadow patterns that you were able to create in the close-up. Lack of ceiling height and off-camera areas contribute greatly to this problem. You may also find that you do not have sufficient power or instruments to light the entire set at the levels maintained in the close-up you lit first.
Since the most important, effective, and frequently used shots in television are the close-up or medium close-up, you will want to carefully consider how you would like to light these shots before you start the setup for the long shot. Then you should try to tailor instrument placement in the wide shots so it will cut with the most effective close-up lighting that you are planning to use. Once again, your wide shot may be the limiting factor. In general, wide shots do not have to be lit as critically as close-ups. We do not expect to see things as clearly from a distance as we do when we get closer. We do expect that the light will be coming from the same direction in both shots, but fill and backlight need not be as closely controlled in the long shot.
A check of terms in Chapter 13 (Glossary) will show that some equipment names have more than one meaning, and terms for lighting setups are far less specific. In my experience, there is no authoritative source that defines so-called “basic” lighting setups. A director cannot tell the lighting director (LD), “Give me a number 29,” or, “I want a Slapitzki setup for this scene” and expect to get a certain look. There must be a discussion of mood, depth of field, preferred f-stop, etc., so that the LD can establish a setup that is consistent with the intentions of the scene.
Therefore, I cannot say, “If you learn the following basic setups, you will know everything there is to know about lighting.” The number of different setups is as large as the number of shots to be lit. It is even larger, because scenes can be lit more than one way so long as the approach from shot to shot remains consistent.
What follows are setups indicative of basic lighting concepts. Within each concept there are many possible variations. I hesitate to assign names to each setup since that name would only have relevance in the context shown here. For purposes of clarity, I will have to call them something, but you must realize these terms will not permit you to communicate your desires to others. They are meant to capture the essence of a particular approach and perhaps evoke a bit of humor.
In very general terms, keys can be placed in one of four positions relative to the talent’s facial position and the camera. The key can be placed (1) directly in front of the talent, (2) on the side of the talent nearest to the camera, (3) on the side of the talent farthest from the camera, or, in certain situations, (4) behind the talent, directly opposite the camera (“backlighting”). Backlighting can make the actor even more separated from the background. Basically you will be exposing for the talent’s face and letting the background (with light source) overexpose. The contrast ratio cannot be too great in video because the overexposed background might clip if it exceeds 100 IEEE. In feature films, backlighting is done all the time. Leading ladies always have a more appealing glow to their appearance. The effect still works in video but you will have less to work with before the background blooms and washes out.
There are also other less conventional placements for the key light that will be discussed at the end of this chapter.
The Cheap and Dirty Head-On Key
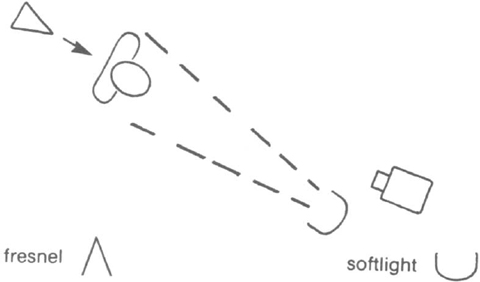
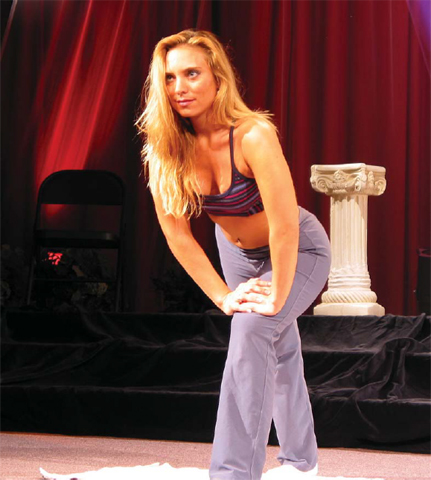
The head-on key is perhaps the easiest to set up, and it most closely approximates natural over-head lighting. In this setup, the key is placed directly in front of the subject so that both sides of the face are lit equally. Exact placement should be guided by the fact that you want the key to cast the shortest possible shadow from the nose and to highlight the eyes. The results are flattering to the subject when proper placement is achieved. Be sure the instrument is far enough away from the subject so that you do not experience the problems of intensity falloff. If the key is too close to the subject, the forehead will be too hot compared to the chin and chest area. If the source is diffuse enough, you may not even require a fill light for this setup. If the scene is high key, the general base light may be sufficient to act as fill.
The need for very little fill may be satisfied by using a bounce card (foam core). If additional fill is required, a small diffuse light mounted on the camera should be enough to do the job. It is quick to set up, and if space is limited, the shadows cast by the key will generally fall low enough on the wall behind the subject to be out of frame for the close-up. Such a setup also works well for low-key setups in which the implied source is a ceiling fixture. This personally is my favorite approach when lighting for interviews. The key light is placed either to the left or right of the camera and the foam core fill is placed on the opposite. With men, women, and children this approach is very soft and flattering, children tend to enjoy playing with the foam core (it holds the imprints of their hands and feet). The backlight position and intensity should be determined using the methods mentioned in Chapter 6. Figure 7.1 shows an example of a head-on lighting setup, and Figure 7.2 shows what that particular setup actually looks like.
Happy High Key from the Near Side
In this setup, the key light is positioned high on the side of the subject’s face nearest the camera, the downstage cheek. It should be situated in such a way that a triangular light pattern strikes the upstage cheek. Since the shadows fall on the far side of the face, away from camera, the placement of the key light in such a setup is not as critical as when the key is from the opposite side and the shadows are cast on the downstage side of the subject. In general, setups with the key located on the near side of the face are less dramatic than setups with the key on the far side and are frequently used in high-key scenes. Like the head-on setup, this setup produces results that closely resemble natural overhead lighting. If there are fluorescent lights at the location, the key should be a diffused focusing spot or a softlight to emulate the natural look of that environment.
The near-side setup also serves well in interior locations partially lit by daylight coming through a window in the shot. In these situations, daylight sources or converted tungsten sources should be used to bring the light level in the room to within a half f-stop of the daylight coming through the windows. This will achieve a natural-looking ratio between the window and the subjects in the room.
As with most setups, the fill is placed at eye level on the opposite side of the key. The intensity of the fill will control the lighting ratio, and like all fills, it should not produce shadows of its own.
Again, the all-important backlight should be positioned in the manner described earlier. Figure 7.3 shows an example of near-side lighting and Figure 7.4 illustrates the result.
Dramatic Low Key from the Far Side
This setup is just the opposite of the near-side setup. Here, the key is placed high above the side of the subject’s face upstage of the camera so that it casts a triangle of light on the side of the face nearest the camera. Place it so the shadows are cast down and toward the camera. Such a key will highlight the shoulder farthest from camera and leave the near shoulder in darkness. This creates depth beyond that added by the backlight. The key may be specular or diffuse, but specular keys provide more dramatic lighting and a greater sense of depth. When setting the backlight, be careful not to destroy the depth you have created with this setup. Keep light off the downstage shoulder. This type of setup was used frequently in the old black-and-white Peter Gunn series to create some wonderfully eerie scenes.
With the far-side setup, placement of the key is critical because the shadows created are cast on the side of the face nearest the camera and are more obvious than in the previous situation. The key should be placed so that the nose does not cast a large shadow on the downstage cheek and the actor can move freely without casting odd shadows on the downstage side of the face. Though the basic effect will change as the subject looks toward the key and back toward camera, there will still be sufficient modeling to keep the mood. If the subject’s head turns toward the fill so far that the downstage cheek is lit directly by the key, the effect will be ruined. In such a case it is best to change the actor’s blocking slightly rather than make lighting adjustments.

In the far-side setup, placement of the fill is also critical. It should slightly overlap the key area and be placed at eye level near the camera. Naturally, it ultimately determines the lighting ratio and should not be strong enough to cast its own shadows.
Best suited to low-key, dramatic lighting, the far-side lighting setup still has a wide range of effects.
As stated previously, it is best to stage your long shots before lighting the close-ups. The lighting ratios of the long shots should be higher than those of the close-ups. The far-side setup intercuts well with higher-ratio long shots, maintaining the mood, but providing additional detail in the shadow areas. Since the basic look of a far-side setup places the downstage side of the face in shadow, a ratio of 4 to 1 may be used in a far-side close-up being intercut with the long shot having an 8 to 1 ratio. Figures 7.5 and 7.6 show examples of far-side lighting.
It’s difficult to show exactly what these different lighting positions do in a drawing, so an example photograph of each is given. Slight movements in the positioning of each light will change the result. It’s best to try each of these lighting setups and notice the subtle and distinct differences each one creates.
Motivated Lighting
To set aside a category titled “Motivated Lighting” seems to imply that it is somehow a lighting form different from earlier categories. Since all lighting should be motivated by elements in the scene, it is merely an extension of the principles that guide the cross-key or side-lighting setups that follow and the setups already mentioned. It utilizes any of the previous setups, and it is determined by the location of windows or practical electricals on the set. Even though these natural sources may not be a part of the close-up, if light sources are seen in the long shot or are implied by dialogue, they should serve as your guide to the placement of keys, fills, and backlights around the set. Additionally, these practical sources will justify your exposure ratio between subject and background.

The use of gobos and the selection of basic instrument types should also be guided by these factors. In documentary production it is best to follow these natural source clues as carefully as possible, maintaining exposure ratios in keeping with the situation. In scripted productions you can be a little freer in your interpretation, or replication, of the natural sources. When practical lights are on the set and are located in frame, use 3200°K photo lamps (see Chapter 3) and gel with neutral density (ND) filter material, if necessary, to achieve the proper exposure. Generally speaking, if a lighted lamp is visible in frame, it should be about one-half f-stop above the exposure of the subject. You should measure its intensity with the incident light meter held about one foot from the shade.
The materials, color, and texture of set walls should guide you in selecting the type and placement of background light sources. Obviously, a shiny white wall will require less light than dark wood paneling to maintain a similar exposure ratio between subject and background.
An excellent magazine (although aimed at the filmmaker) is American Cinematographer. Each month, the magazine shows photos of lighting techniques from feature shoots. I have honed my lighting skills over the past 20 years from reading this magazine and learning by photo example. By looking at the photos, reading the accompanying article, then renting the movie, I have gained a new understanding of motivated lighting.
A moody, dark film like Seven had a unique approach to creating the gritty, foreboding look of the piece. Heavily-silked Fresnels were used to create subtle pools of light in the victims’ homes. Although a dimly lit movie, the director wanted the viewer to see only what was in the pools of light, not what was lurking in the shadows.
The John Grisham film The Pelican Brief used an innovative approach in lighting the massive three-story lobby of the courthouse. White balloons were hung (hanging down) from the ceiling throughout the interior. Five thousand watt on 5K HMIs were then pointed at these balloons. The soft bounce lighting illuminated the southern courthouse and gave the interior a warm, hazy feel. Too many other lighting instruments would have been needed to light the behemoth interior. The balloons solved the problem.
When viewing a DVD of any Hollywood production, the “special features” section often includes how the producers accomplished something. Although rarely on lighting, sometimes a particular shot is important enough to warrant describing how it was lit. Later on, we will discuss in detail how to specifically light a few scenes with this “special features” approach.
The creation of natural, believable lighting that contributes depth and an artistic statement to the production is the challenge of any assignment. There is great satisfaction in looking at the monitor and realizing the pleasing picture you see is the result of your efforts. If you have done your job well, the amount of effort will not be noticeable, but the results will.
Side-Lighting Setups
Side lighting is used to emulate the mood and direction of various interior or exterior lighting sources. An example might involve a practical table lamp that is located next to the chair in which an actor is seated. Whether the practical lamp is seen in the close-up or not, if it is shown in a wider shot, it affects the placement of the key. The type of key light used will be dictated by the practical source itself. If the table lamp has a translucent shade on it, you could use a softlight or a diffused specular source as your key. If the table lamp exposes a bare bulb, a nondiffused key would probably be more appropriate. At any rate, the key would be located at approximately the same height as the lamp and aimed at the subject from the angle of about 90° to the talent. Naturally, you would expect the actor’s face to be hot on the side facing the lamp and much darker on the opposite side. You do not need to be overly concerned about the shadows cast by such a key, as it is more important that you reinforce the effect of the real-life lighting than attempt a portraiture type of setup.
I learned an extreme example of practical lighting in film school. Hitchcock’s 1960 black-and-white thriller Psycho has many memorable scenes. In one of the end scenes, when Norman’s mother’s identity is discovered, the practical lighting intensifies the effect. Mrs. Bates’ form is sitting in a rocking chair, with her back to the camera. The only source of illumination is from a bare bulb directly above her head. As she is slowly turned to face the camera by a hand on her shoulder, we see that it is actually her corpse. Vera Miles screams and hits the light with her hand—sending it swinging back and forth like a pendulum. This moving shadow, the stylized music score, and Vera screaming make it a terrifying scene. The only light on the set was from this bare bulb (probably a higher wattage to ensure an image on slow black-and-white film stock). Through quick cutting we see Mrs. Bates’ corpse and Vera’s face in total darkness, harsh light, total darkness, harsh light—as in real life.
In the film, Cold Creek Manor, Sharon Stone and Dennis Quaid are being chased through their property’s 1200-acre woods by “Dale,” who is a bit psychotic. The only illumination appears to be coming from Dale’s flashlight. As he chases our heroes, his flashlight waves wildly as he transverses the forest. Hollywood added effects like smoke so the illumination of the flashlight would be easier to see. Obviously, although 500-speed film stocks are quite common, additional lighting was needed in this scene to raise the foot-candles enough to expose the film. With clever placement of off-screen HMIs, the forest had light and it still looks as if the flashlight is “lighting the way.”
As with any lighting setup designed to emulate some motivating source, you can (and should) cheat a bit to improve on the natural look, so long as you do not destroy the illusion you are trying to create. Many times, lighting directors are overly concerned about “pleasing results” and destroy the illusion they are trying to create. The temptation is to raise the key and bring it farther forward to create more pleasing shadow patterns than would be created by the practical lamp. When the cheating produces portrait-type lighting, you have gone too far. It’s time to lower the key and push it back a little to get back to reality.
To lessen the stark look of such a setup, a soft fill light is placed directly in front of the subject and carefully adjusted to bring some detail out of the key’s shadow area without adding any conflicting shadows. The fill can do a lot to lessen the often unflattering shadows produced by such a natural setup. The addition of the backlight will complete the illusion and separate the subject from the background. Figures 7.7 and 7.8 show a typical setup for this form of lighting.
Cross-Key Lighting Setups
The cross-key setup is merely a situation in which natural lights dictate that a second key be added to a side-lighting setup from the opposite direction. This second key should generally be of the same type as the first, and it will serve in place of the fill light. In this case there is no fill, but the backlight is still a part of the setup. Figures 7.9 and 7.10 show examples of this setup.

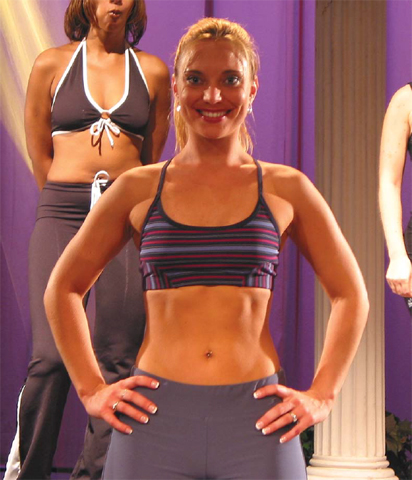

Figure 7.10: Cross-Key lighting at work.
Cross-key setups are common in theatrical lighting. In this type of situation, two identical instruments are located to the right and left of the talent at 45° angles. One key is gelled in a warm color, and another in a cool color. Because of the color difference between keys, the cool-colored key serves the function of a fill light. It creates a convincing illusion that the cool side of the talent is in shadow and establishes the warm-colored light as the key or source light.
When instruments are placed in the same relative positions to light television talent, the results are not at all convincing. Since television lights are not gelled, the theatrical effect is lost. There is no sense of where the source light is located and the end result is conflicting shadows. It’s the old “Get rid of the shadow with another light” approach, and it has no place in good lighting for television.