Specific Lighting Situations
What Should I Do?
You have now come to the point where you should try your hand at lighting some specific scenarios. I tried to make these actual situations a sample of what you might run into in the lighting world because each of these “sets” poses challenges for the lighting director.
Every one of these “problems” is from one of my shoots, and our lighting team created the look we were after with the equipment we had or had rented. I will start with one of the less complicated setups and explain my concept.
The Lone Interviewee
Our first example is lighting someone who will be interviewed on camera. It does not matter if he or she is looking at the camera, at an off-camera interviewer (as was in our case), or is staring at the ceiling. Your goal is to make this individual’s office look pleasing, well lit, and like a real office (which it usually is).
To add a few challenges, the person being interviewed is sitting behind a massive, highly reflective, granite-top desk. Directly behind his mahogany desk is a row of untinted windows—allowing the light from outdoors to flood in. You do not want the talent to be backlit, so his face must be properly exposed. Below the windows are mahogany cabinets (to match the desk) lined with photographs of family members. If this were not enough, your talent has hair as white as newly fallen snow.

For this scenario and all of the others that will be presented, I will light the scene first using the equipment I had available. The next step is for you to light it a different way using the same lighting instruments I had access to. The last part of the exercise will be for you to light the scene using totally different instruments (i.e., fluorescents instead of Fresnels, etc.). There is no right or wrong way to light any of these scenes. The only common ground rules are: all of the lighting must be motivated in that it must come from an obvious source like windows, practicals, etc. (no brilliant light from a flying saucer); no special effects light, like a pulsating neon sign somewhere in the background; and the color temperature should be consistent (no pools of daylight and tungsten). Now that you know what to expect, the first scenario awaits.
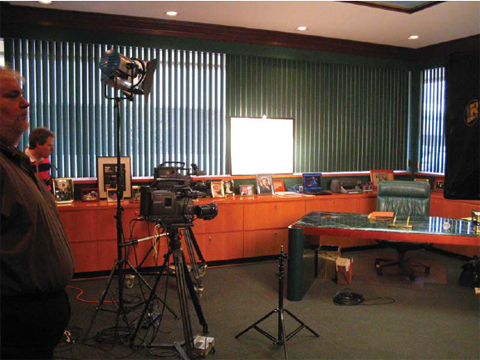
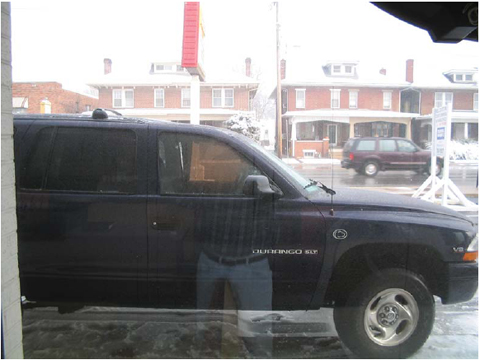
In Figure 12.1, we have some of the rough lighting in place. Greg Ressetar is seated at the desk being our “stand-in talent” as the lighting is tweaked. The first thing we decided to do was close the venetian blinds behind the desk. We could have gelled our tungsten light to daylight with blue gel or covered all of the windows with 85ND6, but the blinds were a pleasing green hue and closing them saved us a lot of aggravation.
In your lighting exercise of the same room, you may decide to diffuse the windows, use HMIs, or gel your tungsten lights. These may be variations on our original theme.
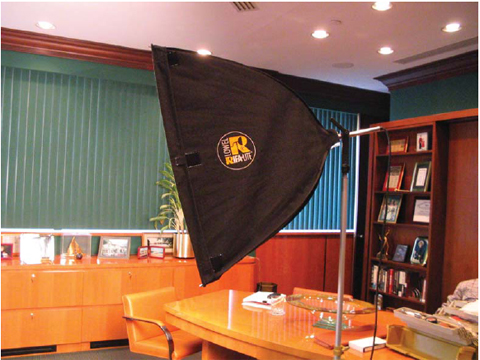
We decided, since we closed the blinds, to shoot everything in tungsten with a soft, pleasing look. The talent had to look friendly, inviting, and someone you would like to meet (he was an attorney so we were being truthful). The key light was to be soft so we chose a 1K Lowel Rifa (see Figure 12.2). Soft, warm light would now emanate from the Rifa that was placed 8 feet from the desk, almost directly in the talent’s line of sight if he were to look forward. With a Rifa elevated to a height of 6 feet, we had to next focus on the fill.
The fill light, as seen in Figure 12.3, is a combination of a 1K Arri Fresnel pointed at a 3 × 4- foot piece of foam core. The Arri was spotted so that its beam did not spill off the foam core. We attached the foam core to the blinds with gaffer tape, and the Arri Fresnel was extended to a height of 8 feet, placed at a 40-degree angle to the foam core, and set 7 feet from the blinds. The barn doors were also used to keep the light from straying anywhere but on the foam core.
I mentioned earlier that the desktop was highly reflective marble—so was everything else (very shiny). We decided to use this to our advantage. The overhead lights in the office were fluorescent (as in most offices) and these were turned off. However, directly above the windows pointing down on the side cabinets and photographs were halogen ceiling lights, as seen in Figure 12.6. These were dimmed slightly (to make them less intense and to produce a warmer color temperature to make the picture frames pop). Each individual frame had to be moved to strategically place it in the scene without glare.
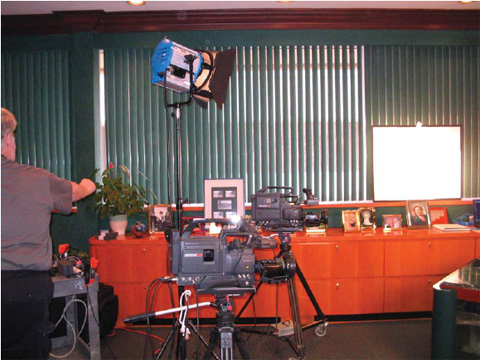
Figure 12.3: The fill setup.
As we slowly added lights to our setup, the reflections from the marble desktop were pleasing and gave the room a more expensive feel. If this were a problem and the desktop would not be in our shots, we could have easily placed something on the marble surface to cut the shine (white card-board, dulling spray, etc.).
Needing a little more fill on our talent, Tom Landis, our gaffer, erected an Arri 350-watt Fresnel at the light stand’s lowest setting and pointed it at a 4 × 4-foot piece of white cardboard attached with a clamp to another stand (see Figure 12.4). On full flood and 3 feet from the bounce card, this helped to get a little more light on the subject. Our plan was coming together, as seen in Figure 12.5.
To finish our three-point lighting, we needed a light to separate the talent from his wooden world. Because his hair was so white, we chose not to illuminate his head, but his shoulders instead. This will still remove him as being three dimensional in the wood-lined office. Since the camera would see behind our talent, we could not place a light stand there. Instead, we mounted an Arri 350-watt Fresnel to a C-Stand arm and extended it high above our talent’s back, as seen in Figure 12.7 and Figure 12.8. The stand was elevated 5 feet, and the arm extended 27 inches and pointed 3 feet from his shoulders. To soften the blow of the 350, we diffused it with 216. By pointing it at his powder-blue shirt, his white hair illuminated itself, and the Arri kept his shoulders separated from the background.
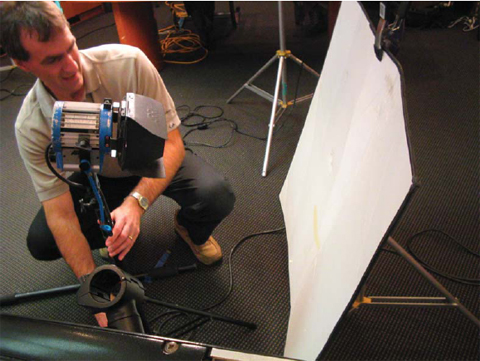

Figure 12.5: Two point lighting with two cameras.
Now comes the time for tweaking and making the set look a little better. Because everything in the office was wood, brass, and shiny, we decided to add a little living material in the form of a plastic plant. When an Arri 350-watt Fresnel was positioned 2 feet away from the plant’s leaves, we got a pleasing pattern on the wood-lined background (see Figure 12.9).
By rotating the plant left or right, we got the shadows to fall where we wanted. With the barn doors narrowed to allow a sliver of light to protrude, we now had a little shaded texture. Small touches like this, although seldom noticed by the viewer, does make a set slightly more believable. This makes it atheistically pleasing.
To the right of our talent, I noticed a bizarre shine flaring into the camera’s lens. One of the ceiling’s halogen fixtures beam was hitting the cabinet and cascading into the lens. The ceiling lamp was too hot and difficult to move, so we placed a sound blanket, out of frame, to cover that spot on the cabinet, as seen in Figure 12.10. Sometimes it takes correcting something that simple to make your world a happier place.


Figure 12.8: Another angle of the backlight.

In Figure 12.11, you have a glimpse of what the talent would see of our lighting while seated at the desk. Once all of the lighting has been adjusted with your stand-in talent, it is time to tweak it with the real person. Height differences, skin color, and clothing might require some lights to be moved a little.
We shot this with two video cameras, although it really made no difference in how it was lit. The look was warm and inviting with all of the wood, and the client was pleased.
Exercise One: It Is Up to You
Now that you’ve read and seen how we illuminated this office environment, find another way to achieve the same effect using the same instruments. The lights we used were: one Lowel 1K Rifa; one 1K Arri Fresnel; three Arri 350-watt Fresnels; one 3 × 4-foot piece of foam core; and one 4 × 4-foot piece of poster board.

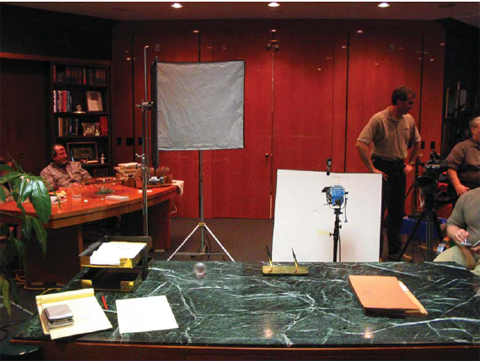
Figure 12.11: What the talent sees of our lighting.
Exercise Two: Different Lighting
In this exercise, you are to illuminate the same set without using tungsten-balanced Fresnels (gelling them does not make them tungsten anymore). Try using HMIs, fluorescent units, open-faced lights, LED lights, etc.
More People, More Light
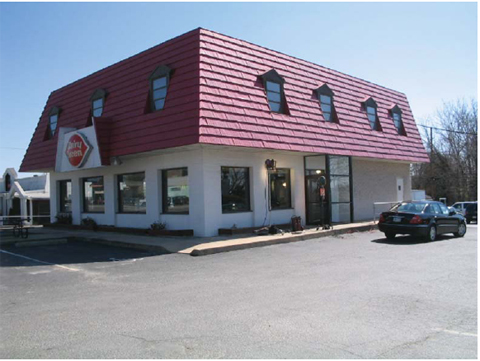
This next scene is slightly more difficult in that we are dealing with a very strong light source—the sun. All of this action takes place directly inside the doorway of a fast food restaurant. Since the time frame is 8:00 a. m. on a sunny day, you will have a lot of light to contend with.
The shot opens with two store employees standing directly in front of the door leading outside. One employee is dressed in dark blue pants with a maroon polo shirt, and the other, his boss, has the same color pants but a light shirt and dark tie. The underling is mopping the floor so it will be seen in the frame. In the middle of mopping, someone comes to the door and wants to come inside.
This presents a problem we didn’t address in the last exercise; we now have to deal with the reversal shot. We may look at the two employees inside the store gazing out at the person arriving outside, but we also have to get that person’s point of view—shooting outside into the store. Hopefully, each scenario will get slightly more difficult to better hone your lighting skills.
One last thing to throw at you: We are shooting this over 2 days, so the lighting has to match. We shot the interior of the store on an f-22 day with brilliant sunshine, and the reversal of that shot (into the store from the point of view of the person outside) on a gray, cloud-covered day. Unfortunately, these two shots are meant to happen within a 2-minute span of time, and everything has to match. Although it might not make any difference, we will be shooting this scene in film where we have an 8-stop exposure and contrast range from the blackest blacks to the whitest whites.
How Do I Begin?
God took care of the sunlight streaming through the door on Day 1, and we just had to punch up our exposure indoors to match the exposure in the wide establishing shot. We used a Mole-Richardson (the telltale color maroon) 2500-watt HMI Molepar outdoors to act as our key to most closely match the sunlight. Actually, any manufacturer of HMIs would have done the job, but only a Mole-Richardson unit was available for rent in our area. Figure 12.12 shows our HMI gelled with amber, to raise the color temperature slightly to warm up the interior.
The HMI provides a strong key, but we needed a little extra help in that department. By gelling a 2K Arri Fresnel with daylight blue and placing it by the doorway (still outdoors) we had a little more key on talent A and a strong backlight on talent B (see Figure 12.13).

With all of this strong backlight coming it from outdoors, we needed a sizeable amount of light to provide fill indoors. Because we wanted the sunlight to appear as such, in no way did we want the fill try to approximate competing with the sun. We still needed strong directionality, but a little fill was needed. Using an Arri 1K Fresnel in a softbox enclosure (like a Chimera, but not that brand), we raised the unit to a height of 6 feet and placed it 4 feet from the actor. To keep the color temperature consistent, we inserted a sheet of booster blue on the white fabric front. This would still give us a slight orange cast (see Figure 12.14). We also placed a 2 × 4-foot piece of foam core on a light stand and arm to act as bounce when shooting the close-ups.
When we shot the person outside from the store employee’s perspective, we wanted the exterior to overexpose slightly. On a cloudless, sunny, winter day the light outdoors can easily reach f-22. Our interior illumination reached f-11 with the HMI and 2K pounding through the glass, so 2 stops is acceptable (outside was f-22 and inside f-11).
Once again, because the sunlight was so strong, we just needed to fill in the shadows a little, not try to compete. We were able to get the master shot and the close-ups from the interior, but still lacked getting the shot of the employees from the person’s point of view outside.

When we decided to do the exterior-to-interior scene the next day, we had total cloud cover, so our “sun” had to be duplicated. Bringing the gelled HMI indoors and positioning it 15 feet from the talent (set on flood), extending it 8 feet, we had another f-11 day (see Figure 12.15). We had the correct illumination level, but no sunlight streaming through the door—obviously, the shots would not match. To make them match, we used our daylight gelled 2K and put it in the doorway (vestibule) and punched it through the frame and glass. This provided our streaming sunlight, complete with the door frame shadows across the talent.
Since the person outside would be coming inside on that same shot, the employee had to open the glass door for her. When this happened, with the camera positioning, we saw the reflection of the light and stand in the glass door. Tom Landis solved this problem by gaffer taping black cloth to the light stand and I framed the light out on top. Figure 12.16 illustrated what we did.
Our lighting was almost complete. The backlight was needed for the store employees. As the person from outside walked in, the Arri 2K acted as sunlight through the windows for the employees and her backlight. An Arri 650-watt Fresnel (gelled booster blue) was raised 8 feet and set back 10 feet from the actors. Since they were in close proximity to each other, the flooded Fresnel would backlight both.

Remember our last exercise? Once you have your three-point lighting set, it is time to tweak the illumination and add additional lights. Both actors were wearing dark-blue pants and the filtered sunlight did little to bring that dark level up. We needed a light from the same direction as the sunlight to be pointed at their pants. Another 650-watt Arri Fresnel, not gelled blue, was pointed at the clothing. The orange cast of this tungsten light would not pose a problem on their blue pants.
Exercise Three
In this instance, you are to illuminate this scenario using the same lighting instrument we used—placed in a different arrangement. Try to create the sun streaming through the window on a cloudy day and accentuate the same look on a sunny day. The lighting instruments at your disposal are: one 2500-watt HMI, one 2K Fresnel, one 1K Fresnel in a Chimera-like enclosure, and two 650-watt Fresnels.
Exercise Four
Use the same scenario as before, but use different lighting instruments to make this a reality. Hint: Using more powerful lights is also an option (i.e., a 5000-watt HMI, 2K Chimera, etc).

Still playing around with the lighting-the-same-fast-food-restaurant theme, this time we will have more actors involved and more obstacles to overcome. Just like in a real movie, we have to light for the master shot, close-ups, and the reversals.
Now we have three employees behind their cash registers at the fast food restaurant. The menu board is to be illuminated, but some of the panels do not have signs covering the fluorescent fixtures (I will give you some tricks to accomplish this feat). There will also be people in line behind the employees waiting to place their order.
When you shoot the reversal from the employees’ point of view, as in most restaurants, the wall is lined with windows. To make the scenario slightly more difficult, you will be shooting this scene in March, where one day there is snow on the ground and the next day it is 70° and it all has melted.
The scene occurs during the day and there is a lot of activity in the restaurant. Hollywood often uses the same approach to lighting a scene like this, which is often explained in American Cinematographer magazine. Since there is so much daylight, it would be too time consuming to gel the windows and try to make this a tungsten production.
With a 2500-watt HMI used as a key source, it was raised to a height of 4 feet, gelled with ND6, and pointed at a 4 × 8-foot sheet of poster board. Foam core could also have been used, but at that size, poster board is much more manageable. Essentially, we now have a giant, soft bounce source that will still act as our key. This setup is out of frame, so it will still be the key for both master shots and close-ups (see Figure 12.17).
An HMI is one of the most versatile lighting instruments made; it has the ability to function in a multitude of settings. This light works as the key for the customers as well as the employees behind the counter. Using the same 1K Arri Fresnel in a Chimera-like enclosure, our off-camera fill light was gelled with booster blue to add a little warmth to the shot.
The same light could serve as the backlight for all three employees behind the counter. An Arri 650-watt Fresnel gelled with booster blue was elevated to a height of 8 feet and 15 feet from the employee closest to the camera, 11 feet from the middle person, and 5 feet from the woman closest to this light. Barn doors are necessary when trying to keep light where you do not want it. By marking the exact positions of the employees and angling the light carefully, we had our back/hair/shoulder light (see Figure 12.18).
Since we shot from the perspective of the customers first (for no particular reason), we will deal with tweaking the lighting behind the employees. A light was desperately needed to illuminate the area in the back where the cooks normally dwell. Leaving the overhead fluorescent fixtures illuminated was not strong enough to cast light from the bowels of the kitchen, and the eerie green cast of those lights would not add to the friendly atmosphere of our restaurant.


Figure 12.18: The backlight for the employees.

An Arri 650-watt Fresnel gelled with booster blue was placed far in the back by the deep fryers to simulate our light source, as seen in Figure 12.19. Raised to a height of 8 feet and placed 20 feet from the opening viewed by the restaurant patrons, we just wanted to show a slit of light as if there were life and activity in the back. Because we positioned the light so it was pointed at the fluorescent ceiling fixture, the viewer believes this is the light being cast from that practical. The illumination cast may be viewed in Figure 12.20. It actually looks like this is coming from the fluorescent.
Next, the menu display needed a lot of attention. Since the restaurant had been closed for months, most of the menu’s lettering had vanished. All old, flickering fluorescent tubes were removed and replaced with new ones. Menus that were not visible had their lighting guts cannibalized to get the needed light tubes—that left us with vacant panels that looked horrible. You have two solutions to correct this: you can have new signs created to fill the void, or you can mask their appearance. We decided to use both options.
A local sign shop created a generic menu that really would not be visible from the camera’s point of view. In close-ups, our depth of field would be too narrow for even those with the sharpest eyes to read them. The blank panels, without lights, were covered with 85ND6 gel cut to size. Straight ND6 gel is not dark enough, and the orange cast of the 85 was perfect to fill our blank spaces. The finished result, plus a few shines we corrected, may be seen in Figures 12.21 and 12.22.

Figure 12.20: The light from those dwelling in the back.
Figure 12.23 shows another angle of our lighting setup as seen from the customer’s point of view.
We were now about to tackle all of the camera angles from the customer’s perspective. It is best to settle on one f-stop and light until that is what you achieve. In this case, my choice was f-5.6 and we lit until that is what we got. At times for the employee close-ups, I would put a 2 × 4-foot piece of foam core on a C-stand arm to add a little fill to the employee’s face. Other than putting bounce cads on the counter or just out of frame, we had what we desired.
The reverse angle proved to be more challenging. Still using the 2500-watt HMI against the white board as our key, and the Chimera-like unit as our fill, we needed a little more light on the customer’s faces. The backlight used for the employee’s hair light (the Arri 650) was turned more to skim the faces of the customers. We were also getting ambient daylight through the side windows of the restaurant, but that fell off too quickly to be of much use. Instead, using new technology, I attached a 140-lamp LED Litepanel to the hot shoe of the camera (see Figure 12.24).

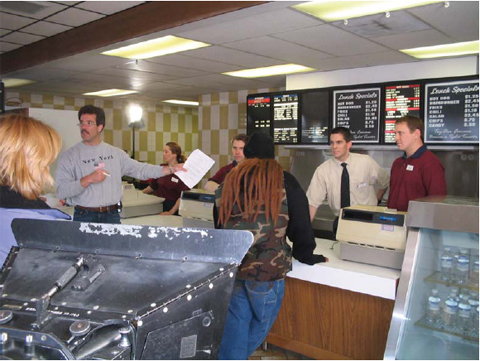
Figure 12.22: Some customers on the scene.


Figure 12.24: The Arri fill light and camera-mounted LED Litepanel.
As mentioned in an earlier chapter, the LED light could be articulated to the correct position and dimmed as needed. The daylight balance added a twinkle in the customer’s eyes that only a small light at close proximity can do.
The biggest problem now was not so much the intense daylight viewed through the rear windows, but dealing with what was happening outdoors. Through the glass, the illumination outside was f-11, still only 2 stops above our interior. But the “view” needed to be changed.
Not having shades, we needed to block the cars on the street as well as the restaurant’s sign. By parking the soundman’s SUV on the sidewalk, we blocked most of what we saw out of one window. From the camera’s point of view, it did not look like the SUV was parked on the side-walk. However, the light coming through his driver-side window still gave away our secret. Tom again solved the problem by cutting a piece of 85ND6 and attaching it to the driver’s window to cut the light (see Figure 12.25). We did the same thing to a car parked across the street. By putting a piece of 85ND6 under the windshield’s wipers, the glint of the chrome and glass was removed.
Pieces of foam core placed in the window acted as pretend “signs” to partially block the view (the backs of most signs are white anyway), and all that remained was the snow or lack thereof. This scene was shot over the course of a few days, and the snow came and went even though consistency was necessary. If snow was visible and needed to be removed, we used brooms to knock all of the white stuff off the bushes, shrubs, and cars.
If we needed snow to match another shot and there was none around, we used large pieces of foam core on the grass as snow, or bundled cotton draped over trees and shrubs. From a distance it was impossible to distinguish this from the real thing.
An ever-mindful eye is needed in the viewfinder to watch for these and other distractions.
Exercise Five
Using the same lighting instruments—one 2500-watt HMI, one 4 × 8-foot piece of foam core, one 1K Fresnel in a Chimera-like box, two 650-watt Fresnels, and an LED Litepanel—create the same look for both angles.
Exercise Six
This should be easy! Now light everyone using different instruments and keep them from baking under the lights.
Under the Colored Lights
There will be times when colored gels are necessary to make a shoot come alive. Our next scenario deals with an exercise video, where brightly colored lights are the norm.
Our space was on a stage, but the same lighting could apply to any interior location. Several talented instructors will be going through their routine, and eventually the viewer will be watching this all on his or her home TV. The background/backdrop should be nondescript and blend into the environment. The lighting must be high-key and happy, much like a sitcom.
Our background was no more than an off-white curtain, but you could use a muslin backdrop just as easily. With three 1500-watt MoleFar Super Quartz Cyc strips, each connected to a light board, we chose to illuminate the white background curtain first. With rose-colored gel in each, we bathed the curtain in a vibrant rose hue. With each dimmer set at 50%, we did not want the set to look like the Red Light District.
Four prop columns were placed against the curtain with a 200-watt inky behind each, gelled orange, and pointed upward. Attached to a pigeon, each light would stay hidden behind the column.
Doing things in reverse, we set the backlight first. A 350-watt Arri Fresnel extended to 9 feet was pointed at the talent 11 feet away. With 216 diffusion on the Fresnel, the talent’s blonde hair radiated. The fill was also an Arri Fresnel, this time a 650-watt unit 9 feet up and 8 feet from the talent. A ½ scrim was used to cut the light’s output.
Her key was a 1K Fresnel in the soft fabric of a Chimera. Although high-key, the illumination still had to be flattering. Only 4 feet from the talent and raised to a height of 6 feet, we now had an f-8 exposure (see Figure 12.29). See Figure 12.26 to see our finished shot.
Another variation on this same scenario is lighting a group of instructors, using a mixture of grid and kit lighting. Figure 12.27 shows our set before we began lighting. Note the black Duvetyn screens to hide the rest of the set.
In Figure 12.28, we added the colored lights, activated the Jumbo Trons (large video display monitors). Now it began looking more like a real set. With all six of the instructors on the set, each needed to have their own backlight. Therefore six 1000-watt Molequartz Molelipso lights were brought into action. Depending on the instructor’s hair color, the individual units were dimmed until we were happy. The same key and fill from the single shot were incorporated—just moved back slightly (see Figure 12.30).
When the instructor grouping was reduced to four, we now used four backlights and the same key and fill. It is easy to make variations to your setup if using a lighting board and multiple units (see Figure 12.31).
Sometimes just changing the background gel color (to blue in this case) can give your set a whole different look. If your lights have automated gel rings, a push of a button gives you a different hue (see Figure 12.32).
Exercise Seven
Using the same units—one Chimera with a 1K, one 650-watt Fresnel, one 350-watt Fresnel, four inkys, six 1000-watt Molelipsos (Leko), and three 1500-watt Quartz Cyc strips—change the lighting from my initial setup. Hint: This was our only tungsten setup—it does not have to be that way.
Exercise Eight
Now find your own units (not what I used) and make this set sing!
Up Close and Personal
This last scenario is an example of lighting an intimate interview without blinding the talent. This is much like the technique used in Dateline and 20/20 for their setups. The lighting should be soft and bounced. Any age, sex, or skin tone works well with this type of lighting.
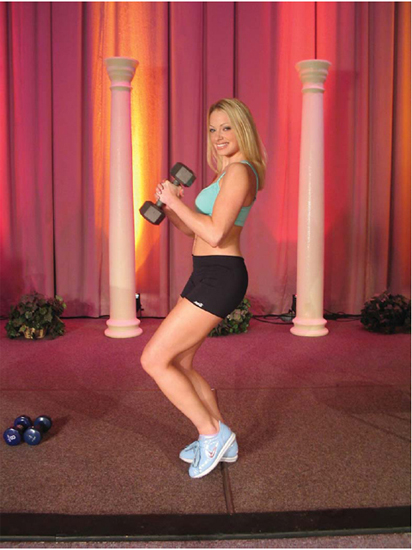
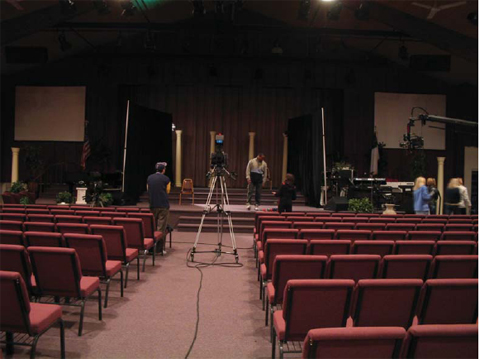

Figure 12.28: See what a difference a color light makes.
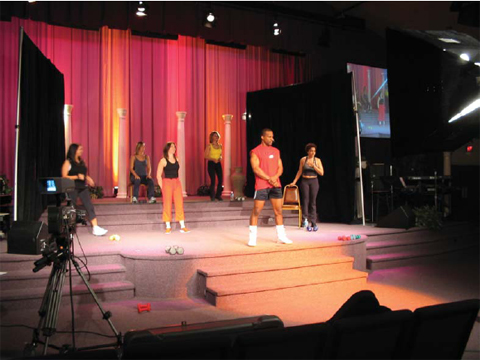
Figure 12.30: Six instructors, six back lights.
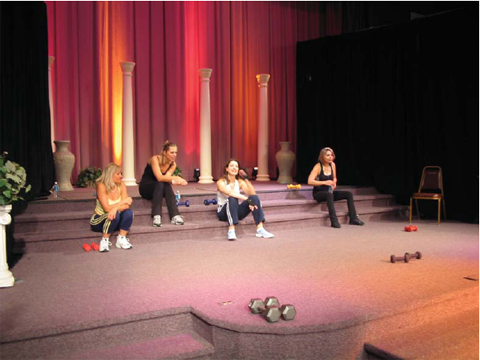

Figure 12.32: Changing the background color for a different look.
The interviewer and interviewee usually sit facing each other with a camera dedicated to each person. Our key would be an Arri 650-watt Fresnel in a Chimera for each individual. Raised to a height of 6 feet and 5 feet from the seated talent, this would serve well (see Figure 12.33).
The fill was a Flexifill 24-inch diameter reflector (using the white rather than the gold side) clamped to a light stand. Each person would have their own fill. The closer to the person, the more fill light (ours was three feet away at eye level) (see Figure 12.34).
Our backlight for each was a 150-watt Dedolight with a hand-cut cookie made from Blackwrap. This created a mottled pattern on the subject’s shoulders. Sometimes this extra texture is unseen, but perceived anyway (see Figure 12.35).
The end result is seen in Figure 12.36. With one of the talent missing, you get an idea what the lighting may look like.
Exercise Nine
Your version using the same lighting should include two 1K Chimeras, two Flexifills, and two 150-watt Dedolights.

Exercise Ten
This lighting style is very popular and may be used on almost every project; it is a good idea to see if you can come up with several variations on how to light an interview.
Hopefully, this chapter was helpful in your quest to light some key scenarios. Chapter 13 will help hammer home some concepts with the Glossary.