What’s Out There in Lighting
There are a lot of different lighting units available from the major dealers. So how do you know what is what and how it can possibly help on your production? This chapter, although not an exhaustive list, will discuss a wide variety of lighting units and what specifically sets them apart from the rest.
To fully know what each manufacturer has to offer, go to their corresponding website (listed in each section) and get a catalog. I will list each company alphabetically and describe a few of their more popular units.
Arri
A maker of high quality 16 mm and 35 mm cameras, Arri (www.arri.com) offers a wide selection of Fresnels, fluorescents, and HMIs. Beginning with their HMIs, the smaller units, 125 watts offer more punch than a tungsten light four times its size. Advancing to the 200-, 575-, 1200-, 2500-, 4000-, and 6000-watt models, you will have an arsenal that is unmatched.
The tiny three pound 125 watt Fresnel HMI produces an outstanding 1872 foot-candles of day-light at a distance of 5 feet. For something that takes up so little space, output of this magnitude was unheard of a short time ago. This light definitely warrants mention because of its size and power (see Figure 4.1).
The next unit is one of my favorites on a shoot because it is powerful enough but still mobile with its ballast. The Arri 1200-watt Compact HMI blasts 8000 foot-candles of light at a distance of 10 feet. I have used these punching through windows to simulate sunlight because it is the closest thing to it without having to harness a team of horses to drag it around. This specific unit will be discussed in greater detail in later chapters (see Figure 4.2).

Figure 4.1: Arri 125-watt compact HMI (Photo courtesy of Arri Co.).
The Arrisun 12 Plus is an HMI PAR that most closely matches a theatrical stage light indoors when shooting film or video (see Figure 4.3). Mounted only 20 feet from the stage, its 14,063 foot-candles of white daylight blanket the actors. Chapter 3 discussed how a PAR differs from other lights, and this is an excellent use for its power (see Figure 4.4). If a strong punch is needed at a distance outdoors, the PAR is the best candidate for the job.
On a shoot for a client, I needed to illuminate a white building that was cloaked in shadow because the early morning sun was still behind the façade. With a 1200-watt HMI PAR, the white stucco of the building almost fluoresced. HMI light is extremely white on video and actually looks better on the monitor than it does in reality. The dirty exterior of our building looked on our monitor as if it had been whitewashed. The client was happy, we got to play with the HMI PAR outdoors, and the world was a better place.
I have also used a 1200-watt HMI PAR indoors when shooting a furniture commercial in a room surrounded by windows. Not having enough gel to change all of the daylight to tungsten, I opted for HMI PARs to send their broad beams to brighten my world. Indoors, these lights must be backed far from your talent because their output is far too strong at a close range. The client was actually worried that we would “bake” the shadow of the talent into the leather fabrics because the light was so bright. I wish people felt the same way about my intensity.


Figure 4.3: Arrisun 12 Plus HMI PAR (Photo courtesy of Arri Co.).

Arri makes numerous other great lights and I will discuss them again in the kit lighting section.
Chimera
Chimera (www.chimeralighting.com) manufactures light banks that are aptly said to “transform a direct, hard light source into ‘perfect light.’” This “perfect light” is a soft, even diffused source that is both flattering and powerful on the subject.
A Chimera is a light or a series of lights placed inside a collapsible silver, aluminized, high-temperature, tent-like housing covered with woven-glass fabric diffusion material. The output is a controllable diffused source. Lowel manufactures the Rifa-Lite, which is essentially the same type of instrument, with the exception of a permanently mounted halogen lamp fixture.
With on-camera Micro Banks, these 5 × 7 inch diffusion screens are great for interviews to make the talents’ eyes sparkle (see Figure 4.5). Graduating to the Video Pro Plus Lightbanks (in sizes from 12 × 16 to 54 × 72), these can create a soft look to any subject. Almost any type of lighting unit attaches to Chimera’s black fabric and white diffusion screen to create “the unit” (see Figure 4.6). I have used Chimeras on most of my product shoots because the soft, even light keeps bright objects under your control.

Chimera’s Pancake Lanterns expel omni-directional lighting to make all areas of the set evenly illuminated. Working with a bare bulb light to a Fresnel, these lanterns are perfect for illuminating people sitting around a table with even light equal to an airplane’s interior fuselage (see Figure 4.7).
Cool-Lux
Since 1977, Cool-Lux (www.cool-lux.com) has been manufacturing a wide variety of lights. Starting small and working up: The Mini-Cool has been designed as a camera-mounted “key light” for smaller digital video cameras. Using the MR-16 lamp (mentioned earlier), this light is said to out-perform 650-watt Fresnels and open-face 1000-watt lights using 150-, 250-, or 300-watt configurations. When the daylight balance filter is attached to the unit, its output competes with a 200-watt HMI.

Cool-Lux’s SL 3000 is a softlight that is mounted on the camera. Using a 100 watt lamp mounted so it bounces off of the back of the unit, it comes in either AC or DV configurations.
A unique light, only from Cool-Lux, is the U3. With a three-lamp configuration (two floods and one spot), these quartz 3200°K lights have a life span of 2000 hours.
Kino-Flo
A name known for fluorescent lighting, Kino-Flo (www.kinoflo.com) specializes in flicker-free daylight and tungsten-balanced fluorescents. One of the most amazing things about Kino-Flo lights is their versatility.
On a commercial shoot for a regional client, we had to illuminate a salad bar and make it look appealing as well as appetizing. Although we had a food stylist, our tungsten lights would illuminate only certain facets of the food—leaving other areas too dark. The answer to this problem was using Kino-Flo Diva Lights. Available in several bank configurations (two-, four-, eight-lamp, etc.), we could place these wide, even lights on the backside of the salad bar and shoot through the front. Salad bars are normally lit with fluorescent lights above the food, but these are rarely color balanced to the correct temperature and leave the food looking too green or red. With tungsten-balanced Diva Lights, we now had a correctly balanced salad bar.

The client wanted a slow dolly shot revealing all of the sumptuous food littering the tufts of green. Tom Landis suggested we replace the fluorescent salad bar lights with the tubes from our Diva Lights. This is versatility! Each fluorescent tube of the Diva Light was removed and attached to the same size holder in the salad bar (see Figure 4.8). When illuminated, we now had color-corrected practicals that still functioned as a unit. Before the Diva Light came along, this would have been a much more difficult shot.
The smallest 12-volt Micro-Flo, these lights are cool enough to hold in your hand but bright enough to illuminate someone in a car.

With lamps in both 3200°K and 5500°K, these 4- to 6-inch lights are thinner than a pencil and flicker free. An object placed 2 inches from the source still receives 130 to 146 foot-candles. A Pepper would cook any object that close to its lamp.
While shooting a short video, all of the action took place in a traveling car. To light this epic, we drove the car onto a trailer and towed it everywhere with the actors seated inside. All of our lighting was Kino-Flo fluorescent. The actors in the front seats were both lit using one daylight-balanced Micro-Flo gaffer taped to the dashboard, and the rear seat passengers each had their own units hung from the headrests.
Although these Micro-Flo units were AC powered, an AC/DC converter (something about the size of a car battery), changed the AC to a more convenient battery-powered DC. Each Micro-Flo was dimmable (without changing the color temperature) and was attached to a ballast, which in turn went to the AC/DC converter (see Figure 4.9).
The Micro-Flos, because of their size, acted more as fill lighting while two Kino-Flo Four Bank Select lights were mounted to the hood to act as key lighting (see Figure 4.10). These units could be illuminated with either two or four banks providing an even look to our cast inside the car. Because of the car’s windshield, a polarizing filter was used to eliminate any glare caused by the Kino-Flos.


Figure 4.10: Kino-Flo fluorescent lights mounted on a car’s hood.
The Four Bank Select lights are basically four fluorescent-tube, 20-watt fixtures that do a much better job than the sun when lighting a car’s interior. The articulating arm on the back of the Four Bank Select allowed us to position the lights in almost any angle.
The Mega-Four Bank lights also offered by Kino-Flo were too large for our needs on the car’s hood, but I have used their Blanket-Lite 6 × 6 indoors when reflections needed to be kept at a minimum (see Figure 4.11).
Most of Kino-Flo’s units are also available in kit form. This will be addressed shortly.
Lowel
Although mentioned in Chapter 3, Lowel (www.lowel.com) produces a large variety of units, from tungsten to fluorescent. Review that chapter to see some of the more conventional lighting units.
Considered a collapsing softlight, Lowel’s Rifa-Lite is a soft, diffused unit handling anywhere from 50 to 1000 watts. Enclosed in a Nomex housing, the tungsten halogen lamp is permanently mounted in the highly reflective interior. Using either the standard glass-fabric diffuser up front or the optional egg crate fabric, the light output is extremely pleasing and takes less than a minute to erect.
I’ve used these Rifa-Lites on numerous shoots (see Figure 4.12) as both the key or fill. Some-times the faster set-up of a Rifa is the only way to go with an impatient client. MegComm Productions, having several Rifa-Lites, prefers to write the lamp’s wattage on the fabric to instantly determine its wattage.
Light Array System
Still on the topic of Lowel’s folding lights, the Light-Array System features 6-hour foot-daylight or fluorescent tubes that produce a respectable 240 watts (six 40-watt lamps), which lasts an estimated 8,000 hours.

Figure 4.12: A Rifa-Lite on the set.

The fluorescent world never quite looked the same after the introduction of LowelScandles (multi-tasking fluorescent). As illustrated in Figure 4.13, the LowelScandles is a 200-watt daylight or tungsten unit with eight 12-inch-long 24-watt or 18-watt fluorescent lamps.
Mole-Richardson
The familiar red color units belong to the Mole-Richardson Company (www.mole.com). Making lights for over 70 years, this company has a vast variety of lighting units to fit every need. Because their catalog is the size of a telephone book, I can only scratch the surface of what they offer.
Beginning with Mole-Richardson’s HMI offerings, one of the smallest is the 200-watt Digimole HMI PAR. This 3-pound light has the power of an HMI in a much smaller footprint. Its bigger brother is the 400-watt model (see Figure 4.14).
On the tungsten side of the tracks, Mole-Richardson has the extremely powerful 6000-watt Molequartz Spacelite. Six 1000-watt quartz lights are arranged in a hexagon, pointed downward, and covered in a black skirt, much like a Chinese lantern (see Figure 4.15). This light is also available in twice the power rating: 12,000 watts.
I’ve used Mole-Richardson’s 1000- and 2000-watt Junior Solarspots for the last 20 years. They are big, red, and dependable. These Fresnels are what formed the industry.
Their softlights, available in 650-, 750-, 2000-, and 4000-watt sizes are extremely popular tungsten light sources on TV sets.
The bare-bulb 1K and 2K Molette is one of the only barebulb fixtures I’ve used when I need a strong bounce or fill light. Its 360° light is unmatched when you only have one unit that needs to perform the work of several (see Figure 4.16).

Kit Lighting
I believe almost every manufacturer makes a “lighting kit.” This usually means they have decided to put their best-selling lights into a convenient package than can be carried from place to place. I don’t have space to mention what every company offers in its complete line, but here are a few examples.
Arri Kits
As with most manufacturers, their most popular lighting instruments are available in kit form. Even HMIs, like the Arrisun and Pocket PAR, come in kit form, with various wattage lamps and units. Numerous Fresnel kits—or, my personal favorite from Arri, the Softbank 2—may be purchased. This is the kit I use. It contains 1K with diffusion, two 650-watt Fresnels, and one 350-watt Fresnel. With stands, barn doors, and screens, you have a portable, 90-pound lighting arsenal.
Soft Kits I, II, and III come strangely enough with the same number of large softlights in each of the corresponding kits. These kits feature a Combo-Light with 300-, 500-, 750-, or 1000-watt lamps. The largest kit, the Soft Kit III, includes three Combo Lights, two Mini-Cools, and one Micro-Lux On Camera Light. As with any manufacturer, these kit specifics might change over time, so it is best to contact them directly for the most recent configurations.
Lowel Kits
Lowel has been making kits forever, and most of us started in this business (back in the early ’80s) with a Lowel Kit. Today, they offer VIP, DP, Omni, Tota, Fren-L, Rifa-Lite, and Multi-System kits. They are available in almost any size and configuration, so contact the manufacturer for kit specifications.
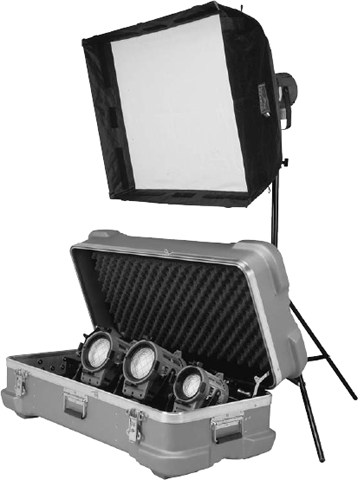
Figure 4.17: Softlight kit (Photo courtesy of Arri Co.).
A variety of lighting instruments exist that can be used on location or in the studio. Location equipment can easily be used in the studio because it is portable and a snap to set up. The only drawback is that they may lack the power or “punch” that studio lighting provides. Studio lighting may be used on location, but some of the instruments may be too cumbersome to drag to the shoot.
Mole-Richardson, Lowel, Arri, Cool-Lux, Kino-Flo, and several others have developed “kits” that contain several lighting instruments, stands, and grip equipment in a convenient (but heavy) carrying case (see Figure 4.17).
Mole-Richardson also makes smaller versions of their studio lights for location work, such as the 600-watt Teenie-Weenie Mole, 650-watt Teenie Mole, 1000-watt Mickey Mole, and 2000-watt Mighty Mole. Most quartz instruments over 2000 watts are difficult to manage and power on location.
Fluorescent Lighting Units
The more lights on a set, the higher the temperature. The only way to illuminate objects without raising the heat level is to use fluorescent lighting fixtures. These units are not the same instruments that are suspended above every office cubicle. These are color corrected lights that may be your only choice in certain situations.

Figure 4.18: Florescent fixtures in a salad bar.
Almost every news desk in television uses fluorescent lighting. The anchors can sit under these lights all day without becoming overheated. Networks like CNN use this type of lighting because the anchors are sitting on the set round the clock. When shooting in restaurants, like Cactus Willies on the East Coast, daylight-balanced Kino-Flos are often used to match the fluorescents in the salad bar (Figure 4.18). Conventional lights would make the set a sauna. These lights are available in one-to ten-lamp combinations and as several different “kits.”
PAR Can
The PAR can is a simple instrument (see Figure 4.19). It is nothing more than a metal housing that contains a socket designed to accommodate a single PAR lamp of any focal length. Because of their simple, lensless design, they are lightweight. They have a relatively high light output and are frequently used for events such as rock concerts and stage productions for which long throws are involved. The light is specular and the instrument design does not lend itself to much control of the spread. That control is limited by your choice of the appropriate focal length PAR lamp. Newer PAR instruments are designed with HMI lamps for very powerful, if somewhat harsh light for location and studio work.
Studio Lighting Instruments
While the following instruments are not restricted from use on location, they are generally used in the studio because of their size and weight. The additional weight is caused by their lens systems, which offer greater control of light output than their lensless location counterparts. “Location” in this case refers to small room interiors. Larger instruments are very much a part of outdoor location shooting and shots that involve large interior spaces such as concert halls and auditoriums.
Fresnels
I have mentioned the term “Fresnel” earlier when discussing lights and their manufacturers. Now it is time to explain what it is. The Fresnel (pronounced “fir NEL”) lens was invented around 1800 by the brilliant French physicist Augustin Jean Fresnel. One of its first uses was to improve light-house beacons of the time. Fresnel’s extraordinary work in the area of optical physics and his discoveries about the nature of light and its method of transmission produced a body of work that forms the basis of modern day lens and reflector design. The distinguishing characteristic of the Fresnel lens is a series of concentric rings that form steps on the front surface of the lens.
Simply put, when light passes through glass with two parallel surfaces, the glass cannot redirect that light. In Figure 1.1, the light is redirected when it passes through the prism because the surfaces of the prism are angled. (Incidentally, Fresnel also explained the Roy G. Biv order of refracted light and measured the wavelengths involved.)


Knowing a lens must have nonparallel surfaces to redirect light, the first lens makers produced a plano convex lens (see Figure 4.20). Such lenses are thick, heavy and break easily. Since the aspect of design that makes them function is the fact that the back surface is not parallel to the curved front surface, it is reasoned that you could remove the center section of the lens as long as the portion extracted had parallel surfaces (see Figure 4.21). This results in a stepped lens, which can bend light in the same way as the heavier plano convex unit can because the back surfaces of the lens are at the same relative angle to the front as they were in the plano convex lens. So much for the excess weight. But we still have a lens that requires the same depth from the farthest rear surface to the front of the curve.
Fresnel reasoned that if the key factor in redirecting light is the difference between the angles of the two surfaces, then it should be possible to slice up a stepped lens and place all the rear surfaces of each step in a straight line, leaving the front surfaces with their original curvature. In this way you have the Fresnel lens—a flat, thin lens that has the same light-bending characteristics as heavier, thicker, fragile plano convex units (Figure 4.22).

Figure 4.21: Stepped lens.

In a Fresnel instrument, the lamp is backed by a spherical reflector located at a fixed distance from the filament. It redirects the light to a focal point at the plane of the filament, producing a single focal point for the reflector and the lamp. Remember, the location of the focal point for a reflector in an open-faced instrument changes in relation to the filament focal point as it is moved to affect focus. This creates two focal points and produces multiple shadows.
To change the focus of a Fresnel from spot to flood, the lamp and reflector together are moved closer to the lens (see Figure 4.23).
All Fresnels provide for the addition of color media holders, scrims, barn doors, and snoots to give the designer maximum control of the output. Instruments start as small as 3-inch, 100-watt Inkys and range up to 25-inch, 20,000-watt units. The 3-inch designation refers to the diameter of the lens. Like the open-faced focusing spot mentioned earlier, Fresnels have a good range from spot to flood (see Figure 4.24).
Lekos
The Lekolite, commonly referred to as an “ellipsoidal” because of its reflector shape, was invented by Messrs. Levy and Kook, who founded Century Lighting and gave the instrument its name. Lekos offer the most precise focus of light output. When absolute control of spill is mandatory, the Leko is often the best choice. The reflector is a specular ellipse so the light output is specular, but it can be modified with filter material to achieve a diffuse quality. A wide variety of lens systems are available to meet the throw and coverage requirements of any given situation. Many Lekos have four built-in shutters located near the gate pattern, making it possible to shape light patterns exactly. These shutters can be moved to many different positions to vary the shape of the lighting pattern.
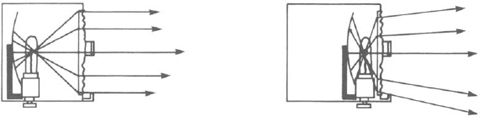
Figure 4.23: The spot and flood focus of a Fresnel.

If four-sided geometric patterns are not what you require, you can insert a wide variety of templates or “gobos” into the pattern gate of these instruments to project intricate patterns or shapes. There are many excellent commercial gobos available, or you can make your own. If you require circular pools of light, you can use a circular gobo, or select an instrument that has an adjustable iris in place of the usual shutters to produce the exact diameter circle required from different throw distances.
Lekos are particularly useful for projecting patterns on the background, foreground, or floor of a set to create some interest or suggest offstage items such as windows or trees. The lens barrel can be moved in or out to control the sharpness of the image projected.
Consult with your dealer before the purchase so the gobos you are ordering are the proper size for the instrument you are using.
The lens system can consist of one or more Fresnel lenses, step lenses, or plano convex units. In all, there are over 25 different configurations.
The design in Figure 4.25 has a couple of disadvantages. The lamp must be burned base up, making it difficult to angle the instrument properly to reach some areas of the set. It also places the filament at a less than optimal position within the elliptical reflector. Modern day computer programs make it possible to design and manufacture a more efficient elliptical reflector. These newer axial-designed Lekos (see Figure 4.26) place the lamp on the focal axis in the center of the reflector and allow you to burn the lamp base in any position. Mole-Richardson’s version of the Leko is seen in Figure 4.27.

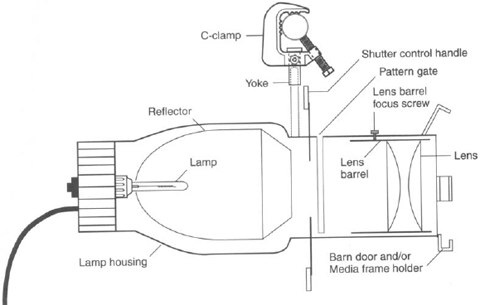
Figure 4.26: Newer form of axial Leko with multifaceted reflector.

Regardless of which form of Leko you rent or own, a common problem is reduced light output due to poor alignment of the filament in the elliptical reflector. Rented instruments are especially plagued by this problem. It is not uncommon for Lekos to be so misaligned that their output is reduced by 66%. If you have worked with certain instruments at a given throw and wattage on a number of occasions, you will know what their output should be. If you have no previous experience with an ellipsoidal instrument and end up renting one that is misaligned, you will probably not detect the misalignment unless there is gross error in the filament placement. As a result, you may install a higher-wattage lamp (which may only add to the alignment problem), or you may add additional instruments to bring the intensity up to the desired level.
Lekos are very precise optical instruments, and even a slight deviation from the intended position of the filament in relation to the reflector results in great degradation of light output. A misaligned filament not only reduces output but affects the quality of the coverage pattern. Instead of producing an even field of light, a misaligned instrument will produce hot spots, dead spots, and color aberrations and may even project an image of the filament on the talent or set walls or floor.
Alignment problems result from harsh handling, or the replacement of lamps or sockets. Even when a lamp is replaced with one of similar wattage, there is enough difference in the orientation of the new filament to reduce output. When the new lamp is of a different wattage entirely, the chance for misalignment is even greater. You can align the lamp properly using the series of screws on the outside of the lamp holder at the base of the lamp. The idea is to place the filament along the optical center of the reflector at the focal point, which is situated at a very precise distance from the back of the reflector.
The alignment screws in most older instruments cannot be adjusted easily and do not appear to be any more than fasteners that hold the lamp housing together. The latest designs from Strand and Colortran, however, provide a joystick at the base of the lamp to make alignment simple. More-efficient heat sinks on the socket keep the instrument cooler during operation and extend lamp and socket life. To make an alignment gauge, cut a rectangle of 16- to 22-gauge sheet metal to the exact size of the color frame holder of the Leko to be aligned. Use a #50 drill to make a small hole in the exact center of the metal rectangle. You now have your alignment gauge.
Place the instrument about 3 feet from a white wall, with its beam perpendicular to the surface of the wall. Insert the alignment gauge in the color frame holder and darken the room so you can see the image of the filament and the reflector projected on the wall through the small hole of the gauge. With a poorly aligned instrument there will be light and dark areas of the reflector caused by the incorrect filament location. By adjusting the four or five screws in the cap of the lamp housing, you will be able to realign the filament within the reflector. The object is to move the filament to the center of the reflector. When it is properly aligned you will see the bright glowing areas of the reflector increase in number and in area. When you have maximized the bright areas of the reflector and created an even pattern of light on the wall, remove the hot gauge with a pair of pliers and aim the instrument at a wall 25 feet away. You should see a much brighter, even field of light. If not, some minor adjustments of the alignment screws may be necessary. Generally it will not require further work.
This procedure gives you the brightest flat field of light possible. If you need more light for your particular situation, you can increase the light output in the center of the pattern by moving the lamp slightly forward in the reflector. This involves an equal adjustment of the three or four perimeter screws and a tightening of the center screw in the lamp base. To gain light in the center of the projected pattern you will have to sacrifice output at the edges and a darker ring will appear there.
These instruments are commonly designated as 6 × 9s or 8 × 8s, etc. The first number in the designation is the diameter of the lens in inches and the second number indicates the focal length of the lens.
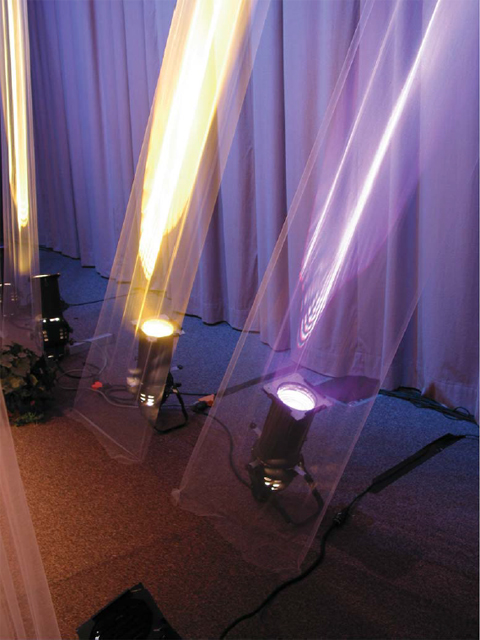
Lekos, in combination with other materials, can create an interesting background pattern. An example of this combination would be to place a Leko on the ground and run some white mesh fabric from the base of the light to the top of your set (see Figure 4.28A). With a colored gel in the light, point the unit so it illuminates the fabric. You now can see the trail of that color light as it travels along the mesh as shone in Figure 4.29. Figure 4.30 shows a slightly different angle of the Lekos and mesh, and Figure 4.31 illustrates a wide shot of the set with all the Lekos illuminated.


An open-face light and a Fresnel will not work unless it is spotted. A Leko is the perfect instrument for this effect.
Times Have Changed
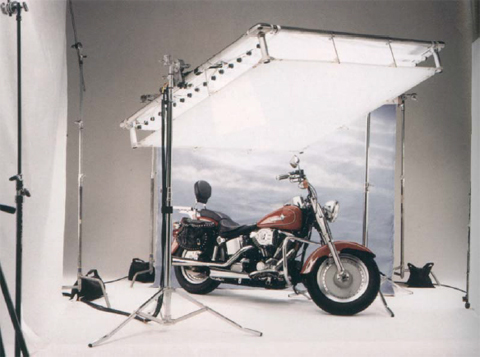
Figure 4.32 shows how you can light an entire set with just the contents of a light kit (Lowel). The umbrellas, Totas, Omnis, and gels were all contained in the kit.

Figure 4.31: The entire set and lighting effect.

Figure 4.32: Lowel kit light and a motorcycle.
It is rare today that most location shoots cannot be lit with the contents of a kit or one of the newer forms of lighting mentioned in this chapter. Chapter 12 will discuss several specific lighting situations and how I lit them. I will then ask, as an exercise, for you to come up with two different ways of lighting the same situation: one using the units I did, and the other using different ones. Use this chapter as a reference as to what each lighting instrument can do for you and apply that knowledge in Chapter 12.