Lamps, Reflectors, and Lighting Instruments
What Is the Difference?
There are two basic types of illumination: specular and diffuse.
Specular illumination is the type found outdoors on a bright sunny day, when the light rays are strong, sharp, and nearly parallel to each other. As a result, they cast sharp, well-defined shadows on your exterior location site. There are also artificial sources of specular illumination for use in the studio or on exterior sets. They are carbon arc sources or specially designed discharge lamps with smooth, well-polished reflectors and some form of lens system.
Diffuse illumination is the type seen on a cloudy, overcast day when the sun’s rays are diffused by the clouds to produce soft, scattered rays. Under these conditions the rays are not parallel to each other and produce flat lighting with poorly defined shadows. This type of lighting can be simulated in the studio as well, using special instruments or placing a diffusing material between the lamp of any instrument and the subject. It is also possible to create diffuse light outdoors on a sunny day, in a limited area, by placing a large piece of diffusion material, called a “butterfly”, between the sun and the subject. Naturally, there is a limit to the area you can tent in this manner (see Figure 3.1).
Lamp Types
As lighting director, you have total control over the look of the finished product when you shoot in the studio, and you have a wide range of control on exterior locations. One of the first options you have is your choice of lamp types. The term “lamp” does not refer to a kind of lighting fixture, like a table lamp, but to what is commonly called a light bulb. A tulip farmer deals with bulbs … a lighting director deals with lamps. A lamp is an envelope that contains a filament. Lamps are rated in terms of the wattage they draw.
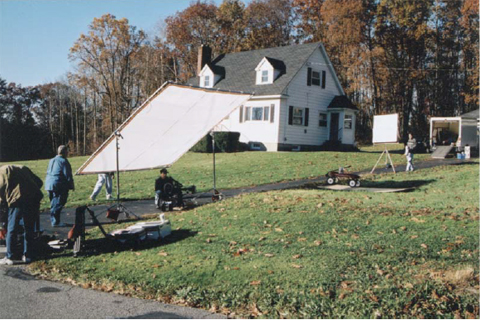
Figure 3.1: A butterfly in use on the set.
Generally speaking, expect a 1000-watt lamp to be twice as bright as a 500-watt lamp. While this is true when comparing lamps of a similar type, we will see that it is not always the case. We will take a look at some common lamp types.
Household Lamps
The most common type of lamp is the one used in ordinary household fixtures. It consists of a tungsten filament enclosed in a pear-shaped glass envelope that contains a mixture of gases. Usually the lamp contains a frosted coating on the inside of the envelope to produce a more pleasing, diffuse light with soft shadows and has a medium screw base. These lamps burn at a color temperature below 3200°K and are generally not suitable as a light source for video. There are two similar-looking lamps that are exceptions to this rule.
Photo Lamps
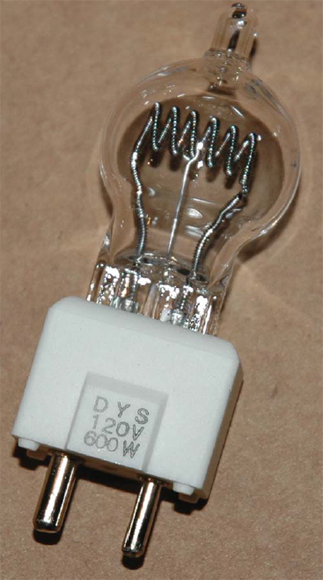
The first type of household lamp is the photo lamp (see Figure 3.2). It comes in two types, 250-watt ECA and 500-watt ECT. These lamps fit into ordinary household sockets and burn at a color temperature of 3200°K. They are inexpensive and available at most photo supply stores.

They can be used in place of household lamps when shooting interiors to provide practical illumination that matches the color temperature of your location lighting instruments.
The second type is the photoflood lamp (see Figure 3.3). Shaped like ordinary reflector flood lamps that screw into household sockets, these 3200°K lamps provide an even, directable light source suitable for a variety of location lighting situations.
All of the lamps mentioned so far share a common problem inherent in their design. As the filament burns, particles of tungsten evaporate and are deposited on the inside of the glass envelope in the form of a dark powder. This process continues throughout the life of the lamp causing a continual reduction of color temperature and a decrease in light output. The older the lamp, the lower its color temperature and lumen output. Early tungsten studio lamps, used in scoops, Fresnels, Lekos, and other instruments, were manufactured like large versions of standard household lamps. They were clear glass envelopes with different base designs to align the filaments properly with the instrument’s optics and reflector. Like regular household lamps, they also grew darker and changed color temperature as they aged. To counteract these shortcomings and increase the useful life of larger lamps of this type, the manufacturer put sand inside the envelope. The instruments were designed to be used with the lamp burning base down. During operation the sand rested in the base. When the vaporized filament deposited a visible black film on the inside of the envelope you could shake the sand around inside to remove the tungsten film from the inner surface of the envelope. When the shaking was completed, the blackened material would settle with the sand to the base of the lamp. This first form of dry cleaning could have been called “one-watt martinizing.”
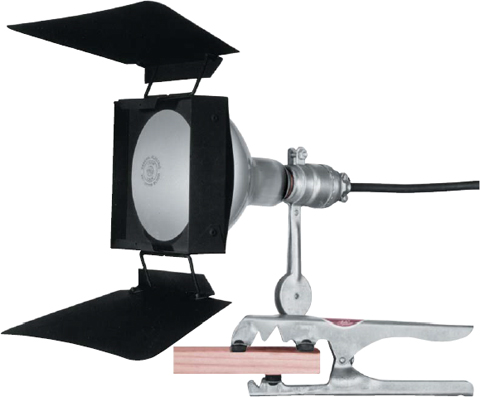
Figure 3.3: Photoflood lamp with barn doors (Photo courtesy of Mole-Richardson Co.).
Quartz Halogen Lamps
The problems of light loss and declining color temperature were solved with the invention of the quartz-halogen lamp. Currently the most common light source for interior location lighting, these lamps offer several distinct advantages over earlier tungsten lamps. They are much smaller than earlier designs of comparable wattage, making possible smaller and lighter fixtures for location lighting. The tungsten filament of these lamps is enclosed in a quartz envelope that is filled with halogen gas. The quartz envelope can withstand greater temperatures than the glass envelope, making the smaller lamp size possible.
Thanks to a man named Emmet Wiley of General Electric, who developed the halogen cycle, these lamps maintain a constant light output and color temperature throughout their lives. Even though their filament evaporates like those in common household lamps or earlier tungsten studio lamps, it is constantly being regenerated. As a result of the halogen cycle, the evaporated tungsten is never deposited on the inside of the envelope. Instead, it is redeposited on the filament to maintain consistent output and color temperature.
The majority of quartz-halogen lamps have clear envelopes and produce specular light with their relatively small filaments that are enclosed in short quartz envelopes (see Figure 3.4).
If you want softer, more diffuse light on the set, there are quartz lamps designed to produce less specular light. These lamps have a longer tubular shape to provide greater filament area (see Figure 3.5). Some have frosted and textured envelopes to diffuse the light further. Though some of these lamps are used in broads that produce a fairly harsh light, others are used in fixtures designed to provide softer, more even illumination such as scoops or softlights.
Even though these lamps produce a softer light, I still do not consider them to be a diffuse source unless they are housed in a softlight. Any other open-faced instrument, such as those commonly found in location lighting kits, will require the use of diffusion material in front of the lamp to produce a truly diffuse light.
A couple of points to remember when working with quartz lamps: Never handle them with your bare fingers. The oil from your skin will react with the quartz envelope and cause a blister to form on the quartz envelope when the lamp is turned on. The blister will expand until the envelope explodes. Obviously, this could harm people and material on the set. Always use gloves to replace lamps, or use the paper or foam cover that comes with each lamp. If you do touch a lamp by accident, or if you aren’t sure if someone else may have touched it, you should clean the lamp with a soft cloth soaked with isopropyl alcohol. Even if you take these precautions, point open-faced fixtures away from people and set decorations when you first turn them on. This will minimize the harm done, should it explode.
When installing the longer, tube-type lamps that have contacts on both ends, you may wonder where to place the small bump that exists on the surface of the lamp. This is a result of the vacuum-sealing process in manufacture and it does not make any difference whether this seal is facing the reflector or the front of the instrument.
You should pay close attention, however, to the manufacturer’s instructions regarding the correct operating position of the lamp base, up or down. Failure to follow these recommendations will substantially shorten the lamp life and may cause damage to the instrument’s socket.
PARs and FAYs
Two types of quartz-halogen lamps, PARs and FAYs, are constructed like the old sealed-beam automobile headlamps. That is, the filament and reflector are sealed together in a quartz envelope, with the front surface of that envelope acting as a lens and the silver-coated neck of the lamp acting as an internal reflector. They are manufactured to provide one of three basic patterns of light distribution: spot, medium flood, or wide-angle flood. If you need to change the focus of instruments using these lamps as light sources you must install new lamps of the appropriate focal length. The PAR lamp is a 3200°K source (see Figure 3.6) and the FAY lamp is a 5600°K source because of a dichroic coating on the front surface of the lens. This coating has a tendency to wear off and cause a shift in color temperature as the lamp ages or as the result of being touched during installation, setup, strike, or packing.

MR-16s
One of the newer applications of modern technology to television lighting is the development of MR-16 lamps (see Figure 3.7). The first versions of this lamp were intended for use in 35 mm slide projectors, but the focal point requirements of such an application made them inappropriate for use as a general-purpose light source. Originally designed by Emmet Wiley, MR-16 lamps consist of a quartz-halogen capsule permanently mounted in a multimirrored ceramic reflector bowl. The reflector has special optical coatings that permit the majority of infrared and ultraviolet radiation to pass through it.
The redesigned version suitable for general lighting purposes is the result of additional design work by George Panagiotou of Cool-Lux and comes in 12-, 14.4-, 30- and 120-volt sizes ranging, from 50 to 250 watts. They are available in a variety of prefocused ranges: narrow spot, spot, narrow flood, and flood (see Chapter 11).
As with all quartz sources, you should not touch the lamp capsule of these units with your fingers. When handling these lamps, it is also important not to touch the inside surface of the special mirrored reflector. The integral reflectors are chemically coated to provide very efficient projection of the visible light spectrum forward while allowing the infrared and ultraviolet radiation to pass backward through the reflector and be vented out the top and rear of the instrument, away from the talent.

Carbon Arc Lamps and Carbon Arc Fixtures
The carbon arc lamp is the closest thing we have to true point source light and consists of a gas-filled quartz envelope containing two carbon electrodes. A high-voltage DC current is discharged between the electrodes to produce an intensely bright light that is color balanced to daylight temperatures. These lamps are used in expensive, bulky instruments that are not suitable to most small-budget interior location work.
Carbon arc fixtures are historically larger and much older than units using carbon arc lamp sources. Although rarely used today, they were used outdoors because they do not have envelopes around the carbon electrodes, and are referred to as plain carbon arcs. Since the arc is not enclosed, it is necessary to vent the resulting fumes away from the operator and the talent. Because of the need to have a technician to service each instrument during operation and the need for a high-voltage DC power distribution system, it is unlikely that you will be involved with such light sources for the average television production. If you tape a theatrical production in an older auditorium you may run into carbon arc sources in their follow spots. These spots have their own DC power converter built in to the base of the unit and are generally vented through flexible tubing to the outside or some ventilating system. Since the other light sources in the production will probably be balanced for 3200°K, a color correction filter such as a Tough MT/Y will be required to convert the follow spot to tungsten color temperature. The exact color correction material required will depend on the type of carbon rods being used. Consult the carbon rod package for details and filter the output accordingly.
My only exposure to a carbon arc lamp has been in a projector at a drive-in theatre. The two carbon arcs in the projector had to be brought together until they ignited, then backed off slightly. Throughout the movie, this “light” had to be constantly adjusted as the carbon arc burned to produce a bright and proficient image on the screen. The vapors, the constant alignment, and the thorough cleaning afterwards made me glad that they have been replaced by more efficient units.
Discharge Lamps (HMI)
Used with increasing frequency for location lighting (and all the time in Hollywood) and a safer replacement for the carbon arc, the HMI discharge lamp offers several advantages over other types of light sources. It is a man-made discharge lamp that comes close to being a true point source. There are other forms of discharge lamps, like mercury vapor or iodine street lamps, that produce extremely poor spectrums for photographic purposes. The HMI discharge lamp, however, is designed primarily as a photographic source with a spectrum well-tailored for the job. Many of the earlier objections to these light sources, like flicker or erratic output, have been overcome and they now deserve your serious attention as a possible light source for interior or exterior location work.
This highly efficient lamp produces 5600°K light with a unique day-lite spectrum and a high CRI. (The CRI is a number assigned to light sources, indicating their ability to render test colors accurately. The higher the number, the more desirable the source.) The HMI discharge lamp contains an optimum combination of various metal halides of rare earths. The quartz envelope contains rod-shaped tungsten electrodes to produce an arc from the extremely high DC voltage supplied by an external ballast. Like other quartz sources, these lamps should be handled with the same precautions. While the HMI system is more costly to purchase or rent than conventional instruments, and each instrument requires its own rather bulky ballast to boost the standard 110 VAC to the required high-voltage DC, it offers other economies that must be examined before eliminating it from your lighting plan (see Figure 3.8).
Unlike other quartz sources, HMI discharge lamps cannot be used immediately after they are turned on. They require a short warm-up period before they reach the correct color temperature.
Also, as a result of the ballast involved, they cannot be dimmed electrically the way quartz-halogen sources can be.
Consider these statistics from a manufacturer’s data sheet. A 575-watt HMI instrument has the light output of a conventional 2000-watt unit with a daylight filter. A 1200-watt HMI equals a 5000-watt conventional unit with daylight filter, and a 2500-watt HMI equals a conventional 10,000-watt unit with daylight filter.
Economy is relative. How else could you put 10,000 watts of light on a set using two instruments and two 15-amp circuits without melting the talent and having to gel a window in the shot with 85 gel? The answer is that you could not. And it takes less time to set up and strike two instruments than it does to deal with five or more instruments and the multiple shadows they produce.
The more expensive HMIs could mean that you do not have to rent a generator, plus they produce less heat than their less expensive counterparts. HMI lamps also have a longer life than quartzhalogen lamps. All things considered, HMIs can be far less costly in the long run. Hollywood has been using HMIs exclusively for years; whether the production is shot on film or tape, the HMI is a highly desirable light source. HMI lights will be discussed in greater detail in Chapter 4.
Reflection
In addition to lamp selection, another important factor that determines light quality is your choice of reflectors. Understanding some of the physics involved will help you select the best reflector and instrument type to achieve your desired results.
Reflection is the redirection of rays from a surface. Like transmission, reflection can be either specular or diffuse.
Lighting involves three different types of reflectors: (1) external reflectors that redirect light to the subject; (2) the reflective surface of the subject itself; and (3) internal reflectors in an instrument that focus the source, increase its efficiency and help determine its quality. Some instruments even provide for the use of interchangeable reflectors to alter the quality and color temperature of the instrument.
External Specular Reflectors
If the angle of the reflection is equal to the incident angle of the source ray, it is a specular reflection (see Figure 3.9). A front surface mirror would create the most specular reflection, but any smooth, shiny surface will produce specular reflection. Eyeglasses, polished metal, calm water, high-gloss paint, moist faces, windows, and vinyl are just some of the things that can produce a specular reflection. It is important to note that, although these last items mentioned may be specular reflectors, they will alter the quality of light reflected from their surfaces as a result of their basic color.
If the source is specular, its specularly reflected light casts hard, well-defined shadows. A silver specular reflector will not change the quality of the light that falls on it. It merely redirects the light source at an angle equal to the incident rays falling on it. When the camera is on the axis of a specular reflection, a glare or hot spot will result. To remove the glare, you can move the camera or the light, or it may be possible to reposition the subject. If the subject is bright and shiny all over, it’s best to use a diffuse light source such as a softlight. In some cases, complete tenting may be required.
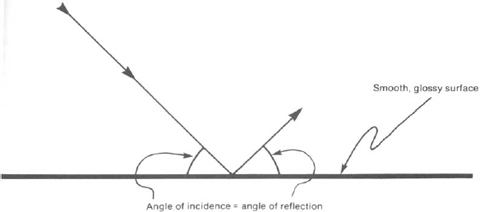
Figure 3.9: Specular reflection.
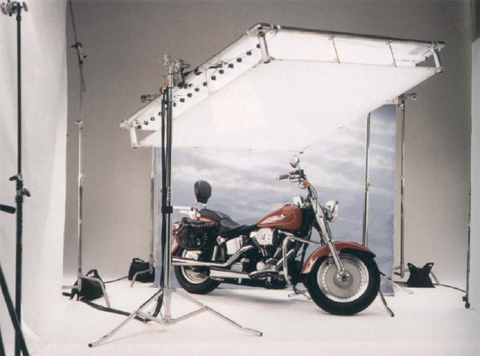
“Tenting” is the technique of partially or completely surrounding the subject with translucent diffusion material (see Figure 3.10). The lights and camera are placed outside of this enclosure with a hole cut for the camera lens to extend inside. Tenting is a common technique used to shoot silverware, automobiles, motorcycles, and other highly reflective objects with complex, curved surfaces.
A Blanket-Lite may also be used instead of a tent for shooting highly reflective objects (see Figure 3.11). The Blanket-Lite 6 × 6 is manufactured by Kino-Flo and is their largest portable softlight. With lamps loaded, the unit has a 10-inch profile and weighs 30 pounds. The Blanket-Lite with bare lamps has 550 foot-candles of illumination at 4 feet, and 324 foot-candles with two diffusion silks. This cool-to-the-touch, flexible, fluorescent system provides flicker-free, controllable lighting. The lamps are controlled in half-stop increments, and two to sixteen lights can be illuminated. Outfitted with 6-foot long high-output lamps (KF32—3200°K, KF55—5500°K), this instrument can be used all day without generating any heat on the set. Popular in print and television commercials, this unit stands above the rest.
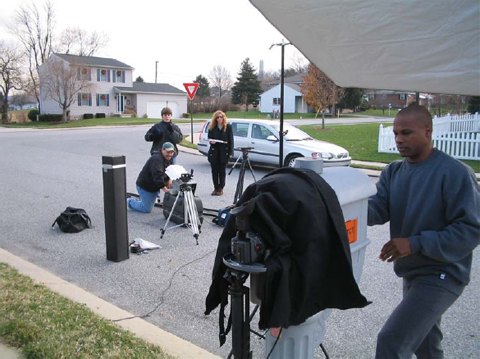
Figure 3.10: An example of tenting.
External Diffuse Reflectors
When the reflector is textured and breaks up the light that strikes it, we have diffuse reflection (see Figure 3.12). Unlike specular reflectors, diffuse reflectors always change the quality of the light that falls on their textured surfaces. The reflected light produces less harsh shadows and lessens the color intensity of the subject. We will examine that effect shortly.
Since the final quality of an instrument’s output is determined by the combination of lamp type, internal reflector type, and lens type, if any, when you want a very harsh light for a scene you should begin with a specular source (a small area filament in a clear quartz envelope or HMI lamp) and a specular reflector. A carbon arc spot would be an even more specular source.
Less specular light is produced by a combination of a specular lamp and a diffuse reflector. The softest light possible is produced by using a diffuse lamp and large diffuse reflector arranged in such a way that the lamp is never visible from the front of the instrument.
Internal Instrument Reflectors
Reflectors serve several functions in lighting instrumentation. They gather, concentrate and direct the light from the lamp. They determine the efficiency of the instrument in terms of its ability to produce the greatest candlepower per watt. They affect the “throw” of the instrument, or the distance it is able to project light efficiently. They also determine the quality of the light. There are several characteristics of reflectors that can be generalized.
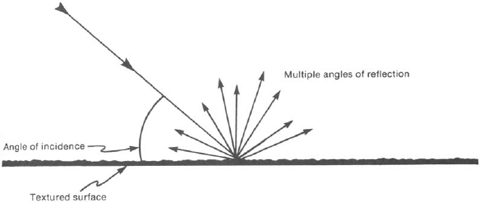
Figure 3.12: Diffuse reflection.
The size of the reflector affects the quality of the light. Smaller reflectors tend to produce more specular light. Larger reflectors tend to produce more diffuse light.
The shape of the reflector affects the focal point of the instrument, its coverage area, and efficiency. There are five basic shapes for reflectors, shown in Figure 3.13, in order of their light-gathering efficiency. For purposes of illustration they are all assumed to be specular reflectors.
The texture of the reflector affects the quality of light as well as the instrument’s throw. A smooth, polished reflector produces a specular beam. It is used in instruments that must be placed great distances from the subject.
A shiny, randomly textured reflector produces a somewhat less specular light with medium throw and is ideal for use in key lights.

Figure 3.13: Reflector shapes.
Shiny, multifaceted reflectors in any of the five basic shapes shown in Figure 3.13 can increase the efficiency of that basic shape. This concept in reflector design is economically achieved today by computer-aided design (CAD). The angle of each flat facet is precisely positioned to improve the precision of the reflector’s focal point.
A dull, randomly textured reflector produces a soft light with shorter throw characteristics. Instruments with such reflectors are commonly used for fill and general or base illumination.
A white, matte surface reflector produces the softest light possible. It produces an extremely widespread, shadowless light, generally used for fill or base light. I say “generally” because it is not uncommon today to use such reflectors for key lights as well, especially in situations where fluorescents are the presumed source of illumination for the location.
Location Lighting Instruments
There are three types of instruments commonly used on location. They are (1) focusing spots, (2) floods, and (3) fixed-focus instruments.
Focusing Spots
Focusing spots may be open-faced like the Lowel Omni or DP, or lensed instruments like the Lowel Tota-Mount (LTM) Peppers and Fren-L 650s (Figure 3.14). The Peppers provide greater control, but retain heat longer and could be more fragile. Fortunately, their excellent design makes it very easy to remove the lens for shipment. Peppers are small enough to be placed almost anywhere.
The Love of Ice Cream and Peppers
On a shoot for an ice cream client, I was hired to “light the ice cream.” The script called for a grandmother to wander into the kitchen in the middle of the night and find an ice cream container sitting on the counter. (Before you delve into the dangers of that alone, it gets worse). Upon opening the plastic container, she is bathed in brilliant light coming from the confines of the ice cream. Without the budget for digital effects, I had to light the inside of the ice cream container (see Figure 3.15).
I inserted an LTM 150-watt Pepper into the ice cream container and removed the barn doors (leaving the glass lens in place). The AC cable was run from Granny’s side of the counter to a grip who would turn it on at the appropriate time. With the lid closed, the intense heat from the pepper would melt the container. Therefore the light had to be switched on the split second Granny opened the lid. Gold foil was taped to the lid’s interior and when opened toward her, the warm glow would intensify the effect.
After numerous rehearsals and several takes, we had the perfect shot, the client was happy, and only a light as small as a Pepper could do this. Kino-Flo’s Micro Flo is small enough to fit in the container, but the fluorescent light was not bright enough. Fiber optics and LED lights, although bright, don’t have the punch of the Pepper. Sometimes the old standby is still the best choice. Several years later, HMIs have become small enough to do the same task with a brighter, whiter output of light—but at the time, we didn’t have any in our arsenal.

Figure 3.14: Focusing spots.
All focusing spots, whether open-faced or lensed, can function as narrow-beam spots with relatively long throws, or be adjusted to provide light over a wider area in the flood position. When focusing spots are in the flood position, their output is more specular and it is possible to create more defined shadow lines with flags or barn doors in the beam they produce. When these lights are in the spot position, their output is more diffuse, and barn doors are almost useless in efforts to shape and limit the pattern.

Changing the Focus
With open-faced instruments, focus change is achieved by moving either the reflector or the lamp by means of a focus knob or lever. When this control is set to the spot position, the lamp is moved close to the reflector, producing a less specular source. When focus is set to the flood position, the lamp is moved away from the reflector to produce a less diffuse output. The focus is continuously variable between the extremes of its range. This capability increases the applications for these instruments.
A common problem with most open-faced focusing spots is that they produce multiple shadows. One shadow results from the focal point of the filament and another from the secondary focal point created by the reflector. Since the relationship between the lamp and the reflector is not fixed, this double shadow situation is impossible to eliminate.
It is preferred that the focus spot be designed to move the reflector rather than the lamp during the focus procedure. This avoids physical shock to the filament. If the lamp itself moves when the control is adjusted, there can be a jolt to the filament as you reach the end of the focus range. With the lamp on, this jolt will frequently result in a broken filament. When using instruments that move the lamp rather than the reflector, use caution when focusing to avoid premature burnout.
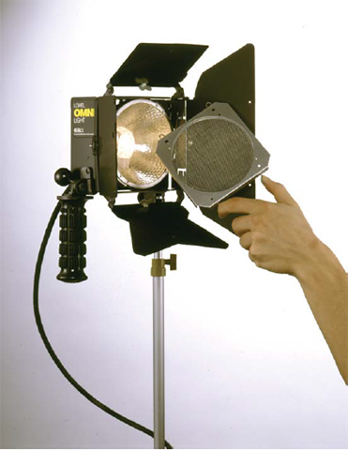
Some focusing spots, like the Lowel Omni (see Figure 3.16) and DP (see Figure 3.17), also permit you to change from a specular reflector to a diffuse silver- or gold-tone reflector, giving even greater control over the quality of light produced. The ability to attach barn doors, scrims, filter holders, and umbrellas gives these instruments even more versatility.
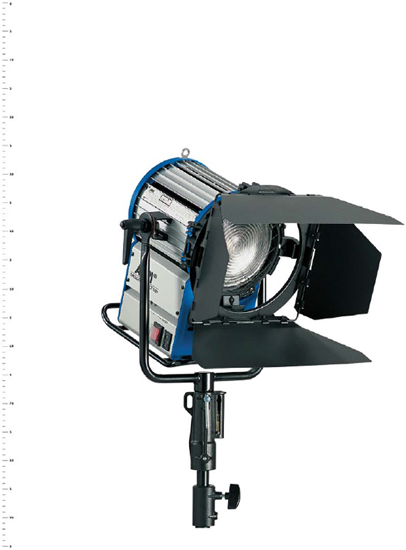
Focusing spots with a lens system, like the Fresnel, have an entirely different method of controlling focus and are discussed later in this chapter under “Studio Lighting Instruments.”
Inkys
The inky is known by various names, depending on the manufacturer (see Figure 3.18). It is one of the smallest focusing spots available and is extremely useful for tabletop photography and close-ups of people or small subjects. It is a small Fresnel, rated from 100 to 250 watts (see definition of “Fresnel” later in this chapter). There is no substitute for this instrument when you need just a little light here or there to decrease contrast or bring detail out of small shadow areas. Wrinkled necks can be made to look more flattering in close-ups using this instrument and some diffusion material. The use of snoots, scrims, and barn doors can bring even greater control to the output. Their extremely small size and light weight make them ideal for location work. Until the LTM Pepper series of inkys was available there really weren’t any quality instruments being made in this size range.

Figure 3.17: Lowel DP light (Photo courtesy of Lowel-Light Manufacturing, Inc.).
Floods
There are three basic types of floodlights. All of them provide diffuse light that spreads evenly over a wide area. Some produce softer light than others. They can be used for a variety of applications, depending on your overall lighting scheme. They are described here in order from the least to the most diffuse.
Broads
The broad is a portable flood consisting of a shallow, angled diffuse reflector that can be used with a clear or frosted tubular quartz lamp. Even when used with the more diffuse frosted lamp, the broad produces a widespread but relatively harsh light, with well-defined shadows. Most broads have two or four barn doors that offer some control of the light pattern. These barn doors usually will not rotate or expand, so their application is limited.
These floods can be used as fill or key lights but, because they lack precise control and have medium throw, they are better utilized as background lights and fill sources when bounced off a ceiling or a reflector board. Due to their relatively harsh output, they must be heavily diffused when serving as fill lights aimed directly at the subject. Many do not offer a convenient way to hold diffusion material in front of the lamp, so select carefully for the specific job you intend to have them serve. The Lowel Tota-light and V-light are multipurpose broads that can be accessorized to serve several functions (see Figures 3.19 and 3.20).
An extremely useful form of small broad is the Nooklite by Mole-Richardson. In common usage the term “nook” is used generically to denote any compact, broad instrument. Such instruments can be hidden easily behind pillars, beams, furniture, and a variety of other set pieces to provide flat, even fill light. Careful placement of nooks can add a great deal of depth to sets by providing separation of scenic elements (see Figure 3.21).

Figure 3.19: Tota-light (Photo courtesy of Lowel-Light Manufacturing, Inc.).
Broads serve well as a source of sunlight through set windows and doors. They can be grouped together and placed behind a diffusion material such as tuff spun or rice paper to provide simulated sunlight like that found on a cloudy day. If you do not diffuse the broads they will create a more specular source that casts more well-defined shadows on the set like sun on a cloudless day.
Scoops
Unlike broads, scoops are not very portable (see Figure 3.22). They are large, round instruments with diffuse, parabolic reflectors. Some have gel frame holders that permit the attachment of barn doors and color or diffusion media. Some have a focus control. They produce a very soft light. Their large size and soft, uncontrollable output make them impractical for most location work. If ceiling height and transportation space permit, they are an excellent choice for base light and fill applications in high-key scenes because of the ease in blending their coverage areas. This same characteristic would make them a poor choice for low-key scenes where precise control of spill is a must. Scoop lights were a favorite in television studios.

Figure 3.20: V-light (Photo courtesy of Lowel-Light Manufacturing, Inc.).
A smaller form of scoop that can be very useful on large location sites, as well as some of the smaller ones, is the utility light. Though it is sold in hardware and department stores under a variety of different names, it is nothing more than a small, aluminum reflector bowl (from 9 to 12 inches) with a standard household lamp socket. Generally they have some wimpy metal clamp attached with a ball and socket arrangement so they can be clamped on the edge of something and aimed at the subject. You can use the various-wattage photo lamps and photo floods in these little wonders to supplement lighting in a variety of locations. They are also an effective means of placing a little light overhead in small areas of a factory or warehouse. Remove the clamp and suspend them on a lamp cord over the area of action. They can be painted and hung within the shot. If you carry a few with you, you’ll find a variety of uses.

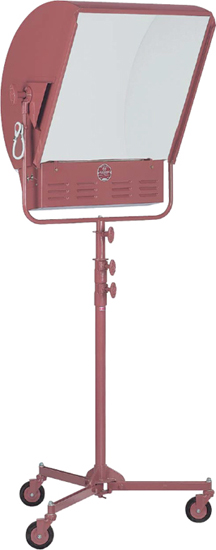
Softlights
Softlights come in standard and portable forms (see Figure 3.23). Both are very popular for location lighting, despite their large size. The standard softlight is a large, rectangular instrument made entirely of metal. It is designed in such a way that no direct light from the source is able to reach the subject, as with other instruments. Instead, it is bounced off a matte white surface onto the matte white reflector and then directed toward the subject. The quality of this light is far more diffuse and widespread than that produced by any other instrument. They may contain two or more lamps that are individually controllable so you can vary the light output as required.
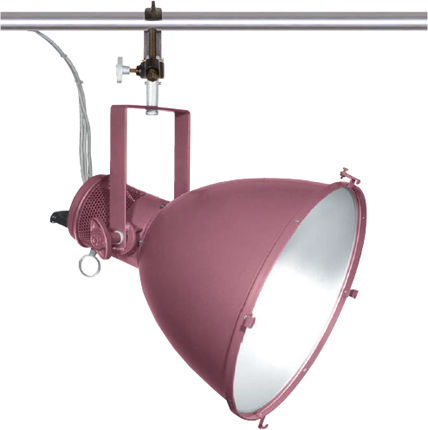
Figure 3.22: Scoop (Photo courtesy of Mole-Richardson Co.).
Portable softlights are made with lightweight, collapsible metal frames (see Figure 3.24). The reflector is made of a textured silver or matte white-coated fabric that is stretched over the frame. Their output is not as diffuse as regular softlights owing to the smaller reflector area and more specular nature of their reflective surfaces. Extreme light weight and portability make them excellent for location work. They usually have two lamps, and some have barn door and color media attachments. Like their heavier counterparts, they produce a very pleasing, near shadowless illumination that can be used as fill or key light. They are sometimes referred to as “zips.” (The term “zip” is also used to refer to an ordinary household lamp cord. It is often called a “zip cord.”)
Softlights can also be created using an umbrella. Some systems, like the Lowel unit shown in Figure 3.25, are specifically designed to work with certain instruments in their product line, but any instrument may be aimed at an umbrella to create a softlight. Light from such units is more specular than that provided by a traditional softlight source, but it is still a very good means of softening light on the set.

Softlights on a much larger scale are available commercially. They may be called “cones” or “over-head clusters” and are commonly used for lighting automobiles and other shiny-surfaced subjects (see Figure 3.26). Generally they contain one or more lamps that are shielded from direct view and their output is directed toward the inner surface of a large matte white box-like fixture. They are often used with diffusion material covering the opening to further diffuse the output. The distant sibling of this cluster is found in fast food restaurants to keep food warm.
You can create effective cluster lights on the set by using Foam core to construct a large, open, box-like container. Once you have taped the five pieces together, place the unit several feet from the subject and aim any number of lighting instruments into it. The light that is bounced out of such an arrangement makes ideal illumination for fashion lighting and other occasions that require an extremely even, soft illumination.


Figure 3.26: Softlight cluster (Photo courtesy of Mole-Richardson Co.).
Fixed-focus instruments will project their light in a given pattern that cannot be altered by instrument adjustment. As stated, PAR and FAY lamps are manufactured like auto headlamps and prefocused to provide wide, medium, or narrow-beam patterns. These lamps are used in the multilights and PAR cans described later. A third type of fixed-focus instrument was discussed earlier in the “Floods” section. Some scoops and most softlights have a fixed-coverage pattern. The intensity of fixed-focus instruments can be altered by changing lamps, but the beam pattern will remain the same, despite the lamp wattage used.
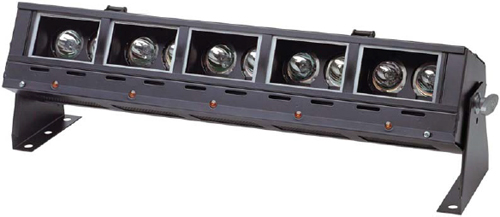
Multi-Lights
I have used the generic term “multi-light” to describe a series of instruments that utilize PAR or FAY lamps. The most common is the Nine-Lite or Molefay or Molepar (see Figure 3.27). First introduced by Mole-Richardson, this instrument is capable of lighting large areas on interior sets or providing excellent fill light for exteriors.
The Nine-Lite contains nine PAR or FAY lamps arranged in three vertical columns of three lamps, side by side. The columns pivot individually, permitting the light pattern to be concentrated in a narrow area or spread out for more broad coverage. Each lamp has its own switch so that you can control light output. The lamps can be spots, medium-, wide-angle floods, or any combination of the three. Their color temperature can be daylight (FAY) or tungsten (PAR). Diffuse or specular metal snoots, called intensifiers, may be placed in front of each lamp for greater control of the light quality and coverage. In addition, scrims, conversion filters, and barn doors may be mounted in front of each lamp. Lamps are usually rated at 500 or 1000 watts, so these instruments require a great deal of power and generate a lot of heat.
The long throw and specular quality of these fixtures make them a good choice for lighting large interiors directly or as bounce-light sources when more diffuse light is required. They come in a variety of configurations, ranging from single-lamp fixtures to three-, four-, five-, six-, nine-, twelve-, twenty-four-, and thirty-six-lamp arrangements. The output ranges from 3000 to 36,000 watts.
Led Lights
As lights get smaller, they seem to output more light. An excellent example of this are two offerings from Lite Panels.

The first, called “Lite Panels”, are two 140-LED units that come in an attaché-sized case. Weighing in at 1.1 pounds, this 5600°K daylight-balanced light measures 6.75 inches wide, 2.25 inches high, and 1.25 inches deep. Running on DC battery, the user will get 1 hour of illumination at full brightness before having to re-charge.
These lights produce no heat, do not flicker at all, and maintain a steady 5600°K color temperature with a dimmable rheostat. Very few other units can state that they are dimmable without having their color temperature being affected. With supplied diffusion, you can change the color temperature to tungsten or diffuse the source with a selection of 16 different gels.
The light output of the Lite Panels is 80 foot-candles at 2 feet, eighteen foot-candles at 4 feet, ten at 6 feet, and six at a distance of 8 feet. Perfect for use in a car’s interior where AC may be a problem and its daylight balance is a definite plus. I have used these lights as eye lights mounted on a camera’s hot shoe. The added sparkle to the talent’s eyes may be controlled with the dimmer, but I usually find that at a distance of 3 feet full power is needed (see Figures 3.28 and 3.29).
The second example of an LED light is the Ringlite, also from Lite Panels. Mounted around the lens of any camera, the Ringlite places the LED illuminate where it is most needed. Weighing in at 5 pounds, this medium-weight light produces as soft and directional illumination and is also daylight balanced (6000°K) and dimmable, with no color change (see Figure 3.30).
With an overall diameter of 19 inches and a depth of 3.5 inches, this 400-LED unit is remotely controlled by three circuits. Extremely bright, this pure bright lite illuminates at 176 foot-candles at 2 to 4 feet, 72 foot-candles at 6 feet, and falls off to 64 at 8 feet.

Figure 3.28: A Lite Panel on the set.

Figure 3.29: On the set of TV’s “24.” Note the use of Lite Panels. (Photo courtesy of Fox and Light Panels).
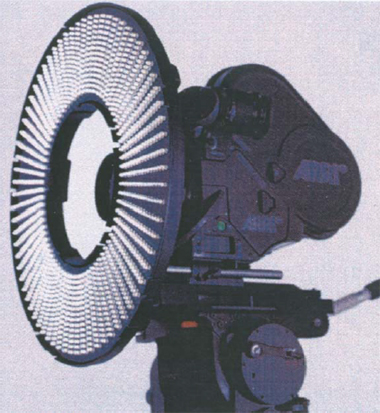
Figure 3.30: 19-Inch LED Ringlite (Photo courtesy of Light Panels Co.).
The most unique feature of LED lights is their longevity. Instead of burning out after a short period of time, an LED will usually last over 100,000 hours before it stops working. You will never experience bulb failure with one of these units unless you live to be very old.
In Chapter 4, we will discuss specific lighting instruments offered from the various manufacturers and what they can do on the set.